The best JavaScript calendar components
We strive to keep posts updated, but code samples may sometimes be outdated. Humans, see the Bryntum documentation; agents, https://mcp.bryntum.com for the latest info.
Are you looking for a feature-rich JavaScript calendar component for your web app? There are plenty of options out there, so we’ve narrowed them down to five popular libraries:
- Bryntum Calendar
- FullCalendar
- Mobiscroll Event Calendar
- DHTMLX Scheduler
- Syncfusion Scheduler
In this article, we’ll compare these calendars’ features, setups, and pricing to help you choose the best calendar for your use case.
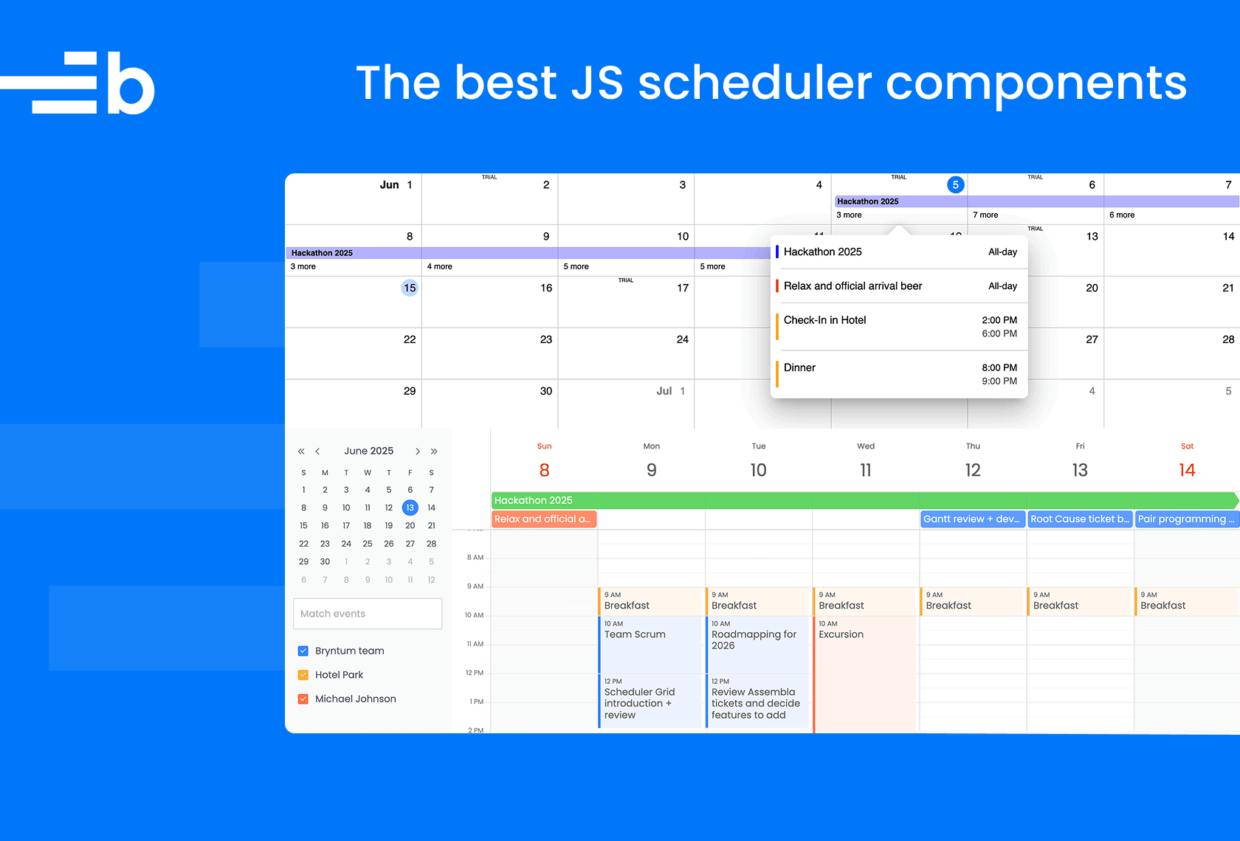
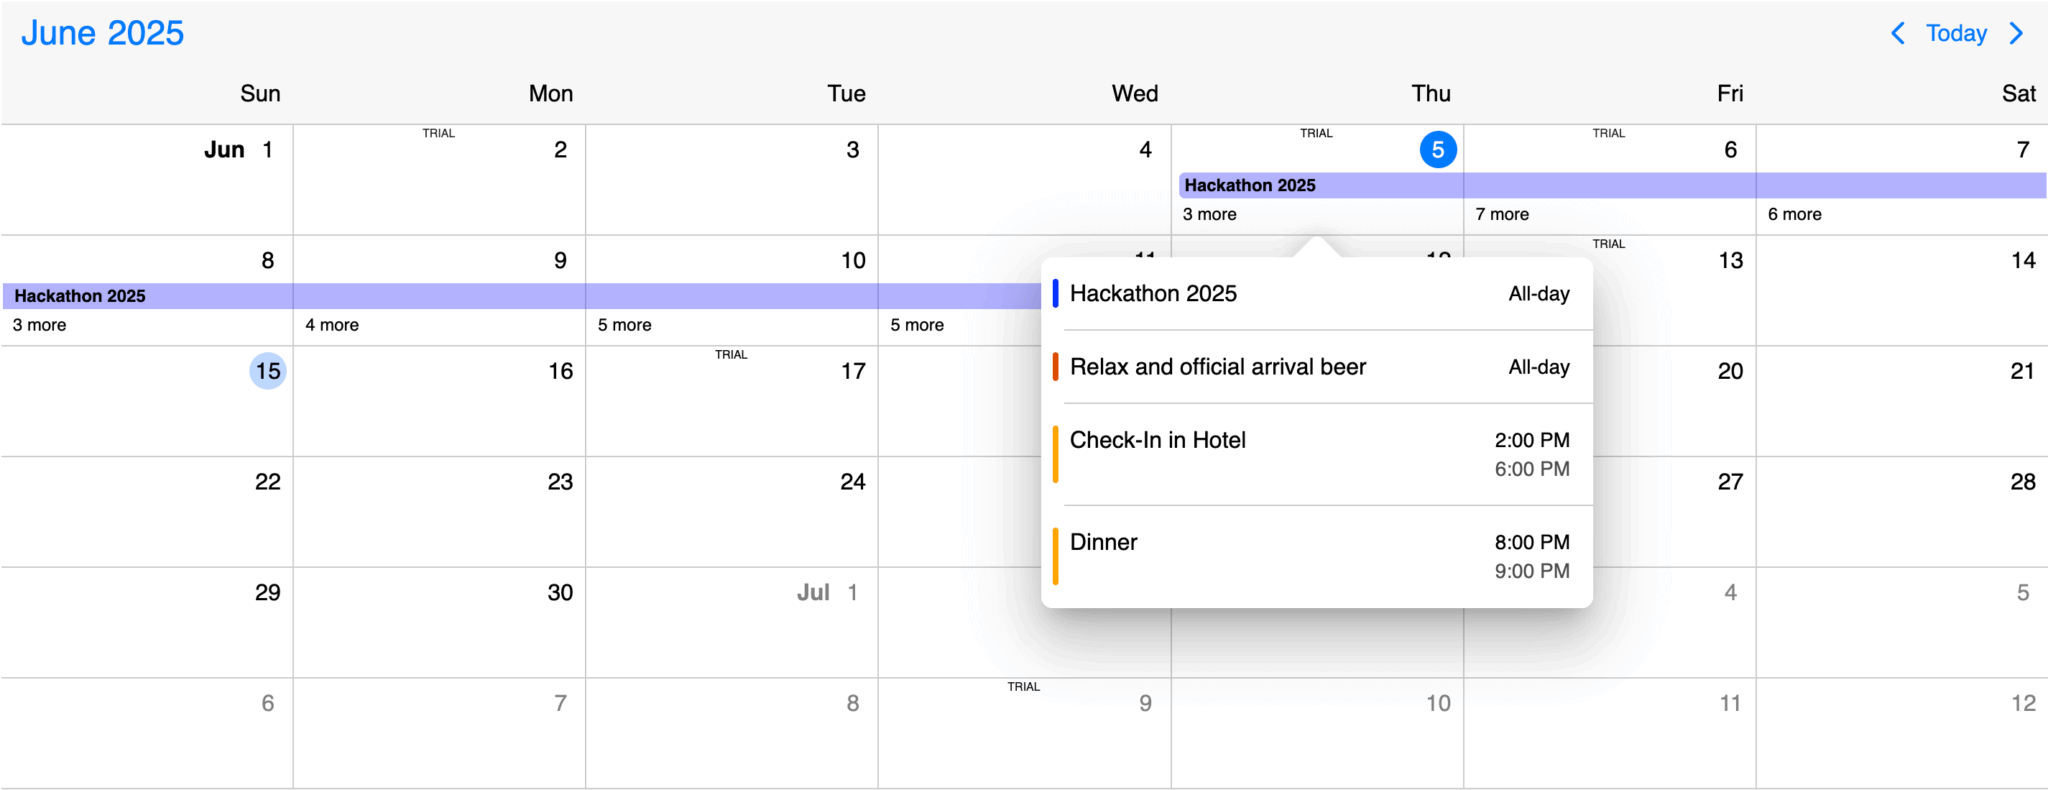
Bryntum Calendar
Bryntum Calendar is part of the Bryntum suite of commercial JavaScript web components designed for project management and resource scheduling. Built with vanilla JavaScript, Bryntum Calendar easily integrates with React, Angular, Vue, Salesforce, Ionic, and SharePoint. It can also be used as a framework-agnostic Web API Web Component. The Bryntum Calendar demos page has a wide selection of examples that exhibit its basic and advanced features, as well as various integrations. Each demo has a code editor that lets you view and edit the demo code.
Getting started
There are two ways to add the Bryntum Calendar library to your project:
- Downloading the package and using the source files
- Using npm
You can try out Bryntum components for free using our public Bryntum trial packages.
If you have a Bryntum license, please refer to our npm Repository Guide to access the private Bryntum repository.
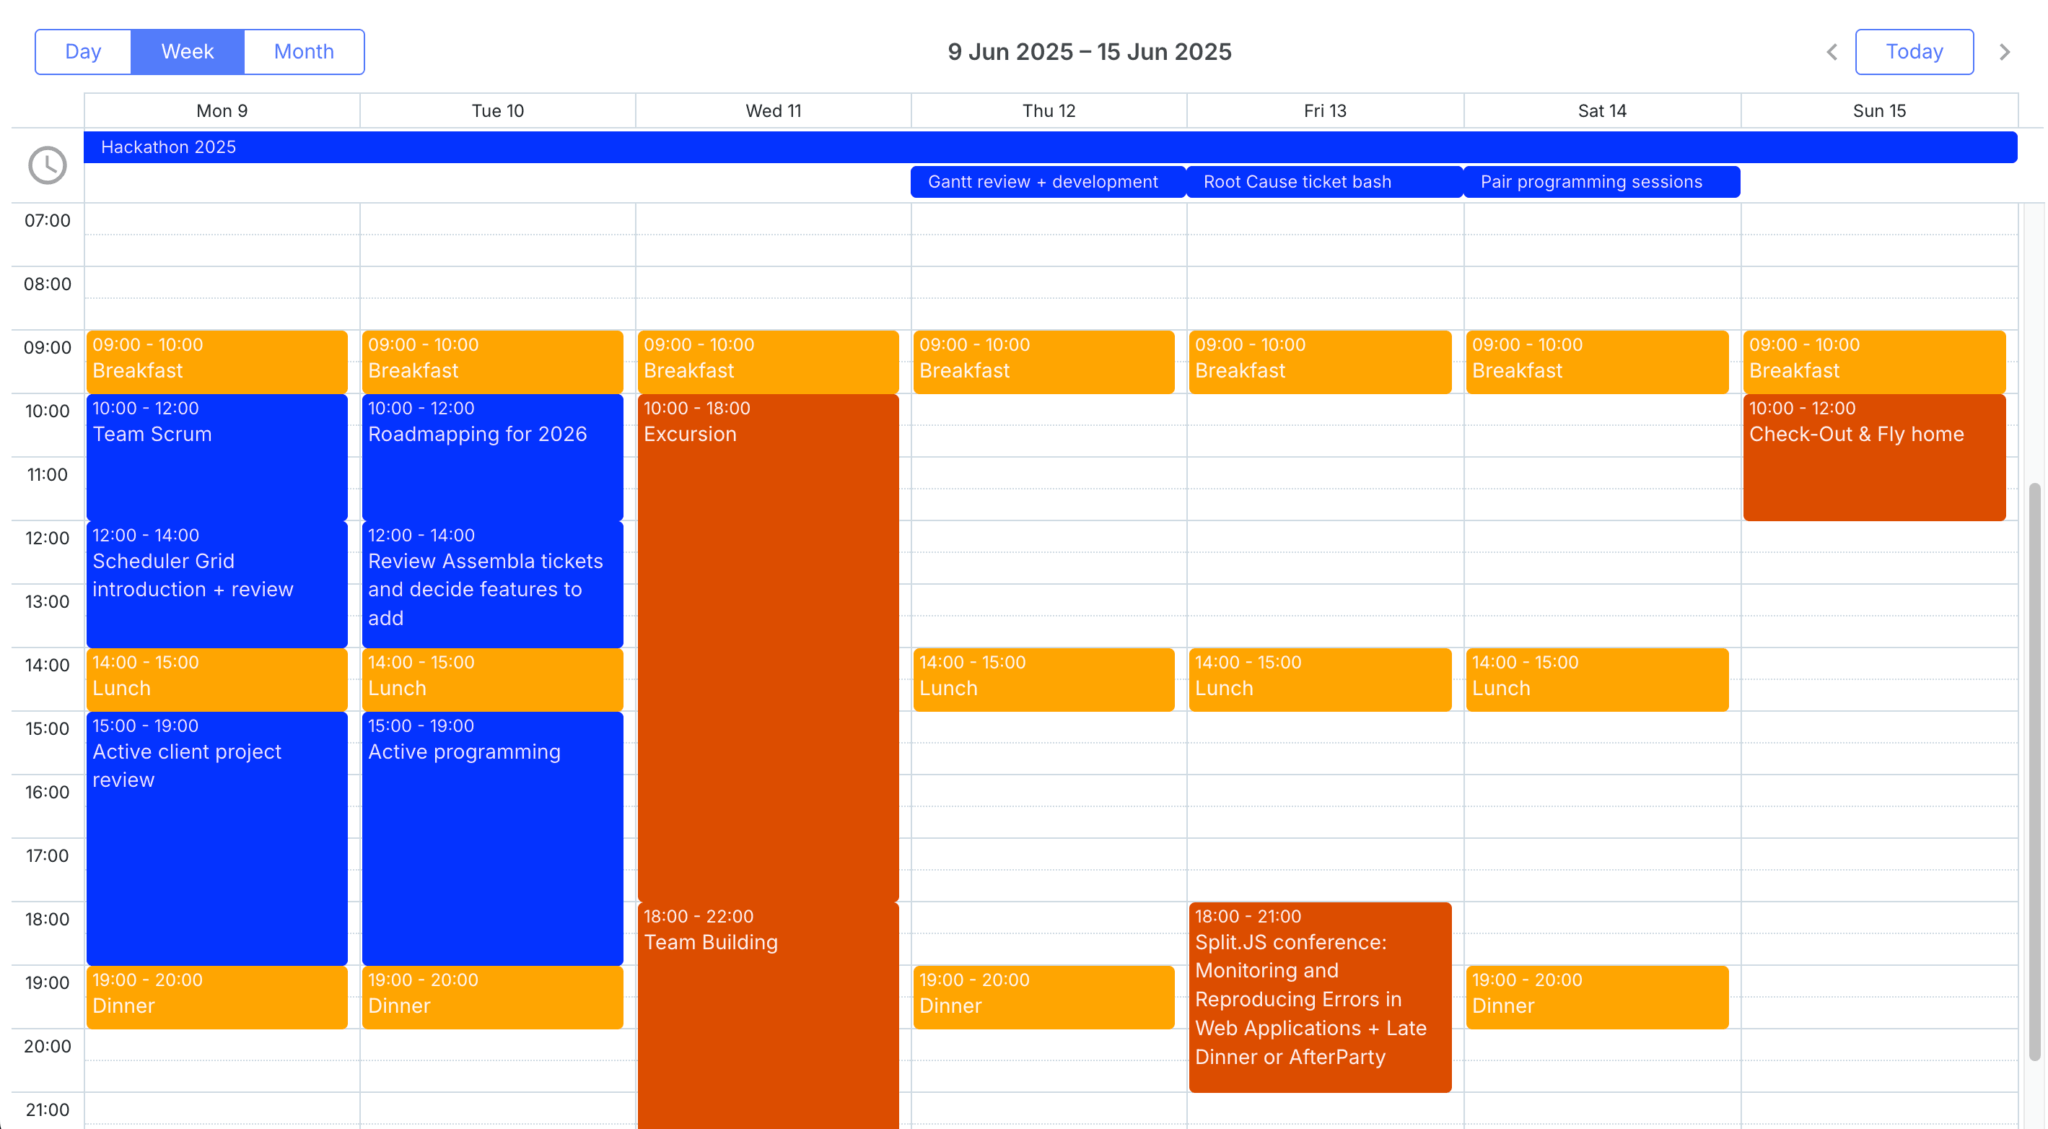
To make a Bryntum Calendar, create an instance of the Calendar class and pass in a configuration object to the constructor function. The configuration determines what the Bryntum Calendar looks like and where it gets data from:
import { Calendar } from '@bryntum/calendar';

const calendar = new Calendar({
    appendTo  : 'app',
    resources : [
        {
            id         : 1,
            name       : 'Default Calendar',
            eventColor : 'green'
        }
    ],
    events : [
        {
            id         : 1,
            name       : 'Meeting',
            startDate  : '2025-06-09T10:00:00',
            endDate    : '2025-06-09T11:00:00',
            resourceId : 1
        }
    ]
});
The calendar is added to the page using the appendTo property, which is the DOM element or DOM element id that the calendar will be added to as a child element.
Bryntum Calendar uses a Store to hold data. There are five store types: ResourceStore, EventStore, AssignmentStore, TimeRangeStore, and ResourceTimeRangeStore. You can add data to the stores in three different ways:
- Using inline or preloaded data, as shown in the code example above
- Loading remote data over HTTP
- Using the Crud Manager (recommended)
The Crud Manager simplifies loading data and saving changes. It requires only two requests to APIs (with URLs set using the Crud Manager’s loadUrl and syncUrl properties) to load the stores and save all changes:
crudManager : {
    loadUrl  : '/api/load',
    syncUrl  : '/api/sync',
    autoLoad : true,
    autoSync : true,
}
When data is created, updated, or deleted, the Crud Manager combines all of the data changes into a single request that’s sent to the syncUrl.
Setting autoLoad to true makes the data load on page load. Setting autoSync to true automatically persists store changes to the server. For more information, take a look at the Crud Manager guide in the Bryntum docs.
To style the component, you can use one of Bryntum’s five available themes. For example, you can import the Stockholm theme in your CSS file as follows:
@import "@bryntum/calendar/calendar.stockholm.css";The Bryntum Calendar with the Stockholm theme looks great. For example:
You can also modify the themes or create your own custom theme.
Bryntum Calendar features
Bryntum Calendar comes with a lot of functionality by default, including recurring events and nine view modes, and zoomable hour heights.
The advanced features of Bryntum Calendar include:
- Multi-category filtering
- Exporting events to Internet Calendaring and Scheduling (ICS) format
- Undo and redo functionality
- Multiple calendar instances
- Time zone support
- Custom rendering
- Easy integration with other Bryntum project management tools, like Bryntum Task Board
- Large dataset handling features such as lazy data loading and pagination
- Accessibility support
- Localization support
- Support for right-to-left layouts
- Deeply embed background information using the
tickRenderer - Display details before and after events, like travel time
- Show non-consecutive dates
- Visualize time ranges and resource time ranges
- Multiple resource modes
For a more detailed list, take a look at our summary of the Bryntum Calendar features and feature demos.
Bryntum Calendar pricing
You can purchase Bryntum components individually or as a discounted bundle. The Bryntum Calendar license starts at $600 per developer, and there are different licenses for small teams, large teams, internal use, non-commercial use, and commercial use. The internal, non-commercial EUL license is perpetual and includes forum support and free upgrades for one year.
We offer a free 45-day Bryntum trial and discounts for charity, environmental, and educational work, as well as for startups. You can also get a discount if you publish a post about using Bryntum on your company blog.
Pros
Bryntum Calendar offers a range of benefits that are ideal for enterprise-grade applications:
- The component has extensive documentation that includes live code demos, good search functionality, and integration and migration guides.
- Bryntum has an active blog where you can learn about customers’ experiences of using Bryntum components and follow tutorials such as Sync Google Calendar with Bryntum Calendar using the Google Calendar API and Google OAuth.
- We provide a large selection of demos that include source code and tips for integration with various frameworks. You can filter the Bryntum demos page by frontend frameworks, features, and customizations or by using a text search.
- It’s highly customizable with a wide range of advanced features, including a cross-product drag-and-drop feature and instantaneous project management recalculations.
- The high-performance library is well-suited to large datasets.
- Bryntum has an active support forum and offers additional professional services.
- It has a clean and modern UI that focuses on critical project information.
Cons
There is no open-source version of Bryntum Calendar, so it may be an expensive option if you only need a simple calendar.
FullCalendar
FullCalendar is a JavaScript calendar built for React that can also be used with vanilla JavaScript, TypeScript, Angular, and Vue, or be used as a Web Component. The standard version is open source, and the commercial premium version has additional features. You can browse examples of the FullCalendar features on the Demos page.
Getting started
You have two options for adding the FullCalendar library to your project:
FullCalendar’s functionality is split into plugins.
Install the core package and any plugins you require:
npm install @fullcalendar/core @fullcalendar/daygrid @fullcalendar/timegrid @fullcalendar/list @fullcalendar/interactionNote that you need to add a calendar view plugin at the bare minimum. Premium plugins require a license, but you can use the unlimited free trial to test out the calendar.
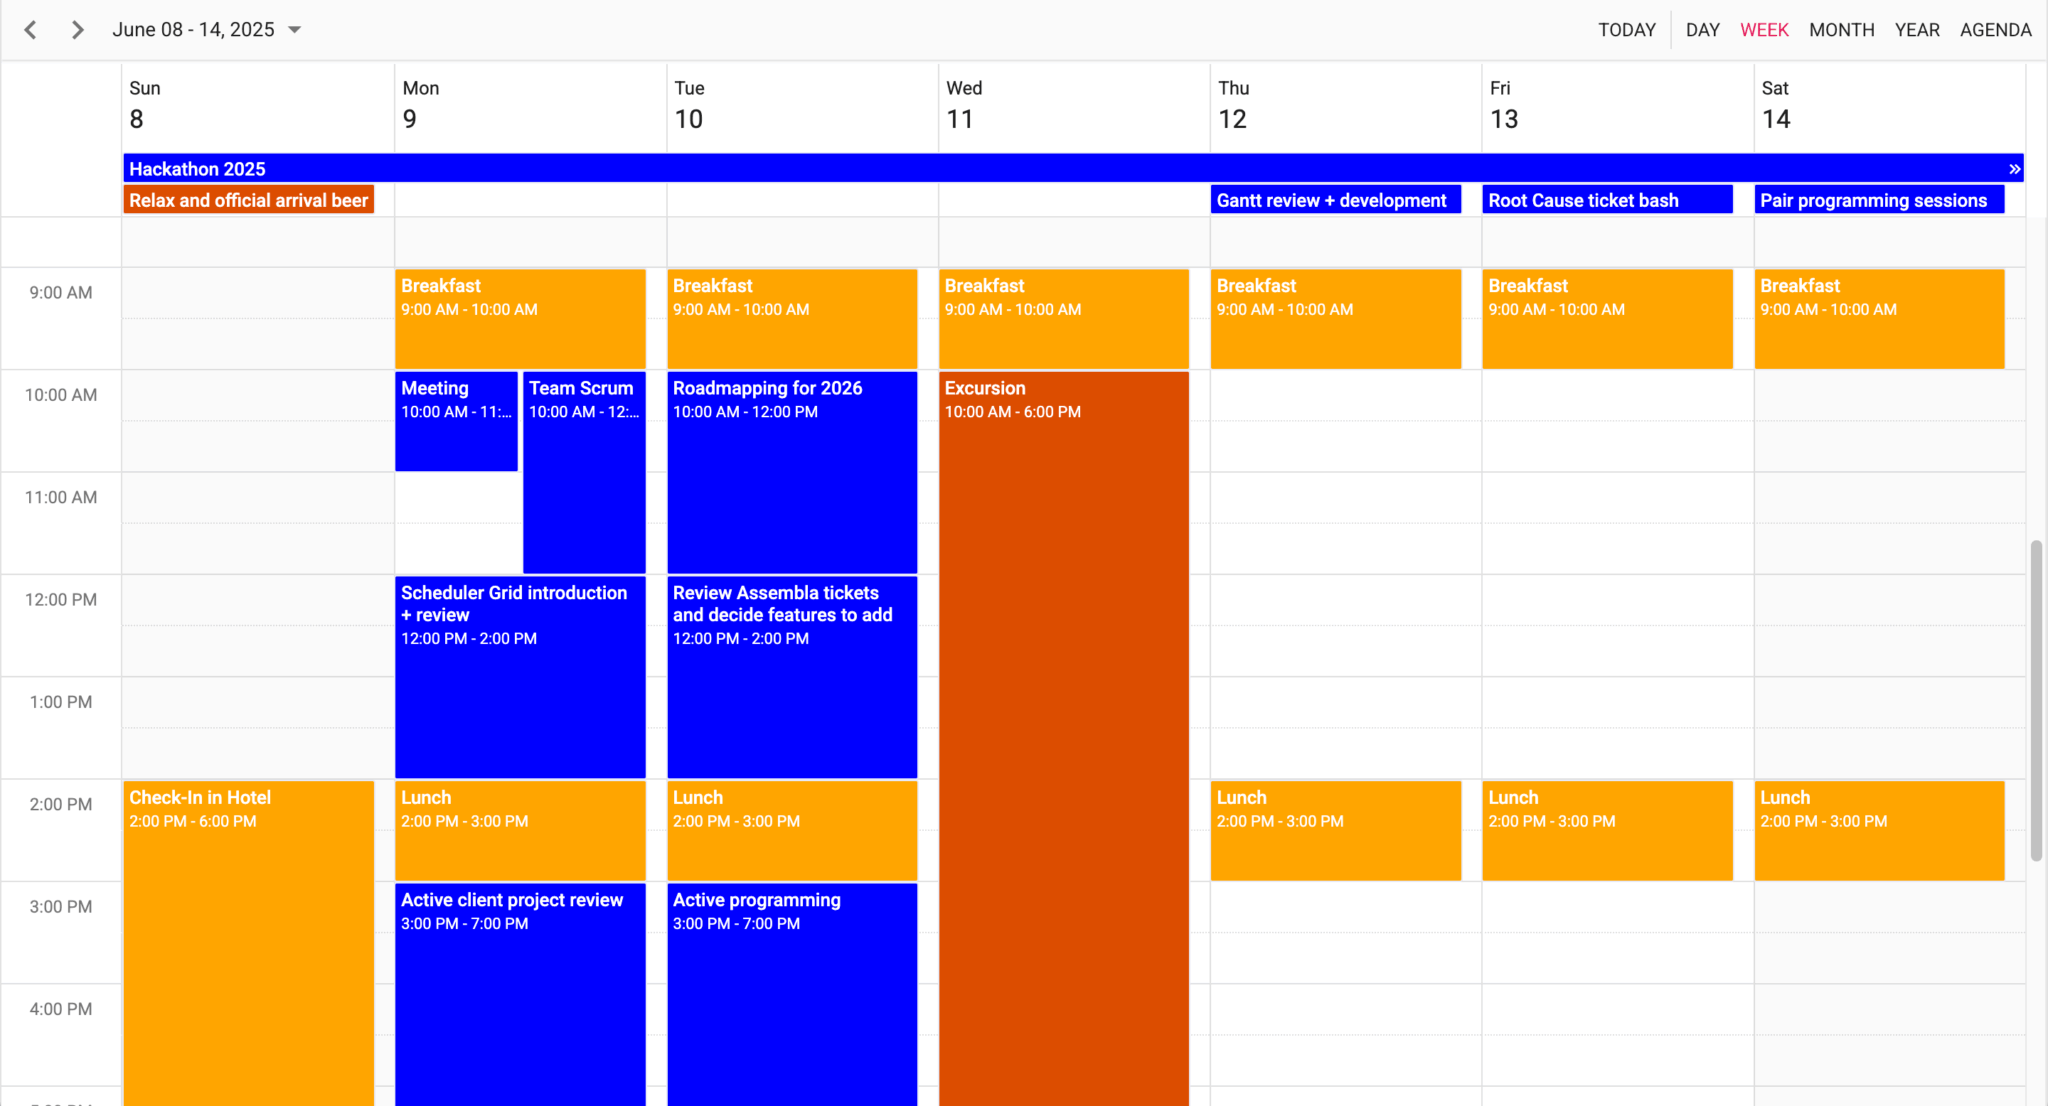
To make a FullCalendar calendar, create an instance of the Calendar class and pass in to the constructor function both the element that you’ll append the calendar to and a configuration object. The configuration determines what the calendar looks like and where it gets its data:
import { Calendar } from '@fullcalendar/core';
import dayGridPlugin from '@fullcalendar/daygrid';
import timeGridPlugin from '@fullcalendar/timegrid';
import listPlugin from '@fullcalendar/list';
import interactionPlugin from '@fullcalendar/interaction';

const calendarEl = document.getElementById('app');
const calendar = new Calendar(calendarEl, {
    initialDate         : '2025-06-13',
    plugins             : [dayGridPlugin, timeGridPlugin, listPlugin, interactionPlugin],
    initialView         : 'timeGridWeek',
    editable            : true,
    headerToolbar       : {
        left   : 'prev,next today',
        center : 'title',
        right  : 'timeGridDay,timeGridWeek,dayGridMonth,listWeek'
    },
    resources : [
        {
            id                   : 1,
            title                : 'Default Calendar',
            eventBackgroundColor : 'green'
        }
    ],
    events : [
        {
            id         : 1,
            title      : 'Meeting',
            start      : '2025-06-09T10:00:00',
            end        : '2025-06-09T11:00:00',
            resourceId : 1
        }
    ]
});

calendar.render();
The headerToolbar property defines the buttons and the title at the top of the calendar. There are two types of data: resources and events. There are different event data sources that you can use. Data can be passed in as an array, a URL that provides the data as a JSON object, or a function. Events can also be retrieved from Google Calendar or an iCalendar feed.
To sync changes to a backend, you can use the eventReceive, eventDrop, and eventResize methods.
The calendar has a themeSystem for styling. By default, it uses the minimalist 'standard' theme. Bootstrap themes are also available.
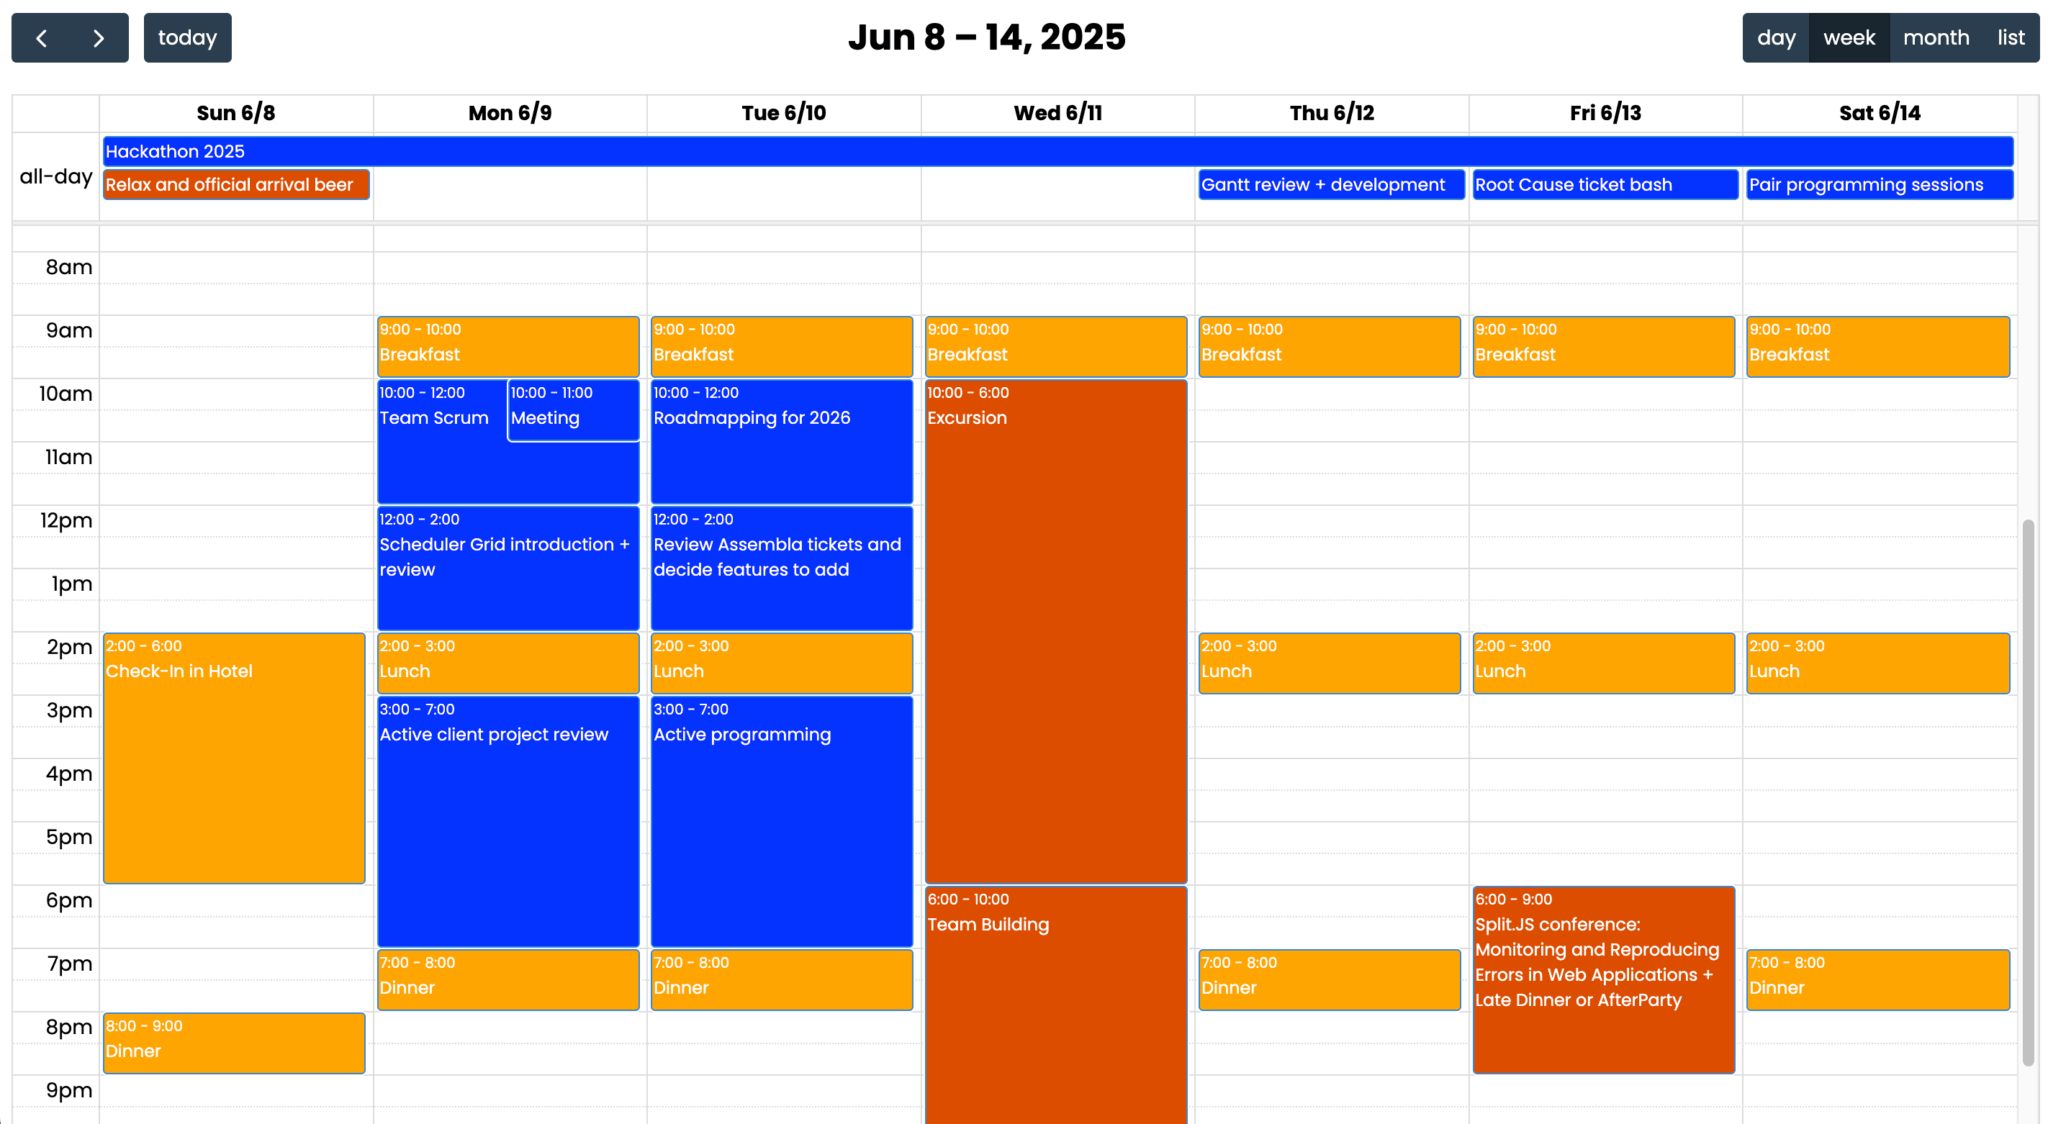
FullCalendar features
FullCalendar has over 300 settings. Its standard features include:
- Selectable dates
- Background events
- Theming
- Locales
- Time zone support
The Premium features include:
You can see the list of features in the FullCalendar docs.
FullCalendar pricing
The core features are open-source and free. A license is required to access the Premium features. Pricing starts at $480 per developer. The license is valid for one year and includes upgrades and email support. If you renew your license before it expires, you get a 50% discount. If you renew after your license has expired, you get a 25% discount.
Pros
FullCalendar has a range of benefits:
- Its base functionality is open-source and popular, with around 148,000 npm downloads per week, so you can easily find community help. There are 9,884 questions about FullCalendar on Stack Overflow.
- It has a good range of features, including different views, theming, locales, and time zone support.
- It supports vanilla JavaScript, React, Vue, and Angular.
Cons
FullCalendar lacks advanced features, such as undo and redo functionality, as well as basic features, such as an event editor. It’s less feature-rich than the other calendars in this comparison. The premium version is quite expensive for the few additional features.
The UI is also lacking, and it doesn’t perform well with large datasets containing thousands of events.
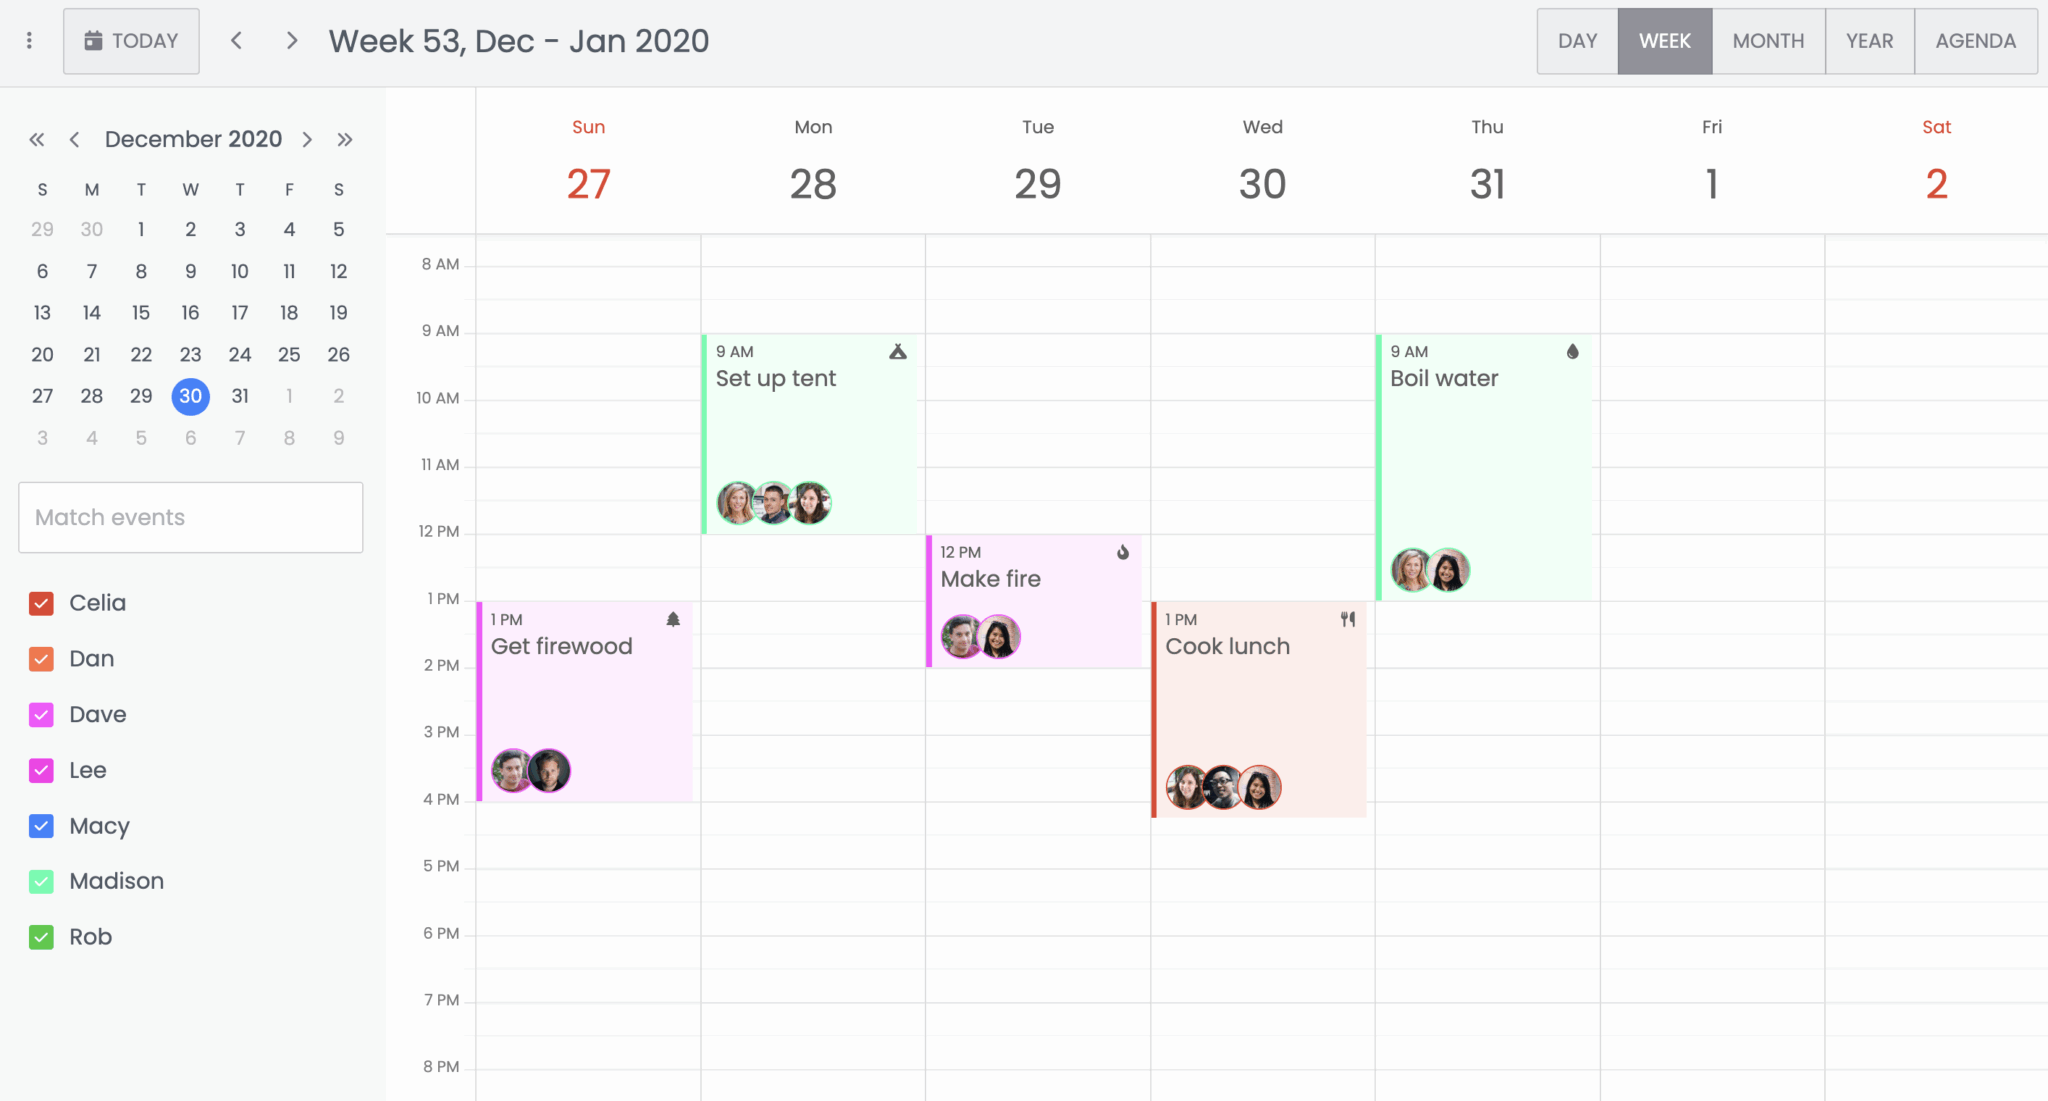
Mobiscroll Event Calendar
The Mobiscroll Event Calendar is a commercial, mobile-first scheduling component that’s part of Mobiscroll’s UI component suite for scheduling, planning, and resource management. The components work with vanilla JavaScript, React, Angular, Vue, and Ionic.
The Event Calendar Demos page showcases a range of features and mobile views to demonstrate how the Event Calendar is optimized for touch interaction and small screens. The demos also include code snippets.
Getting started
You can add the library to your project in two ways:
- Download the package and include it in a
<script>tag. - Use npm.
To install Event Calendar using npm, sign up for a Mobiscroll account to access the free trial and follow the guide to getting started with Mobiscroll.
Create an instance of the Mobiscroll Event calendar by passing in to the initialization object both the element that you’ll append the component to and a configuration object:
import * as mobiscroll from '@mobiscroll/javascript';
import '@mobiscroll/javascript/dist/css/mobiscroll.min.css';

var inst = mobiscroll.eventcalendar('#app', {
    theme         : 'ios',
    themeVariant  : 'light',
    clickToCreate : true,
    dragToCreate  : true,
    dragToMove    : true,
    dragToResize  : true,
    eventDelete   : true,
    view          : {
        calendar : { labels : true }
    },
    onEventClick : function(args) {
        mobiscroll.toast({
            message : args.event.title
        });
    }
});
Mobiscroll has three built-in themes, each with a light and a dark mode. You can customize these themes or create your own. It also provides a theme builder that lets you easily change and view custom color themes.
The clickToCreate, dragToCreate, dragToMove, dragToResize, and eventDelete properties make the calendar events responsive.
Event data can be passed as an array to the calendar using the data property. You can fetch remote data using the getJSON method and then update the calendar with that fetched data using the setEvents method:
mobiscroll.getJson(
    '/api/data',
    function(events) {
        inst.setEvents(events);
    },
    'jsonp'
);
The CRUD methods and events allow you to save changes and persist them to a remote server. The addEvent, updateEvent, and removeEvent methods let you update the calendar. The events include onEventCreate, onEventUpdate, and onEventDelete.
Unlike other calendars, the Event Calendar has no week view, so you’ll need to use the Mobiscroll Scheduler to view one week at a time.
Mobiscroll Event Calendar features
The Mobiscroll Event Calendar has a wide range of features, including:
- Support for multiple resources
- A calendar, scheduler, timeline, and agenda view
- A customizable event editor
- Time zone support
- Google and Outlook calendar integrations
- A calendar sync add-on for two-way integration with Google Calendar and Microsoft Outlook 365
- Accessibility support
- Localization support
- Support for right-to-left layouts
- Support for different calendar systems: Gregorian, Jalali, and Hijri calendar systems
Mobiscroll pricing
On the Mobiscroll homepage, you can sign up for a free 90-day trial of the Event Calendar, which can be extended on request. The Event Calendar pricing starts at $595 per developer for a perpetual license for internal projects, with one year of updates and support. This includes the scheduler view.
Mobiscroll also offers a subscription SaaS license and discounts for startups and early-stage SaaS companies. You can also get a discount by posting about your use of Mobiscroll on your company blog.
Team and enterprise tiers are more expensive but include unlimited apps and priority support.
Pros
The benefits of using the Mobiscroll Event Calendar include:
- A mobile-first UX with touch-optimized gestures, large tap targets, and adaptive layouts that make it ideal for phone and tablet apps
- Advanced functionality with four view modes, time zone support, Google and Outlook calendar integration, and localization support
- Support for different calendar systems, including the Gregorian, Jalali, and Hijri calendars
- Features that support large dataset handling, such as on-demand data loading, which fetches only the data for the currently active view
- Swift styling using customizable themes and the theme builder
- Support for vanilla JavaScript, React, Vue, and Angular
- Its extensive documentation and good search functionality
- The technical support offered via the Mobiscroll forum
- Well-organized demos that show code examples and cover common use cases
Cons
The Mobiscroll Event Calendar may be expensive if you only need a simple calendar. Some of the functionality, like the event editor, requires quite a lot of code compared to other calendar components such as Bryntum Calendar. The Mobiscroll Event Calendar also isn’t as feature-rich as Bryntum Calendar, DHTMLX Scheduler, or Syncfusion Scheduler.
DHTMLX Scheduler
DHTMLX Scheduler is part of the DHTMLX suite of components for project management, data analysis, and content management. It’s the more feature-rich and complex version of DHTMLX Event Calendar, which is a lightweight, simple, and modern Google-like event calendar.
The Scheduler works with React, Angular, Vue, Svelte, and TypeScript. DHTMLX also offers an ASP.NET Scheduler. DHTMLX also has a demos page showing more complex use cases and a samples page showing different UI features. Both demos and samples include the source code.
Getting started
The Standard edition of DHTMLX Scheduler is free and open-source. The PRO edition has extra features and a 30-day free trial.
The Standard and PRO editions can be installed using npm. The PRO edition uses a private npm registry. The DHTMLX Scheduler installation guide includes detailed instructions for accessing and installing the PRO package.
To create a DHTMLX Scheduler, use the init constructor method to create a scheduler instance, customize it using the config property, and activate plugins using the plugins property:
window.addEventListener('DOMContentLoaded', function(){
    scheduler.plugins({
        quick_info : true,
        recurring  : true
    });
    scheduler.config.details_on_create = true;
    scheduler.config.details_on_dblclick = true;

    scheduler.config.header = [
        'day',
        'week',
        'month',
        'date',
        'prev',
        'today',
        'next'
    ];

    scheduler.config.scroll_hour = 7;
    scheduler.config.occurrence_timestamp_in_utc = true;
    scheduler.config.include_end_by = true;
    scheduler.config.repeat_precise = true;
    scheduler.init('dhtmlx-scheduling-calendar', new Date(2025, 5, 20), 'week');

    scheduler.parse([
        { start_date : '2025-06-18 09:00', end_date : '2025-06-18 12:00', text : 'English lesson' },
        { start_date : '2025-06-20 10:00', end_date : '2025-06-21 16:00', text : 'Math exam' },
        { start_date : '2025-06-21 10:00', end_date : '2025-06-21 14:00', text : 'Science lesson' },
        { start_date : '2025-06-23 16:00', end_date : '2025-06-23 17:00', text : 'English lesson' },
        { start_date : '2025-06-22 09:00', end_date : '2025-06-22 17:00', text : 'Usual event' }
    ]);
});
The parse method lets you load data inline. Use the load method to load data from an external source.
To sync data changes to a backend, use the ajax module or the DataProcessor API:
scheduler.load('/data');
const dp = scheduler.createDataProcessor({
    url  : '/data',
    mode : 'REST'
});
dp.init(scheduler);
The DataProcessor API simplifies performing CRUD operations. It has connectors (which are helper server-side libraries) for PHP, Java, and .NET.
DHTMLX Scheduler features
The DHTMLX documentation includes demos and a full list of the available DHTMLX Scheduler features, including the following advanced features:
- Resource scheduling
- Creating multiple instances
- Dynamic data loading
- Theme customization
- PNG and PDF exporting
- Accessibility support
- Localization support
- Support for right-to-left layouts
Using the connector APIs simplifies using DHTMLX Scheduler with PHP, Java, and .NET backends. DHTMLX even has a Scheduler specifically for .NET.
DHTMLX pricing
Licenses for DHTMLX components come with a year of support. Choose your license from the range of DHTMLX license options based on your team size and whether you’ll use the components in a SaaS product. Licenses for DHTMLX Scheduler start at $599, and you can take advantage of DHTMLX bundle offers if you’d like to use several DHTMLX components.
DHTMLX also has open-source (Standard) library versions of its components, which are free to use but have fewer features than the PRO versions. The licensed libraries are the PRO versions. You can see the differences between the Standard and the PRO library features on the DHTMLX Scheduler Library page.
Pros
Choosing the DHTMLX Scheduler has a range of benefits, including:
- Access to comprehensive documentation and an active blog with tutorials
- The large collection of examples on the DHTMLX demos and samples pages, which show the source code for each example, including integration with various frameworks
- The text search filter on the demos page
- Advanced features
- Integration with many server-side platforms
- Good performance with large datasets
DHTMLX Scheduler’s long list of features, backend integration helpers, and examples makes it a good choice for complex applications.
Cons
The predefined skins for styling DHTMLX Scheduler have an outdated look, and the UI also lacks animations, which are a nice finishing touch to have. Despite their comprehensive content, the API docs aren’t easy to browse due to the mix of old and new docs and the search functionality often doesn’t surface relevant information.
Syncfusion Scheduler
Syncfusion is a commercial UI component library for web, desktop, and mobile apps. It offers UI components, including the Scheduler, for the popular JavaScript frameworks, React, Angular, and Vue. The Syncfusion Scheduler also supports Blazor.
Syncfusion’s comprehensive demos page shows the source code for each example and lets you edit the code on StackBlitz.
Getting started
You have three options for installing the Syncfusion Scheduler:
- Downloading the Essential Studio JavaScript (Essential JS 2) build
- Using a CDN
- Using npm
Create a Syncfusion Scheduler by creating an instance of the Scheduler and passing in the configuration object, which determines how the Scheduler looks and where it gets its data from:
import { DataManager, UrlAdaptor } from "@syncfusion/ej2-data";
import {
  Agenda,
  Day,
  DragAndDrop,
  Month,
  Resize,
  Schedule,
  Week,
  Year,
} from "@syncfusion/ej2-schedule";

Schedule.Inject(Day, Week, Month, Year, Agenda, Resize, DragAndDrop);

const scheduleObj: Schedule = new Schedule({
  width: "100%",
  height: "100vh",
  selectedDate: new Date(2025, 6, 1),
  views: ["Day", "Week", "Month", "Year", "Agenda"],
  eventSettings: { dataSource: scheduleData },
});

scheduleObj.appendTo("#Schedule");
The Scheduler requires module injection for views and specific functionality. Events are referred to as appointments in the Scheduler. For basic data fetching, you can use the browser Fetch API and pass the data to the dataSource property.
Use the DataManager to simplify getting and syncing data from a backend:
const dataSource = new DataManager({
  url: 'https://localhost:3001/api/schedulerData',
  adaptor: new UrlAdaptor(),
  batchUrl: 'https://localhost:3001/api/batchData',
});
To style the Scheduler, import one of the theme CSS stylesheets:
@import "@syncfusion/ej2/material.css";There are 13 themes to choose from, which you can further customize using the Theme Studio for Essential JS 2 GUI.
Syncfusion Scheduler features
The Syncfusion Scheduler is mobile touch-friendly, responsive, and built with accessibility in mind. Its advanced features include:
- Blocking time intervals
- Time zone support
- Custom rendering
- Highlighting working time
- Exporting appointments to Excel and iCal formats
- Large dataset support using on-demand data loading
- Accessibility support
- Localization support
- Support for right-to-left layouts
The Theme Studio GUI is a standout feature that allows for easy customization of the Scheduler styling. On the Syncfusion site, you can see a comprehensive list of features and view the Scheduler demos.
Syncfusion pricing
Syncfusion UI components are sold as bundles. Team licenses start at $395 per month. You can also choose an annual license for a project, company, or company division. Paid licenses include unlimited bug and feature requests and access to 24-hour remote support. There is a free Community License for companies that have less than $1 million in annual gross revenue, fewer than six developers, and under $3 million in capital from outside sources. You can sign up for a free 30-day trial of Syncfusion, which includes the same support services that are offered to licensed customers.
Pros
The Syncfusion Scheduler has a range of benefits, including:
- The demos page, which shows source code, links to the API documentation, and allows you to edit example code on StackBlitz
- Syncfusion’s active blog and many tutorials
- Its comprehensive documentation
- Support for multiple web frameworks, including Blazor
- Its advanced features
- The Theme Studio GUI, which makes for easy theme customization
- Syncfusion’s active support forum and the 24-hour remote support offered to licensed teams
Cons
The Syncfusion Scheduler is an expensive choice if you don’t qualify for the Community License or only want to use the Scheduler or a few of the Syncfusion components. The Scheduler also lacks some features, such as filtering of appointments and undo and redo functionality. The Syncfusion docs search functionality isn’t as good as some of the other options. It uses a modified Google search that often returns results for a different Syncfusion component.
Conclusion
Below is a table comparing some of the features of the different calendar libraries:
| Bryntum | FullCalendar | Mobiscroll | DHTMLX | Syncfusion | |
|---|---|---|---|---|---|
| Easy to customize | ✔️ | ✔️ | ✔️ | ✔️ | ✔️ |
| Advanced features | ✔️ | ❌ | ✔️ | ✔️ | ✔️ |
| Data fetching helpers | ✔️ | ✔️ | ✔️ | ✔️ | ✔️ |
| Handle large datasets | ✔️ | ❌ | ✔️ | ✔️ | ❌ |
| Styling themes | ✔️ | ❌ | ✔️ | ✔️ | ✔️ |
| Theme builder GUI | ❌ | ❌ | ✔️ | ❌ | ✔️ |
| Open source | ❌ | ✔️ | ❌ | ✔️ | ❌ |
| Accessibility | ✔️ | ❌ | ✔️ | ✔️ | ✔️ |
| React, Angular, and Vue support | ✔️ | ✔️ | ✔️ | ✔️ | ✔️ |
| TypeScript support | ✔️ | ✔️ | ✔️ | ✔️ | ✔️ |
| Undo and redo functionality | ✔️ | ❌ | ❌ | ❌ | ❌ |
| Time zone support | ✔️ | ✔️ | ✔️ | ✔️ | ✔️ |
| Custom rendering | ✔️ | ✔️ | ✔️ | ✔️ | ✔️ |
| Export to Excel | ✔️ | ❌ | ❌ | ✔️ | ✔️ |
| Export to ICS format | ✔️ | ❌ | ❌ | ❌ | ✔️ |
| Formatting for printing | ✔️ | ✔️ | ✔️ | ✔️ | ✔️ |
Based on the results of the comparison, we can give you the following recommendations:
| Use case | Requirements | Best choice |
|---|---|---|
| Enterprise | Advanced features (like undo/redo and lazy loading) and good customer support | Bryntum Calendar, DHTMLX Scheduler PRO, or Syncfusion Scheduler |
| Power-user / small-scale commercial | Modern UI, good mobile UX, and feature-rich | Mobiscroll Event Calendar |
| Budget / open-source | Basic scheduling | DHTMLX Scheduler Standard or FullCalendar |
Bryntum Calendar is the best calendar we tried, especially in terms of UI, docs, and demos. It has the most advanced feature set, which includes advanced filtering, undo and redo functionality, and displaying travel time.
If you’re thinking of moving from another calendar to Bryntum, we provide the following step-by-step migration guides:
The Syncfusion Scheduler and DHTMLX Scheduler are also good choices for enterprise-grade apps. The Syncfusion Scheduler has a comprehensive feature set and a generous free Community License for small companies.
Mobiscroll Event Calendar’s mobile-first UX and theme builder make it a good choice when there is a high percentage of mobile device use.
FullCalendar and DHTMLX Scheduler Standard are great open-source options when you have budget constraints. You can upgrade to the paid plans when you need extra functionality. DHTMLX Scheduler is the better, more feature-rich option.
In the end, your choice comes down to project scope, budget, and time constraints. Each library offers different functionalities, support, and pricing, so you’ll need to consider your requirements to see which calendar is most suitable for your use case.