How to connect and sync Bryntum Scheduler Pro to monday.com
We strive to keep posts updated, but code samples may sometimes be outdated. Humans, see the Bryntum documentation; agents, https://mcp.bryntum.com for the latest info.
Bryntum Scheduler Pro is a scheduling UI component that extends the functionality of the original Bryntum Scheduler. In addition to a more powerful scheduling engine, capable of automatically scheduling events based on their constraints, dependencies, and resource availability, Bryntum Scheduler Pro offers the following additional features:
- Travel time
- Highlighting options
- Custom event grouping
- Event splitting
- Nested events
You can learn more about the differences between the two UI components in our comparison article, Scheduler vs. Scheduler Pro.
monday.com is a cloud-based project management platform. Boards form a core component of the monday.com platform, as they comprise the workspaces where users add all of their data. Different board views can be made to resemble a Bryntum Scheduler, including the Timeline View.
In this tutorial, we’ll connect and sync a Bryntum Scheduler Pro component with monday.com by:
- Creating a monday.com board for property bookings.
- Using the monday.com software development kit (SDK) and GraphQL API to get items from the property bookings board.
- Displaying the bookings in a Bryntum Scheduler Pro component.
- Syncing event changes in Bryntum Scheduler Pro with the monday.com board.
Getting started
We’ll use an existing Express project as our starting point. Clone the Express starter repository and find the completed code for this guide on the completed-app branch.
The starter code has the following directory structure:
server.js: This file sets up and starts an Express server and serves the files from thepublicdirectory.public: This directory contains static HTML, CSS, and JavaScript files that we’ll use to create a Bryntum Scheduler Pro scheduler.
We use a backend to protect the monday.com access token, which is required for accessing monday.com data.
Install the dependencies using the following command:
npm installStart the project by running the following command:
npm startOpen https://localhost:1338. You should see the text, TODO, on your screen.
Define the port number by creating a .env file and adding the following PORT environment variable to it:
PORT=1338Creating a Bryntum Scheduler Pro component
We’ll start by using npm to install Bryntum Scheduler Pro. We’ll start by using npm to install Bryntum Scheduler Pro. You can try out Bryntum components for free using our public Bryntum trial packages.
If you have a Bryntum license, please refer to our npm Repository Guide to access the private Bryntum repository.
To use the Scheduler Pro module code on the client, add the following line of code to the top of the server.js file, below the const app = express(); line:
app.use(
    express.static(path.join(__dirname, '/node_modules/@bryntum/schedulerpro'))
);
In the public/index.html file, remove the TODO text in the <div> element and add an empty <div> with an id of "scheduler":
- <div id="scheduler">TODO</div>
+ <div id="scheduler"></div>
Replace the code in the public/main.js file with the following:
import { SchedulerPro } from './schedulerpro.module.js';
const today = new Date();
const schedulerPro = new SchedulerPro({
appendTo : 'scheduler',
viewPreset : 'dayAndWeek',
columns : [
{ text : 'Property', field : 'name', width : 160, editor: false }
],
project : {
resourcesData : [
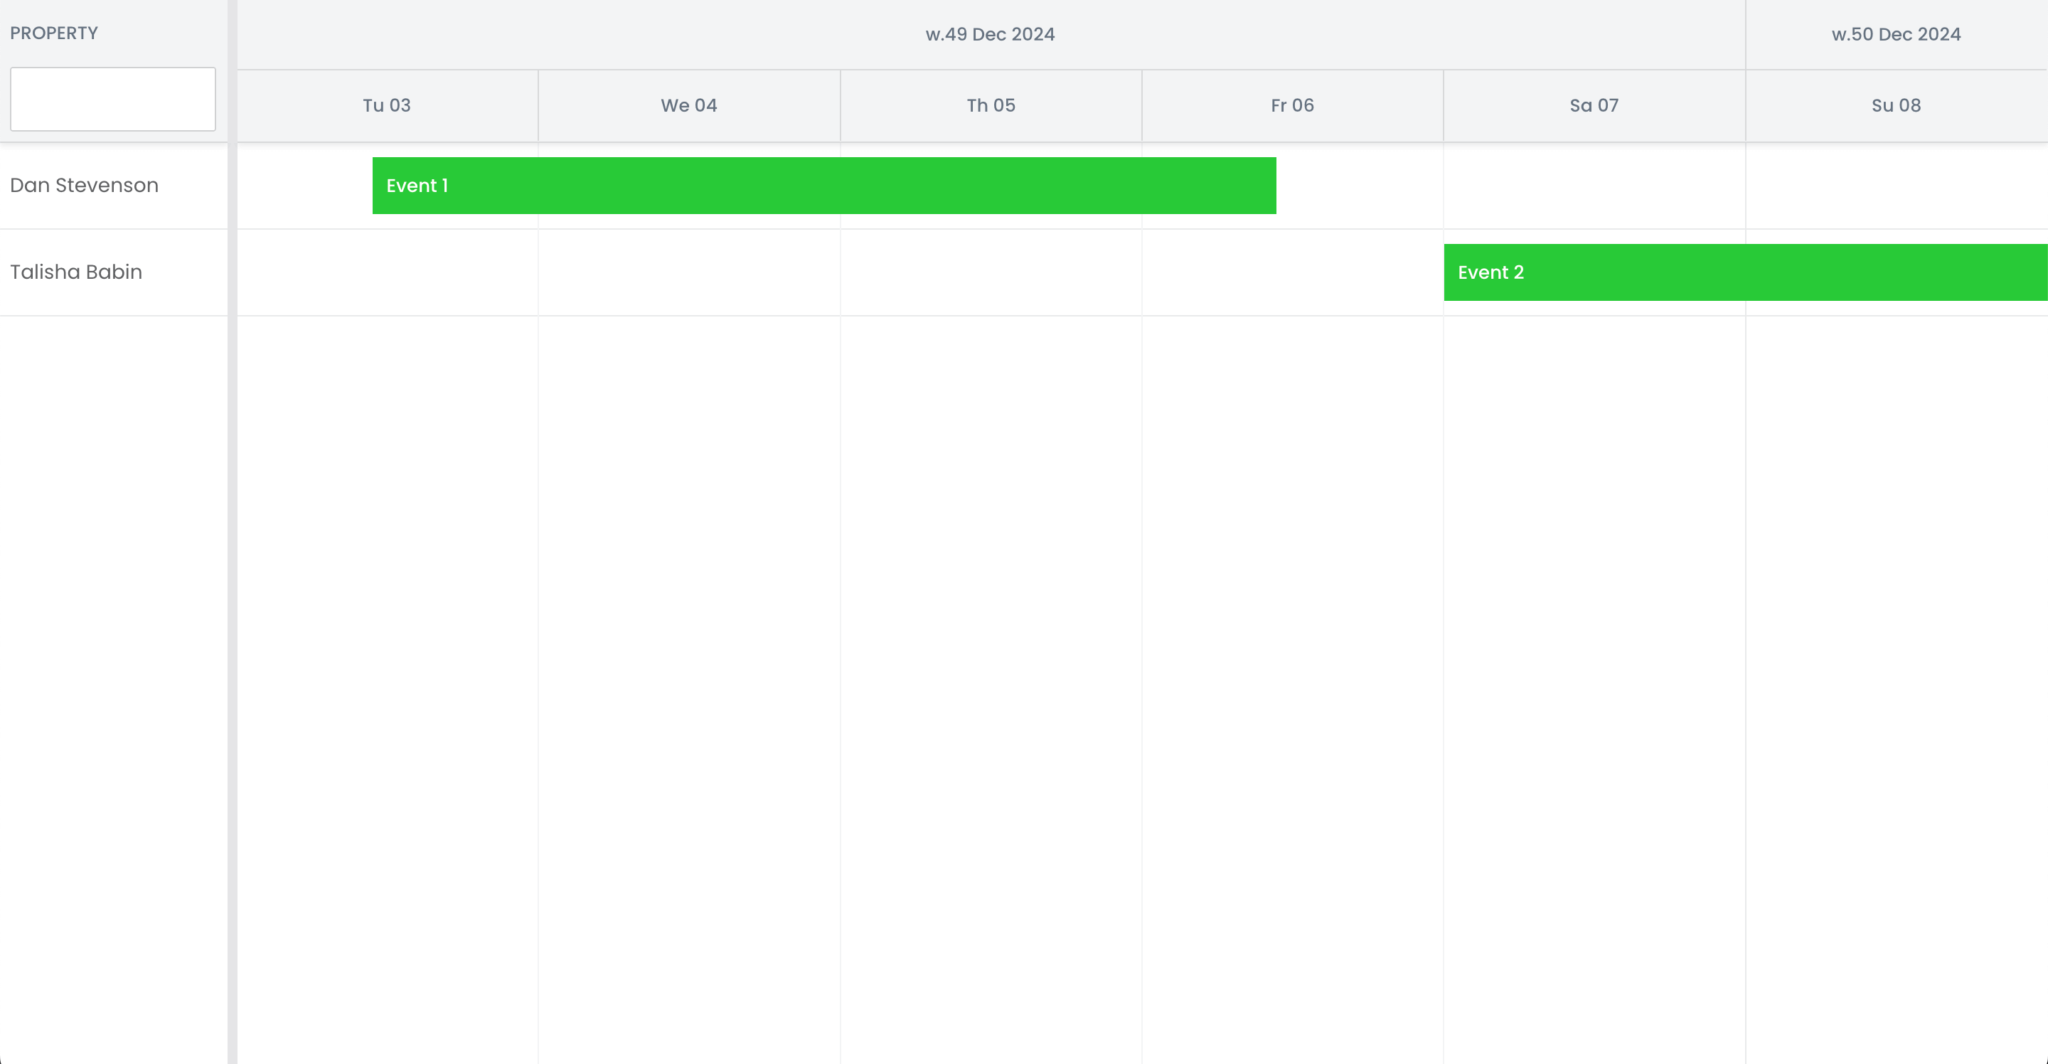
{ id : 1, name : 'Dan Stevenson' },
{ id : 2, name : 'Talisha Babin' }
],
eventsData : [
{ id : 1, name : 'Event 1', startDate : today, duration : 3 },
{ id : 2, name : 'Event 2', startDate : new Date(today.getFullYear(), today.getMonth(), today.getDate() + 4), duration : 4 }
],
assignmentsData : [
{ event : 1, resource : 1 },
{ event : 2, resource : 2 }
]
}
});This creates a Bryntum Scheduler Pro instance and passes a configuration object in to the instance. It then appends the instance to the <div> with an id of "scheduler" and provides some example inline data, which we’ll remove later. The Bryntum Scheduler Pro data stores are held and interlinked within the project. The example inline data includes resources, events, and assignments. Assignments hold information about which events are assigned to which resources.
The following data store types are also commonly used by the Scheduler Pro, although they don’t feature in this tutorial:
In the public/style.css file, import the Scheduler Pro Stockholm theme:
@import "./schedulerpro.stockholm.css";This theme is one of the five available themes for Bryntum components. You can also customize a theme or create your own.
Add the following styles to the public/style.css stylesheet to make the Bryntum Scheduler Pro take up the full screen height:
#scheduler {
  height: 100vh;
  font-size: 14px;
}
Open https://localhost:1338 and refresh the page to see the Bryntum Scheduler Pro with the two example events:
Now let’s learn to create a monday.com board for property bookings and use the monday.com SDK and GraphQL API to import items from that board into the Scheduler.
Creating a monday.com booking scheduler
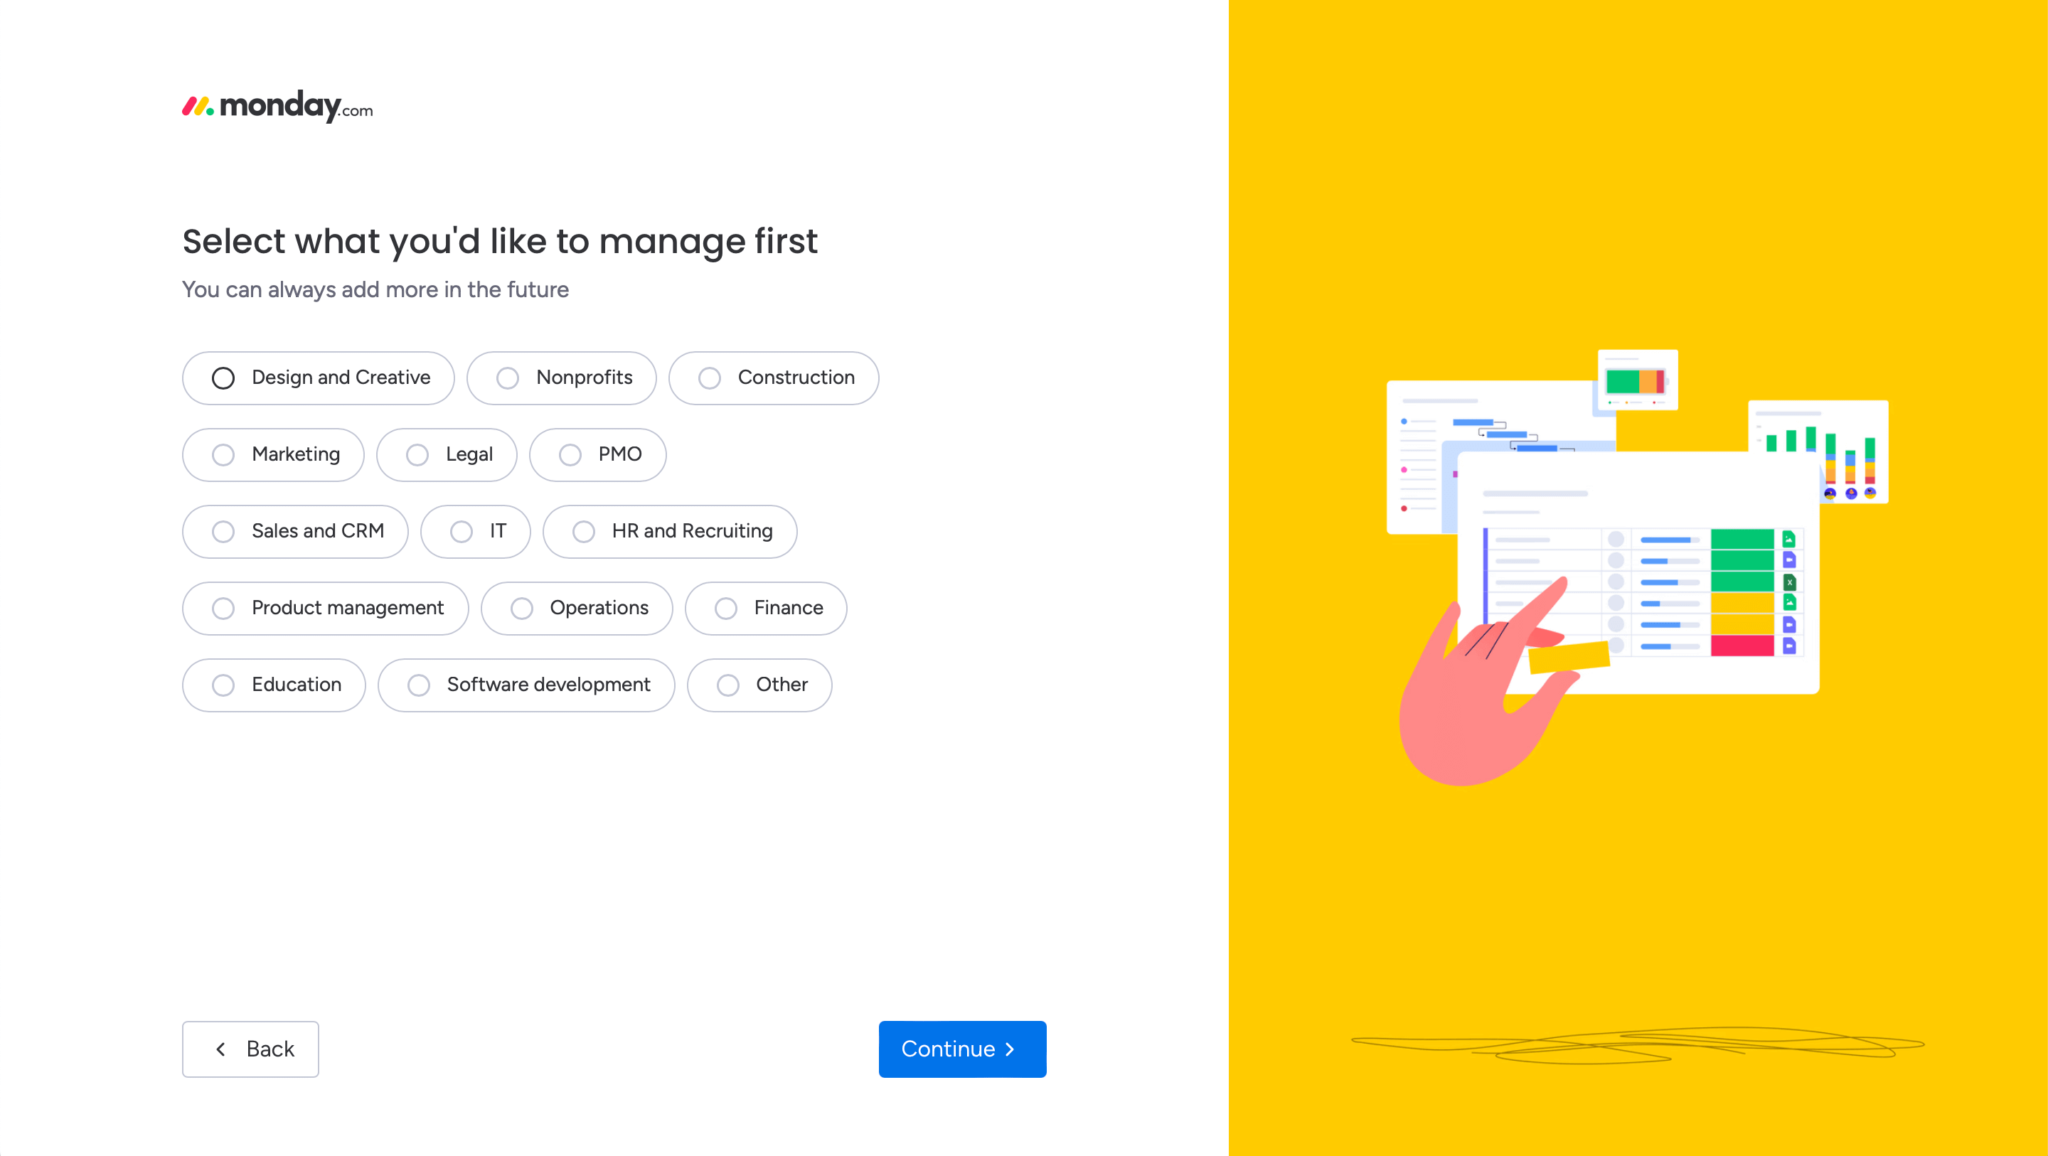
Sign up or log in to monday.com. If you’re setting up a new personal account, click the Continue button when asked what you want to manage first:
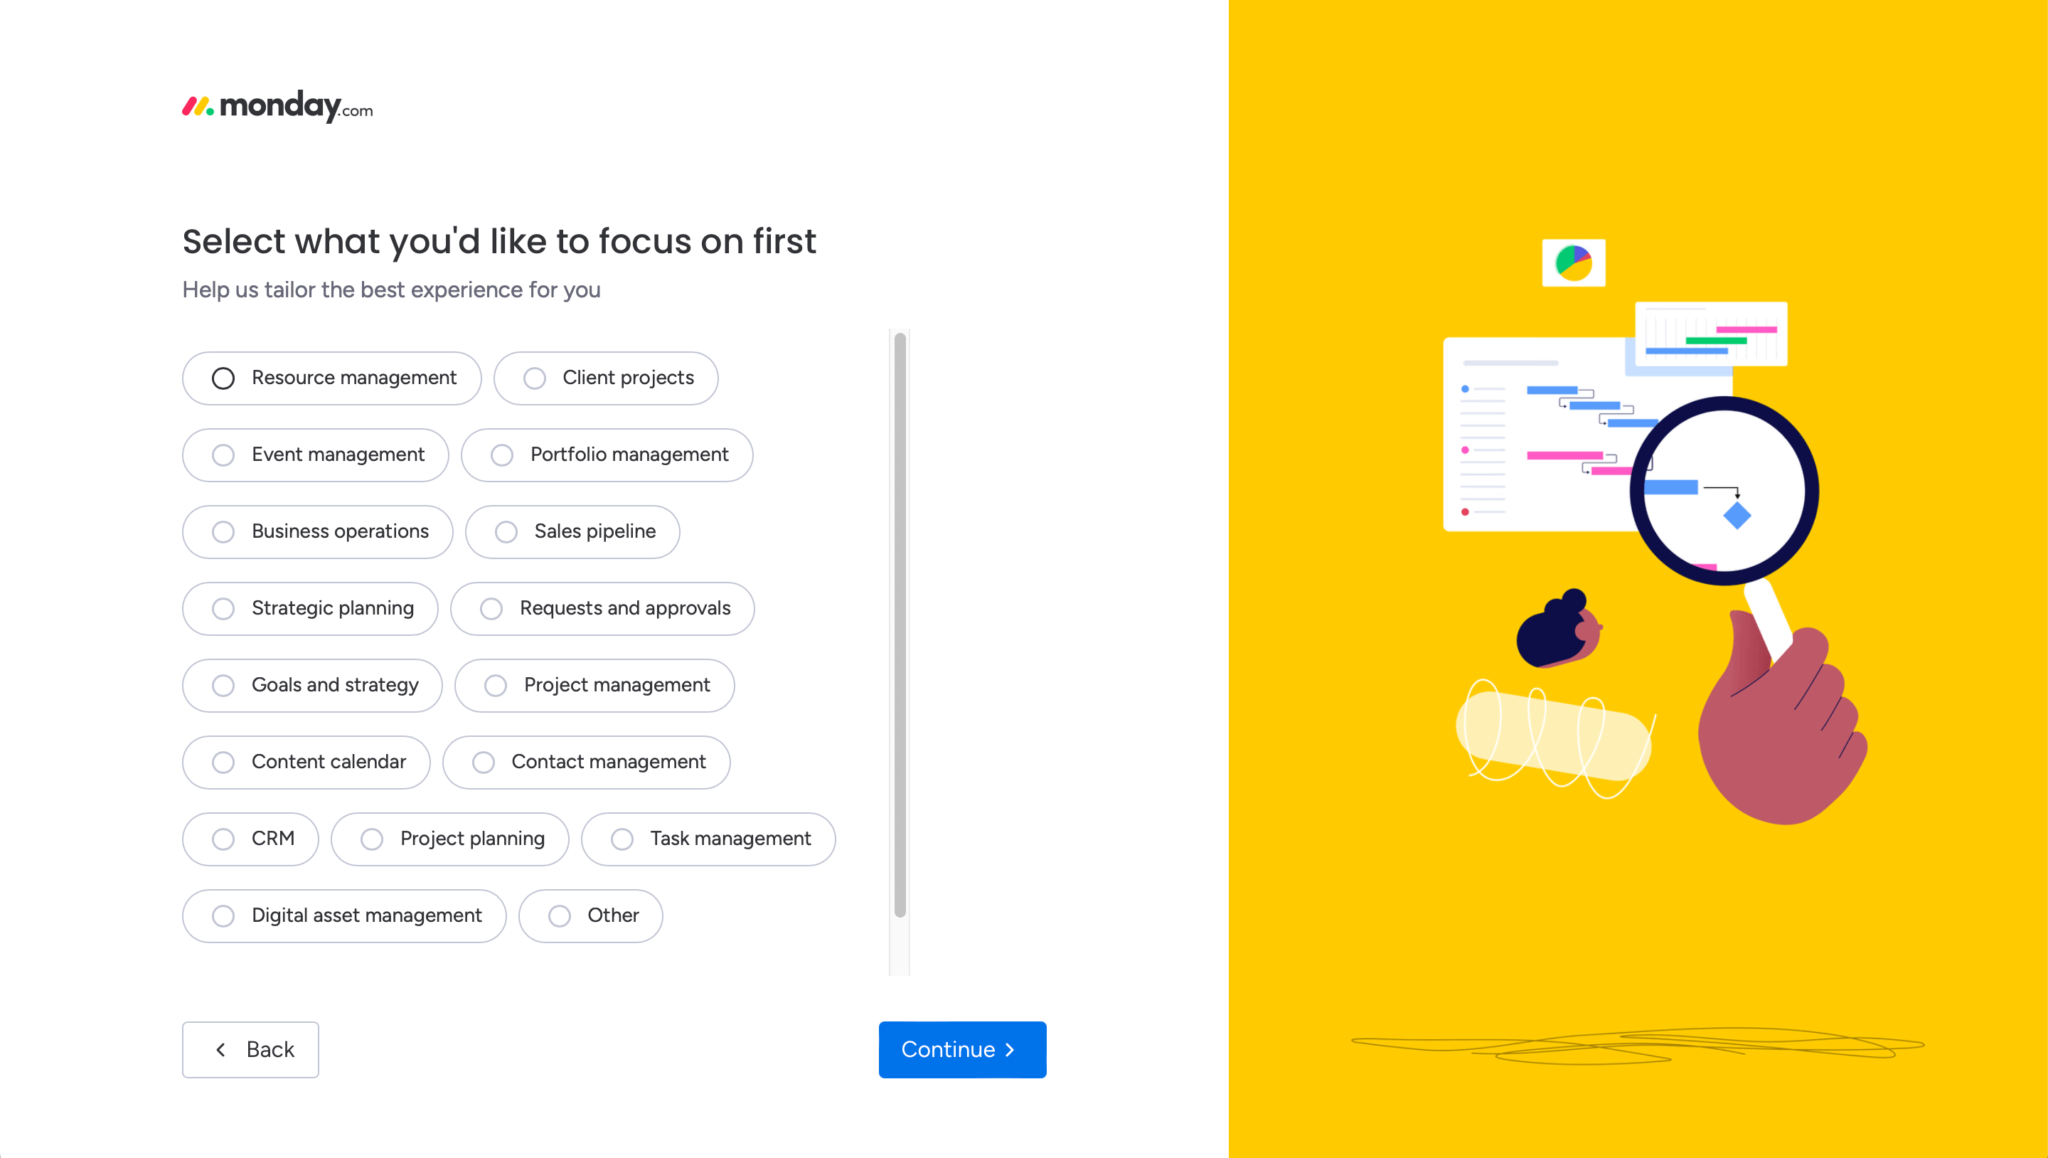
Click Continue again when asked what you want to focus on first:
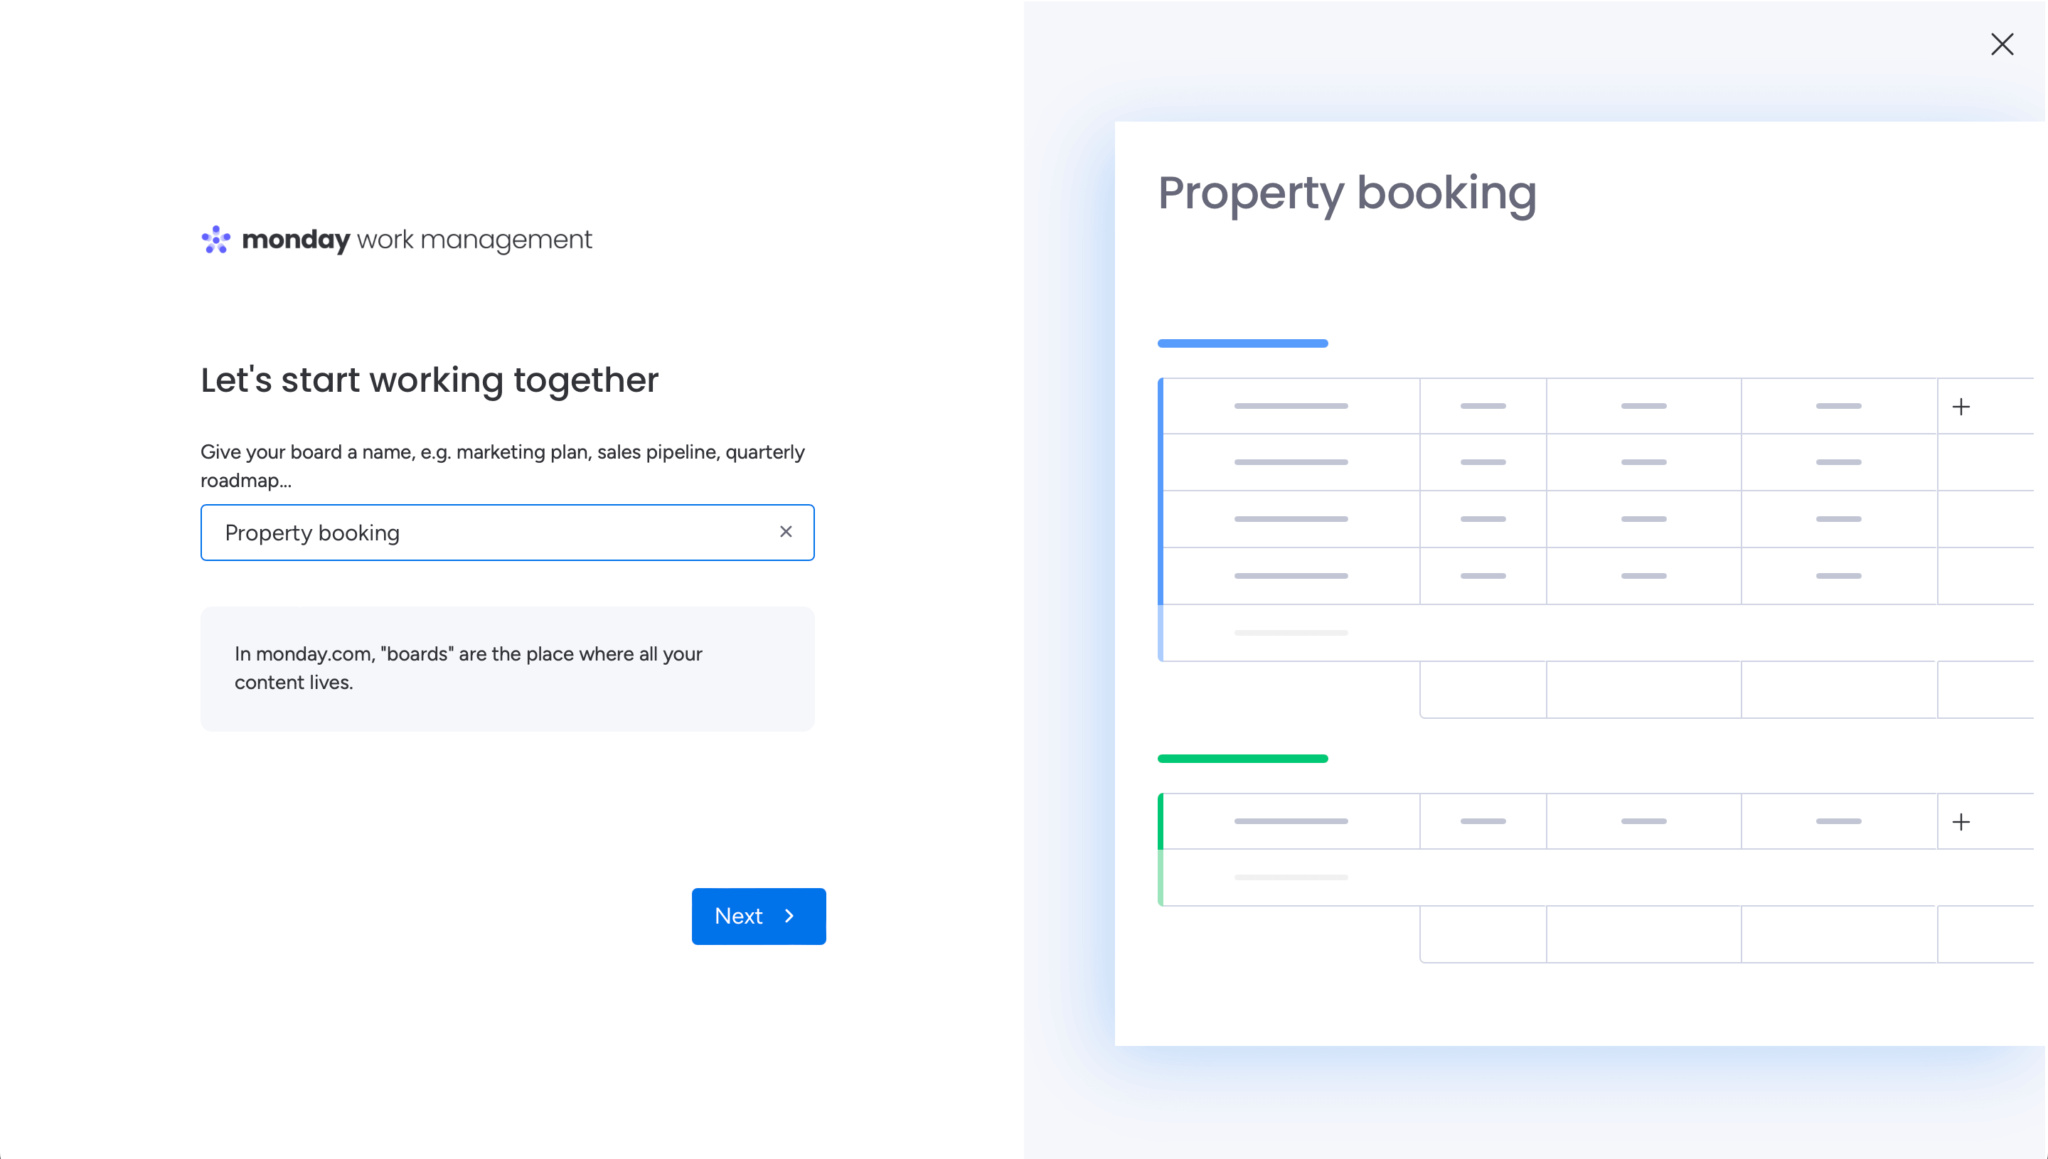
Name your board Property booking:
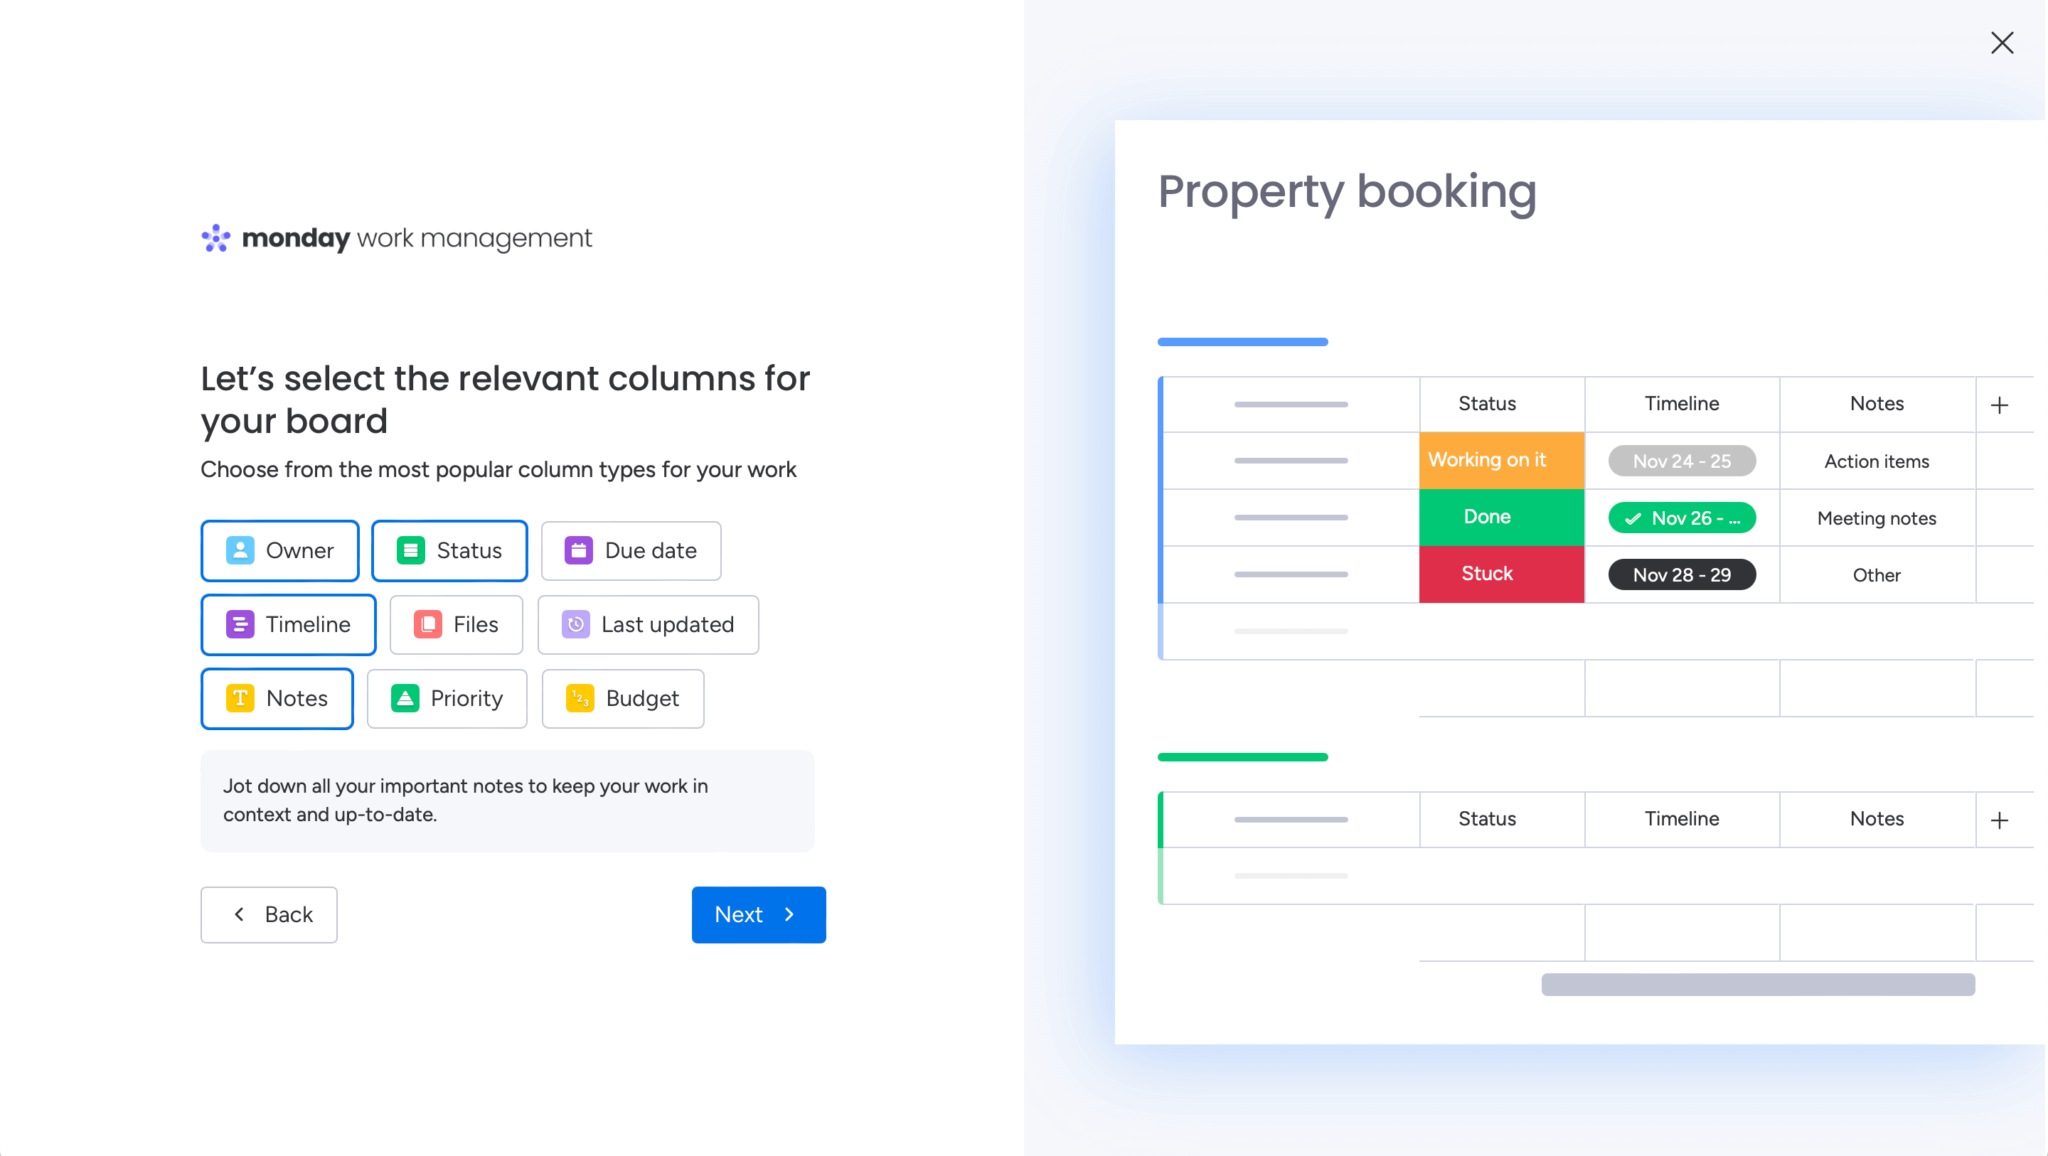
Select the Owner, Status, Timeline, and Notes columns for your board. These can also be added later.
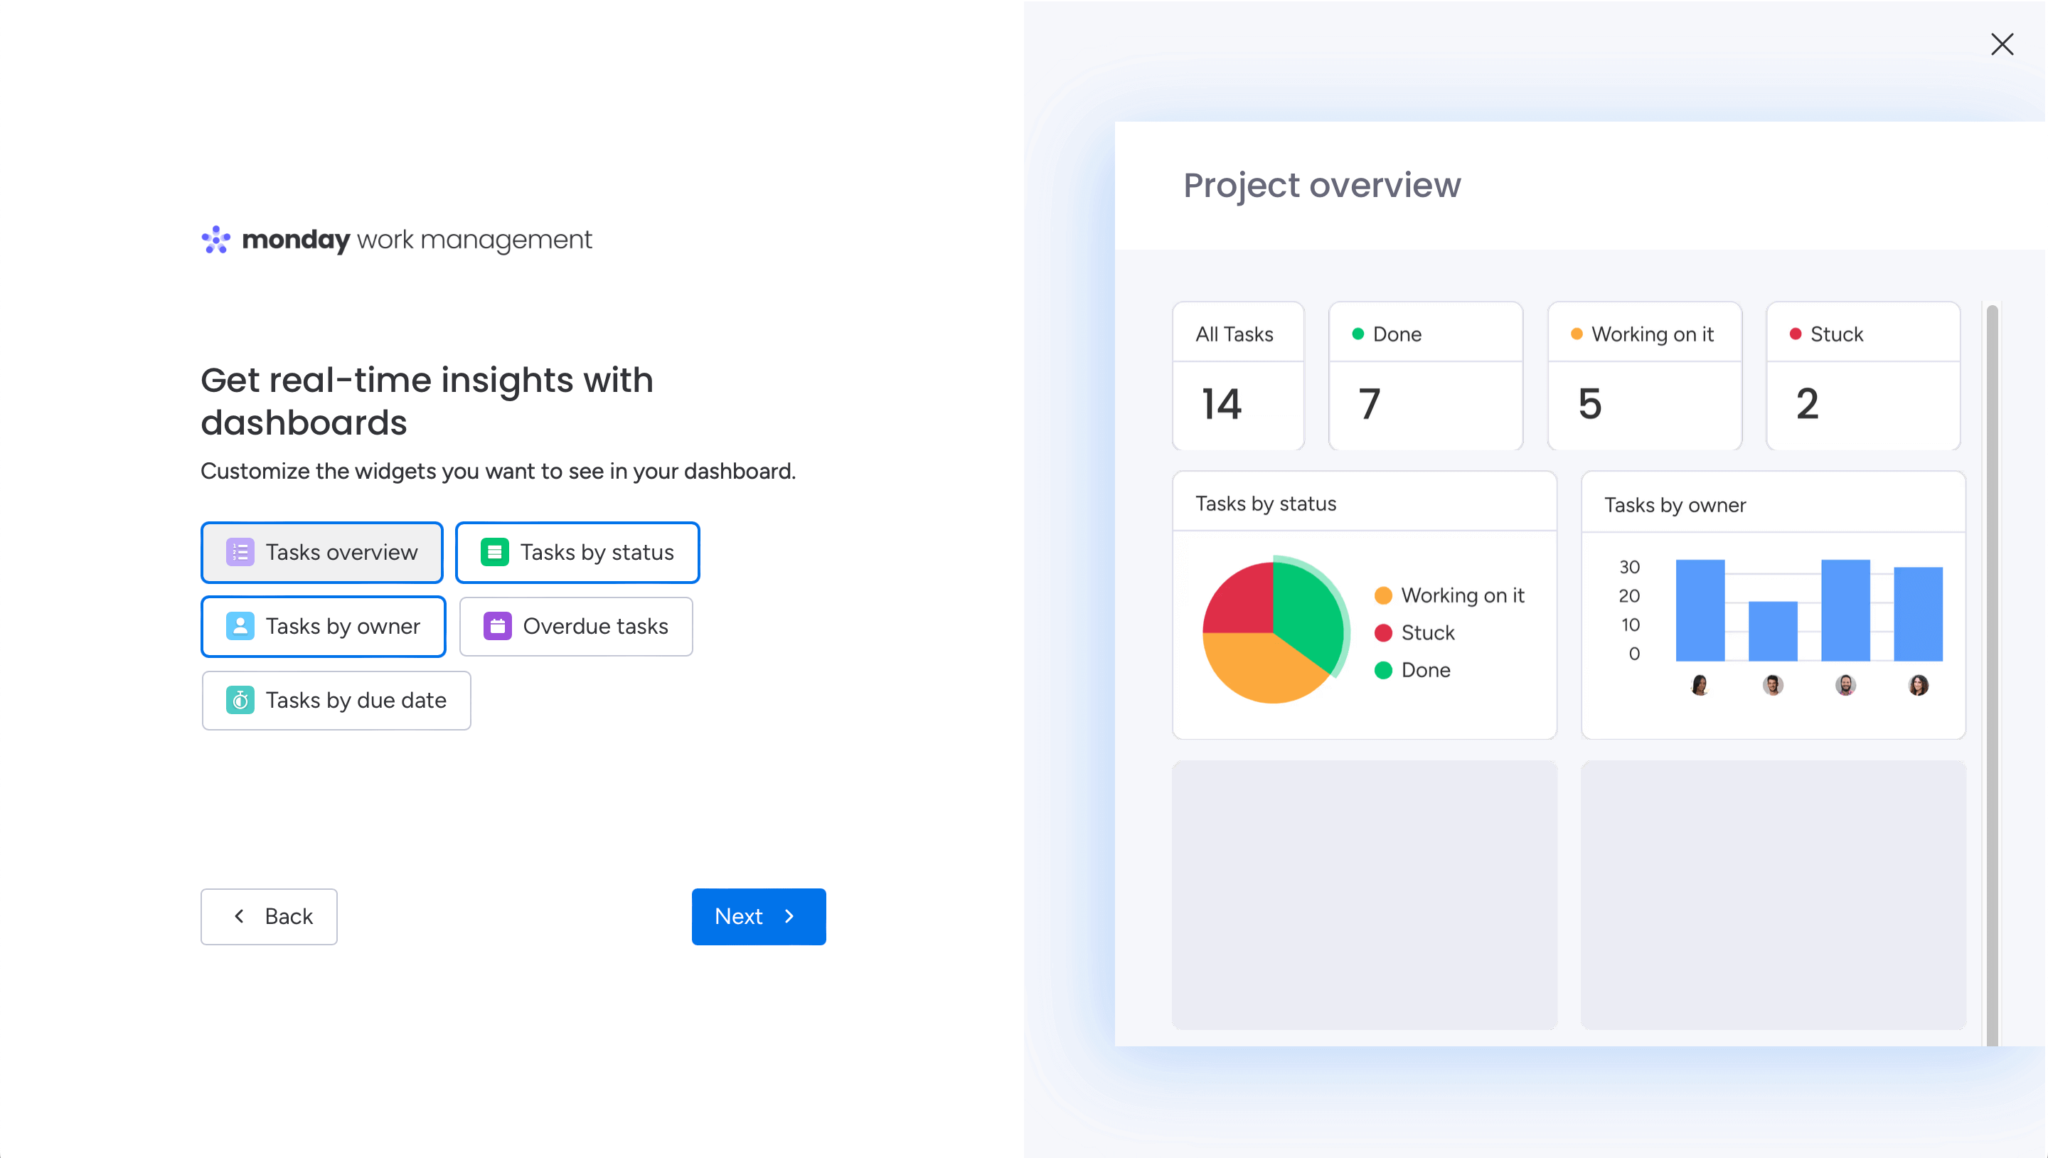
Select the Tasks overview, Tasks by status, and Tasks by owner widgets for your dashboard:
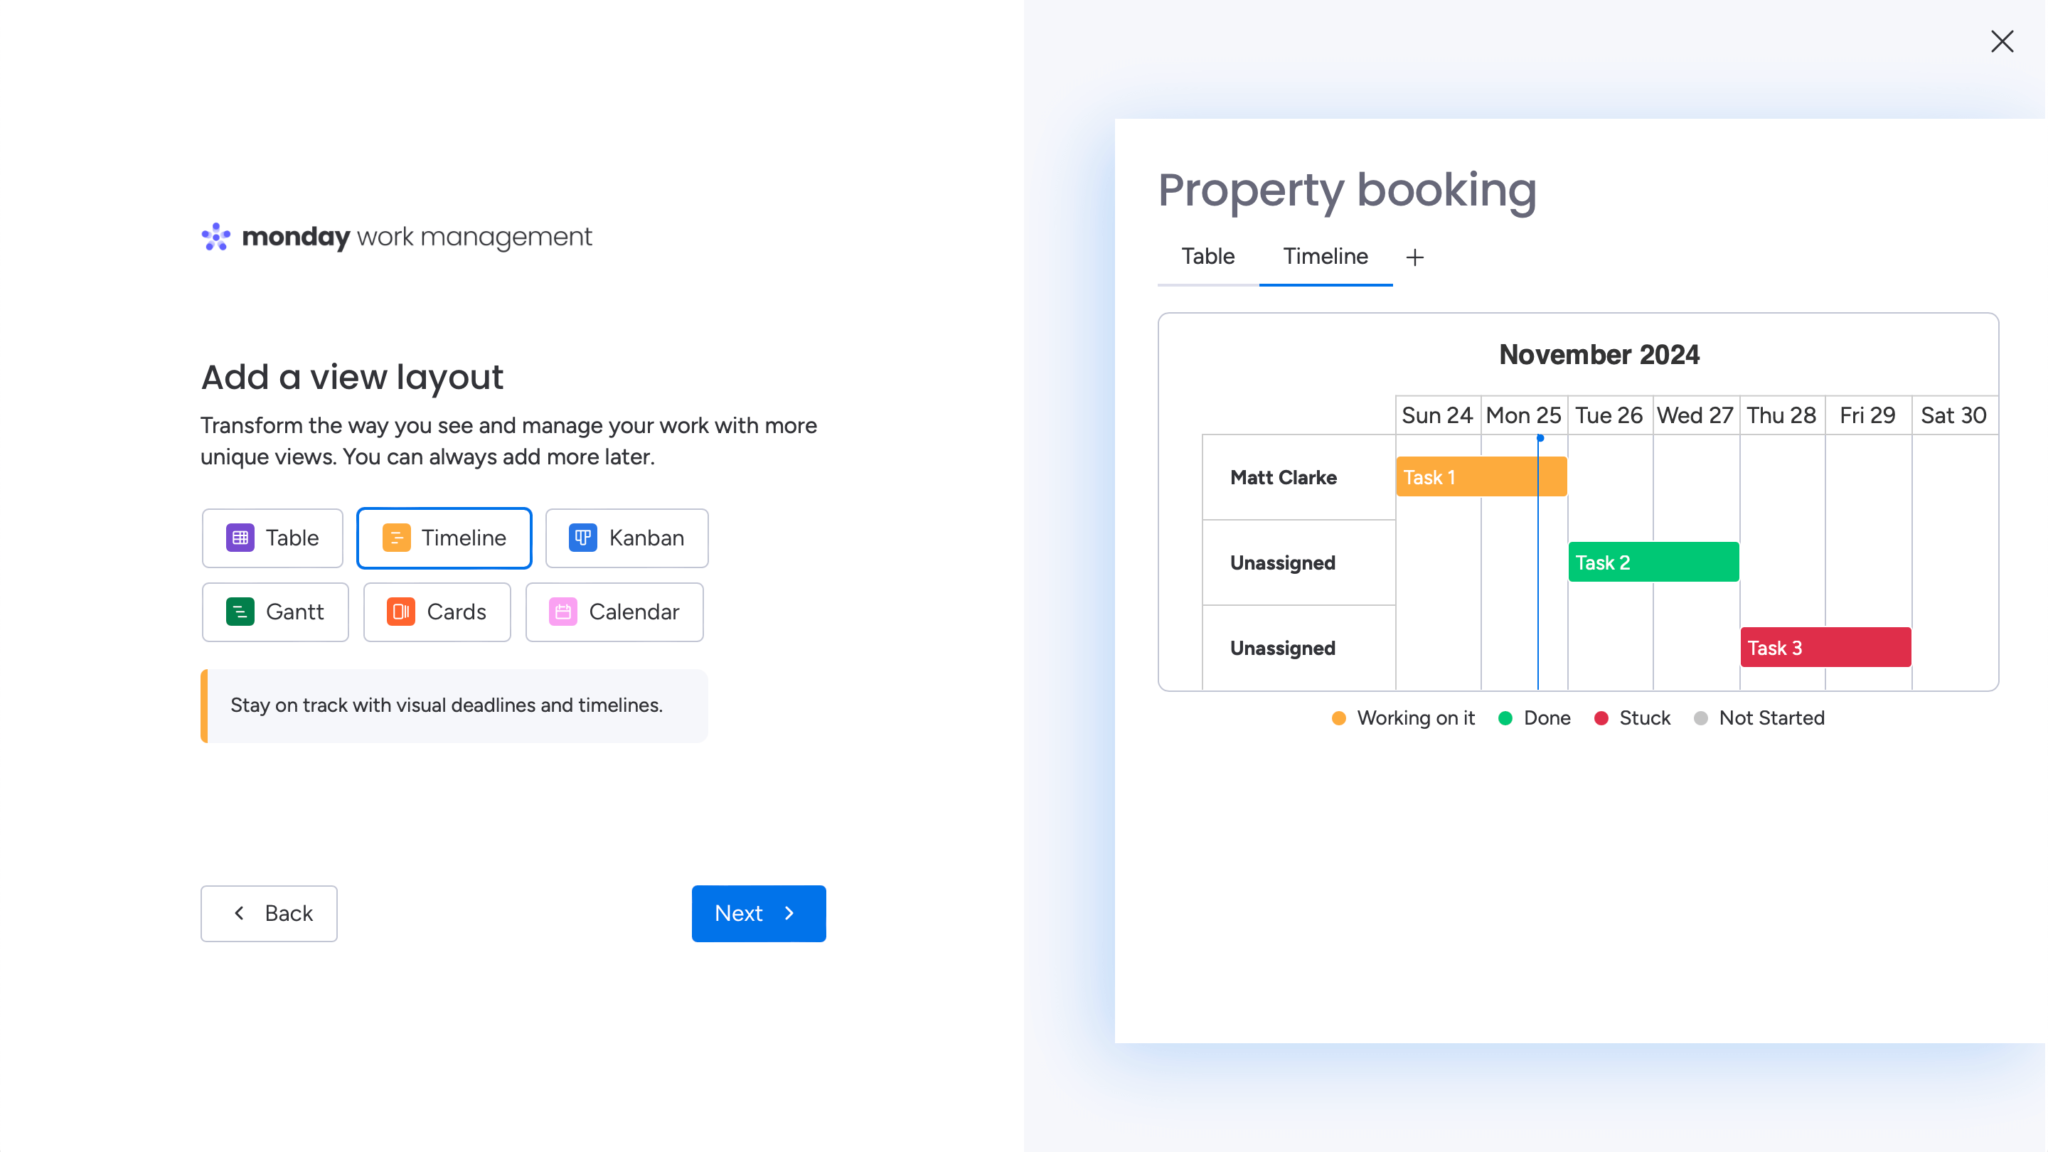
Add the Timeline view layout:
Click the Get started button in the List your projects step:

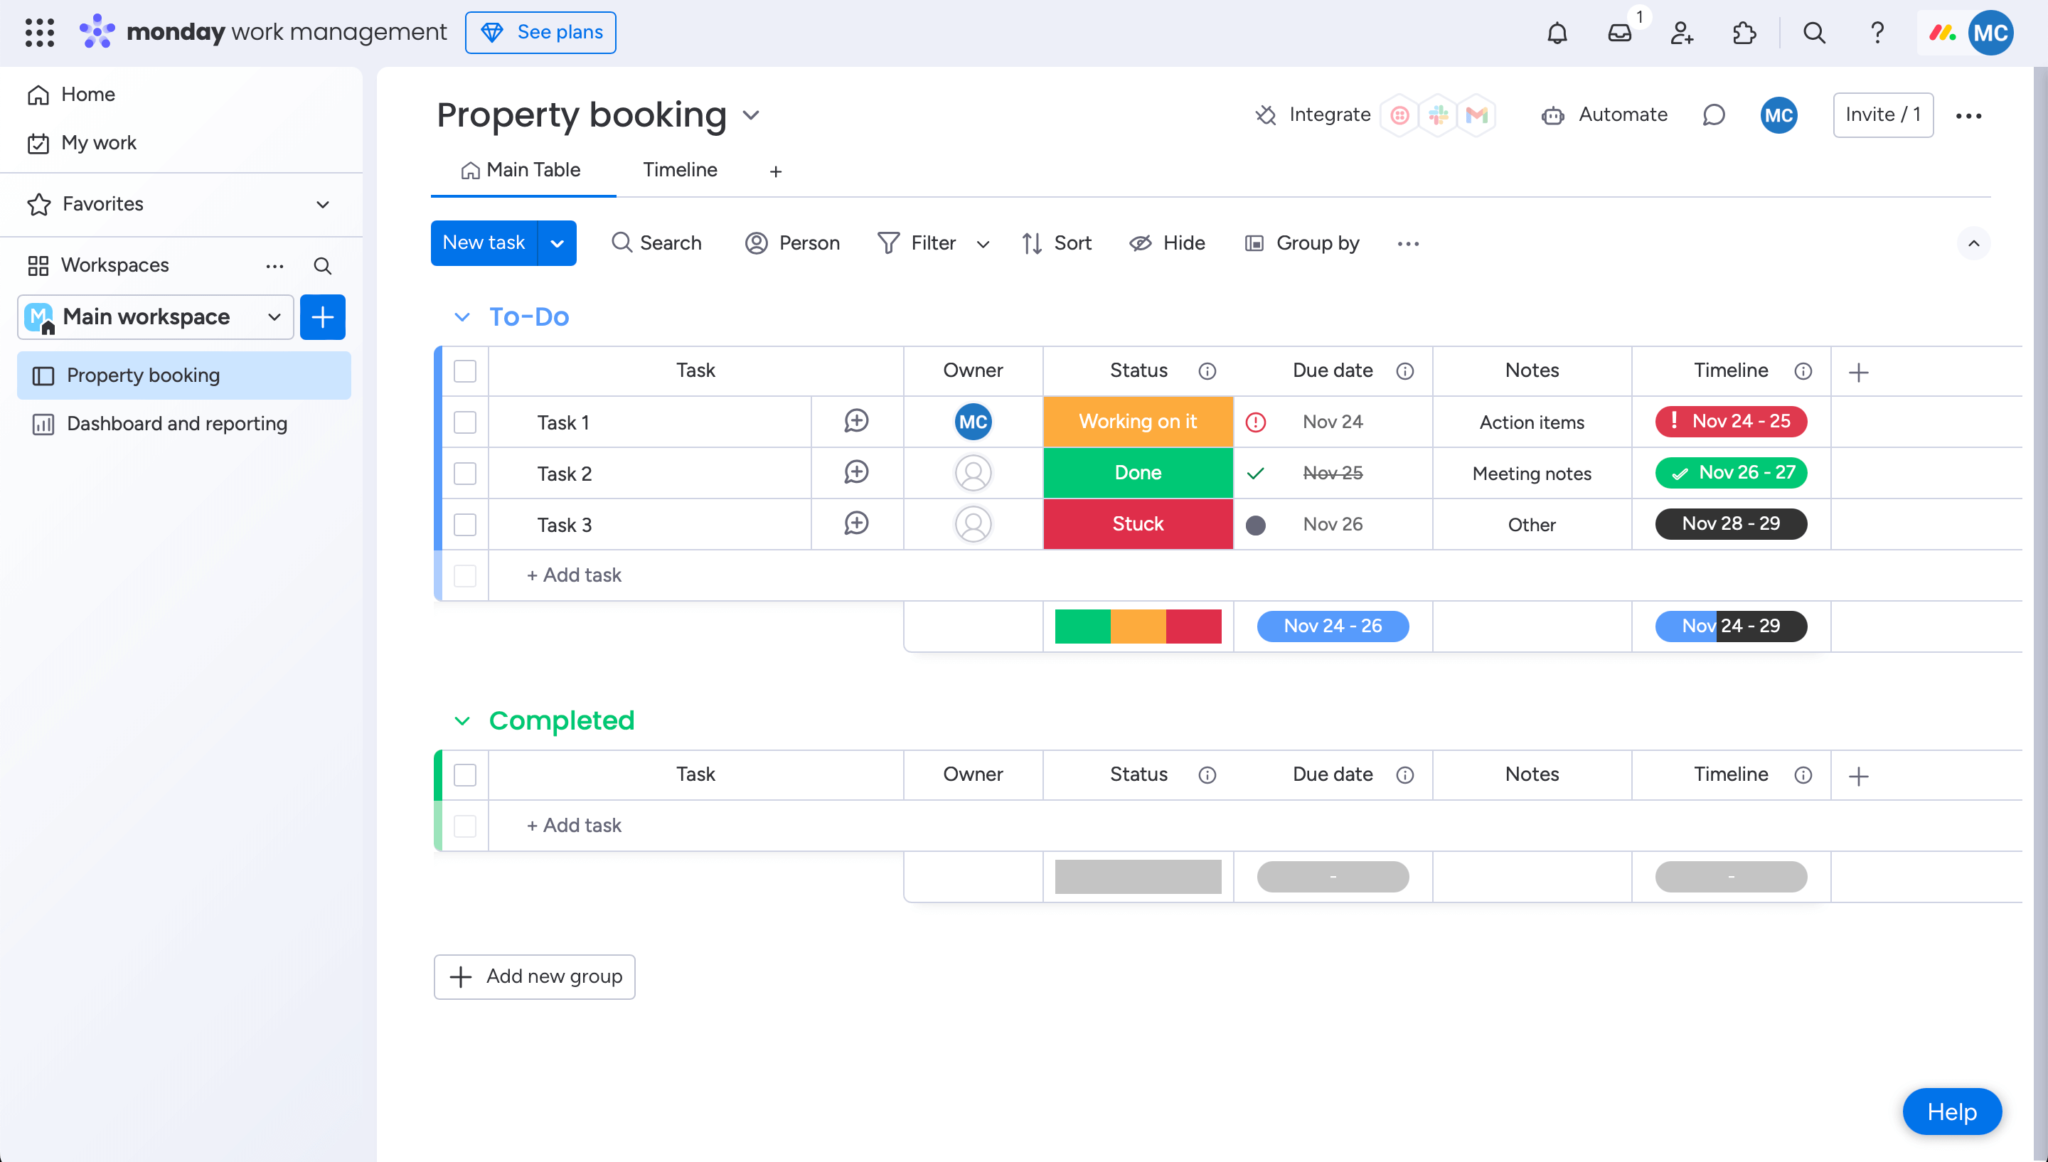
You’ll see your Property booking board and three example tasks displayed on the monday.com work management dashboard:
Let’s change the columns to make this board suitable for making property bookings.
Creating columns for property bookings
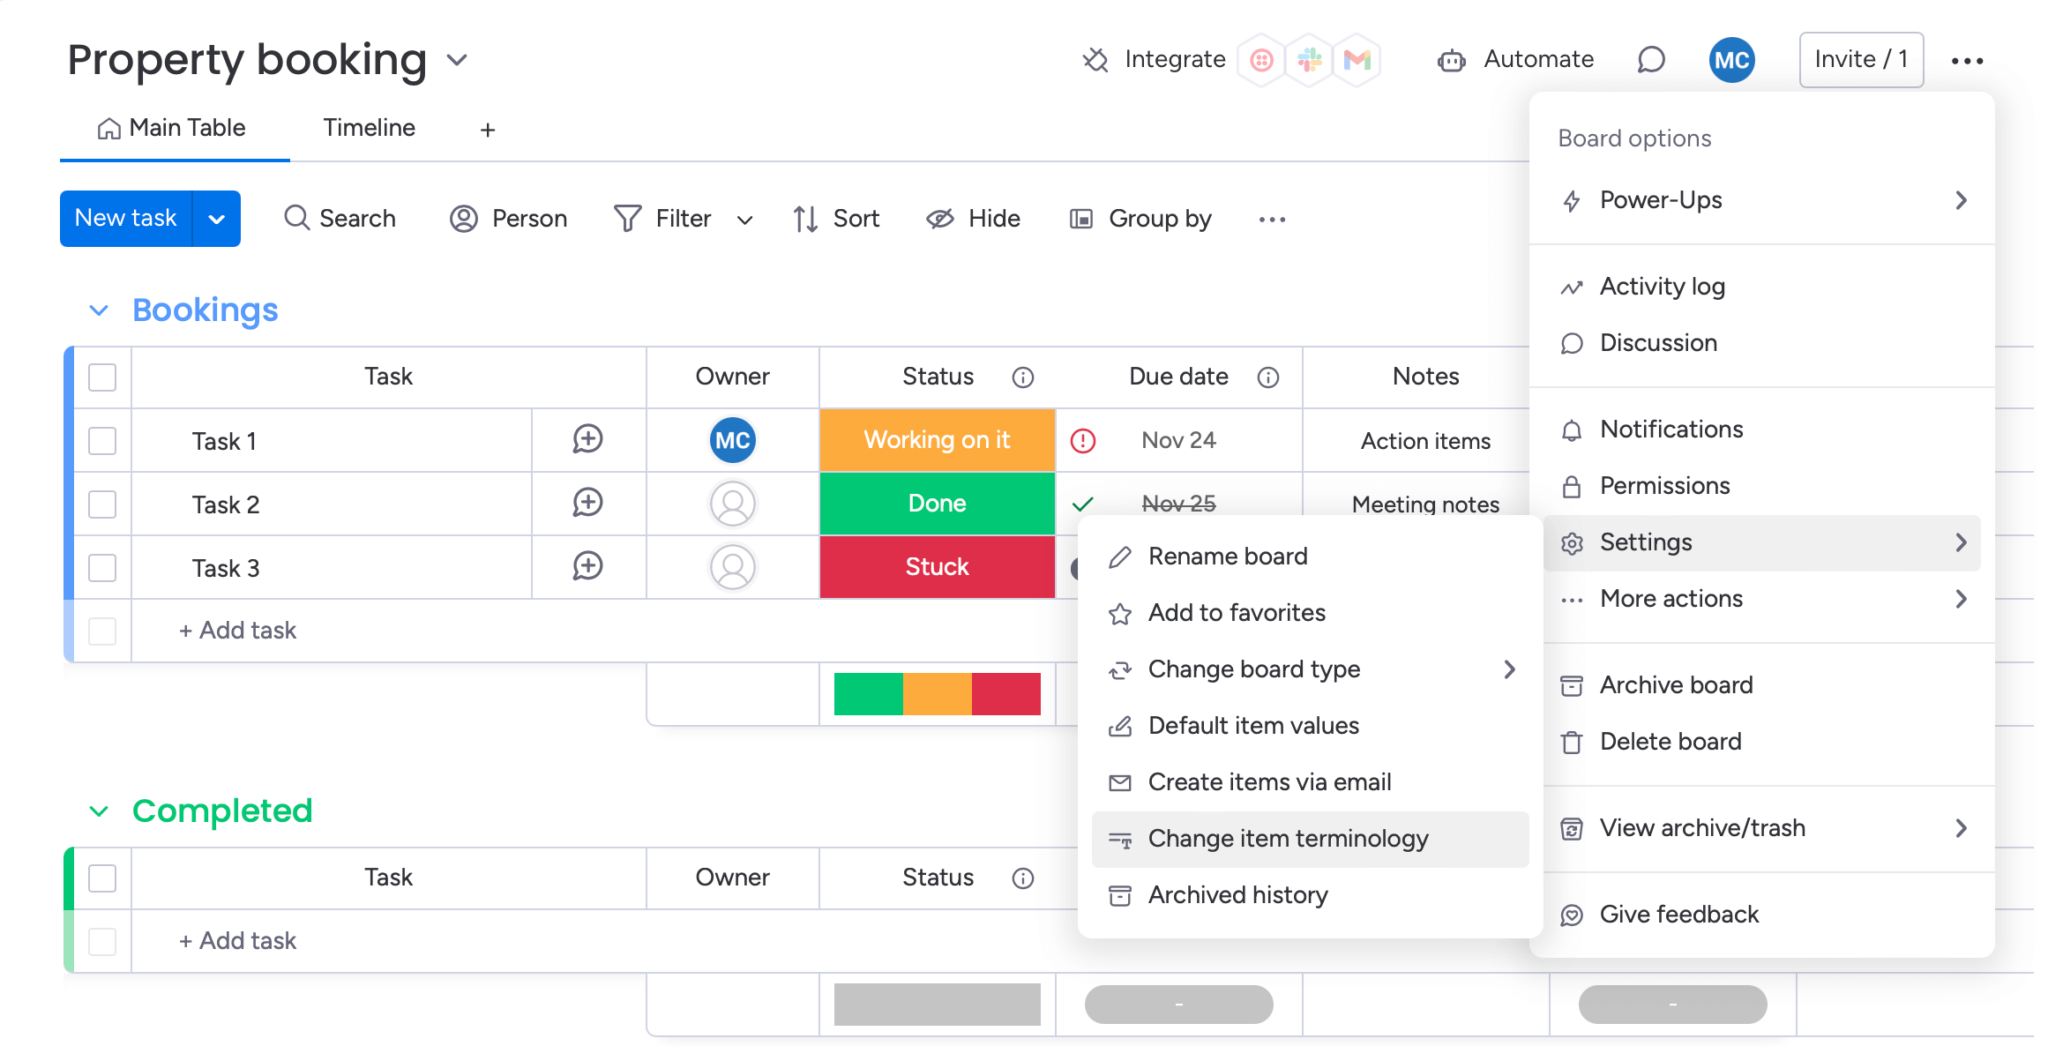
First, change the name of the Task item column to Guest name. To do this, open the board’s Options menu by clicking the ellipsis icon in the top-right corner of the board. Open the Settings menu, select Change item terminology, and add your custom column name, Guest name.
Change the name of the Owner column to Booking agent by clicking on the header to edit it. Note that you can reorder columns by clicking and dragging their headers.
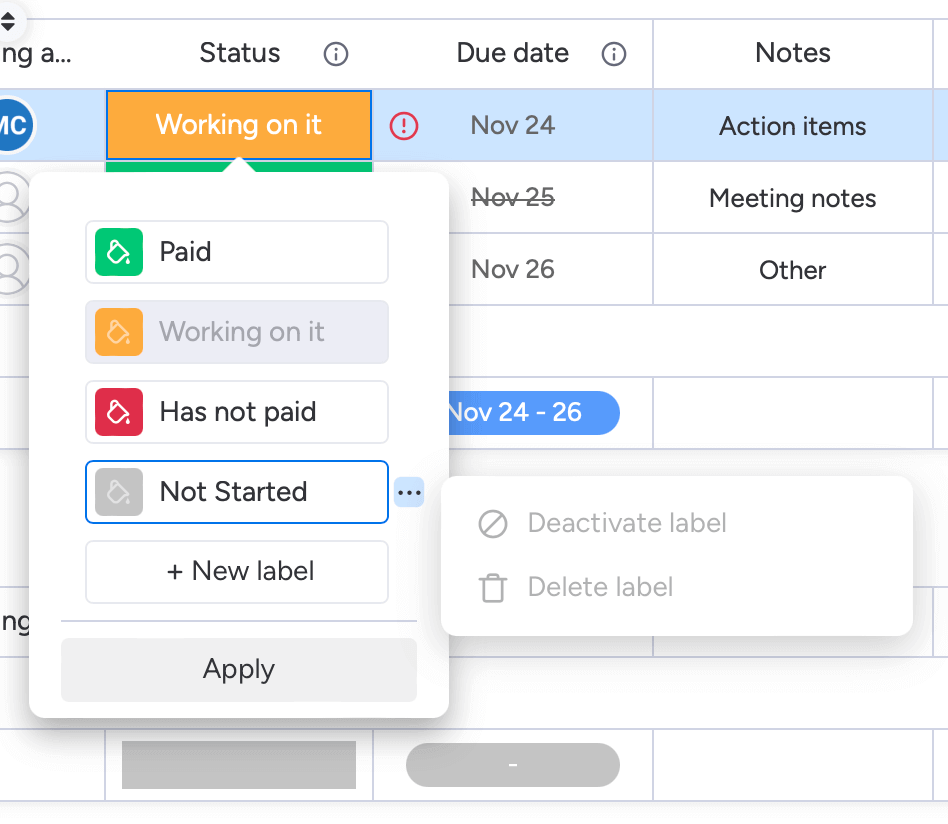
Change the Status column labels by clicking on a column cell and selecting Edit labels in the popup menu. Set the green label to Paid and the red label to Has not paid and click Apply to save the changes:
Delete the Due date column type by hovering over the header name, clicking the ellipsis icon, and selecting the Delete menu item.
Rename the Timeline column Dates.
To the right of the existing columns, click the + icon (which reveals an Add column label when you hover your cursor over it) to create a new column. Name it Property and set its type to Dropdown.
Click on the + icon in a Property column cell to add property labels:

Create the following labels:
- Cabin 1
- Cabin 2
- Cabin 3
- The lodge
Create two more columns, named Number of guests and Prices, and assign them both the Numbers type.
You can add a currency symbol to the values in the Prices column by hovering over the header name, clicking the ellipsis, opening the Settings menu, and selecting Customize Numbers column.
Next, change the three example tasks to example bookings:
| Guest name | Property | Number of guests | Status |
|---|---|---|---|
| Mr. Woods | Cabin 1 | 2 | Has not paid |
| Ms. Davis | Cabin 1 | 3 | Paid |
| Mr. Smith | The lodge | 5 | Paid |
Add your own Dates, Price, Booking agent, and Notes values.
You can also add subitems to a monday.com board, although we don’t use any in this tutorial.
Configuring the Timeline View to resemble Bryntum Scheduler
Open the Timeline tab at the top left of the board to display the Timeline View of your bookings:
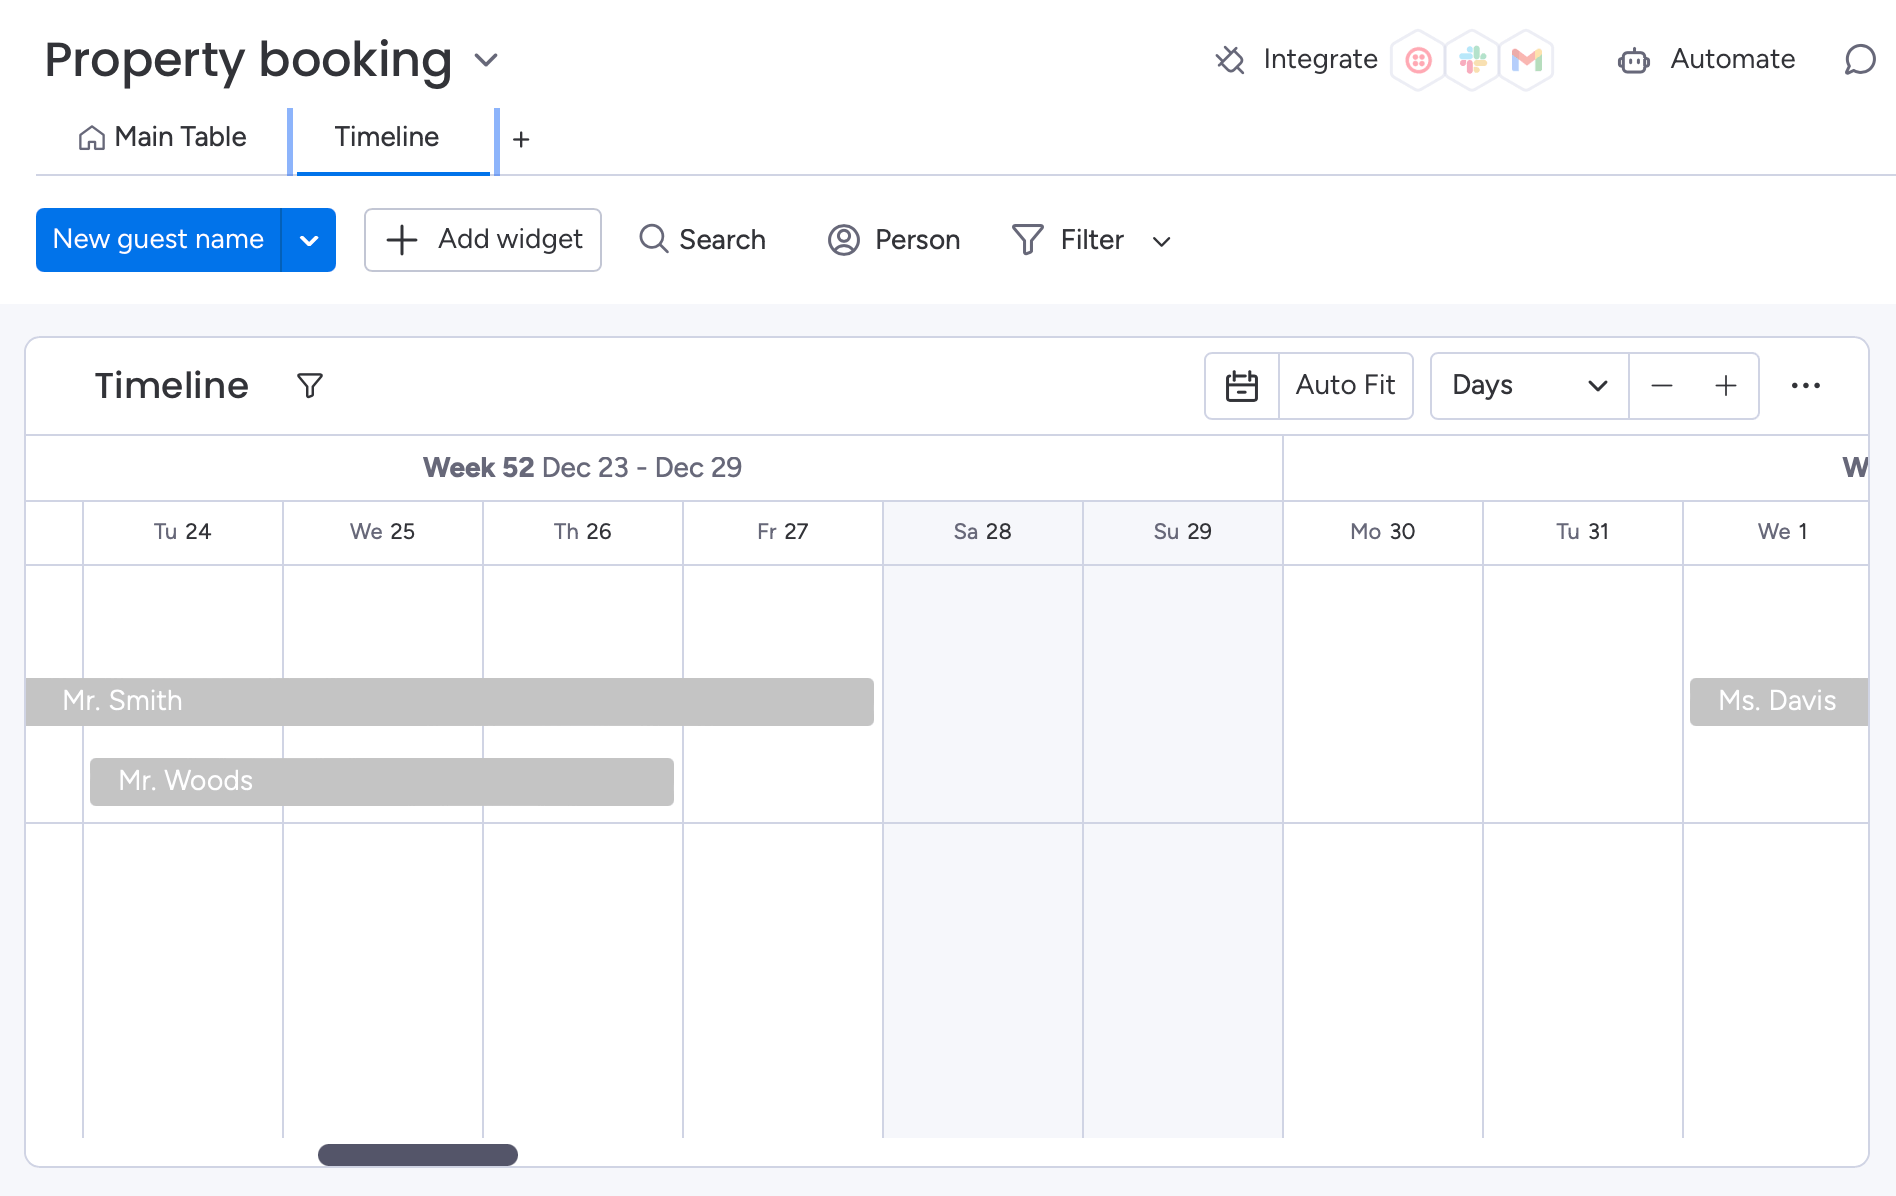
Click on the ellipsis icon at the top right of the timeline card to open the Options menu and select Settings. In the Timeline menu that opens, click the gear icon on the right to open the Widget settings menu. In the Group by section, select Property from the dropdown to sort the timeline according to property labels:
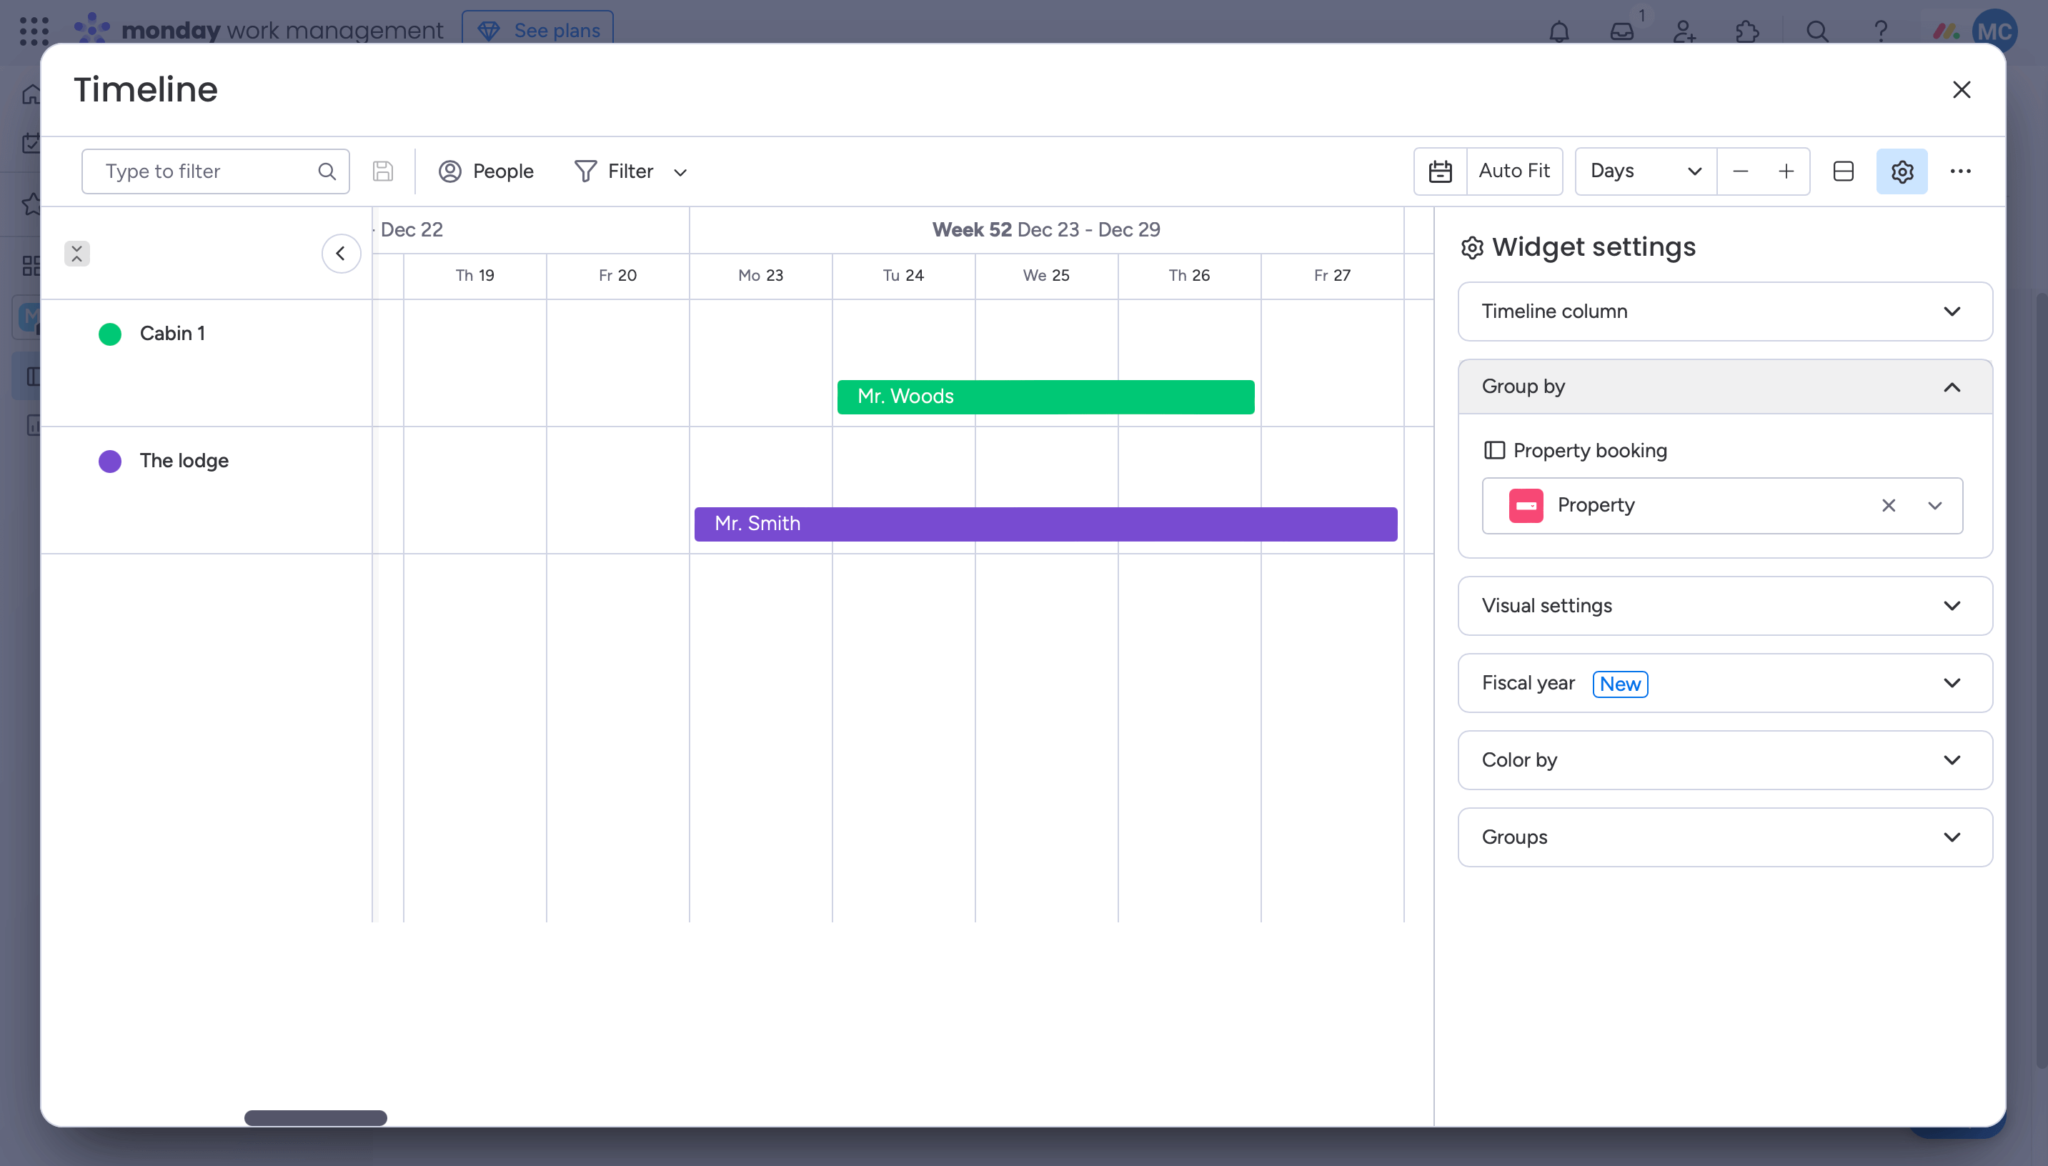
You can customize the color of each property label, resize and move the bookings on the timeline, and edit bookings via the timeline bookings bars.
Getting your monday.com access token
You need an access token to get the booking items from the Express app into your monday.com board using the monday.com SDK and GraphQL API.
Click on your profile picture in the top-right corner of the screen and select Developers in the popup menu:
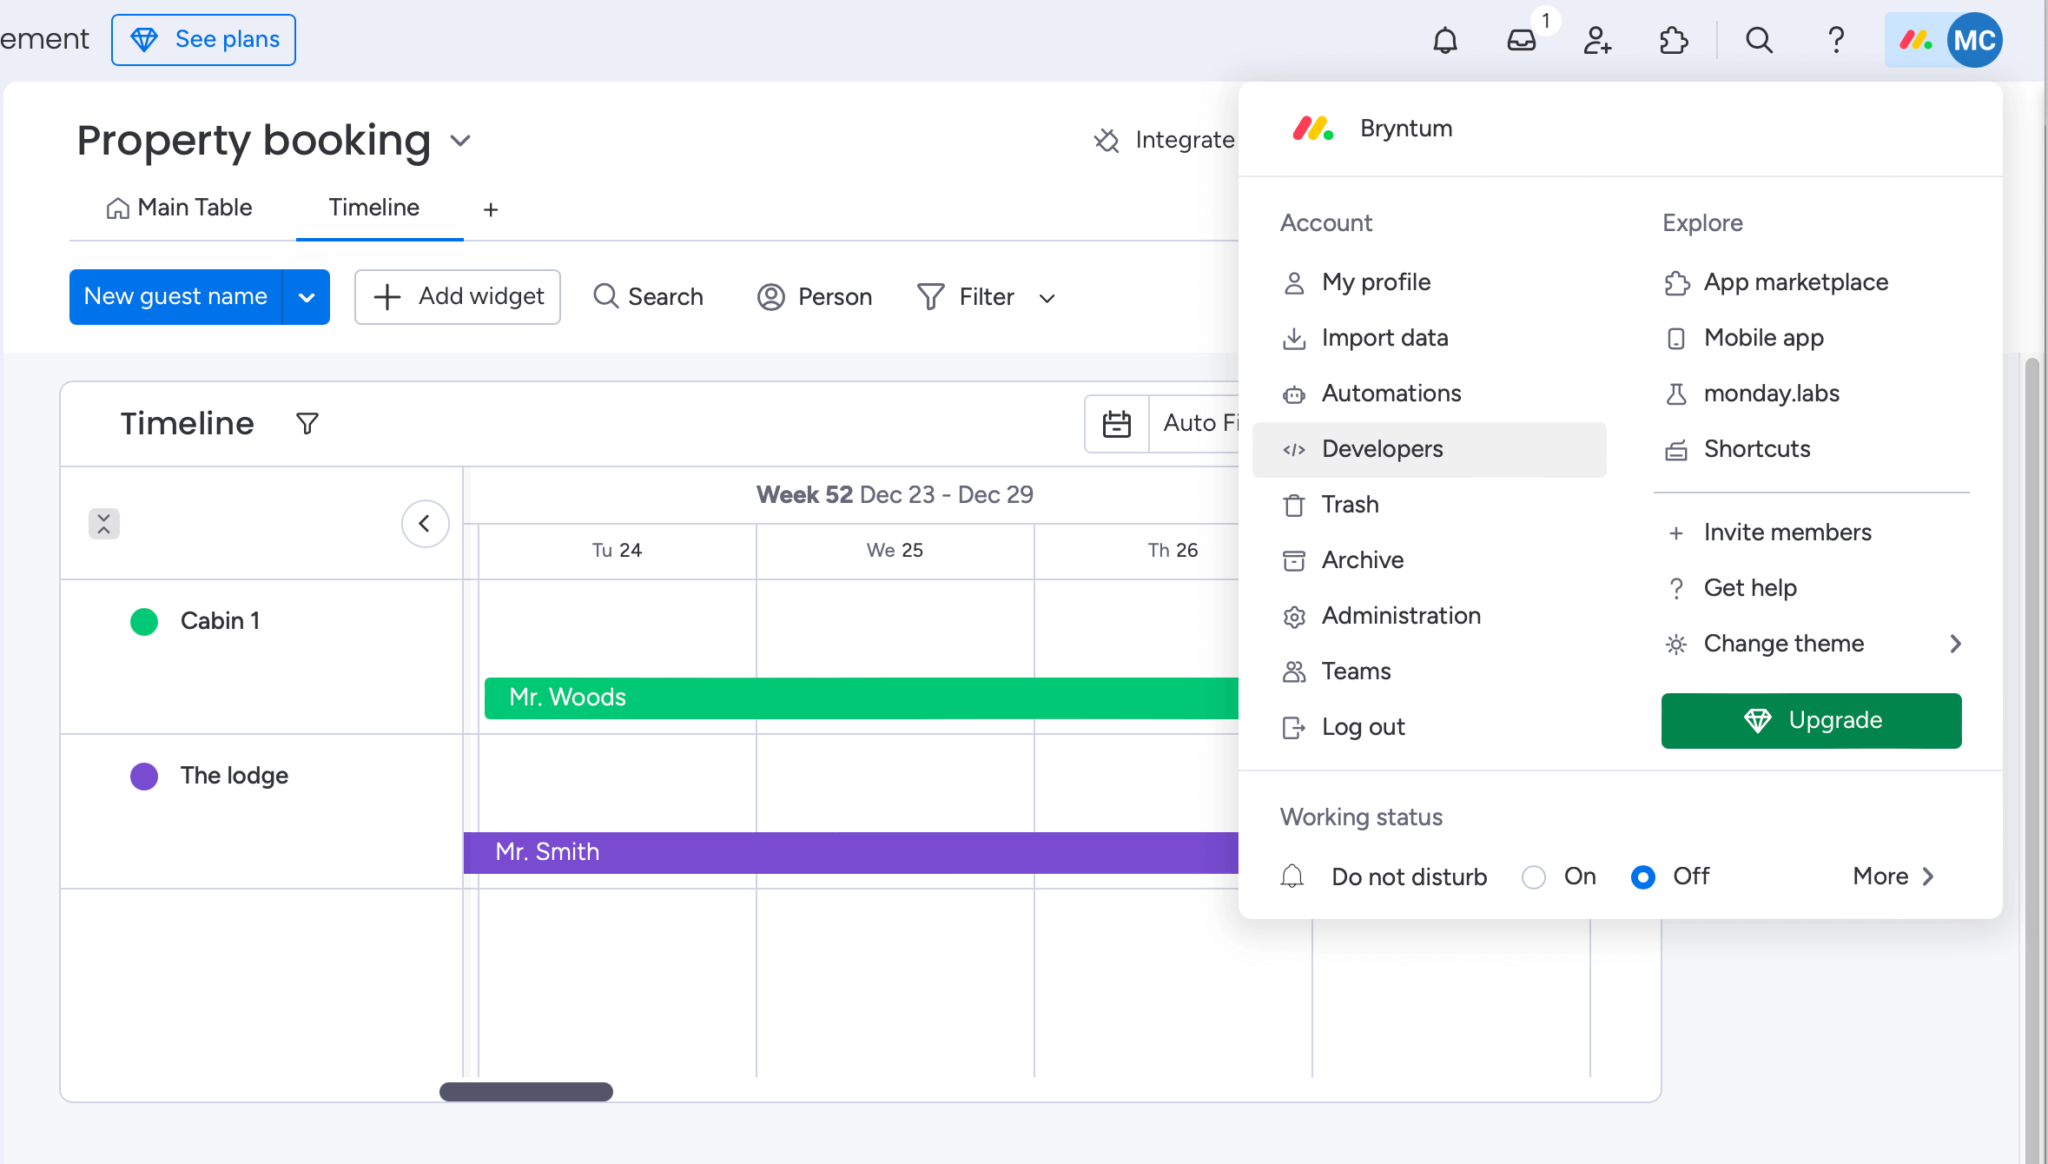
This opens the monday.com Developer Center. Open the My access tokens page from the left-hand navigation panel. Click Show to reveal and copy your access token.
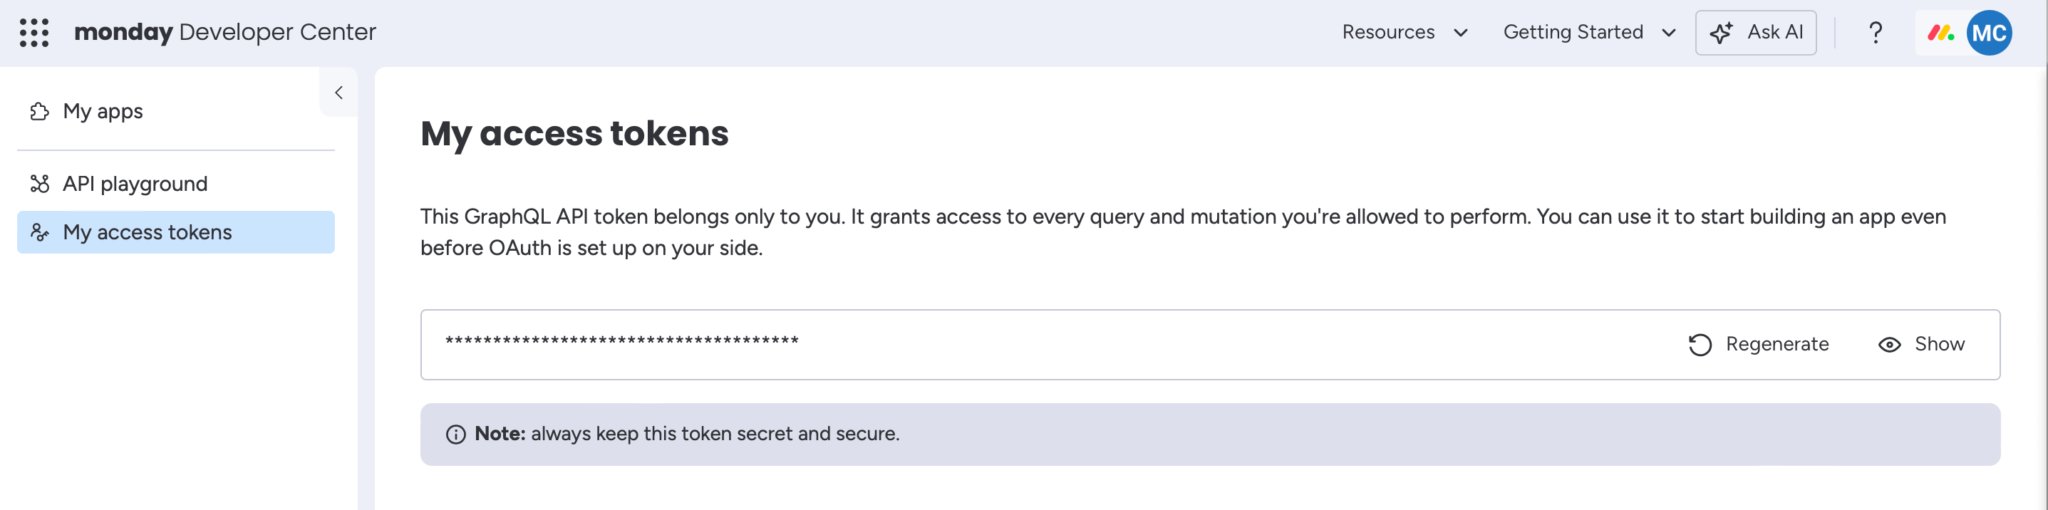
Save the token as MONDAY_ACCESS_TOKEN in the .env file for your Express project.
Using the monday.com GraphQL API playground
The monday.com API is built with GraphQL and has a GraphQL playground for testing and building your queries. To access it, open the API playground page from the Developer Center navigation panel.
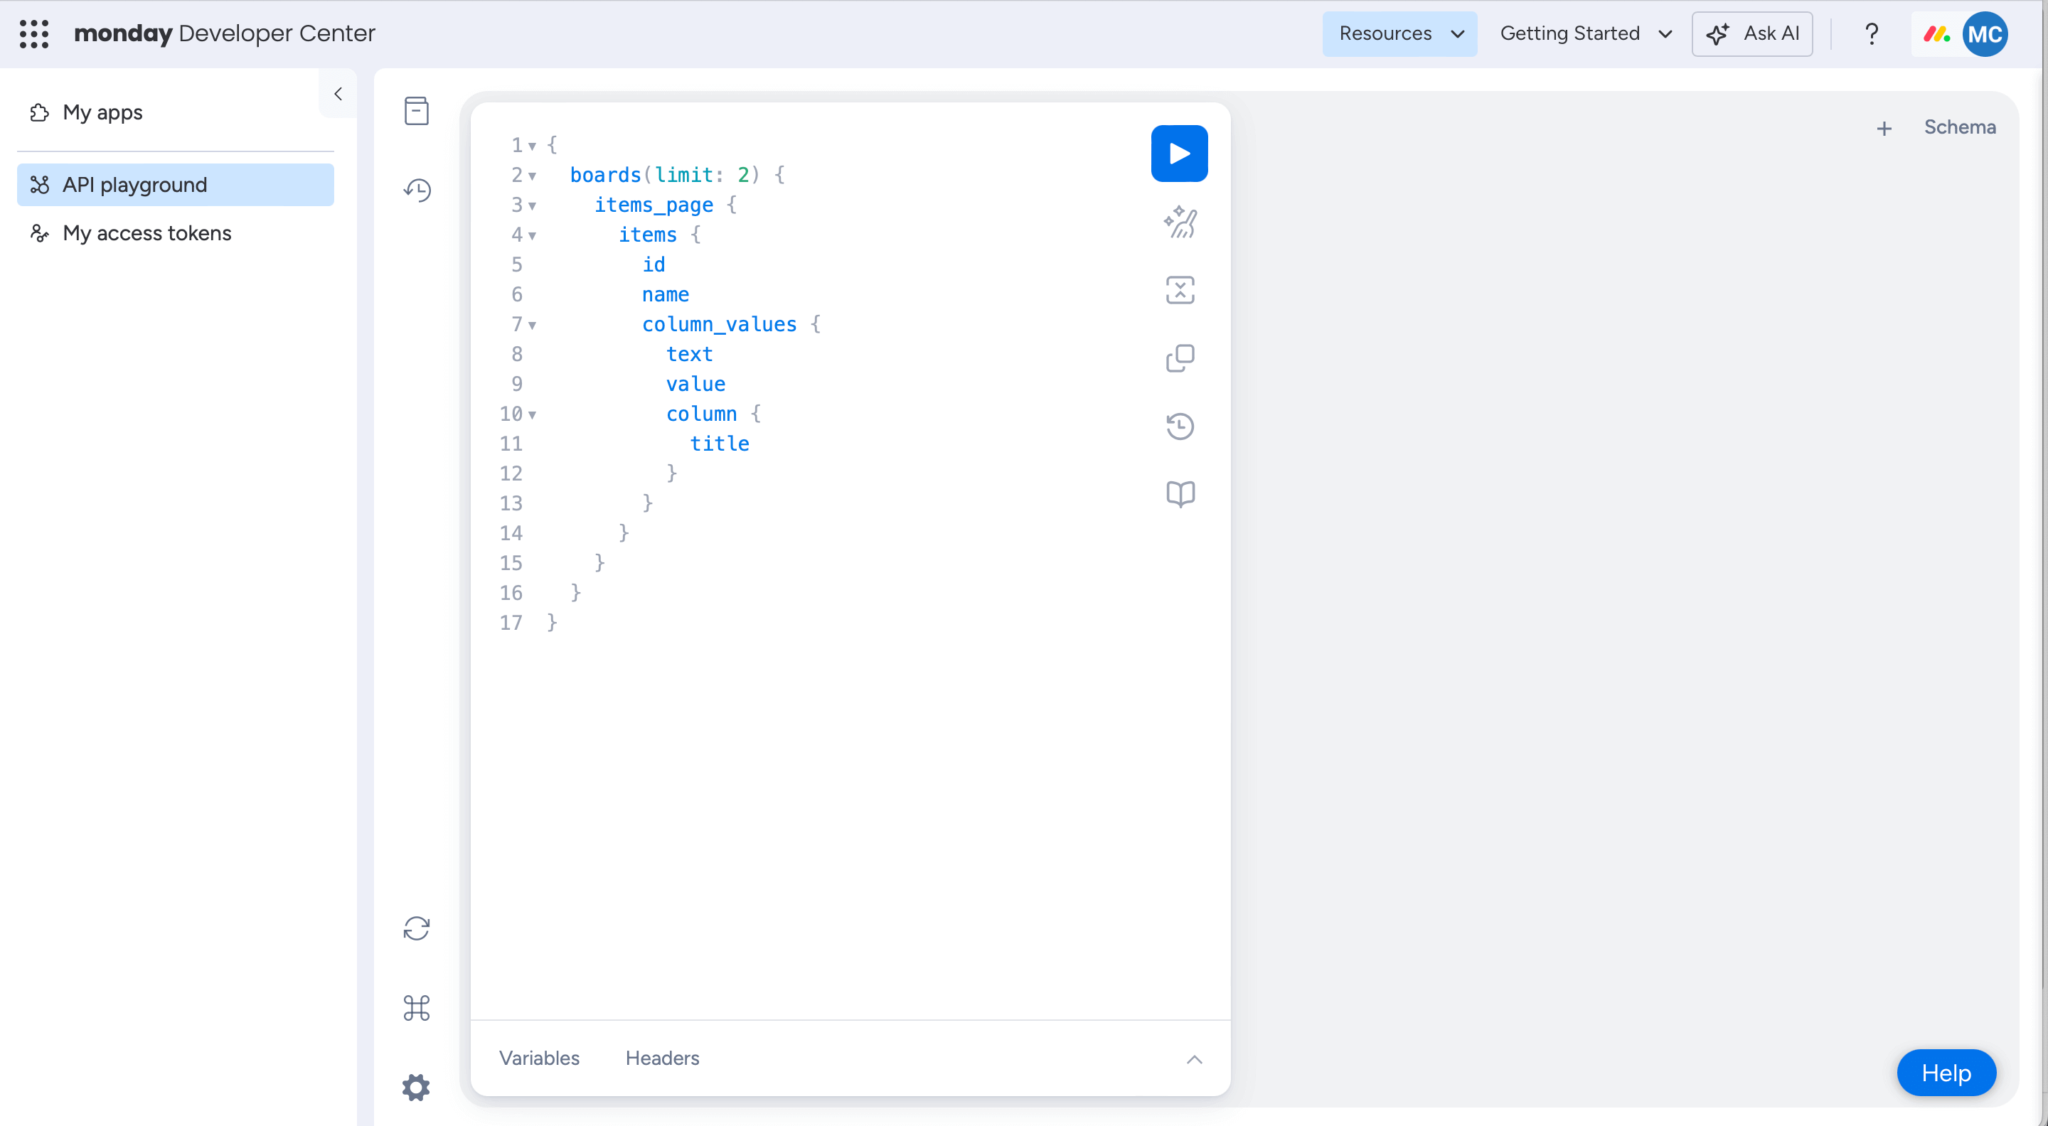
You can edit the GraphQL query and then execute it by clicking the “Execute query” button represented by the blue play icon.
Using the monday.com SDK and GraphQL API to get data from monday.com
Install the monday.com SDK in your Express app:
npm install monday-sdk-js --saveIn the server.js file, import the SDK module:
import mondaySdk from 'monday-sdk-js';Initialize the SDK client and set the monday.com platform API version and access token:
const monday = mondaySdk();
monday.setApiVersion('2024-10');
monday.setToken(process.env.MONDAY_ACCESS_TOKEN);
Now let’s create an Express API route to get the property bookings data from our monday.com board.
Creating an API endpoint to get data from monday.com
Create the following GET request handler for the '/api/load' endpoint in the server.js file:
app.get('/api/load', async(req, res) => {
    try {
        res.send({
            success   : true,
            statusValues,
            resources : {
                rows : resourcesData
            },
            events : {
                rows : eventsData
            },
            assignments : {
                rows : assignmentsData
            }
        }).status(200);
    }
    catch (error) {
        console.error({ error });
        res.send({
            success : false,
            message : 'There was an error loading the Monday boards data.'
        });
    }
});
We’ll return the data from the monday.com Property bookings board using the load response structure expected by Bryntum Scheduler Pro.
At the top of the try block, add the following monday.api query:
const mondayAPIresponse = await monday.api(`
    {
        boards(limit: 2) {
            id
            items_page {
            items {
                id
                name
                column_values {
                    text
                    value
                    column {
                        title
                        settings_str
                        }
                    }
                }
            }
        }
    }`);
This instructs the monday.com SDK to query the monday.com GraphQL API for your board items, using the items_page object to get the booking items from the monday.com board.
Add the following variables below the mondayAPIresponse variable:
let resourcesData = [];
const bookingBoardItems = mondayAPIresponse.data.boards[0].items_page.items,
    eventsData = [],
    assignmentsData = [],
    statusValues = [];
The bookingBoardItems are our bookings. We’ll loop through these bookings and populate the data arrays that will be loaded by the Bryntum Scheduler Pro.
Add the following forEach loop below the variables:
bookingBoardItems.forEach((item, i) => {
    const event = {};
    event.id = item.id;
    event.name = item.name;
    item.column_values.forEach((columnValue) => {
        if (columnValue.column.title === 'Property') {
            if (i === 0) {
                const settings_str = JSON.parse(columnValue.column.settings_str);
                resourcesData = [...settings_str.labels];
            }
            if (columnValue.value) {
                const resourceIds = JSON.parse(columnValue.value).ids;
                resourceIds.forEach((resourceId) => {
                    assignmentsData.push({ event : event.id, resource : resourceId });
                });
            }
        }
        if (columnValue.column.title === 'Dates' && columnValue.value) {
            const columnValueParsed = JSON.parse(columnValue.value);
            event.startDate = columnValueParsed.from;
            event.endDate = columnValueParsed.to;
        }
        if (columnValue.column.title === 'Price') {
            event.price = parseFloat(columnValue.text);
        }
        if (columnValue.column.title === 'Number of guests') {
            event.guests = parseInt(columnValue.text);
        }
        if (columnValue.column.title === 'Status' && columnValue.value) {
            if (i === 0) {
                const settings_str = JSON.parse(columnValue.column.settings_str);
                for (const [key, value] of Object.entries(settings_str.labels)) {
                    statusValues.push({
                        value : parseInt(key),
                        text  : value,
                        color : settings_str.labels_colors[key].color
                    });
                }
            }
            event.status = JSON.parse(columnValue.value).index;
        }
        if (columnValue.column.title === 'Booking agent') {
            event.agent = columnValue.text;
        }
        if (columnValue.column.title === 'Notes') {
            event.note = columnValue.text;
        }
    });
    eventsData.push(event);
});
if (mondayAPIresponse.errors)  {
    const errors = mondayAPIresponse.errors.map(error => error.message).join(', ');
    throw new Error(errors);
}
This loops through the board items and populates the data arrays with the correct fields for the Bryntum Scheduler Pro component:
- The function parses the Property, Dates, Price, Number of guests, Status, Booking agent, and Notes columns to get the events data.
- For each Property, it gets the
nameandidof the people (resources) making the booking and pushes that data to theresourcesDataarray. The eventidand resourceidare used to populate theassignmentsDataarray. - The
statusValuesarray includes the colors of different payment statuses, which we’ll use to style the component’s status input.
Run the development server if it’s not already running:
npm startOpen https://localhost:1338/api/load in your browser. You should see a JSON object of the status values, resources, events, and assignments data from your monday.com board:
{
  "success": true,
  "statusValues": [
    {
      "value": 0,
      "text": "Working on it",
      "color": "#fdab3d"
    },
    {
      "value": 1,
      "text": "Paid",
      "color": "#00c875"
    },
    // ...
Now let’s load this data into our Bryntum Scheduler Pro.
Loading monday.com items into the Bryntum Scheduler Pro component
In the public/main.js file, replace the project config in the schedulerPro with the following lines of code:
project : {
    eventModelClass  : CustomEventModel,
    loadUrl          : '/api/load',
    autoLoad         : true,
    // This config enables response validation and the dumping of found errors to the browser console.
    // It's only meant to be used as a development-stage helper, so please set it to false for production systems.
    validateResponse : true
}
The Bryntum Scheduler Pro project has a Crud Manager that simplifies loading data from and syncing data changes to the server. The Crud Manager uses the Fetch API as its transport system and JSON as its encoding format. We’ll set the loadUrl to our Express API route.
We’ll also use a custom event model to extend the Scheduler EventModel and add extra fields to our booking events.
In the public folder, create a lib folder and a CustomEventModel.js file within it. Add the following lines of code to the public/lib/CustomEventModel.js file:
import { EventModel } from '../schedulerpro.module.js';
// A custom task class with a few extra fields
export default class CustomEventModel extends EventModel {
    static get fields() {
        return [
            { name : 'name', type : 'string', defaultValue : 'New booking' },
            { name : 'price', type : 'number' },
            { name : 'guests', type : 'number' },
            { name : 'status', type : 'number' },
            { name : 'agent' }
        ];
    }
}
This model adds the following monday.com-specific fields to our Bryntum Scheduler Pro model:
- Price
- Guests
- Status
- Agent
Import the custom event model in the public/main.js file:
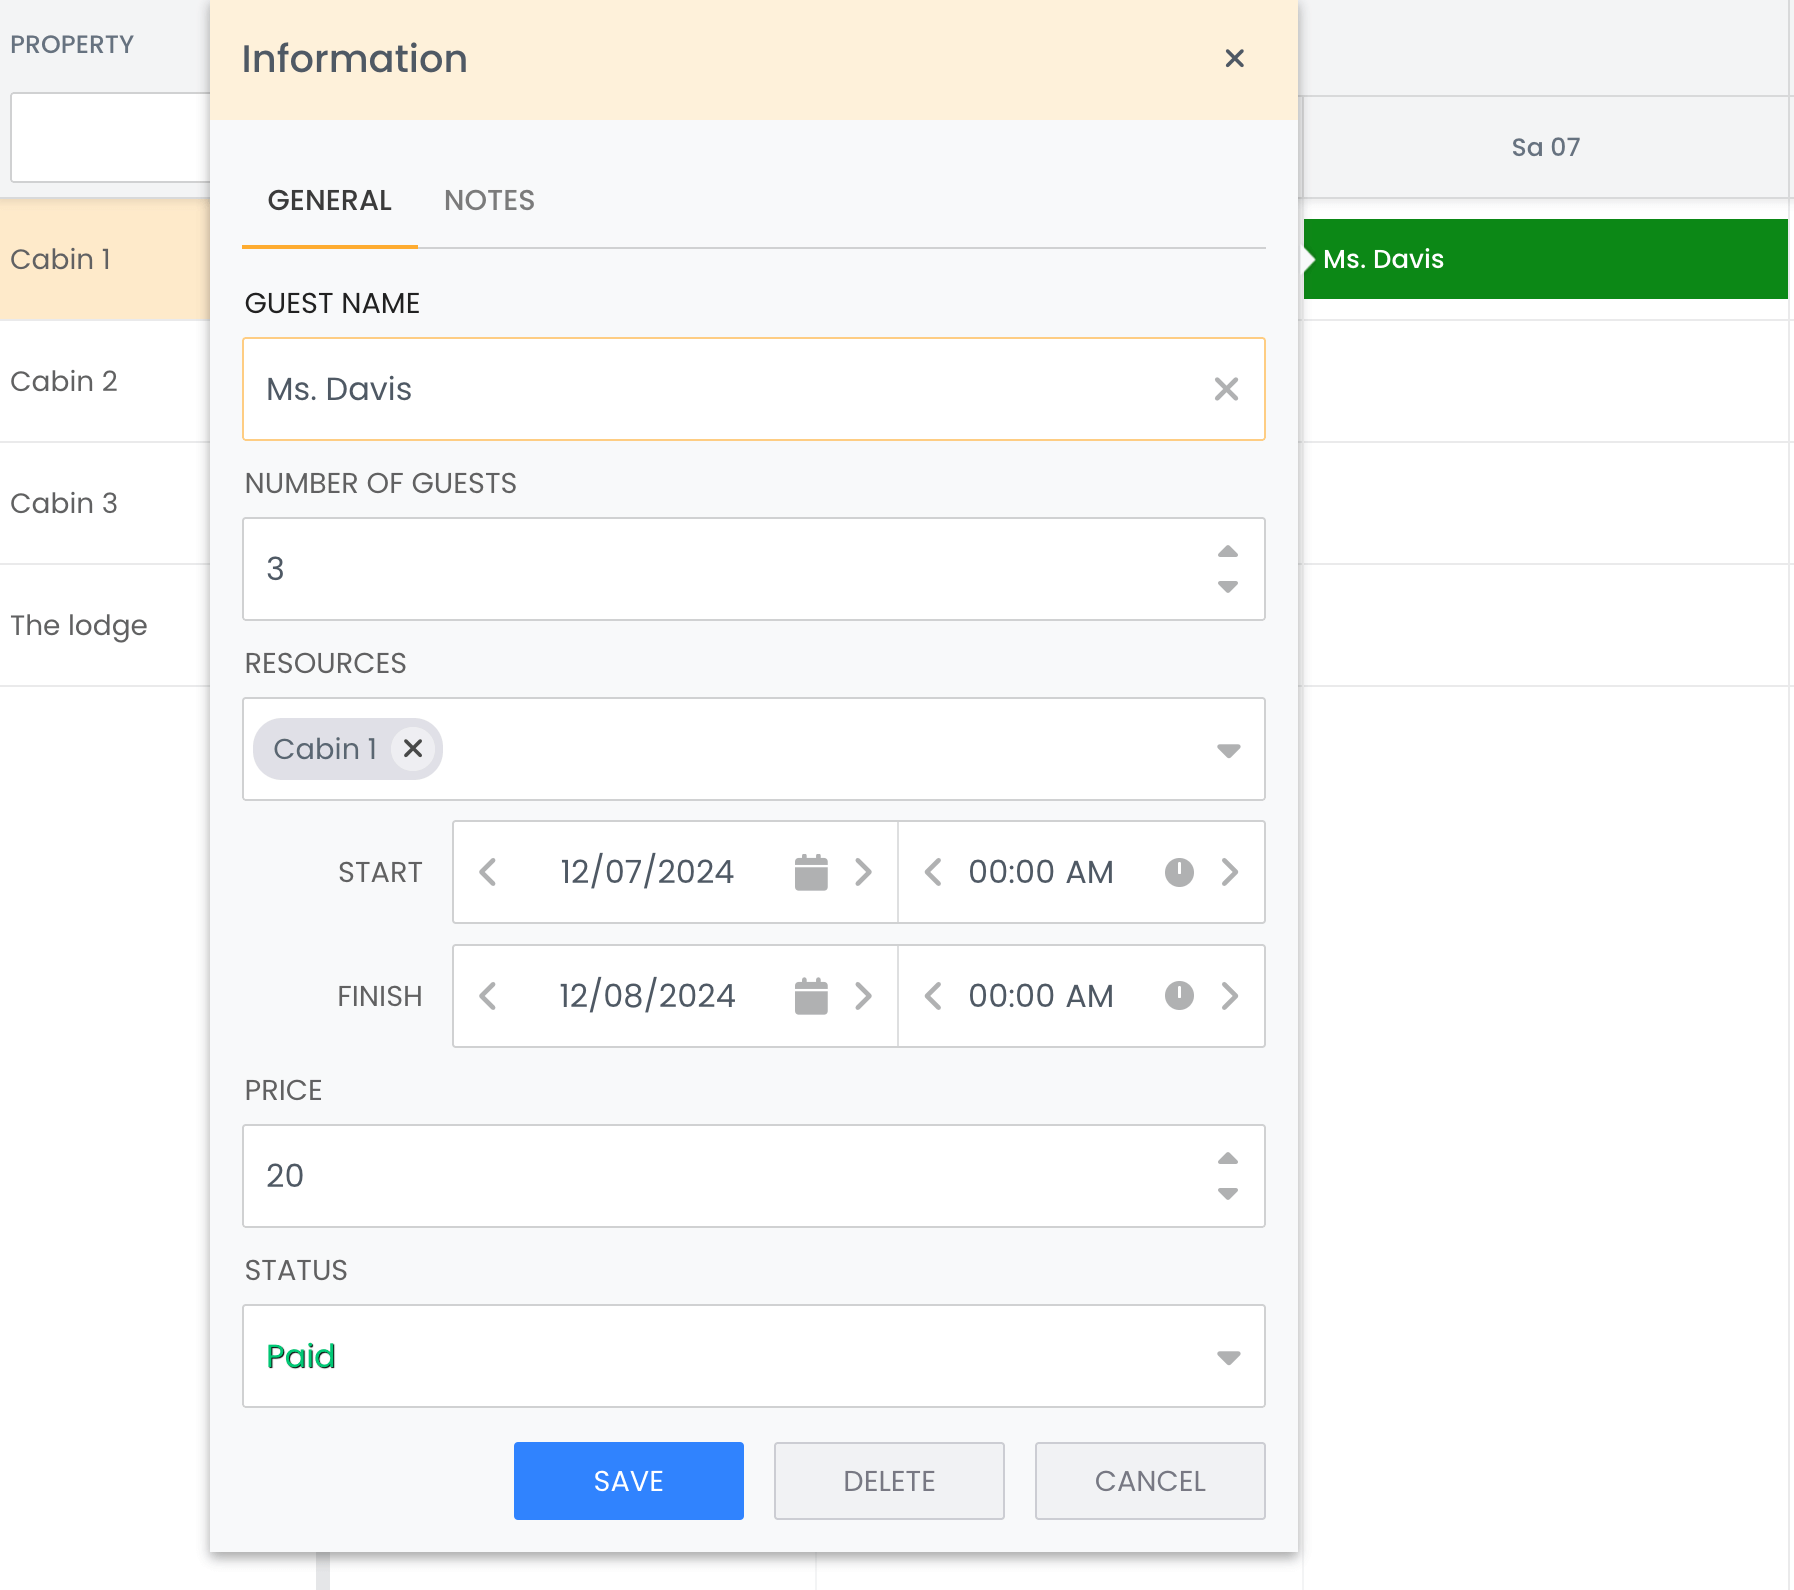
import CustomEventModel from './lib/CustomEventModel.js';Open https://localhost:1338 in your browser to see the monday.com property bookings data in your Scheduler Pro component. Double-click on a booking to open the task editor:
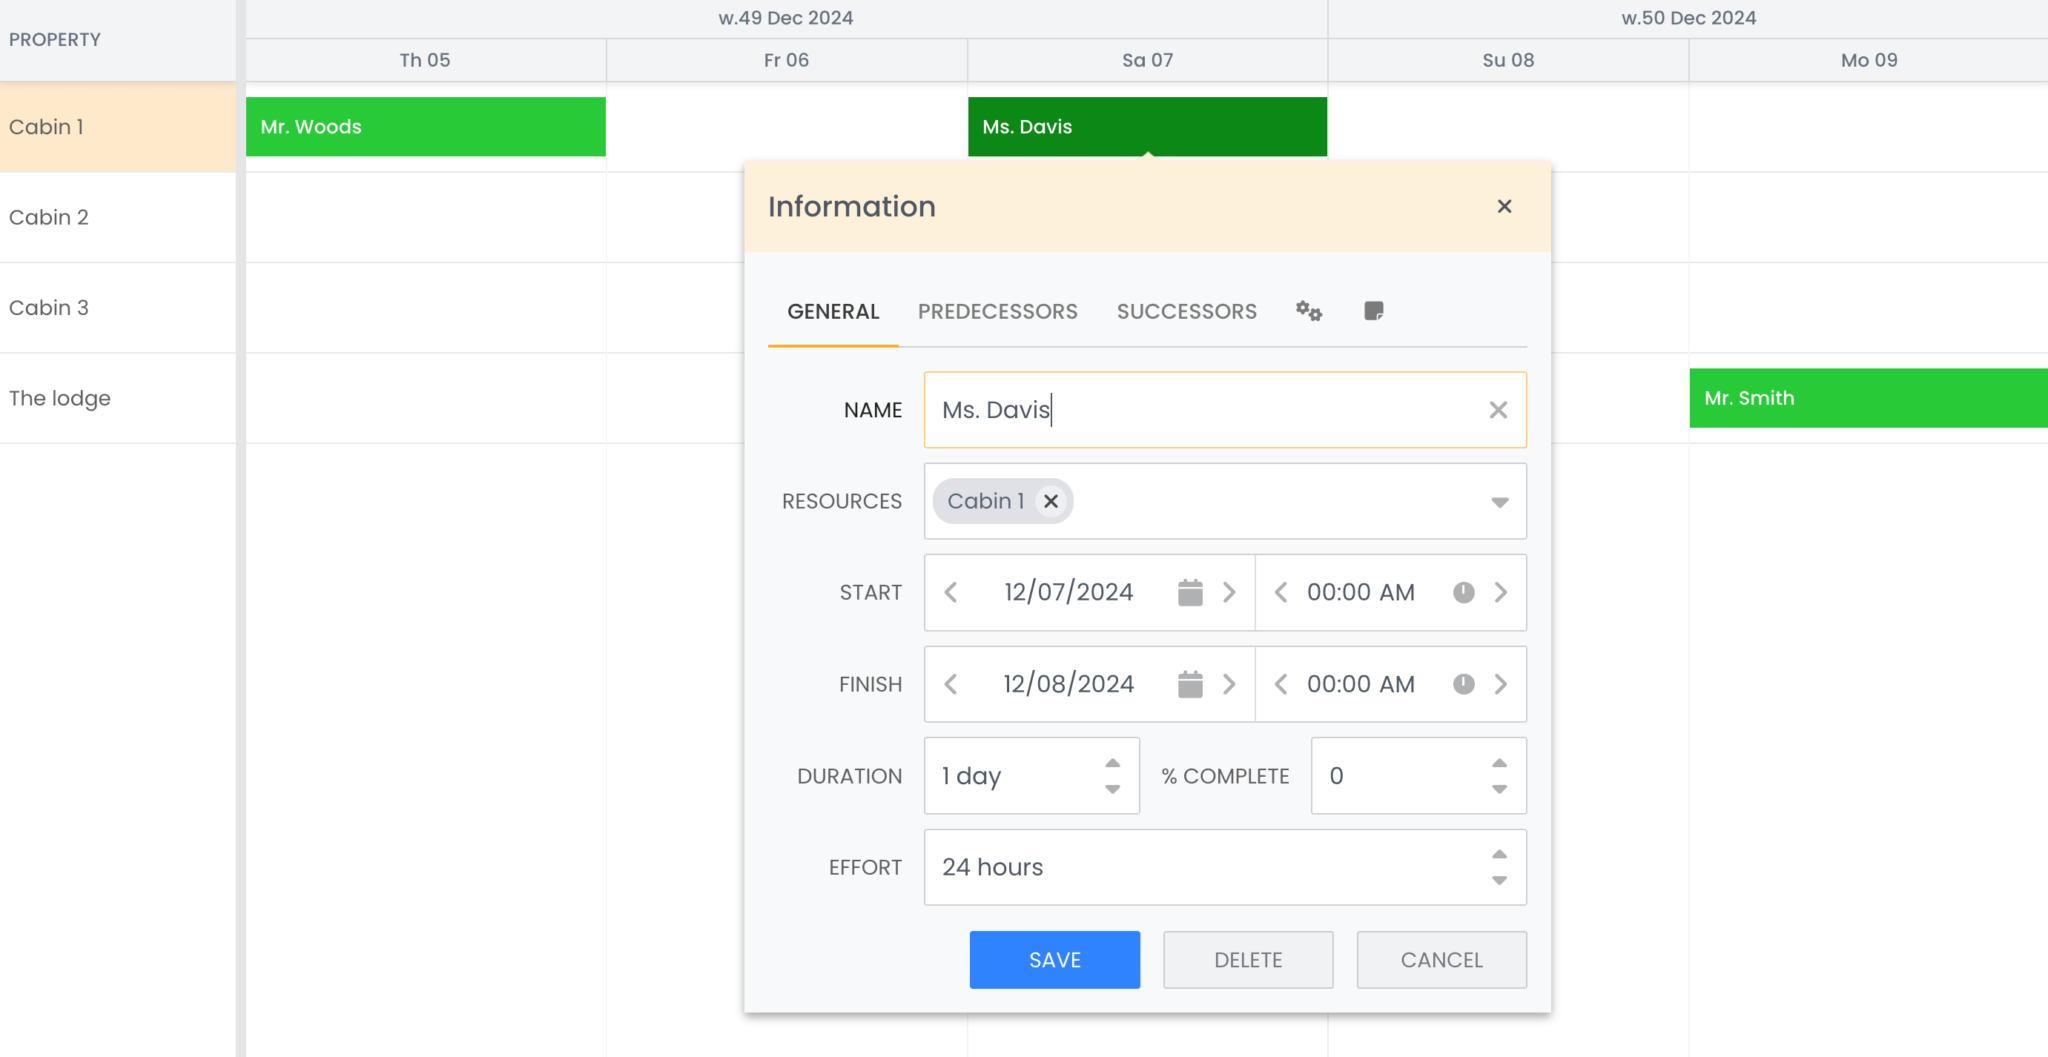
The task editor has tabs and inputs that we don’t need in this tutorial. Let’s remove these and add some styling to the task editor.
Customizing the task editor
Add the following features configuration property to the schedulerPro in the public/main.js file:
  features : {
      dependencies : false,
      cellMenu     : false,
      taskEdit     : {
          items : {
              generalTab : {
                  items  : {
                      nameField : {
                          required      : true,
                          label         : 'Guest name',
                          labelPosition : 'above'
                      },
                      guestField : {
                          type          : 'number',
                          name          : 'guests',
                          label         : 'Number of guests',
                          labelPosition : 'above',
                          min           : 1,
                          // Place after end date
                          weight        : 150,
                          required      : true
                      },
                      resourcesField : {
                          required      : true,
                          labelPosition : 'above'
                      },
                      durationField    : false,
                      percentDoneField : false,
                      effortField      : false,
                      priceField       : {
                          type          : 'number',
                          name          : 'price',
                          label         : 'Price',
                          labelPosition : 'above',
                          min           : 0,
                          weight        : 450,
                          required      : true
                      },
                      statusField : {
                          type          : 'combo',
                          name          : 'status',
                          label         : 'Status',
                          labelPosition : 'above',
                          weight        : 450,
                          required      : true
                      }
                  }
              },
              notesTab : {
                    tab : {
                        text : 'Notes',
                        icon : ''
                    }
              },
              predecessorsTab : false,
              successorsTab   : false,
              advancedTab     : false
          }
      },
      filterBar : true
  },
This sets dependencies to false so that the bookings can’t have dependencies and sets the cellMenu feature to false so that the context menu for Property column cells (which includes a Delete option) is not displayed when a user right-clicks on a cell.
It modifies the task editor feature so that it only displays the General and Notes tabs. In the General tab, durationField, percentDoneField, and effortField are set to false to prevent the corresponding inputs from being displayed.
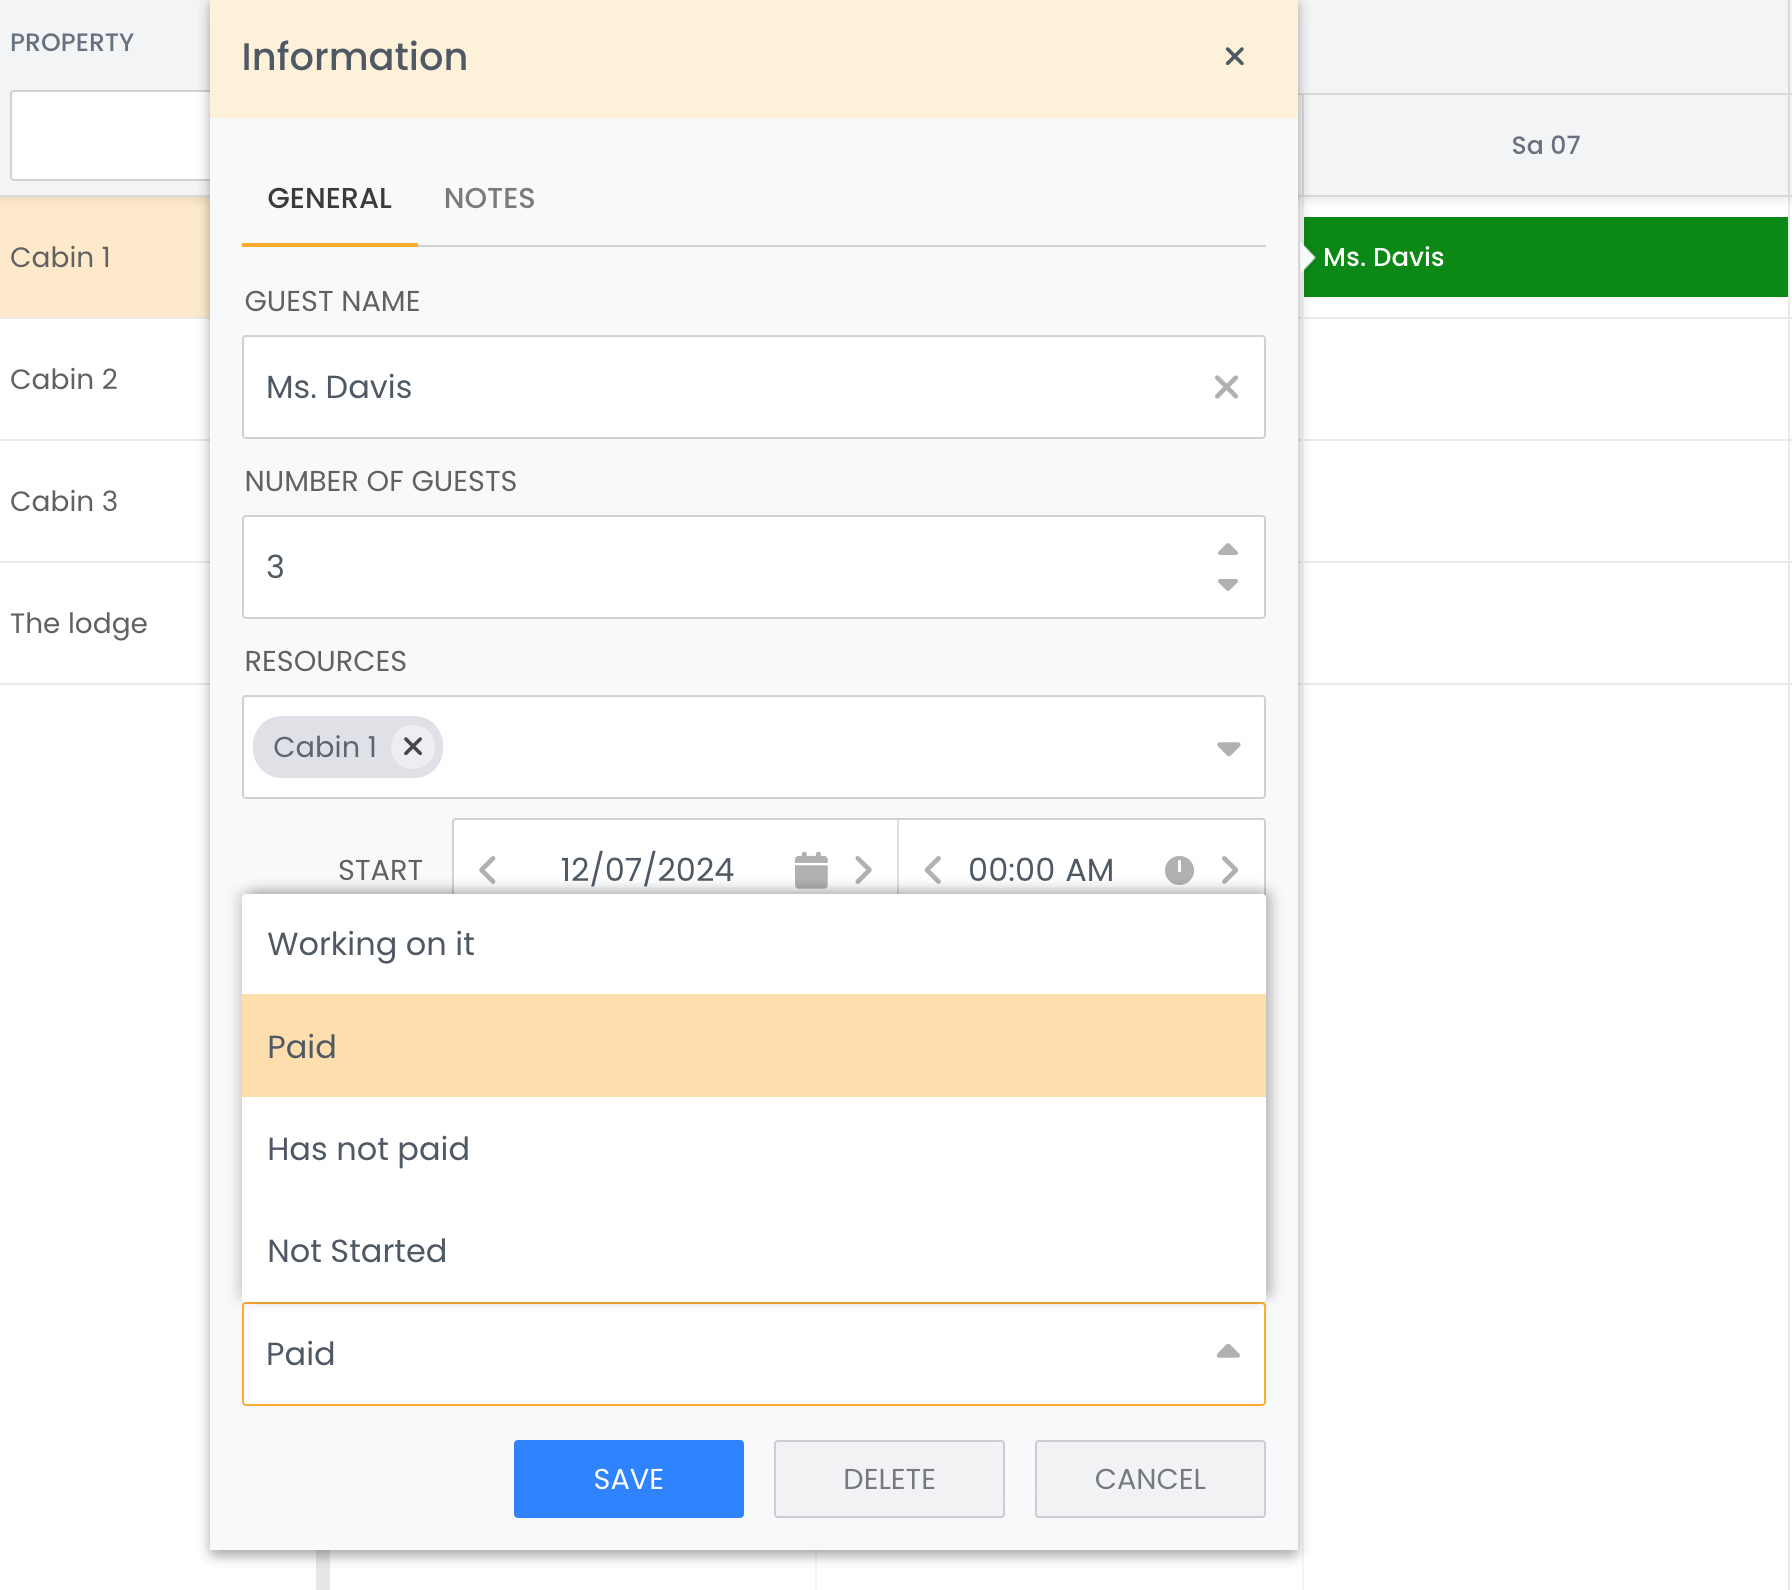
The statusField is a combo widget with a dropdown input. As you can see in the UI, the Status widget does not currently have any list items:

Let’s add the list items.
Adding the statusField dropdown items
Add the following onLoad event handler to the project configuration:
onLoad          : ({ response }) => {
    schedulerPro.features.taskEdit.items.generalTab.
        items.statusField.items = response.statusValues;
},
The onLoad event is called when a data load request has been completed, and the data has been loaded into the project stores. It sets the statusField‘s items to the statusValues array returned from the Express API load endpoint.
You’ll now see the statusField value and dropdown menu items have been populated in the UI component:
Styling the statusField dropdown items
Let’s add color to the Status options, like in the monday.com board.
Add the following property to the statusField item in the taskEdit feature:
listItemTpl   : item => `
    <div style="flex: 1; padding: 0.8em; background-color: ${item.color}; color: white; text-shadow: 1px 1px 1px rgba(0, 0, 0, 0.5);">
        ${item.text}
    </div>
`
The listItemTbl function is a template string that’s used to render the list items in a dropdown. It adds CSS styles, including a background color based on the color set for each item in the project’s onLoad function.
Add the following styles to the public/styles.css file:
.b-list-item {
  padding: 0;
}
input[name="status"] {
  text-shadow: 0.5px 0.5px 0.5px rgba(0, 0, 0, 1);
}
You’ll now see that the Status dropdown menu items have different background colors.

Let’s also add color to the Status value.
Add the following property to the statusField item in the taskEdit feature:
onChange      : ({ source, value }) => {
    const statusValues = {};
    source.items.forEach(({ data }) => {
        statusValues[data.value] = data.color;
    });
    source.style = `color: ${statusValues[value]};`;
},
The onChange callback function is called when a field value changes, whether due to a user opening or closing the task editor, modifying an event, or changing the statusField value. The onChange event sets the style of the source (in this case, the statusField combo widget) to the correct color based on the current value of the statusField and the statusValues object, which maps the value to the appropriate color.
You’ll now see that each Status value has a different text color:
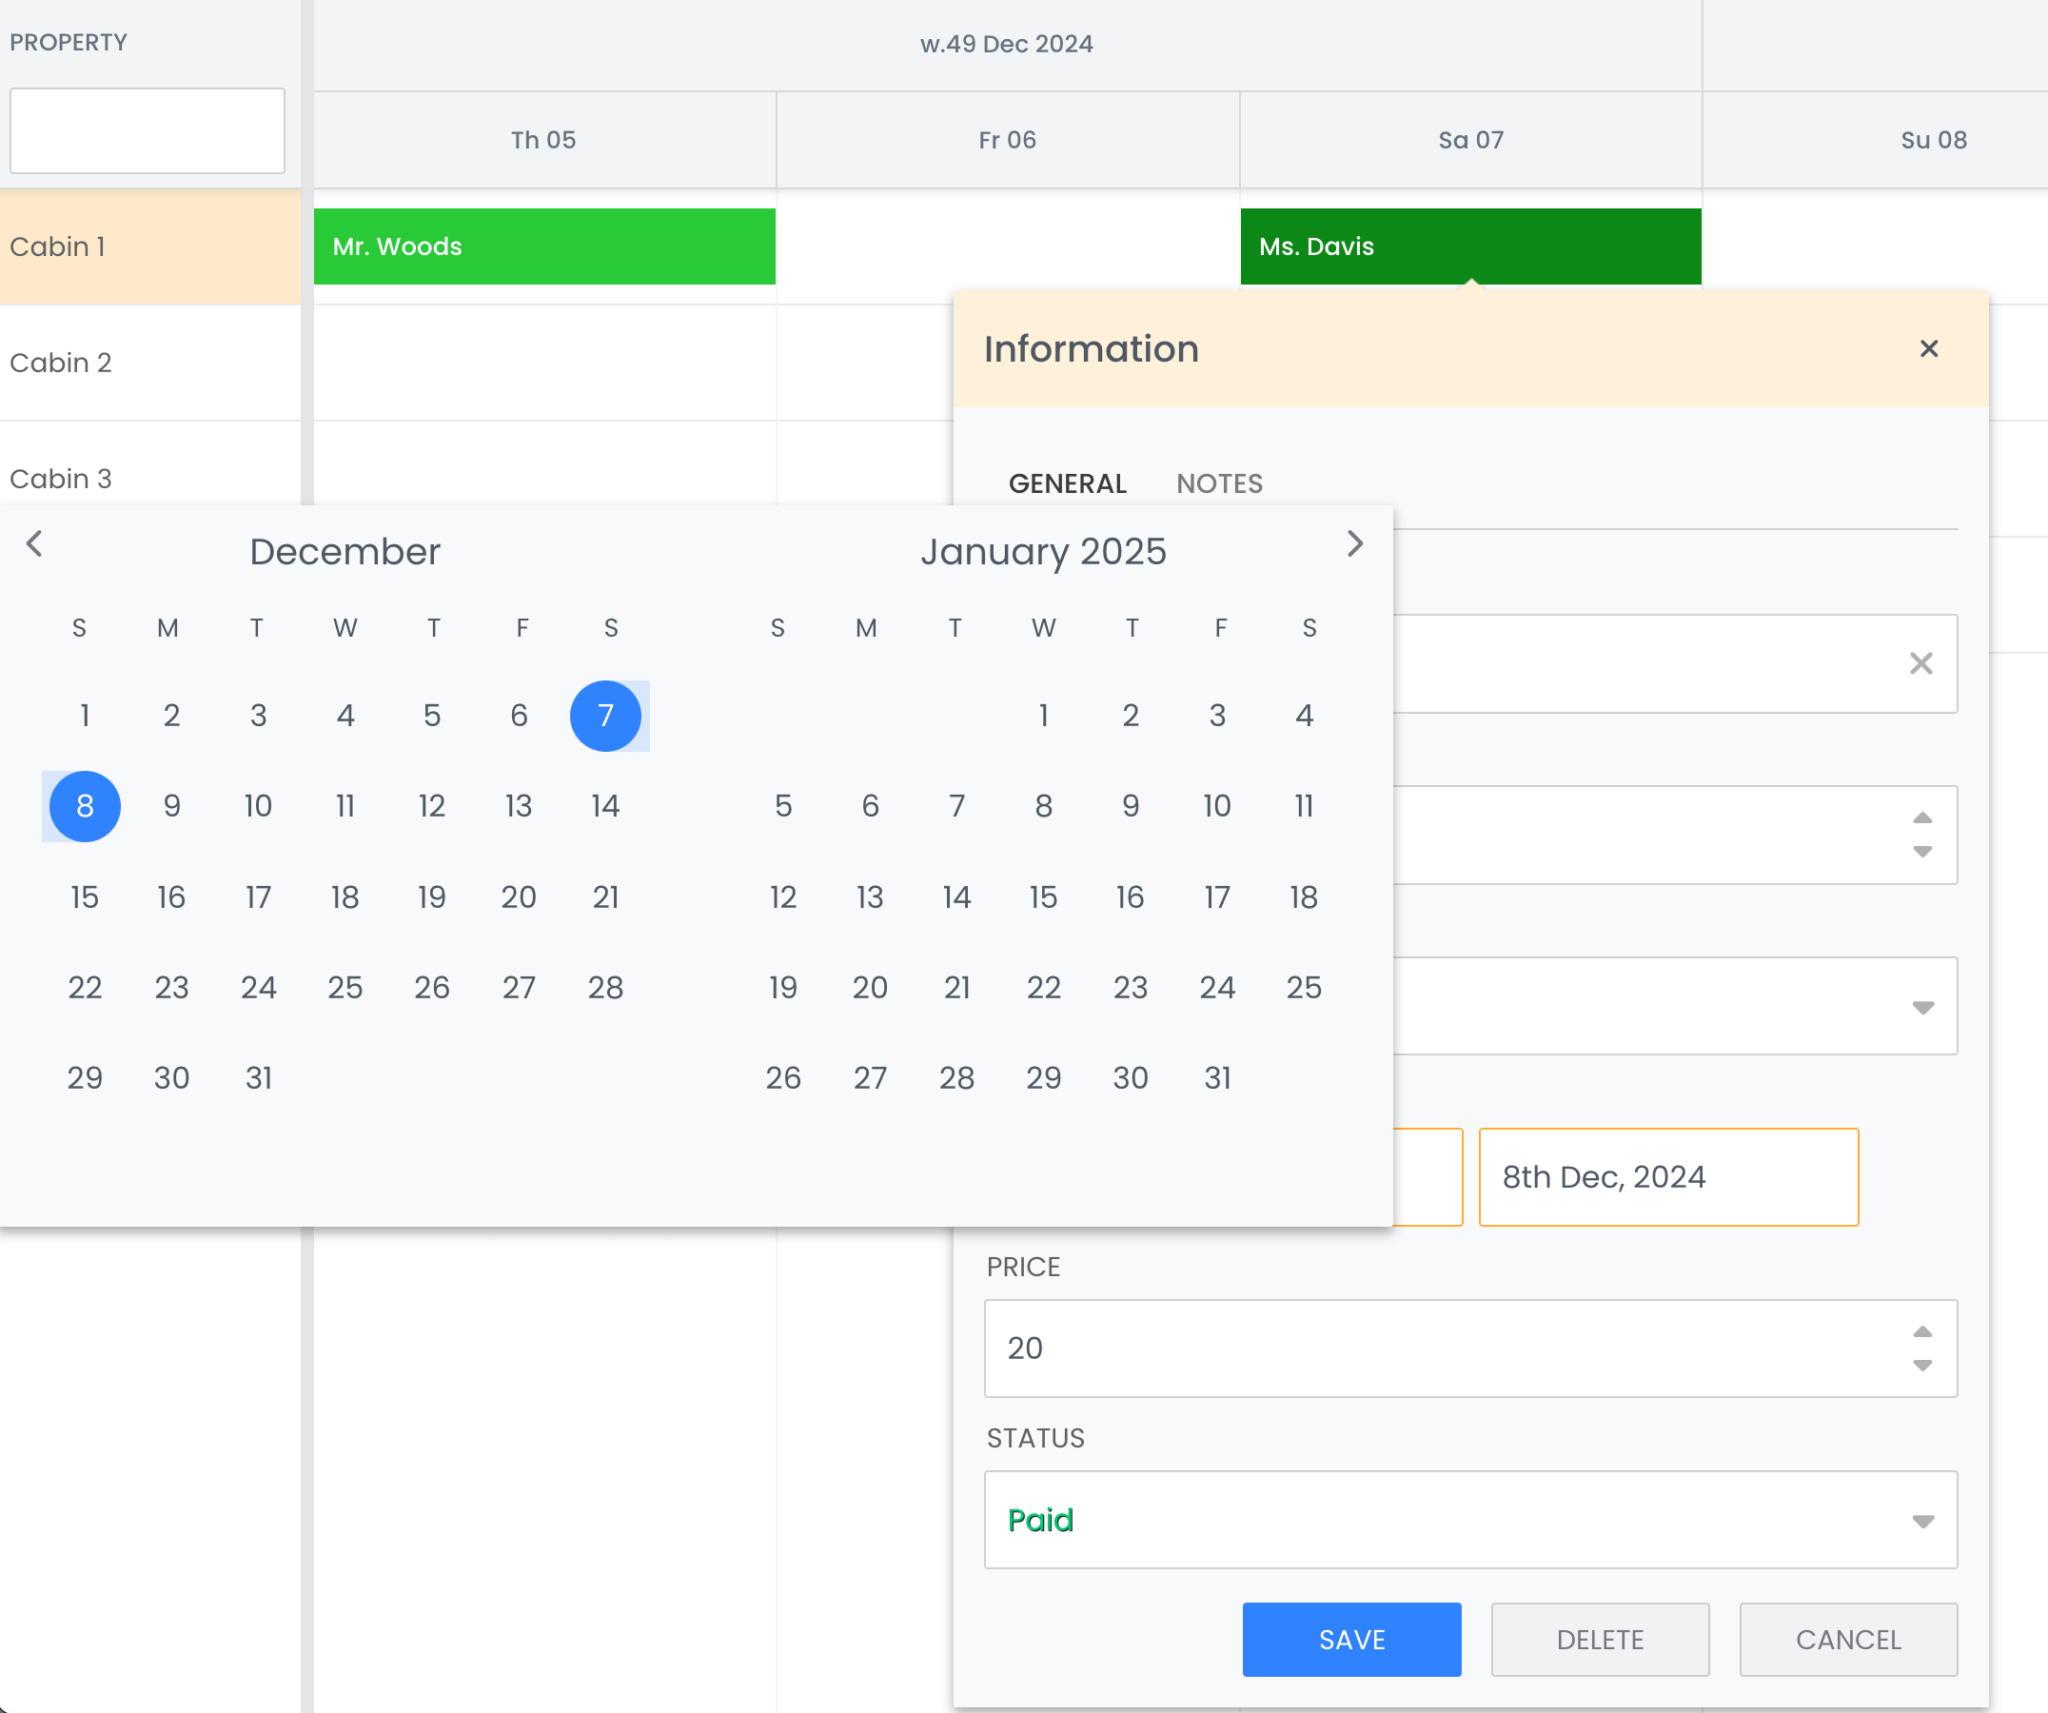
Start and Finish represent the startDateField and the endDateField in the task editor. The values for both these fields are added separately. On the monday.com board, the Dates column allows you to select a date range with a single input. Let’s do the same for the Bryntum Scheduler Pro task editor.
Adding a DateRangeField
We’ll use the DateRangeField widget to edit the start and end date together. Import DateRangeField at the top of the public/main.js file:
import { DateRangeField } from './schedulerpro.module.js';Add the following lines of code at the top of the file:
const dateRangeWidget = new DateRangeField({
    autoExpand     : true,
    ref            : 'dateRangeField',
    label          : 'Dates',
    labelPosition  : 'above',
    fieldStartDate : 'startDateField',
    fieldEndDate   : 'endDateField',
    format         : 'Do MMM, YYYY',
    weight         : 410,
    required       : true
});
This creates a separate date-range widget. The autoExpand property is set to true, so that the date-range picker expands when the input is in focus.
Add the dateRangeWidget to the generalTab‘s items and set the startDateField and endDateField to false, so that they are not displayed:
dateRangeWidget,
startDateField   : false,
endDateField     : false,
Add the following listeners property to the schedulerPro config:
listeners : {
    beforeTaskEditShow({ editor, taskRecord }) {
        const dateRangeField = editor.widgetMap.dateRangeWidget;
        dateRangeField.value = [
            taskRecord.startDate,
            taskRecord.endDate
        ];
    },
}
This event uses the startDate and endDate values of the Property booking board to set the values of the dateRangeField before the task editor is displayed.
Add the following event below the beforeTaskEditShow event callback function in the listeners property:
afterEventSave({ eventRecord, source }) {
    const dateRangeValue = source.features.taskEdit.items.generalTab.items.dateRangeWidget.value;
    eventRecord.startDate = dateRangeValue[0];
    eventRecord.endDate = dateRangeValue[1];
}
After an event has been saved, the afterEventSave event uses the dateRangeField values to set the startDate and endDate fields.
You’ll now be able to select the dates using the date-range picker represented by a calendar icon:
Now let’s create Express API endpoints to sync data changes in the Bryntum Scheduler Pro with monday.com.
Creating API endpoints to sync changes in the Bryntum Scheduler Pro to monday.com
The Crud Manager sync URL simplifies uploading data changes to a backend by treating all the data stores as a single dataset, combining the changes from all stores into a single HTTP request, and preventing the data inconsistency problems that result from syncing multiple data stores. However, we won’t use a single sync URL in this case, as data from the Bryntum Scheduler Pro data stores must be combined on the client to make changes to the monday.com board items. We’ll create three separate Express API endpoints to create, update, or delete monday.com board items.
Creating a create API endpoint
Add the following '/api/create' API POST request route definition to the server.js file:
app.post('/api/create', async(req, res) => {
    try {
        const mondayApiResponse = await monday.api(`
            mutation {
                create_item(
                    board_id: ${process.env.MONDAY_BOARD_ID},
                    item_name: "${req.body.item_name}",
                    column_values: "${JSON.stringify(req.body.column_values).replace(/"/g, '"')}"
                ) {
                id
            }
        }`);
        if (mondayApiResponse.errors)  {
            const errors = mondayApiResponse.errors.map(error => error.message).join(', ');
            throw new Error(errors);
        }
        res.send({ id : mondayApiResponse.data.create_item.id }).status(200);
    }
    catch (error) {
        console.error({ error });
        res.send({
            success : false,
            message : 'There was an error creating the Monday board item.'
        });
    }
});
This definition handles the creation of monday.com board items by using the create_item GraphQL mutation to make new board items based on the data from the POST request body and sending the newly created item id in the response. This ensures the Bryntum Scheduler Pro event id is updated with the new id.
Create a MONDAY_BOARD_ID environment variable in your .env file:
MONDAY_BOARD_ID=Get your board id by opening the monday.com GraphQL playground and entering the following GraphQL query:
{
    boards(limit: 2) {
        id
    }
}
Copy the board id returned by the query and use it as the value of your MONDAY_BOARD_ID environment variable.
Creating a delete API endpoint
Add the following "/api/delete/:id" API DELETE request route definition to handle the deletion of monday.com board items in the server.js file:
app.delete('/api/delete/:id', async(req, res) => {
    try {
        await monday.api(`
            mutation {
                delete_item(item_id: ${req.params.id}) {
                    id
                }
            }`);
        if (res.errors)  {
            const errors = res.errors.map(error => error.message).join(', ');
            throw new Error(errors);
        }
        res.send({ success : true }).status(200);
    }
    catch (error) {
        console.error({ error });
        res.send({
            success : false,
            message : 'There was an error deleting the Monday board item.'
        });
    }
});
This definition uses the Express route parameter :id to get the id of the item that needs to be deleted and then passes the id to the delete_item mutation.
Creating an update API endpoint
Add the following '/api/update/:id' API PATCH request route definition to handle monday.com board item updates in the server.js file:
app.patch('/api/update/:id', async(req, res) => {
    try {
        const response = await monday.api(`
            mutation {
                change_multiple_column_values(
                    board_id: ${process.env.MONDAY_BOARD_ID},
                    item_id: ${req.params.id},
                    column_values: "${JSON.stringify(req.body.column_values).replace(/"/g, '"')}"
                ) {
                id
            }
        }`);

        if (response.errors)  {
            const errors = response.errors.map(error => error.message).join(', ');
            throw new Error(errors);
        }

        res.send({ success : true }).status(200);
    }
    catch (error) {
        console.error({ error });
        res.send({
            success : false,
            message : 'There was an error creating the Monday board item.'
        });
    }
});
This definition uses the Express route parameter :id to get the id of the board item that needs to be updated and then passes the id to the change_multiple_column_values mutation to update the correct item.
Now let’s update our Bryntum Scheduler Pro to call these API endpoints when data is changed on the client app.
Making requests to the sync API endpoints from the Bryntum Scheduler Pro
We’ll make use of the Bryntum Scheduler Pro afterEventSave and dataChange events to determine the changes that occurred in our app component. Then, we’ll create functions capable of making Fetch requests to our sync API endpoints and adding the data changes to the monday.com board.
Adding create and update logic to the afterEventSave event listener callback function
Add the following lines of code to the afterEventSave callback function in the public/main.js file:
if (eventRecord.id.startsWith('_generated')) {
    createMondayItem(eventRecord);
}
else {
    updateMondayItem(eventRecord);
};
When a user submits the task editor form, this function calls one of the helper functions defined later in this guide to create or update an item. If the event has an id that starts with '_generated', it hasn’t been created on the server yet, so the afterEventSave listener calls the createMondayItem helper function.
Note: New records in the Bryntum Scheduler Pro project data store are assigned a UUID id prefixed with _generated. This is a temporary id that should be replaced by an id created on the server.
Adding a dataChange event listener callback function
Add the following dataChange event listener below the afterEventSave listener:
dataChange : function(event) {
    handleDataChange(event);
}
Next, we’ll create a handleDataChange function to handle event updates and deletions performed by moving or resizing event bars rather than by opening the task editor.
Handling the dataChange events
Add the following handleDataChange function to the bottom of the public/main.js file:
function handleDataChange({ action, record, store, records }) {
    const storeId = store.id;
    if (storeId === 'events') {
        if (action === 'update') {
            if (`${record.id}`.startsWith('_generated')) return;
            updateMondayItem(record);
        }
        if (action === 'remove') {
            const recordsData = records.map((record) => record.data);
            recordsData.forEach(async(record) => {
                if (record.id.startsWith('_generated')) return;
                fetch(`/api/delete/${record.id}`, {
                    method : 'DELETE'
                });
            });
        }
    }
}
This function is called when a data change occurs in the Bryntum Scheduler Pro. If an event with a server-assigned id is updated, it calls the updateMondayItem helper function. If events are deleted, it loops through the deleted events and uses the Fetch API to call our '/api/delete/:id' endpoint. The id of the event that needs to be deleted is passed in the URL.
Handling afterEventSave events
We’ll now prepare a function to format the Bryntum Scheduler Pro data to match the formatting of the monday.com board items.
First, determine the column ids for your board. In the query below, replace 1718730574 with your board id and run the query in the monday.com GraphQL API playground. Take note of the columns ids, as they may differ from the example if you have other boards.
{
  boards(ids: 1718730574) {
    columns {
      id
      title
    }
  }
}
Then add the following createMondayItem function to the bottom of the public/main.js file. The keys for the boardItem object are the column ids from the monday.com board. Replace the column ids in the code block with the column ids from your board:
function createMondayItem(eventRecord) {
    const resourceIds = eventRecord.resources.map(resource => resource.id);
    const startDate = new Date(eventRecord.startDate);
    const formattedStartDate= startDate.toISOString().split('T')[0];
    const endDate = new Date(eventRecord.endDate);
    const formattedEndDate= endDate.toISOString().split('T')[0];

    const boardItem = {
        // replace the keys with your column ids
        dropdown__1 : {
            ids : resourceIds
        },
        project_timeline : {
            from : formattedStartDate,
            to   : formattedEndDate
        },
        numbers0__1    : eventRecord.price,
        numbers__1     : eventRecord.guests,
        project_status : {
            index : eventRecord.status
        },
        text9 : eventRecord.note ? eventRecord.note : ''
    };
    fetch('/api/create', {
        method  : 'POST',
        headers : {
            'Content-Type' : 'application/json'
        },
        body : JSON.stringify({
            item_name     : eventRecord.name,
            column_values : boardItem
        })
    }).then(async response => {
        const data = await response.json();
        schedulerPro.project.eventStore.applyChangeset({
            updated : [
                // Will set proper id for added event
                {
                    $PhantomId : eventRecord.id,
                    id         : data.id
                }
            ]
        });
    });
}
The createMondayItem function takes the eventRecord as an argument and formats the Bryntum Scheduler Pro data. The boardItem object properties are the column values used in the create_item mutation in the '/api/create' endpoint. It uses the column ids for updates.
The createMondayItem function makes a Fetch request to the '/api/create' endpoint to create an item. If the item is successfully created, it calls the applyChangeset method to update the event created locally with the id created by monday.com.
Now that we’ve added the create function, let’s add an update function below it.
Enter the following updateMondayItem function. Remember to replace the column ids with the ids from your board:
function updateMondayItem(eventRecord) {
    const resourceIds = eventRecord.resources.map(resource => resource.id);
    const startDate = new Date(eventRecord.startDate);
    const formattedStartDate= startDate.toISOString().split('T')[0];
    const endDate = new Date(eventRecord.endDate);
    const formattedEndDate= endDate.toISOString().split('T')[0];

    const boardItem = {
        // replace the keys with your column ids
        name        : eventRecord.name,
        dropdown__1 : {
            ids : resourceIds
        },
        project_timeline : {
            from : formattedStartDate,
            to   : formattedEndDate
        },
        numbers0__1    : eventRecord.price,
        numbers__1     : eventRecord.guests,
        project_status : {
            index : eventRecord.status
        },
        text9 : eventRecord.note ? eventRecord.note : ''
    };
    fetch(`/api/update/${eventRecord.id}`, {
        method  : 'PATCH',
        headers : {
            'Content-Type' : 'application/json'
        },
        body : JSON.stringify({
            item_name     : eventRecord.name,
            column_values : boardItem
        })
    });
}
This function is similar to the createMondayItem function, except the boardItem includes the name of the event and the applyChangeset method is omitted because the id does not need to be updated.
Run your development server and open https://localhost:1338 in your browser. Any changes you make to the Bryntum Scheduler Pro data will be saved in your monday.com Property booking board:
Next steps
This tutorial provides a starting point for using vanilla JavaScript to create a Bryntum Scheduler Pro component that is synced with monday.com. For technical assistance, see our support forum.
Visit our Bryntum Scheduler Pro demos page to see which features you want to add next. You may find our property booking demo particularly useful for extending the functionality and improving the design of the scheduler created in this tutorial.
If you’re interested in learning how to handle location data, take a look at our blog post: Build a location-based scheduler with Mapbox using Bryntum.
Are you new to Bryntum products? Sign up for our 45-day trial to build with Bryntum Scheduler Pro.
Build it with Bryntum Scheduler Pro
Start a free trial, explore live demos, or read the docs.
Related posts