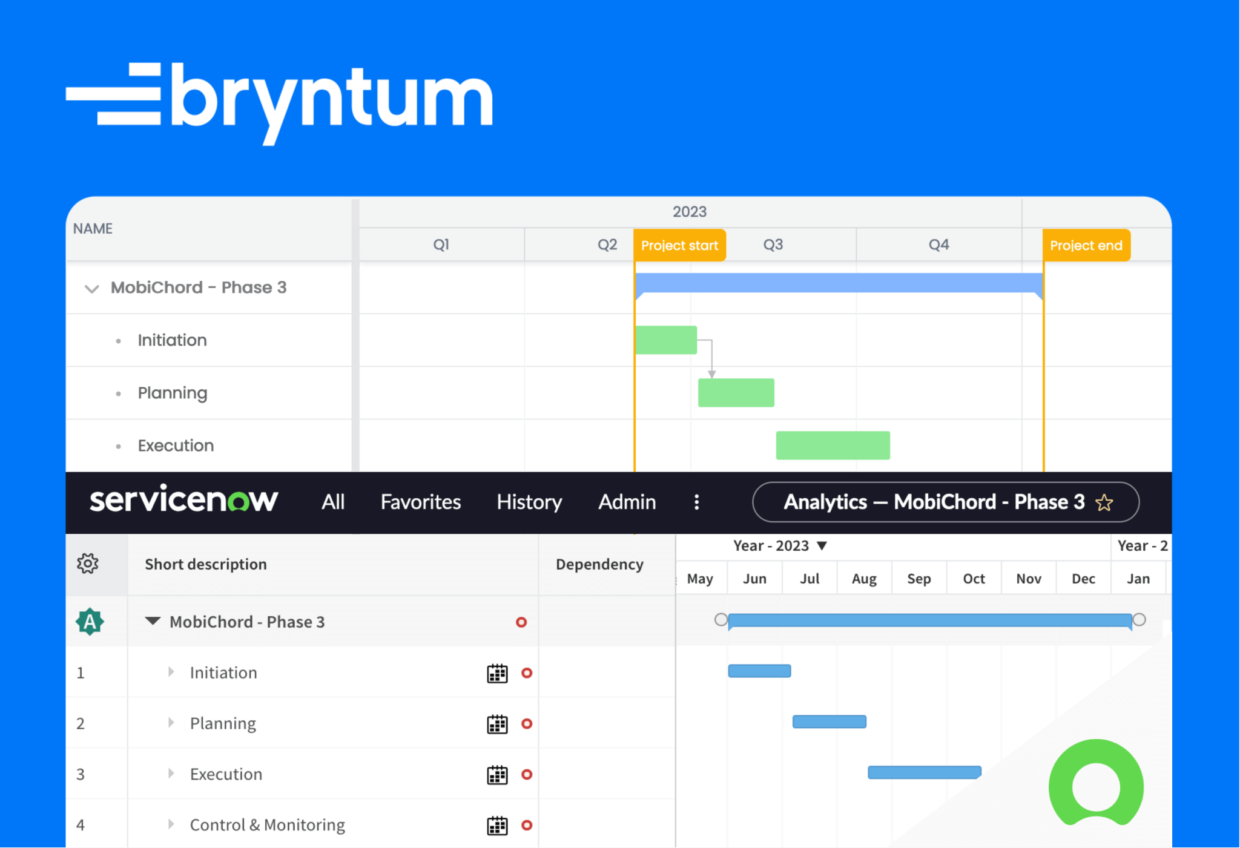
How to connect and sync Bryntum Gantt to a ServiceNow Project Portfolio Management planning chart
We strive to keep posts updated, but code samples may sometimes be outdated. Humans, see the Bryntum documentation; agents, https://mcp.bryntum.com for the latest info.
Bryntum Gantt is a fully customizable, high-performance JavaScript Gantt chart that you can use with vanilla JavaScript or your framework of choice: React, Vue, or Angular.
In this tutorial, we’ll show you how to connect and sync Bryntum Gantt to a ServiceNow Project Portfolio Management (PPM) project. We’ll do the following:
- Use the ServiceNow REST API to get tasks and task dependencies from a PPM project.
- Display the PPM project tasks and dependencies in a Bryntum Gantt chart.
- Sync changes in Bryntum Gantt with the PPM project.
Getting started with ServiceNow
ServiceNow offers free Personal Developer Instances (PDI) to registered users.
First, create a ServiceNow account to get a ServiceNow ID.
Then, log in to ServiceNow and select the Developer Program tile. Follow the prompts and you will be taken to a welcome page that displays a Start Building button. Click the button to initialize your PDI.
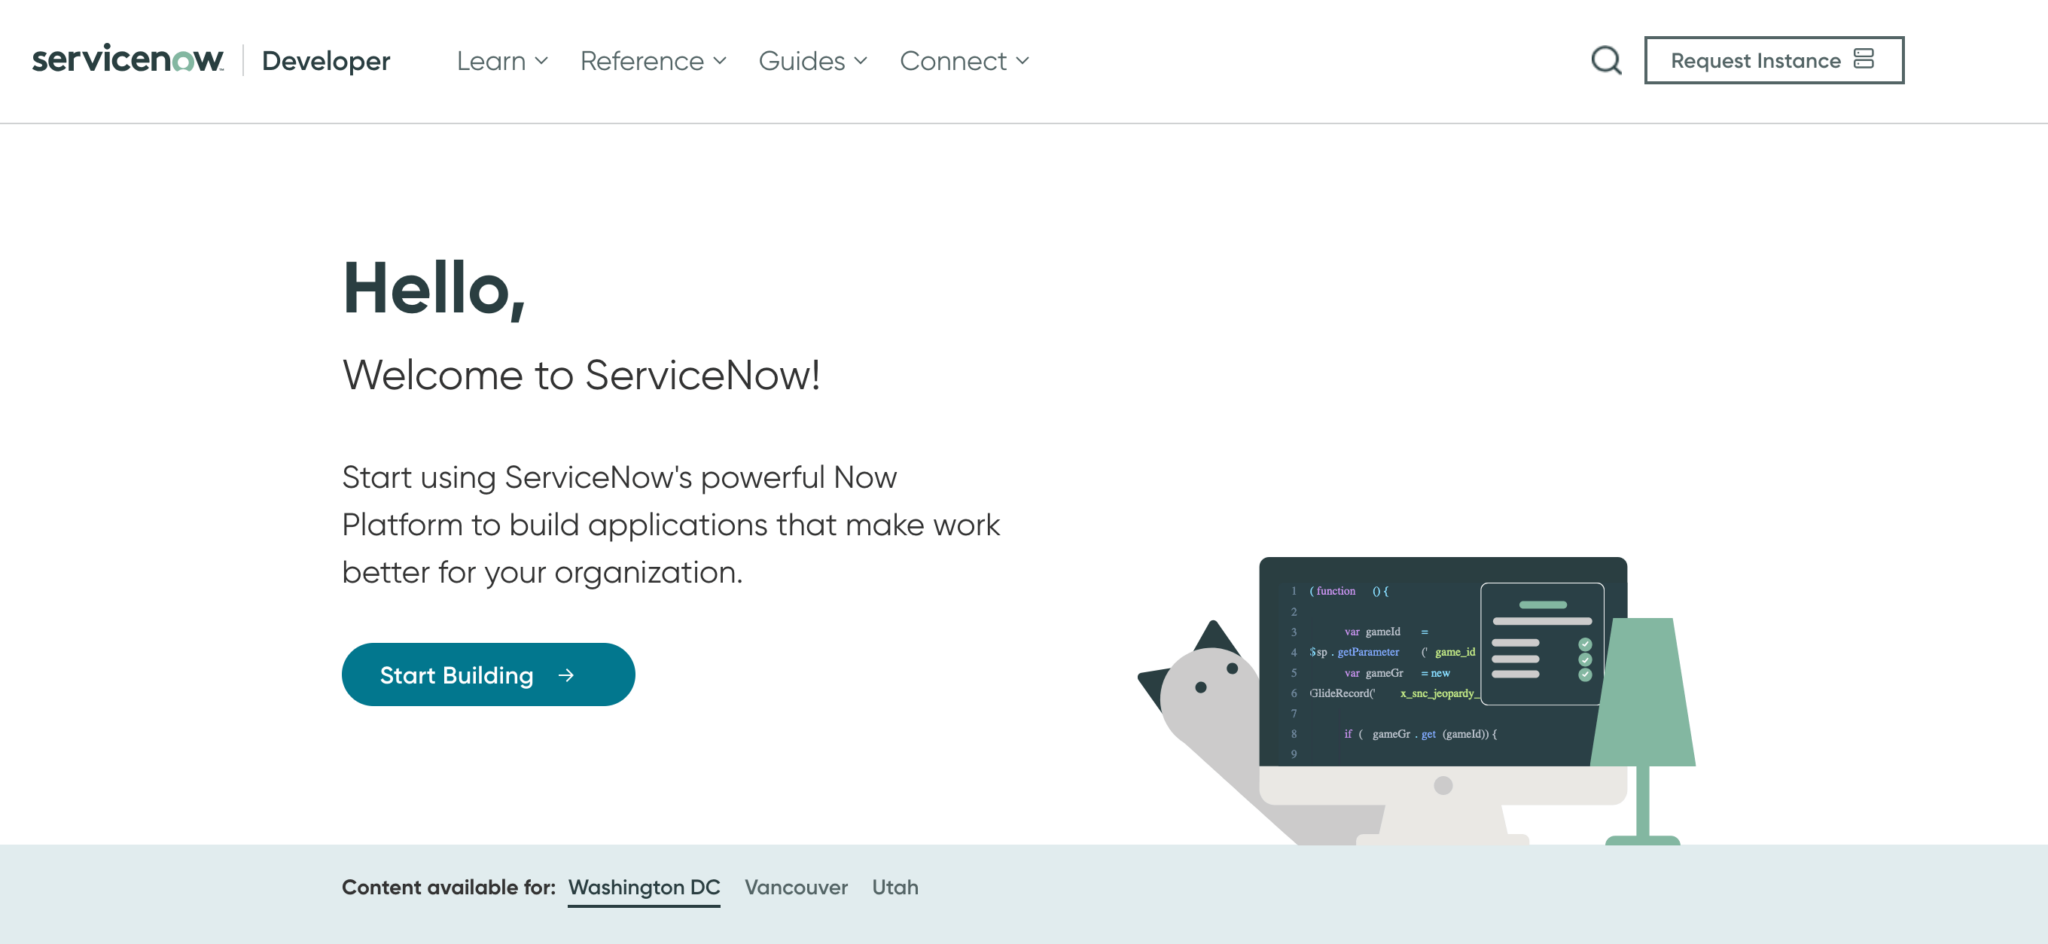
The ServiceNow PDI used in this tutorial uses the ServiceNow Washington DC release.
Once your instance is initialized, a popup dialog will indicate that your instance is ready. Click the Open Instance button. Your PDI has a unique instance ID that you can see in the URL, for example, https://<instance ID>.service-now.com.
Now that you have a PDI, let’s add an example PPM project.
Accessing ServiceNow Project Portfolio Management features
The ServiceNow Project Portfolio Management (PPM) product provides tools to manage projects, portfolios, their resources, and financials.
Follow these steps to install the PPM plugins in your PDI:
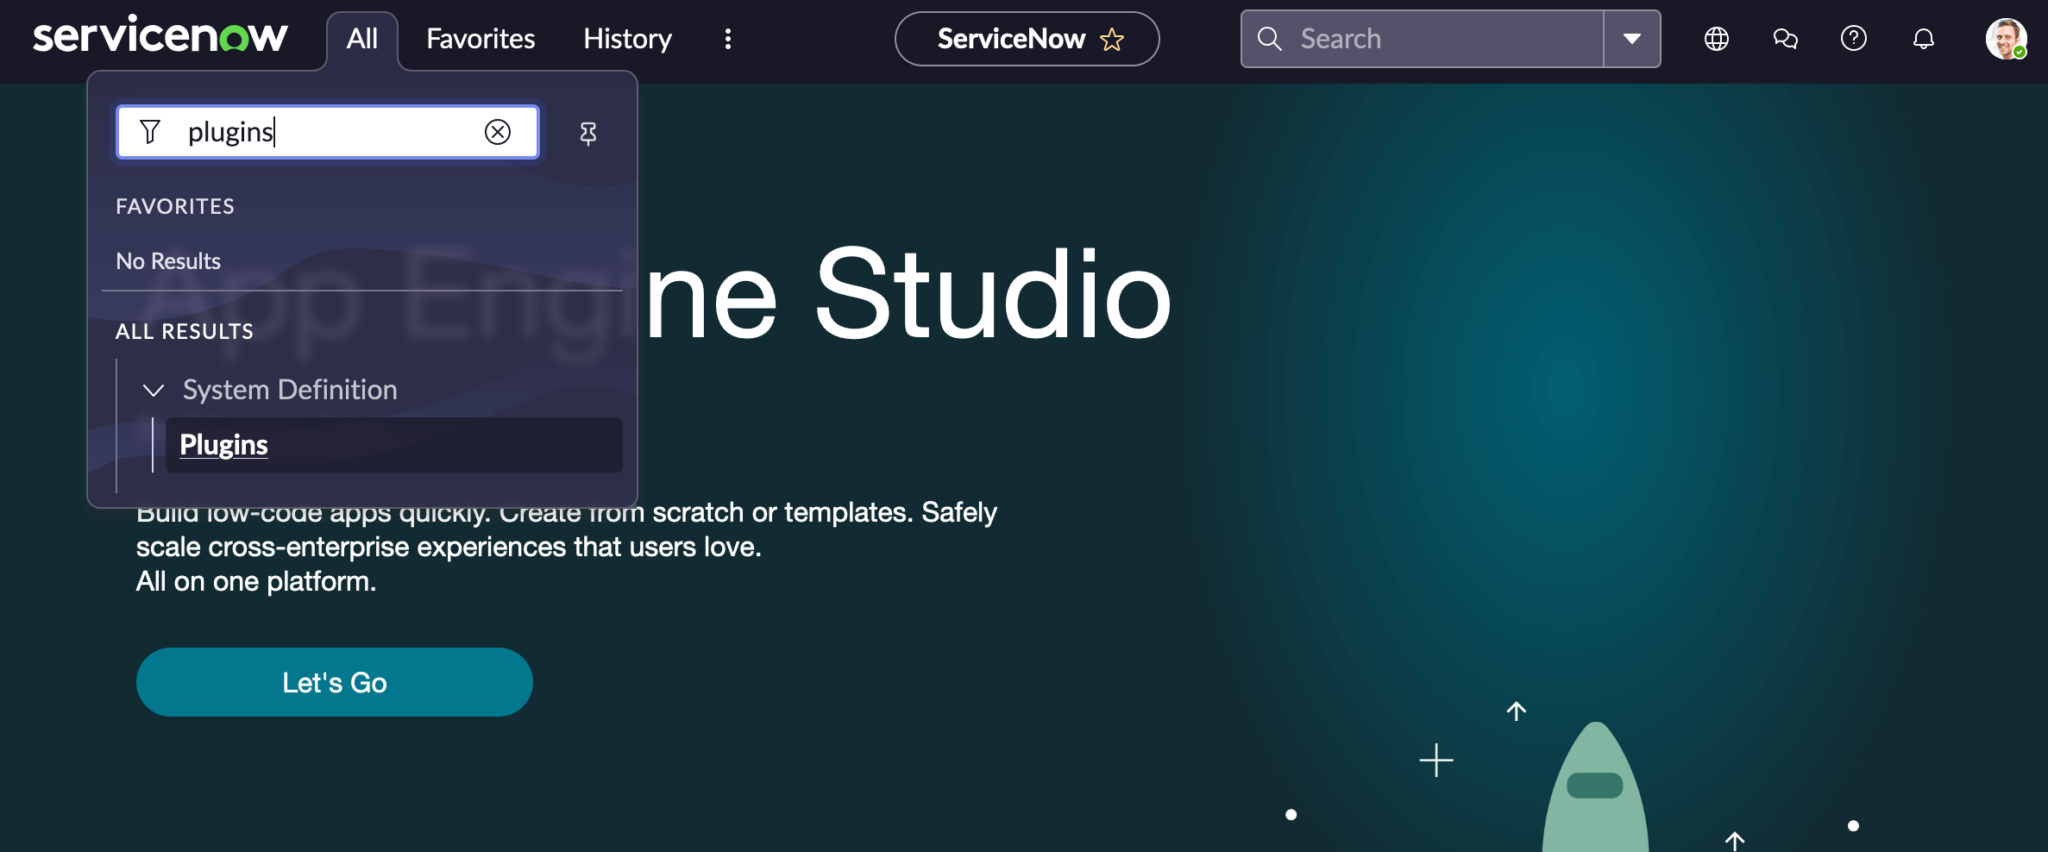
- Click the All button at the top left of your PDI home page. In the filter search input, type “plugins”. Click on the Plugins item under System Definition.
- In the Application Manager page that opens, search for “project portfolio management” in the Search your licensed applications and plugins search input.
- Under Servicenow Products, select Project Portfolio Management.
- Install all ten plugins for the Project Portfolio Management ServiceNow product by clicking the Install button. Make sure that you check the “Load demo data” checkbox, as we’ll use the demo data for this tutorial. Click Proceed, and then Install.
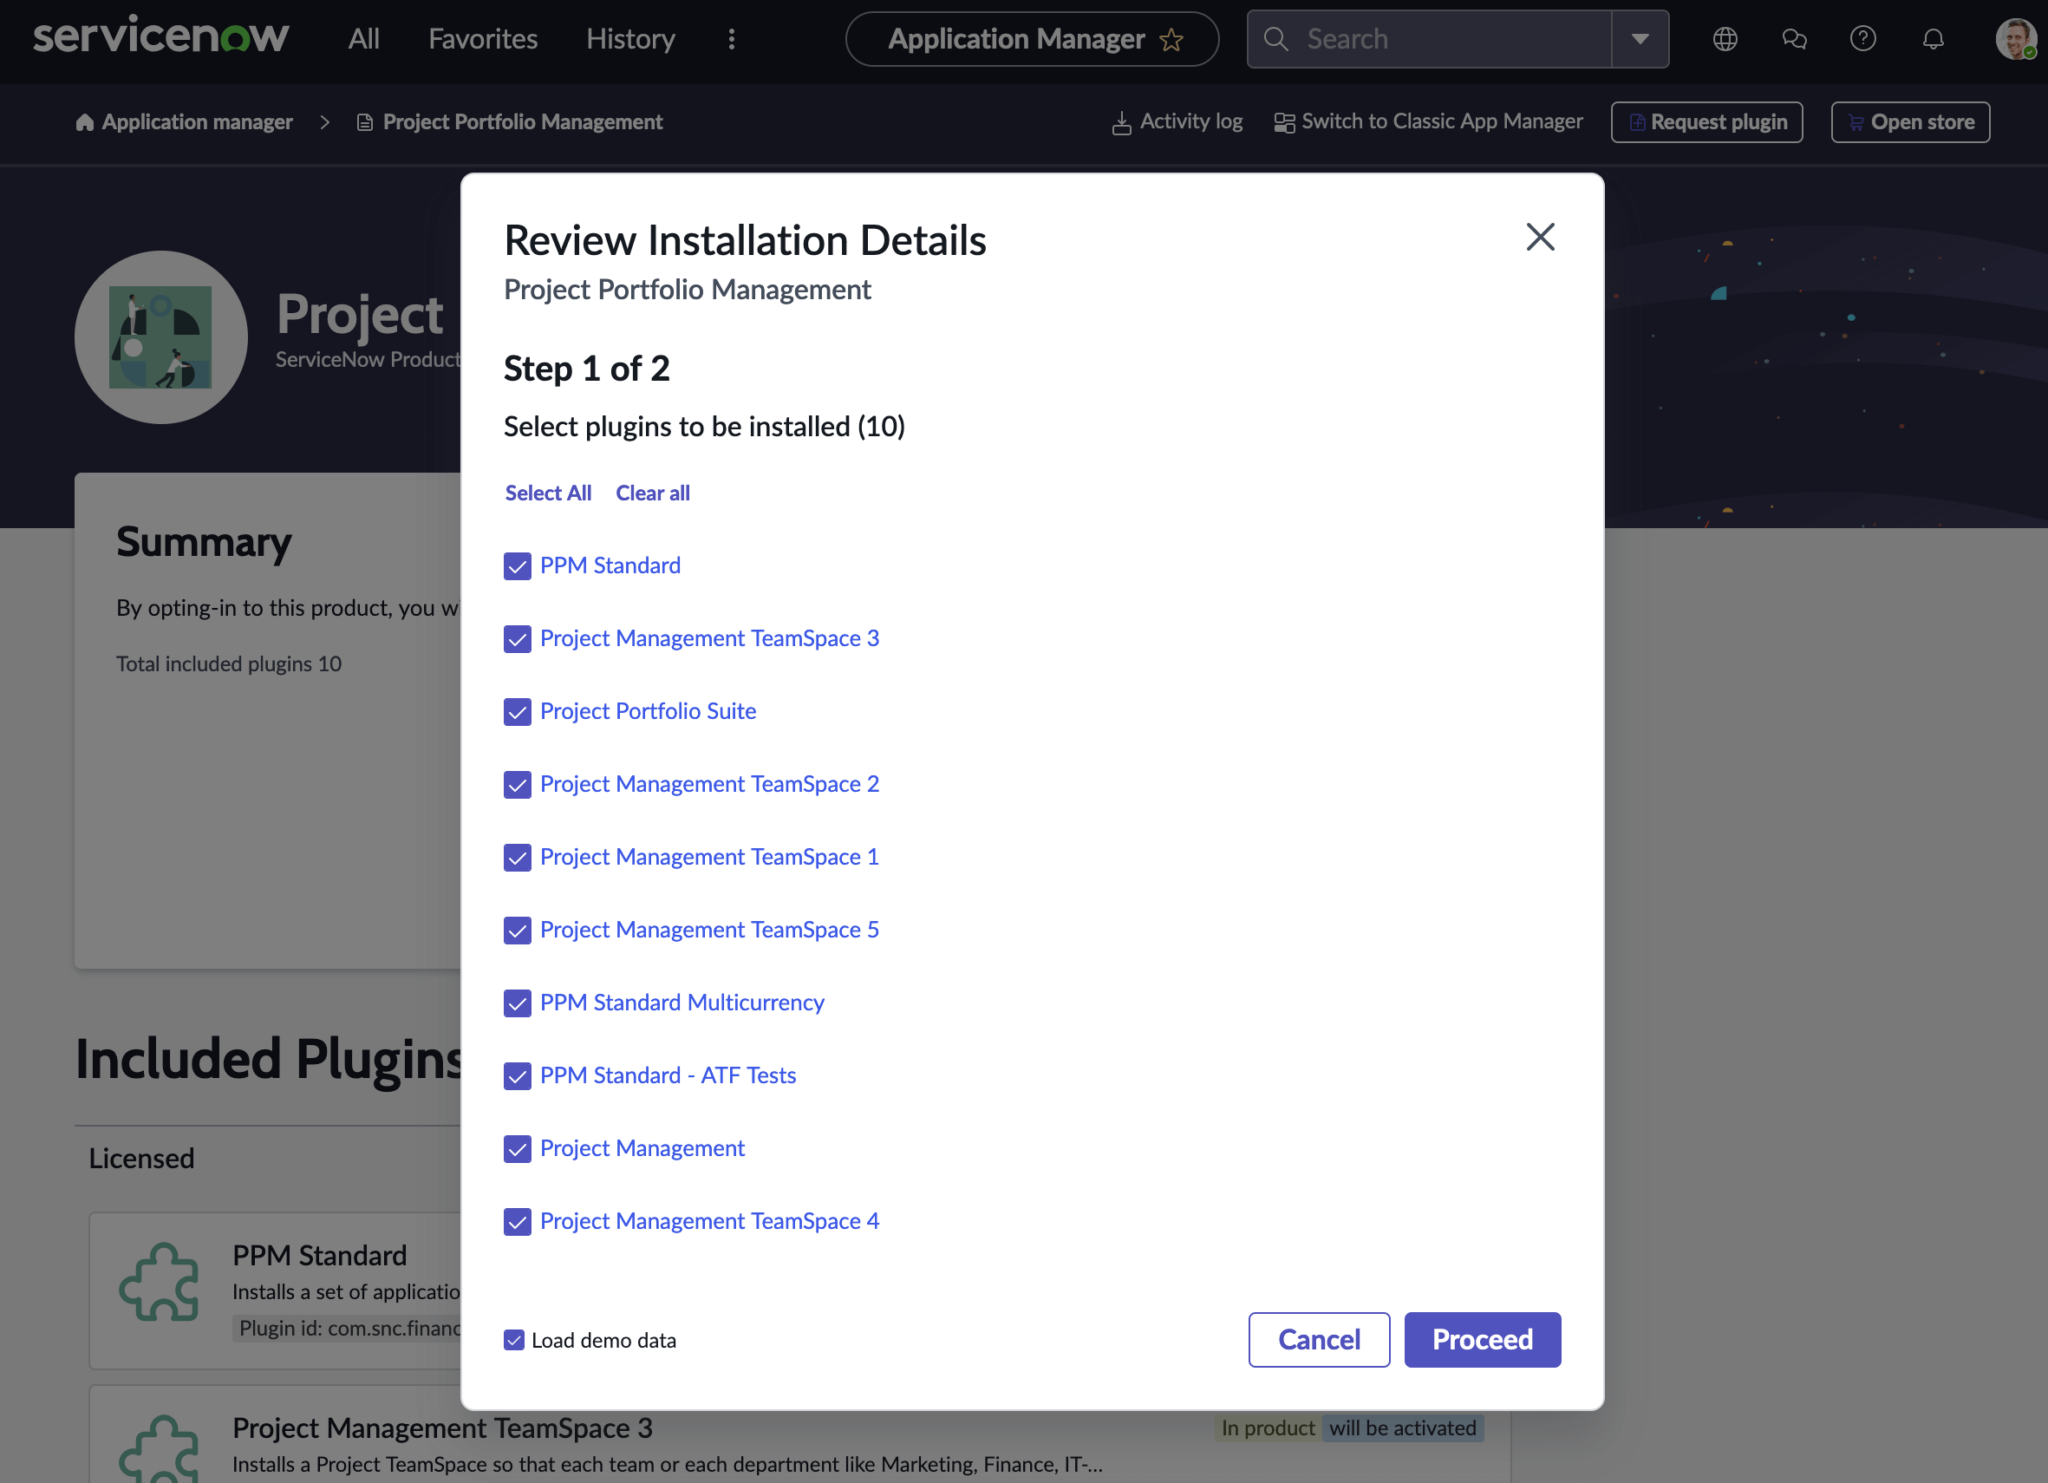
The installation process may take a couple of minutes.
Accessing an example PPM project
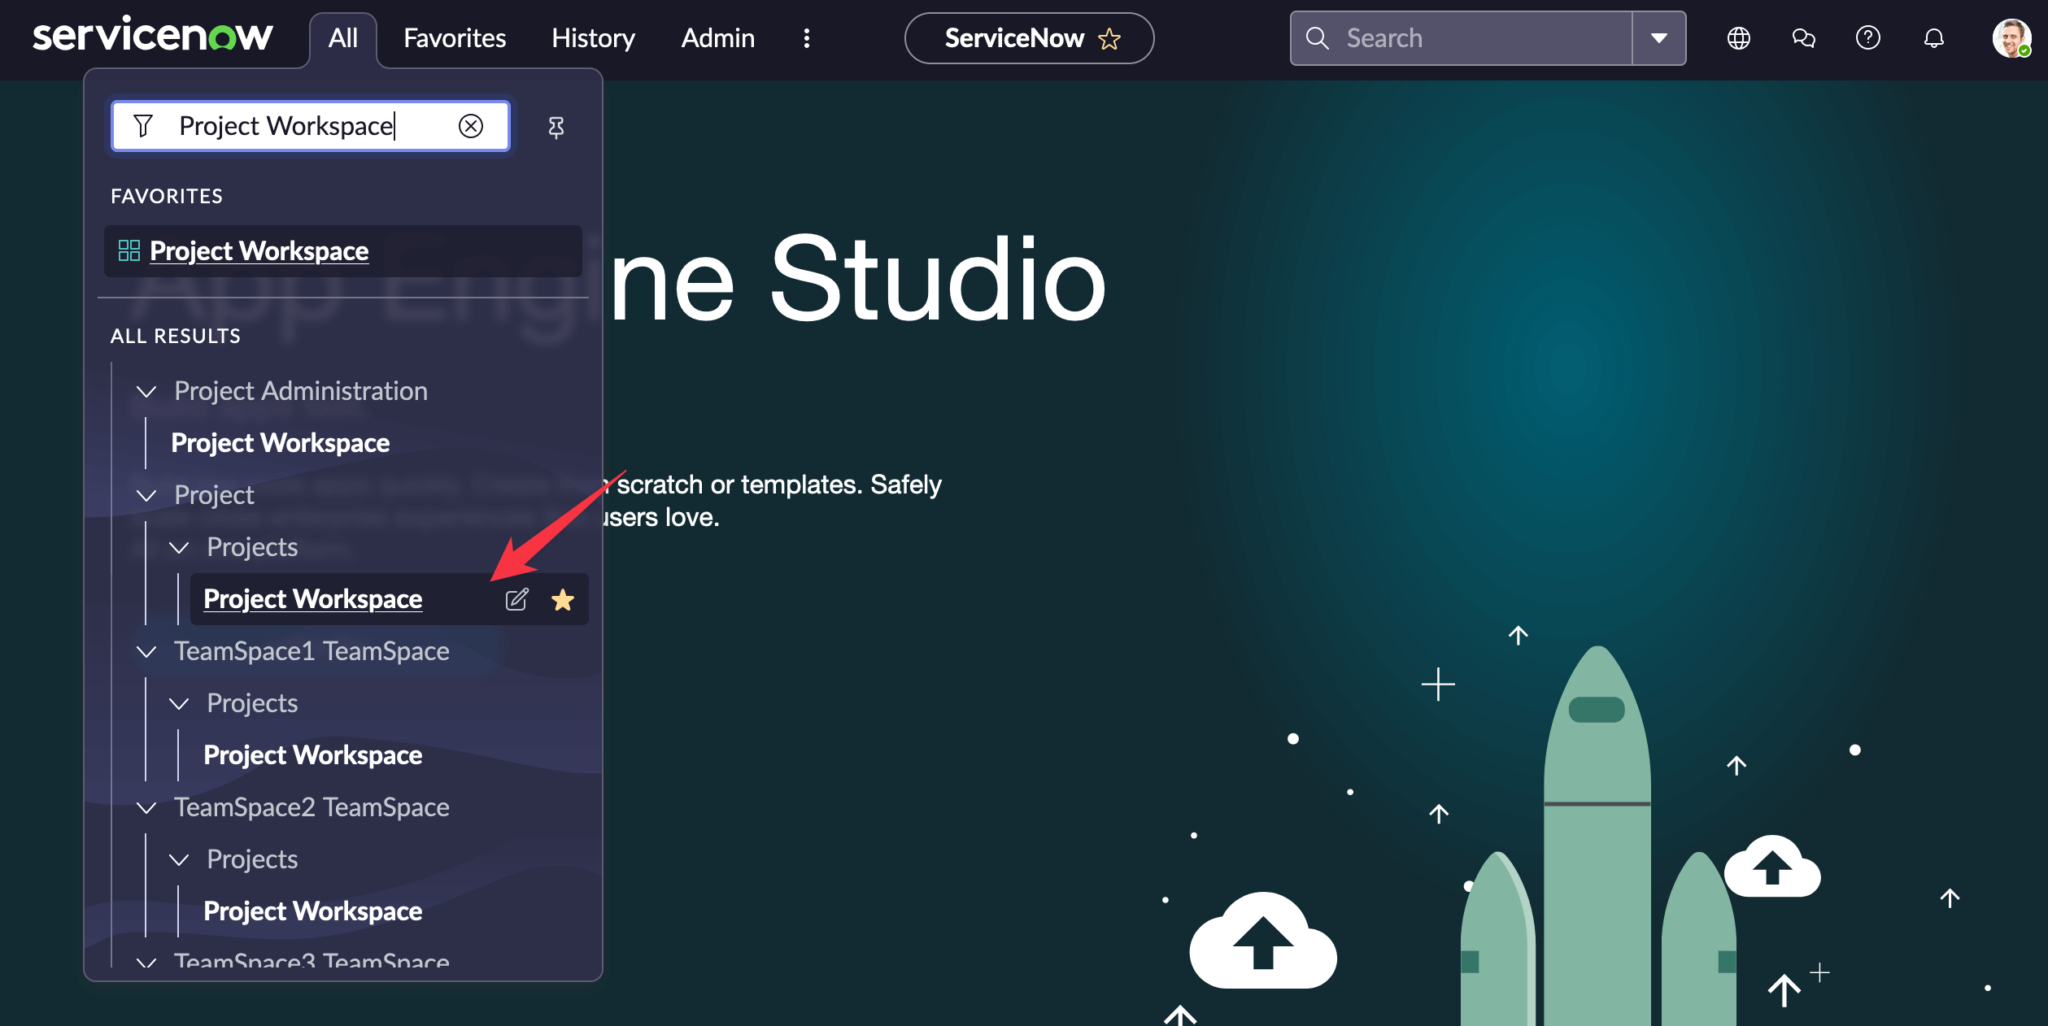
In your PDI, open the Project Workspace by searching for it in the All menu. It will be under the Project group:
In the My Projects Space, search for the “MobiChord – Phase 3” project card and click on it:
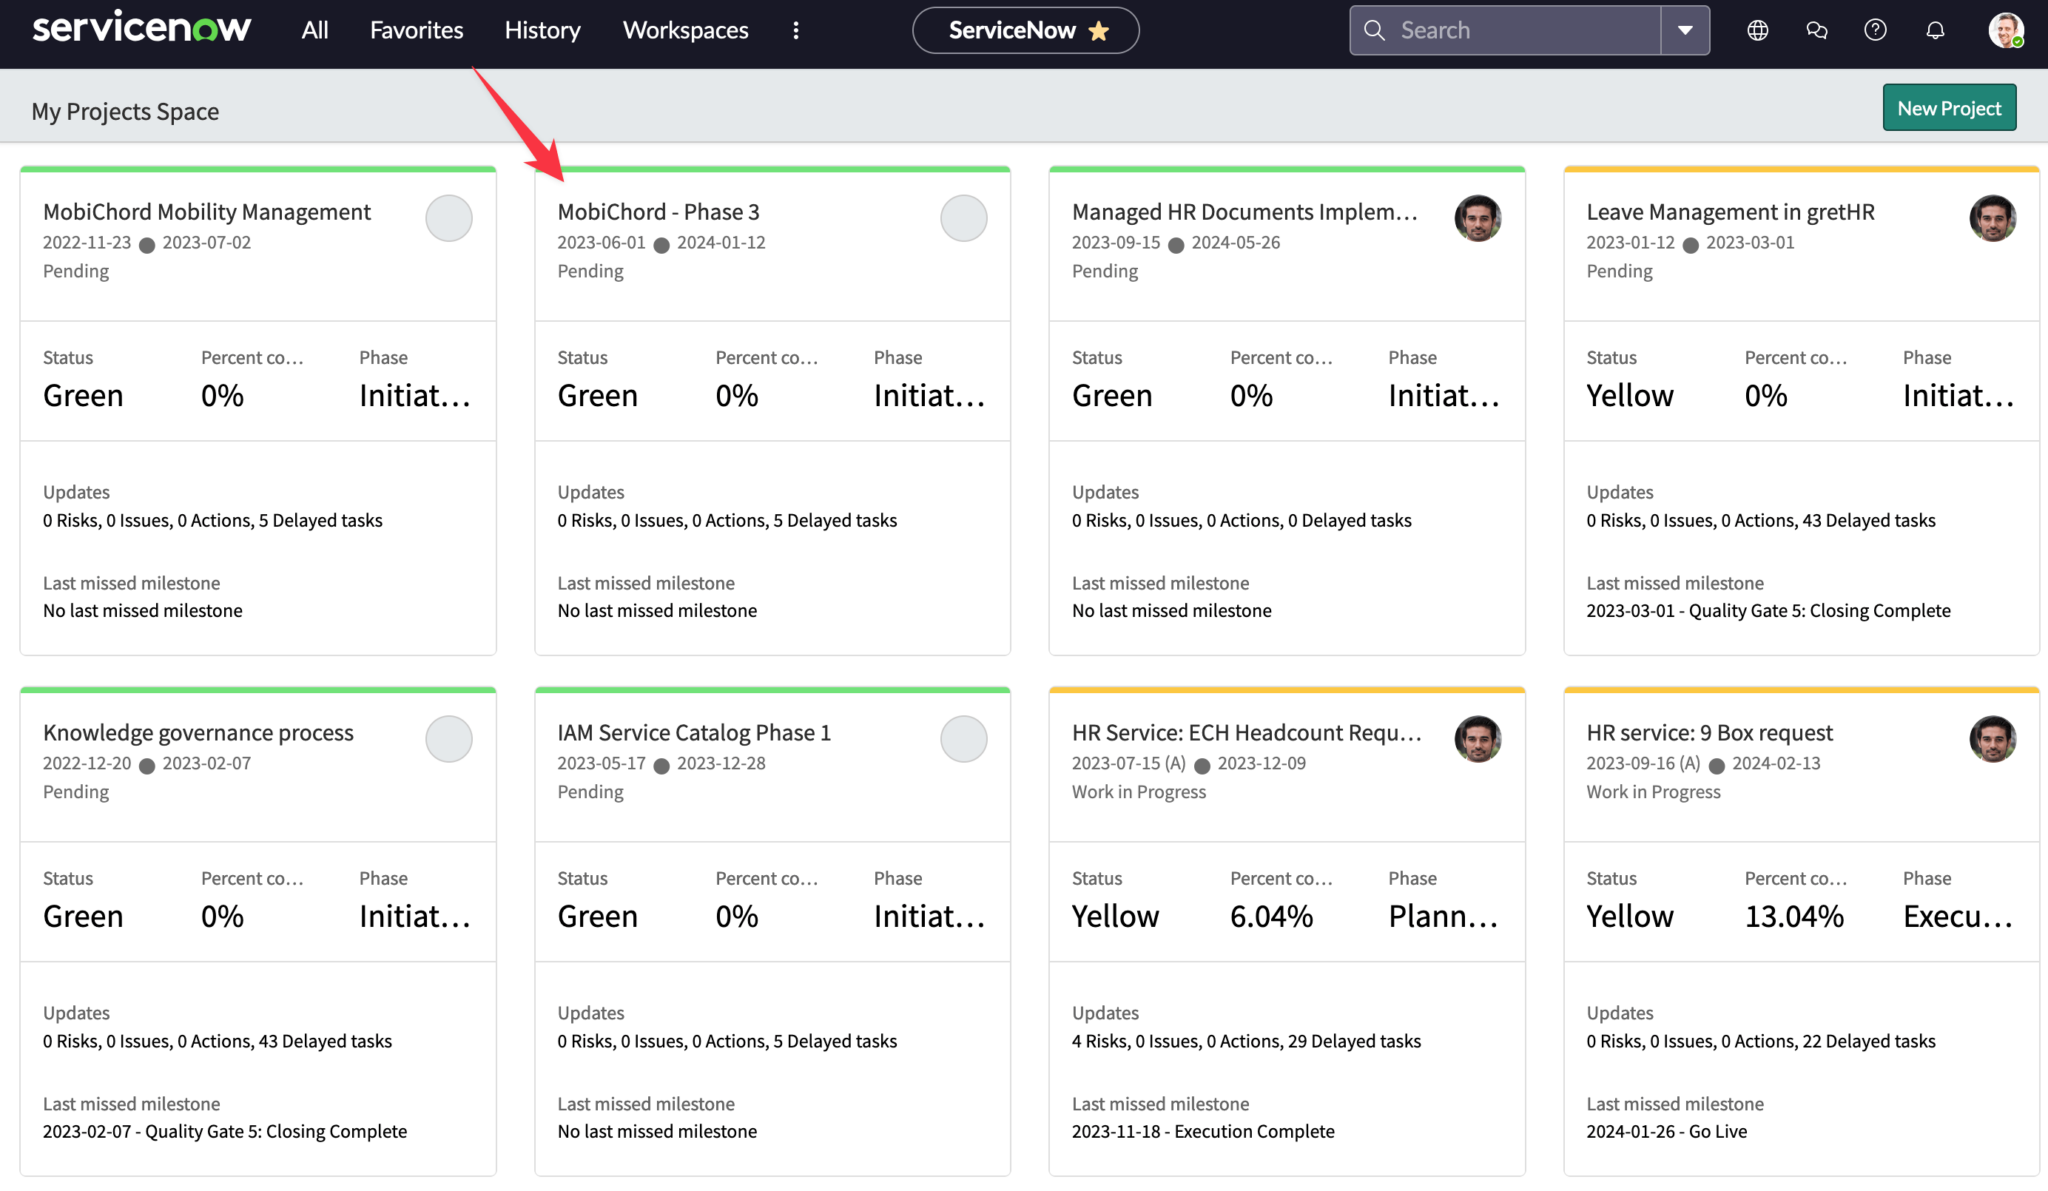
We’ll use this example PPM project for this tutorial.
The project dashboard has tabs for managing and analyzing the project.
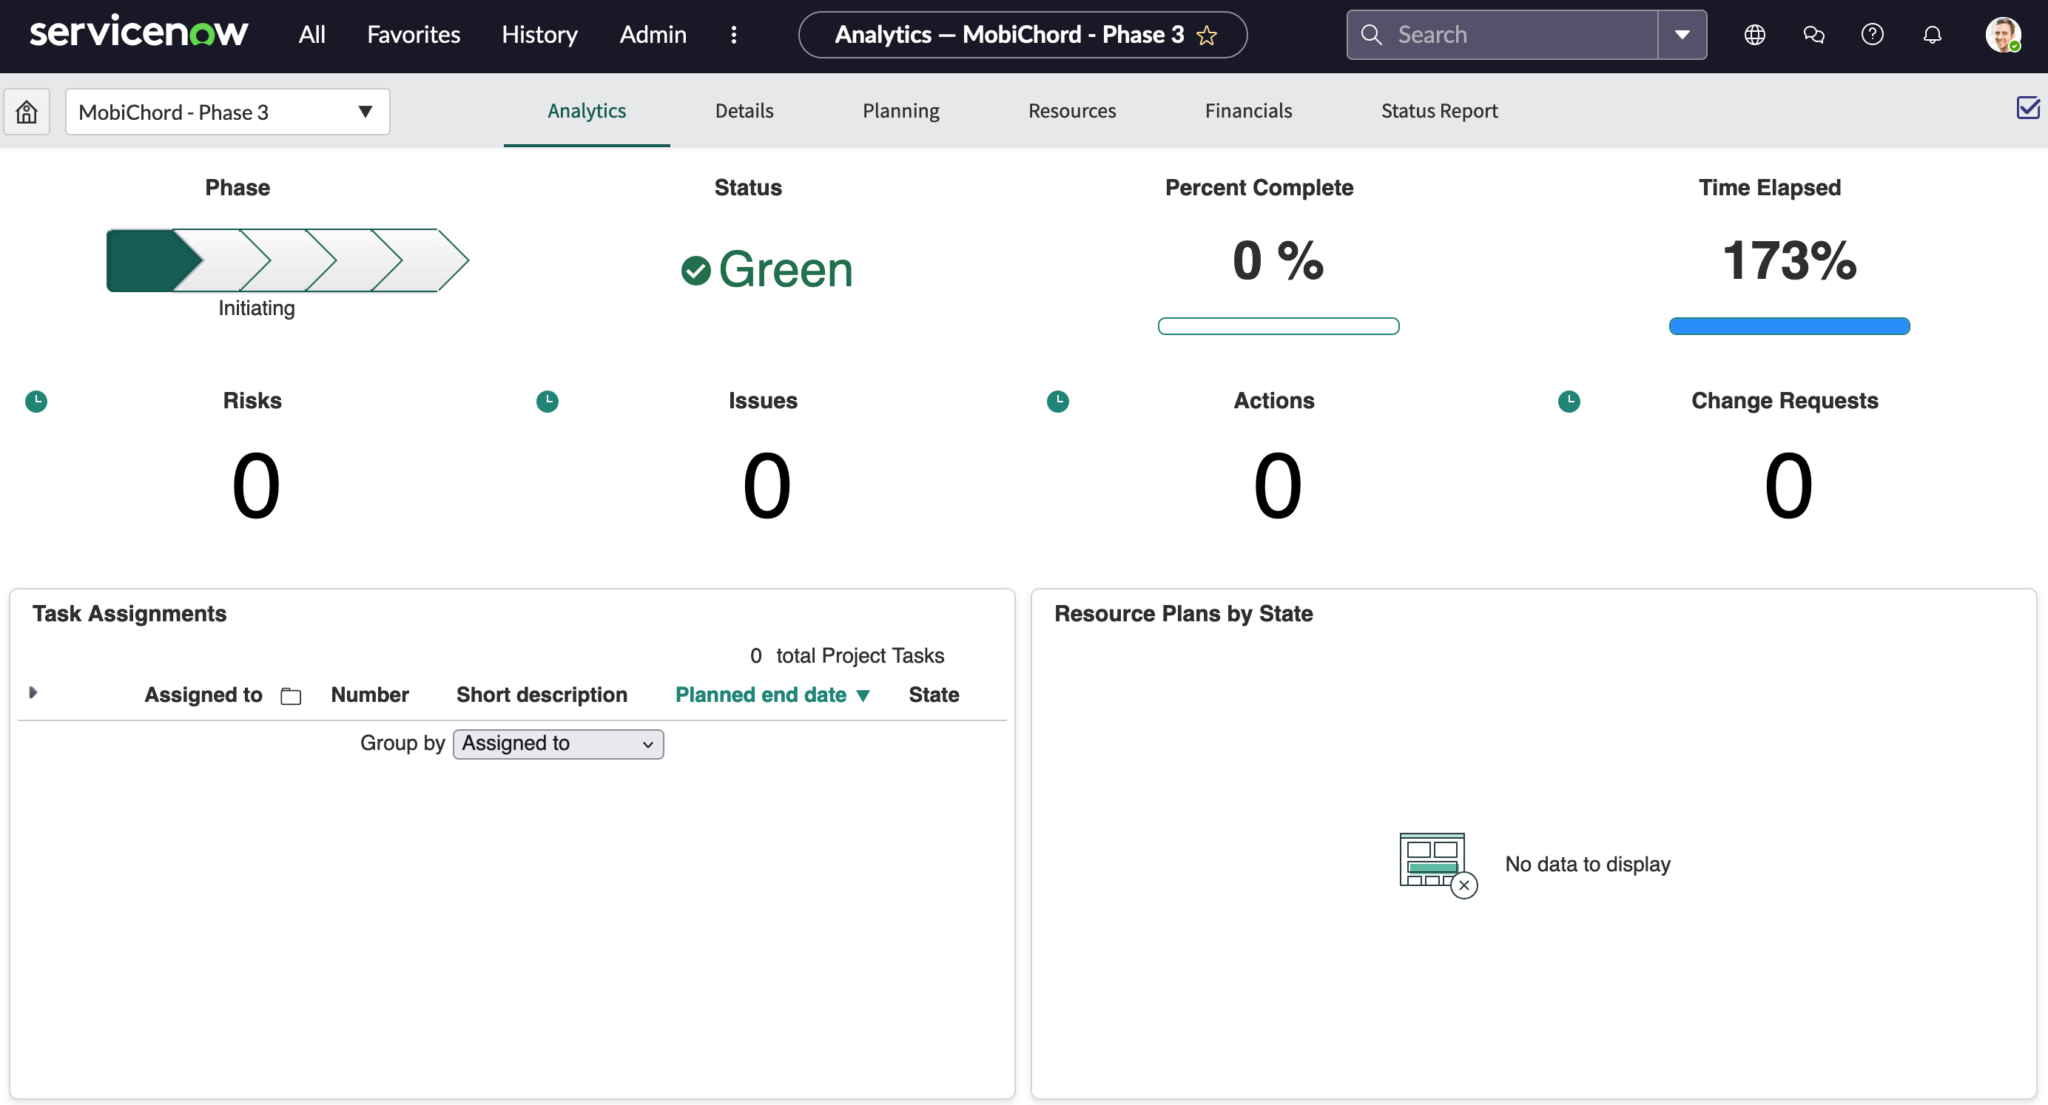
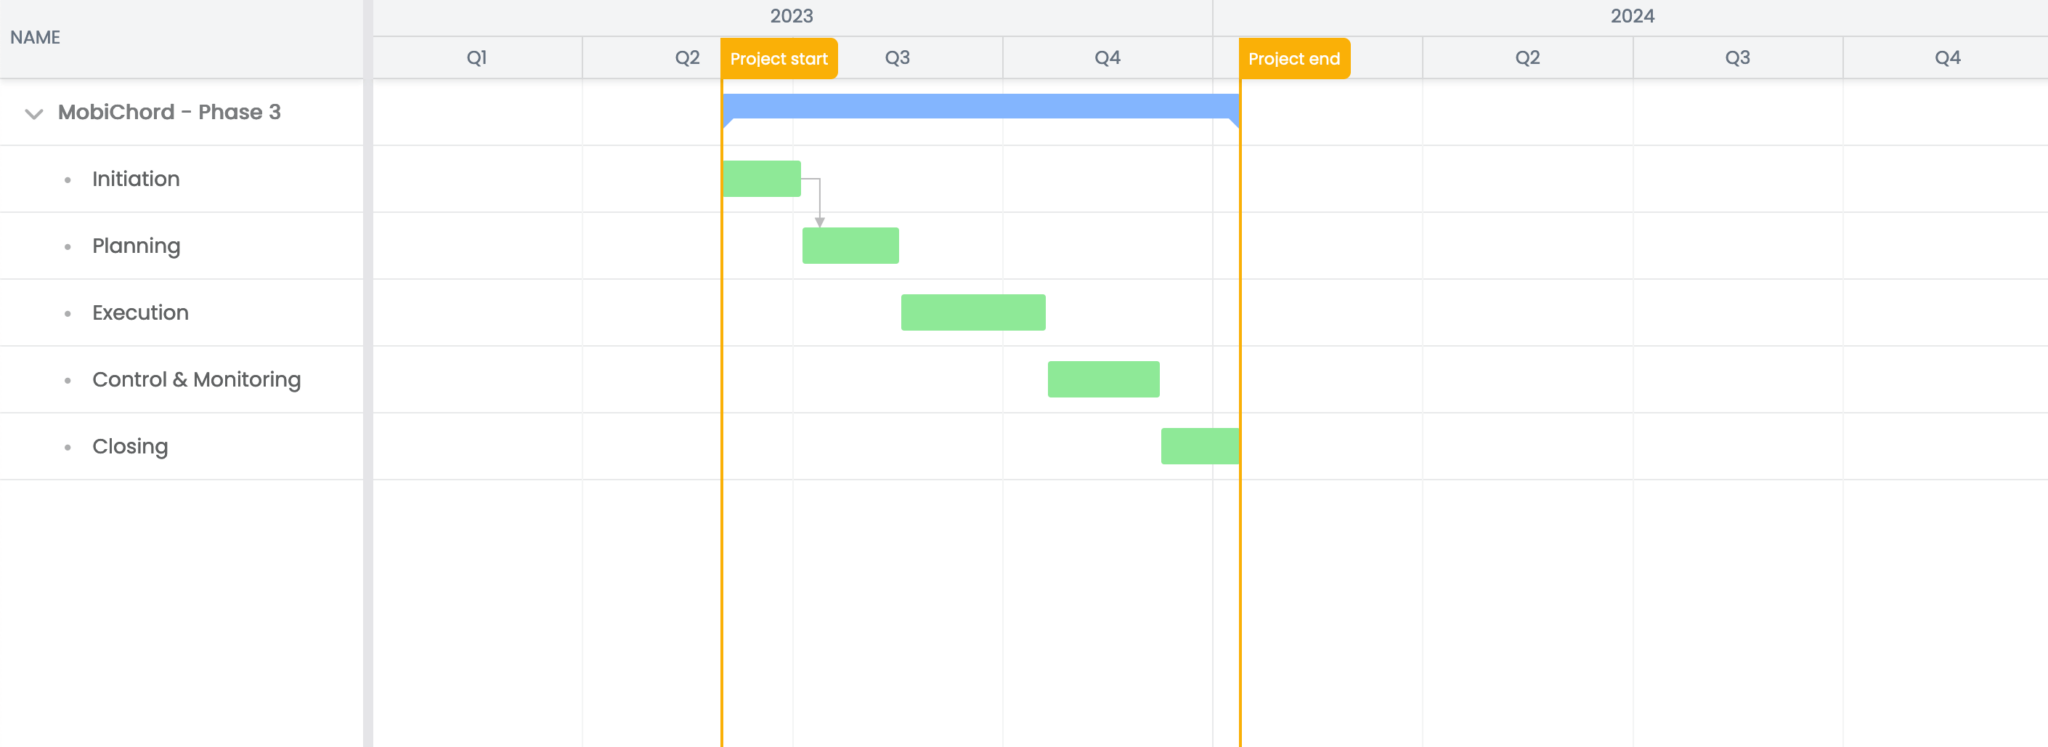
Click on the Planning tab to see a Gantt chart displaying the project data:

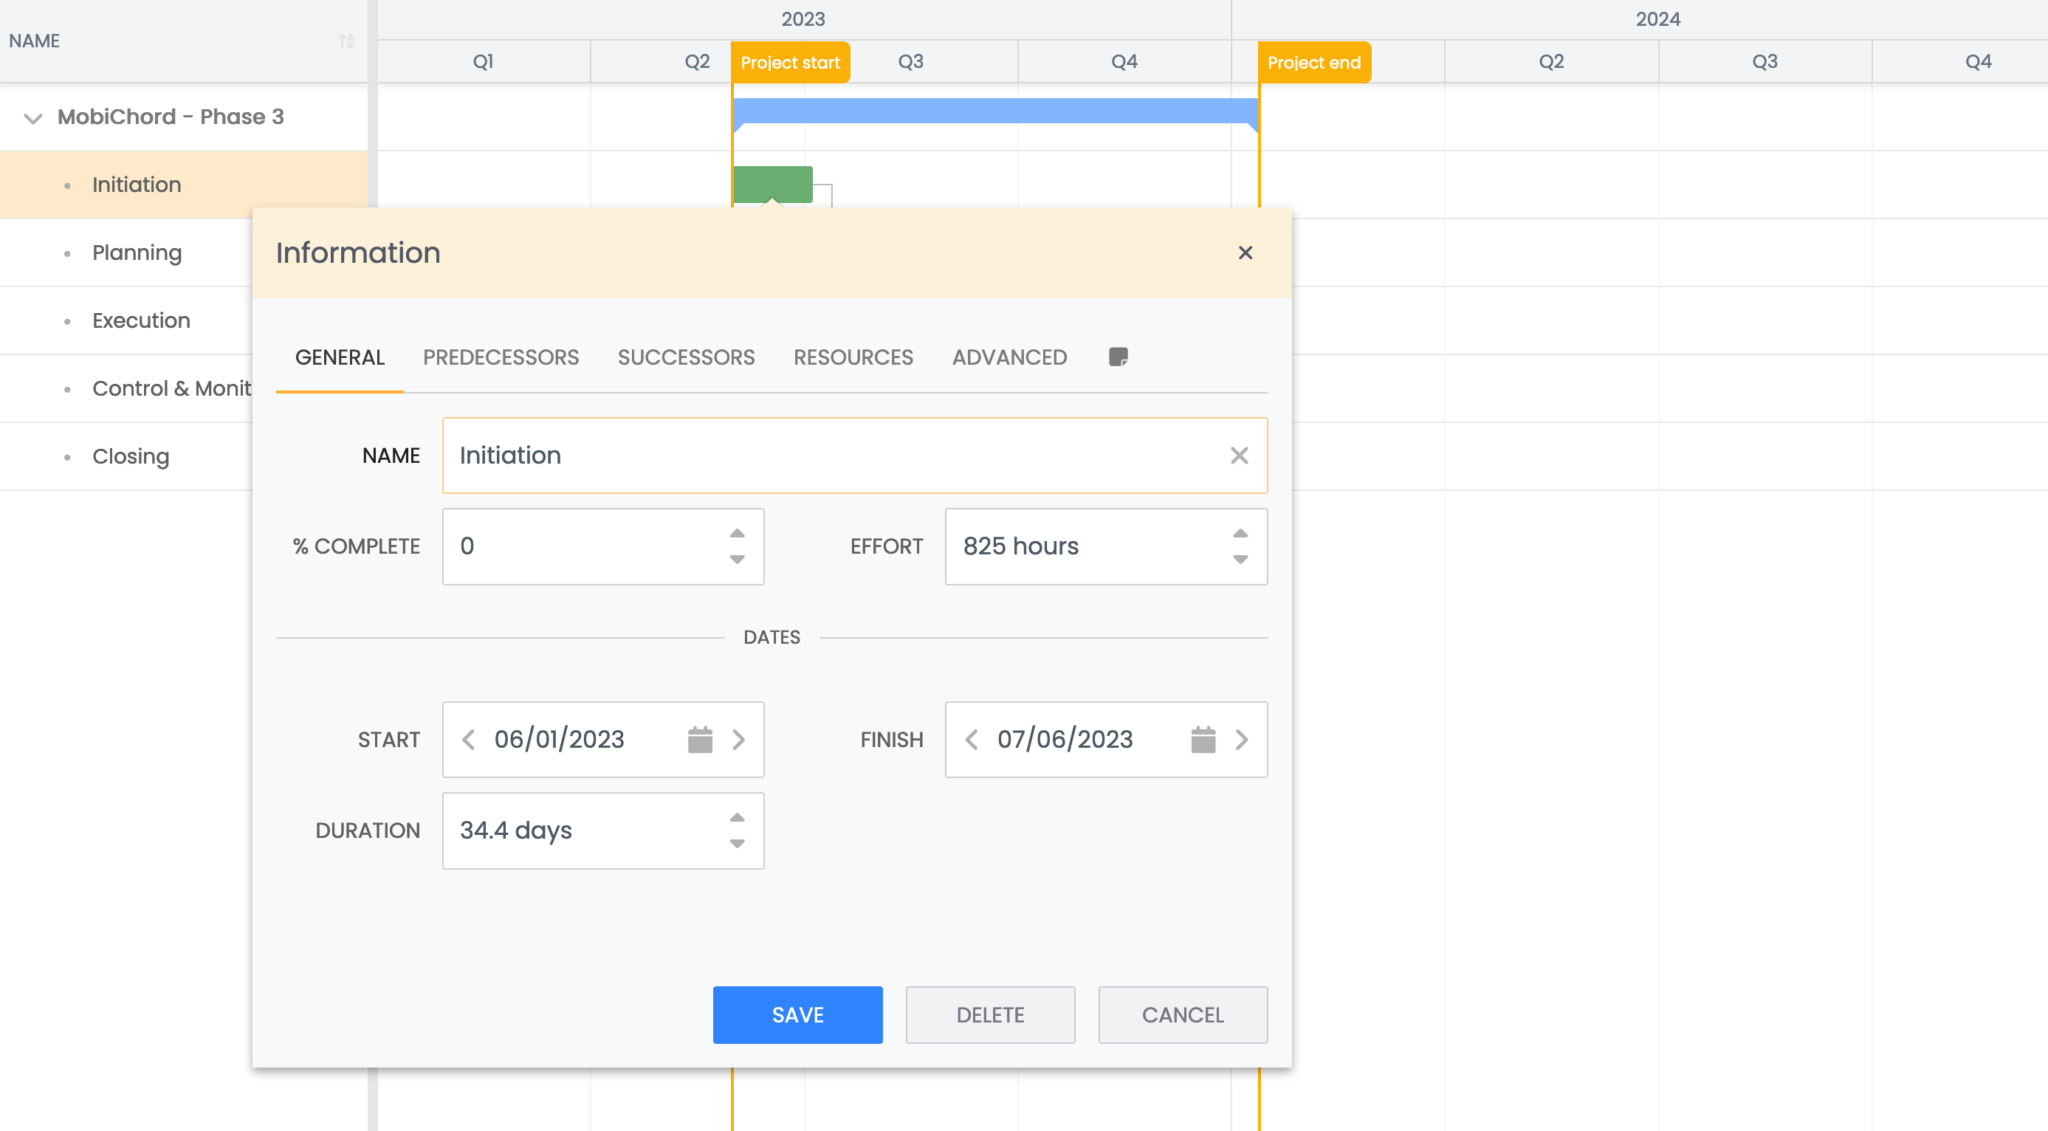
The Gantt chart is interactive. You can drag tasks, resize tasks, and add dependencies using your mouse. You can edit a task by double-clicking it or right-clicking on it and selecting Edit in the menu that opens.
Notice that opening the task editor may be delayed as a new HTTP request is made each time it’s opened. The task editor is server-side rendered.
Let’s create a dependency. Hover your cursor over the Initiation taskbar. You’ll see two grey circles added to the ends of the task. Click and hold on the circle at the end of the task and drag your cursor to the start of the Planning taskbar. When you release, a dependency between the two tasks is added.
Click the save changes icon at the top-right of the Gantt chart.
Getting project data using the ServiceNow REST API Explorer
We’ll use the ServiceNow REST API Explorer to test the ServiceNow REST APIs that perform CRUD operations on our project’s data. Note that a ServiceNow GraphQL API is also available.
Click the All button in your PDI, search for “REST API Explorer”, and select it.
A form will open that you can use to build and send an HTTP request. If prompted, first click the Explore button to get to the form.
On the left-hand side of the form, you can select the API name and the type of HTTP request to make.
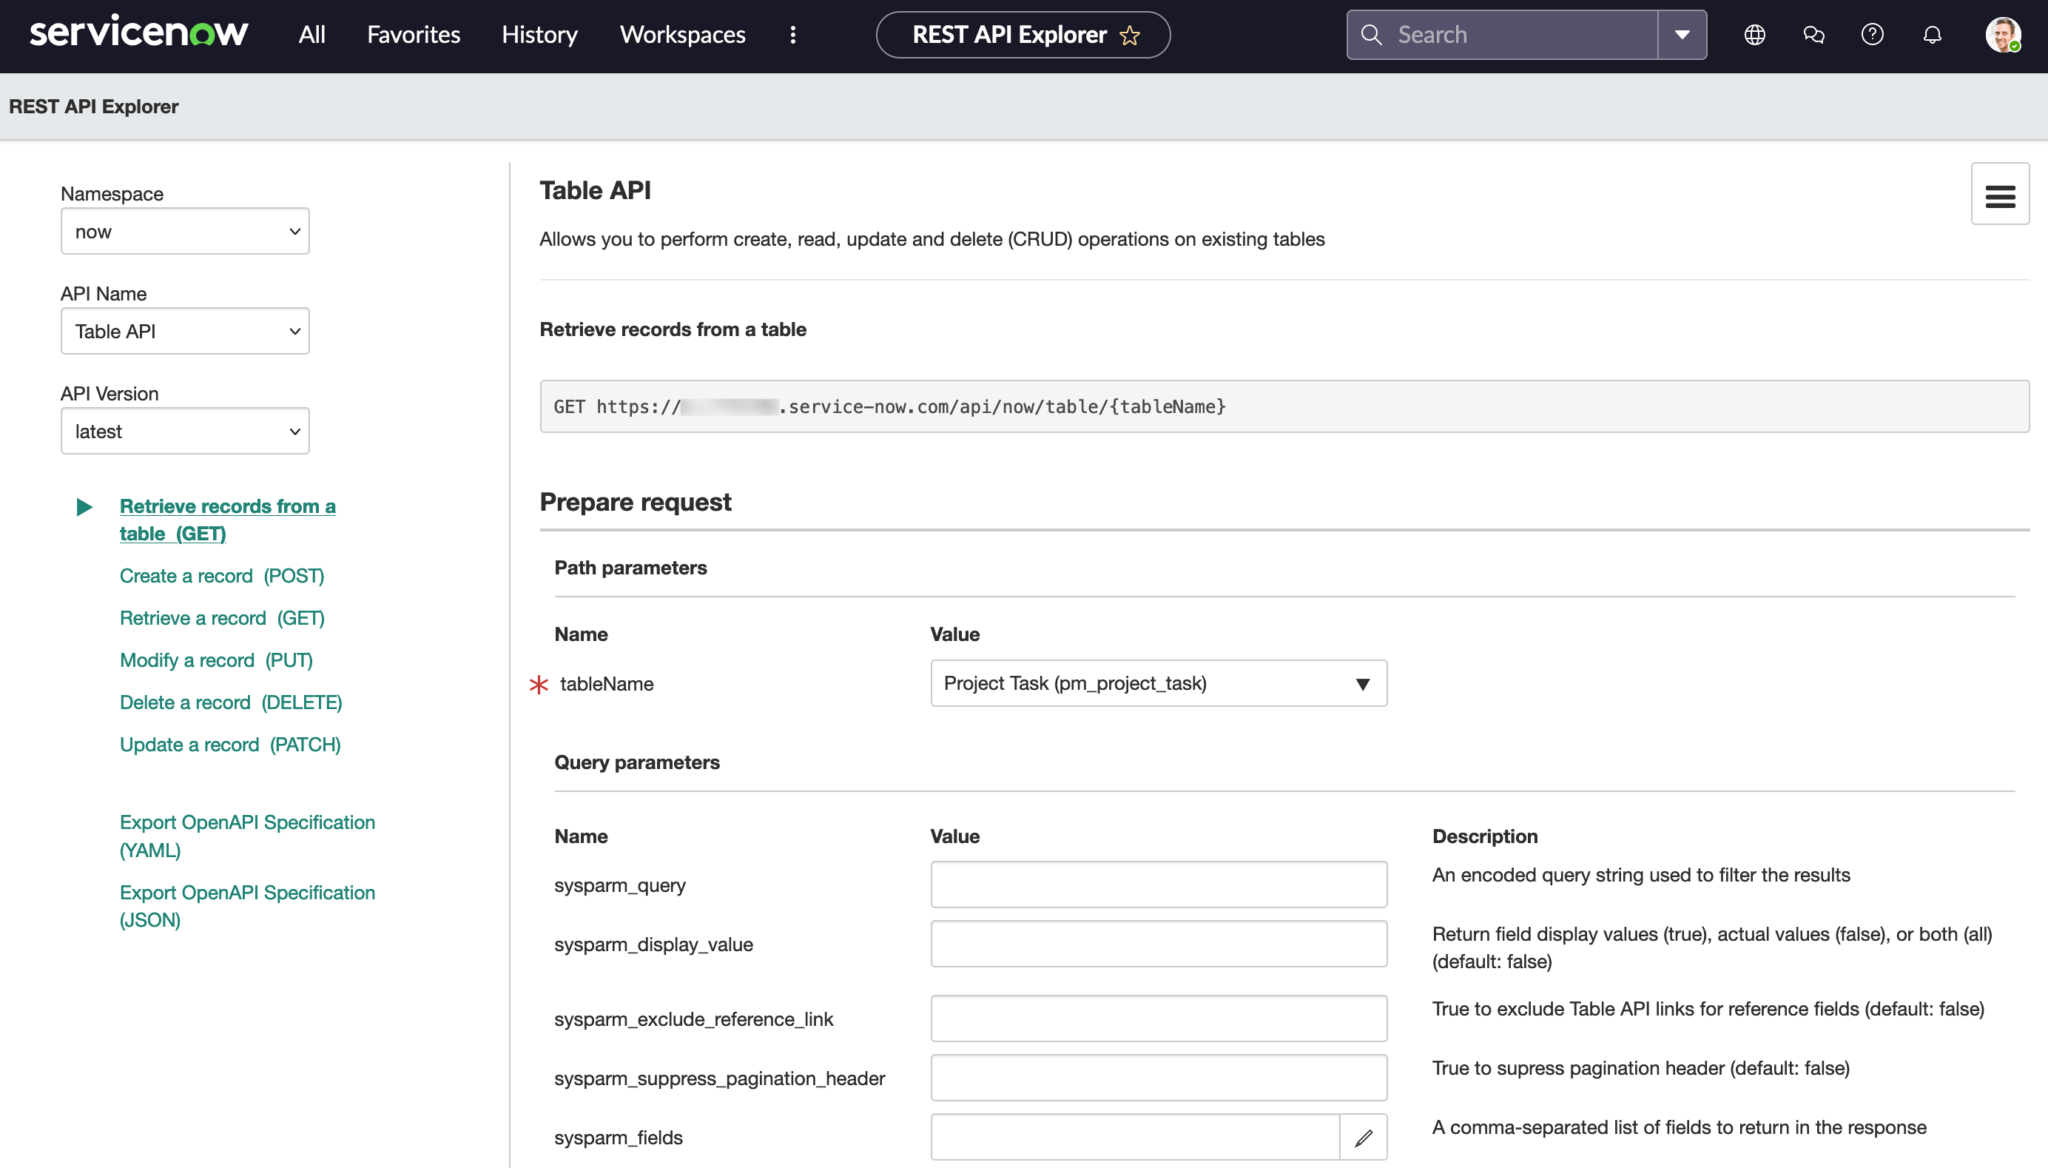
The Table API allows you to perform CRUD operations on existing database tables.
Retrieving all tasks and dependencies in a project
Let’s get all the tasks for our example “MobiChord – Phase 3” project. In the REST API Explorer, set the following form values:
- API Name: Table API
- Select a GET HTTP request: Retrieve records from a table (GET)
- tableName: Project Task (pm_project_task)
Set the following Query parameters:
- sysparm_fields: short_description
- sysparm_limit: 10
- Add a query parameter – sub_tree_root:
<sys_id of project>
PPM tasks and projects are organized in a tree. The sub_tree_root query parameter allows you to retrieve all records that are descendants of a root record in the tree of data.
The sys_id value is a globally unique identifier assigned to each record in your PDI.
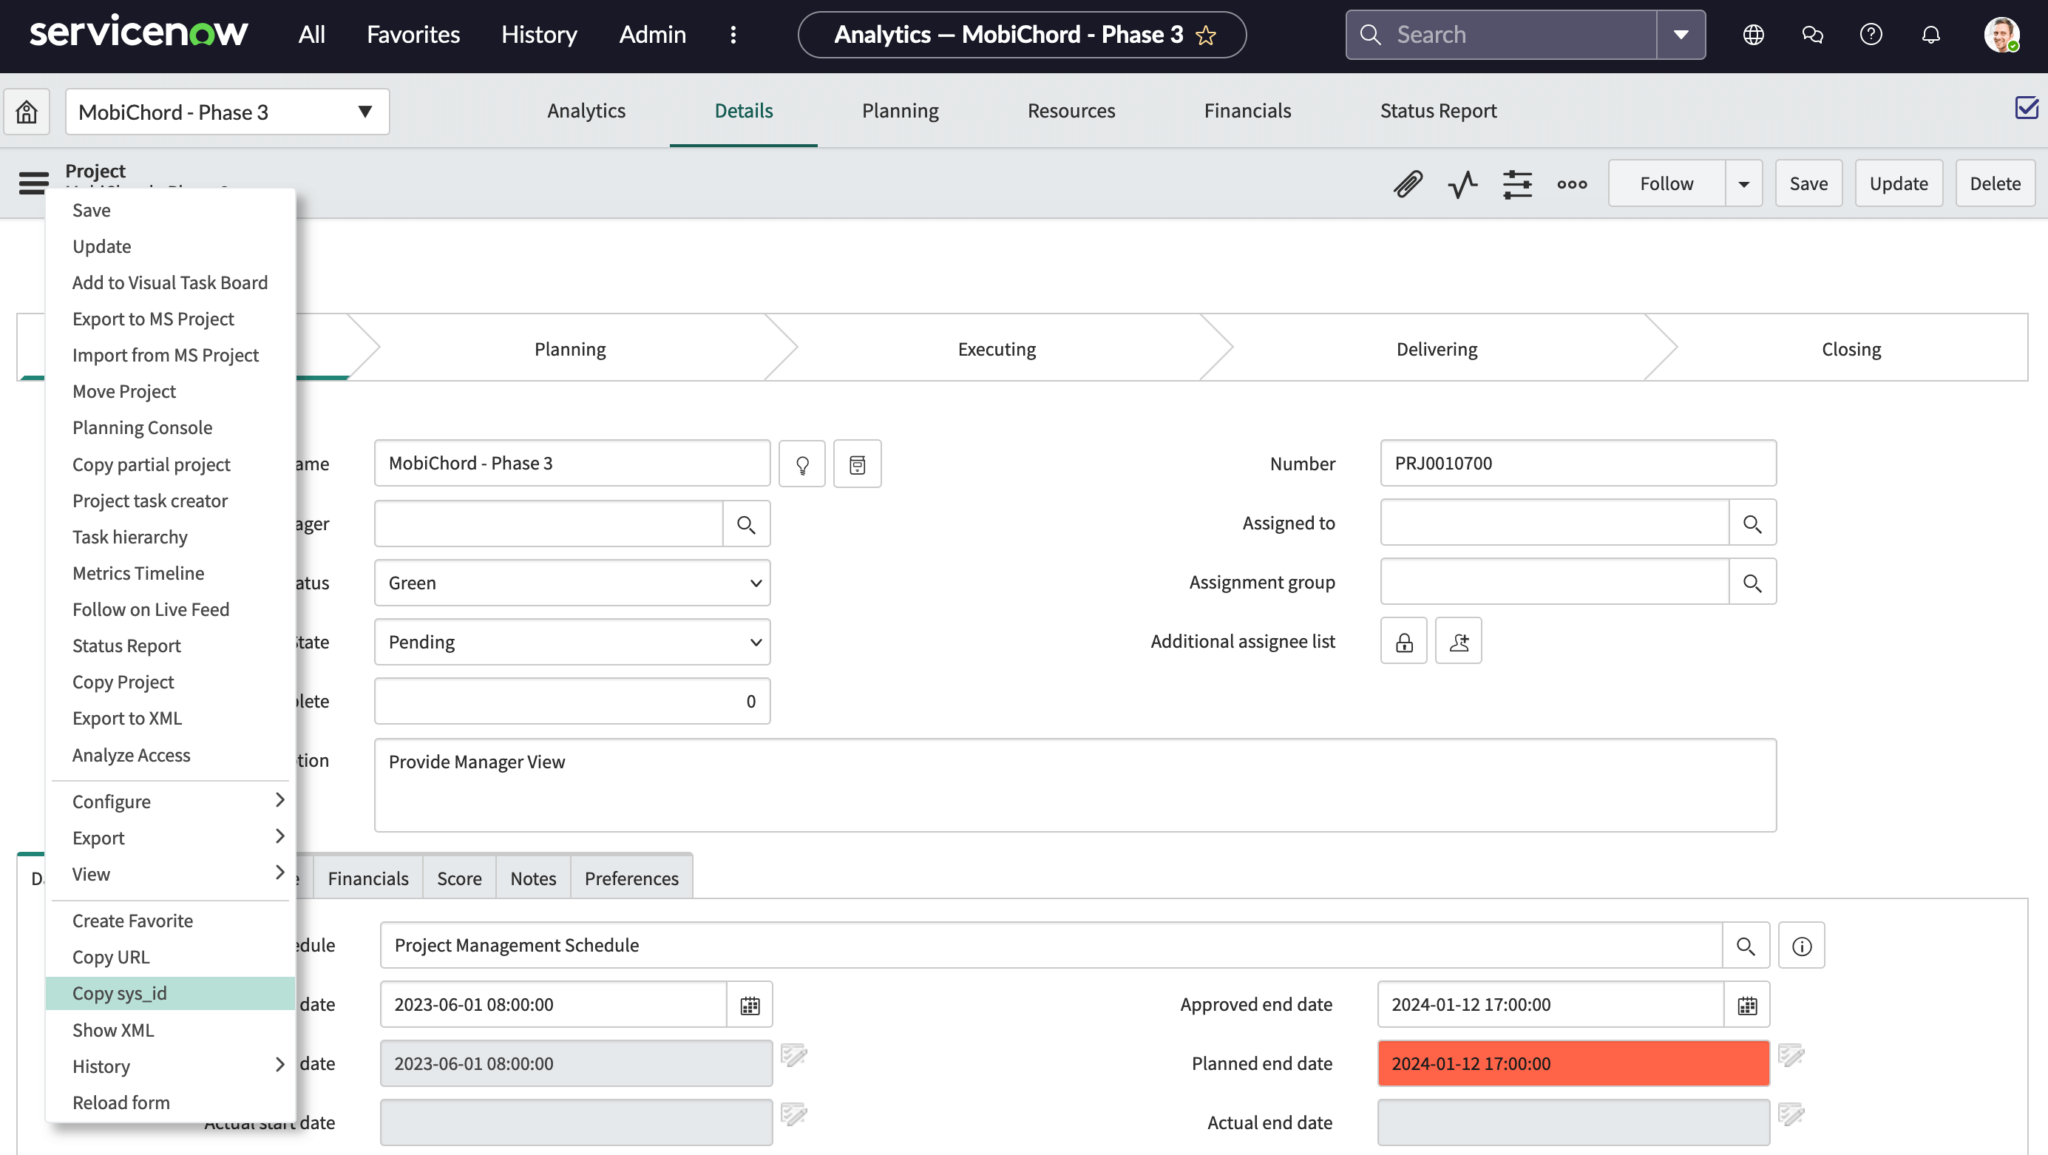
To get the sys_id of your “MobiChord – Phase 3” project, open the project in the My Projects Space page and navigate to the Details tab.

Click on the additional actions menu at the top left of the page and select “Copy sys_id” from the menu to copy it to your clipboard.
Click the Send button in the REST API Explorer form to send the HTTP request. Scroll to the bottom of the page to see the response body. An object will be returned with a “result” property that contains an array of the project’s tasks:
{
  "result": [
    {
      "short_description": "Closing"
    },
    {
      "short_description": "Control & Monitoring"
    },
    {
      "short_description": "Initiation"
    },
    {
      "short_description": "Execution"
    },
    {
      "short_description": "Planning"
    }
  ]
}
When we create the Bryntum Gantt app, we’ll add additional task fields and associated dependencies to include in the response when retrieving data.
Below the Send button, you’ll see a Code samples section where you can find code samples to send this request using commonly used languages.
There’s also a Request section that contains the URI to make this request. We’ll use this URI in our Bryntum Gantt app backend API.
Creating a full-stack Bryntum Gantt application
Clone the Express server starter GitHub repository. The completed-app branch contains the code for the completed tutorial.
Install the dependencies:
npm installA basic Express app defined in the server.js file serves static files in the public folder and provides a way to query the ServiceNow REST API from API routes. The public folder contains the client-side HTML, CSS, and JavaScript files we’ll use to create a Bryntum Gantt. The requests require an authorization header that contains the login details for your ServiceNow PDI.
The utils.js file contains utility functions for converting ServiceNow data to Bryntum Gantt-compatible data and vice versa. We’ll use these utility functions in the Express API routes we create.
We’ll append the Bryntum Gantt to the <div> defined in the public/index.html file. The CSS file contains styling to make the Bryntum Gantt take up the whole screen.
Let’s create a load API to get the tasks and dependencies from our ServiceNow project.
Creating an API endpoint to get the ServiceNow project’s tasks and dependencies
We’ll create two API endpoints in our Express server: /api/load and /api/sync.
We’ll use the /api/sync endpoint to save data changes in the Bryntum Gantt to the ServiceNow project. The Bryntum Gantt Crud Manager will fetch data and sync data changes to the backend. The Crud Manager combines all changes from the Bryntum Gantt data stores (tasks and dependencies) into a single HTTP request, preventing data inconsistencies that can happen if stores are managed separately.
While this tutorial only uses two types of Bryntum Gantt data stores, tasks and dependencies, other available data stores include calendars, assignments, and resources.
In the root folder of your Bryntum Gantt app, create a .env file and add the following environmental variables to it:
PORT=1337
SERVICENOW_PDI_ID=
SERVICENOW_USERNAME=admin
SERVICENOW_PASSWORD=
SERVICENOW_PROJECT_SYS_ID=
To get the sys_id of your project, open the project in the My Projects Space page and navigate to the Details tab. Click on the additional actions menu at the top left of the page and select “Copy sys_id” from the menu to copy it to your clipboard.
Add your PDI’s ServiceNow ID (which you can find in the PDI URL: https://<SERVICENOW_PDI_ID>.service-now.com/), username, and password.
In the server.js file, add the following GET request /api/load route below the app.use(bodyParser.json()); code line:
app.get('/api/load', async(req, res) => {
    try {
        const projectResponse = await fetch(
          `https://${process.env.SERVICENOW_PDI_ID}.service-now.com/api/now/table/pm_project?sysparm_fields=sys_id,short_description,start_date,end_date,wbs_order,percent_complete,description,status,override_status&sys_id=${process.env.SERVICENOW_PROJECT_SYS_ID}`,
          {
              headers : {
                  Accept         : 'application/json',
                  'Content-Type' : 'application/json',
                  Authorization :
                'Basic ' +
                btoa(
                  `${process.env.SERVICENOW_USERNAME}:${process.env.SERVICENOW_PASSWORD}`
                )
              }
          }
        );
        const projectResult = await projectResponse.json();
        const tasksResponse = await fetch(
          `https://${process.env.SERVICENOW_PDI_ID}.service-now.com/api/now/table/pm_project_task?sysparm_fields=relation_applied,relation_applied.parent,relation_applied.lag,relation_applied.sub_type,sys_id,short_description,parent,project,start_date,end_date,wbs_order,percent_complete,description,status,override_status&sub_tree_root=${process.env.SERVICENOW_PROJECT_SYS_ID}`,
          {
              headers : {
                  Accept         : 'application/json',
                  'Content-Type' : 'application/json',
                  Authorization :
                'Basic ' +
                btoa(            `${process.env.SERVICENOW_USERNAME}:${process.env.SERVICENOW_PASSWORD}`
                )
              }
          }
        );
        const tasksResult = await tasksResponse.json();
        const dependencies = [];
        const tasks = tasksResult?.result.map((task) => {
        // add dependencies
            if (task.relation_applied) {
                // calculate lag and lagUnit
                const { lag, lagUnit } = serviceNowDepLagToBryntumDepLag(
                    task['relation_applied.lag']
                );
                dependencies.push({
                    id   : task.relation_applied.value,
                    from : task['relation_applied.parent'].value,
                    to   : task.sys_id,
                    // map to Bryntum Gantt dependency type
                    type : serviceNowDepTypeToBryntumDepType(
                        task['relation_applied.sub_type']
                    ),
                    lag,
                    lagUnit
                });
            }
            return {
                id                : task.sys_id,
                name              : task.short_description,
                parentId          : task.parent.value,
                startDate         : task.start_date,
                endDate           : task.end_date,
                parentIndex       : parseInt(task.wbs_order),
                percentDone       : Math.round(parseInt(task.percent_complete)),
                note              : task.description,
                status            : task.status,
                override_status   : parseInt(task.override_status),
                manuallyScheduled : true,
                expanded          : true
            };
        });
        if (!projectResult?.result[0]) throw new Error('Project data not found');
        const {
            sys_id,
            short_description,
            start_date,
            end_date,
            wbs_order,
            percent_complete,
            description,
            status,
            override_status
        } = projectResult?.result[0];
        tasks.push({
            id                : sys_id,
            name              : short_description,
            parentId          : null,
            startDate         : start_date,
            endDate           : end_date,
            parentIndex       : parseInt(wbs_order),
            percentDone       : Math.round(parseInt(percent_complete)),
            note              : description,
            status            : status,
            override_status   : parseInt(override_status),
            manuallyScheduled : true,
            expanded          : true
        });
        res.send({
            success : true,
            tasksResult,
            tasks   : {
                rows : tasks
            },
            dependencies : {
                rows : dependencies
            }
        });
    }
    catch (error) {
        console.error(error);
        res.send({
            success : false,
            message : 'There was an error getting the tasks'
        });
    }
});
Import the following utility functions from the utils.js file:
import {
    serviceNowDepLagToBryntumDepLag,
    serviceNowDepTypeToBryntumDepType
} from './utils.js';
We make two fetch requests in the API route. The first request fetches the project data from the ServiceNow project management project table called “pm_project”. We find the specific “MobiChord – Phase 3” project by adding its sys_id to the query parameters. We limit the data returned by adding only the fields we need to the sysparm_fields query parameter. This fetch request is a modified version of the example JavaScript code provided for this GET request by the ServiceNow REST API Explorer.
The second fetch request gets the tasks and dependencies for the project. After fetching the data, we loop through the fetched tasksResult data and modify the data structure so that it’s formatted for a Bryntum Gantt.
We also populate the dependencies array by checking if any dependencies have been applied to a task. We do this by checking if the relation_applied property has been populated for each task. If so, we structure the dependency to match the structure of a Bryntum Gantt dependency. We use two helper functions from the utils.js file, serviceNowDepLagToBryntumDepLag and serviceNowDepTypeToBryntumDepType, to get the values for the lag, lagUnit, and type dependency fields.
We then add the data for the project to the tasks array and sort the array in descending order, based on its parentIndex value.
The Bryntum Gantt Crud Manager expects the data it receives from the /api/load API endpoint to have a specific structure.
Run the development server locally using the following command:
npm startOpen your browser to the load API URL at https://localhost:1337/api/load and you’ll see the task and dependency data from your ServiceNow project:
{
  "success": true,
  "tasksResult": {
    "result": [
      {
        "end_date": "2022-07-02 00:00:00",
        "short_description": "Closing"
        // ...
      }
    ]
  }
}
Creating a Bryntum Gantt
You can try out Bryntum components for free using our public Bryntum trial packages.
If you have a Bryntum license, please refer to our npm Repository Guide to access the private Bryntum repository.
In the index.js file in the public folder, add the following lines of code to create a Bryntum Gantt instance:
import { Gantt } from './gantt.module.js';
const gantt = new Gantt({
    appendTo   : 'app',
    viewPreset : 'year',
    barMargin  : 10,
    project : {
        taskStore : {
            transformFlatData : true
        },
        loadUrl          : 'https://localhost:1337/api/load',
        autoLoad         : true,
        syncUrl          : 'https://localhost:1337/api/sync',
        autoSync         : true,
        // This config enables response validation and dumping of found errors to the browser console.
        // It's meant to be used as a development stage helper only so please set it to false for production.
        validateResponse : true
    },
    columns : [{ type : 'name', field : 'name', width : 250 }]
});
The Bryntum Gantt will be appended to the <div> with an id of app in the index.html file. The project holds and links the data stores, and we configure it to load data from the /api/load API endpoint on page load. The Bryntum Gantt project Crud Manager loads data from the loadUrl and saves changes to the syncUrl, using the Fetch API for requests and JSON as the encoding format.
As the task data we receive from the ServiceNow API has a flat data structure, the task store is configured to transform flat data into a tree data structure.
Add the following line of code to your server.js file, below the app.use(express.static(path.join(__dirname, 'public'))); line:
app.use(express.static(path.join(__dirname, '/node_modules/@bryntum/gantt')));This code makes the Bryntum Gantt npm library files accessible from the public folder.
Add the following <link> HTML tag to the <head> of the index.html file:
<link rel="stylesheet" href="./gantt.stockholm.css" data-bryntum-theme>This adds the Stockholm theme styling to the Bryntum Gantt. Bryntum Gantt can be styled using one of five Bryntum themes, using multiple themes, or by creating a custom theme.
Now run the local server and browse to https://localhost:1337/ to see the Bryntum Gantt populated with the ServiceNow project tasks and dependencies data:
Creating custom Bryntum Gantt fields
The Bryntum Gantt and ServiceNow project data share some overlap in their task and dependency fields, for example, the start-date and end-date fields. Let’s add custom fields to the Bryntum Gantt project to accommodate ServiceNow-specific data.
In the public folder, create a folder called lib. Create a file called CustomTaskModel.js in the lib folder and add the following lines of code to it:
import { TaskModel } from '../gantt.module.js';
// Custom event model
export default class CustomTaskModel extends TaskModel {
    static $name = 'CustomTaskModel';
    static fields = [
        { name : 'status', type : 'string', defaultValue : 'red' },
        { name : 'override_status', type : 'boolean', defaultValue : false }
    ];
}
We create a custom task model by extending the existing TaskModel and adding status and override_status fields to the static fields property. We return the data for these additional fields through the /api/load API endpoint.
To use this custom task model in the Bryntum Gantt, add the following property to the project configuration in the Gantt’s index.js file:
eventModelClass: CustomTaskModel,Import the custom task model:
import CustomTaskModel from './lib/CustomTaskModel.js';In the development server, right-click on a task and select Edit from the popup menu to open the task editor.
Notice that the task editor displays no inputs for the custom task fields. Let’s add them.
Copy the following features property and paste it into the Bryntum Gantt config:
features : {
taskEdit : {
items : {
generalTab : {
items : {
statusField : {
type : 'combo',
label : 'Status',
name : 'status',
items : ['red', 'yellow', 'green'],
required : 'true'
},
overrideStatusField : {
type : 'checkbox',
label : 'Override status',
labelPosition : 'before',
name : 'override_status'
}
}
}
}
}
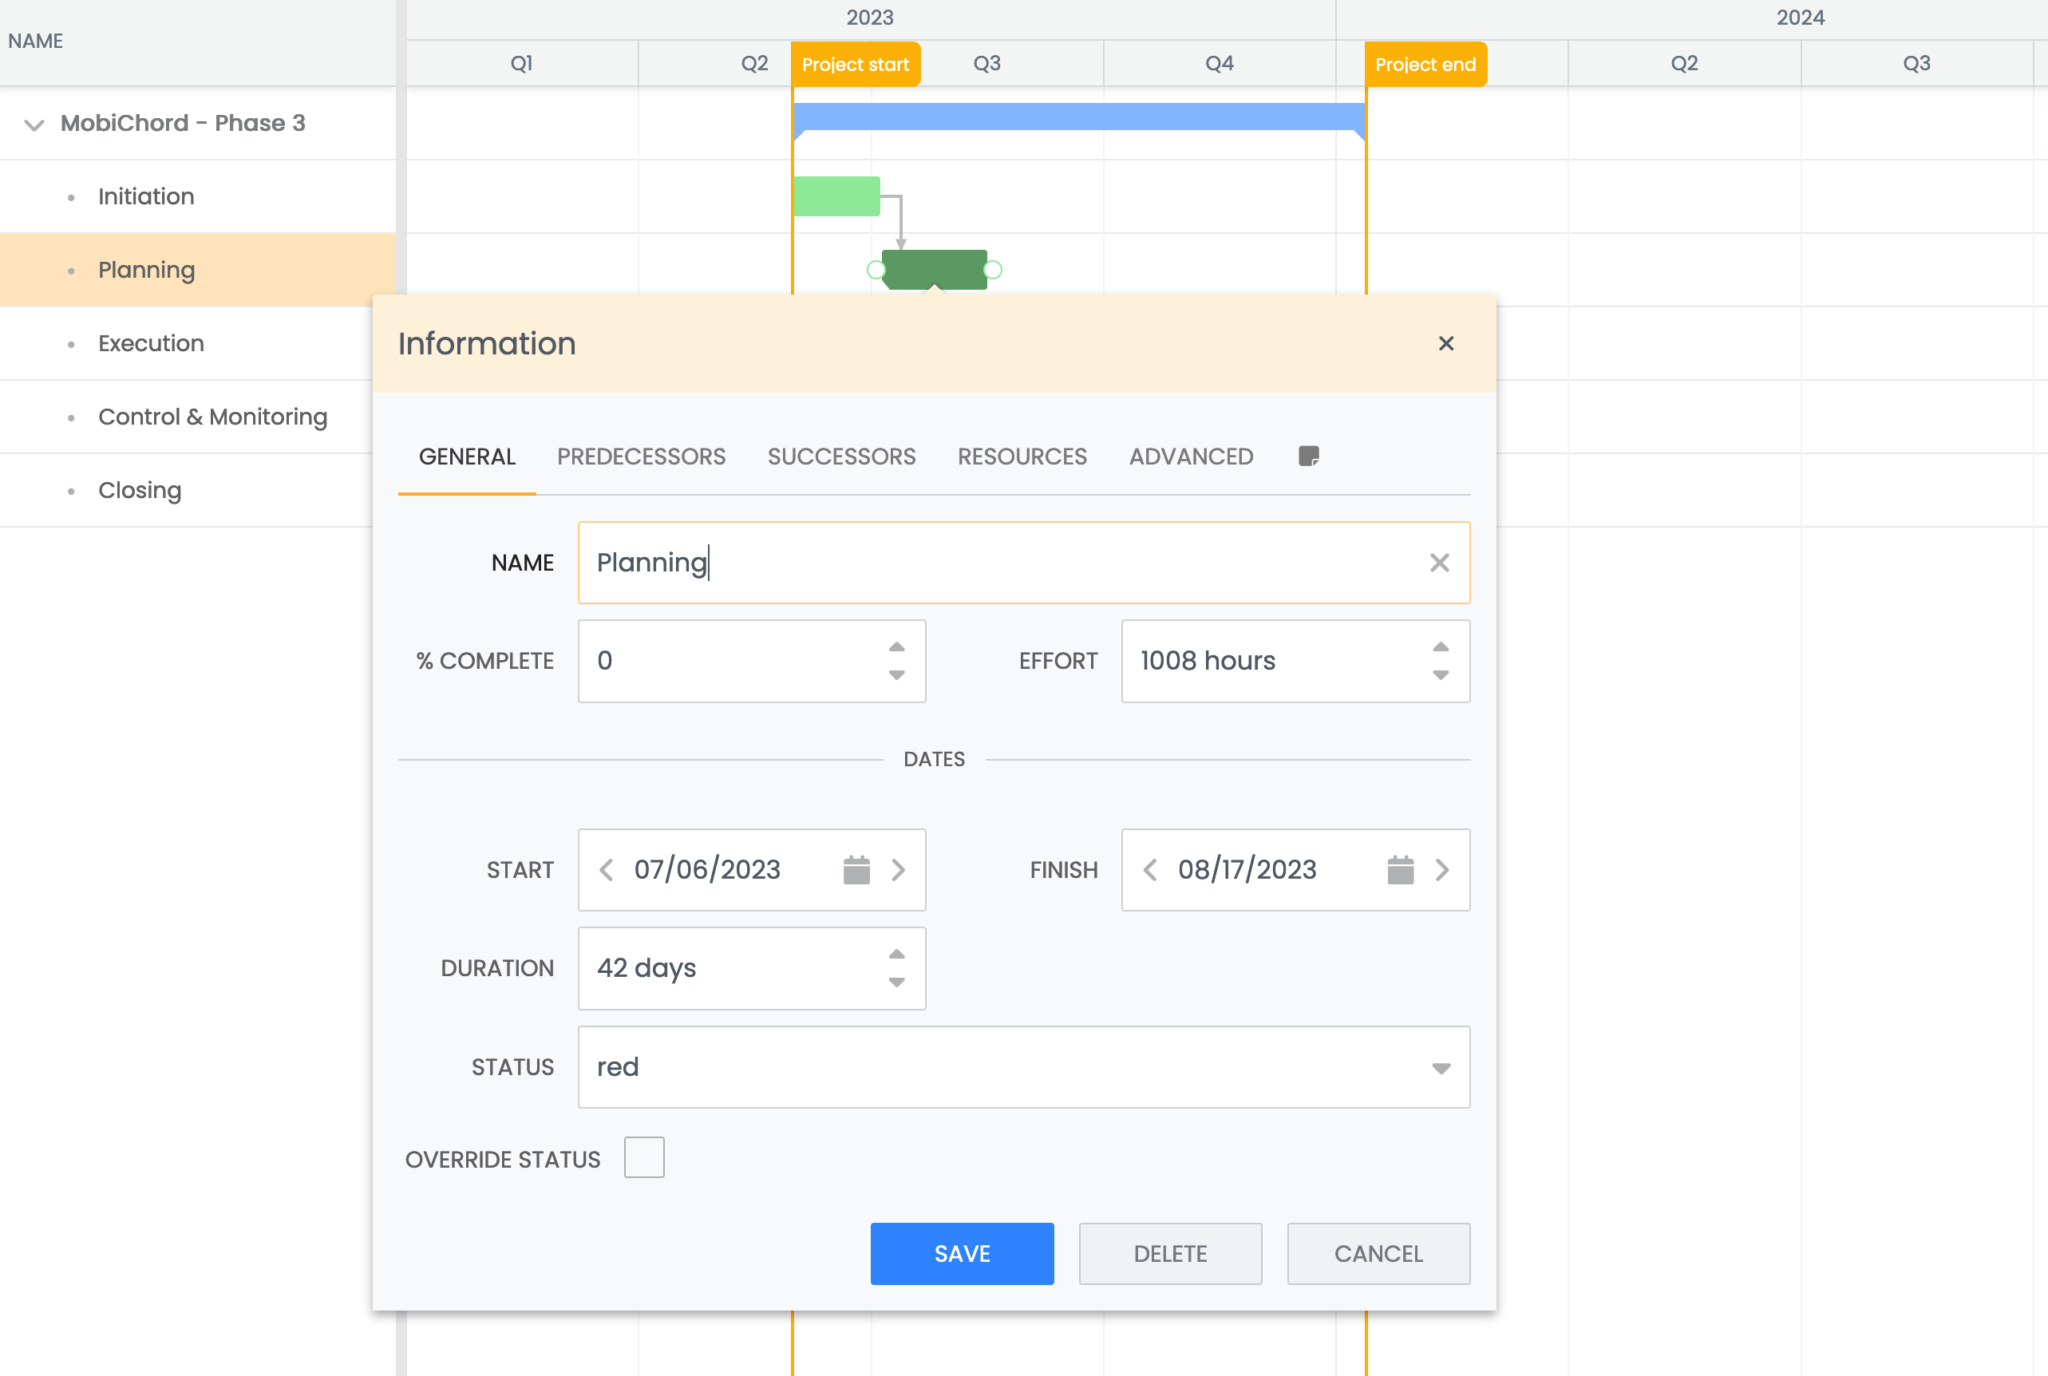
}The taskEdit feature allows you to customize the task editor. We added the two custom fields as inputs in the General tab.
Now you’ll see the inputs for the custom fields in the task editor:
Next, we’ll create an API endpoint to save data changes in the Bryntum Gantt to the ServiceNow project.
Creating an API endpoint to sync Bryntum Gantt data changes to the ServiceNow project
We’ll use a single API endpoint to save data changes in the Bryntum Gantt to the ServiceNow project.
In the server.js file, add the following /api/sync route below the /api/load route:
app.post('/api/sync', async function(req, res) {
    const { requestId, tasks, dependencies } = req.body;
    try {
        const response = { requestId, success : true };
        // if task changes are passed
        if (tasks) {
            const rows = await applyTableChanges('tasks', tasks);
            // if got some new data to update client
            if (rows) {
                response.tasks = { rows };
            }
        }
        // if dependency changes are passed
        if (dependencies) {
            const rows = await applyTableChanges('dependencies', dependencies);
            // if got some new data to update client
            if (rows) {
                response.dependencies = { rows };
            }
        }
        res.send(response);
    }
    catch (error) {
        console.error(error);
        res.send({
            requestId,
            success : false,
            message : 'There was an error syncing the data changes'
        });
    }
});
Define the applyTableChanges function at the end of the server.js file:
async function applyTableChanges(table, changes) {
    let rows;
    if (changes.added) {
        rows = await createOperation(changes.added, table);
    }
    if (changes.updated) {
        await updateOperation(changes.updated, table);
    }
    if (changes.removed) {
        await deleteOperation(changes.removed, table);
    }
    // if got some new data to update client
    return rows;
}
The /api/sync route handler checks the request body of a sync POST request to determine which CRUD action should be performed on the project data. The applyTableChanges function is called to perform the CRUD operations using helper functions.
Next, we’ll define the CRUD operation helper functions.
Creating a task
Add the following createOperation function at the end of the server.js file:
function createOperation(added, table) {
    return Promise.all(
        added.map(async(record) => {
            const { $PhantomId, ...data } = record;
            let result;
            if (table === 'tasks') {
                const taskData = {
                    short_description : data.name,
                    parent            : data.parentId,
                    start_date        : formatDateServiceNow(data.startDate),
                    end_date          : formatDateServiceNow(data.endDate),
                    duration          : calculateDuration(data.startDate, data.endDate),
                    project           : process.env.SERVICENOW_PROJECT_SYS_ID,
                    wbs_order         : data.parentIndex+1,
                    description       : data.note,
                    status            : data.status,
                    override_status   : parseInt(data.override_status),
                    constraint_date   : formatDateServiceNow(data.startDate),
                    time_constraint   : "snet",
                };
                const createTaskResponse = await fetch(
                  `https://${process.env.SERVICENOW_PDI_ID}.service-now.com/api/now/table/pm_project_task`,
                  {
                      method  : 'POST',
                      headers : {
                          Accept         : 'application/json',
                          'Content-Type' : 'application/json',
                          Authorization :
                        'Basic ' +
                        btoa(
                          `${process.env.SERVICENOW_USERNAME}:${process.env.SERVICENOW_PASSWORD}`
                        )
                      },
                      body : JSON.stringify(taskData)
                  }
                );
                const createTaskResJSON = await createTaskResponse.json();
                result = createTaskResJSON?.result;
            }
            if (table === 'dependencies') {
            }
            // Report to the client that the record identifier has been changed
            return { $PhantomId, id : result?.sys_id };
        })
    );
}
We loop through the added store records. If a task should be created, we create a taskData object. This object maps the Bryntum Gantt task fields to the equivalent ServiceNow project task fields. We use the formatDateServiceNow utility function from our utils.js function to format the start date and end date fields for ServiceNow. The calculateDuration utility method is used to calculate the task duration, which in ServiceNow is the number of days and time from January 1, 1970, 00:00:00.
The fetch request is a modified version of the example JavaScript code provided for this POST request by the ServiceNow REST API Explorer.
We return the added store item’s ID and phantom ID (a unique auto-generated client-side value used to identify a record) so that the Bryntum Gantt can set the correct ServiceNow-generated ID for the added item. The phantom ID should not be persisted in the database. The backend should assign new IDs for records.
Import the utility functions we used to create the taskData object:
import { formatDateServiceNow, calculateDuration } from './utils.js';Creating a dependency
We’ll now add the code to create a new ServiceNow task dependency. Add the following code to the if statement in the createOperation function where table === 'dependencies' is:
const dependencyData = {
    parent   : data.from,
    child    : data.to,
    sub_type : bryntumDepTypeToServiceNowDepType(data.type),
    lag      : bryntumGanttDepLagToServiceNowDepLag(data.lag, data.lagUnit)
};
const createDependencyResponse = await fetch(
    `https://${process.env.SERVICENOW_PDI_ID}.service-now.com/api/now/table/planned_task_rel_planned_task`,
    {
        method  : 'POST',
        headers : {
            Accept         : 'application/json',
            'Content-Type' : 'application/json',
            Authorization :
          'Basic ' +
          btoa(
            `${process.env.SERVICENOW_USERNAME}:${process.env.SERVICENOW_PASSWORD}`
          )
        },
        body : JSON.stringify(dependencyData)
    }
);
const createDependencyResJSON = await createDependencyResponse.json();
result = createDependencyResJSON?.result;
Import the utility functions that we used to create the dependencyData object:
import { bryntumDepTypeToServiceNowDepType, bryntumGanttDepLagToServiceNowDepLag } from './utils.js';The code used to create a dependency is similar to the code used to create a task. The fetch request makes a POST request to the ServiceNow REST API to add the task dependency in the Planned Task Relationship table called planned_task_rel_planned_task.
Deleting a task
Add the following deleteOperation function at the end of the server.js file:
function deleteOperation(deleted, table) {
    return Promise.all(
        deleted.map(async(record) => {
            const { id } = record;
            if (table === 'tasks') {
                await fetch(
                  `https://${process.env.SERVICENOW_PDI_ID}.service-now.com/api/now/table/pm_project_task/${id}`,
                  {
                      method  : 'DELETE',
                      headers : {
                          Accept         : 'application/json',
                          'Content-Type' : 'application/json',
                          Authorization :
                        'Basic ' +
                        btoa(
                          `${process.env.SERVICENOW_USERNAME}:${process.env.SERVICENOW_PASSWORD}`
                        )
                      }
                  }
                );
            }
            if (table === 'dependencies') {
            }
        })
    );
}
We loop through the items to delete. For each item, we get the ID of the record. If a task is deleted, we make a DELETE request to the ServiceNow API. The ID of the task is added to the URL as a route parameter.
Deleting a dependency
To delete a dependency, add the following code to the if statement in the deleteOperation function where table === 'dependencies' is:
await fetch(
    `https://${process.env.SERVICENOW_PDI_ID}.service-now.com/api/now/table/planned_task_rel_planned_task/${id}`,
    {
        method  : 'DELETE',
        headers : {
            Accept         : 'application/json',
            'Content-Type' : 'application/json',
            Authorization :
          'Basic ' +
          btoa(
            `${process.env.SERVICENOW_USERNAME}:${process.env.SERVICENOW_PASSWORD}`
          )
        }
    }
);
We delete the task dependency from the planned_task_rel_planned_task ServiceNow table.
Updating a task
Add the following updateOperation function at the end of the server.js file:
function updateOperation(updated, table) {
    let result;
    return Promise.all(
        updated.map(async({ id, ...data }) => {
            const updateBody = {};
            if (table === 'tasks') {
                for (const [key, value] of Object.entries(data)) {
                    if (bryntumTaskFieldsToServiceNowFields[key]) {
                        updateBody[bryntumTaskFieldsToServiceNowFields[key]] = value;
                    }
                }

                // format dates and add required ServiceNow duration field
                // 2 possible cases for updating a task date:
                if (updateBody?.start_date && updateBody?.end_date) {
                    updateBody.start_date = formatDateServiceNow(data.startDate);
                    updateBody.end_date = formatDateServiceNow(data.endDate);
                    updateBody.duration = calculateDuration(data.startDate, data.endDate);
                    updateBody.percent_complete = `${data.percentDone}`;
                }
                else if (updateBody?.end_date && updateBody?.duration) {
                    const startDate = calcStartDate(
                        data.endDate,
                        data.duration,
                        data?.durationUnit
                    );
                    updateBody.end_date = formatDateServiceNow(data.endDate);
                    updateBody.start_date = startDate;
                    updateBody.duration = calculateDuration(startDate, data.endDate);
                }

                if (typeof updateBody.wbs_order === 'number'
                ) {
                    updateBody.wbs_order += 1;
                }

                const projectResponse = await fetch(
                    `https://${process.env.SERVICENOW_PDI_ID}.service-now.com/api/now/table/pm_project?sysparm_fields=sys_id,short_description,start_date,end_date,wbs_order,percent_complete,description,status,override_status&sys_id=${process.env.SERVICENOW_PROJECT_SYS_ID}`,
                    {
                        headers : {
                            Accept         : 'application/json',
                            'Content-Type' : 'application/json',
                            Authorization :
                            'Basic ' +
                            btoa(
                            `${process.env.SERVICENOW_USERNAME}:${process.env.SERVICENOW_PASSWORD}`
                            )
                        }
                    }
                );
                let table = 'pm_project_task';
                const projectResult = await projectResponse.json();
                if (projectResult?.result[0]){
                    const { sys_id } = projectResult?.result[0];
                    if (sys_id === id){
                        table = 'pm_project';
                    }
                }

                await fetch(
                    `https://${process.env.SERVICENOW_PDI_ID}.service-now.com/api/now/table/${table}/${id}`,
                    {
                        method  : 'PATCH',
                        headers : {
                            Accept         : 'application/json',
                            'Content-Type' : 'application/json',
                            Authorization :
                        'Basic ' +
                        btoa(
                            `${process.env.SERVICENOW_USERNAME}:${process.env.SERVICENOW_PASSWORD}`
                        )
                        },
                        body : JSON.stringify(updateBody)
                    }
                );
            }
            if (table === 'dependencies') {

            }
        })
    );
}
We loop through all the records to update. If tasks must be updated, we loop through the fields of the record and use the bryntumTaskFieldsToServiceNowFields helper method to map the Bryntum event fields to ServiceNow and save the result in the updateBody object. Import this method from the utils.js file:
import { calcStartDate, bryntumTaskFieldsToServiceNowFields } from './utils.js';The passed-in updates only include the fields that have changed. We need the startDate, endDate, and duration values to update the ServiceNow project task. If the startDate has not changed, we calculate its value using the calcStartDate helper function. We pass in the endDate, duration, and durationUnit values as arguments for the helper function.
We then make a PATCH HTTP request to the ServiceNow REST API, passing in the updateBody object in the request’s body.
Updating a dependency
Add the following code to the if statement in the updateOperation function where table === 'dependencies' is:
for (const [key, value] of Object.entries(data)) {
    if (bryntumDependencyFieldsToServiceNowFields[key]) {
        updateBody[bryntumDependencyFieldsToServiceNowFields[key]] = value;
    }
}

updateBody.sub_type = bryntumDepTypeToServiceNowDepType(data.type);
updateBody.lag = bryntumGanttDepLagToServiceNowDepLag(
    data.lag,
    data.lagUnit
);

// 1. delete dependency then create new one. In ServiceNow it's a good practice to delete a relationship and create a new one between the correct tasks

await fetch(
    `https://${process.env.SERVICENOW_PDI_ID}.service-now.com/api/now/table/planned_task_rel_planned_task/${id}`,
    {
        method  : 'DELETE',
        headers : {
            Accept         : 'application/json',
            'Content-Type' : 'application/json',
            Authorization :
          'Basic ' +
          btoa(
            `${process.env.SERVICENOW_USERNAME}:${process.env.SERVICENOW_PASSWORD}`
          )
        }
    }
);

const createDependencyResponse = await fetch(
    `https://${process.env.SERVICENOW_PDI_ID}.service-now.com/api/now/table/planned_task_rel_planned_task`,
    {
        method  : 'POST',
        headers : {
            Accept         : 'application/json',
            'Content-Type' : 'application/json',
            Authorization :
          'Basic ' +
          btoa(
            `${process.env.SERVICENOW_USERNAME}:${process.env.SERVICENOW_PASSWORD}`
          )
        },
        body : JSON.stringify(updateBody)
    }
);

const createDependencyResJSON = await createDependencyResponse.json();
result = createDependencyResJSON?.result;
// Report to the client that the record identifier has been changed
return { oldId: id, newId: result?.sys_id };
Import the bryntumDependencyFieldsToServiceNowFields utility function:
import { bryntumDependencyFieldsToServiceNowFields } from './utils.js';Updating a dependency is different from updating a task. To update a dependency, we first delete the existing dependency and then create a new one. This is a recommended practice in ServiceNow. If you only update a dependency, the old dependency link to a task remains and the new dependency link to a task has a new sys_id.
If a dependency is created, we return the old ID and new ID to the client. To do this we need to modify the applyTableChanges function. Replace the applyTableChanges function with the following code:
async function applyTableChanges(table, changes) {
    let rows;
    let moreRows;
    if (changes.added) {
        rows = await createOperation(changes.added, table);
    }
    if (changes.updated) {
        moreRows = await updateOperation(changes.updated, table);
    }
    if (changes.removed) {
        await deleteOperation(changes.removed, table);
    }
    // if we got some new data to update client
    if (!moreRows) return rows;
    if (moreRows[0] == null) return rows;
    return moreRows;
}
We need to adjust our Bryntum Gantt to handle the custom modification to the response it will receive. We also need the Bryntum Gantt Crud Manager to send all the data when a dependency changes, not just the fields that have changed. To do this, add the following configuration property and event listener to the Bryntum Gantt project config in the public/index.js file:
dependencyStore : {
    // Setting to true will ensure this field is included in any update/insert request payload when a Store/Project/CrudManager performs a request
    writeAllFields : true
},
onSync({ response }) {
    if (
        response?.dependencies?.rows.length &&
      response.dependencies.rows[0]?.oldId
    ) {
        const { oldId, newId } = response.dependencies.rows[0];
        // temporarily disable autoSync to avoid sending the change back to the server
        gantt.project.autoSync = false;
        gantt.dependencyStore.getById(oldId).id = newId;
        gantt.project.autoSync = true;
    }
}
We modify the Crud Manager to send all dependency record fields when a dependency is changed by setting writeAllFields to true.
Disabling ServiceNow business rules to enable all task and dependency updates
We need to disable two ServiceNow Business Rules to enable all task and dependency updates: “Disable the Change of Planned Dates” and “Prevent relations to WIP/Closed tasks”. Business Rules are server-side logic executed when database records are queried, updated, inserted, or deleted.
In your ServiceNow PDI, do the following to disable these rules:
- Click the All button at the top left of your PDI home page. In the filter search input, type “business rules”. Click on the Business Rules item under System Definition.
- Search for “Disable the Change of Planned Dates”. Click on the name of the business rule in the table to open the business rule editor.
- Uncheck the “Active” checkbox and then click the “Update” button.
Repeat the above steps for the “Prevent relations to WIP/Closed tasks” business rule.
Now we can test our Bryntum Gantt. Run the local development server:
npm startOpen the development server URL: https://localhost:1337/.
Now try to create, update, delete, and edit items in the Bryntum Gantt chart. You’ll see the changes reflected in your ServiceNow project.
Next steps
This tutorial gives you a starting point for creating a Bryntum Gantt chart using vanilla JavaScript and syncing it with a ServiceNow project.
There are many ways you can improve your Bryntum Gantt chart, for example, you can add features like tree grouping. Take a look at our demos page to see demos of the available features.
You can also add more custom Bryntum Gantt fields for other ServiceNow task fields.