How to build a React Gantt chart in Microsoft Power Apps using Bryntum, Power Apps component framework, and Dataverse
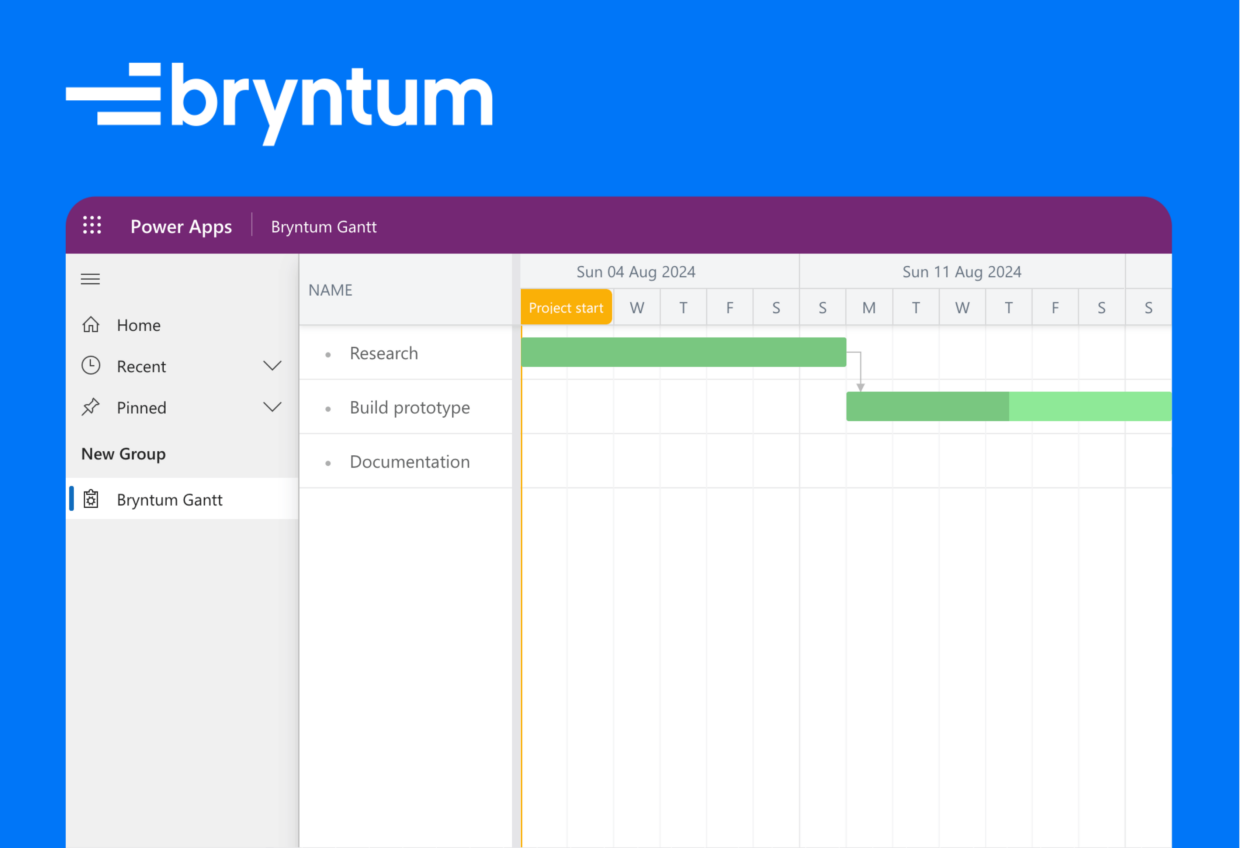
Microsoft Power Apps is a collection of apps, services, connectors, and a data platform for building custom apps without needing to write code. You can connect your custom app to different data sources such as Excel, Microsoft SQL Server, and Microsoft Dataverse. Dataverse is the cloud data platform for the Microsoft Power Platform, which Power Apps is a part of.
The Power Apps component framework (PCF) allows developers to create custom Power Apps components using HTML, CSS, and JavaScript. The framework also has various APIs to simplify development, such as the Web API that provides methods to perform database CRUD operations. The Power Apps component framework supports using React, which the Power Apps platform uses, to build components.
Bryntum Gantt is a performant, fully customizable Gantt chart that you can use with major JavaScript frameworks and even Salesforce.
In this tutorial, we’ll create a Bryntum Gantt PCF component and add it to a custom page in a Power Apps app.
We’ll do the following:
- Create a Power Apps app in the online Power Apps platform.
- Create Dataverse tables for the Gantt tasks and dependencies using example data imported from CSV files.
- Create a Bryntum Gantt Power Apps component framework React component locally.
- Bundle all the code component elements into a solution file and then import the solution file into Dataverse using the VS Code Power Platform Tools extension.
- Add the Bryntum Gantt React component to the Power Apps app.
You can see the code for the completed Bryntum Gantt Power Apps component in our GitHub repository.
Prerequisites
To follow along, you’ll need the following software installed on your machine:
- Node.js
- VS Code editor
- Build Tools for Visual Studio from Visual Studio Downloads Install the VS Code Power Platform Tools extension.
Getting access to Microsoft Power Apps
To start using Power Apps, sign in to your organizational Microsoft 365 account or create a Microsoft account using your work email address and join the Microsoft 365 Developer Program with that Microsoft account.
Then go to the Power Apps Maker Portal at make.powerapps.com, where you can begin creating your app.
Sign up for a 30-day Power Apps trial plan if you don’t already have a Power Apps license or a license through Office 365.
The trial plan provides temporary access to the following activities:
- Create and run Power Apps canvas apps that connect to Microsoft Dataverse and more than 200 other data sources, including premium connectors and on-premises data.
- Create and run Power Apps model-driven apps.
- Create and manage environments and Dataverse databases.
Creating an app in Power Apps
We’ll now create a Power Apps app in the Power Apps Maker Portal. Follow these steps to create an app:
- Go to https://make.powerapps.com.
- Click the “+ Create” menu item in the navigation on the left.
- Click the Start from Blank App card to create an app from scratch.
- Select Blank App based on Dataverse and click “Create”.
- Give your app the name “Bryntum Gantt”.
- Add a page to your navigation by clicking the “+ Add Page” button.
- Select “Custom page” and then click the “Next” button.
- Select “+ Create custom page” with the name “Bryntum Gantt” and then click the “Create” button.
We’ll create a custom Bryntum Gantt React component to add to this custom page. But first, we’ll create Dataverse tables for the Gantt tasks and dependencies.
Creating custom Dataverse tables
We’ll store our data in Dataverse tables. There are multiple benefits to using Dataverse as a data store for a Power Apps app, including:
We’ll create two Dataverse tables to store our tasks and dependencies data and import example CSV data into them.
Creating a Dataverse table to store tasks data
Follow these steps to create a Dataverse table for our tasks and populate it with example CSV data:
- Go to https://make.powerapps.com.
- Click the “Tables” menu item in the navigation on the left.
- Click the “Import an Excel or .CSV file” card.
Copy and paste the following data into a bryntum-gantt-tasks.csv file.
name,startDate,endDate,effort,effortUnit,duration,durationUnit,percentDone,schedulingMode,note,constraintType,constraintDate,manuallyScheduled,unscheduled,ignoreResourceCalendar,effortDriven,inactive,cls,iconCls,color,parentIndex,expanded,calendar,deadline,direction,parentId,orderedParentIndex
Research,2024/08/05,2024/08/12,,,,,100,,,,,1,,,,,,,,,,,,,,0
Build prototype,2024/08/12,2024/08/19,,,,,50,,,,,1,,,,,,,,,,,,,,1
Documentation,2024/08/19,2024/08/27,,,,,0,,,,,1,,,,,,,,,,,,,,2
The headings in this CSV text represent most of the fields for a Bryntum Gantt task.
Now upload this CSV file. Once the CSV file is uploaded, you’ll see the following screen:
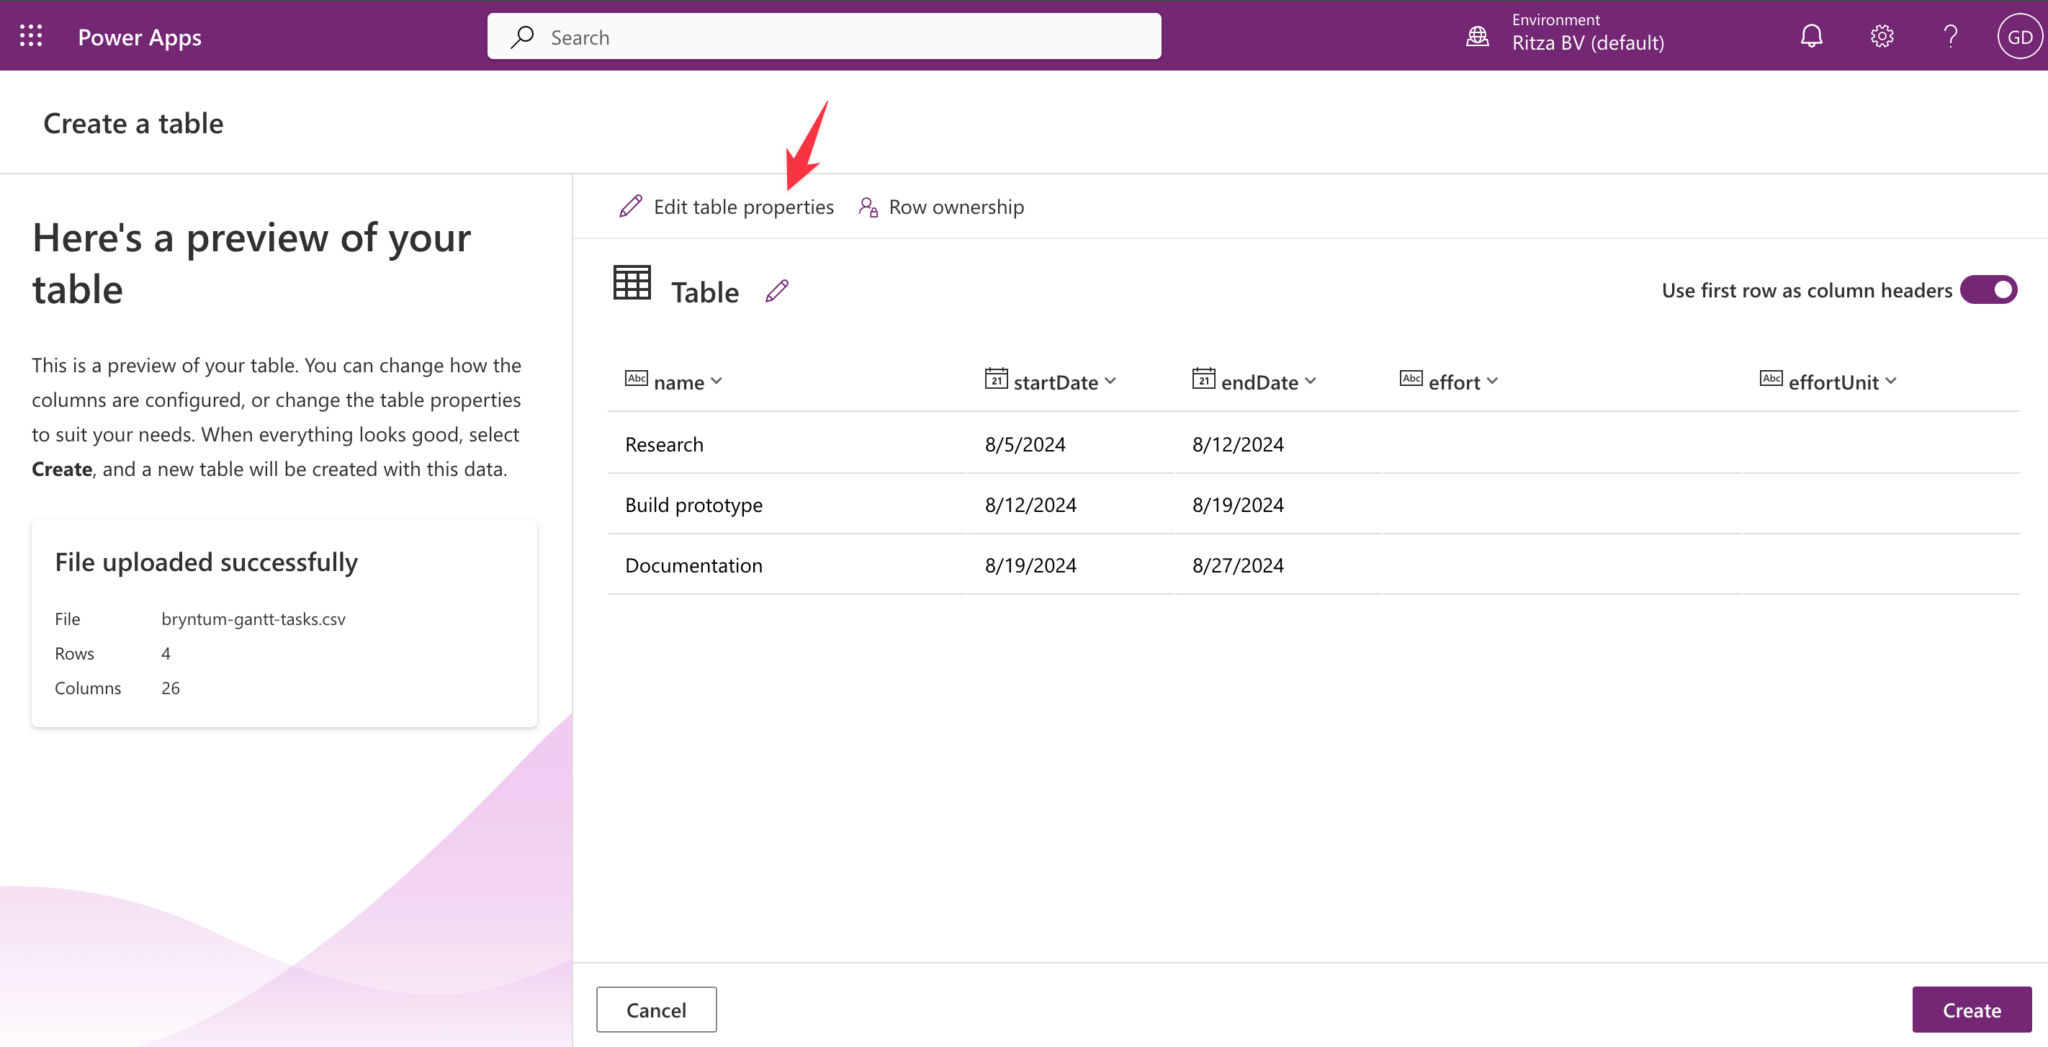
Click on the “Edit table properties” button. Change the following properties of the table:
- Display name: Bryntum Gantt Tasks
- Schema name: BryntumGanttTasks
Save the table properties.
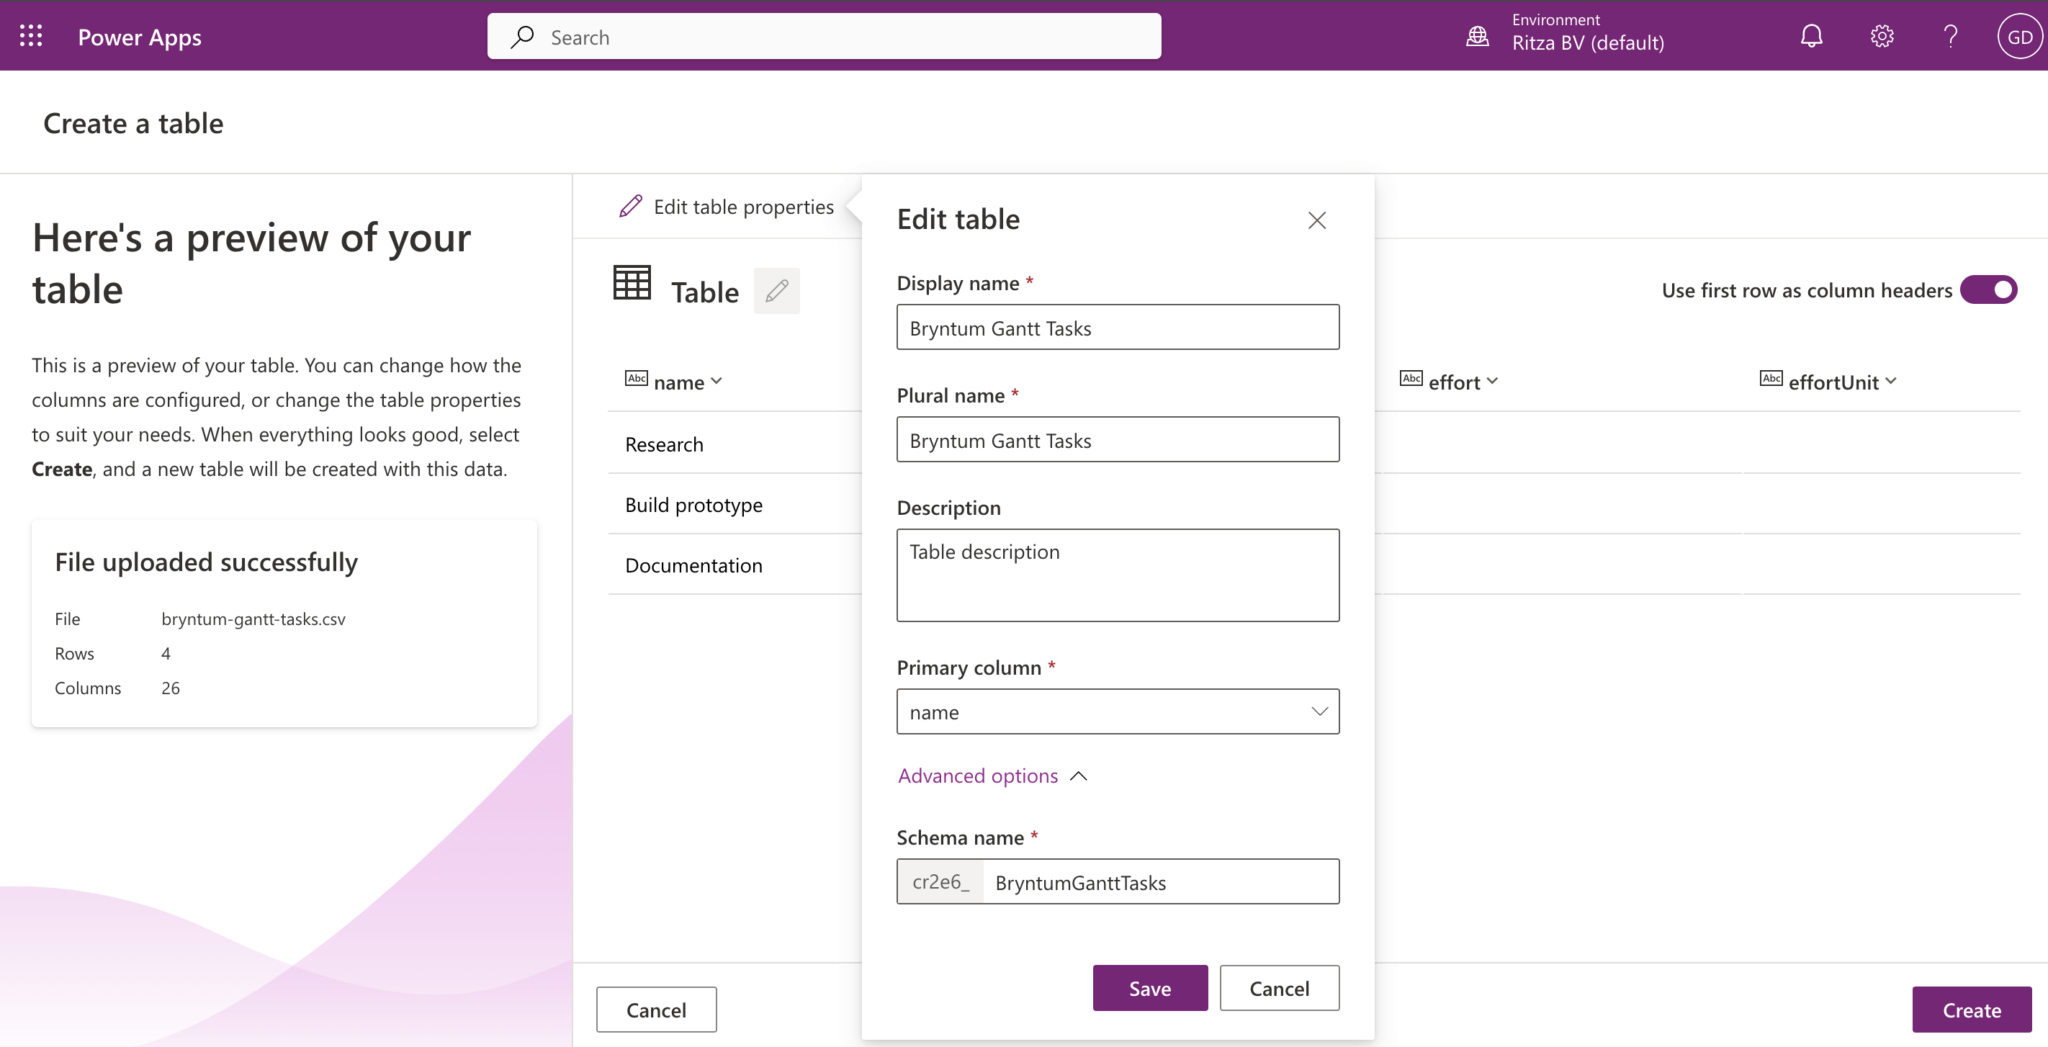
We’ll use the schema name when making queries to the database table. Note that the names of tables and columns have an auto-generated prefix that makes their names unique.
The primary column is used when a table has a relationship to another table. You can use a lookup column to show data from another table. If you create an app from a Dataverse table with a lookup column, the column appears as a dropdown control containing data from the primary column of the linked table.
We’ll now edit each column by clicking on the column header and then clicking on the “Edit column” pop-up:
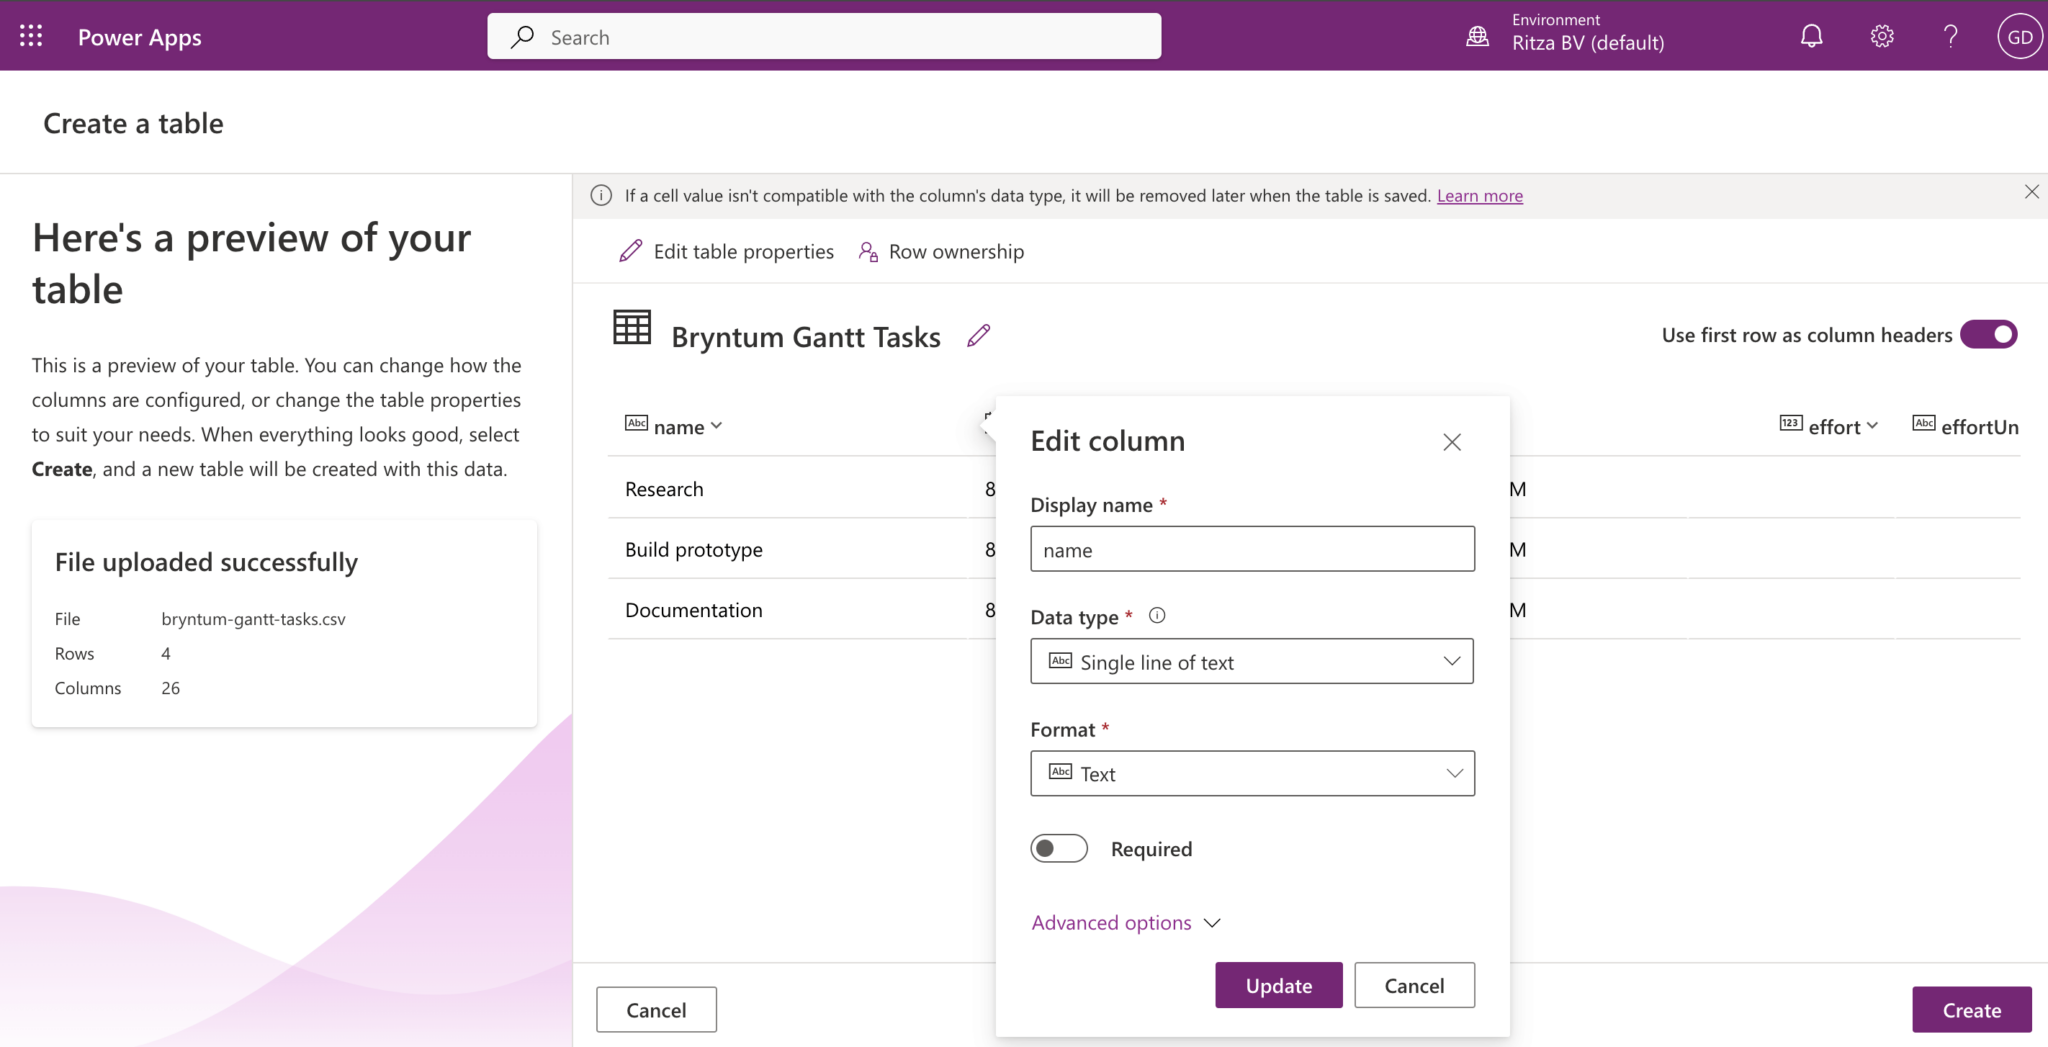
Change the column properties as follows:
| Column, Display name, and Schema name | Data type |
|---|---|
name | Single line of plain text |
startDate | Date and time |
endDate | Date and time |
effort | Float |
effortUnit | Single line of plain text |
duration | Float |
durationUnit | Single line of plain text |
percentDone | Float |
schedulingMode | Single line of plain text |
note | Multiple lines of text |
constraintType | Single line of plain text |
constraintDate | Date and time |
manuallyScheduled | Whole number |
unscheduled | Whole number |
ignoreResourceCalendar | Whole number |
effortDriven | Whole number |
inactive | Whole number |
cls | Single line of plain text |
iconCls | Single line of plain text |
color | Single line of plain text |
parentIndex | Whole Number |
parentId | Single line of plain text |
expanded | Whole Number |
calendar | Whole Number |
deadline | Date and time |
direction | Single line of plain text |
orderedParentIndex | Whole number |
Click the “Create” button at the bottom-right of the screen to create the table.
You can find your custom Dataverse table by opening the “Tables” menu item in the navigation on the left and then clicking the “Custom” button above the table of tables:
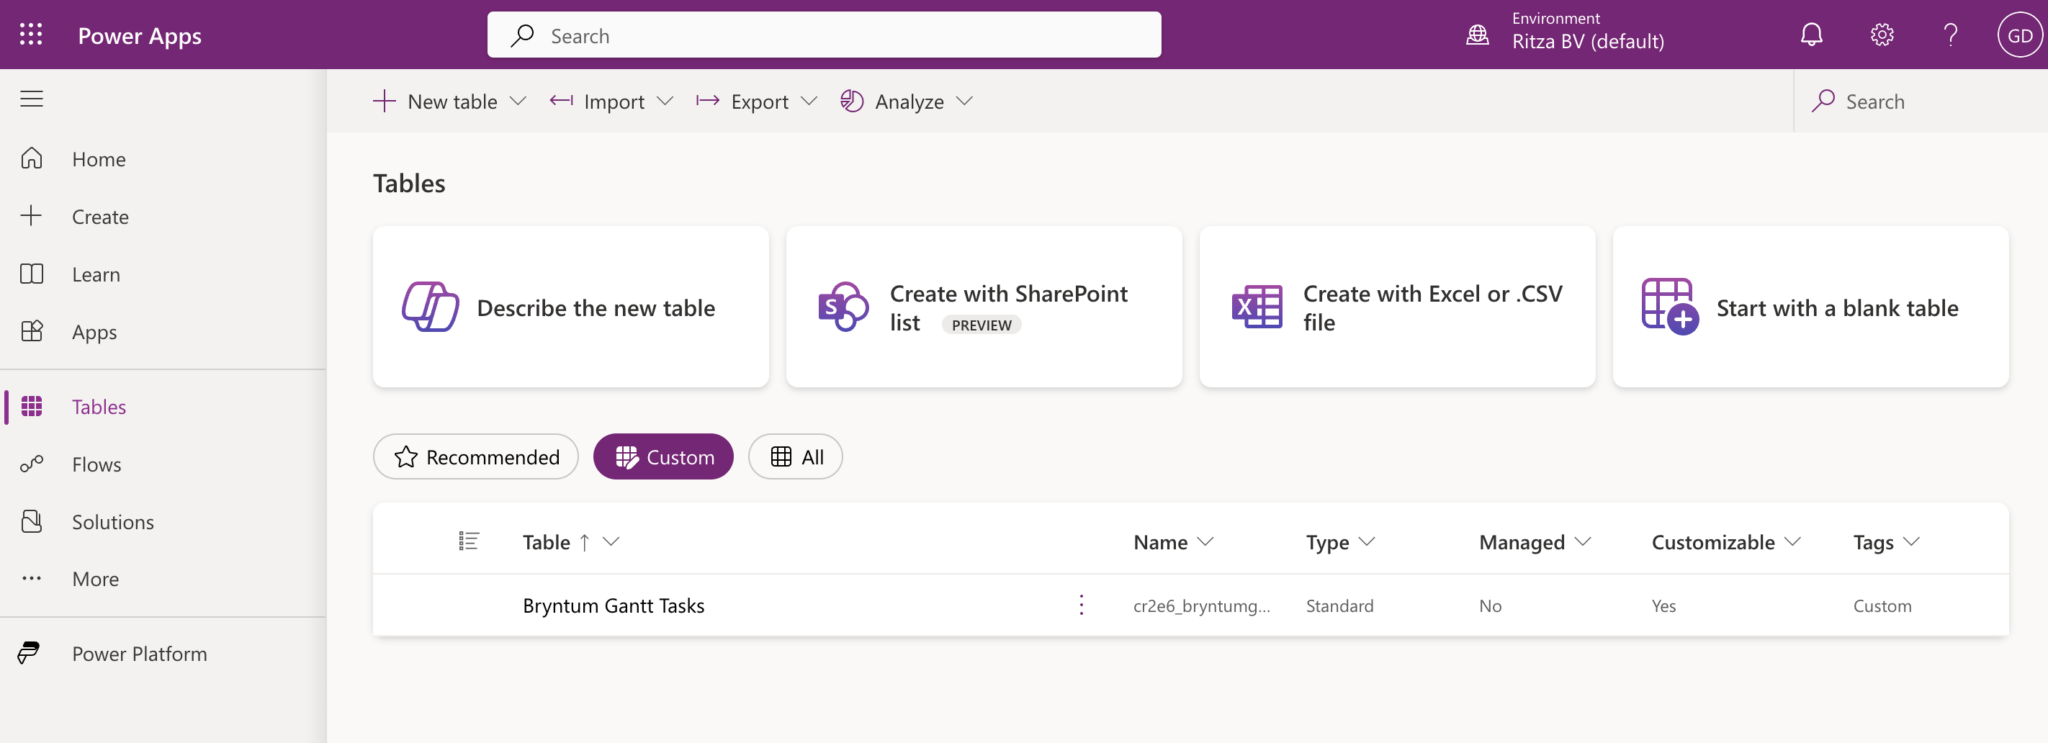
Creating a Dataverse table to store dependencies data
We’ll now create a table for the dependencies data.
Copy and paste the following data into a bryntum-gantt-dependencies.csv file.
type,cls,Lag,lagUnit,active,fromSide,toSide
2,,0,day,1,end,start
The headings in this CSV text represent most of the fields for a Bryntum Gantt dependency.
Select “Create with Excel or .CSV file” and upload this CSV file.
Click on the “Edit table properties” button. Change the following properties of the table:
- Display name: Bryntum Gantt Dependencies
- Primary column: cls
- Schema name: BryntumGanttDependencies
Change the column properties as follows:
| Column, Display name, and Schema name | Data type |
|---|---|
type | Whole number |
cls | Single line of plain text |
lag | Float |
lagUnit | Single line of plain text |
active | Whole number |
fromSide | Single line of plain text |
toSide | Single line of plain text |
Click the “Create” button to create the table.
Open the Bryntum Gantt Tasks table in a separate tab, click on the “+18 more” button on the right of the tasks table, and then check the “Bryntum Gantt Tasks” column:
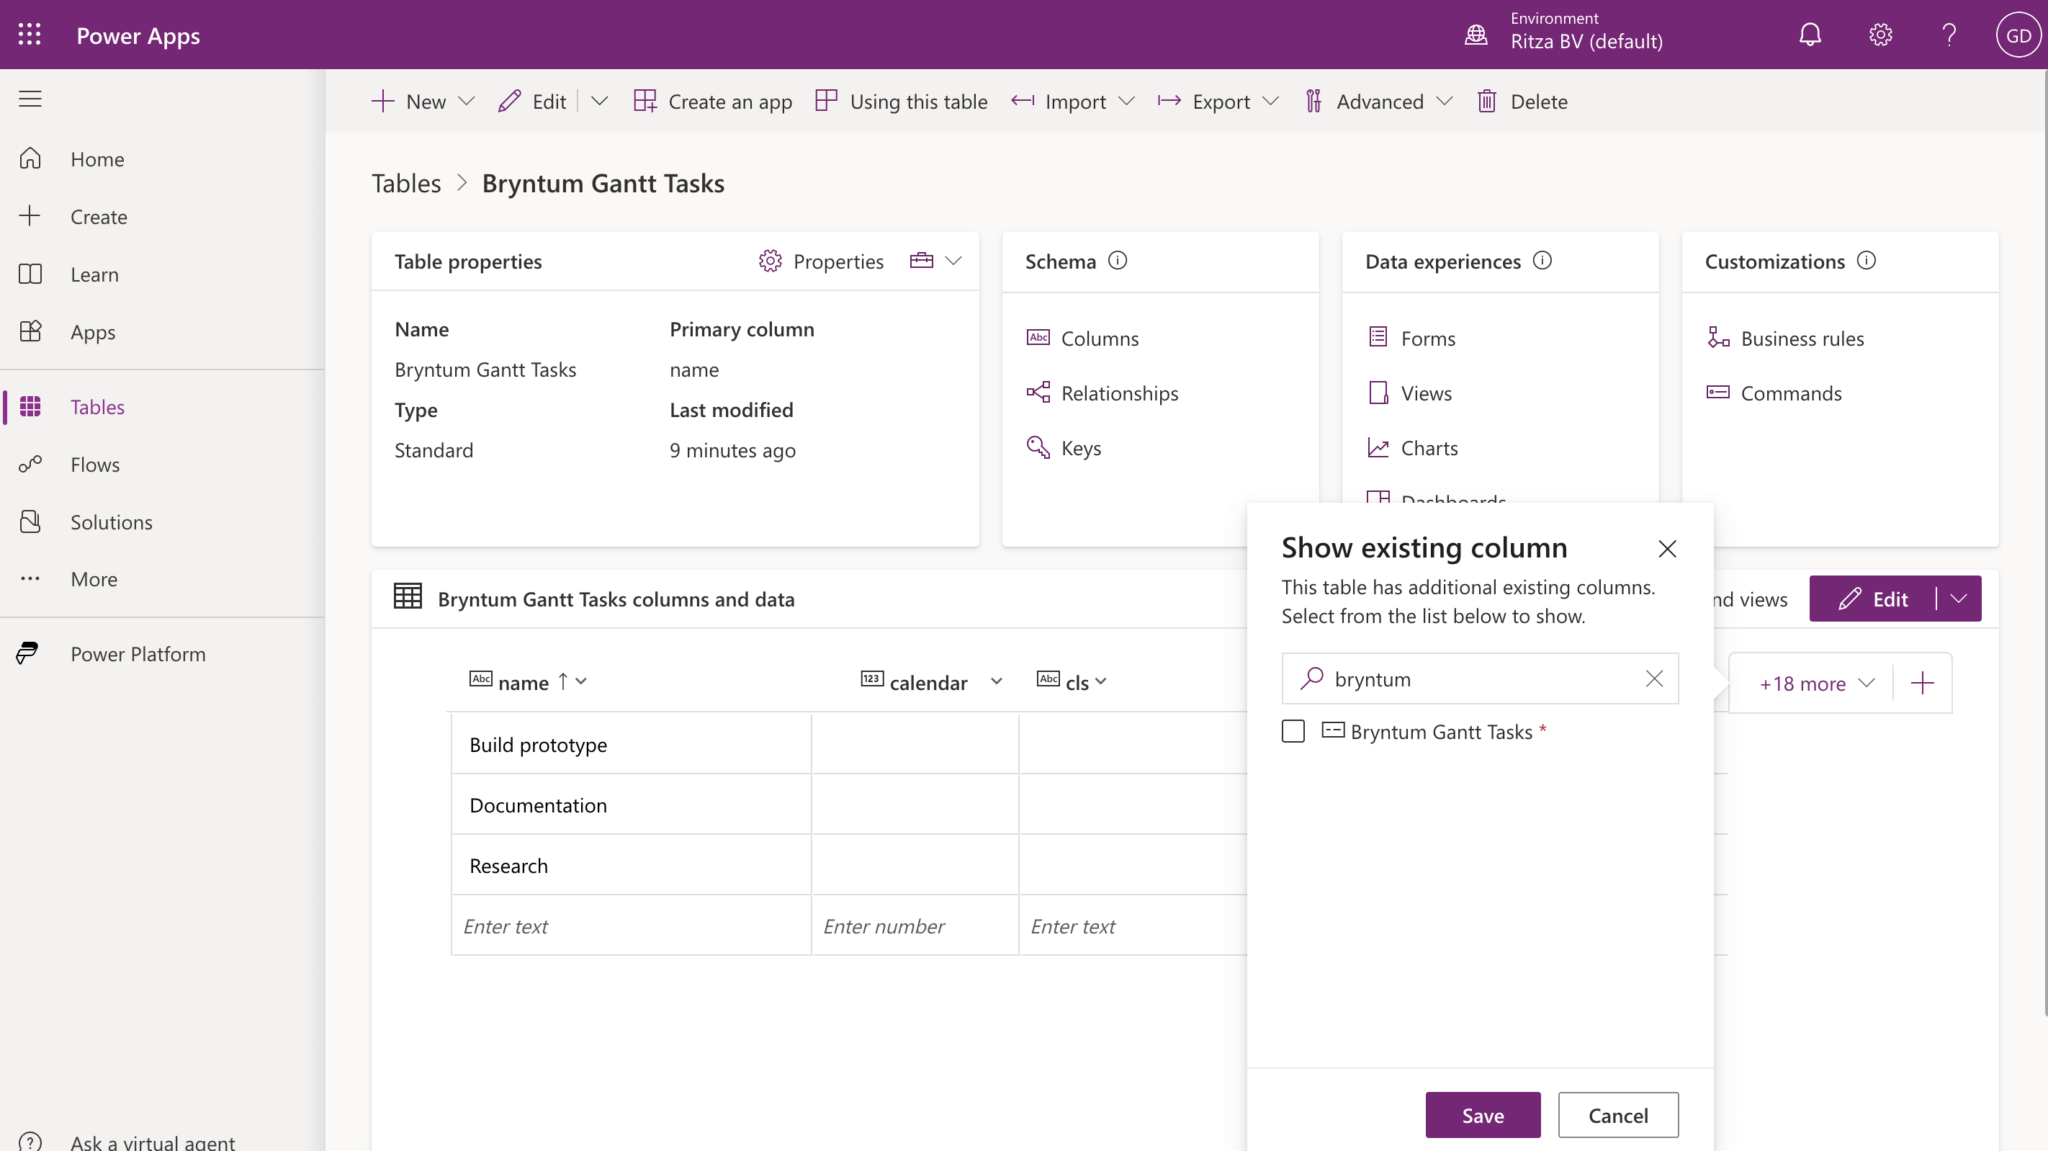
This id column uses globally unique identifiers (GUIDs) and is auto-generated by Dataverse. If you open the edit column popup for this column, you’ll see that its data type is “Unique identifier”.
Open the edit column popup for one of the custom columns that you created. Notice the “Logical name” property under the Advanced options dropdown. We’ll use this property when we create and update records using the Dataverse Web API from the custom Bryntum Gantt Power Apps component that we’ll create.
Create from and to columns for the dependencies table with relationships to the tasks tables
We’ll now create “from” and “to” lookup columns for the dependencies table that are related to the tasks table. These columns will indicate which tasks are connected in a dependency.
Click the “New column” button to the right of the “+18 more” button in the Bryntum Gantt Dependencies columns and data table.
Set the following values in the popup form and then click the save button:
- Display name: from
- Data type: Lookup
- Related table: Bryntum Gantt tasks
- Schema name: from
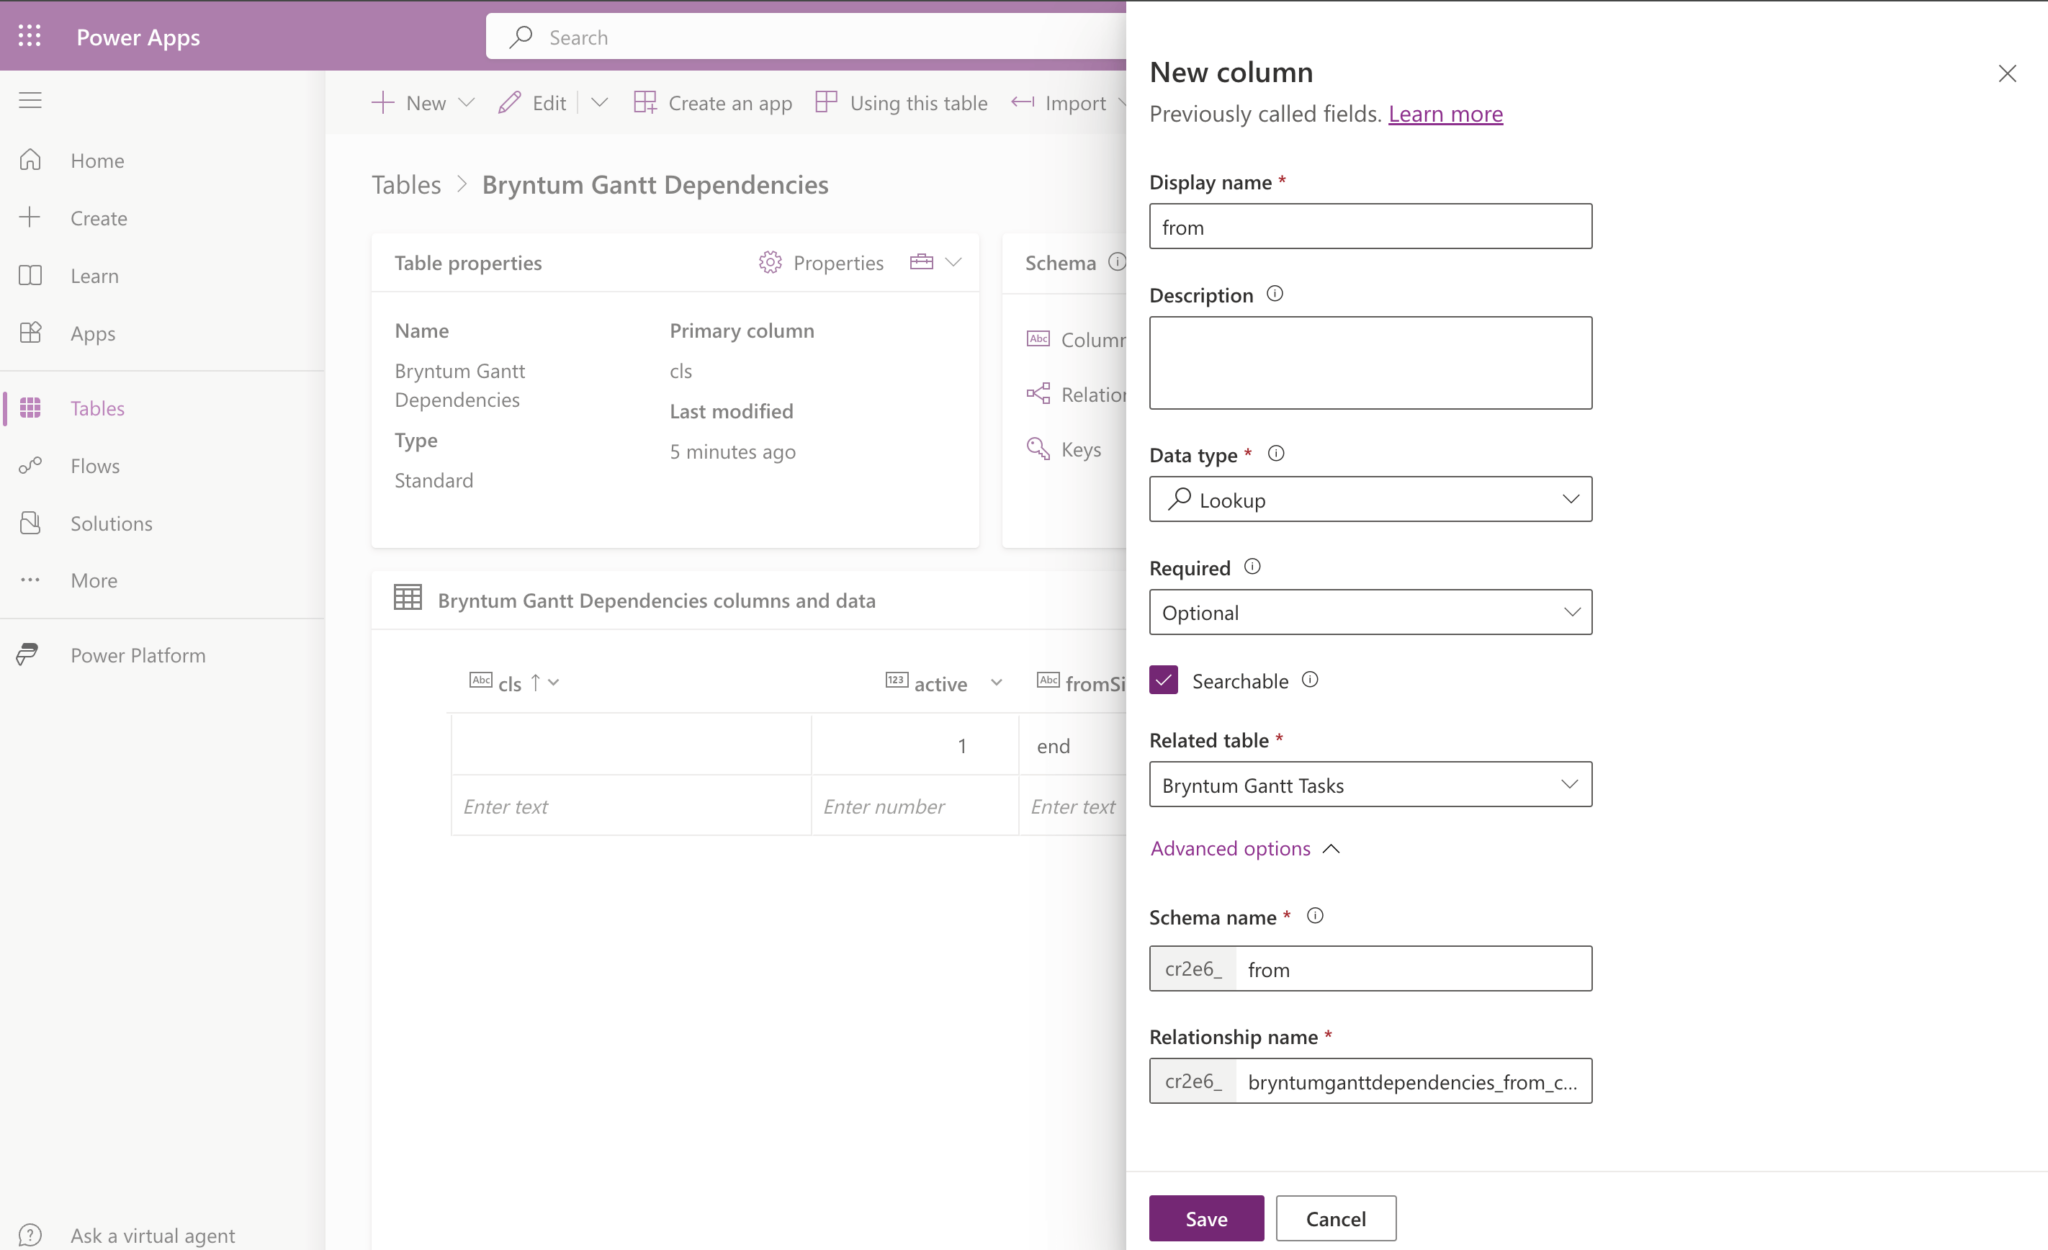
You’ll now be able to add values to the “from” column using an auto-complete input. The displayed values are the primary column (name column) values of the columns of the linked task. Set the “from” value for the example dependency to “Research”.
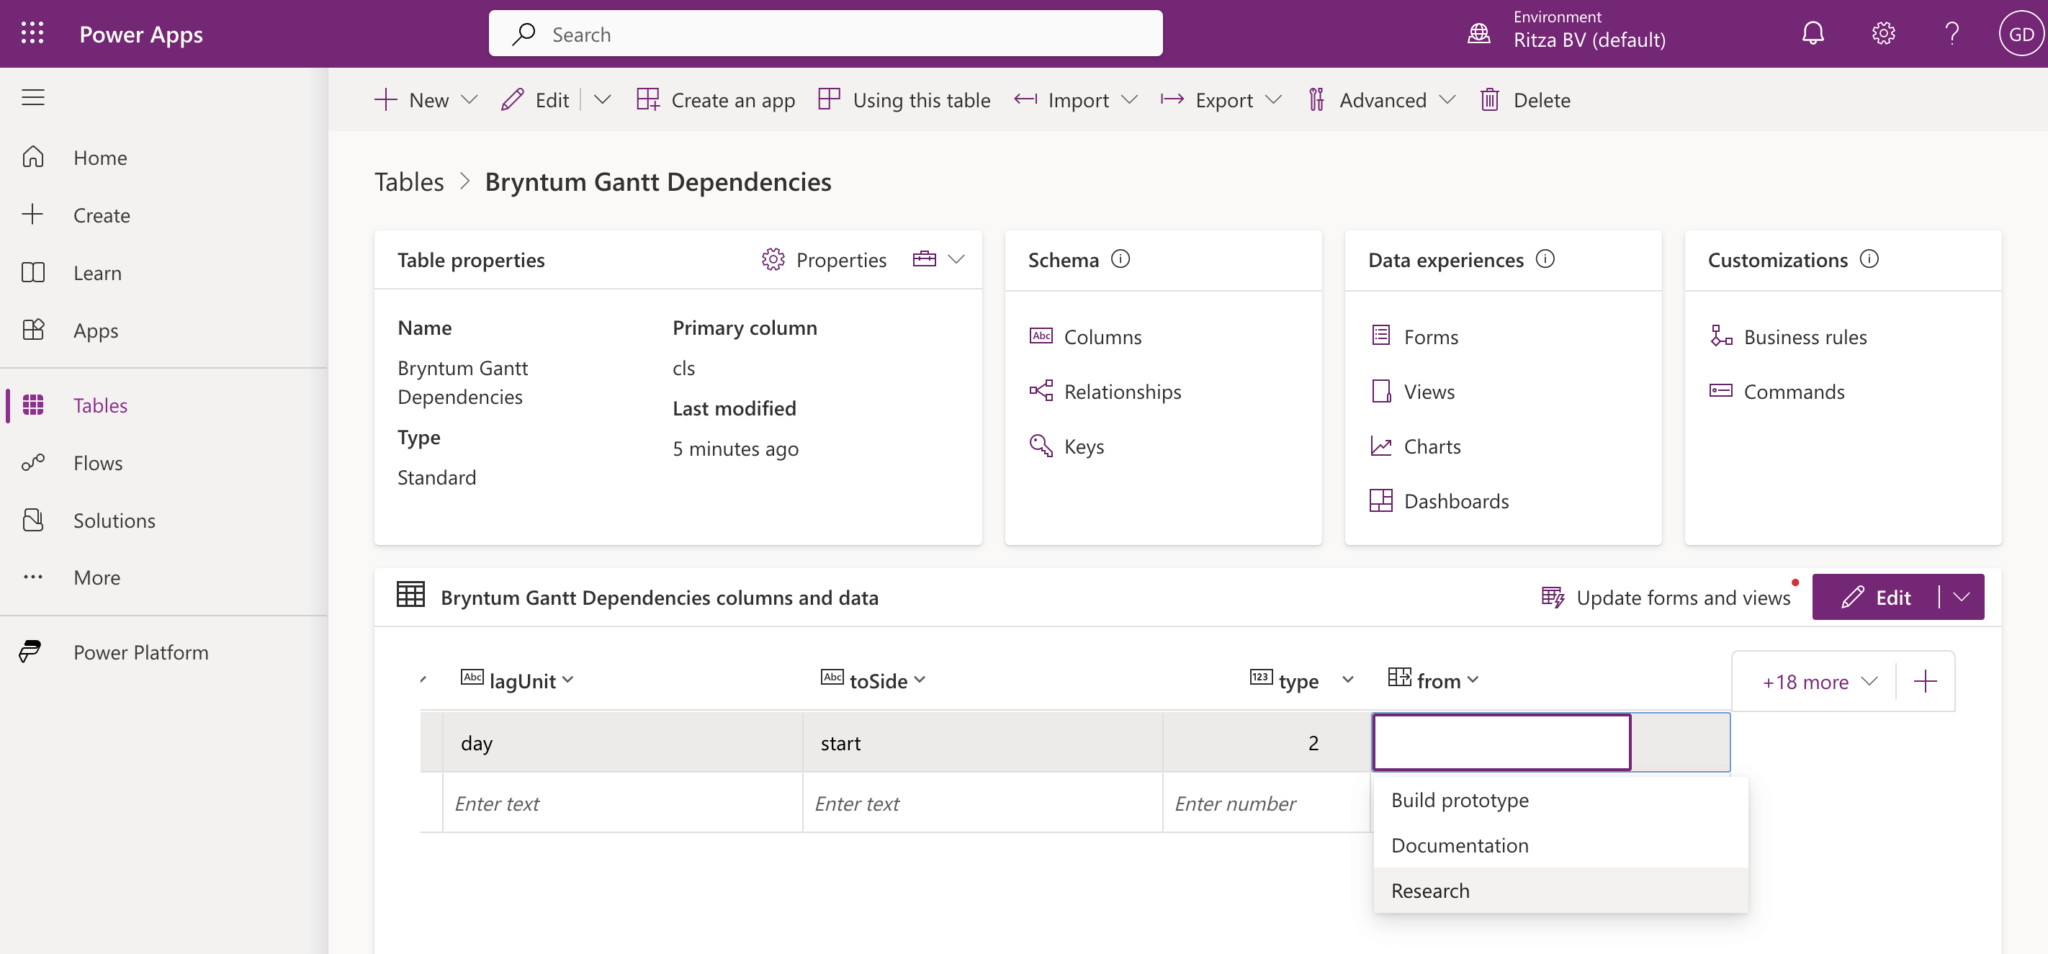
Create another column with the following values:
- Display name: to
- Data type: Lookup
- Related table: Bryntum Gantt tasks
- Schema name: to
Set the “to” value for the example dependency to “Build prototype”.
Now that our Dataverse database tables are ready, let’s create a Bryntum Gantt Power Apps component to add to our Power Apps page.
Create a Bryntum Gantt Power Apps component framework component
We’ll use the Power Apps component framework to create a Bryntum Gantt code component that we can use in our Power Apps app.
We’ll use the Microsoft Power Platform CLI to create a PCF project and push the component to the Power Apps platform.
Make sure that you’ve installed the prerequisite VS Code Power Platform Tools extension in VS Code. This extension enables you to use the Microsoft Power Platform CLI commands in a PowerShell terminal within Visual Studio Code on Windows 10, Windows 11, Linux, and macOS.
Run the following command in a new directory to create a PCF React project template:
pac pcf init --name BryntumGantt --namespace BryntumGantt --template field --framework reactThe pac pcf init command initializes a directory with a new PCF project.
--name: Name of the component.--namespace: Namespace for the component.--template: Template for the component. The value can befieldordataset.--framework: Rendering framework for the control. The value can benoneorreact. The default value isnone, which means HTML is used for rendering.
Now install the project dependencies:
npm installNext, install the Bryntum Gantt packages for React. Make sure that you have access to the Bryntum npm repository.
npm install @bryntum/gantt @bryntum/gantt-reactNext, update the .eslintrc.json file and disable the following rules:
"rules": {
  "no-unused-vars": "off",
  "@typescript-eslint/no-unused-vars": "off",
  "promise/always-return": "off",
  "@typescript-eslint/ban-ts-comment": "off"
},
Updating the code component’s manifest
The manifest BryntumGantt/ControlManifest.Input.xml is an XML metadata file that describes the component. We’ll update it to accurately describe our component.
Replace the contents of BryntumGantt/ControlManifest.Input.xml with the following code:
<?xml version="1.0" encoding="utf-8"?>
<manifest>
    <control namespace="BryntumGanttComponent" constructor="BryntumGantt" version="2.0.1"
        display-name-key="BryntumGanttComponent" description-key="BryntumGanttComponent description"
        control-type="virtual">
        <!--external-service-usage
        node declares whether this 3rd party PCF control is using external service or not, if yes,
        this control will be considered as premium and please also add the external domain it is
        using.
        If it is not using any external service, please set the enabled="false" and DO NOT add any domain
            below. The "enabled" will be false by default.
        Example1:
        <external-service-usage enabled="true">
            <domain>www.Microsoft.com</domain>
        </external-service-usage>
        Example2:
        <external-service-usage enabled="false">
        </external-service-usage>
        -->
        <external-service-usage enabled="false">
        <!--UNCOMMENT
        TO ADD EXTERNAL DOMAINS
        <domain></domain>
        <domain></domain>
        -->
        </external-service-usage>
        <!-- property node identifies a specific, configurable piece of data that the control
        expects from CDS -->
        <property name="BryntumGantt" display-name-key="BryntumGantt"
            description-key="BryntumGantt description" of-type="SingleLine.Text" usage="bound"
            required="false" />
        <resources>
            <code path="index.ts" order="1" />
            <platform-library name="React" version="16.8.6" />
            <css path="css/BryntumGanttComponent.css" order="1" />
            <css path="css/gantt.stockholm.css" order="2" />
        </resources>
        <feature-usage>
            <uses-feature name="WebAPI" required="true" />
        </feature-usage>
    </control>
</manifest>
Here we add the CSS resources we’ll create in the next step in the <resources> tag.
In the <feature-usage> tag, we add the WebAPI feature, which provides properties and methods to perform CRUD operations on our Dataverse tables.
Adding CSS styling
Let’s create the CSS resource files that we added to the manifest.
Create a css folder in the BryntumGantt component folder. Copy the gantt.stockholm.css file from the node_modules/@bryntum/gantt folder and add it to the css folder.
We need to add this CSS file to our component folder because bundling font resources is currently not supported by the Power Apps component framework. Bryntum components use icons that are based on the Font Awesome 6 Free solid font. This Bryntum Gantt CSS theme file uses these Font Awesome font resources. We’ll use the Font Awesome CDN to get these font resources in our component.
In the gantt.stockholm.css file, delete the following @font-face source URL:
"fonts/fa-solid-900.woff2"Replace it with this CDN URL:
"https://use.fontawesome.com/releases/v6.0.0/webfonts/fa-solid-900.woff2"Now delete the following @font-face source URL:
"fonts/fa-solid-900.ttf"Replace it with this CDN URL:
"https://use.fontawesome.com/releases/v6.0.0/webfonts/fa-solid-900.ttf"In the BryntumGantt/css folder, create a BryntumGanttComponent.css file and add the following styles to it:
#root {
    height: 100vh;
}
.loader-container {
    display: flex;
    justify-content: center;
    align-items: center;
    height: 100%;
    width: 100%;
}
.loader {
    border: 16px solid #f3f3f3;
    border-radius: 50%;
    border-top: 16px solid #3498db;
    width: 80px;
    height: 80px;
    -webkit-animation: spin 2s linear infinite;
    /* Safari */
    animation: spin 2s linear infinite;
}
/* Safari */
@-webkit-keyframes spin {
    0% {
        -webkit-transform: rotate(0deg);
    }
    100% {
        -webkit-transform: rotate(360deg);
    }
}
@keyframes spin {
    0% {
        transform: rotate(0deg);
    }
    100% {
        transform: rotate(360deg);
    }
}
Creating the Bryntum Gantt component
Before we create the Bryntum Gantt React component, first create a constants.ts file in the BryntumGantt folder and add the following lines of code to it.
⚠️ Replace the databasePrefix value with the database prefix value in your Dataverse tables.
export const databasePrefix = 'cr8a7_';  // replace with your own prefix
export const tasksDataverseTableName = 'bryntumgantttasks';
export const dependenciesDataverseTableName = 'bryntumganttdependencies';
We’ll show a loading spinner React component while the Dataverse data is being fetched. Create a file called LoadingSpinner.tsx in the BryntumGantt folder and add the following lines of code to it:
import * as React from 'react';
function LoadingSpinner() {
    return (
        <div className="loader-container">
            <div className="loader" />
        </div>
    );
}
export default LoadingSpinner;
Create a BryntumGanttComponent.types.ts file in the BryntumGantt folder and add the following types to it:
import { Grid, Store } from '@bryntum/gantt';
import { databasePrefix } from './constants';
import { IInputs } from './generated/ManifestTypes';
export interface IBryntumGanttComponentProps {
  context?: ComponentFramework.Context<IInputs>;
}
type RecordItem = {
  data: GanttTask | GanttDependency;
  meta: {
    modified: Partial<GanttTask> | Partial<GanttDependency>;
  };
} & GanttTask &
  GanttDependency;
export type SyncData = {
  source: Grid;
  store: Store;
  action: 'remove' | 'removeAll' | 'add' | 'clearchanges' | 'filter' | 'update' | 'dataset' | 'replace';
  record:  RecordItem;
  records: RecordItem[];
  changes: object;
}
export type GanttTask = {
  id: string;
  name: string;
  startDate: string;
  endDate: string;
  effort: number;
  effortUnit: string;
  duration: number;
  durationUnit: string;
  percentDone: number;
  schedulingMode: string;
  note: string;
  constraintType: string;
  constraintDate: string;
  manuallyScheduled: number;
  unscheduled: number;
  ignoreResourceCalendar: number;
  effortDriven: number;
  inactive: number;
  cls: string;
  iconCls: string;
  color: string;
  parentIndex: number;
  expanded: number;
  calendar: number;
  deadline: string;
  direction: string;
  parentId: string;
  orderedParentIndex: number;
  meta: {
    modified: Partial;
  };
};
const KEY_ID = `${databasePrefix}id` as const;
const KEY_NAME = `${databasePrefix}name` as const;
const KEY_START_DATE = `${databasePrefix}startdate` as const;
const KEY_END_DATE = `${databasePrefix}enddate` as const;
const KEY_EFFORT = `${databasePrefix}effort` as const;
const KEY_EFFORT_UNIT = `${databasePrefix}effortunit` as const;
const KEY_DURATION = `${databasePrefix}duration` as const;
const KEY_DURATION_UNIT = `${databasePrefix}durationunit` as const;
const KEY_PERCENT_DONE = `${databasePrefix}percentdone` as const;
const KEY_SCHEDULING_MODE = `${databasePrefix}schedulingmode` as const;
const KEY_NOTE = `${databasePrefix}note` as const;
const KEY_CONSTRAINT_TYPE = `${databasePrefix}constrainttype` as const;
const KEY_CONSTRAINT_DATE = `${databasePrefix}constraintdate` as const;
const KEY_MANUALLY_SCHEDULED = `${databasePrefix}manuallyscheduled` as const;
const KEY_UNSCHEDULED = `${databasePrefix}unscheduled` as const;
const KEY_IGNORE_RESOURCE_CALENDAR =
  `${databasePrefix}ignoreresourcecalendar` as const;
const KEY_EFFORT_DRIVEN = `${databasePrefix}effortdriven` as const;
const KEY_INACTIVE = `${databasePrefix}inactive` as const;
const KEY_CLS = `${databasePrefix}cls` as const;
const KEY_ICON_CLS = `${databasePrefix}iconcls` as const;
const KEY_COLOR = `${databasePrefix}color` as const;
const KEY_PARENT_INDEX = `${databasePrefix}parentindex` as const;
const KEY_EXPANDED = `${databasePrefix}expanded` as const;
const KEY_CALENDAR = `${databasePrefix}calendar` as const;
const KEY_DEADLINE = `${databasePrefix}deadline` as const;
const KEY_DIRECTION = `${databasePrefix}direction` as const;
const KEY_PARENT_ID = `${databasePrefix}parentid` as const;
const KEY_ORDERED_PARENT_INDEX = `${databasePrefix}orderedparentindex` as const;
export type GanttTaskDataverse = {
  [KEY_ID]: string;
  [KEY_NAME]: string;
  [KEY_START_DATE]: string;
  [KEY_END_DATE]: string;
  [KEY_EFFORT]: number;
  [KEY_EFFORT_UNIT]: string;
  [KEY_DURATION]: number;
  [KEY_DURATION_UNIT]: string;
  [KEY_PERCENT_DONE]: number;
  [KEY_SCHEDULING_MODE]: string;
  [KEY_NOTE]: string;
  [KEY_CONSTRAINT_TYPE]: string;
  [KEY_CONSTRAINT_DATE]: string;
  [KEY_MANUALLY_SCHEDULED]: number;
  [KEY_UNSCHEDULED]: number;
  [KEY_IGNORE_RESOURCE_CALENDAR]: number;
  [KEY_EFFORT_DRIVEN]: number;
  [KEY_INACTIVE]: number;
  [KEY_CLS]: string;
  [KEY_ICON_CLS]: string;
  [KEY_COLOR]: string;
  [KEY_PARENT_INDEX]: number;
  [KEY_EXPANDED]: number;
  [KEY_CALENDAR]: number;
  [KEY_DEADLINE]: string;
  [KEY_DIRECTION]: string;
  [KEY_PARENT_ID]: string;
  [KEY_ORDERED_PARENT_INDEX]: number;
};
export type GanttDependency = {
  id: string;
  type: number;
  cls: string;
  lag: number;
  lagUnit: string;
  active: number;
  from: string;
  to: string;
  fromSide: string;
  toSide: string;
};
const KEY_TYPE = `${databasePrefix}type` as const;
const KEY_LAG = `${databasePrefix}lag` as const;
const KEY_LAG_UNIT = `${databasePrefix}lagunit` as const;
const KEY_ACTIVE = `${databasePrefix}active` as const;
const KEY_FROM = `${databasePrefix}from@odata.bind` as const;
const KEY_TO = `${databasePrefix}to@odata.bind` as const;
const KEY_FROM_SIDE = `${databasePrefix}fromside` as const;
const KEY_TO_SIDE = `${databasePrefix}toside` as const;
export type GanttDependencyDataverse = {
  [KEY_ID]: string;
  [KEY_TYPE]: number;
  [KEY_CLS]: string;
  [KEY_LAG]: number;
  [KEY_LAG_UNIT]: string;
  [KEY_ACTIVE]: number;
  [KEY_FROM]: string;
  [KEY_TO]: string;
  [KEY_FROM_SIDE]: string;
  [KEY_TO_SIDE]: string;
};
These are the TypeScript types we’ll use for the Bryntum Gantt and Dataverse data.
We’ll now define some basic configurations for our Bryntum Gantt. Create a file called ganttConfig.ts in the BryntumGantt folder and add the following lines of code to it:
import type { BryntumGanttProps } from '@bryntum/gantt-react';
const ganttConfig: Partial<BryntumGanttProps> = {
    taskStore : {
        // @ts-ignore
        tree              : true,
        transformFlatData : true,
    },
    columns       : [{ type : 'name', field : 'name', width : 250 }],
    viewPreset    : 'weekAndDayLetter',
    barMargin     : 10,
    selectionMode : {
        multiSelect : false
    }
};
export { ganttConfig };
Now create the Bryntum Gantt React component. Create a BryntumGanttComponent.tsx file in the BryntumGantt folder and add the following lines of code to it:
import * as React from 'react';
import { BryntumGantt } from '@bryntum/gantt-react';
import { FunctionComponent, useRef } from 'react';
import {
    GanttDependency,
    GanttTask,
    IBryntumGanttComponentProps
} from './BryntumGanttComponent.types';
import LoadingSpinner from './LoadingSpinner';
import { ganttConfig } from './ganttConfig';
import { DependencyModel, TaskModel } from '@bryntum/gantt';
const BryntumGanttComponent: FunctionComponent<IBryntumGanttComponentProps> = (
    props
) => {
    const [data, setData] = React.useState<{
    tasks: TaskModel[];
    dependencies: DependencyModel[];
  }>();
    const gantt = useRef<BryntumGantt>(null);
    return data ? (
        // @ts-ignore
        <BryntumGantt
            ref={gantt}
            tasks={data.tasks}
            dependencies={data.dependencies}
            {...ganttConfig}
        />
    ) : (
        <LoadingSpinner />
    );
};
export default BryntumGanttComponent;
We render the Bryntum Gantt React component and pass in ganttConfig as a prop. We’ll store the data in the data state variable and pass in the tasks and dependencies data properties as props. When there is no data, the LoadingSpinner component is displayed.
To render the component, we need to add the PCF component logic to the index.ts file, the required TypeScript web resource. The four essential functions are predefined in the file: init, updateView, getOutputs, and destroy.
Add the following lines of code to the init function:
Object.defineProperty(window, 'globalThis', {
    value    : window,
    writable : false
});
Replace the updateView function with the following lines of code:
public updateView(
    context: ComponentFramework.Context<IInputs>
  ): React.ReactElement {
    const props: IBryntumGanttComponentProps = { context };
    return React.createElement(BryntumGanttComponent, props);
  }
We render our BryntumGanttComponent in this function, which is called when any value in the property bag has changed. The property bag includes field values, datasets, and global values like container height and width.
Import the component and the prop types:
import BryntumGanttComponent from './BryntumGanttComponent';
import { IBryntumGanttComponentProps } from './BryntumGanttComponent.types';
You can remove the imports from the HelloWorld.tsx file and delete the file, too.
Let’s create a build of the component.
npm run buildThis command creates an out folder in the root directory. The folder contains the component’s manifest, CSS, and JavaScript bundle.
Now run the browser test harness to view the component:
npm run startA browser tab will automatically open, showing the development server URL: http://localhost:8181/. You’ll see the loading spinner:

You can use your browser React dev tools to change the data state variable to an empty array. If you do this, you’ll see the Bryntum Gantt with no data:

Let’s fetch the Dataverse data and add it to our Gantt component.
Fetching data using the Web API retrieveMultipleRecords method
We’ll use the Web API retrieveMultipleRecords method to fetch the tasks and dependencies records from our Dataverse tables.
Add the following lines of code to the BryntumGanttComponent.tsx file, below the gantt variable declaration:
const fetchRecords = async() => {
    try {
        const tasksPromise = props?.context?.webAPI.retrieveMultipleRecords(
        `${databasePrefix}${tasksDataverseTableName}`,
        `?$orderby=${databasePrefix}parentindex asc,${databasePrefix}orderedparentindex asc`
        );
        const dependenciesPromise:
        | Promise<ComponentFramework.WebApi.RetrieveMultipleResponse>
        | undefined = props?.context?.webAPI.retrieveMultipleRecords(
        `${databasePrefix}${dependenciesDataverseTableName}`,
        `?$select=${databasePrefix}type,${databasePrefix}lag,${databasePrefix}lagunit,${databasePrefix}active,${databasePrefix}fromside,${databasePrefix}toside,${databasePrefix}from,${databasePrefix}to&$expand=${databasePrefix}from($select=${databasePrefix}${tasksDataverseTableName}id),${databasePrefix}to($select=${databasePrefix}${tasksDataverseTableName}id)`
        );
        const [tasks, dependencies] = await Promise.all([
            tasksPromise,
            dependenciesPromise
        ]);
        if (tasks && dependencies) {
            setData({
                tasks        : removeTasksDataColumnPrefixes(tasks.entities) as TaskModel[],
                dependencies : removeDependenciesDataColumnPrefixes(
                    dependencies.entities
                ) as DependencyModel[]
            });
        }
    }
    catch (e) {
        if (e instanceof Error) {
            if (e.name === 'PCFNonImplementedError') {
                console.log('PCFNonImplementedError: ', e.message);
                // You can add fallback data tasks and dependencies state for the development mode browser test harness
                // webAPI is not available in the test harness
            }
        }
        throw e;
    }
};
React.useEffect(() => {
    fetchRecords();
}, []);
When the component is mounted, we call the fetchRecords function, which calls the retrieveMultipleRecords method to fetch tasks and dependencies data. The logical name of the tasks Dataverse table is passed in as an argument. We access the Web API through the context object that we passed in from our index.ts file as a prop.
The removeTasksDataColumnPrefixes and removeDependenciesDataColumnPrefixes functions transform the Dataverse data to match the format expected by the Bryntum Gantt.
Add the following definitions for these functions at the top of the file:
function removeTasksDataColumnPrefixes(entities: ComponentFramework.WebApi.Entity[]) {
    return entities.map((entity: ComponentFramework.WebApi.Entity) => {
        return {
            id                     : entity[`${databasePrefix}${tasksDataverseTableName}id`],
            name                   : entity[`${databasePrefix}name`],
            startDate              : entity[`${databasePrefix}startdate`],
            endDate                : entity[`${databasePrefix}enddate`],
            effort                 : entity[`${databasePrefix}effort`],
            effortUnit             : entity[`${databasePrefix}effortunit`],
            duration               : entity[`${databasePrefix}duration`],
            durationUnit           : entity[`${databasePrefix}durationunit`],
            percentDone            : entity[`${databasePrefix}percentdone`],
            schedulingMode         : entity[`${databasePrefix}schedulingmode`],
            note                   : entity[`${databasePrefix}note`],
            constraintType         : entity[`${databasePrefix}constrainttype`],
            constraintDate         : entity[`${databasePrefix}constraintdate`],
            manuallyScheduled      : entity[`${databasePrefix}manuallyscheduled`],
            unscheduled            : entity[`${databasePrefix}unscheduled`],
            ignoreResourceCalendar : entity[`${databasePrefix}ignoreresourcecalendar`],
            effortDriven           : entity[`${databasePrefix}effortdriven`],
            inactive               : entity[`${databasePrefix}inactive`],
            cls                    : entity[`${databasePrefix}cls`],
            iconCls                : entity[`${databasePrefix}iconcls`],
            color                  : entity[`${databasePrefix}color`],
            parentIndex            : entity[`${databasePrefix}parentindex`],
            expanded               : entity[`${databasePrefix}expanded`],
            calendar               : entity[`${databasePrefix}calendar`],
            deadline               : entity[`${databasePrefix}deadline`],
            direction              : entity[`${databasePrefix}direction`],
            parentId               : entity[`${databasePrefix}parentid`],
            orderedParentIndex     : entity[`${databasePrefix}orderedParentIndex`]
        } as Partial<TaskModel>;
    });
}
function removeDependenciesDataColumnPrefixes(entities: ComponentFramework.WebApi.Entity[]) {
    return entities.map((entity: ComponentFramework.WebApi.Entity) => {
        return {
            id       : entity[`${databasePrefix}${dependenciesDataverseTableName}id`],
            type     : entity[`${databasePrefix}type`],
            cls      : entity[`${databasePrefix}cls`],
            lag      : entity[`${databasePrefix}lag`],
            lagUnit  : entity[`${databasePrefix}lagunit`],
            active   : entity[`${databasePrefix}active`],
            from     : entity[`${databasePrefix}from`][`${databasePrefix}${tasksDataverseTableName}id`],
            to       : entity[`${databasePrefix}to`][`${databasePrefix}${tasksDataverseTableName}id`],
            fromSide : entity[`${databasePrefix}fromside`],
            toSide   : entity[`${databasePrefix}toside`]
        } as Partial<DependencyModel>;
    });
}
Add the imports for the constant values:
import { databasePrefix, dependenciesDataverseTableName, tasksDataverseTableName } from './constants';The Web API methods currently can’t be tested in the test harness. We need to publish and host the component in a Microsoft Power Platform environment.
Creating a component solution package
You need to deploy your component to a Microsoft Dataverse environment before using it in Power Apps. The first step is to package the component into a solution that you can import. There are two ways to do this:
- During development, use the Microsoft Power Platform CLI
pushcommand to create a temporary solution file that pushes the component to a Microsoft Dataverse environment. The solution file consists of a bundle of all of the component elements. - For build pipelines or manual deploys, create a solution for the component and import it separately into your Dataverse environment.
We’ll use the first way.
To push the Bryntum Gantt component to the Microsoft Power Platform, do the following:
- Open your PCF component in VS Code, open the Power Platform tab, and select Add Auth Profile.
- Look for a Sign in to your account popup and sign in with your Microsoft account.
- The profile you added will show up under Auth Profiles and you’ll also see the profile’s Environments & Solutions. Select the UNIVERSAL profile and the MSFT (default) environment.
⚠️ To add custom components to a Power Apps app, you need to enable the Power Apps component framework for canvas apps feature in the environment where you want to use the component. You can do this by following the Microsoft guide to enabling the Power Apps component framework feature.
- Build your project by running the build command:
npm run build- Push your custom component to the Power Apps platform environment by running the following command:
pac pcf push --publisher-prefix testThis command imports your Power Apps component framework project into the current Dataverse organization. The publisher prefix is the customization prefix value for the Dataverse solution publisher. You can change it.
⚠️ If the push fails due to the size of the component, try the following to increase the file size limit:
- Go to https://make.powerapps.com/.
- Click the Settings button at top right and open Advanced Settings. This opens a separate ….crm4.dynamics.com browser tab.
- In the Dynamics 365 tab, open the Settings dropdown. Under System, click on the Administration link.
- Click on System Settings. In the Email tab, under Set File Size Limit for Attachments, set the maximum file size to 32,120.
You should now be able to use the component in the Power Apps app.
Adding the Bryntum Gantt React component to the Power Apps app
Go back to the custom Power Apps app page that you created and do the following to add the Bryntum Gantt component to your page:
- Click the + insert button on the left navigation.
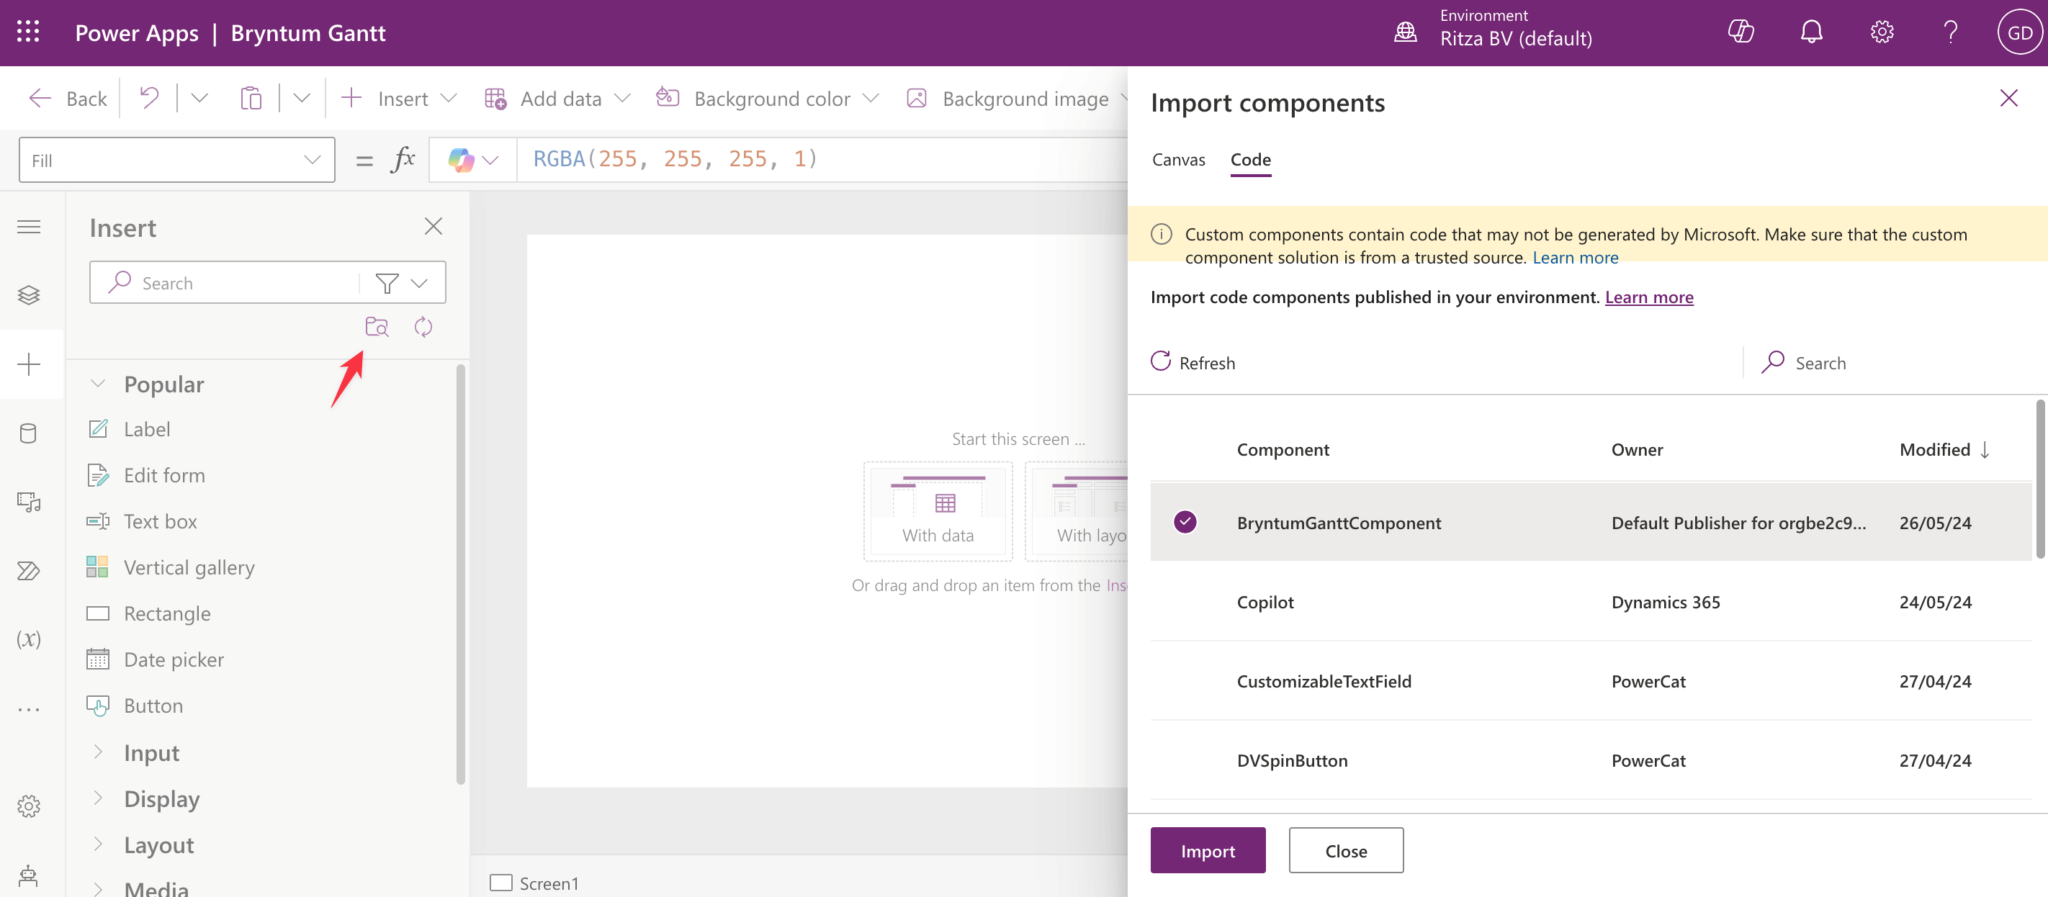
- Click the Get more components button below the “Search” input in the Insert column.
- In the Import components panel, select the Code tab and select the “BryntumGanttComponent” component.
- Click the Import button.
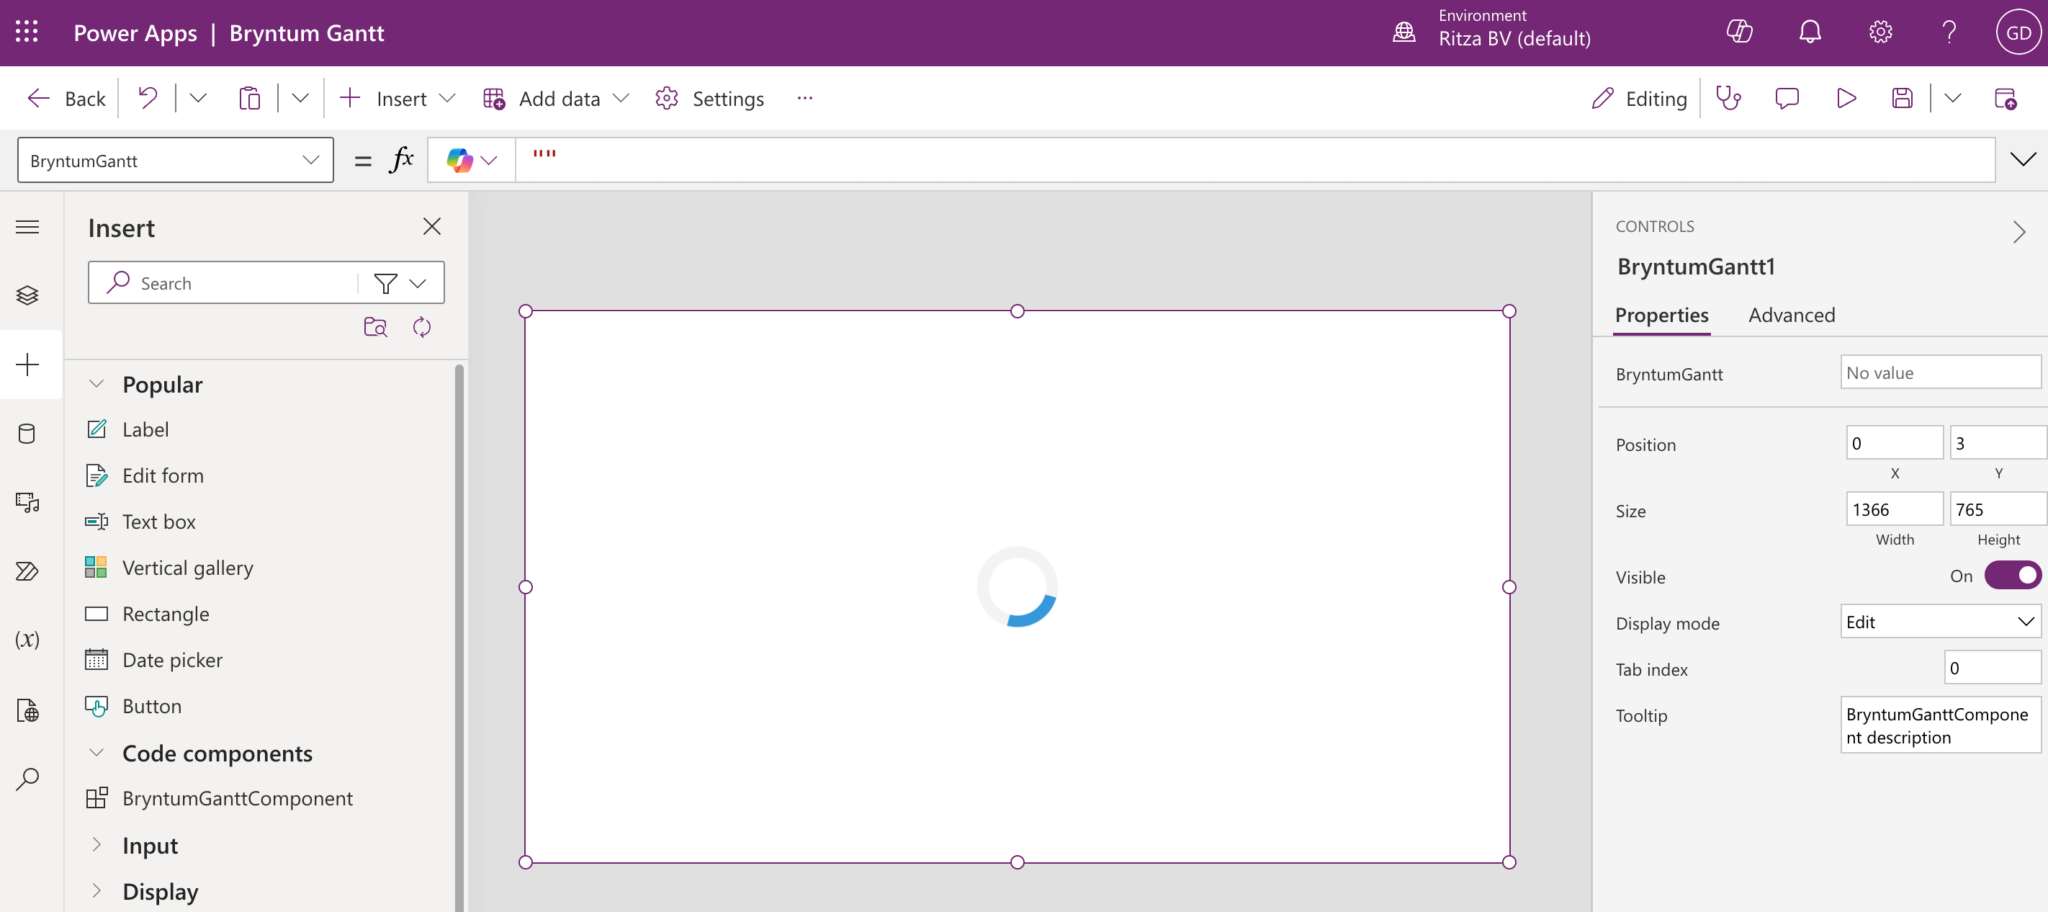
- In the Insert column, there will now be a Code components dropdown item. Click on it and select the “BryntumGanttComponent” component. This will add the custom Bryntum Gantt component to the page.
- Resize the component, which will show a loading spinner, to take up the whole page.
- Click the “Save” button at the top-right.
- Once the save is complete, click the “Back” button at the top left of the page and leave the app.
- Hover over the “Bryntum Gantt” app row in the table on the Apps page and click the “Edit” button.
- Click the “Publish” button at the top-right of the screen.
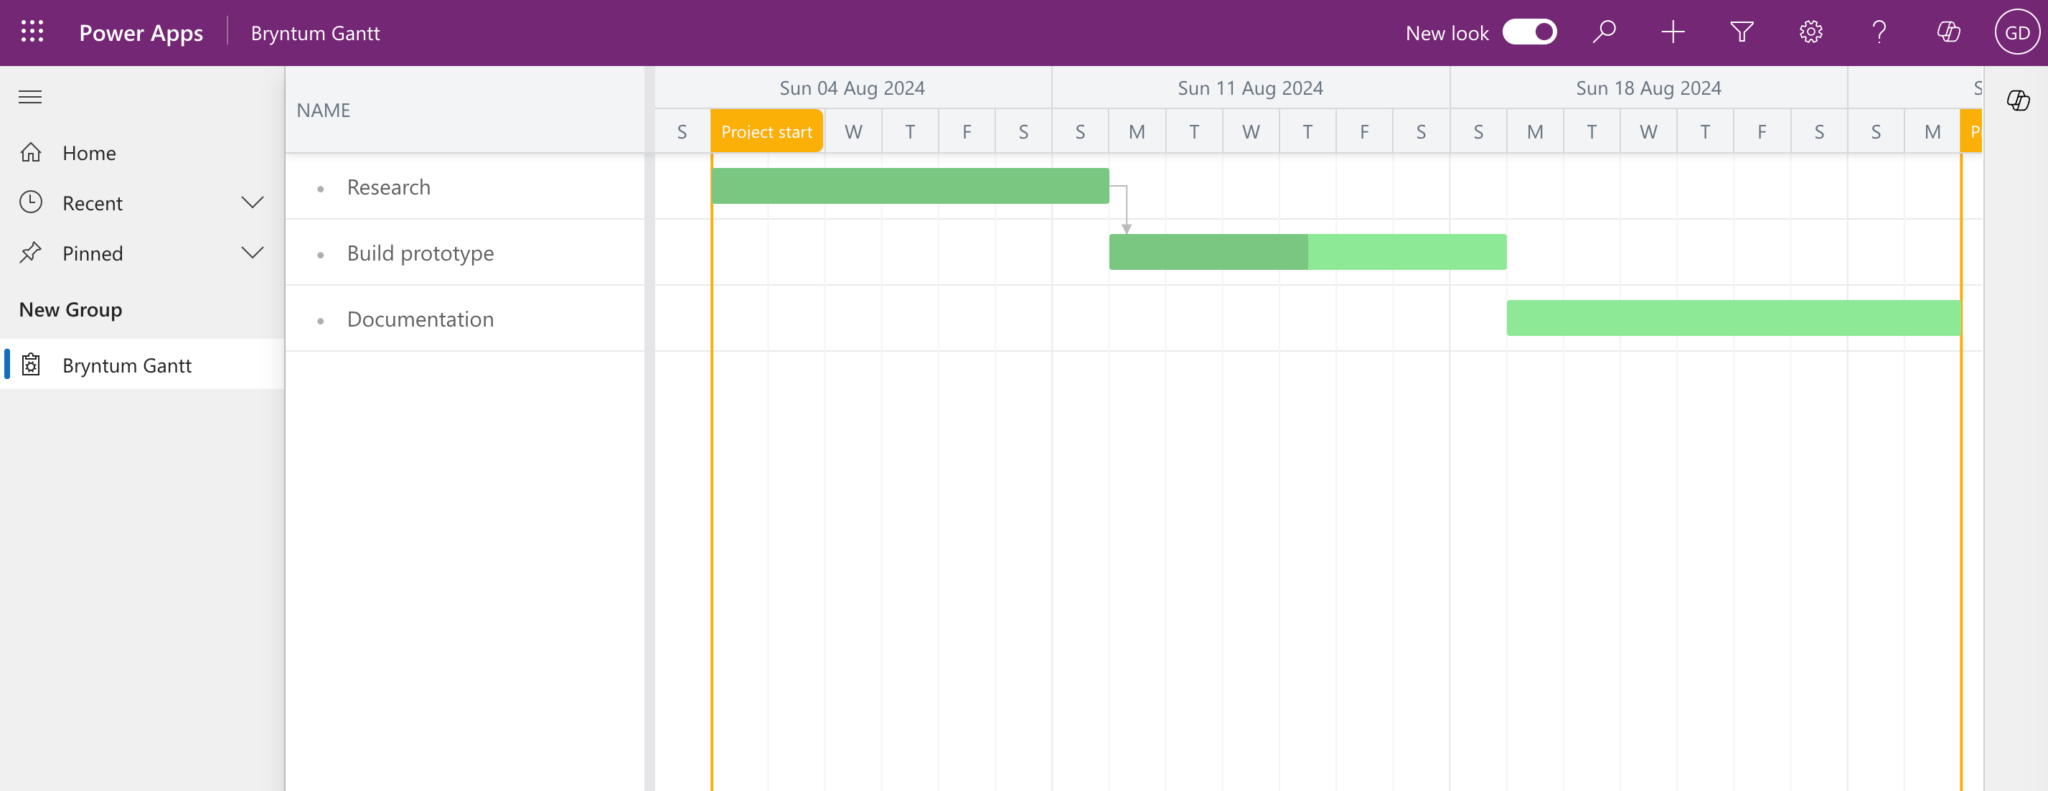
- Click the “Play” button next to the “Publish” button to view the React Bryntum Gantt Power Apps component:
Now let’s make the component save changes to the Bryntum Gantt in the Dataverse tables.
Creating a syncData function to sync data changes
Add the onDataChange property to the BryntumGantt React component in the BryntumGanttComponent.tsx file:
onDataChange={syncData}When a data change occurs in the Bryntum Gantt, the dataChange event will be fired and the syncData function will be called.
Define the syncData function in the BryntumGanttComponent component:
const syncData = ({ store, action, records }: SyncData) => {
    const storeId = store.id;
    if (storeId === 'tasks') {
        if (action === 'add') {
        }
        if (action === 'remove') {
        }
        if (action === 'update') {
        }
    }
    if (storeId === 'dependencies') {
        if (action === 'add') {
        }
        if (action === 'remove') {
        }
        if (action === 'update') {
        }
    }
};
We get information about the store, action, and records from the dataChange event. The store is used to determine which data store has been changed, "tasks" or "dependencies". The action determines the type of data change, "add", "remove", or "update".
Now add the following type imports to the top of the BryntumGanttComponent.tsx file:
import { SyncData, GanttDependencyDataverse, GanttTaskDataverse } from './BryntumGanttComponent.types';Creating Dataverse data using the Web API createRecord method
Add the following code to the if statement in the syncData function where storeId === "tasks" and action === 'add‘ are:
if (records.length > 1) return;
  try {
      const newTask = records[0] as GanttTask;
      if (JSON.stringify(newTask.meta.modified) === "{}") return;
      const modifiedKeys = Object.keys(newTask.meta.modified);
      if (modifiedKeys.includes('orderedParentIndex')) return;
      const insertData: Partial<GanttTaskDataverse> = {
          [`${databasePrefix}name`]           : newTask.name,
          [`${databasePrefix}startdate`]      : newTask.startDate,
          [`${databasePrefix}enddate`]        : newTask.endDate,
          [`${databasePrefix}effort`]         : newTask.effort,
          [`${databasePrefix}effortunit`]     : newTask.effortUnit,
          [`${databasePrefix}duration`]       : newTask.duration,
          [`${databasePrefix}durationunit`]   : newTask.durationUnit,
          [`${databasePrefix}percentdone`]    : newTask.percentDone,
          [`${databasePrefix}schedulingmode`] : newTask.schedulingMode,
          [`${databasePrefix}constrainttype`] : newTask.constraintType,
          [`${databasePrefix}constraintdate`] : newTask.constraintDate,
          [`${databasePrefix}manuallyscheduled`] :
        newTask.manuallyScheduled !== undefined &&
        newTask.manuallyScheduled !== null
            ? Number(newTask.manuallyScheduled)
            : newTask.manuallyScheduled,
          [`${databasePrefix}unscheduled`] :
        newTask.unscheduled !== undefined &&
        newTask.unscheduled !== null
            ? Number(newTask.unscheduled)
            : newTask.unscheduled,
          [`${databasePrefix}effortdriven`] :
        newTask.effortDriven !== undefined &&
        newTask.effortDriven !== null
            ? Number(newTask.effortDriven)
            : newTask.effortDriven,
          [`${databasePrefix}inactive`] :
        newTask.inactive !== undefined && newTask.inactive !== null
            ? Number(newTask.inactive)
            : newTask.inactive,
          [`${databasePrefix}cls`]         : newTask.cls,
          [`${databasePrefix}parentindex`] : newTask.parentIndex,
          [`${databasePrefix}parentid`] : newTask.parentId,
          [`${databasePrefix}orderedparentindex`] : newTask.orderedParentIndex,
          [`${databasePrefix}calendar`] :
        newTask.calendar !== undefined && newTask.calendar !== null
            ? Number(newTask.calendar)
            : newTask.calendar,
          [`${databasePrefix}direction`] : newTask.direction
      };
      if (newTask.ignoreResourceCalendar !== null) {
          insertData[`${databasePrefix}ignoreresourcecalendar`] =
        newTask.ignoreResourceCalendar;
      }
      if (newTask.note !== null) {
          insertData[`${databasePrefix}note`] = newTask.note;
      }
      if (newTask.iconCls !== null) {
          insertData[`${databasePrefix}iconcls`] = newTask.iconCls;
      }
      if (newTask.color !== null) {
          insertData[`${databasePrefix}color`] = newTask.color;
      }
      if (newTask.expanded !== null) {
          insertData[`${databasePrefix}expanded`] = Number(
              newTask.expanded
          );
      }
      if (newTask.deadline !== null) {
          insertData[`${databasePrefix}deadline`] = newTask.deadline;
      }
      return props?.context?.webAPI
          .createRecord(
      `${databasePrefix}${tasksDataverseTableName}`,
      insertData
          )
          .then((res) => {
              if (gantt?.current?.instance) {
                  gantt.current.instance.taskStore.applyChangeset({
                      updated : [
                          // Will set proper id for added task
                          {
                              $PhantomId : newTask.id,
                              id         : res.id
                          }
                      ]
                  });
              }
          });
  }
  catch (error) {
      console.error(error);
  }
We create an insertData object that’s passed into the Web API createRecord method as an argument. We use the insertData object to format the task data for insertion into the tasks Dataverse table. The query uses the Dataverse columns’ logical names, which are lowercase and have prefixes.
Once the task has been successfully inserted into the database, we update the id of the task in the Gantt data store to use the Dataverse id instead of the auto-generated client-side $PhantomId.
⚠️ You should not persist phantom record identifiers as-is on the server. Doing this may cause id collisions on the client after data reloading. The backend should assign a new id to added records.
Add the following code to the if statement in the syncData function where storeId === "dependencies" and action === 'add‘ are:
for (let i = 0; i < records.length; i++) {
    try {
        const newDep = records[i];
        const insertData: Partial<GanttDependencyDataverse> = {
            [`${databasePrefix}type`] :
          newDep.type !== undefined && newDep.type !== null
              ? Number(newDep.type)
              : newDep.type,
            [`${databasePrefix}lag`]     : newDep.lag,
            // case sensitive
            [`${databasePrefix}lagunit`] : newDep.lagUnit,
            [`${databasePrefix}active`] :
          newDep.active !== undefined && newDep.active !== null
              ? Number(newDep.active)
              : newDep.active,
            [`${databasePrefix}from@odata.bind`] : `/${databasePrefix}${tasksDataverseTableName}es(${newDep.from})`,
            [`${databasePrefix}to@odata.bind`]   : `/${databasePrefix}${tasksDataverseTableName}es(${newDep.to})`
        };
        if (newDep.cls !== null && newDep.cls !== '') {
            insertData[`${databasePrefix}cls`] = newDep.cls;
        }
        if (newDep.fromSide !== null) {
            insertData[`${databasePrefix}fromside`] = newDep.fromSide;
        }
        if (newDep.toSide !== null) {
            insertData[`${databasePrefix}toside`] = newDep.toSide;
        }
        return props?.context?.webAPI
            .createRecord(
          `${databasePrefix}${dependenciesDataverseTableName}`,
          insertData
            )
            .then((res) => {
                if (gantt?.current?.instance) {
                    // @ts-ignore
                    gantt.current.instance.dependencyStore.applyChangeset({
                        updated : [
                            // Will set proper id for added dependency
                            {
                                $PhantomId : newDep.id,
                                id         : res.id
                            }
                        ]
                    });
                }
            });
    }
    catch (error) {
        console.error(error);
    }
}
This code follows the same logic as the code to add a new task.
Deleting Dataverse data using the Web API deleteRecord method
Add the following code to the if statement where storeId === "tasks" and action === 'remove‘ are:
if (records[0].data.id.startsWith('_generated')) return;
records.forEach((record) => {
    try {
        return props?.context?.webAPI
            .deleteRecord(
      `${databasePrefix}${tasksDataverseTableName}`,
      record.data.id
            )
            .then((res) => {
                console.log('deleteRecord: ', { res });
            });
    }
    catch (error) {
        console.error(error);
    }
});
We call the Web API deleteRecord method and pass in the task id as an argument.
Now add the following code to the if statement where storeId === "dependencies" and action === 'remove‘ are:
if (records[0].data.id.startsWith('_generated')) return;
records.forEach((record) => {
    try {
        return props?.context?.webAPI
            .deleteRecord(
        `${databasePrefix}${dependenciesDataverseTableName}`,
        record.data.id
            )
            .then((res) => {
                console.log('deleteRecord: ', { res });
            });
    }
    catch (error) {
        console.error(error);
    }
});
Updating Dataverse data using the Web API updateRecord method
Add the following code to the if statement where storeId === "tasks" and action === 'update‘ are:
for (let i = 0; i < records.length; i++) {
    try {
        if (records[i].data.id.startsWith('_generated')) continue;
        const task = records[i];
        const updateData: Partial<GanttTaskDataverse> = {
            [`${databasePrefix}name`]           : task.name,
            [`${databasePrefix}startdate`]      : task.startDate,
            [`${databasePrefix}enddate`]        : task.endDate,
            [`${databasePrefix}effort`]         : task.effort,
            [`${databasePrefix}effortunit`]     : task.effortUnit,
            [`${databasePrefix}duration`]       : task.duration,
            [`${databasePrefix}durationunit`]   : task.durationUnit,
            [`${databasePrefix}percentdone`]    : task.percentDone,
            [`${databasePrefix}schedulingmode`] : task.schedulingMode,
            [`${databasePrefix}constrainttype`] : task.constraintType,
            [`${databasePrefix}constraintdate`] : task.constraintDate,
            [`${databasePrefix}manuallyscheduled`] :
          task.manuallyScheduled !== undefined &&
          task.manuallyScheduled !== null
              ? Number(task.manuallyScheduled)
              : task.manuallyScheduled,
            [`${databasePrefix}unscheduled`] :
          task.unscheduled !== undefined && task.unscheduled !== null
              ? Number(task.unscheduled)
              : task.unscheduled,
            [`${databasePrefix}effortdriven`] :
          task.effortDriven !== undefined && task.effortDriven !== null
              ? Number(task.effortDriven)
              : task.effortDriven,
            [`${databasePrefix}inactive`] :
          task.inactive !== undefined && task.inactive !== null
              ? Number(task.inactive)
              : task.inactive,
            [`${databasePrefix}cls`]         : task.cls,
            [`${databasePrefix}parentindex`] : task.parentIndex,
            [`${databasePrefix}parentid`] : task.parentId,
            [`${databasePrefix}orderedparentindex`] : task.orderedParentIndex,
            [`${databasePrefix}calendar`] :
          task.calendar !== undefined && task.calendar !== null
              ? Number(task.calendar)
              : task.calendar,
            [`${databasePrefix}direction`] : task.direction
        };
        if (task.ignoreResourceCalendar !== null) {
            updateData[`${databasePrefix}ignoreresourcecalendar`] = Number(
                task.ignoreResourceCalendar
            );
        }
        if (task.note !== null) {
            updateData[`${databasePrefix}note`] = task.note;
        }
        if (task.iconCls !== null) {
            updateData[`${databasePrefix}iconcls`] = task.iconCls;
        }
        if (task.color !== null) {
            updateData[`${databasePrefix}color`] = task.color;
        }
        if (task.expanded !== null) {
            updateData[`${databasePrefix}expanded`] = Number(task.expanded);
        }
        if (task.deadline !== null) {
            updateData[`${databasePrefix}deadline`] = task.deadline;
        }
        return props?.context?.webAPI
            .updateRecord(
          `${databasePrefix}${tasksDataverseTableName}`,
          task.id,
          updateData
            )
            .then((res) => {
                console.log('webAPI.updateRecord for tasks response: ', res);
            });
    }
    catch (error) {
        console.error(error);
    }
}
We call the Web API updateRecord method and pass in the task id and data to update as arguments.
For the last CRUD operation, add the following code to the if statement where storeId === "dependencies" and action === 'update' are:
for (let i = 0; i < records.length; i++) {
    try {
        if (records[i].data.id.startsWith('_generated')) continue;
        const dep = records[i] as GanttDependency;
        const updateData: Partial<GanttDependencyDataverse> = {
            [`${databasePrefix}type`] :
          dep.type !== undefined && dep.type !== null
              ? Number(dep.type)
              : dep.type,
            [`${databasePrefix}lag`]     : dep.lag,
            // case sensitive
            [`${databasePrefix}lagunit`] : dep.lagUnit,
            [`${databasePrefix}active`] :
          dep.active !== undefined && dep.active !== null
              ? Number(dep.active)
              : dep.active,
            [`${databasePrefix}from@odata.bind`] : `/${databasePrefix}${tasksDataverseTableName}es(${dep.from})`,
            [`${databasePrefix}to@odata.bind`]   : `/${databasePrefix}${tasksDataverseTableName}es(${dep.to})`
        };
        if (dep.cls !== null && dep.cls !== '') {
            updateData[`${databasePrefix}cls`] = dep.cls;
        }
        if (dep.fromSide !== null) {
            updateData[`${databasePrefix}fromside`] = dep.fromSide;
        }
        if (dep.toSide !== null) {
            updateData[`${databasePrefix}toside`] = dep.toSide;
        }
        return props?.context?.webAPI
            .updateRecord(
          `${databasePrefix}${dependenciesDataverseTableName}`,
          dep.id,
          updateData
            )
            .then((res) => {
                console.log(
                    'webAPI.updateRecord for dependencies response: ',
                    res
                );
            });
    }
    catch (error) {
        console.error(error);
    }
}
Disabling create and delete when collapsing or expanding a parent task
When you expand a parent task to show its children tasks, an add event is triggered. When you collapse a parent task to hide its children tasks, a remove event is triggered. Let’s disable adding or deleting tasks when the parent task is expanded or collapsed by using React refs.
Add the following refs to the BryntumGanttComponent:
const disableCreateRef = useRef(false);
const disableDeleteRef = useRef(false);
Replace the following line of code with the if statement in the syncData function where storeId === "tasks" and action === 'add' are:
- if (records.length > 1) return;
+ if (records.length > 1 || disableCreateRef.current) return;
Add the following lines of code in the try block right below the line of code you replaced:
disableCreateRef.current = true;
setTimeout(() => {
    disableCreateRef.current = false;
}, 50);
When the value of the disableCreateRef is true, creating a task will be disabled temporarily.
Add the following line of code to the if statement in the syncData function where storeId === "tasks" and action === 'remove' are:
if (disableDeleteRef.current) return;When the value of the disableDeleteRef is true, deleting a task will be disabled temporarily.
Add the following onCellClick property to the BryntumGantt React component:
onCellClick={cellClick}Define the cellClick function in the BryntumGanttComponent component:
const cellClick = ({ target }: {target: HTMLElement}) => {
  if (target.className === 'b-tree-expander b-icon b-icon-tree-collapse' || target.className === 'b-tree-expander b-icon b-icon-tree-expand') {
    disableCreateRef.current = true;
    disableDeleteRef.current = true;
    setTimeout(() => {
      disableCreateRef.current = false;
      disableDeleteRef.current = false;
  }, 50);
  }
}
If the expand or collapse button of a parent task has been clicked, we temporarily disable creating or deleting tasks.
Re-build and push the completed custom component to the Power Apps platform environment
Rebuild npm run build and push the component pac pcf push --publisher-prefix test.
Publish the app:
- Click the Save button at the top-right.
- Once the save is complete, go back to the previous Bryntum Scheduler Power Apps app browser tab.
- Click the Publish button at the top-right of the screen.
- Click the Play button next to the Publish button to view the React Bryntum Scheduler Power Apps component.
You now have a Bryntum Scheduler Power Apps component with CRUD functionality.

- Publish the app.
- Create a new page.
- Publish the app again.
Next steps
Now that you know how to create a Bryntum Gantt Power Apps component, you can create other Power Apps components using any Bryntum components. You can also use multiple Bryntum components together.
Creating a Bryntum Gantt Power Apps component is similar to creating a custom Salesforce component. To learn more, read our Bryntum Gantt as a Salesforce Lightning Web Component blog post.