Using Bryntum Gantt as a Salesforce Lightning Web Component
We strive to keep posts updated, but code samples may sometimes be outdated. Humans, see the Bryntum documentation; agents, https://mcp.bryntum.com for the latest info.
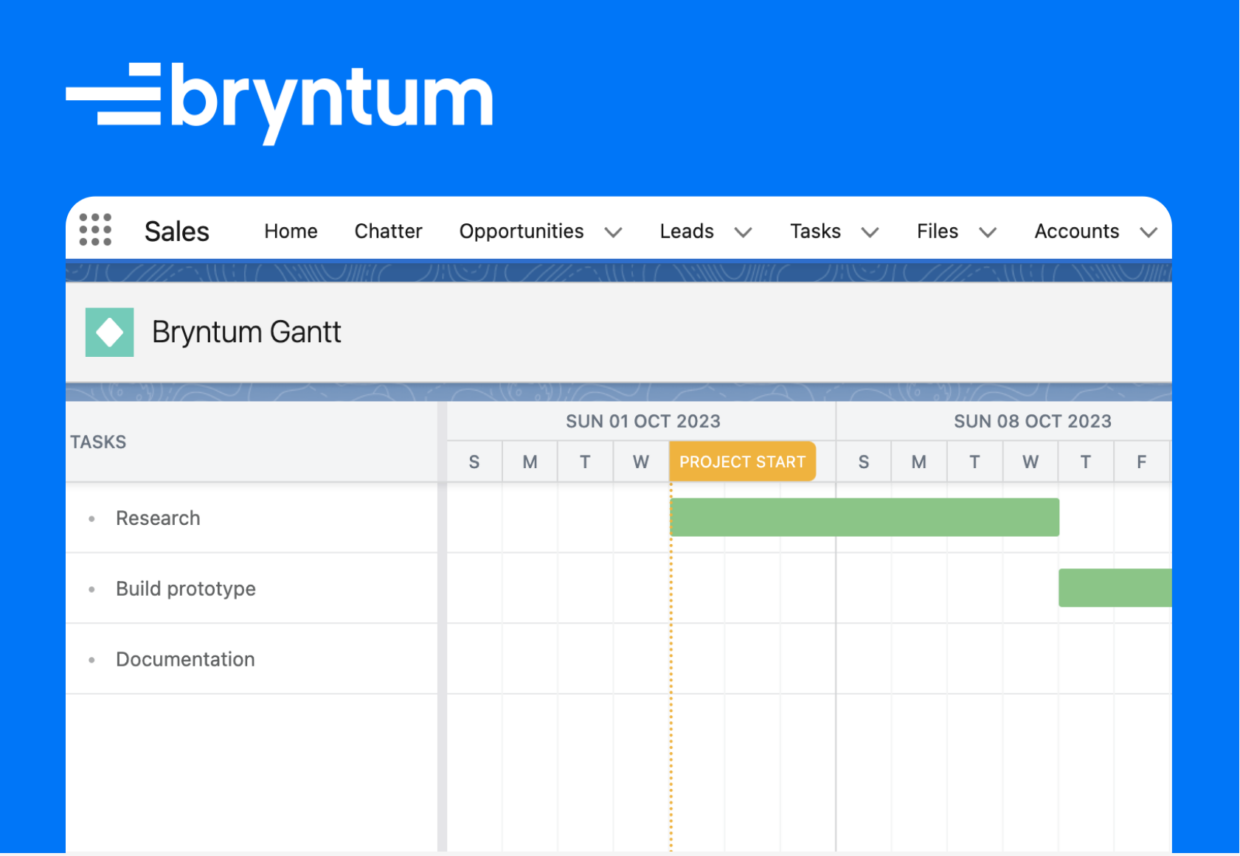
Salesforce Lightning web components (LWC) are custom HTML elements built using HTML, CSS, and JavaScript that you can use to create custom pages on the Salesforce platform. You can use any Bryntum component easily in Salesforce. View any of the Bryntum components integrated with Salesforce by accessing our Salesforce demo below.
Salesforce Demo(Username: demouser@bryntum.com, password: BryntumSalesforce3).
In this tutorial, we’ll create a Bryntum Gantt Lightning web component. Salesforce has a free sample Gantt chart Lightning web component for resource allocations, but it’s functionality and flexibility is limited. If you are looking for a fully customizable Gantt chart with great performance, Bryntum Gantt is a good choice.
We’ll do the following in this tutorial:
- Create custom objects in Salesforce to store the Gantt tasks and dependencies data.
- Create a Bryntum Gantt Lightning web component.
- Add the Bryntum Gantt Lightning web component to a Salesforce Lightning page.
- Get data from the custom objects into the Bryntum Gantt.
- Save updates to the custom objects.
Prerequisites
If you don’t have a Salesforce account or if you want a Salesforce Platform playground, sign up for the Salesforce Developer Edition. It’s a free, full-featured copy of the Salesforce Platform.
You’ll need to install the Salesforce CLI to create a Lightning web component and deploy it to your Salesforce organization. Install the CLI from here. Visual Studio Code (VS Code) is the recommended IDE for Salesforce development. Install the recommended VS Code extension: Salesforce Extension Pack. Please be aware that the extension pack relies on the presence of Java on your system. For guidance on configuring Java JDK with VS Code, you can find more information here.
For this tutorial, we’ll create a Salesforce scratch organization. A scratch org is used for development and testing. It’s a disposable deployment of Salesforce code and metadata. Note that you should not use data containing personal information in a scratch org. Salesforce CLI and scratch orgs are part of the Salesforce Developer Experience (DX) product suite. To create a scratch org, you’ll need to log in to your Salesforce developer environment and enable Dev Hub features in your org.
Create a Salesforce DX project
Follow these steps to create a boilerplate project:
- Create a base directory for your project.
- In VS Code, open the command palette by pressing Ctrl+Shift+P (Windows) or Cmd+Shift+P (macOS).
- Type
SFDXand selectSFDX: Create Project. - Select the default Standard Project Template.
- Give your project a name, for example,
BryntumGantt. - Select the base directory that you created to store your project in.
This creates various folders and files for developing with Salesforce, such as .sfdx, config, and force-app.
Authorize a Dev Hub
Open the VS Code command palette, then type and select SFDX: Authorize a Dev Hub. Use the default alias. The Salesforce login page will open in a new browser window. Log in using your Salesforce Developer Edition account. Click the “Allow” button when prompted to allow the Salesforce CLI access to your org. The Salesforce CLI remembers your credentials once you’ve authenticated your Dev Hub in the browser.
Create a scratch org
In the VS Code command palette, type and select the following:
SFDX: Create a Default Scratch Org
Now, open the VS Code command palette, then type and select the following:
SFDX: Open Default Org
In the Salesforce Platform UI, click on the “Setup gear” icon on the top right and click “Setup” in the popup menu. In the “Quick Find” input on the top left, search for “My Domain”. Under My Domain Details, copy the “Current My Domain URL”. In your Salesforce code in VS Code, open the sfdx-project.json file and set sfdcLoginUrl to your domain URL.
Creating the static resources for the Bryntum Gantt Lightning web component
Before we create the Bryntum Gantt LWC, let’s get the static resources we need for it. The resources required for the Bryntum Gantt are:
- The JavaScript bundle for the Bryntum Gantt LWC.
- Bryntum Gantt LWC CSS files.
- Bryntum Gantt LWC locales.
- Bryntum Gantt LWC fonts.
To get these static resources, download the free trial version distribution folder of the Bryntum Gantt here. If you have already bought the licensed version, you can log in here to download the Bryntum Gantt distribution folder. These static resources will be uploaded to your Salesforce scratch org and will be accessible to your Bryntum Gantt LWC.
In the /examples/salesforce/src/staticresources folder of the Bryntum Gantt distribution folder, copy the bryntum_gantt.resource-meta.xml file and add it to the /force-app/main/default/staticresources folder in your Salesforce DX project in VS Code.
In this /force-app/main/default/staticresources folder, create a folder called bryntum_gantt. Now, copy the following files and folders from the /build folder in the Bryntum Gantt distribution folder:
fontslocalesgantt.lwc.module.min.jsgantt.stockholm.cssgantt.stockholm.css.map
Add them to the /force-app/main/default/staticresources/bryntum_gantt folder.
Push the static resources to your scratch org by typing and selecting the following in the VS Code command palette:
SFDX: Push Source to Default OrgIn your Salesforce scratch org, click on the Setup gear icon on the top right and click “Setup” in the popup menu. Go to the “Quick Find” search input and search for “Static Resources”. You should see a folder with the name “bryntum_gantt” in the table.
Creating a custom object in Salesforce to store tasks data
Salesforce allows you to create custom objects to store unique data. We’ll create two custom objects for our Bryntum Gantt chart tasks and dependencies. Let’s create the custom object for tasks first. In your Salesforce scratch org, open “Setup” by clicking the gear icon on the top right of the page. Navigate to the “Object Manager” tab. On the top of this tab, right-click the “Create” button. In the dropdown menu, click “Custom Object from Spreadsheet”. We’ll create most of the fields for the custom objects and add some initial data by importing data from spreadsheets, as this is faster than creating each field manually in the Salesforce UI. In the new tab that opens, click the “Login with Sandbox” button. In the login form, click “Use Custom Domain”. Use the domain URL that you added to the sfdcLoginUrl property in your sfdx-project.json file. To get the username for your scratch org, run the following command in your VS Code terminal:
sfdx org:list --allTo generate a password for the username, run the following command:
sfdx user:password:generate -u <alias>Replace <alias> with the alias of your scratch org.
Once you’ve been authenticated, copy and paste the following data in a bryntum-gantt-tasks-data.csv file.
Name,Start Date,End Date,Effort,Effort Unit,Duration,Duration Unit,Percent Done,Scheduling Mode,Note,Constraint Type,Constraint Date,Manually Scheduled,Unscheduled,Ignore Resource Calendar,Effort Driven,Inactive,Cls,Icon Cls,Color,Parent Index,Expanded,Calendar,Deadline,Direction
Research,2023/10/05,2023/10/12,,,,,100,,,,,1,,,,,,,,,,,,
Build prototype,2023/10/12,2023/10/19,,,,,50,,,,,1,,,,,,,,,,,,
Documentation,2023/10/19,2023/10/27,,,,,0,,,,,1,,,,,,,,,,,,
The headings in this CSV text represent most of the fields for a Bryntum Gantt task.
Now upload this CSV file in the “Select a Spreadsheet” section. If you don’t see this section, click the “Cancel” button on the bottom left of the screen. Once the CSV file is uploaded you’ll see the following screen:
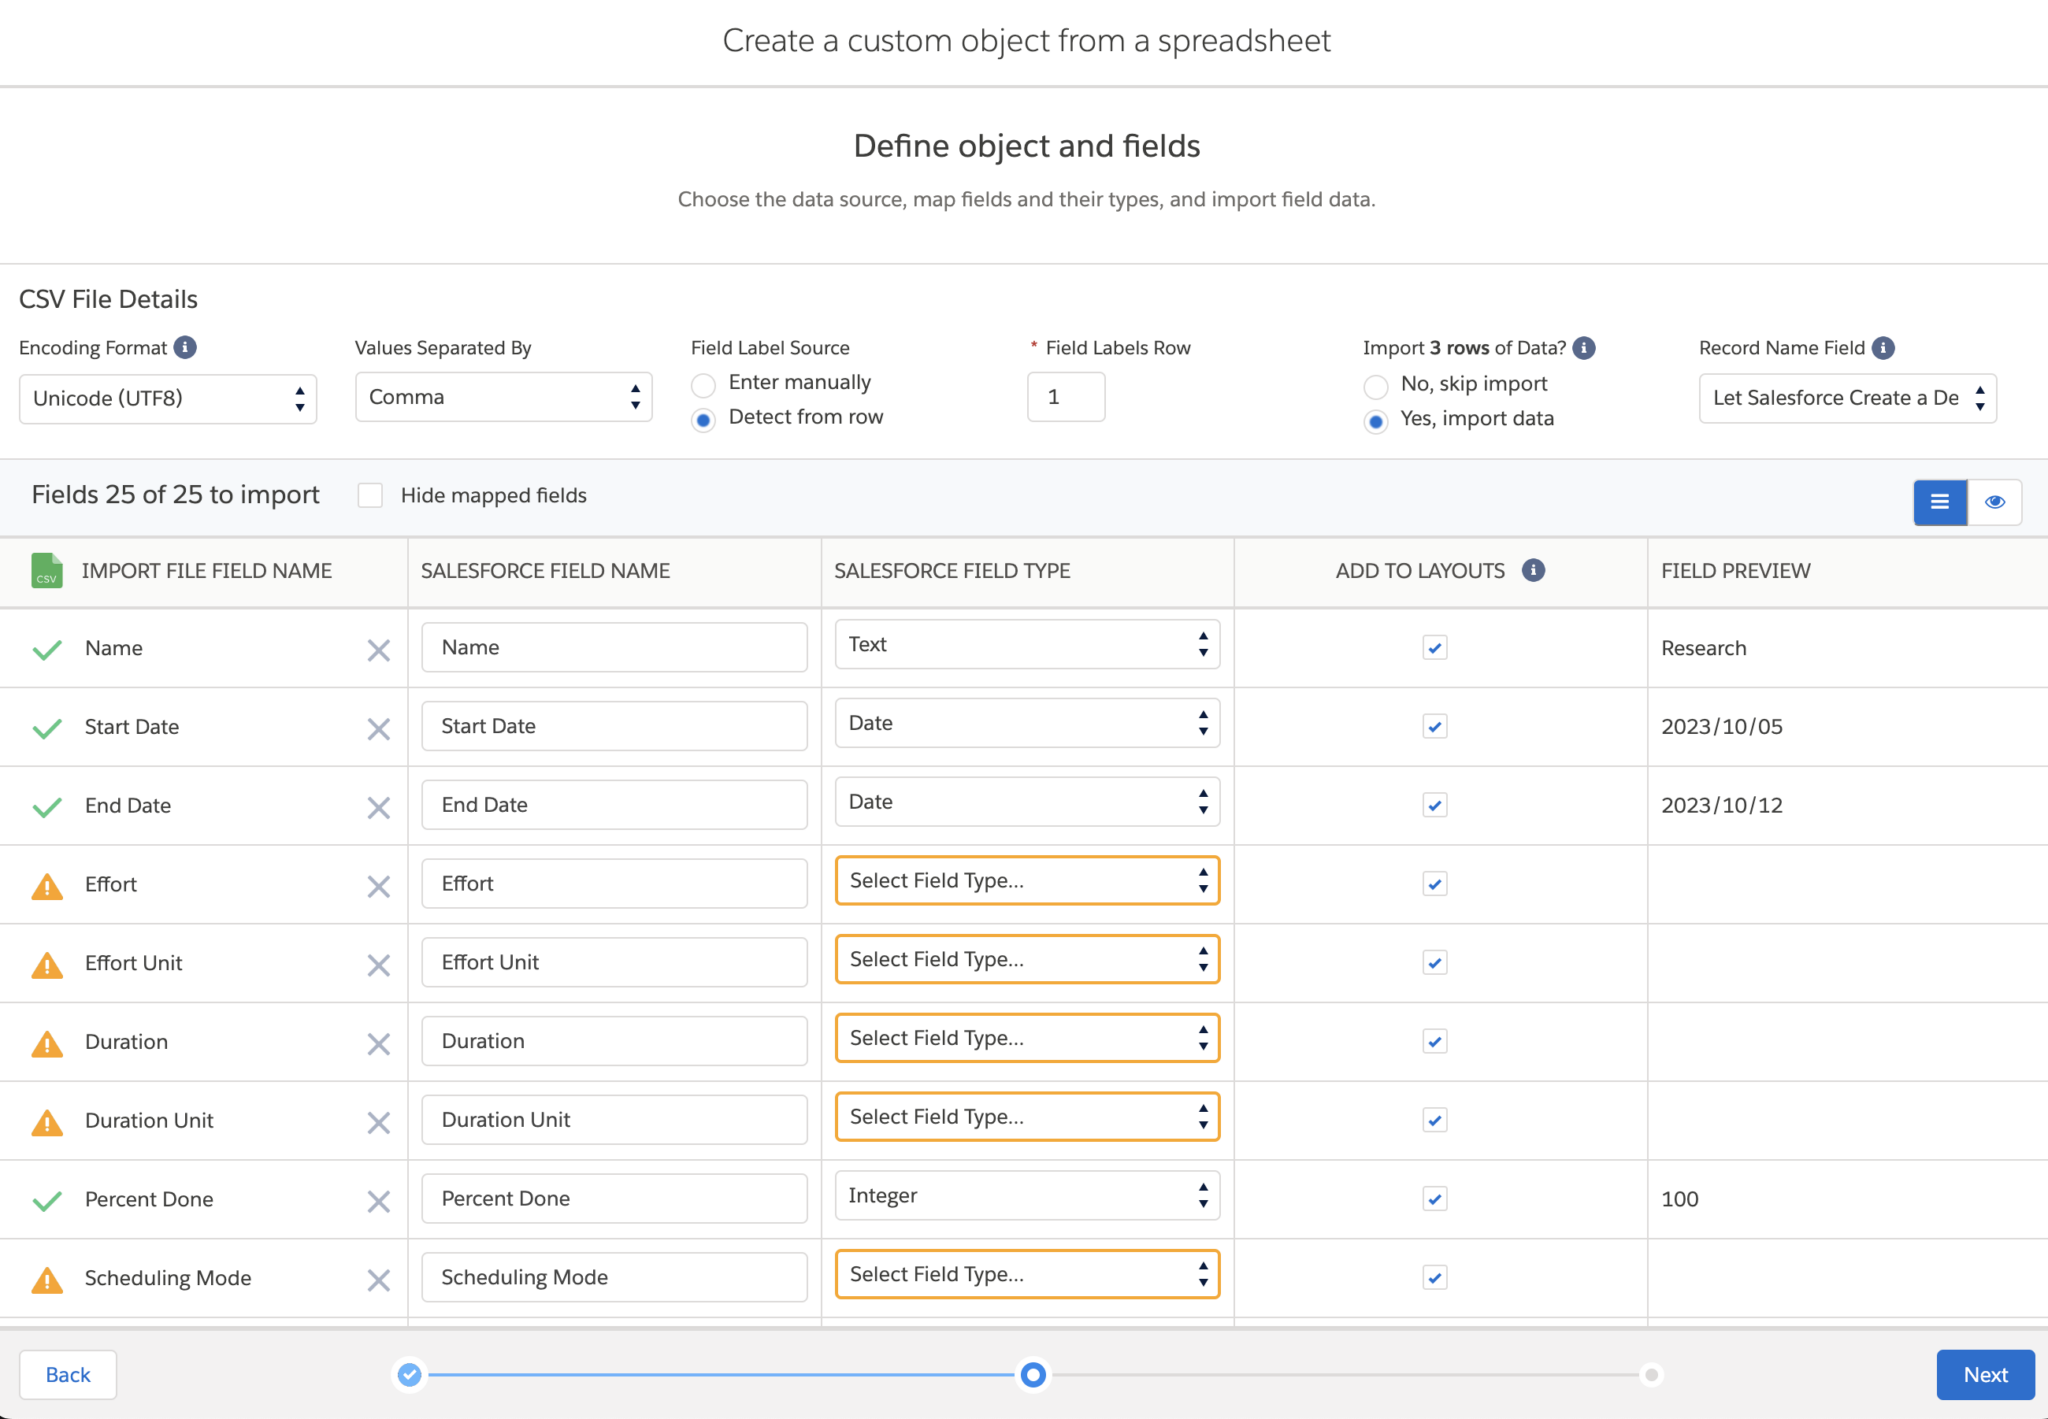
In the “SALESFORCE FIELD TYPE” column, change the field types as follows:
- Name:
Text - Start Date:
Date - End Date:
Date - Effort:
Decimal - Effort Unit:
Text - Duration:
Decimal - Duration Unit:
Text - Percent Done:
Decimal - Scheduling Mode:
Text - Note:
Text - Constraint Type:
Text - Constraint Date:
Date/Time - Manually Scheduled:
Integer - Unscheduled:
Integer - Ignore Resource Calendar:
Integer - Effort Driven:
Integer - Inactive:
Integer - Cls:
Text - Icon Cls:
Text - Color:
Text - Parent Index:
Integer - Expanded:
Integer - Calendar:
Integer - Deadline:
Date/Time - Direction:
Text
Now click the “Next” button at the bottom right. For the Object Properties, set “Label” to bryntum-gantt-tasks-data, “Plural Label” to bryntum-gantt-tasks-data, and “API Name” to bryntum_gantt_tasks_data. Click the “Finish” button at the bottom right.
Once the object is created, go to the “Object Manager” tab in “Setup” and search for your new custom object using the “Quick Find” input at the top right of the “Object Manager” tab. You’ll notice that the API Name has __c added to the end. This indicates that it’s a custom object. We’ll now make some modifications to the fields of the bryntum-gantt-tasks-data object.
First, let’s change the number of decimal places in the values of the “Duration” and “Percent Done” fields. In the navigation menu on the left, click on “Fields & Relationships”. Click on the “Duration field” and then click on the “Edit” button at the top. In the “Custom Field Definition Edit” form, change the “Decimal Places” input in the “Number Options” section to 2 and then click the “Save” button. Do the same for the “Percent Done” field.
We’ll now add the parent ID field as a lookup field. This is a special field type that allows you to connect two objects. Follow these steps to create the lookup field:
- In the “Fields and Relationships” tab, click the “New” button.
- Select the data type “Lookup Relationship” and then click “Next”.
- In the “Related To” dropdown list, select “bryntum_gantt_tasks_data” and then click “Next”.
- Set the “Field Label” to
Parent Idand the “Field Name” toParent_Id. - Click “Next” three times and then click “Save”.
You can add a parent ID to a task in the custom object using the Salesforce UI. Click on the “App Launcher” icon at the top left of the page and search for “bryntum_gantt_tasks_data”. A table showing the tasks data that you imported from the CSV file will be displayed. Click on the “Recently Viewed” dropdown list at the top left and select “All Records”. Click on the dropdown arrow button at the end of one of the task rows and select “Edit” in the popup menu. In the “Parent Id” field, you can select a task that will be the parent of the edited task.
Creating a custom object in Salesforce to store dependencies data
Now let’s create a custom object for the task dependencies. Create a custom object as you did with the tasks custom object by creating the object from a spreadsheet. Create the dependencies object using a bryntum-gantt-dependencies-data.csv CSV file with the following CSV values:
Type,Cls,Lag,Lag Unit,Active,From Side,To Side
2,,0,day,1,,
The headings in this CSV text represent fields for a Bryntum Gantt dependency. In the “SALESFORCE FIELD TYPE” column, change the field types as follows:
- Type:
Integer - Cls:
Text - Lag:
Decimal - Lag Unit:
Text - Active:
Integer - From Side:
Text - To Side:
Text
For the Object Properties, set “Label” to bryntum-gantt-dependencies-data, “Plural Label” to bryntum-gantt-dependencies-data, and “API Name” to bryntum_gantt_dependencies_data.
Create two custom lookup fields that reference the bryntum-gantt-tasks-data custom object. For one field, set the “Field Label” to From Event and the “Field Name” to From_Event. For the other field, set the “Field Label” to To Event and the “Field Name” to To_Event.
In your VS Code terminal, run the following command to add your custom tasks object to your Salesforce DX project:
sfdx project retrieve start -m CustomObject:bryntum_gantt_tasks_data__cNow run the following command to add your custom dependencies object to your Salesforce DX project:
sfdx project retrieve start -CustomObject:bryntum_gantt_dependencies_data__cCreating a Bryntum Gantt Lightning web component
Open the VS Code command palette, type and select SFDX: Create Lightning Web Component. Enter gantt as the name of the new component. Press “Enter” to accept the default directory: /force-app/main/default/lwc. This creates a gantt folder in the /force-app/main/default/lwc folder that contains an HTML file and a JavaScript file for the Lightning web component, and an XML configuration file named gantt.js-meta.xml that defines the component’s metadata values.
Replace the code in the gantt.js-meta.xml with the following:
<?xml version="1.0" encoding="UTF-8"?>
<LightningComponentBundle xmlns="https://soap.sforce.com/2006/04/metadata">
    <apiVersion>57.0</apiVersion>
    <isExposed>true</isExposed>
    <masterLabel>Bryntum Gantt</masterLabel>
    <description>Bryntum Gantt - data from custom objects</description>
    <targets>
      <target>lightning__AppPage</target>
    </targets>
</LightningComponentBundle>
We expose the LWC so that it can be used in the Lightning App Builder in your Salesforce scratch org. We also set the targets, which specifies where the LWC can be added. The LWC can be added to a “Lightning App Page”.
Replace the code in the gantt.html file with the following lines of code:
<template>
    <div class="container" lwc:dom="manual"></div>
</template>
This HTML file uses an LWC HTML template to render components efficiently using a virtual DOM. In most cases, it’s best to let the LWC manipulate the DOM instead of using JavaScript. For the Bryntum Gantt LWC, we set lwc:dom to manual as the Bryntum Gantt JavaScript code will need to manipulate the DOM by adding the Gantt component to the <div> with a class of container.
Now create a gantt.css file and add the following lines of code:
.container {
    height : 50em;
}
.b-float-root {
    z-index: 100;
}
In the gantt.js file, the LightningElement class is the base class for Lightning Web Components. We’ll extend it to create the Gantt_component class that will create the Bryntum Gantt. Replace the code in the gantt.js file with the following lines of code:
/* globals bryntum : true */
import { LightningElement } from "lwc";
import { ShowToastEvent } from "lightning/platformShowToastEvent";
import { loadScript, loadStyle } from "lightning/platformResourceLoader";
import GANTT from "@salesforce/resourceUrl/bryntum_gantt";
export default class Gantt_component extends LightningElement {
  isDataReady = false;
  ganttData = null;
  renderedCallback() {
    if (this.bryntumInitialized) {
      return;
    }
    this.bryntumInitialized = true;
    Promise.all([
      loadScript(this, GANTT + "/gantt.lwc.module.min.js"),
      loadStyle(this, GANTT + "/gantt.stockholm.css"),
    ])
      .then(() => {
        this.loadAndPrepareData();
      })
      .catch((error) => {
        this.dispatchEvent(
          new ShowToastEvent({
            title: "Error loading Bryntum Gantt",
            message: error,
            variant: "error",
          })
        );
      });
  }
  async loadAndPrepareData() {
    this.createGantt();
  }
  createGantt() {
    if (!this.isDataReady) {
      return; // If data is not ready, we don't want to create the Gantt chart
    }
    const project = new bryntum.gantt.ProjectModel({
      taskStore: {
        autoTree: true,
        transformFlatData: true,
      },
    });
    const gantt = new bryntum.gantt.Gantt({
      project,
      appendTo: this.template.querySelector(".container"),
      columns: [{ field: "name", type: "name", width: 250, text: "Tasks" }],
    });
  }
}
The ganttData property will store the Gantt data that we’ll get from the custom objects that we created. The isDataReady boolean property is used to wait for data to load before adding it to the Bryntum Gantt. The renderedCallback() method is called after every render of the component. Once the Bryntum Gantt JavaScript and CSS static resources are loaded, the loadAndPrepareData method is called. This method will get the Bryntum Gantt data and then create the Bryntum Gantt instance.
The loadScript and loadStyle functions of the platformResourceLoader module are used to import the third-party Bryntum Gantt JavaScript and CSS static resource files that we added to our Salesforce scratch org.
In the createGantt method we define the project model that will store the tasks and dependencies data and link them together. The taskStore represents the tree of tasks in the Gantt project, and we configure it to transform flat data into a tree structure. We do this as flat data is easier to store. The hierarchical structure of the tasks is determined using a parentId property.
Lastly, we create a Bryntum Gantt instance. In the Bryntum Gantt config, we add the project as a property, add the Gantt to the <div> with a class ".container", and define a "name" column.
Now let’s get the data from our custom Salesforce objects into the Bryntum Gantt.
Querying tasks and dependencies data from the custom objects
When working with Salesforce data, you can use the Lightning Data Service to load, create, edit, or delete a Salesforce record. For more complex data operations, such as making a Salesforce Object Query Language (SOQL) query to select certain records, you can use Apex to write server-side controller classes. Let’s create an Apex class to get our tasks and dependencies data from our custom Salesforce objects.
- In the VS Code explorer pane, right-click on the
classesfolder and selectSFDX: Create Apex Class. - Set the class name as
GanttDataLoadControllerand press “Enter”. - Press “Enter” again to accept the default directory.
- Replace the contents of the created
GanttDataLoadController.clsfile with the following code:
public with sharing class GanttDataLoadController {
    @AuraEnabled(cacheable=true)

    public static Map<String, Object> getTasks() {
        // fetching the Records via SOQL
        List<bryntum_gantt_tasks_data__c> Tasks = new List<bryntum_gantt_tasks_data__c>();
        Tasks = [
            SELECT Calendar__c,
            Cls__c,
            Color__c,
            Constraint_Date__c,
            Constraint_Type__c,
            Deadline__c,
            Direction__c,
            Duration__c,
            Duration_Unit__c,
            Effort__c,
            Effort_Driven__c,
            Effort_Unit__c,
            End_Date__c,
            Expanded__c,
            Icon_Cls__c,
            Ignore_Resource_Calendar__c,
            Inactive__c,
            Manually_Scheduled__c,
            Name__c,
            Note__c,
            Parent_Id__c,
            Parent_Index__c,
            Percent_Done__c,
            Scheduling_Mode__c,
            Start_Date__c,
            Unscheduled__c
        FROM bryntum_gantt_tasks_data__c WITH SECURITY_ENFORCED];

        List<bryntum_gantt_dependencies_data__c> Dependencies = new List<bryntum_gantt_dependencies_data__c>();
        Dependencies = [
            SELECT Active__c,
            Cls__c,
            From_Event__c,
            From_Side__c,
            Lag__c,
            Lag_Unit__c,
            To_Event__c,
            To_Side__c,
            Type__c
        FROM bryntum_gantt_dependencies_data__c WITH SECURITY_ENFORCED];

        Map<String, Object> result = new Map<String, Object>{
            'tasks' => Tasks, 'dependencies' => Dependencies };
        return result;
   }
}
The AuraEnabled annotation enables Lightning web components to use Apex methods and properties. We set cacheable=true so that the results are cached to improve runtime performance.
In Salesforce Apex, collections are used to store data. There are three types: lists, sets, and maps. The getTasks Apex method returns a map type, where the keys are strings and the values are objects. The getTasks Apex method creates two lists. The type of elements that will be stored in the Tasks list are records with the object type of the bryntum_gantt_tasks_data__c custom object. The type of elements stored in the Dependencies list are records with the object type of the bryntum_gantt_tasks_dependencies__c custom object. The __c indicates that it is a custom object, this is a Salesforce naming convention.
Each list performs a SOQL read operation to get the tasks or dependencies data. The result of the query is assigned to the list to store the values. The getTasks method returns a map of the tasks and dependencies data.
Add the Apex class to your Salesforce org by right-clicking on the classes folder in the VS Code Explorer pane and selecting SFDX: Deploy Source to Org.
Loading data from the custom objects into the Bryntum Gantt
Let’s import the Apex method that we created into our Bryntum Gantt LWC. In your gantt.js file, import the getTasks method:
import getTasks from "@salesforce/apex/GanttDataLoadController.getTasks";In the loadAndPrepareData method, add the following lines of code above the line this.createGantt();:
    let data;
    try {
      data = await getTasks();
    } catch (error) {
      console.error("Error getting tasks data: ", { error });
      return; // If there's an error, we don't want to proceed
    }
    this.ganttData = mapData(data);
    this.isDataReady = true;
We fetch the data from the getTasks method and then set the ganttData property. We’ll define the mapData function, which formats the data for the Bryntum Gantt project data store.
Let’s define the mapData function. Add the following function definition to the top of the gantt.js file:
function mapData(fromSF) {
  const tasks = fromSF.tasks.map((item) => ({
    id: item.Id,
    calendar: item.Calendar__c,
    cls: item.Cls__c,
    color: item.Color__c,
    constraintDate: item.Constraint_Date__c,
    constraintType: item.Constraint_Type__c,
    deadline: item.Deadline__c,
    direction: item.Direction__c,
    duration: item.Duration__c,
    durationUnit: item.Duration_Unit__c,
    effort: item.Effort__c,
    effortDriven: item.Effort_Driven__c,
    effortUnit: item.Effort_Unit__c,
    endDate: item.End_Date__c,
    expanded: item.Expanded__c,
    iconCls: item.Icon_Cls__c,
    ignoreResourceCalendar: item.Ignore_Resource_Calendar__c,
    inactive: item.Inactive__c,
    manuallyScheduled: item.Manually_Scheduled__c,
    name: item.Name__c,
    note: item.Note__c,
    parentId: item.Parent_Id__c,
    parentIndex: item.Parent_Index__c,
    percentDone: item.Percent_Done__c,
    schedulingMode: item.Scheduling_Mode__c,
    startDate: item.Start_Date__c,
    unscheduled: item.Unscheduled__c,
  }));
  const dependencies = fromSF.dependencies.map((item) => ({
    id: item.Id,
    active: item.Active__c,
    cls: item.Cls__c,
    fromEvent: item.From_Event__c,
    fromSide: item.From_Side__c,
    lag: item.Lag__c,
    lagUnit: item.Lag_Unit__c,
    toEvent: item.To_Event__c,
    toSide: item.To_Side__c,
    type: item.Type__c,
  }));
  return { tasks, dependencies };
}
This function changes the property names from sentence case, where words are separated by an underscore, to camel case. It also removes the __c suffix.
In the project model configuration, add the following properties below the taskStore object:
      tasksData: this.ganttData.tasks,
      dependenciesData: this.ganttData.dependencies,
This sets the initial data for the Bryntum Gantt tasks and dependencies stores.
We’ll now add our Bryntum Gantt LWC to our Salesforce scratch org.
Adding the Bryntum Gantt component to a Salesforce Lightning App
In the VS Code Explorer pane, right-click on the gantt LWC folder and select SFDX: Deploy Source to Org. Open the VS Code command palette, type and select SFDX: Open Default Org. This opens your Salesforce scratch org in a browser window. In the “Quick Find” input at the top left of the page in the navigation column, search for “Lightning App Builder” and click on it. Follow these steps to create a Lightning Page with your Bryntum Gantt LWC:
- Click the “New” button to create a Lightning page.
- Click the “Next” button on the “App Page” tab.
- Give the page the label “Bryntum Gantt”.
- Select “One Region” for the layout type.
- You’ll see the “Bryntum Gantt” custom component at the bottom of the components column on the left of the page. Drag your “Bryntum Gantt” component into the block labeled “Add Component(s) Here” in the center of the page.
- Click the “Save” button and then click the “Activate” button.
- Click the “Save” button in the Activation dialog and then click “Finish”.
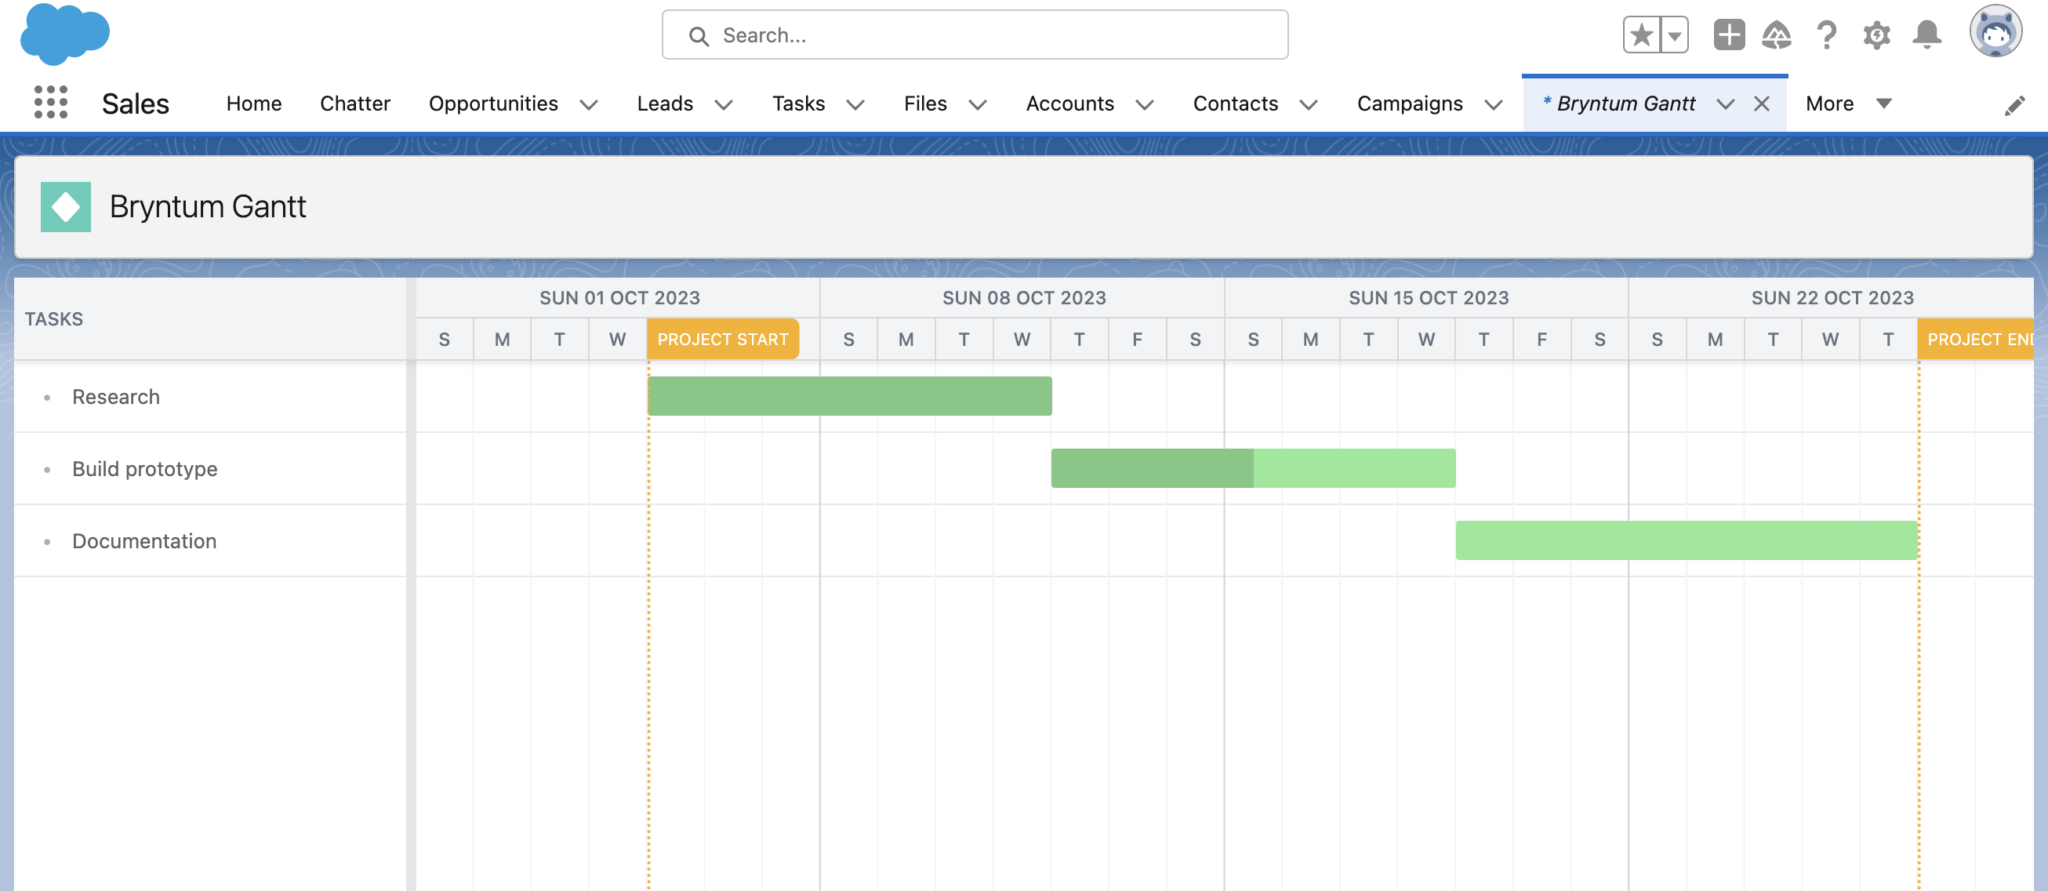
Now click the back button on the top left corner of the page. Open the App Launcher by clicking the nine-dot button at the top left of the page and search for “Bryntum Gantt”. You should see your Bryntum Gantt LWC in the Lightning Page:
Now let’s save changes made to the Bryntum Gantt LWC to our tasks and dependencies custom objects.
Listening for store data changes in the Bryntum Gantt LWC
We’ll make updates to the custom object data stores when data changes in the Bryntum Gantt LWC data stores. To do this, we’ll listen for client-side data changes in the Bryntum Gantt LWC and then use methods from the Salesforce lightning/uiRecordApi module to make requests to Salesforce JavaScript APIs that will allow us to create, delete, or update records in our custom objects. In the project model configuration, add the following listeners property below the dependenciesData property:
      listeners: {
        change({ store, action, records }) {
          const storeId = store.id;
          if (storeId === "tasks") {
            if (action === "add") {
            }
            if (action === "remove") {
            }
            if (action === "update") {
            }
          }
          if (storeId === "dependencies") {
            if (action === "add") {
            }
            if (action === "remove") {
            }
            if (action === "update") {
            }
          }
        },
      },
The change method is called when data in a project store changes. We get information about the store change from the method parameters. The store object allows us to determine which store changed: tasks or dependencies. The action is the name of the action that triggered the change, such as "add", "remove", or "update". There are other events, which we have excluded for simplicity: "removeAll", "updateMultiple", "filter", "dataset", and "replace". The records are an array of all of the changed records: tasks or dependencies. The change method has nested if statements that will allow us to perform the correct CRUD operation for a custom object store update.
Saving Bryntum Gantt updates to the custom objects: Adding records
Let’s add the logic for adding a task to the Salesforce tasks custom object when a task is added in the Bryntum Gantt LWC. Import the createRecord method from the Salesforce lightning/uiRecordApi module:
import { createRecord } from "lightning/uiRecordApi";Add the following lines of code in the if block, where the storeId is equal to "tasks" and the action is "add":
              for (let i = 0; i < records.length; i++) {
                try {
                  const newTask = records[i];
                  const insert = {
                    apiName: "bryntum_gantt_tasks_data__c",
                    fields: {
                      Calendar__c: newTask.calendar,
                      Cls__c: newTask.cls,
                      Color__c: newTask.color,
                      Constraint_Date__c: newTask.constraintDate,
                      Constraint_Type__c: newTask.constraintType,
                      Deadline__c: newTask.deadline,
                      Direction__c: newTask.direction,
                      Duration__c: newTask.duration,
                      Duration_Unit__c: newTask.durationUnit,
                      Effort__c: newTask.effort,
                      Effort_Driven__c: Number(newTask.effortDriven),
                      Effort_Unit__c: newTask.effortUnit,
                      End_Date__c: formatDate(newTask.endDate),
                      Expanded__c: Number(newTask.expanded),
                      Icon_Cls__c: newTask.iconCls,
                      Ignore_Resource_Calendar__c: Number(
                        newTask.ignoreResourceCalendar
                      ),
                      Inactive__c: Number(newTask.inactive),
                      Manually_Scheduled__c: 1,
                      Name__c: newTask.name,
                      Note__c: newTask.note,
                      Parent_Id__c: newTask.parentId,
                      Parent_Index__c: newTask.parentIndex,
                      Percent_Done__c: parseFloat(newTask.percentDone),
                      Scheduling_Mode__c: newTask.schedulingMode,
                      Start_Date__c: formatDate(newTask.startDate),
                      Unscheduled__c: Number(newTask.unscheduled),
                    },
                  };
                  return createRecord(insert).then((res) => {
                    gantt.taskStore.applyChangeset({
                      updated: [
                        // Will set proper id for added task
                        { $PhantomId: newTask.id, id: res.id },
                      ],
                    });
                  });
                } catch (error) {
                  console.error(error);
                }
              }
We loop through all of the changed "task" records and for each, we create an insert object for the createRecord method. The apiName property indicates the API name of the object that we’ll create a record for, which is our tasks custom object.
The fields property is a map of field names to field values. We do the reverse of what we did in the mapData function: Change field names to sentence case and add the __c suffix. The manually scheduled property has a default value of false (0). We set it to true so that the task will not be changed by any of its incoming dependencies or constraints.
If the record was successfully created, we call the applyChangeset method to update the task created locally with the id created by the Salesforce backend.
We need to define the formatDate function. At the top of the gantt.js file, add the following lines of code:
function formatDate(dateString) {
  let date = new Date(dateString);
  let year = date.getUTCFullYear();
  let month = date.getUTCMonth() + 1; // getUTCMonth() returns 0-11, so add 1.
  let day = date.getUTCDate();
  // Zero-pad the month and day if necessary (e.g. '7' becomes '07').
  month = month < 10 ? "0" + month : month;
  day = day < 10 ? "0" + day : day;
  return `${year}-${month}-${day}`;
}
This formats the date for Salesforce object fields that are of type Date.
Now add the following lines of code in the if block where the storeId is equal to "dependencies" and the action is "add":
              for (let i = 0; i < records.length; i++) {
                try {
                  const newDep = records[i];
                  const insert = {
                    apiName: "bryntum_gantt_dependencies_data__c",
                    fields: {
                      Active__c: Number(newDep.active),
                      Cls__c: newDep.cls,
                      From_Event__c: newDep.fromEvent.id,
                      From_Side__c: newDep.fromSide,
                      Lag__c: newDep.lag,
                      Lag_Unit__c: newDep.lagUnit,
                      To_Event__c: newDep.toEvent.id,
                      To_Side__c: newDep.toSide,
                      Type__c: newDep.type,
                    },
                  };
                  return createRecord(insert).then((res) => {
                    gantt.dependencyStore.applyChangeset({
                      updated: [
                        // Will set proper id for added dependency
                        { $PhantomId: newDep.id, id: res.id },
                      ],
                    });
                  });
                } catch (error) {
                  console.error(error);
                }
              }
The code for creating a dependency is similar to the code for creating a task.
Saving Bryntum Gantt updates to the custom objects: Deleting records
Add the following lines of code in the if block where the storeId is equal to "tasks" and the action is "remove":
              if (records[0].data.id.startsWith("_generated")) return;
              records.forEach((record) => {
                deleteRecord(record.data.id).then((res) =>
                  console.log("deleteRecord: ", { res })
                );
              });
The if block prevents deleting records that have not been saved to the Salesforce custom tasks object. For each task record, we call the deleteRecord method from the Salesforce lightning/uiRecordApi module, which we need to import:
import { deleteRecord } from "lightning/uiRecordApi";Now add the following lines of code in the if block where the storeId is equal to "dependencies" and the action is "remove":
              if (records[0].data.id.startsWith("_generated")) return;
              records.forEach((record) => {
                deleteRecord(record.data.id).then((res) =>
                  console.log("deleteRecord res: ", { res })
                );
              });
Saving Bryntum Gantt updates to the custom objects: Updating records
Add the following lines of code in the if block where the storeId is equal to "tasks" and the action is "update":
             for (let i = 0; i < records.length; i++) {
                try {
                  if (records[i].data.id.startsWith("_generated")) continue;
                  const task = records[i];
                  const update = {
                    fields: {
                      Id: task.id,
                      Calendar__c: task.calendar,
                      Cls__c: task.cls,
                      Color__c: task.color,
                      Constraint_Date__c: task.constraintDate,
                      Constraint_Type__c: task.constraintType,
                      Deadline__c: task.deadline,
                      Direction__c: task.direction,
                      Duration__c: task.duration,
                      Duration_Unit__c: task.durationUnit,
                      Effort__c: task.effort,
                      Effort_Driven__c: Number(task.effortDriven),
                      Effort_Unit__c: task.effortUnit,
                      End_Date__c: formatDate(task.endDate),
                      Expanded__c: Number(task.expanded),
                      Icon_Cls__c: task.iconCls,
                      Ignore_Resource_Calendar__c: Number(
                        task.ignoreResourceCalendar
                      ),
                      Inactive__c: Number(task.inactive),
                      Manually_Scheduled__c: Number(task.manuallyScheduled),
                      Name__c: task.name,
                      Note__c: task.note,
                      Parent_Id__c: task.parentId,
                      Parent_Index__c: task.parentIndex,
                      Percent_Done__c: parseFloat(task.percentDone),
                      Scheduling_Mode__c: task.schedulingMode,
                      Start_Date__c: formatDate(task.startDate),
                      Unscheduled__c: Number(task.unscheduled),
                    },
                  };
                  return updateRecord(update).then((res) =>
                    console.log("updateRecord res: ", { res })
                  );
                } catch (error) {
                  console.error(error);
                }
              }
This code is similar to the code for adding a record but there are some differences. A check is added to only update tasks that have been added to the Salesforce custom tasks object. The update object passed into the updateRecord has no apiName property. This property is not included for record updates. The fields property has the task Id included so that the record can be found.
Add the import for the updateRecord method:
import { updateRecord } from "lightning/uiRecordApi";Add the following lines of code in the if block where the storeId is equal to "dependencies" and the action is "update":
              for (let i = 0; i < records.length; i++) {
                try {
                  if (records[i].data.id.startsWith("_generated")) continue;
                  const dep = records[i];
                  const update = {
                    fields: {
                      Id: dep.id,
                      Active__c: Number(dep.active),
                      Cls__c: dep.cls,
                      From_Event__c: dep.fromEvent.id,
                      From_Side__c: dep.fromSide,
                      Lag__c: dep.lag,
                      Lag_Unit__c: dep.lagUnit,
                      To_Event__c: dep.toEvent.id,
                      To_Side__c: dep.toSide,
                      Type__c: dep.type,
                    },
                  };
                  return updateRecord(update).then((res) =>
                    console.log("updateRecord res: ", { res })
                  );
                } catch (error) {
                  console.error(error);
                }
              }
Right-click on the gantt folder and select SFDX: Deploy Source to Org. Create another Lightning Page with this updated Bryntum Gantt LWC. You now have a Bryntum Gantt LWC with CRUD functionality.
And remember, you can use any Bryntum component easily in Salesforce. Check out the demo page below.
Salesforce Demo(Username: demouser@bryntum.com, password: BryntumSalesforce3).