Creating a Bryntum Scheduler component with Refine and Next.js
We strive to keep posts updated, but code samples may sometimes be outdated. Humans, see the Bryntum documentation; agents, https://mcp.bryntum.com for the latest info.
Bryntum Scheduler is a feature-rich scheduling UI component that’s performant, highly customizable, and easily integrates with any backend or UI framework.
In this tutorial, we’ll show you how to add a React Bryntum Scheduler component to a Refine application that uses Next.js. Refine is an open-source React meta-framework for building enterprise-grade, CRUD-heavy applications like internal tools, admin panels, and dashboards.
We’ll do the following:
- Create API route handlers in a Next.js Refine app to perform CRUD operations on a local SQLite database using Sequelize ORM.
- Create a Refine data provider to handle data fetching and mutations using the Next.js API routes.
- Create a Bryntum Scheduler page and component.
- Use Refine helper hooks to connect the Bryntum Scheduler to the data provider.
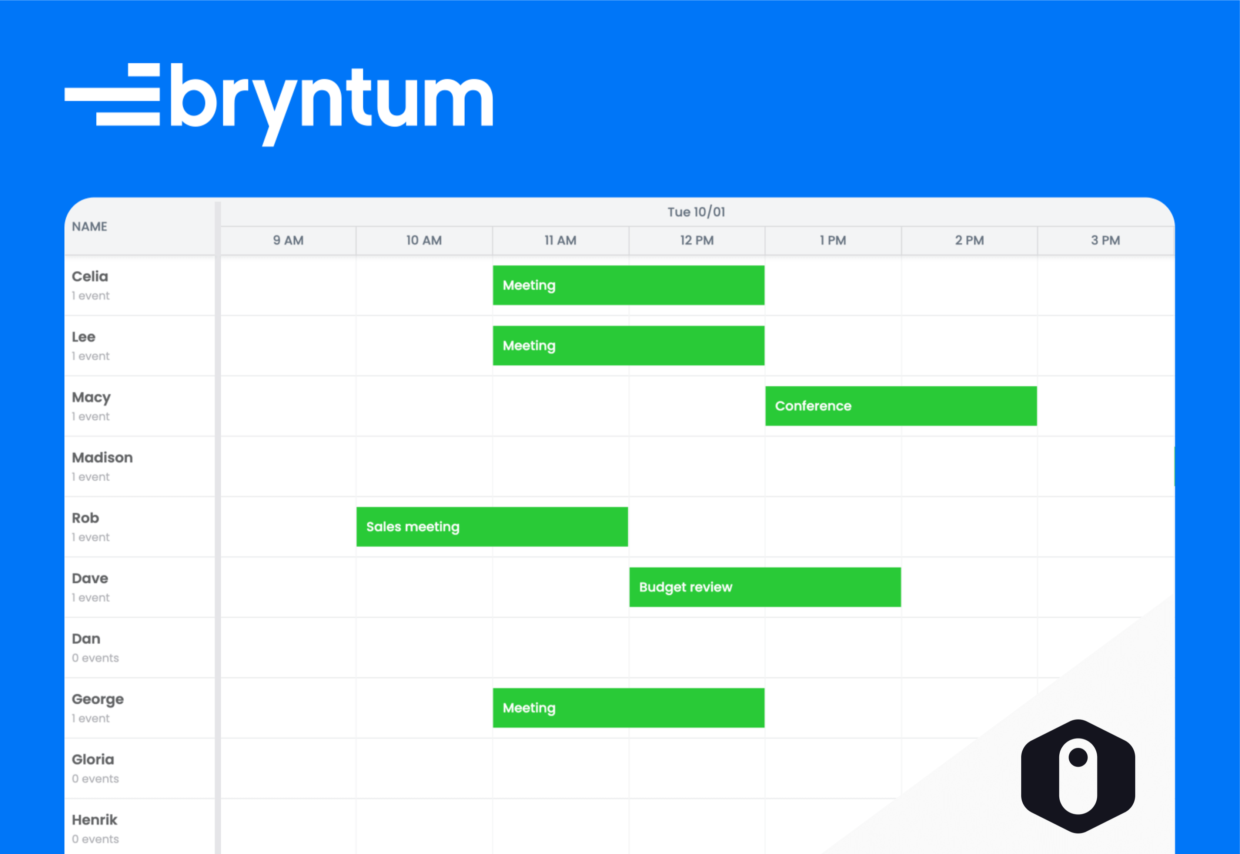
Here’s what we’ll build:

You can find the code for the completed tutorial in this GitHub repository.
Getting started: Clone the starter Refine Next.js app and populate a local SQLite database with example data
We’ll use the Bryntum Scheduler with Refine and Next.js starter template as a starting point. The completed-app branch contains the code for the completed tutorial.
Install the dependencies and populate a local SQLite database with the example data using Sequelize ORM by following the steps in the starter template’s README file.
This starter app uses the Refine Next.js starter template with a REST API data provider and two example pages of blog posts and categories. No UI framework or authentication logic has been added.
The Refine Next.js starter template has the following added code and data to populate a local SQLite database with example data:
- Sequelize instantiation code (
src/config/database.ts): Code to create a Sequelize instance that uses a local SQLite database, stored as adatabase.sqlite3file in the project’s root folder. - Example data (
src/initialData): Example JSON data for events, resources, and assignments, used to populate the database. - Sequelize data models (
src/models): Sequelize models to define the structure of the scheduler database tables. - Database seeding script (
src/addExampleData.ts): A Node.js script that uses Sequelize to create a local SQLite database and populate it with the example data.
For more details on using Bryntum Scheduler with Sequelize and SQLite, take a look at our guide to using Bryntum Scheduler with Express and SQLite.
Creating Next.js API route handlers to connect to the scheduler data
We’ll create four Next.js route handlers to load the data into a Bryntum Scheduler and sync data changes to the database. We’ll use the following HTTP methods and routes for the CRUD operations:
- GET:
/api/[resource] - POST:
/api/[resource] - DELETE:
/api/[resource]/[id] - PATCH:
/api/[resource]/[id]
Here, [resource] is the Dynamic Segment for the type of scheduler data: event, resource, or assignment.
Before we create the route handlers, let’s add a Next.js middleware function to allow only certain routes in our API.
Adding middleware for API route validation
Create a middleware.ts file in the src folder and add the following lines of code to it:
import { NextResponse, NextRequest } from 'next/server';
export function middleware(request: NextRequest) {
    const
        url = request.nextUrl,
        resource = url.pathname.split('/')[2], // Extract the resource name from the path (e.g., /api/[resources]/[id])
        allowedResources = ['events', 'resources', 'assignments'];
    // Check if the resource is allowed
    if (!allowedResources.includes(resource)) {
        return NextResponse.json({ error : 'Invalid resource type' }, { status : 400 });
    }
    // Continue the request if the resource is valid
    return NextResponse.next();
}
// Configuration to apply middleware to API routes matching the pattern
export const config = {
    matcher : '/api/:path*' // Apply middleware to all API routes
};
We use the middleware function to check that the dynamic route parameter [resource] is events, resources, or assignments. If it’s not, we return an error response.
Reading records
Create an api folder in the app folder. Add a [resource] folder to it to create a dynamic route segment. Create a route.ts folder inside the [resource] folder and add the following lines of code to it:
import { Assignment, Resource, Event } from '@/models';
import { AllowedAPIResources } from '@types';
import { NextRequest } from 'next/server';
export async function GET(req: NextRequest, { params }: { params: { id: string, resource: AllowedAPIResources } }) {
    const resource = params.resource;
    if (resource === 'resources') {
        try {
            const resources = await Resource.findAll();
            return Response.json(
                resources
            );
        }
        catch (error) {
            return new Response(
                'Loading resources failed',
                {
                    status : 400
                }
            );
        }
    }
    if (resource === 'events') {
        try {
            const events = await Event.findAll();
            return Response.json(
                events
            );
        }
        catch (error) {
            return new Response(
                'Loading events failed',
                {
                    status : 400
                }
            );
        }
    }
    if (resource === 'assignments') {
        try {
            const assignments = await Assignment.findAll();
            return Response.json(
                assignments
            );
        }
        catch (error) {
            return new Response(
                'Loading assignments failed',
                {
                    status : 400
                }
            );
        }
    }
}
We determine the type of resource from the dynamic route segment parameter and then use the Sequelize findAll method on the Resource, Event, or Assignment model to retrieve the records from the corresponding table in the SQLite database.
We need to create the AllowedAPIResources type used in this route handler. In the src folder, create a types.ts file and add the following type definition to it:
export type AllowedAPIResources = 'resources' | 'events' | 'assignments';Creating records
Add the following POST request handler at the end of the src/app/api/[resource]/route.ts file:
export async function POST(req: NextRequest, { params }: { params: { id: string, resource: AllowedAPIResources } }) {
    const
        resource = params.resource,
        reqBody = await req.json();
    if (resource === 'resources') {
        try {
            const resource = await Resource.create(reqBody);
            return Response.json({
                data : resource.dataValues
            });
        }
        catch (error) {
            return new Response(
                'Creating resource failed',
                {
                    status : 400
                }
            );
        }
    }
    if (resource === 'events') {
        try {
            const event = await Event.create(reqBody);
            return Response.json({
                data : event.dataValues
            });
        }
        catch (error) {
            return new Response(
                'Creating event failed',
                {
                    status : 400
                }
            );
        }
    }
    if (resource === 'assignments') {
        try {
            const assignment = await Assignment.create(reqBody);
            return Response.json({
                data : assignment.dataValues
            });
        }
        catch (error) {
            return new Response(
                'Creating assignment failed',
                {
                    status : 400
                }
            );
        }
    }
}
We use the Sequelize create() method to create an instance of the data model and save it to the database.
Deleting records
Create an [id] folder in the src/app/api/[resource] folder. Create a route.ts file in the src/app/api/[resource]/[id] folder and add the following route handler to the route.ts file:
import { Assignment, Event, Resource } from '@/models';
import { AllowedAPIResources } from '@types';
import { NextRequest } from 'next/server';
export async function DELETE(req: NextRequest, { params }: { params: { id: string, resource: AllowedAPIResources } }) {
    const
        resource = params.resource,
        id = params.id;
    if (resource === 'resources') {
        try {
            await Resource.destroy({ where : { id } });
            return Response.json({ success : true });
        }
        catch (error) {
            return new Response('Deleting resource failed', {
                status : 400
            });
        }
    }
    if (resource === 'events') {
        try {
            await Event.destroy({ where : { id } });
            return Response.json({ success : true });
        }
        catch (error) {
            return new Response('Deleting event failed', {
                status : 400
            });
        }
    }
    if (resource === 'assignments') {
        try {
            await Assignment.destroy({ where : { id } });
            return Response.json({ success : true });
        }
        catch (error) {
            return new Response('Deleting assignment failed', {
                status : 400
            });
        }
    }
}
The DELETE request route handler uses the Sequelize destroy method to delete a database record by ID.
Updating records
Add the following PATCH request route handler below the DELETE request route handler in src/app/api/[resource]/[id]/route.ts:
export async function PATCH(req: NextRequest, { params }: { params: { id: string, resource: AllowedAPIResources } }) {
    const
        resource = params.resource,
        id = params.id,
        reqBody = await req.json();
    if (resource === 'resources') {
        try {
            Resource.update(reqBody, { where : { id } });
            return Response.json({ success : true });
        }
        catch (error) {
            return new Response(
                'Updating resource failed',
                {
                    status : 400
                }
            );
        }
    }
    if (resource === 'events') {
        try {
            Event.update(reqBody, { where : { id } });
            return Response.json({ success : true });
        }
        catch (error) {
            return new Response(
                'Updating event failed',
                {
                    status : 400
                }
            );
        }
    }
    if (resource === 'assignments') {
        try {
            Assignment.update(reqBody, { where : { id } });
            return Response.json({ success : true });
        }
        catch (error) {
            return new Response(
                'Updating assignment failed',
                {
                    status : 400
                }
            );
        }
    }
}
We use the Sequelize update method to update the database records.
Creating a Refine data provider to handle all data fetching and mutation operations
The Refine data provider handles data fetching and data mutation HTTP requests. Data provider methods make requests to API endpoints to perform CRUD operations. Refine provides data hooks to call these methods. The data hooks use TanStack Query to manage data fetching.
Refine has built-in data provider support for popular API providers, such as the simple REST API data provider that the starter app uses. This data provider is designed to be used with REST APIs that follow the standard API design but can be customized. We’ll create another data provider from scratch for the scheduler data with all the required CRUD methods.
Fetching all records
In the src/providers folder, create a folder called scheduler-data-provider. Create an index.ts file in it and add the following lines of code to the file:
'use client';
import type { DataProvider } from '@refinedev/core';
const API_URL = 'https://localhost:3000/api';
export const schedulerDataProvider: DataProvider = {
    getList : async({ resource }) => {
        const response = await fetch(`${API_URL}/${resource}`);
        if (response.status < 200 || response.status > 299) throw response;
        const data = await response.json();
        return {
            data,
            total : data.length
        };
    },
};
We create a data provider and define the getList method. We use the fetch API to get the scheduler data from the Next.js API route, /api/[resource], GET request handler we created.
To use this data provider in our app, we need to add it to the dataProvider prop in the <Refine> component.
Using multiple data providers
In the src/app/layout.tsx file, change the value of the dataProvider prop in the <Refine> component to the following:
dataProvider={{
    default   : dataProvider,
    scheduler : schedulerDataProvider
}}
We pass in the data providers as key-value pairs in the dataProvider prop. The default key is required for defining the default data provider. Note that the <Refine> component needs to be used in a client component as it uses React context and state.
Import schedulerDataProvider along with the other imports at the top of the src/app/layout.tsx file:
import { schedulerDataProvider } from '@providers/scheduler-data-provider';Creating a record
Add the following create method to the schedulerDataProvider in the src/providers/scheduler-data-provider/index.ts file below the getList property:
create : async({ resource, variables }) => {
    const response = await fetch(`${API_URL}/${resource}`, {
        method  : 'POST',
        headers : {
            'Content-Type' : 'application/json'
        },
        body : JSON.stringify(variables)
    });
    if (response.status < 200 || response.status > 299) throw response;
    return await response.json();
},
This method will make a POST request to the /api/[resource]/[id] route in the Next.js API.
Deleting a record
Add the following deleteOne method to schedulerDataProvider in the src/providers/scheduler-data-provider/index.ts file:
deleteOne : async({ resource, id, variables }) => {
    const response = await fetch(`${API_URL}/${resource}/${id}`, {
        method : 'DELETE'
    });
    if (response.status < 200 || response.status > 299) throw response;
    return await response.json();
},
This method will make a DELETE request to the /api/[resource]/[id] route in the Next.js API.
Updating a record
Add the following update method to the schedulerDataProvider in the src/providers/scheduler-data-provider/index.ts file:
update : async({ resource, id, variables }) => {
    const response = await fetch(`${API_URL}/${resource}/${id}`, {
        method  : 'PATCH',
        body    : JSON.stringify(variables),
        headers : {
            'Content-Type' : 'application/json'
        }
    });
    if (response.status < 200 || response.status > 299) throw response;
    const data = await response.json();
    return { data };
},
This method will make a PATCH request to the /api/[resource]/[id] route in the Next.js API.
You’ll notice that schedulerDataProvider has a type error. This is because we haven’t defined all the required methods. Add the following methods to schedulerDataProvider:
getOne : () => {
    throw new Error('Not implemented');
},
getApiUrl : () => API_URL
We don’t need these methods for the Bryntum Scheduler we’ll create, but they are required.
Creating a scheduler events page
Let’s add an example scheduler events page. In the src/app/layout.tsx file, add the following resource object to the resources prop array of the <Refine> component:
{
    name : 'events',
    list : '/events',
    meta : {
        dataProviderName : 'scheduler'
    }
}
A Refine resource represents an entity, usually a data entity. The list, create, edit, and show properties are used to define the Next.js routes for the corresponding CRUD actions.
Let’s create an example page for the events resource. In the src/app folder, create an events folder and add a layout.tsx file to it. Paste the following lines of code to it:
import { Layout as BaseLayout } from '@components/layout';
import React from 'react';
export default async function Layout({ children }: React.PropsWithChildren) {
    return <BaseLayout>{children}</BaseLayout>;
}
This creates the base layout, which adds the page menu to the left of the page and the breadcrumbs navigation to the top of the page.
Create a page.tsx file in the src/app/events folder and add the following lines of code to it:
'use client';
import { useList } from '@refinedev/core';
export default function Events() {
    const { data } = useList({
        resource : 'events'
    });
    return (
        <div style={{ height : '100vh', padding : '1rem' }}>
            <h1>Events</h1>
            <ul style={{ padding : '1rem' }}>
                {data?.data?.map((event) => (
                    <li key={event.id}>
                        {event.name}
                    </li>
                ))}
            </ul>
        </div>
    );
}
We use the Refine useList data hook to fetch the events data. This data hook is an extended version of the TanStack Query useQuery hook. The useList data hook uses the getList method we created in the scheduler data provider as the query function. Data is cached using a query key, which is generated from the provided useList properties. You can see the query key using Refine Devtools.
Using Refine Devtools
The @refinedev/devtools package has been added to the starter app, so you don’t need to manually install it. To use it, the <DevtoolsProvider /> component must be wrapped around the <Refine /> component in the RootLayout component in src/app/layout.tsx, which has been done already.
Run the local dev server using the following command:
npm run devOpen https://localhost:3000/ and you’ll see a small Devtools tab in the footer of the application. Navigate to the events page and click on the Devtools tab to open the Devtools screen, and then open the Monitor screen from the sidebar menu. You will need to sign in to connect Refine with your GitHub or Google account.
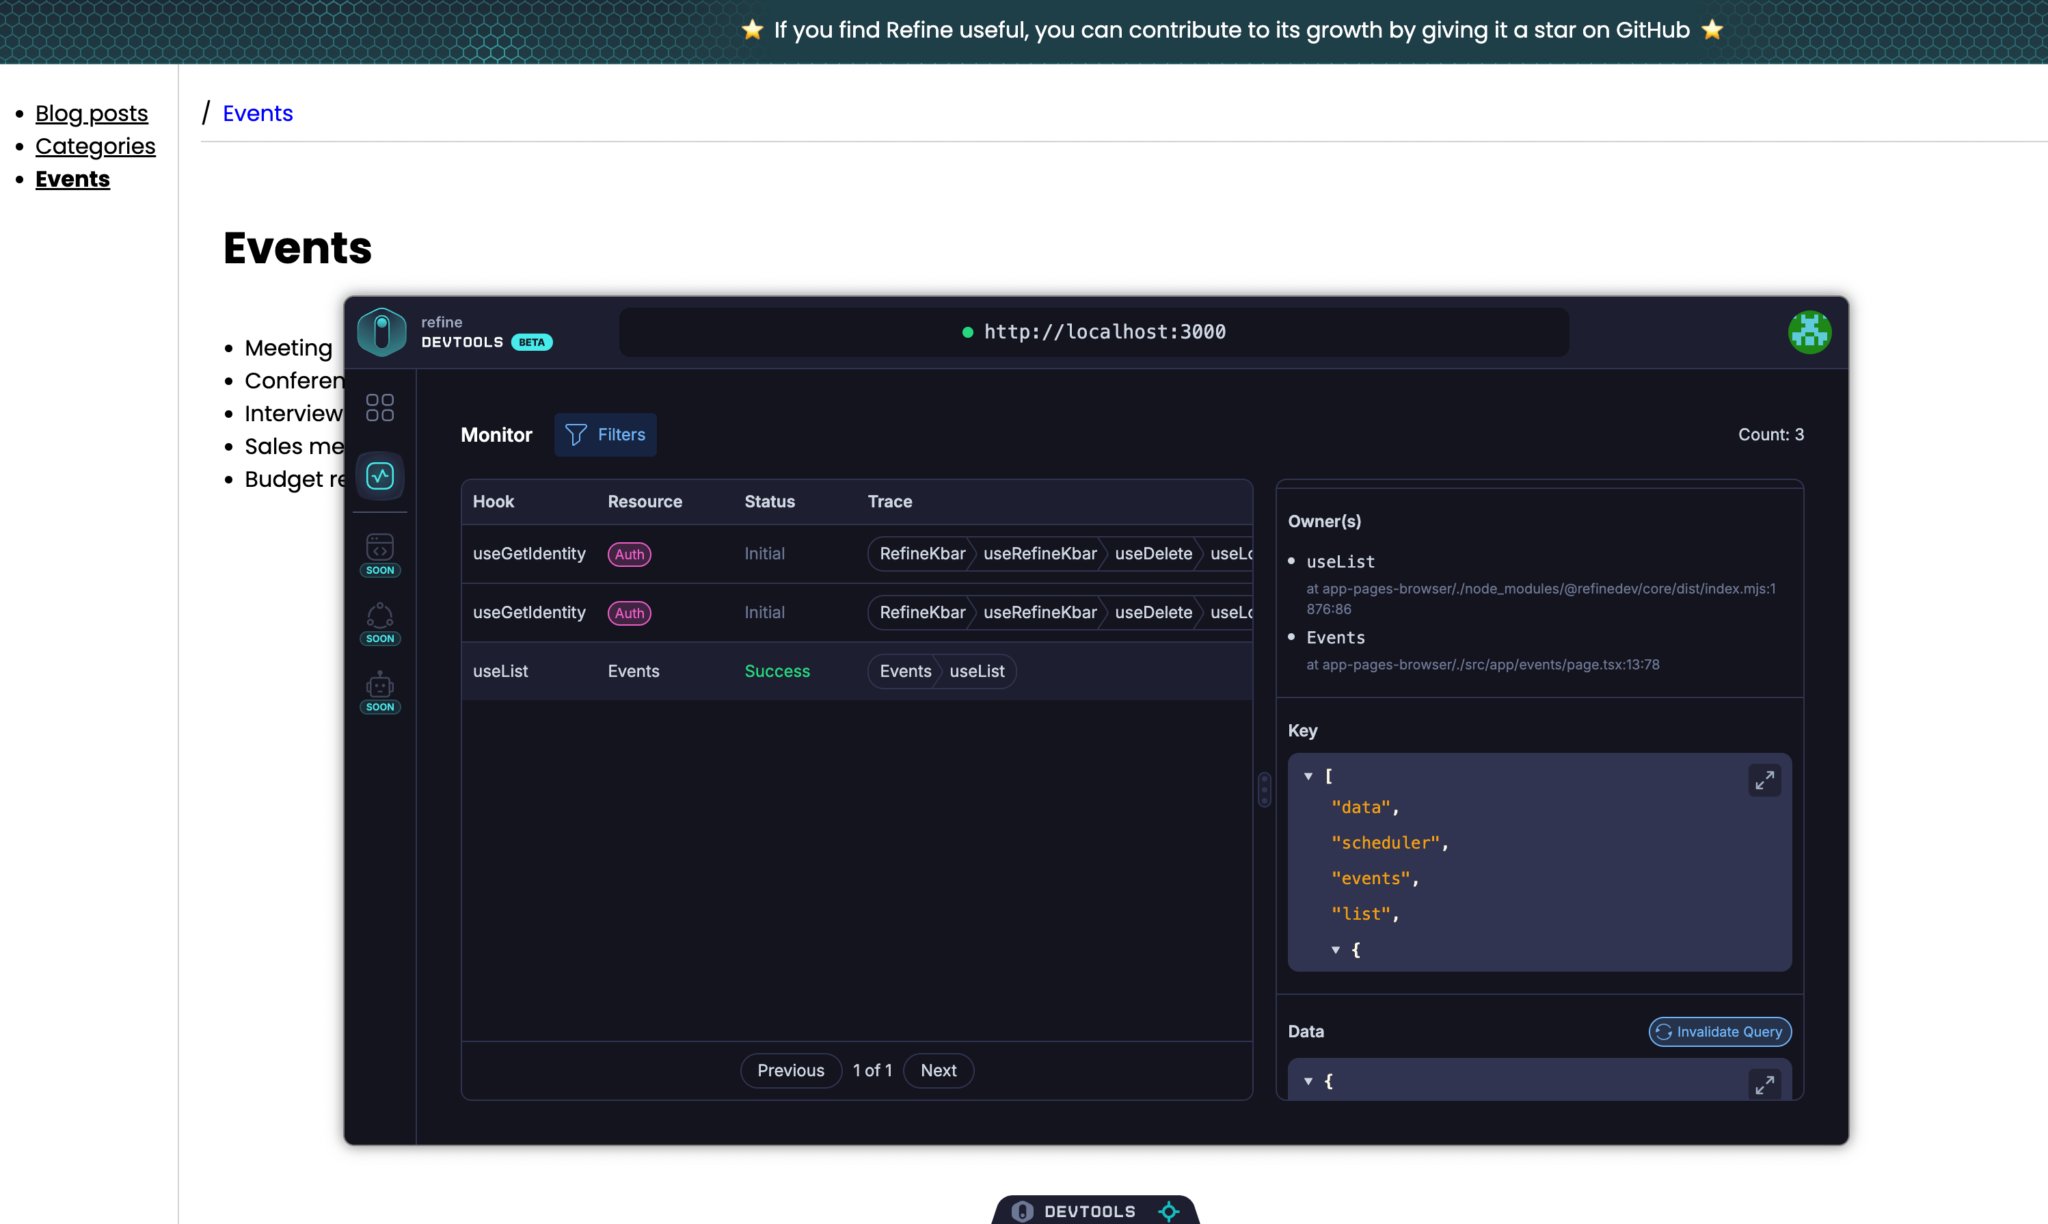
In the Monitor screen, you’ll see all the queries and mutations triggered in the application for the current session, including the useList data hook call from the events page that fetched the events data from the API endpoint using the scheduler data provider’s getList method.
Learn more about using Refine Devtools, which is in beta at the time of writing, in the Refine tutorial.
Creating a Bryntum Scheduler component
You can try out Bryntum components for free using our public Bryntum trial packages.
If you have a Bryntum license, please refer to our npm Repository Guide to access the private Bryntum repository.
Now let’s create a basic Bryntum Scheduler component.
In the src/components folder, create a BryntumScheduler folder. Add an index.tsx file to it and add the following lines of code to the file:
'use client';
import { BryntumScheduler } from '@bryntum/scheduler-react';
import { useEffect, useRef } from 'react';
import '@bryntum/scheduler/scheduler.stockholm.css';
export default function Scheduler({ ...props }) {
    const schedulerRef = useRef<BryntumScheduler>(null);
    useEffect(() => {
        // Bryntum Scheduler instance
        const scheduler = schedulerRef?.current?.instance;
    }, []);
    return (
        <div id="app">
            <BryntumScheduler
                ref={schedulerRef}
                {...props}
            />
        </div>
    );
}
The schedulerRef allows you to access the Bryntum Scheduler instance. We don’t use this in this tutorial, but it can be useful.
Creating a Bryntum Scheduler configuration file
Next, create a Bryntum Scheduler configuration file. Create a schedulerConfig.ts file in the src/config folder, and add the following lines of code to it:
const schedulerConfig = {
    startDate                 : new Date(2024, 9, 1),
    zoomOnMouseWheel          : false,
    zoomOnTimeAxisDoubleClick : false,
    viewPreset                : 'hourAndDay',
    workingTime : {
        fromHour : 8,
        toHour   : 17
    },
    columns : [
        {
            type      : 'resourceInfo',
            text      : 'Name',
            field     : 'name',
            width     : 150,
            showImage : false
        }
    ]
};
export { schedulerConfig };
The scheduler will have a single column called “Name” and show only the set workingTime. When using the workingTime feature, the Zooming feature is not supported. This is why the zooming controls zoomOnMouseWheel and zoomOnTimeAxisDoubleClick are disabled.
Bryntum components are client-side only and Next.js uses server-side rendering (SSR). To make the Bryntum Scheduler client-side only, we’ll import the BryntumScheduler component dynamically to ensure that it’s only rendered on the client.
Creating a wrapper component to render the Bryntum Scheduler on the client only
Now, let’s create a scheduler wrapper component to dynamically import the BryntumScheduler component. In the src/components folder, create a schedulerWrapper folder. Create an index.tsx file in the src/components/schedulerWrapper folder and add the following lines of code to it:
import dynamic from 'next/dynamic';
import { schedulerConfig } from '../../config/schedulerConfig';
const Scheduler = dynamic(() => import('../BryntumScheduler'), {
    ssr     : false,
    loading : () => {
        return (
            <div
                style={{
                    display        : 'flex',
                    alignItems     : 'center',
                    justifyContent : 'center',
                    height         : '100vh'
                }}
            >
                <p>Loading...</p>
            </div>
        );
    }
});
const SchedulerWrapper = () => {
    return (
        <>
            <Scheduler {...schedulerConfig} />
        </>
    );
};
export { SchedulerWrapper };
We dynamically import the BryntumScheduler component with ssr set to false. While the component is being imported, a loading message is displayed.
Creating a scheduler page
Let’s create a page for our Bryntum Scheduler. Create a scheduler folder in the src/app folder. Create a layout.tsx file in the src/app/scheduler and add the following lines of code to it:
import { Layout as BaseLayout } from '@components/layout';
import React from 'react';
export default async function Layout({ children }: React.PropsWithChildren) {
    return <BaseLayout>{children}</BaseLayout>;
}
Create a page.tsx file in the src/app/scheduler folder and add the following lines of code to it:
'use client';
import { SchedulerWrapper } from '@components/schedulerWrapper';
import { useList } from '@refinedev/core';
export default function SchedulerComponent() {
    return (
        <div>
            <SchedulerWrapper />
        </div>
    );
}
The page is a client component. Client components are prerendered on the server, which is why we need the scheduler wrapper.
Add the following styles to the src/styles/global.css file to make the Bryntum Scheduler take up the full height of the page:
* {
  box-sizing: border-box;
  padding: 0;
  margin: 0;
}
#app {
  margin: 0;
  display: flex;
  flex-direction: column;
  height: 100vh;
  font-size: 14px;
}
In the src/app/layout.tsx file, add the scheduler route to the resources prop of the <Refine> component:
{
    name : 'scheduler',
    list : '/scheduler',
    meta : {
        dataProviderName : 'scheduler'
    }
},
To prevent the “scheduler” menu item from being pluralized to “schedulers”, make the following change to the rendered <Link> text in the menu component in src/components/menu/index.tsx:
- {item.label}
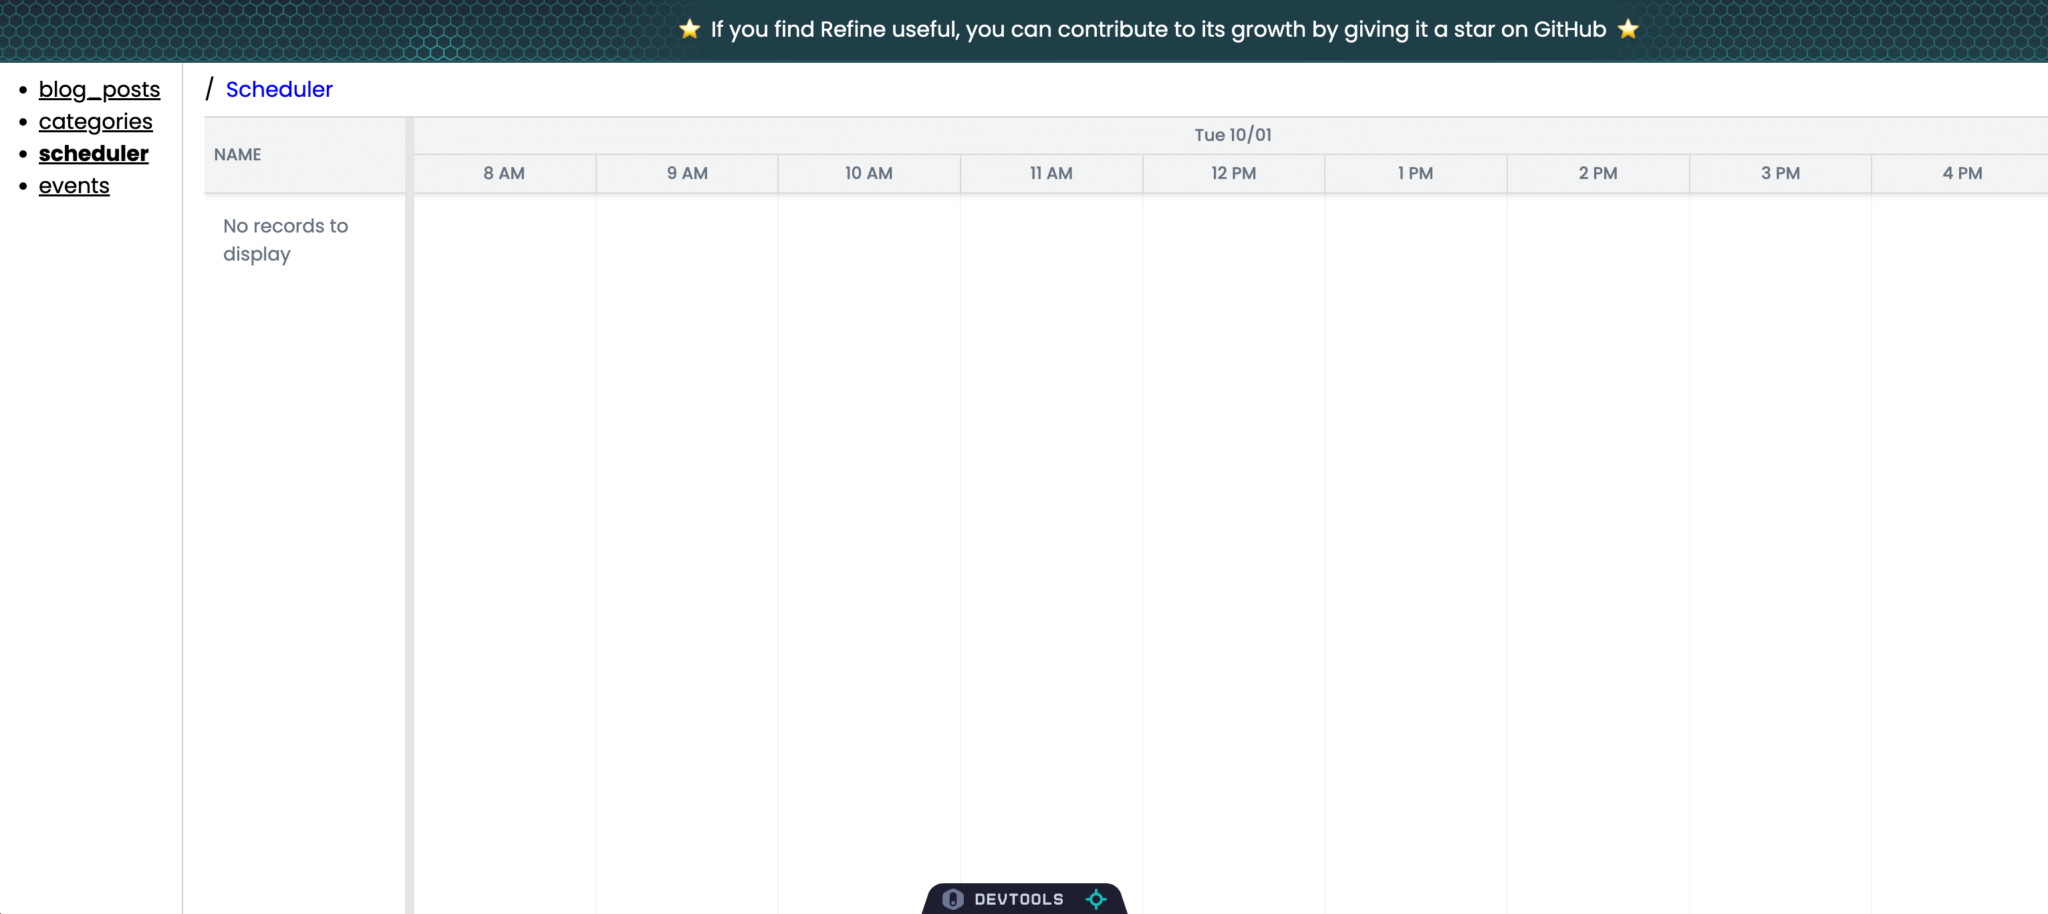
+ {item.name}Run the local development server and you’ll see an empty Bryntum Scheduler on the scheduler page.
Fetching the scheduler data and adding it to the Bryntum Scheduler
Add the following useList data hook calls to the Scheduler component in the src/components/BryntumScheduler/index.tsx file above the line const schedulerRef = useRef<BryntumScheduler>(null);:
const
    { data: dataResources } = useList({
        resource         : 'resources',
        dataProviderName : 'scheduler'
    }),
    { data: dataEvents } = useList({
        resource         : 'events',
        dataProviderName : 'scheduler'
    }),
    { data: dataAssignments } = useList({
        resource         : 'assignments',
        dataProviderName : 'scheduler'
    });
The useList data hook queries the scheduler data using the getList method in the scheduler data provider.
Add the following variables below the useList data hook calls:
const
    events = useMemo(() => dataEvents?.data || [], [dataEvents]),
    assignments = useMemo(() => dataAssignments?.data || [], [dataAssignments]),
    resources = useMemo(() => dataResources?.data || [], [dataResources]);
Pass the data as props in the <BryntumScheduler> component returned in the src/components/BryntumScheduler/index.tsx file:
events={events}
assignments={assignments}
resources={resources}
We use useMemo to ensure the <BryntumScheduler> component receives the latest updated data. Without it, the scheduler data won’t update when the useList data fetch completes.
Make sure to import useMemo and useList:
import { useMemo } from 'react';
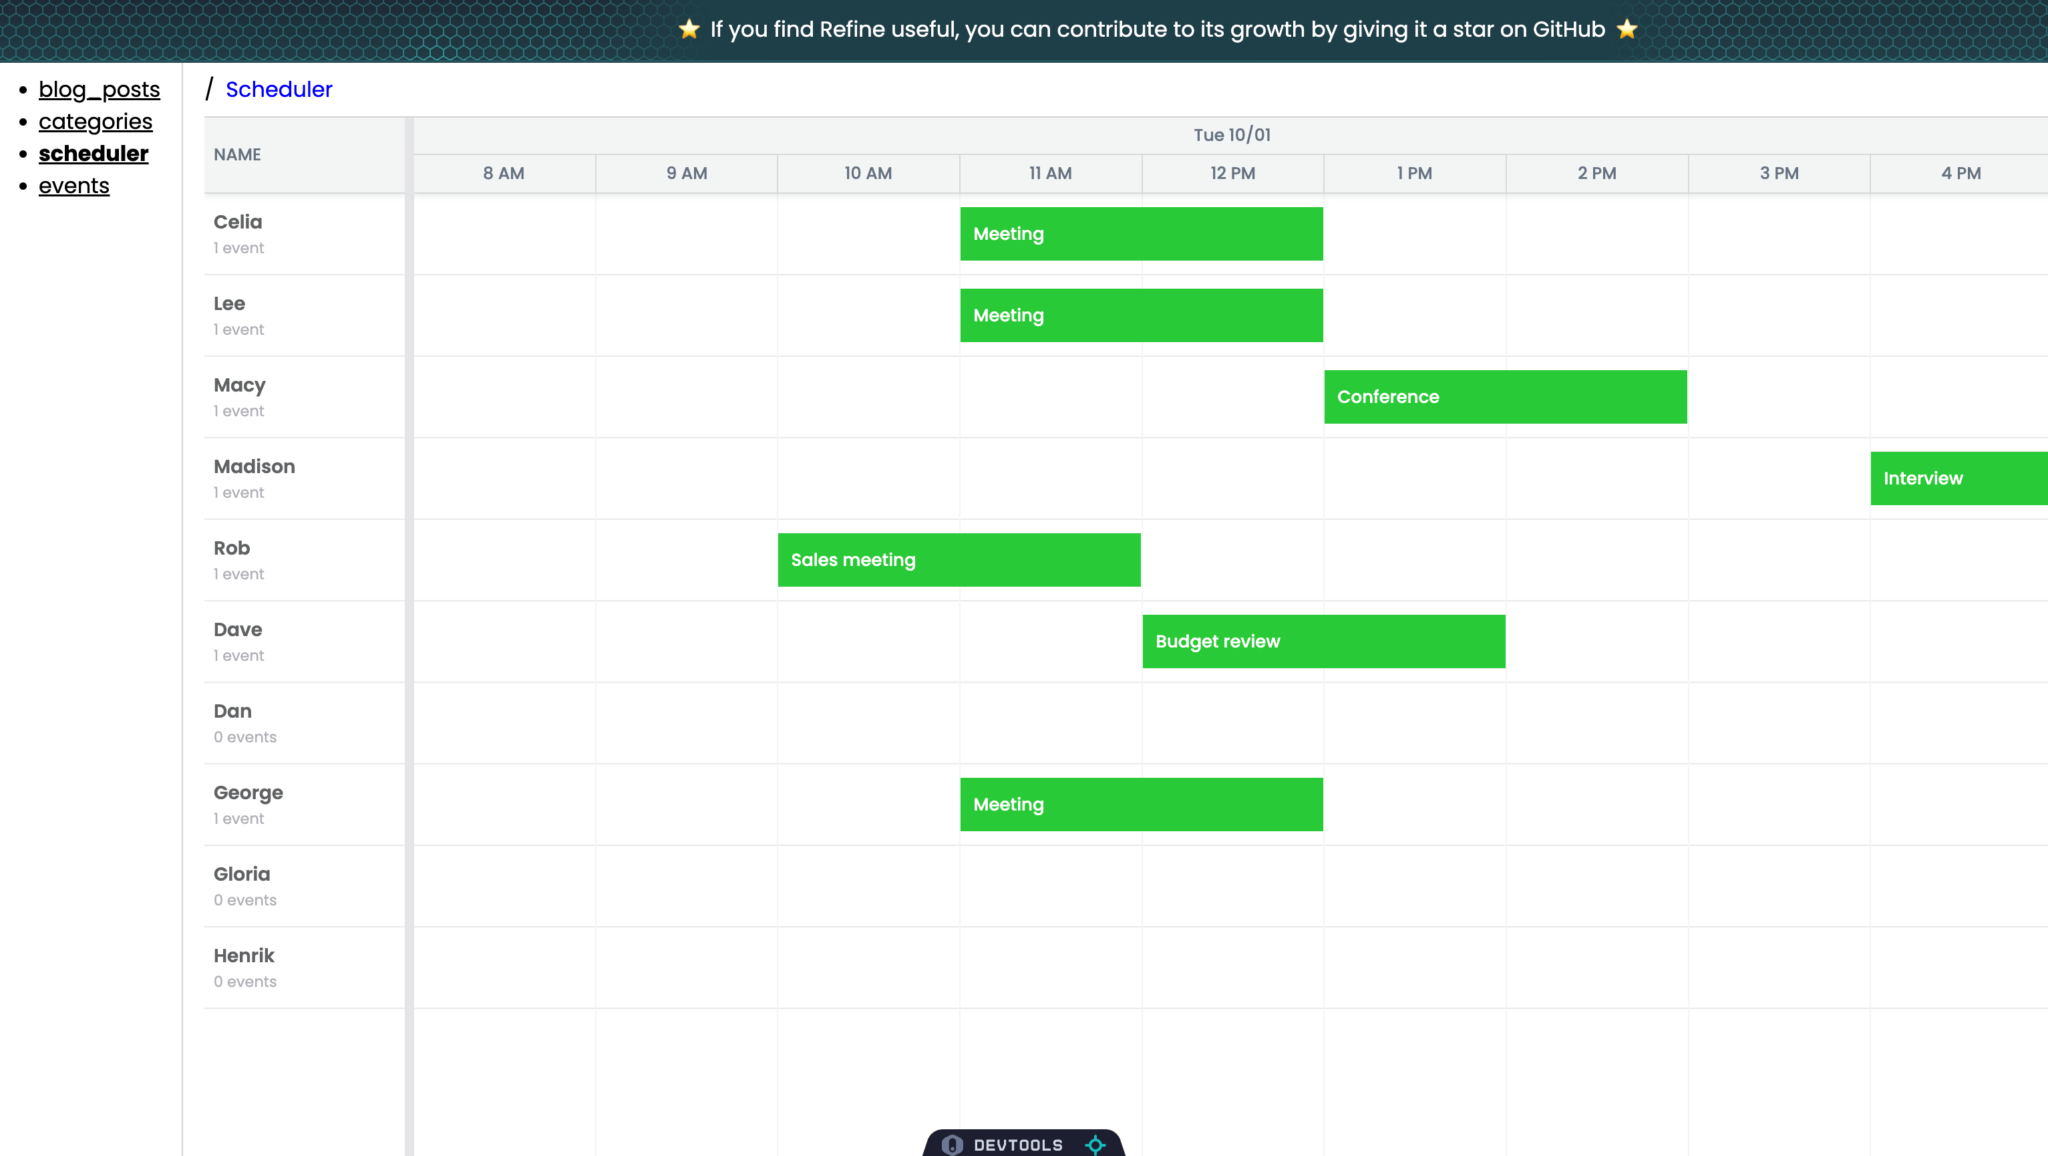
import { useList } from '@refinedev/core';You’ll now see the events, assignments, and resources data in the scheduler:
Syncing data changes with the Bryntum Scheduler onDataChange event
We’ll use the Bryntum Scheduler onDataChange event to sync data changes in the scheduler UI with the SQLite database.
Creating a syncData function to sync data changes
Add the following onDataChange prop to the BryntumScheduler component returned in the src/components/BryntumScheduler/index.tsx file:
onDataChange={syncData}When a data change occurs in the Bryntum Scheduler, the dataChange event will be fired and the syncData function will be called.
Let’s define the skeleton of this function within the Scheduler function in src/components/BryntumScheduler/index.tsx:
const syncData = ({ store, action, records }: SyncData) => {
    const storeId = store.id;
    if (storeId === 'resources') {
        if (action === 'add') {
        }
        if (action === 'remove') {
        }
        if (action === 'update') {
        }
    }
    if (storeId === 'events') {
        if (action === 'remove') {
        }
        if (action === 'update') {
        }
    }
    if (storeId === 'assignments') {
        if (action === 'add') {
        }
        if (action === 'update') {
        }
    }
};
We get information about the store, action, and records from the dataChange event. The store is used to determine which data store has been changed, "resources", "events", or "assignments". The action determines the type of data change, "add", "remove", or "update". We won’t use the "add" event when an event is created, we’ll create the event when it’s updated. This is because when an event is created in the Bryntum Scheduler, an "add" event occurs and then the event editor menu is opened. An "update" event occurs when the new scheduler event is edited. We’ll create the event when this "update" occurs.
Now add the following type imports to the top of the src/components/BryntumScheduler/index.tsx file:
import { ResourceModel, EventModel, AssignmentModel, Grid, Store, Model } from '@bryntum/scheduler';Add the SyncData interface that we use for the syncData function below the imports in the src/components/BryntumScheduler/index.tsx file:
interface SyncData {
  source: Grid;
  store: Store;
  action: 'remove' | 'removeAll' | 'add' | 'clearchanges' | 'filter' | 'update' | 'dataset' | 'replace';
  records: Model[];
  changes: object;
  }[];
Import the Refine data hooks we’ll use to create, update, and delete records:
import { useCreate, useDelete, useUpdate } from '@refinedev/core';Add the following lines of code in the Scheduler function:
const
    { mutate: mutateCreate } = useCreate(),
    { mutate: mutateDelete } = useDelete(),
    { mutate: mutateUpdate } = useUpdate();
These data hooks are extended versions of the TanStack Query useMutation hook. We’ll use the returned mutate method to create, delete, and update the SQLite database using the CRUD methods we created in the scheduler data provider.
When calling the mutate method, we’ll add the following arguments to indicate which records to mutate:
resource: One of “resources”, “events”, or “assignments”.dataProviderName: Will be “scheduler” in this case.id: ID of the record for deleting or updating.
Creating resources
In the syncData function, where storeId === 'resources' is and the action is 'add', add the following lines of code:
const resourcesIds = resources.map((obj) => obj.id);
for (let i = 0; i < records.length; i++) {
    const record = records[i] as ResourceModel;
    const recordData = (record as any).data as ResourceModel;
    const resourceExists = resourcesIds.includes(recordData.id);
    if (resourceExists) return;
    const { id, ...newResource } = recordData as ResourceModel;
    mutateCreate({
        resource         : 'resources',
        dataProviderName : 'scheduler',
        values           : newResource
    });
}
We loop through the added records objects, and for each of them, we run the mutateCreate method. If the resource already exists in the data from the useList query, we don’t create a new resource.
If you create a new resource by copying and pasting an existing resource in the Bryntum Scheduler UI, all of the resources will be fetched again. You can see this in your browser dev tools Network tab.
After each create, delete, and update operation, the store data is invalidated and refetched. If you need better performance, you can update the data cache on the client instead of refetching data when a mutation is successful. You can use the onSuccess option from mutationOptions and Tanstack Query queryClient to interact with a cache.
Deleting resources
In the syncData function, where storeId === 'resources' is and the action is 'remove', add the following lines of code:
const record = records[0] as ResourceModel;
const recordData = (record as any).data as ResourceModel;
if (`${recordData?.id}`.startsWith('_generated')) return;
records.forEach((rec) => {
    mutateDelete({
        resource         : 'resources',
        dataProviderName : 'scheduler',
        id               : rec.id
    });
});
For each record that's removed, we call the mutateDelete method.
Updating resources
In the syncData function, where storeId === 'resources' is and the action is 'update', add the following lines of code:
for (let i = 0; i < records.length; i++) {
    const record = records[i] as ResourceModel;
    const recordData = (record as any).data as ResourceModel;
    if (`${records[i].id}`.startsWith('_generated')) return;
    const modifiedVariables = (records[i] as any).meta
        .modified as Writable>;
    (Object.keys(modifiedVariables) as Array).forEach(
        (key) => {
            modifiedVariables[key] = (recordData)[
                key
            ];
        }
    );

    mutateUpdate({
        resource         : 'resources',
        dataProviderName : 'scheduler',
        id               : recordData.id,
        values           : {
            ...modifiedVariables
        }
    });
}
For each updated resource, we pass the modified variables to the mutateUpdate mutation method.
Deleting events
In the syncData function, where storeId === 'events' is and the action is 'remove', add the following lines of code:
const record = records[0] as ResourceModel;
const recordData = (record as any).data as ResourceModel;
if (`${recordData?.id}`.startsWith('_generated')) return;
records.forEach((rec) => {
    mutateDelete({
        resource         : 'events',
        dataProviderName : 'scheduler',
        id               : rec.id
    });
});
For each record that's removed, we call the mutateDelete method.
Creating and updating events
We’ll run the mutateEvent mutation when a newly created event is first updated. To do this, we’ll create a disableCreate flag variable. We’ll determine if an event is newly created by checking if its id starts with '_generated'.
We need to disable the mutateCreate mutation when an event is created using the Bryntum Scheduler EventDragCreate feature. This feature allows users to create events by clicking and dragging in the Bryntum Scheduler timeline. We disable creating the event in this case because an 'add' event followed by an 'update' event occurs. We’ll prevent this update from triggering a mutateCreate mutation so that an event is only created when a user clicks the "SAVE" button in the event editor popup menu.
Create a disableCreate variable below the schedulerRef variable and set it to false:
let disableCreate = false;Add onBeforeDragCreate and onAfterDragCreate event listeners to the BryntumScheduler component:
onBeforeDragCreate={onBeforeDragCreate}
onAfterDragCreate={onAfterDragCreate}
Add the following functions below the disableCreate variable:
function onBeforeDragCreate() {
    disableCreate = true;
}
function onAfterDragCreate() {
    disableCreate = false;
}
This sets the disableCreate variable to true during a drag-create event.
Now add the following code in the syncData function where storeId === 'events' is and the action is 'update':
if (disableCreate) return;
for (let i = 0; i < records.length; i++) {
    const record = records[0] as EventModel;
    const recordData = (record as any).data as EventModel;
    if (`${recordData.id}`.startsWith('_generated')) {
        const eventsIds = events.map((obj) => obj.id);
        for (let i = 0; i < records.length; i++) {
            const eventExists = eventsIds.includes(recordData.id);
            if (eventExists) return;
            const { id, ...newEvent } = recordData as EventModel;
            // get current resource
            const resourceId = (schedulerRef?.current?.instance?.selectedRecords[0] as any).data.id;
            mutateCreate({
                resource         : 'events',
                dataProviderName : 'scheduler',
                values           : newEvent
            }, {
                onSuccess : ({ data }) => {
                    return mutateCreate({
                        resource         : 'assignments',
                        dataProviderName : 'scheduler',
                        values           : { eventId : data.id, resourceId }
                    }, {
                        onSuccess : (response) => {
                            console.log('Assignment created:', response);
                        },
                        onError : (error) => {
                            console.error('Error creating assignment:', error);
                        }
                    });
                },
                onError : (error) => {
                    console.error('Error creating event:', error);
                },
                onSettled : () => {
                    // Handle completion regardless of success/failure
                    console.log('Event creation settled');
                }
            });
        }
    }
    else {
        const modifiedVariables = (records[i] as any).meta
            .modified as Writable>;
        (Object.keys(modifiedVariables) as Array).forEach(
            (key) => {
                modifiedVariables[key] = (recordData)[
                    key
                ];
            }
        );

        mutateUpdate({
            resource         : 'events',
            dataProviderName : 'scheduler',
            id               : recordData.id,
            values           : {
                ...modifiedVariables
            }
        });
    }
}
If an event is a newly created event record and the 'update' is not caused by a drag-create event, we create a new event using the mutateCreate mutation. If the event ID does not start with _generated, we call the mutateUpdate mutation and pass in the modified variables.
Creating assignments
In the syncData function, where storeId === 'assignments' is and the action is 'add', add the following lines of code:
const assignmentIds = assignments.map((obj) => obj.id);
for (let i = 0; i < records.length; i++) {
    const record = records[0] as AssignmentModel;
    const recordData = (record as any).data as AssignmentModel;
    const assignmentExists = assignmentIds.includes(recordData.id);
    if (assignmentExists) return;
    if (disableCreate) return;
    const { eventId, resourceId } = recordData as AssignmentModel;
    if (`${eventId}`.startsWith('_generated') || `${resourceId}`.startsWith('_generated')) return;
    mutateCreate({
        resource         : 'assignments',
        dataProviderName : 'scheduler',
        values           : { eventId, resourceId }
    });
}
For each created assignment, we create an assignment using the mutateCreate mutation.
Updating assignments
In the syncData function, where storeId === 'assignments' is and the action is 'update', add the following lines of code:
for (let i = 0; i < records.length; i++) {
    const record = records[0] as AssignmentModel;
    const recordData = (record as any).data as AssignmentModel;
    if (`${recordData.id}`.startsWith('_generated')) return;
    mutateUpdate({
        resource         : 'assignments',
        dataProviderName : 'scheduler',
        id               : recordData.id,
        values           : {
            eventId    : recordData.eventId,
            resourceId : recordData.resourceId
        }
    });
}
For each updated assignment, we pass the modified variables to the mutateUpdate mutation function method.
Deleting assignments
The Sequelize Assignment data model in src/models/Assignment.ts has an onDelete property for the events and resources foreign keys that deletes all associated assignments when an event or resource is deleted so we don't need an assignments mutateDelete function call.
Now run the local dev server. Data changes in your Bryntum Scheduler will be saved to the local SQLite database:
Next steps
This tutorial gives you a starting point for using a Bryntum Scheduler in a Refine Next.js app. Refine also offers features like authentication, integration with various services (such as data providers), support for real-time projects, and access to multiple community packages.
Our Bryntum Scheduler demo page will give you an idea of what additional features you can add to your scheduler.
You can also learn more about the Bryntum Scheduler from our blog posts: