Migrating From Ext Scheduler to Bryntum Scheduler
We strive to keep posts updated, but code samples may sometimes be outdated. Humans, see the Bryntum documentation; agents, https://mcp.bryntum.com for the latest info.
Ext Scheduler was written based on the Ext JS library, and therefore had a strict dependency on the Ext JS library. About a year ago, we announced the new pure JS version of the Scheduler which is completely standalone and does not depend on any third-party JavaScript libraries. The new “Bryntum Scheduler” distribution also contains many additional supporting widgets such as buttons, input fields, combo boxes, tooltips etc. that can be used in an application. If you use the Ext JS version of our Scheduler in your application and you only use the Ext JS library to be able to use the Ext Scheduler, then this blog post is for you.
Please consult our Feature Comparison Table to make sure that all features you need to use in your application are also supported in the Bryntum Scheduler.
What’s covered in this guide?
We selected one of our Ext Scheduler examples and this guide shows you how to implement it using the Bryntum Scheduler. This guide describes the process and the areas of the migration that must be addressed to achieve the desired result most effectively. Below you can see the original Ext JS example together with the migrated one. Click on the links to see them in action.
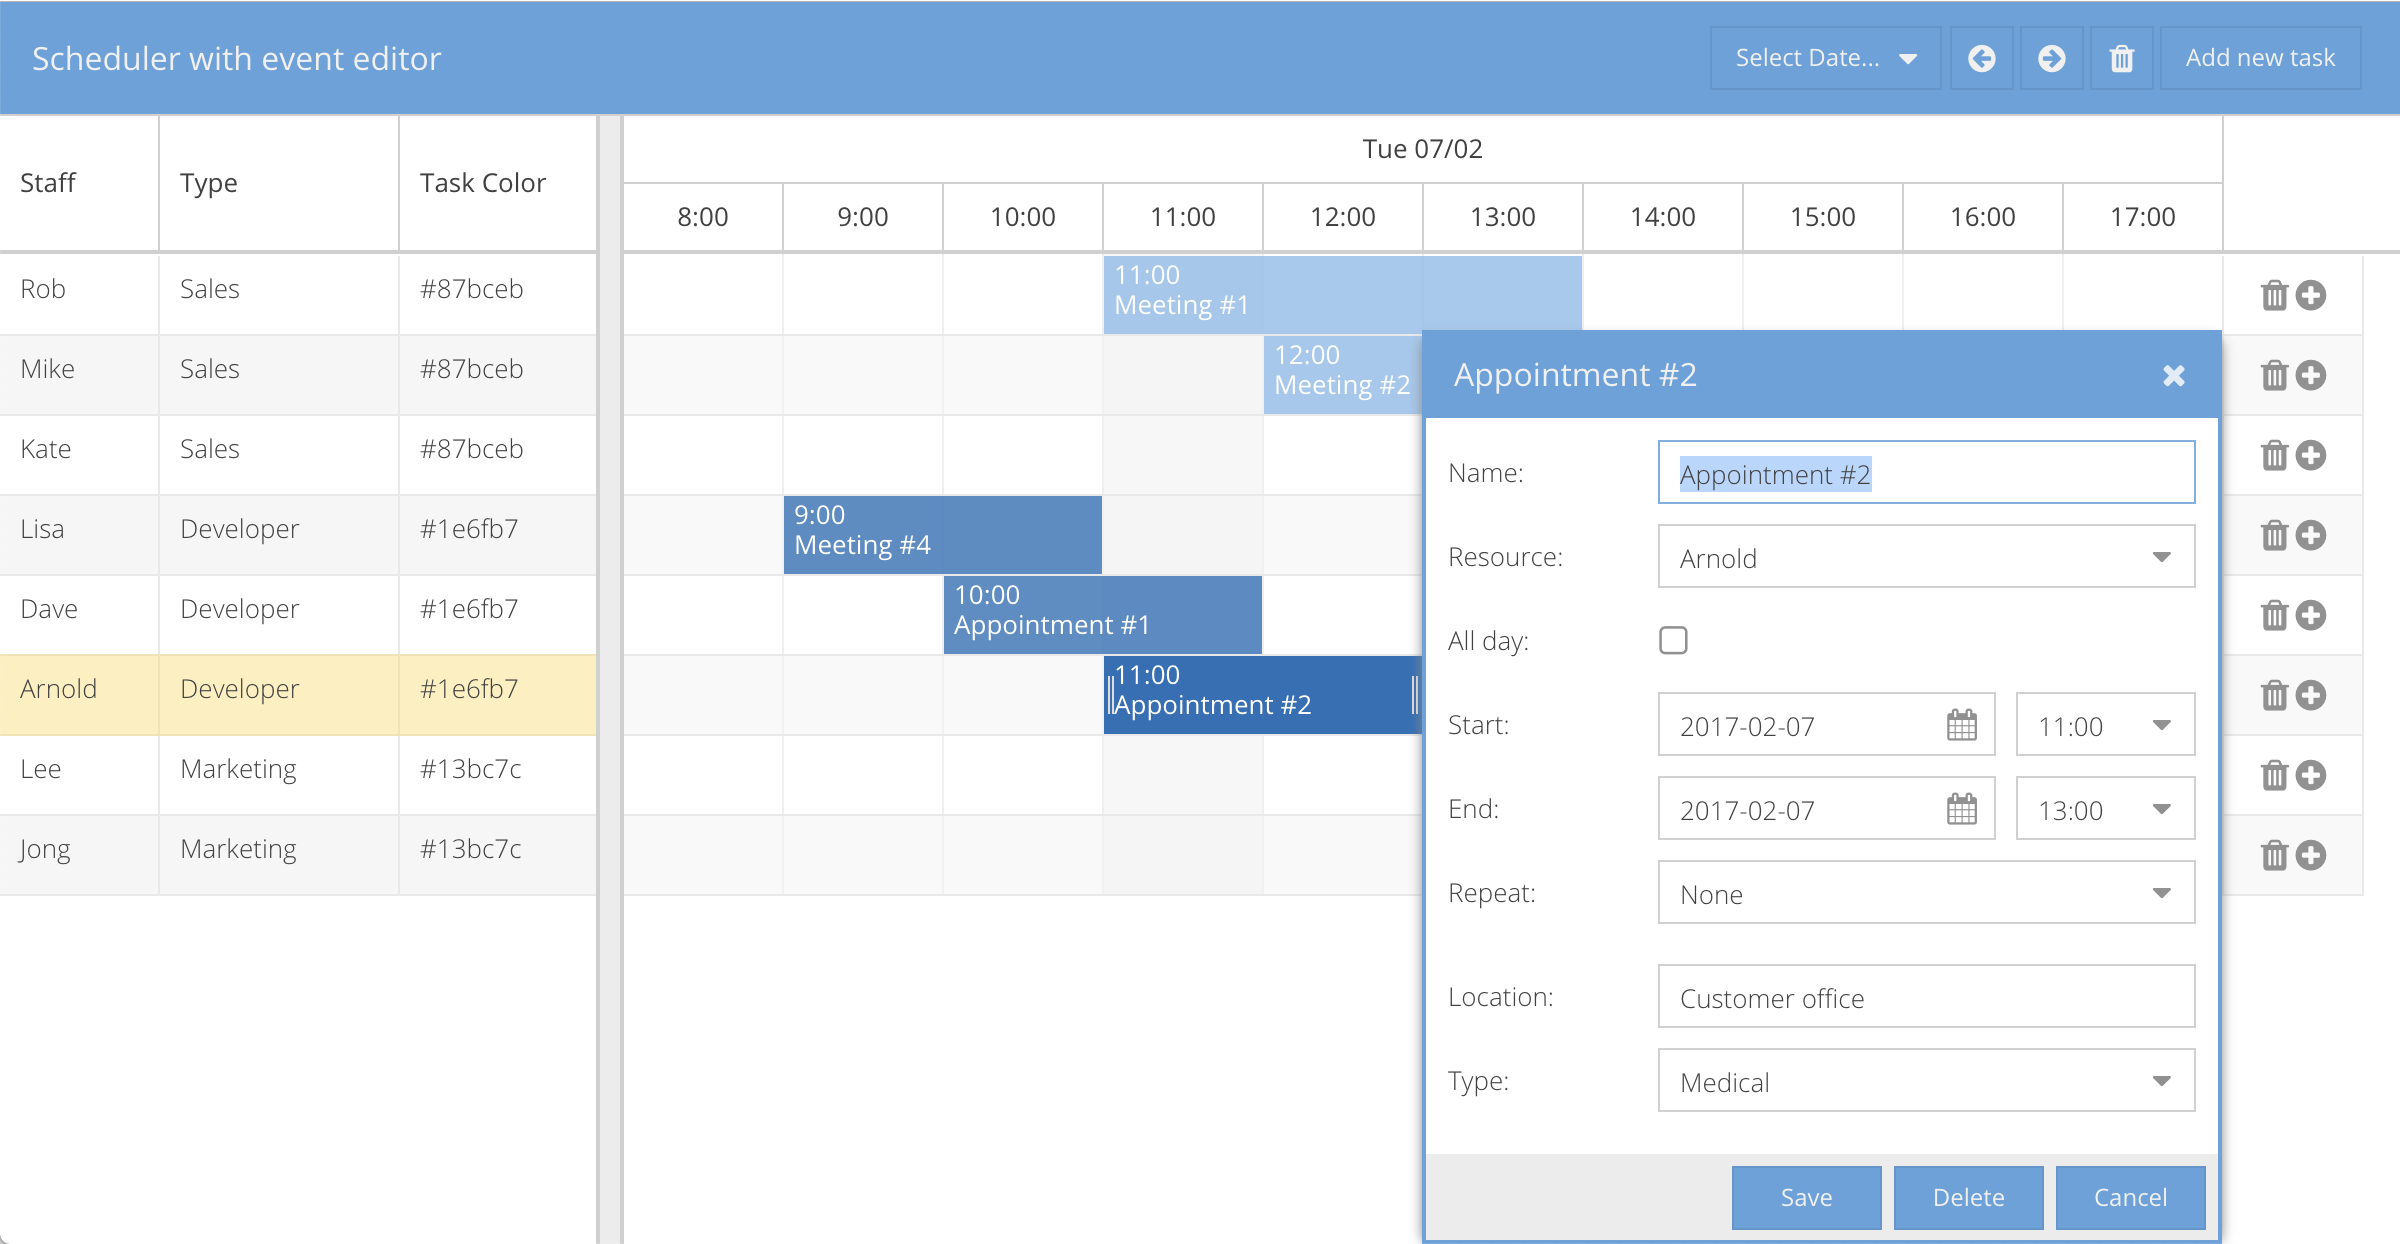 The original Ext JS example
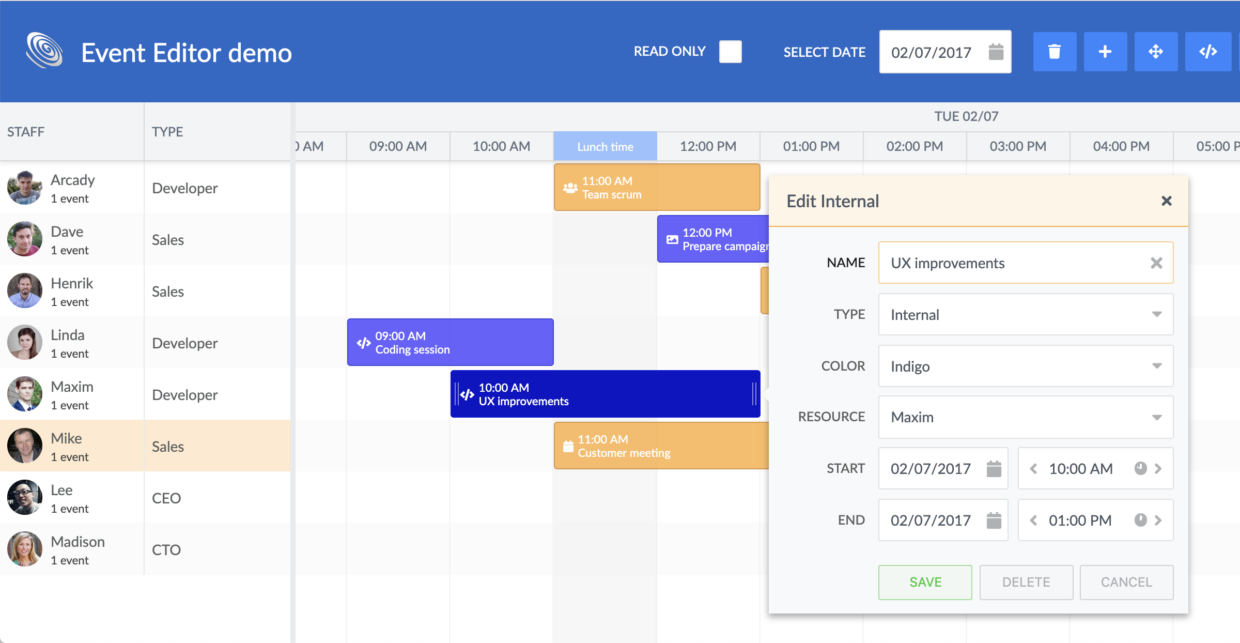
 The migrated new Bryntum Scheduler
Please note that the header tools and the row icons from the original demo are not included in the migrated version. The task editor form is also simplified.
The migration procedure
The following are the steps of the migration procedure. Depending on the character and complexity of the application being migrated, there might be some additional steps that would address the specific details of the application. However, it will be always necessary to execute the steps below.
index.html
You first need to remove any links to the Ext JS library and its stylesheets from the existing index.html and replace stylesheets with the Bryntum Scheduler equivalents.
This is the resulting index.html:
<!DOCTYPE html>
<html lang="en">

<head>
    <meta charset="UTF-8">
    <meta name="viewport" content="width=device-width, initial-scale=1, maximum-scale=1, user-scalable=no">
    <link rel="icon" href="resources/favicon.png">
    <title>Event Editor demo</title>
    <link rel="stylesheet" href="../../../build/scheduler.stockholm.css" id="bryntum-theme">
    <link rel="stylesheet" href="../../_shared/shared.css">
    <link rel="stylesheet" href="resources/app.css">
</head>

<body>
    <div id="container" class="large-sized-tools">
        <header class="demo-header">
            <div id="title-container">
                <a id="title" href="../#eventeditor">
                    Event Editor demo
                </a>
            </div>
            <div id="tools">
            </div>
        </header>
    </div>
    <script type="module" src="app.js"></script>
</body>

</html>
The following stylesheets are loaded in the head:
- `scheduler.stockholm.css` – the default theme for Bryntum Scheduler
- `shared.css` – styles common for all Bryntum examples that may not be needed in your application
- `app.css` – the application specific styles. In this demo it contains only custom tooltip styles.
The body contains markup of the main container with the header. You finally load `app.js` that contains the code of the application.
Scheduler configuration
The Ext Scheduler and the new Bryntum Scheduler share a lot identical or similar configuration options, some are only used in Ext JS version and others are only used in the Bryntum Scheduler version. The best advice while migrating, is to always have the API documentation open. Then use the docs to answer the following questions for every config option:
- Does the existing Ext Scheduler config option exist in the Bryntum version?
- Has the Ext JS config option been renamed in the Bryntum version?
- What other Bryntum Scheduler options are required to achieve the desired functionality or appearance?
For example, if you take the existing Ext JS configuration object from our example:
    title                 : 'Scheduler with event editor',
    rowHeight             : 40,
    snapToIncrement       : true,
    border                : false,
    colorResources        : false,
    forceFit              : true,
    viewPreset            : 'hourAndDay',
    createEventOnDblClick : true,
    lockedGridConfig      : {
        width : 300
    },
You can analyze it this way:
– `title`: remove as it has no effect in vanilla. Scheduler does not (yet) extend Panel.
– `rowHeight` : keep as it exists in both Ext JS and Bryntum versions
– `snapToIncrement` : rename to `snap`
– `border` : remove, ignored
– `colorResources` : remove, ignored
– `forceFit` : keep as it exists in both.
– `viewPreset` : keep, important config
– `createEventOnDblClick` : exits is both but defaults to true in Bryntum Scheduler so you can remove
– `lockedGridConfig` : In Bryntum Scheduler, sub-grids are configured with the ´subGridConfigs´ object
So you end up with the following:
    appendTo   : 'container', // scheduler container element id
    rowHeight  : 50,
    snap       : true,
    viewPreset : 'hourAndDay',
    subGridConfigs : { locked : { width : 300 } }
Note: Do not take the above as the complete list of configuration options that have to be removed or changed when migrating. Take it rather as an example of the thinking process to undergo during the migration and the possible result thereof.
Configuring the Scheduler columns
The `columns` configuration option exists in both Ext JS and Bryntum versions of the Bryntum Scheduler but the individual column config options differ.
The following table shows main (but not all) differences:
Ext JS      | Bryntum
-------------------------
header      | text
dataIndex   | field
field       | editor
You do not need to configure `editor` if you want the text field because as it is the default.
To get a combo box editor you would need to change the following options:
Ext JS           | Bryntum
------------------------------------
xtype:'combobox' | type:'combo'
store            | items
Data configuration
When you have a running application that you are migrating, you definitely want to keep the server APIs intact if possible. The default model field names are different in Ext Scheduler and Bryntum Scheduler, so you have to configure the data models correctly to keep the scheduler working with the existing data.
Stores and Models
In Ext JS you are used to data being kept in a store, the structure of the data is defined by a Model and that you must provide a store for some components such as the Grid or Scheduler. The good news is that the same concept is implemented in the new Bryntum Scheduler. It needs at least a `resourceStore` and an `eventStore` that you can pass either by instances or config objects to the Scheduler. These stores use `ResourceModel` and `EventModel` respectively, but you can also configure them to use your own model classes if needed.
The Ext JS Store and Bryntum Store are similar but not exactly the same. Always consult resourceStore or eventStore API documentation to get the full details.
ResourceModel and ResourceModel are the default models for their respective stores and they have some mandatory fields that must be populated for the Scheduler to render and function properly. If the server already delivers the data in fields with the default names, you do not need to set up models at all. However, if the received data field names differ from the defaults or if you need additional fields you must configure your models with the field names mappings as it will be shown later.
Crud Manager
The Crud Manager (or “CM”) is a class implementing centralized loading and saving of data for multiple stores. Loading the stores and saving all changes is done using one request to the server. This class uses `fetch` as the transport mechanism and JSON as the data encoding format.
The Crud Manager is the easiest and the recommended way of loading and saving data of a Scheduler.
In the Ext Scheduler example you receive the following data from the server:
"resources" : {
    "rows" : [
        {
            "YourIdField" : "a",
            "Name"        : "Rob",
            "Type"        : "Sales",
            "ImgUrl"      : "resources/images/homer.png",
            "Color"       : "#87bceb"
        },
        ...

"events" : {
    "rows" : [
        {
            "ResourceId" : "a",
            "Title"      : "Meeting #1",
            "StartDate"  : "2017-02-07 11:00",
            "EndDate"    : "2017-02-07 14:00",
            "Location"   : "Some office",
            "EventType" : "Meeting"
        },
To consume this data in the Bryntum Scheduler, you should use the following CM configuration:
crudManager : {
        autoLoad      : true,
        resourceStore : {
            idField : 'YourIdField',
            fields  : [
                { name : 'id', dataSource : 'YourIdField' },
                { name : 'name', dataSource : 'Name' },
                { name : 'eventType', dataSource : 'Type' },
                { name : 'imgUrl', dataSource : 'ImgUrl' },
                { name : 'color', dataSource : 'Color' }
            ]
        },
        eventStore : {
            modelClass : MyEvent
        },
        transport : {
            load : {
                url : 'data/data.json'
            }
        }
    },
This configuration provides inline definition for the `resourceStore` where the field names are mapped to the mandatory internal names, i.e. received `YourIdField` will become `id` in the store, `Type` will become `eventType`, etc.
The configuration for `eventStore` uses the `MyEvent` model that defines field mappings in the same way (you could also use the inline definition here too).
`MyEvent` is defined in a separate file this way:
import EventModel from '../../../../lib/Scheduler/model/EventModel.js';

class MyEvent extends EventModel {
    static get fields() {
        return [
            { name : 'name', type : 'string', dataSource : 'Title' },
            { name : 'resourceId', dataSource : 'ResourceId' },
            { name : 'startDate', type : 'date', dataSource : 'StartDate' },
            { name : 'endDate', type : 'date', dataSource : 'EndDate' },
            { name : 'location', dataSource : 'Location' },
            { name : 'eventType', dataSource : 'EventType' }
        ];
    }
}

export default MyEvent;
Event markup and styling
Now you need to port `eventBodyTemplate` and `eventRenderer`.
`eventBodyTemplate` is an `Ext.XTemplate` in the Ext JS version so you must convert it to a function in Bryntum Scheduler:
 // Ext JS version
eventBodyTemplate : function(data) {
    return `<div><div class="sch-event-header">${data.headerText}</div><div class="sch-event-footer">${data.footerText}</div></div>`;
},

// Bryntum Scheduler version
eventBodyTemplate : data => `<section><div class="b-sch-event-header">${data.headerText}</div><div class="b-sch-event-footer">${data.footerText}</div></section>`,
Although `eventRenderer` exists in both Ext JS and Bryntum Scheduler, you still need to adjust it as the new version receives different arguments. Result:
eventRenderer : function({ eventRecord, resourceRecord, tplData }) {
    const bookingStart = eventRecord.startDate;

    if (resourceRecord) {
        tplData.style = 'background-color:' + resourceRecord.color;
    }

    return {
        headerText : DateHelper.format(bookingStart, 'HH:mm'),
        footerText : eventRecord.name
    };
}
Tooltip appearance
You need to move the tooltip template from `tooltipTpl` config option in Ext JS to the `eventTooltip.template` function in Bryntum Scheduler (in the features config). The final configuration is:
features : {
    eventTooltip : {
        template : function({ eventRecord }) {
            const startDate = DateHelper.format(eventRecord.startDate, 'Y-MM-DD H:mm');

            return ´
            <dl class="eventTip">
                <dt>Time</dt><dd>${startDate}</dd>
                <dt>Task</dt><dd>${eventRecord.name}</dd>
                <dt>Location</dt><dd>${eventRecord.location}</dd>
            </dl>
            ´;
        }
    },
For the tooltip to look good you also need to copy a few demo specific styles into `resources/app.css`:
.eventTip {
    margin-block-start : 0;
}
.eventTip dd {
    margin-bottom       : 17px;
    margin-inline-start : 0;
    white-space         : nowrap;
}

.eventTip dd:last-child {
    margin-bottom : 0 !important;
}

.eventTip dt {
    font-weight : bold;
}
Customising the event editor
To configure the Bryntum Scheduler equivalent of the Ext Scheduler event editor, you should look at the `eventEdit` feature. Here you can also see the implementation of dynamically showing and hiding certain editor fields based on the value in another field – you only show `Location` for events of type `Meeting`
features : {
    eventEdit : {
        editorConfig : {
            showResourceField : true,

            startTimeConfig : {
                minValue : '08:00',
                maxValue : '18:00'
            },

            endTimeConfig : {
                minValue : '08:00',
                maxValue : '18:00'
            }
        },
        extraItems : [
            {
                type    : 'text',
                name    : 'location',
                label   : 'Location',
                index   : 7,
                // This field is only displayed for meetings
                dataset : { eventType : 'Meeting' }
            },
            {
                type      : 'combo',
                name      : 'eventType',
                label     : 'Type',
                index     : 1,
                editable  : false,
                items     : ['Appointment', 'Internal', 'Meeting'],
                listeners : {
                    change : ({ source : combo, value }) => {
                        // toggle visibility of widgets belonging to eventTypes
                        combo.owner.items.forEach(widget => {
                            if (widget.dataset && widget.dataset.eventType) {
                                widget.hidden = widget.dataset.eventType !== value;
                            }
                        });
                    }
                }
            }
        ]
    }
},
Summing up
The migration from Ext Scheduler version to Bryntum Scheduler is a quite straight forward task, and you should observe a nice performance boost when you have migrated to the new version. We hope this guide has given you enough details to start your migration process. Remember to study the API documentation and our Bryntum Scheduler examples. If you get stuck you can always get help in our support forums.
Further reading
- For more information on config options, features, events and methods consult please the API docs
- For more information about Ext Scheduler version see Ext Scheduler API docs
- If you have any questions related to the migration or the Scheduler itself you can always ask on our forum