Manage data using Bryntum Grid and Directus
We strive to keep posts updated, but code samples may sometimes be outdated. Humans, see the Bryntum documentation; agents, https://mcp.bryntum.com for the latest info.
Bryntum Grid is a high-performance JavaScript table component that’s feature-rich, easily customizable, and integrates with all major frontend JavaScript frameworks. In this tutorial, we’ll show you how to use Bryntum Grid with Directus.
Directus is an open-source data platform you can link to your SQL database to create REST and GraphQL endpoints that you can customize with Node.js. Use Directus to perform CRUD operations on your data, add users, assign roles, create webhooks, and more with ease, and the Directus app dashboard is suitable for non-technical users to view and manage data. The Directus platform is highly customizable, works with new or existing SQL databases, and does not alter your database schema. You can self-host Directus or use the managed cloud service, and there is no vendor lock-in: You can export or migrate your database from Directus.
While you can use Directus as a headless CMS, internal tool builder, or data management and analytics service, this tutorial uses it as a backend service to connect Bryntum Grid to a SQLite database to demonstrate how Directus simplifies creating and modifying API endpoints and connecting them to your database.
We’ll show you how to do the following:
- Self-host Directus using Docker and set it up to use SQLite.
- Create a database table to store sample sports player information and populate it with data.
- Create custom Directus API endpoints.
- Connect an existing Bryntum Grid to the Directus API endpoints.
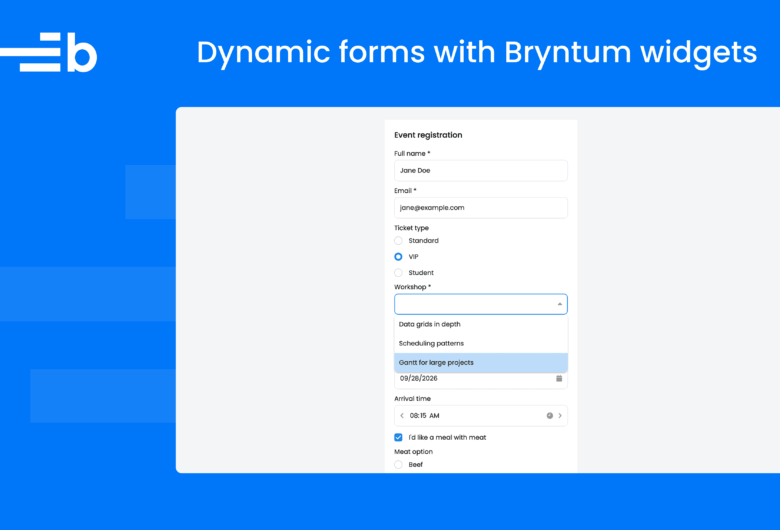
Here is what we’ll build:
Getting started
We’ll use an existing vanilla JavaScript Bryntum Grid app as a starting point. This Bryntum Grid is identical to the Grid we created in our article comparing JavaScript table libraries using Svelte: Bryntum Grid vs. AG Grid vs. DataTables.
Start by cloning the Bryntum Grid starter GitHub repository, which uses Vite as a development server and JavaScript bundler. The completed-grid branch of the repo contains the code for the completed tutorial.
Install the Vite dev dependency by running the following command:
npm installYou can try out Bryntum components for free using our public Bryntum trial packages.
If you have a Bryntum license, please refer to our npm Repository Guide to access the private Bryntum repository.
Now run the local development server using the following command:
npm run devYou’ll see a Bryntum Grid:
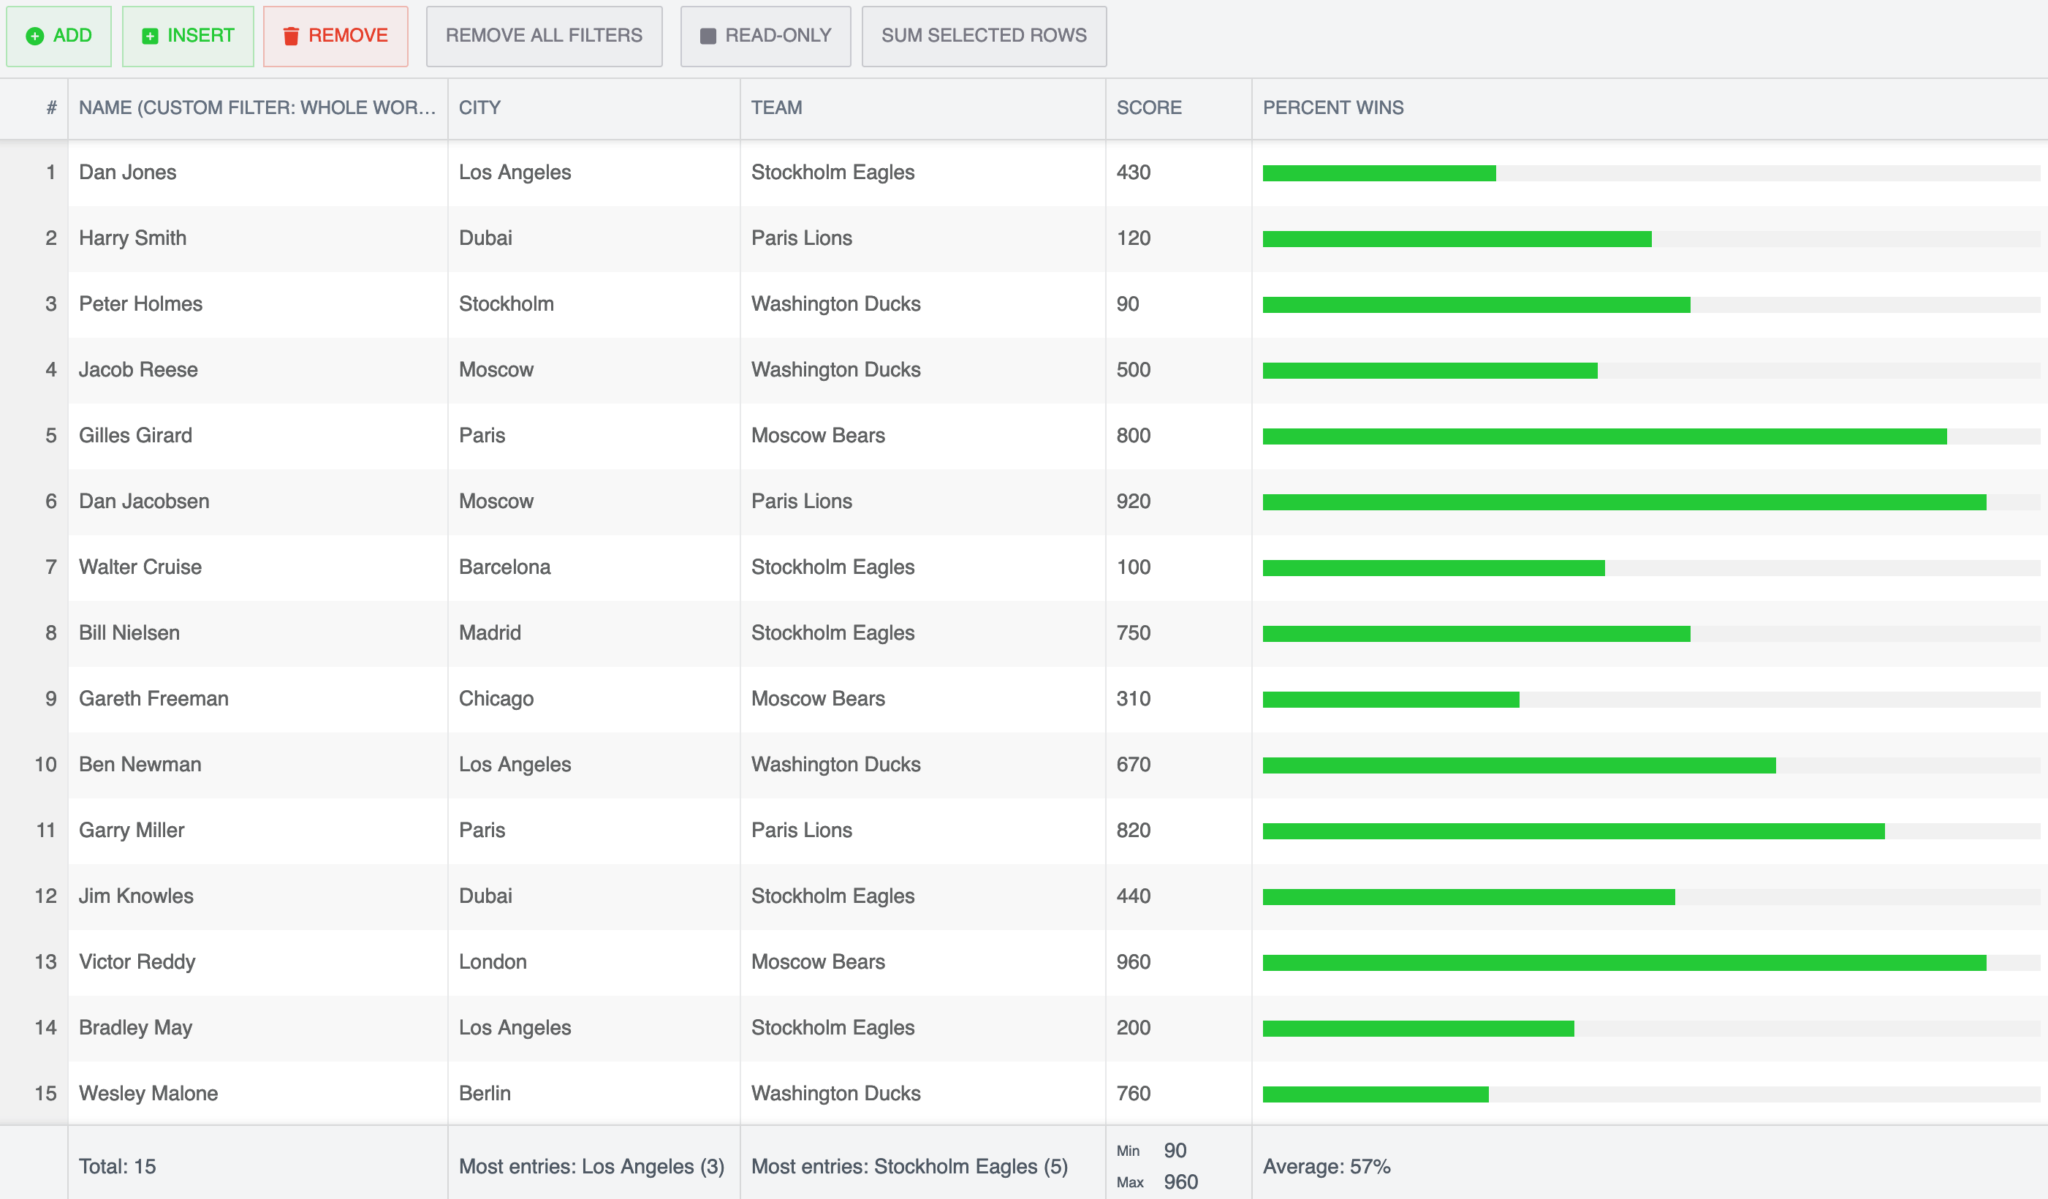
This Grid displays example sports player data. A Bryntum Grid AjaxStore is used to get example data from the public/data/data.json file. We’ll modify the AjaxStore configuration once we have created and populated our database with example data, connected it to Directus, and set up Directus API endpoints.
Self-host Directus using Docker
Self-hosting Directus gives you full control over your data and deployment. You can use Docker to self-host Directus. Each new release of Directus is published to Docker Hub. Using Docker has various benefits, including simplifying deployment as it allows Directus to run reliably and consistently across different environments. Refer to the Directus Self-Hosting Quickstart for a detailed guide on running the Directus app with Docker.
Modify the Directus Docker Compose file
In the docker-compose.yml file that you would have created whilst following the Directus Self-Hosting Quickstart, replace the environment variable WEBSOCKETS_ENABLED: "true" with the following:
CORS_ENABLED: "true"
CORS_ORIGIN: "https://localhost:5173"
We set CORS_ENABLED to "true" and CORS_ORIGIN to the URL of the frontend to allow the Bryntum Grid to make API requests to Directus.
To create the application containers and run the Directus app, run the following command in your terminal:
docker compose upTo view the Directus app, open https://localhost:8055 or https://127.0.0.1:8055. Sign in using the admin user credentials in your .env file. In the database folder, you’ll see that a data.db file is created for your SQLite database. Now let’s take a look at the Directus app.
Use the Directus app
The Directus Data Studio app is accessible to non-technical users thanks to its intuitive UI and friendly names for database terms and technical concepts. In Directus, a database is called a Project, a table is a Collection, a column is a Field, a record is an Item, and a datatype is a Type.
Take a look at the Directus Quickstart Guide to see how you can create a Project, Collection, Field, and Item in the app.
We’ll create a player information table in the SQLite database and populate it with example data using the sqlite3 command-line program.
Create a SQLite database table and populate it with example data
To make it easy to work with SQLite database files, there is a set of command-line tools that you can get from the SQLite download page. On macOS, the sqlite3 command-line tools should already be available, but on other operating systems like Windows, you will need to first download this bundle of command-line tools and add the SQLite directory (the path with the sqlite3 executable file) to your computer’s PATH system variable to install the sqlite3 command-line program. Now you can manually enter and execute SQL statements.
Navigate to the database directory in your directus folder:
cd databaseStart the sqlite3 program for your database by running the following command:
sqlite3 data.dbNow create a database table for player information data. Paste the following SQL statement into the command prompt and press Enter to execute it:
CREATE TABLE player_info
(
    id          INTEGER PRIMARY KEY AUTOINCREMENT,
    name        TEXT DEFAULT NULL,
    city        TEXT DEFAULT NULL,
    team        TEXT DEFAULT NULL,
    percentWins REAL DEFAULT NULL,
    score       INTEGER DEFAULT NULL
);
Insert some example data:
INSERT INTO player_info (name, city, team, score, percentWins) VALUES
('Dan Jones', 'Los Angeles', 'Stockholm Eagles', 430, 30),
('Harry Smith', 'Dubai', 'Paris Lions', 120, 50),
('Peter Holmes', 'Stockholm', 'Washington Ducks', 90, 55),
('Jacob Reese', 'Moscow', 'Washington Ducks', 500, 43),
('Gilles Girard', 'Paris', 'Moscow Bears', 800, 88),
('Dan Jacobsen', 'Moscow', 'Paris Lions', 920, 93),
('Walter Cruise', 'Barcelona', 'Stockholm Eagles', 100, 44),
('Bill Nielsen', 'Madrid', 'Stockholm Eagles', 750, 55),
('Gareth Freeman', 'Chicago', 'Moscow Bears', 310, 33),
('Ben Newman', 'Los Angeles', 'Washington Ducks', 670, 66),
('Garry Miller', 'Paris', 'Paris Lions', 820, 80),
('Jim Knowles', 'Dubai', 'Stockholm Eagles', 440, 53),
('Victor Reddy', 'London', 'Moscow Bears', 960, 93),
('Bradley May', 'Los Angeles', 'Stockholm Eagles', 200, 40),
('Wesley Malone', 'Berlin', 'Washington Ducks', 760, 29);
You can view the data using the following SQL query:
SELECT * FROM player_info;To exit the sqlite3 program, type .quit and press Enter.
Open your Directus app in your browser at https://localhost:8055 or https://127.0.0.1:8055 and navigate to Settings Module > Data Model. You’ll see the Player Info Collection from the SQLite database. Click on it to configure it.
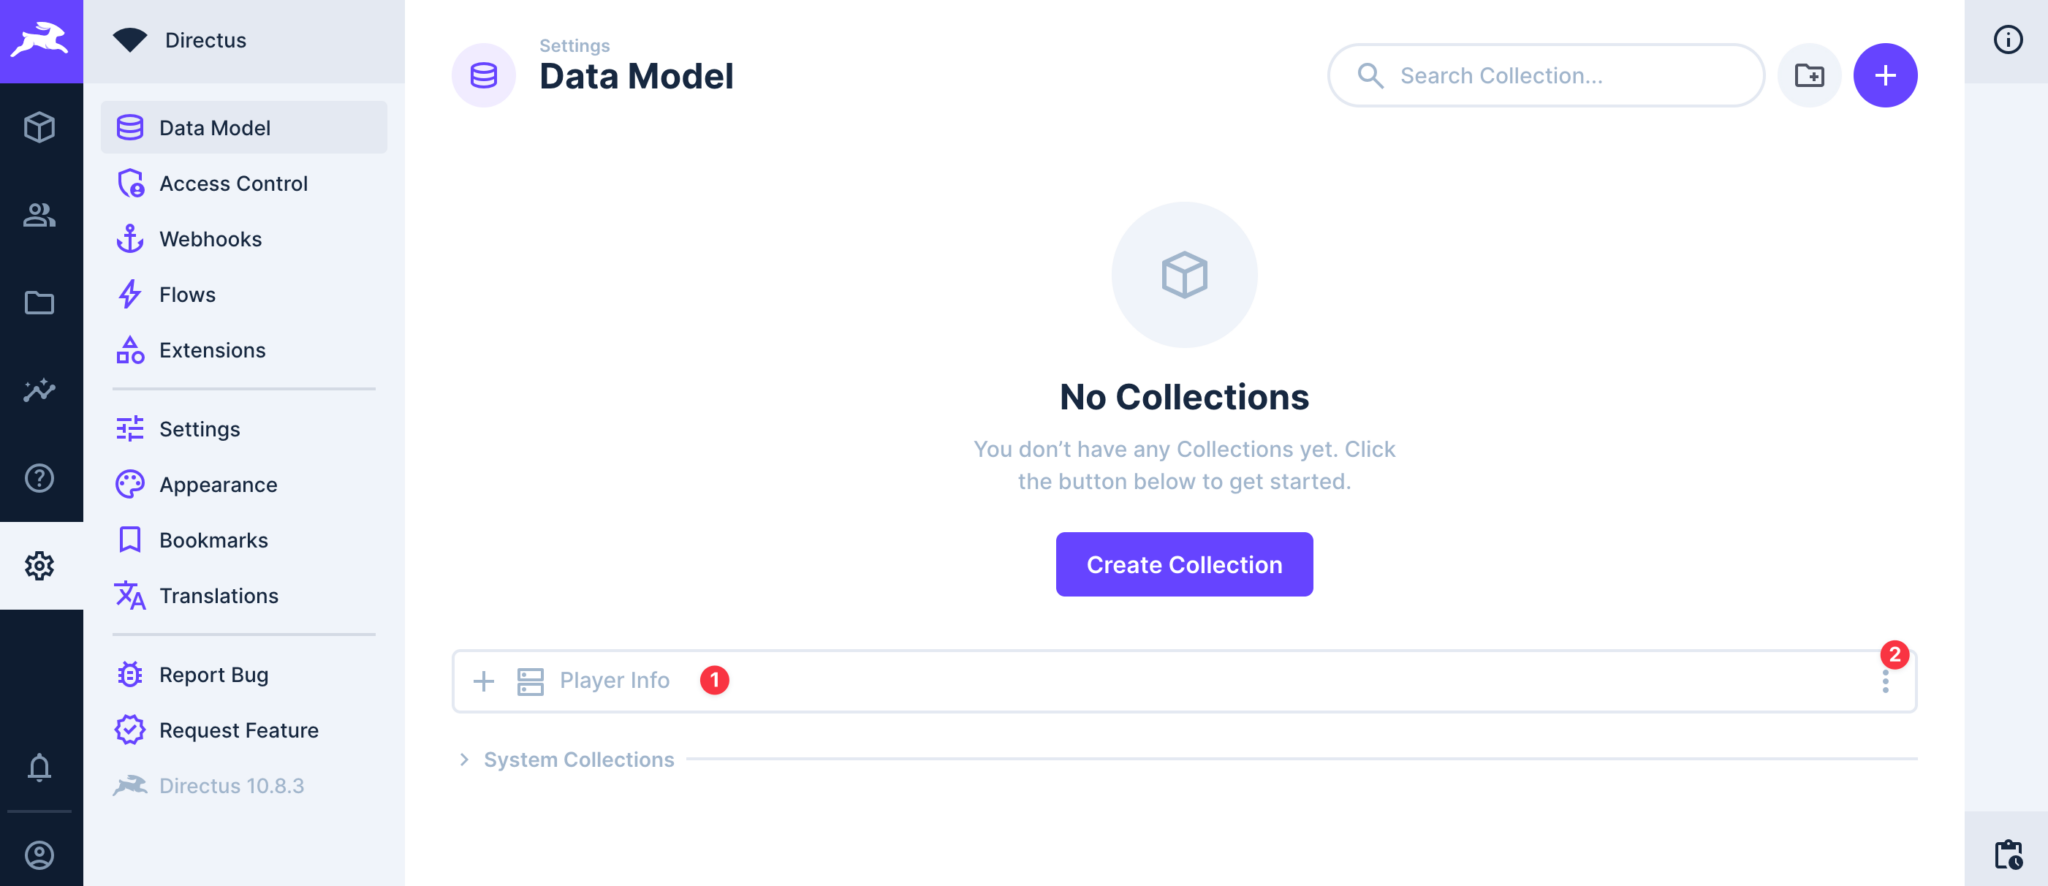
Notice that Directus has figured out the field names and data types from our database column. Directus uses database introspection to do this.
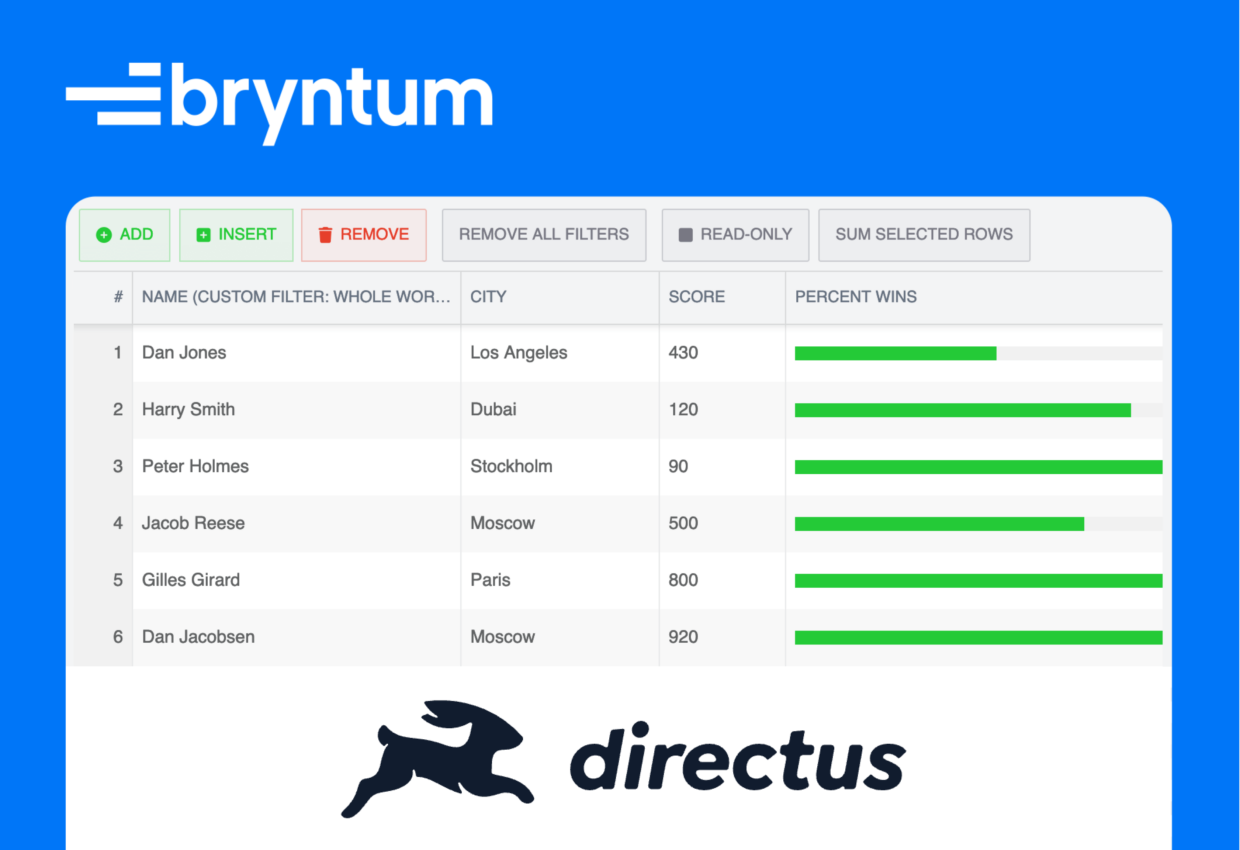
Now navigate to the Content Module by clicking the three-dot menu to the right of the Player Info element and selecting View Content. You’ll see the example data:
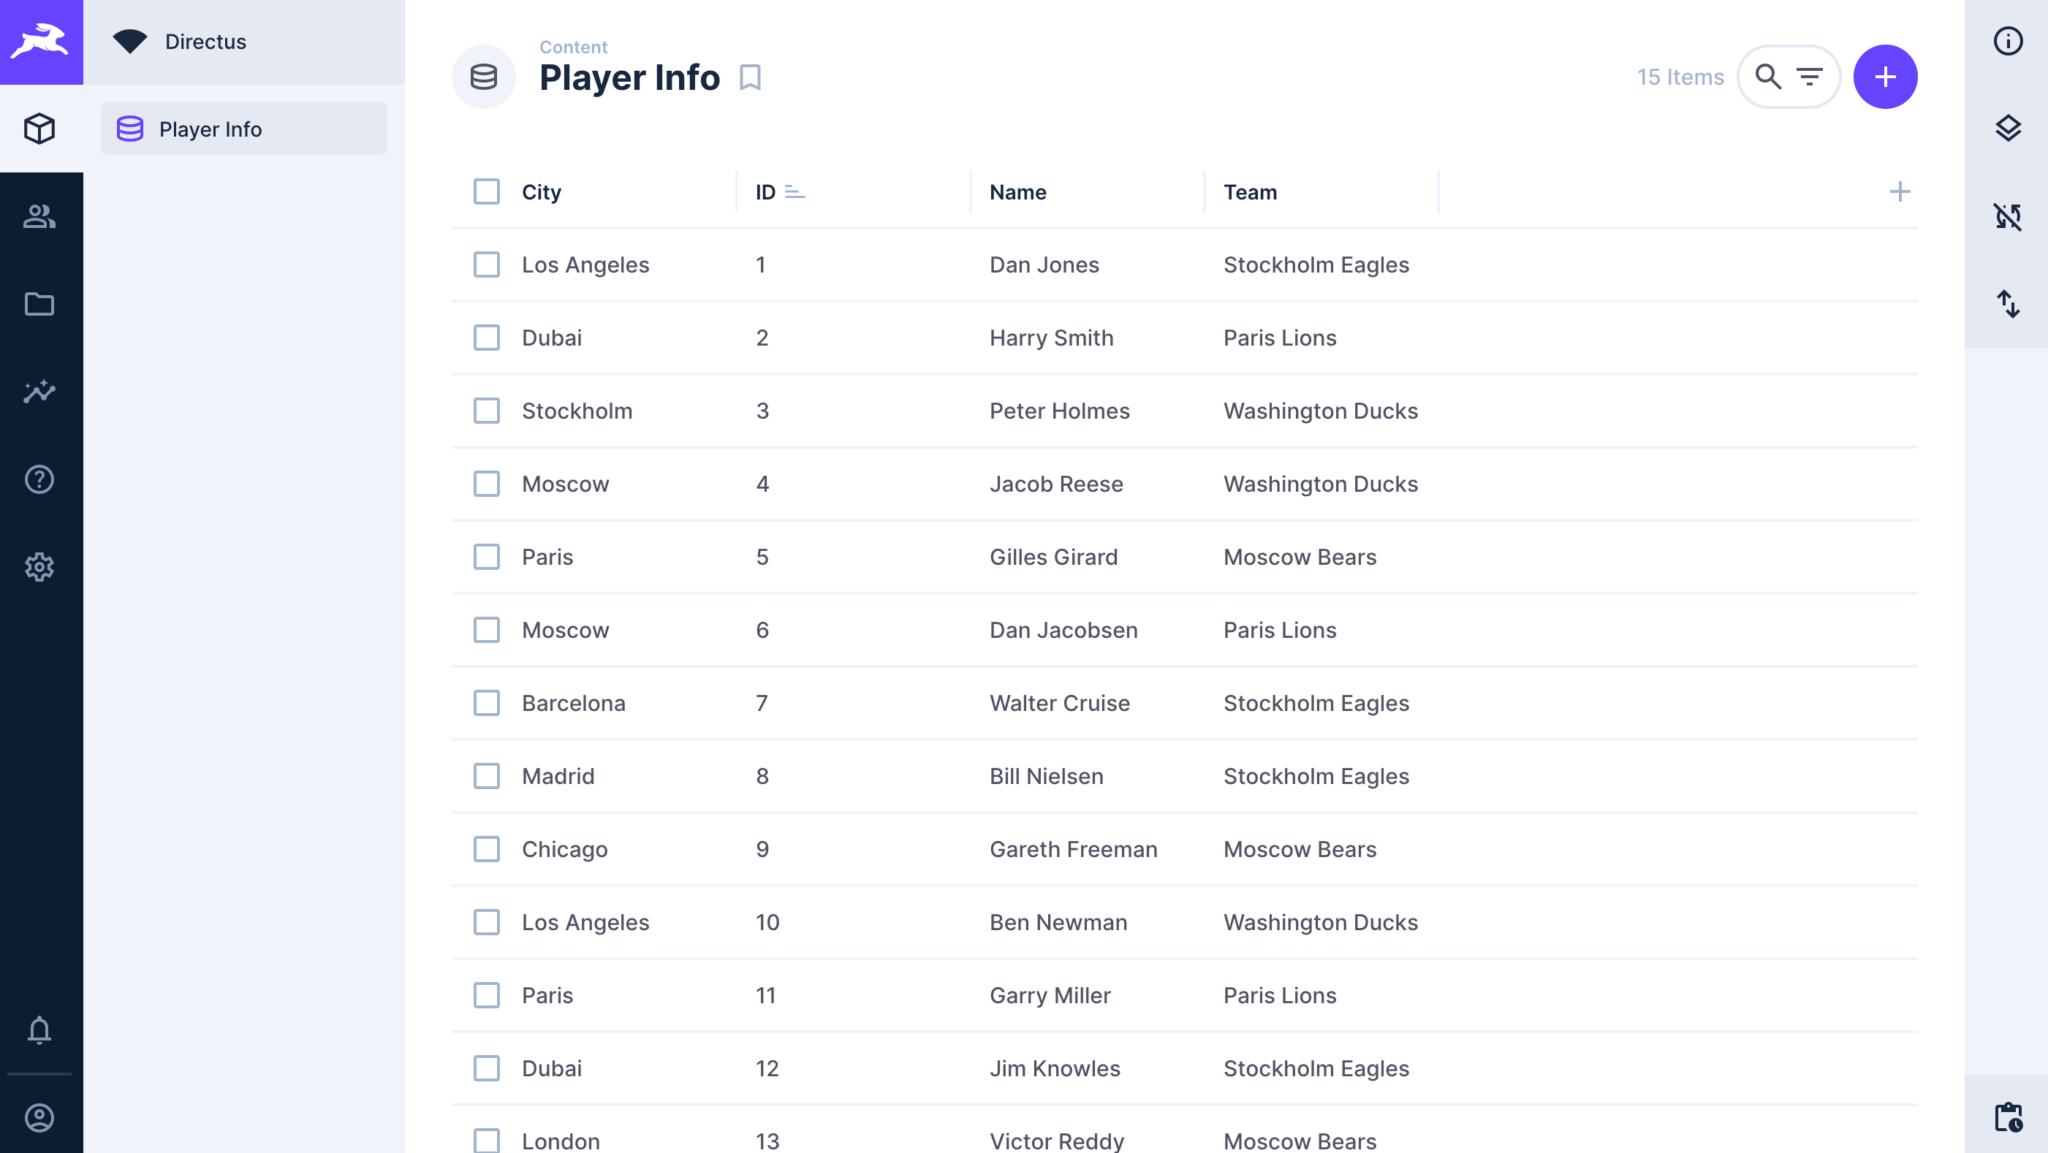
If you don’t see the items, try refreshing the page. Note that you can add extra fields to display using the “Add field” plus button to the right of the table headings.
The information panel on the right has options to auto-refresh the data at set intervals or import and export data.
Control API access to the collection
To give Bryntum Grid access to the collection, we’ll make all CRUD operations on the player_info table public by setting the collection permissions. Directus has two built-in roles: Admin and Public. The public role determines what’s accessible to non-authenticated users.
Open the Settings Module > Access Control page and click on the Public role.
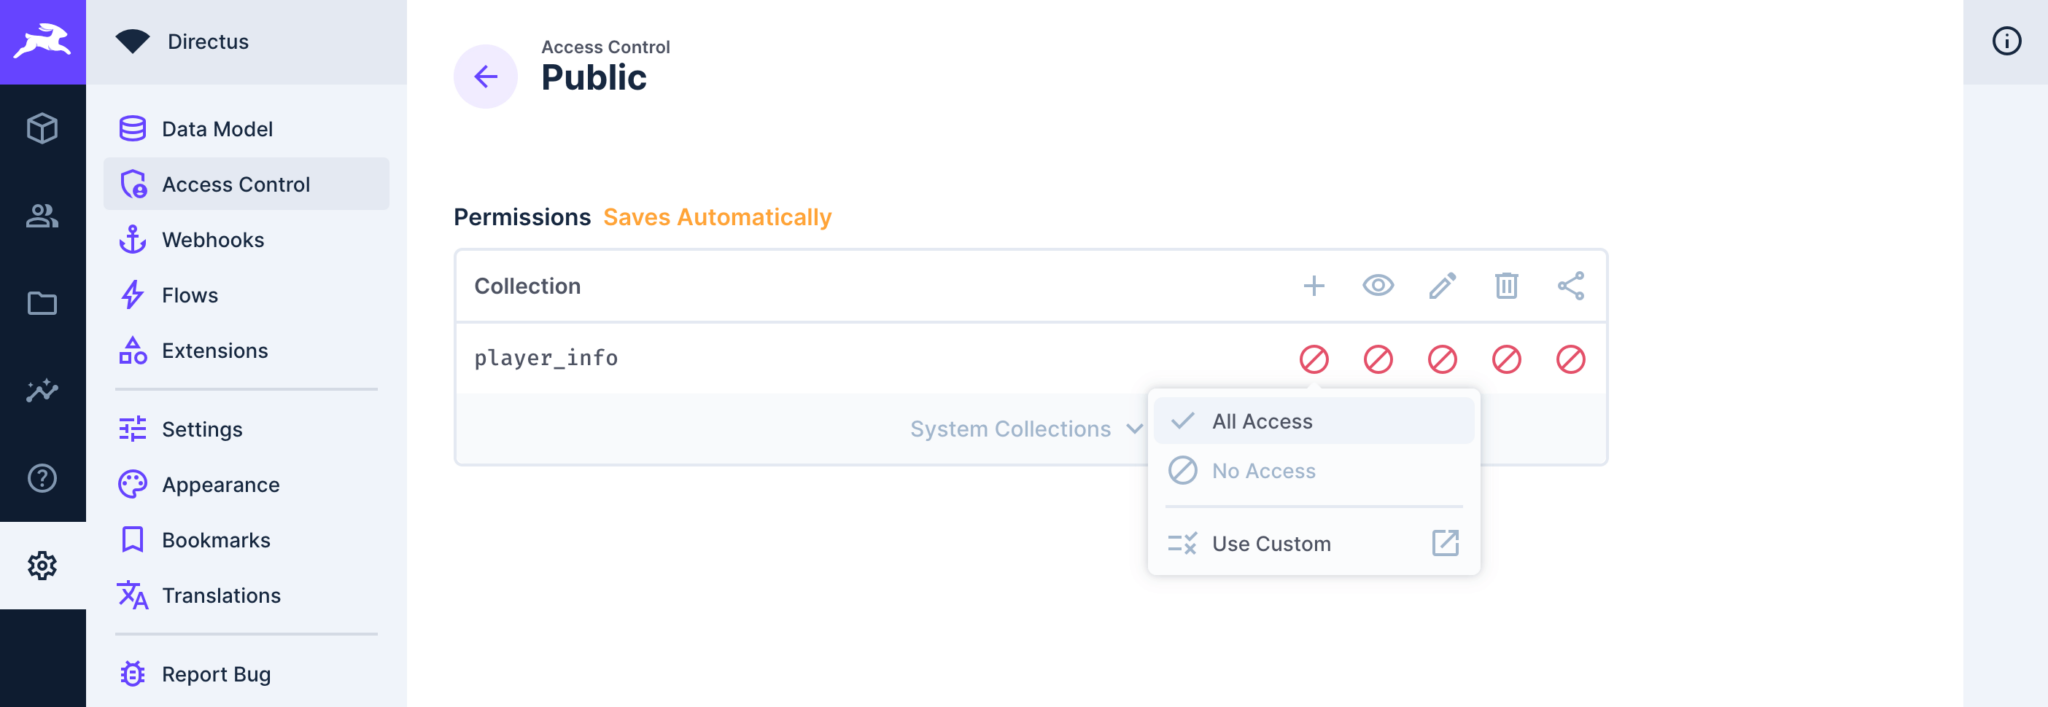
The symbols represent create, read, update, delete, and share access for the player_info collection. The red icons represent no access. Click on the icon to change the access. We’ll make all the CRUD operations “All Access” for this collection. Now we’ll be able to perform CRUD operations on this collection from our Bryntum Grid without needing authentication.
Connect Bryntum Grid AjaxStore to Directus API endpoint to read data
Let’s get the data from Directus into our Bryntum Grid. In your Bryntum Grid app, change the readUrl in the AjaxStore store variable in the main.js file to the following:
readUrl: "https://localhost:8055/items/player_info",This will read the player info data from the API endpoint created by Directus.
Run the development server using the following command:
npm run devYou’ll see the data from your SQLite player_info table. The API endpoint created has the following URL structure:
/items/:collectionYou use a GET request to read, a POST request to create, a PATCH request to update, and a DELETE request to delete data through the API endpoint. You can read more about these endpoints in the Directus Items API reference docs page.
On the client side, we use an AjaxStore to handle CRUD operations in the Bryntum Grid. The response from the Directus API for reading the player information data matches the response structure expected by the Bryntum Grid AjaxStore. The responses for the other CRUD operations do not. We’ll create custom Directus API endpoints to return the response in the correct format expected by the Bryntum Grid AjaxStore.
Create custom Directus API endpoints to create, update, and delete items
A custom Directus API endpoint allows you to register new API endpoints.
Move into the extensions directory:
cd extensionsA custom API endpoint is a Directus Extension that allows you to modify or expand Directus’ functionality.
To create an extension, we’ll use the create-directus-extension utility:
npx create-directus-extension@latestIn the options that follow in the command line, input the following:
- Extension type: endpoint
- Name: directus-extension-endpoint-player_info
- Language: JavaScript
- Auto-install dependencies: yes
In the directus-extension-endpoint-player_info/src/index.js file, replace the code with the following lines of code:
const collectionName = "player_info";
export default {
  id: "player_info-api", // API endpoint name
  handler: (router, context) => {

    const { services, getSchema } = context;
    const { ItemsService } = services;
    router.post("/", async (req, res) => {
      const itemsService = new ItemsService(collectionName, {
        schema: await getSchema(),
        accountability: req.accountability,
      });
      try {
        const createdId = await itemsService.createOne(req.body);
        // Retrieve the full item data
        const fullItemData = await itemsService.readOne(createdId);
        const modifiedData = {
          success: true,
          data: [fullItemData],
        };
        res.json(modifiedData);
      } catch (error) {
        console.error("Error:", error);
        res.status(500).json({
		  success: false,
		  message: "There was an error creating an item.",
		});
      }
    });
  },
};
By default, the endpoint root will be the name of the extensions folder, which is /directus-extension-endpoint-player_info/ in this case. To change the endpoint root, we set the id property. Our API endpoint will now be: https://localhost:8055/player_info-api.
The handler is the endpoint’s registration handler function. We use its router parameter to modify specific API requests. The context parameter has various properties, of which we use services and getSchema. The services property contains all API internal services. The getSchema property is an async function that reads the available schemas for use in services.
The ItemsService allows you to perform CRUD operations on items in a collection. We use its createOne method to create a new player information item in our database based on the data sent to the API endpoint in a POST request.
We then modify the response to match the response expected by the Bryntum Grid AjaxStore.
Now add the following route handler methods below the router.post route handler method:
    router.patch("/:itemId", async (req, res) => {
      const itemsService = new ItemsService(collectionName, {
        schema: await getSchema(),
        accountability: req.accountability,
      });
      // Extract itemId from the URL
      const itemId = req.params.itemId;
      try {
        const updatedId = await itemsService.updateOne(itemId, req.body);
        // Retrieve the full item data
        const fullItemData = await itemsService.readOne(updatedId);
        const modifiedData = {
          success: true,
          data: [fullItemData],
        };
        res.json(modifiedData);
      } catch (error) {
        console.error("Error:", error);
        res.status(500).json({
          success: false,
          message: "There was an error updating an item.",
        });
      }
    });
    router.delete("/", async (req, res) => {
      const itemsService = new ItemsService(collectionName, {
        schema: await getSchema(),
        accountability: req.accountability,
      });
      try {
        await itemsService.deleteMany(req.body);
        res.json({ success: true });
      } catch (error) {
        console.error("Error:", error);
        res.status(500).json({
          success: false,
          message: "There was an error deleting items.",
        });
      }
    });
These two route handlers will handle update and delete operations.
The itemsService CRUD methods expect the data passed as arguments to have a specific structure. We’ll modify the data sent by the Bryntum Grid before it’s added to the SQLite database. We can do this in the route handlers. For this tutorial, we’ll do it on the client side to show how you can do it by configuring the Bryntum Grid AjaxStore.
Modify the Bryntum Grid AjaxStore to sync data changes to the Directus API endpoints
In the main.js file in your Bryntum Grid app, add the following properties to the AjaxStore store variable:
    createUrl: "https://localhost:8055/player_info-api",
    updateUrl: "https://localhost:8055/player_info-api",
    deleteUrl: "https://localhost:8055/player_info-api",
    autoCommit: true,
    useRestfulMethods: true,
    httpMethods: {
      read: "GET",
      create: "POST",
      update: "PATCH",
      delete: "DELETE",
    },
We set the create, update, and delete URLs and HTTP methods for each CRUD operation.
To modify the data sent to our custom Directus API endpoint, we’ll use the beforeRequest event. Add the following listeners property to the AjaxStore configuration:
listeners: {
      // change request body as needed
      beforeRequest: (event) => {
        if (event.action === "create") {
          const newItem = event.body.data;
          delete newItem.id;
          event.body = newItem;
        }
        if (event.action === "update") {
          const updatedItem = event.body.data;
          const itemId = updatedItem.id;
          delete updatedItem.id;
          event.body = updatedItem;
          store.updateUrl = https://localhost:8055/player_info-api/${itemId};
        }
        if (event.action === "delete") {
          const itemIds = event.body.ids;
          event.body = itemIds;
        }
      },
    },
When the AjaxStore sends a request, we listen for the beforeRequest event to modify the data sent in the event.body to match the data structure required by the custom Directus API endpoints for create, update, and delete CRUD operations.
Note that we add the required itemId route parameter for the update operation by modifying the store.updateUrl property.
Add the custom Directus API endpoints to Directus
We need to build the custom endpoint to use it with Directus.
First, stop the Directus app from running by exiting the running Docker container. Do this by pressing Ctrl + C in your terminal.
Next, move into the directory with your custom Directus API endpoint:
cd extensions/directus-extension-endpoint-player_infoNow build the endpoint using the following command:
npm run buildOnce that’s done, move back to your root directory:
cd ../..Now run the following command to stop and remove the containers, networks, and other resources that were created using docker compose up:
docker compose downRun your Directus app again using the following command:
docker compose upOpen https://localhost:5173/ to view your Bryntum Grid, which now has full CRUD functionality.
Next steps
This tutorial covers the basics of using Bryntum Grid with Directus. As a next step, you could add your Bryntum Grid to an app with user roles to take advantage of the Directus Roles and Permissions feature. You could set up your app so that some users can only read the Bryntum Grid data and others can perform specific CRUD operations.
You can also take a look at the Bryntum Grid examples page to see additional features that you can add, such as:
Build it with Bryntum Grid
Start a free trial, explore live demos, or read the docs.