How to use Zustand with Bryntum Gantt in React
We strive to keep posts updated, but code samples may sometimes be outdated. Humans, see the Bryntum documentation; agents, https://mcp.bryntum.com for the latest info.
Bryntum Gantt works with React state management libraries such as Zustand, but because the Gantt engine is framework-agnostic, its rendering lifecycle is independent of React’s. This is important to note if you add custom React components inside Bryntum Gantt components, such as column cells. React state changes in that component don’t cause the cell to re-render.
In this guide, we’ll show you how to make custom React components respond to state changes using Zustand. For readers already using Zustand elsewhere, we’ll also show you how to store task data in a Zustand store.
You can find the code we use in this guide in our GitHub repositories:
- Bryntum Gantt with custom React component in an Assignee column – no re-render
- Bryntum Gantt with custom React component in an Assignee column – no re-render fix using Zustand
- Example Bryntum Gantt with task data in Zustand store with Express and SQLite backend
Prerequisites
To follow along, you need Node.js version 20.19 or later installed on your system.
Creating a Bryntum Gantt with a custom React component in column cells
We’ll build a Bryntum Gantt with an Assignee column that renders an AssigneeBadge React component in each cell. Then, we’ll add buttons to the top of the Gantt for selecting assignees, and style it so that the color of AssigneeBadge React components changes when assignees are selected.
Creating a Vite React TypeScript app
In a terminal, scaffold a new Vite project with the React and TypeScript template:
npm create vite@latest bryntum-gantt-app -- --template react-tsInstall the dependencies and start the dev server:
cd bryntum-gantt-app
npm install
npm run dev
Remove the assets, stylesheet, TypeScript file, and icon that we won’t use:
rm -rf public/icons.svg src/assets src/counter.ts src/index.cssOpen src/main.tsx and remove the import './index.css'; line.
Creating the AssigneeToggle component
We’ll create a component to encapsulate three selector buttons, one per team member.
Create an AssigneeToggle.tsx file in the src folder and add the following code to it:
const TEAM_MEMBERS = ['Alice', 'Bob', 'Charlie'];

const teamColors: Record<string, string> = {
    Alice   : '#6366f1',
    Bob     : '#f59e0b',
    Charlie : '#22c55e'
};

const AssigneeToggle = ({
    selectedMembers,
    onToggleMember
}: {
  selectedMembers: string[];
  onToggleMember: (name: string) => void;
}) => {
    return (
        <div style={{ padding : '16px', borderBottom : '1px solid #e2e8f0' }}>
            <h3 style={{ margin : '0 0 8px 0', fontSize : '0.9em', color : '#64748b' }}>
        Highlight team member tasks:
            </h3>
            <div style={{ display : 'flex', gap : '8px' }}>
                {TEAM_MEMBERS.map((name) => {
                    const isSelected = selectedMembers.includes(name);
                    return (
                        <button
                            key={name}
                            onClick={() => onToggleMember(name)}
                            style={{
                                backgroundColor : isSelected ? teamColors[name] : '#f1f5f9',
                                color           : isSelected ? '#fff' : '#475569',
                                border          : 'none',
                                padding         : '6px 14px',
                                borderRadius    : '6px',
                                cursor          : 'pointer',
                                fontSize        : '0.85em',
                                fontFamily      : 'inherit'
                            }}
                        >
                            {name}
                        </button>
                    );
                })}
            </div>
        </div>
    );
};

export default AssigneeToggle;
The component renders a selector button for each team member. The button’s background turns into that member’s color when the selectedMembers state includes their name, and clicking the button calls onToggleMember state setter, so the parent can add or remove the member from the selection.
Note that Bryntum products come with a wide selection of helper widgets you can use instead of creating your own, such as buttons, popups, date pickers, file pickers, and charts. You can see all the Gantt widgets in our kitchen sink demo.
Installing the Bryntum Gantt component
If you’re using the free trial, install the public Bryntum Gantt trial package and the React wrapper:
npm install @bryntum/gantt@npm:@bryntum/gantt-trial @bryntum/gantt-reactIf you have a Bryntum license, refer to our npm Repository Guide and install the licensed packages:
npm install @bryntum/gantt @bryntum/gantt-reactWe need to customize the Bryntum Task Model to include an assignee field. Create a lib folder in src, create a CustomTaskModel.ts file in it and add the following lines of code:
import { TaskModel } from '@bryntum/gantt';

export default class CustomTaskModel extends TaskModel {
    static $name = 'CustomTaskModel';

    static fields = [
        { name : 'assignee', type : 'string' }
    ];
}
This extends the base Task Model with a custom assignee field. We’ll configure the Gantt to use this custom Task Model.
Creating the AssigneeBadge component
The AssigneeBadge component, which we’ll add inside the Bryntum Gantt assignee column, renders the team member’s name with a colored background when that member is selected.
Create an AssigneeBadge.tsx file in the src folder and add the following code to it:
const teamColors: Record<string, string> = {
    Alice   : '#6366f1',
    Bob     : '#f59e0b',
    Charlie : '#22c55e'
};

const AssigneeBadge = ({
    assignee,
    selectedMembers
}: {
  assignee: string;
  selectedMembers: string[];
}) => {
    const isSelected = selectedMembers.includes(assignee);

    return (
        <span
            style={{
                backgroundColor : isSelected ? teamColors[assignee] : '#e2e8f0',
                color           : isSelected ? '#fff' : '#475569',
                padding         : '2px 8px',
                borderRadius    : '4px',
                fontSize        : '0.8em',
                fontWeight      : isSelected ? 600 : 400,
                transition      : 'all 0.2s'
            }}
        >
            {assignee}
        </span>
    );
};

export default AssigneeBadge;
The component derives isSelected from the selectedMembers prop. It returns a styled span with the assignee’s name, which is colored when that assignee is selected.
Configuring and rendering the Gantt
Replace the contents of src/App.tsx with the following code:
import { type FunctionComponent, useCallback, useRef, useState } from 'react';
import { BryntumGantt, type BryntumGanttProps } from '@bryntum/gantt-react';
import CustomTaskModel from './lib/CustomTaskModel';
import AssigneeBadge from './AssigneeBadge';
import AssigneeToggle from './AssigneeToggle';
import './App.css';

const App: FunctionComponent = () => {
    const gantt = useRef<BryntumGantt>(null);
    const [selectedMembers, setSelectedMembers] = useState<string[]>([]);

    const toggleMember = useCallback((name: string) => {
        setSelectedMembers((prev) =>
            prev.includes(name) ? prev.filter((m) => m !== name) : [...prev, name]
        );
    }, []);

    const [ganttProps] = useState<BryntumGanttProps>({
        startDate  : new Date(2026, 10, 1),
        endDate    : new Date(2026, 11, 1),
        viewPreset : 'weekAndDayLetter',
        barMargin  : 10,

        columns : [
            { type : 'name', field : 'name', width : 300 },
            {
                text     : 'Assignee',
                field    : 'assignee',
                readOnly : true,
                width    : 140,
                renderer : ({ record }: { record: { get: (field: string) => string } }) => {
                    const assignee = record.get('assignee');
                    if (!assignee) return null;
                    return (
                        <AssigneeBadge
                            assignee={assignee}
                            selectedMembers={selectedMembers}
                        />
                    );
                }
            }
        ],

        project : {
            taskModelClass : CustomTaskModel,
            transport      : {
                load : {
                    url : 'data/data.json'
                }
            },
            autoLoad           : true,
            autoSetConstraints : true
        }
    });

    return (
        <div style={{ display : 'flex', flexDirection : 'column', height : '100vh' }}>
            <AssigneeToggle
                selectedMembers={selectedMembers}
                onToggleMember={toggleMember}
            />
            <div style={{ flex : 1 }}>
                <BryntumGantt ref={gantt} {...ganttProps} />
            </div>
        </div>
    );
};

export default App;
Here, we store the Gantt configuration in useState; this ensures that the configuration maintains its reference across re-renders, which means the Gantt config object is re-used. The renderer function closes over selectedMembers. It captures the value of selectedMembers when useState initializes the config, which is the initial render when it’s []. Since useState only runs its initializer once, that captured value is frozen and the badges won’t re-render when selectedMembers changes.
The project loads example data from the data/data.json file (in the public folder) using the built-in transport that configures AJAX requests used by Crud Manager. We use the CustomTaskModel so that the Gantt recognizes the assignee field.
Create a data folder in the public folder and create a data.json file in it. Add the following example data to the data.json file:
{
  "success": "true",
  "tasks": {
    "rows": [
      {
        "id": 1,
        "name": "Documentation Project",
        "expanded": true,
        "children": [
          {
            "id": 2,
            "name": "Preparation",
            "expanded": true,
            "children": [
              { "id": 6, "name": "Proof-read docs", "startDate": "2026-11-02", "endDate": "2026-11-09", "assignee": "Alice" },
              { "id": 3, "name": "Release docs",    "startDate": "2026-11-09", "endDate": "2026-11-10", "assignee": "Bob" }
            ]
          },
          {
            "id": 4,
            "name": "Development",
            "expanded": true,
            "children": [
              { "id": 7, "name": "Write API docs",  "startDate": "2026-11-05", "endDate": "2026-11-12", "assignee": "Alice" },
              { "id": 8, "name": "Write tutorials", "startDate": "2026-11-10", "endDate": "2026-11-16", "assignee": "Charlie" },
              { "id": 9, "name": "Create examples", "startDate": "2026-11-12", "endDate": "2026-11-18", "assignee": "Bob" }
            ]
          },
          {
            "id": 5,
            "name": "Review & Release",
            "expanded": true,
            "children": [
              { "id": 10, "name": "Team review",     "startDate": "2026-11-18", "endDate": "2026-11-20", "assignee": "Charlie" },
              { "id": 11, "name": "Final approval",  "startDate": "2026-11-20", "endDate": "2026-11-21", "assignee": "Alice" },
              { "id": 12, "name": "Public release",  "startDate": "2026-11-22", "endDate": "2026-11-22", "assignee": "Bob" }
            ]
          }
        ]
      }
    ]
  },
  "dependencies": {
    "rows": [
      { "fromTask": 6,  "toTask": 3  },
      { "fromTask": 7,  "toTask": 8  },
      { "fromTask": 8,  "toTask": 9  },
      { "fromTask": 9,  "toTask": 10 },
      { "fromTask": 10, "toTask": 11 },
      { "fromTask": 11, "toTask": 12 }
    ]
  }
}
The file has a tree of tasks grouped under a single "Documentation Project" parent, with dependencies between successive tasks. When autoLoad runs on page load, the Gantt transforms the file into a tree in the task store.
Styling the Bryntum Gantt
Replace the contents of App.css with the following styles:
@import url('https://fonts.googleapis.com/css2?family=Poppins:wght@400;500;600;700&display=swap');
@import "@bryntum/gantt/fontawesome/css/fontawesome.css";
@import "@bryntum/gantt/fontawesome/css/solid.css";
@import "@bryntum/gantt/gantt.css";
@import "@bryntum/gantt/svalbard-light.css";

* {
    margin: 0;
}

body {
    font-family: 'Poppins', 'Segoe UI', Arial, sans-serif;
}
This stylesheet imports the Bryntum Gantt structural CSS, Font Awesome icons, and the Svalbard light theme. The Bryntum Gantt has five themes with light and dark variants.
Understanding state in custom React components inside Bryntum Gantt columns
Run the local development server:
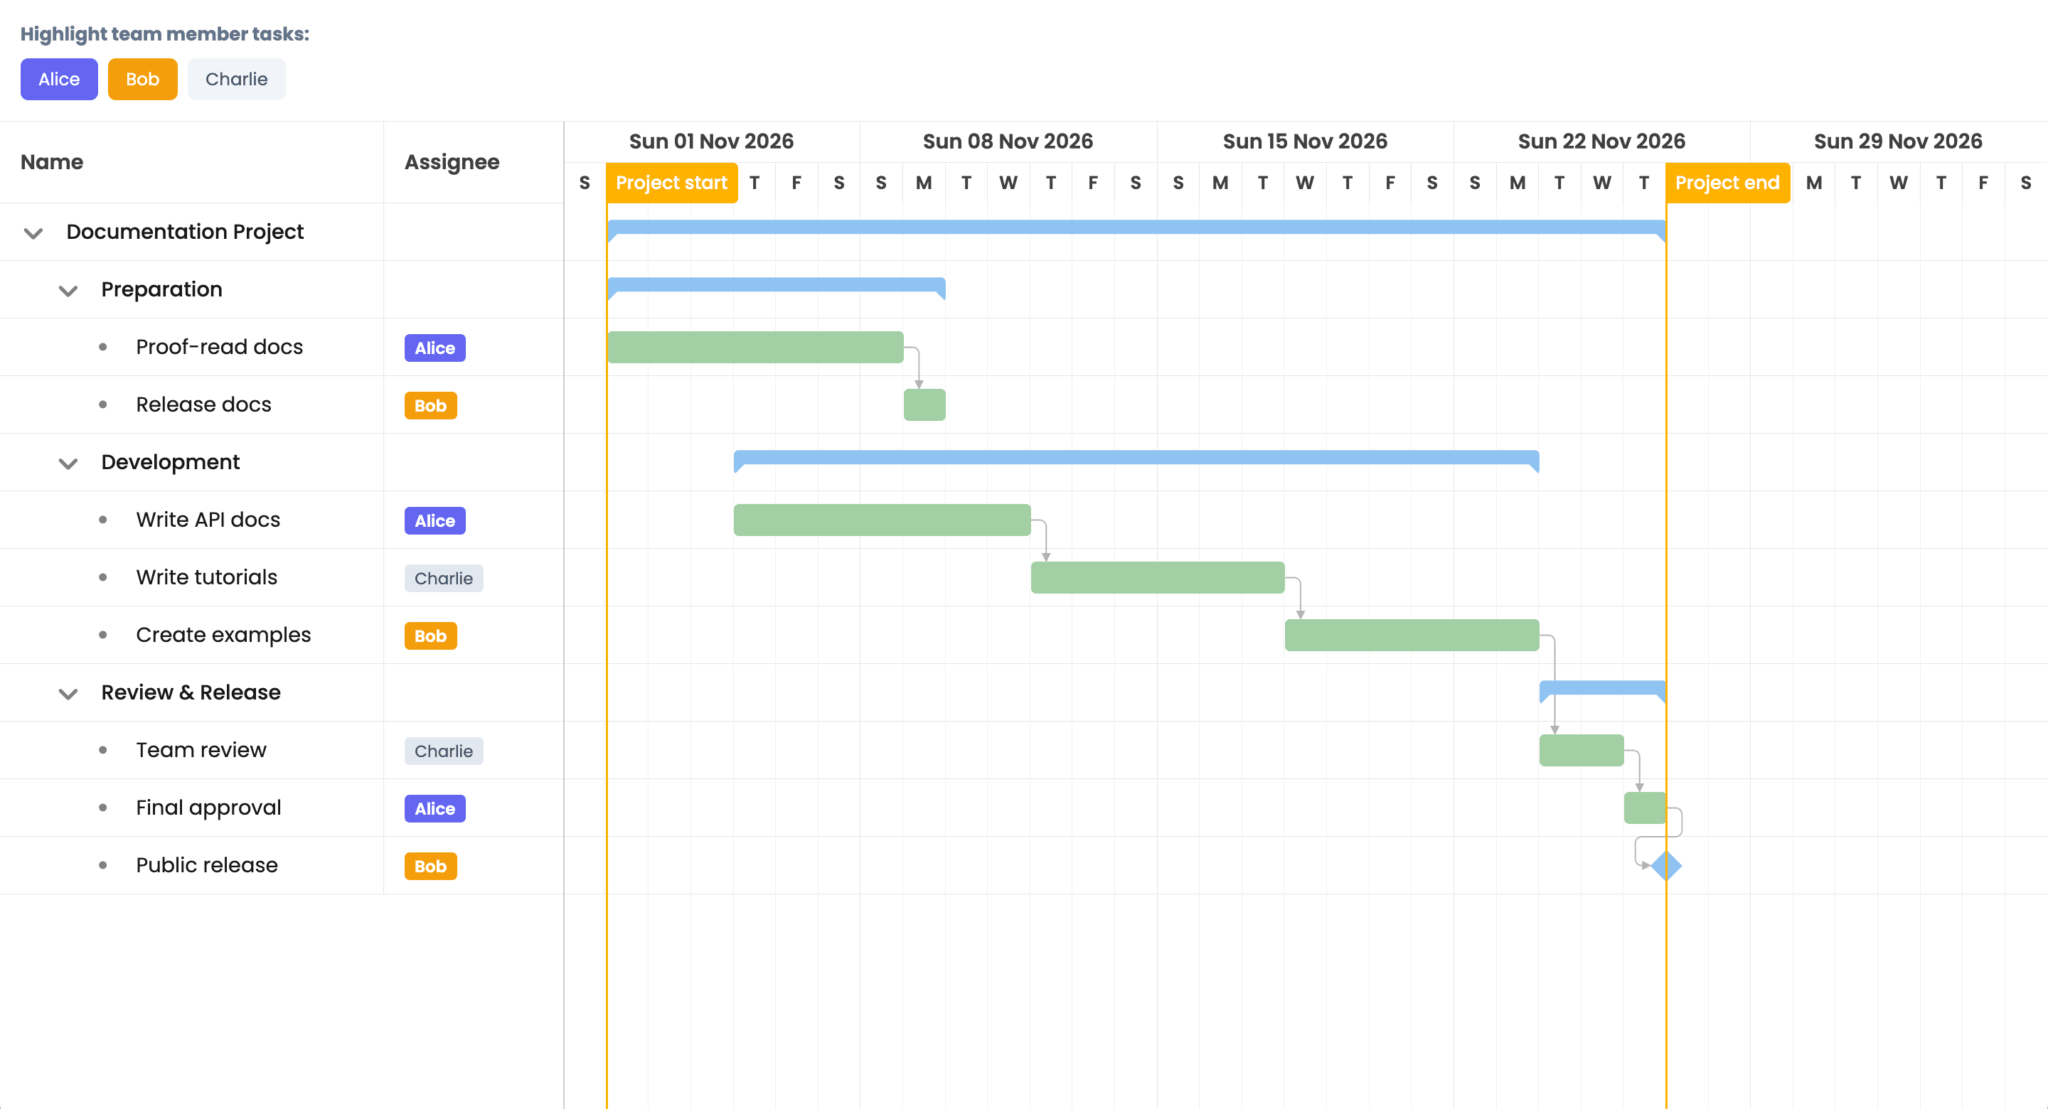
npm run devYou should see a Gantt chart with three assignee selector buttons at the top and assignee badges in the Assignee column:
Note that using the buttons at the top of the Gantt to select assignees doesn’t update the color of the assignee badges in the Assignee column. If you click the assignee selector button labeled Alice (above the Gantt chart), the button turns purple, but the Alice badges in the Gantt remain gray.
This is documented behavior. From the Bryntum Gantt React integration guide:
When rendering custom React components inside Bryntum columns, React state changes (e.g., useState) do not automatically trigger the renderer to re-execute. This means that state updates within your custom component will not cause the cell to re-render.
The Gantt Assignee column renderer captures the selectedMembers state (initially []) when ganttProps is first created, and Bryntum doesn’t re-execute the renderer when selectedMembers changes. So the AssigneeBadge components don’t show new selections.
The docs recommend lifting the shared state into a global store using React Context or a state management library such as Zustand or Redux. Zustand is a lightweight alternative to Redux that’s sufficient for most apps.
Wiring custom components to Zustand
Zustand is a small state management library for React. A Zustand store is a hook that you can use anywhere, and when a store’s state changes, only the components that subscribe to that store will re-render.
Installing Zustand
Install the zustand package:
npm install zustandCreating a Zustand store
Create a store.ts file in the src folder and add the following code to it:
import { create } from 'zustand';

interface TeamStore {
    selectedMembers: string[];
    toggleMember: (name: string) => void;
}

export const useTeamStore = create<TeamStore>((set) => ({
    selectedMembers : [],
    toggleMember    : (name) =>
        set((state) => ({
            selectedMembers : state.selectedMembers.includes(name)
                ? state.selectedMembers.filter((m) => m !== name)
                : [...state.selectedMembers, name]
        }))
}));
Here, we define a store with a selectedMembers state array and a toggleMember action. The create function returns a hook, useTeamStore, which components can use to read and update global state. Specifically, the set function within useTeamStore updates the state.
Subscribing AssigneeBadge to the store
Replace the contents of AssigneeBadge.tsx with the following:
import { useTeamStore } from './store';

const teamColors: Record<string, string> = {
    Alice   : '#6366f1',
    Bob     : '#f59e0b',
    Charlie : '#22c55e'
};

const AssigneeBadge = ({ assignee }: { assignee: string }) => {
    const selectedMembers = useTeamStore((state) => state.selectedMembers);
    const isSelected = selectedMembers.includes(assignee);

    return (
        <span
            style={{
                backgroundColor : isSelected ? teamColors[assignee] : '#e2e8f0',
                color           : isSelected ? '#fff' : '#475569',
                padding         : '2px 8px',
                borderRadius    : '4px',
                fontSize        : '0.8em',
                fontWeight      : isSelected ? 600 : 400,
                transition      : 'all 0.2s'
            }}
        >
            {assignee}
        </span>
    );
};

export default AssigneeBadge;
The AssigneeBadge component no longer needs the selectedMembers prop, because it reads the selection state directly from the Zustand useTeamStore custom hook. Zustand subscribes the component to only the selectedMembers state slice, so the badge re-renders whenever the selection changes.
Subscribing AssigneeToggle to the store
Replace the contents of AssigneeToggle.tsx with the following lines of code:
import { useTeamStore } from './store';

const TEAM_MEMBERS = ['Alice', 'Bob', 'Charlie'];

const teamColors: Record<string, string> = {
    Alice   : '#6366f1',
    Bob     : '#f59e0b',
    Charlie : '#22c55e'
};

const AssigneeToggle = () => {
    const selectedMembers = useTeamStore((state) => state.selectedMembers);
    const toggleMember = useTeamStore((state) => state.toggleMember);

    return (
        <div style={{ padding : '16px', borderBottom : '1px solid #e2e8f0' }}>
            <h3 style={{ margin : '0 0 8px 0', fontSize : '0.9em', color : '#64748b' }}>
        Highlight team member tasks:
            </h3>
            <div style={{ display : 'flex', gap : '8px' }}>
                {TEAM_MEMBERS.map((name) => {
                    const isSelected = selectedMembers.includes(name);
                    return (
                        <button
                            key={name}
                            onClick={() => toggleMember(name)}
                            style={{
                                backgroundColor : isSelected ? teamColors[name] : '#f1f5f9',
                                color           : isSelected ? '#fff' : '#475569',
                                border          : 'none',
                                padding         : '6px 14px',
                                borderRadius    : '6px',
                                cursor          : 'pointer',
                                fontSize        : '0.85em',
                                fontFamily      : 'inherit'
                            }}
                        >
                            {name}
                        </button>
                    );
                })}
            </div>
        </div>
    );
};

export default AssigneeToggle;
The component now gets the state, selectedMembers, and the action, toggleMember, from the Zustand store. The buttons call toggleMember directly, which re-renders the component when the selection changes.
Simplifying App.tsx
With both components talking to the store directly, App.tsx no longer needs to own the selection state or pass state setters to the AssigneeBadge and AssigneeToggle components.
Replace the contents of App.tsx with the following:
import { type FunctionComponent, useRef, useState } from 'react';
import { BryntumGantt, type BryntumGanttProps } from '@bryntum/gantt-react';
import CustomTaskModel from './lib/CustomTaskModel';
import AssigneeBadge from './AssigneeBadge';
import AssigneeToggle from './AssigneeToggle';
import './App.css';

const App: FunctionComponent = () => {
    const gantt = useRef<BryntumGantt>(null);

    const [ganttProps] = useState<BryntumGanttProps>({
        startDate  : new Date(2026, 10, 1),
        endDate    : new Date(2026, 11, 1),
        viewPreset : 'weekAndDayLetter',
        barMargin  : 10,

        columns : [
            { type : 'name', field : 'name', width : 300 },
            {
                text     : 'Assignee',
                field    : 'assignee',
                readOnly : true,
                width    : 140,
                renderer : ({ record }: { record: { get: (field: string) => string } }) => {
                    const assignee = record.get('assignee');
                    if (!assignee) return null;
                    return <AssigneeBadge assignee={assignee} />;
                }
            }
        ],

        project : {
            taskModelClass : CustomTaskModel,
            transport      : {
                load : {
                    url : 'data/data.json'
                }
            },
            autoLoad           : true,
            autoSetConstraints : true
        }
    });

    return (
        <div style={{ display : 'flex', flexDirection : 'column', height : '100vh' }}>
            <AssigneeToggle />
            <div style={{ flex : 1 }}>
                <BryntumGantt ref={gantt} {...ganttProps} />
            </div>
        </div>
    );
};

export default App;
This removes the useState for selectedMembers and the toggleMember callback. AssigneeToggle and AssigneeBadge both use the Zustand store directly, so there’s no prop drilling.
Verifying the updates flow through
Reload the app. Clicking one of the assignee selector buttons should color the matching Assignee column badge in the Bryntum Gantt:
Using Zustand to store Gantt task data
The fix above only covers UI state. If your app already uses Zustand for data that the Gantt can use, such as task data, and has a REST backend, you can configure the Gantt to read from the Zustand store. The snippets below are from an example app you can find in our GitHub repository:
The app also has assignee selector buttons and persists task changes to a local SQLite database:
Setting up the store
The Zustand store holds both the task data and the UI state, with one action per backend endpoint. The addTask action returns the saved task so the caller can read the real backend-assigned ID:
import { create } from 'zustand';

const API_URL = 'http://localhost:1337/api';

interface Task {
  id: number;
  name: string;
  startDate?: string;
  endDate?: string;
  duration?: number;
  percentDone?: number;
  parentId?: number | null;
  expanded?: boolean;
  rollup?: boolean;
  manuallyScheduled?: boolean;
  assignee?: string;
  [key: string]: unknown;
}

interface AppStore {
  // UI state
  selectedMembers: string[];
  toggleMember: (name: string) => void;

  // Task data
  tasks: Task[];
  isLoading: boolean;
  fetchTasks: () => Promise<void>;
  addTask: (task: Partial<Task>) => Promise<Task | undefined>;
  updateTask: (id: number, changes: Partial<Task>) => Promise<void>;
  removeTask: (id: number) => Promise<void>;
}

export const useAppStore = create<AppStore>((set, get) => ({
    // UI state
    selectedMembers : [],
    toggleMember    : (name) =>
        set((state) => ({
            selectedMembers : state.selectedMembers.includes(name)
                ? state.selectedMembers.filter((m) => m !== name)
                : [...state.selectedMembers, name]
        })),

    // Task data
    tasks     : [],
    isLoading : true,

    fetchTasks : async() => {
        try {
            const res = await fetch(`${API_URL}/load`);
            const data = await res.json();
            if (data.success) {
                set({ tasks : data.tasks.rows, isLoading : false });
            }
        }
        catch (error) {
            console.error('Failed to fetch tasks:', error);
            set({ isLoading : false });
        }
    },

    addTask : async(task) => {
        try {
            const res = await fetch(`${API_URL}/tasks`, {
                method  : 'POST',
                headers : { 'Content-Type' : 'application/json' },
                body    : JSON.stringify(task)
            });
            const data = await res.json();
            if (data.success) {
                set((state) => ({ tasks : [...state.tasks, data.task] }));
                return data.task as Task;
            }
        }
        catch (error) {
            console.error('Failed to add task:', error);
        }
        return undefined;
    },

    updateTask : async(id, changes) => {
        try {
            await fetch(`${API_URL}/tasks/${id}`, {
                method  : 'PUT',
                headers : { 'Content-Type' : 'application/json' },
                body    : JSON.stringify(changes)
            });
            set((state) => ({
                tasks : state.tasks.map((t) => (t.id === id ? { ...t, ...changes } : t))
            }));
        }
        catch (error) {
            console.error('Failed to update task:', error);
        }
    },

    removeTask : async(id) => {
        try {
            await fetch(`${API_URL}/tasks/${id}`, { method : 'DELETE' });
            set((state) => ({
                tasks : state.tasks.filter((t) => t.id !== id)
            }));
        }
        catch (error) {
            console.error('Failed to remove task:', error);
        }
    }
}));
Each action calls the backend, waits for the response, catches network errors, and updates local state.
Handing initial tasks to the Gantt once
The Gantt takes its initial data from the Zustand store, but doesn’t re-subscribe on every change. Setting project.tasks = newTasks on every Zustand update would replace the entire task store in Bryntum. Instead, the Gantt reads the current tasks array once, via a useState lazy initializer, and Bryntum manages its own engine state from there.
In App.tsx, the Gantt is rendered once the task’s fetch completes:
const App: FunctionComponent = () => {
    const isLoading = useAppStore((state) => state.isLoading);
    const fetchTasks = useAppStore((state) => state.fetchTasks);

    useEffect(() => {
        fetchTasks();
    }, [fetchTasks]);

    if (isLoading) {
        return <div style={{ padding : 20 }}>Loading...</div>;
    }

    return (
        <div style={{ display : 'flex', flexDirection : 'column', height : '100vh' }}>
            <AssigneeToggle />
            <div style={{ flex : 1 }}>
                <GanttView />
            </div>
        </div>
    );
};
We split the Gantt into a separate GanttView component, and ensure the GanttView only mounts after the data is in the store, so the lazy initializer below reads the populated array.
The GanttView component passes the initial tasks to the task store:
const [ganttProps] = useState<BryntumGanttProps>(() => ({
    viewPreset : 'weekAndDayLetter',
    barMargin  : 10,
    project    : {
        taskModelClass     : CustomTaskModel,
        autoSetConstraints : true,
        taskStore          : {
            transformFlatData : true,
            data              : useAppStore.getState().tasks
        }
    },
    columns : [
        { type : 'name', field : 'name', width : 360 },
        {
            text     : 'Assignee',
            field    : 'assignee',
            width    : 140,
            renderer : ({ record }: { record: { get: (field: string) => string } }) => {
                const assignee = record.get('assignee');
                if (!assignee) return null;
                return <AssigneeBadge assignee={assignee} />;
            }
        },
        { type : 'startdate', field : 'startDate', text : 'Start Date' },
        { type : 'enddate', field : 'endDate', text : 'End Date' },
        { type : 'percentdone', field : 'percentDone', text : '% Done', width : 100 }
    ]
}));
Here we use the useState(() => …) form of the initializer because it runs once on mount. Calling useAppStore.getState() reads the current state without subscribing, so the Gantt gets the tasks as they are at that moment and never sees later updates.
Syncing Gantt edits back through Zustand
The Gantt’s dataChange event syncs Gantt edits to the Express backend. When the user adds, edits, or deletes a task in the UI, the event fires with an action and the affected records, and the handler calls the Zustand CRUD actions to perform the API requests:
...

const addTask = useAppStore((state) => state.addTask);

...

const handleDataChange = useCallback(
    (event: {
      store: { id: string };
      action: string;
      records: { id: number | string; data: Record<string, unknown> }[];
      isExpand?: boolean;
      isCollapse?: boolean;
    }) => {
        if (event.store.id !== 'tasks') return;
        if (event.isExpand || event.isCollapse) return;

        const { action, records } = event;

        const toBackendParentId = (value: unknown): number | null =>
            typeof value === 'number' ? value : null;

        for (const record of records) {
            const data = record.data;
            const id = record.id;
            const isPhantom = typeof id === 'string' && id.startsWith('_generated');

            switch (action) {
                case 'add':
                    if (isPhantom) {
                        addTask({
                            name        : data.name as string,
                            startDate   : toDateString(data.startDate),
                            endDate     : toDateString(data.endDate),
                            duration    : data.duration as number,
                            percentDone : data.percentDone as number,
                            parentId    : toBackendParentId(data.parentId),
                            assignee    : data.assignee as string
                        }).then((newTask) => {
                            if (newTask?.id && gantt.current?.instance) {
                                gantt.current.instance.project.taskStore.applyChangeset({
                                    updated : [{ $PhantomId : id, id : newTask.id }]
                                });
                            }
                        });
                    }
...
The snippet above shows the add case, including the phantom-ID swap that replaces Bryntum’s client-generated ID with the backend-assigned one.
When not to use this pattern
The store-as-data-source pattern works well if you already use Zustand for the rest of your app, but it has trade-offs:
- One-way binding at mount only: External Zustand updates (from WebSocket, a refetch, or another page) don’t flow into the Gantt. To go fully bidirectional, diff the new tasks against the Gantt’s
taskStorewithapplyChangeset. - Duplicated data: This method stores the same tasks in Zustand and in Bryntum’s project and leaves you responsible for keeping them in sync.
For most cases, Bryntum’s built-in CrudManager is a better choice for handling data fetching and syncing.
Next steps
As a rule of thumb, reach for Zustand for UI state (selections, filters, view toggles) and other app state stored outside the Gantt. Let Bryntum manage the task data itself through its built-in stores (such as the taskStore) and CrudManager.
Using a store as a data source is useful when you already have a Zustand-backed API layer and want to reuse it, but Bryntum’s built-in approaches are simpler if you’re starting fresh.