How to connect and sync a React Bryntum Calendar to a Microsoft Outlook Calendar
Bryntum Calendar is a feature-rich, responsive, and fully customizable calendar component built with vanilla JavaScript. It easily integrates with React, Angular, and Vue applications.
This guide demonstrates how to sync Bryntum Calendar with Microsoft Outlook Calendar by:
- Creating a React Bryntum Calendar app.
- Creating a Microsoft Entra app to access the Microsoft Graph API.
- Authenticating users in the React app using the Microsoft Authentication Library (MSAL) for React.
- Using Microsoft Graph to get the user’s Microsoft Outlook Calendar events.
- Syncing event changes in the Bryntum Calendar with the user’s Microsoft Outlook Calendar.
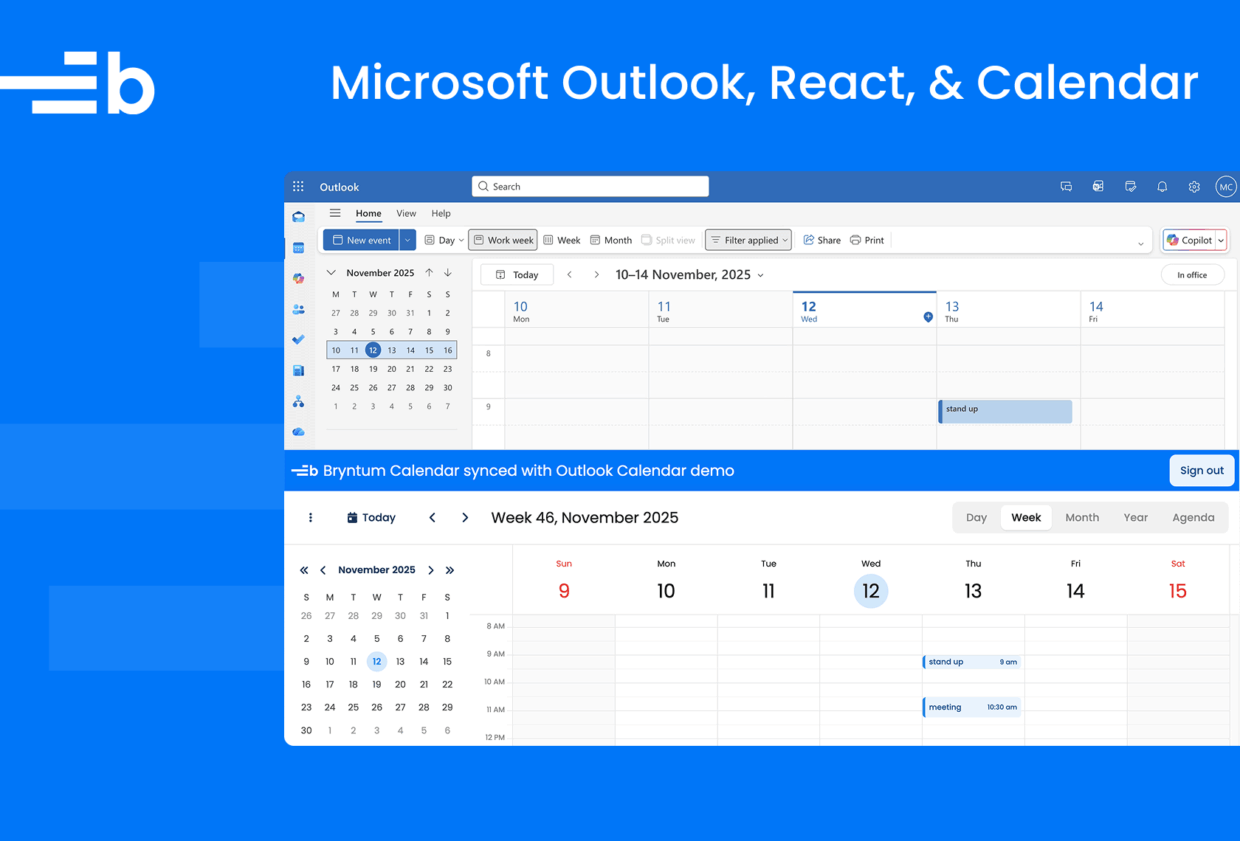
Once you’ve followed this guide, you’ll be able to sync your Bryntum Calendar and Outlook Calendar, as shown below.
⚠️ To learn how to build a simpler vanilla JavaScript version of the app, consult our previous guide to connecting and syncing Bryntum Calendar to a Microsoft Outlook Calendar.
Getting started
Clone the GitHub starter repository, which we’ll use as the initial template for our app.
If you want to consult the final code, you can find the Bryntum Calendar app that syncs with Outlook Calendar on the completed-calendar branch of this repository.
The starter template is a React TypeScript app that uses the development server and bundler, Vite.
After cloning the app, install the dependencies:
npm installRun the local development server using the following command:
npm run devYou’ll see a blue header with the title Bryntum Calendar synced with Outlook Calendar demo and text reading TODO rendered below the header.
Creating a Bryntum Calendar React component
First, let’s install the Bryntum Calendar component.
If you’re using the free trial, install the public Bryntum trial packages:
npm install @bryntum/calendar@npm:@bryntum/calendar-trial @bryntum/calendar-reactIf you have a Bryntum license, refer to our npm Repository Guide and install the licensed packages:
npm install @bryntum/calendar @bryntum/calendar-reactNow let’s create a basic Bryntum Calendar component.
Add the following imports to the top of the src/css/index.css
@import "@bryntum/calendar/fontawesome/css/fontawesome.css";
@import "@bryntum/calendar/fontawesome/css/solid.css";
@import "@bryntum/calendar/calendar.css";
@import "@bryntum/calendar/svalbard-light.css";
We imported the Bryntum Calendar and the CSS for the Svalbard light theme, which is one of the four available themes with light and dark variants. The structural CSS and themes have separate imports. You can also create custom themes. You can read more about styling the calendar here.
Create a calendarConfig.ts file in your src folder and add the following lines of code to it:
import { BryntumCalendarProps } from '@bryntum/calendar-react';

export function createCalendarConfig(): BryntumCalendarProps {
    return {
        mode             : 'week',
        eventEditFeature : {
            items : {
                nameField : {
                    required : true
                },
                resourceField   : null,
                recurrenceCombo : null
            }
        }
    };
}
This function creates a Bryntum Calendar config object. We use the EventEdit feature to customize the event editor fields. We set the event Name as a required field and remove the Resource and Recurrence fields, which we won’t use in this tutorial.
Add the following imports to the src/components/Calendar.tsx file:
import { useRef } from 'react';
import { BryntumCalendar } from '@bryntum/calendar-react';
import { createCalendarConfig } from '../calendarConfig';
Add the following ref and create the calendarProps in the Calendar component:
const calendarRef = useRef(null);
const calendarProps = createCalendarConfig();
Next, replace the rendered TODO text with the BryntumCalendar component:
- TODO
+ <BryntumCalendar ref={calendarRef} {...calendarProps} />
Now run the local dev server using the following command:
npm run devOpen https://localhost:5173. You should see an empty Bryntum Calendar:
Next, let’s set up authentication in our Bryntum Calendar React app so that we can access our Microsoft Outlook Calendar data.
Creating a Microsoft Entra app
We’ll use Microsoft Graph to access the user’s Outlook calendar data. The Microsoft Graph API is a single endpoint, https://graph.microsoft.com, that provides access to the Microsoft data cloud, including Microsoft 365 data.
We need an access token to use the API. Let’s create one using Microsoft Entra ID, the integrated cloud identity and access solution that was previously named Azure Active Directory.
To use Microsoft Entra ID, you’ll need a Microsoft 365 Developer Program account or an Entra ID account. Check whether you qualify for a Developer Program subscription. If you don’t qualify for the Microsoft 365 developer program, you can sign up for a Microsoft 365 Business Premium trial to get a Microsoft 365 tenant.
Let’s create a Microsoft Entra app in the Microsoft Entra admin center:
- Sign in to Microsoft Entra using your Microsoft 365 Developer Program or Azure email address.
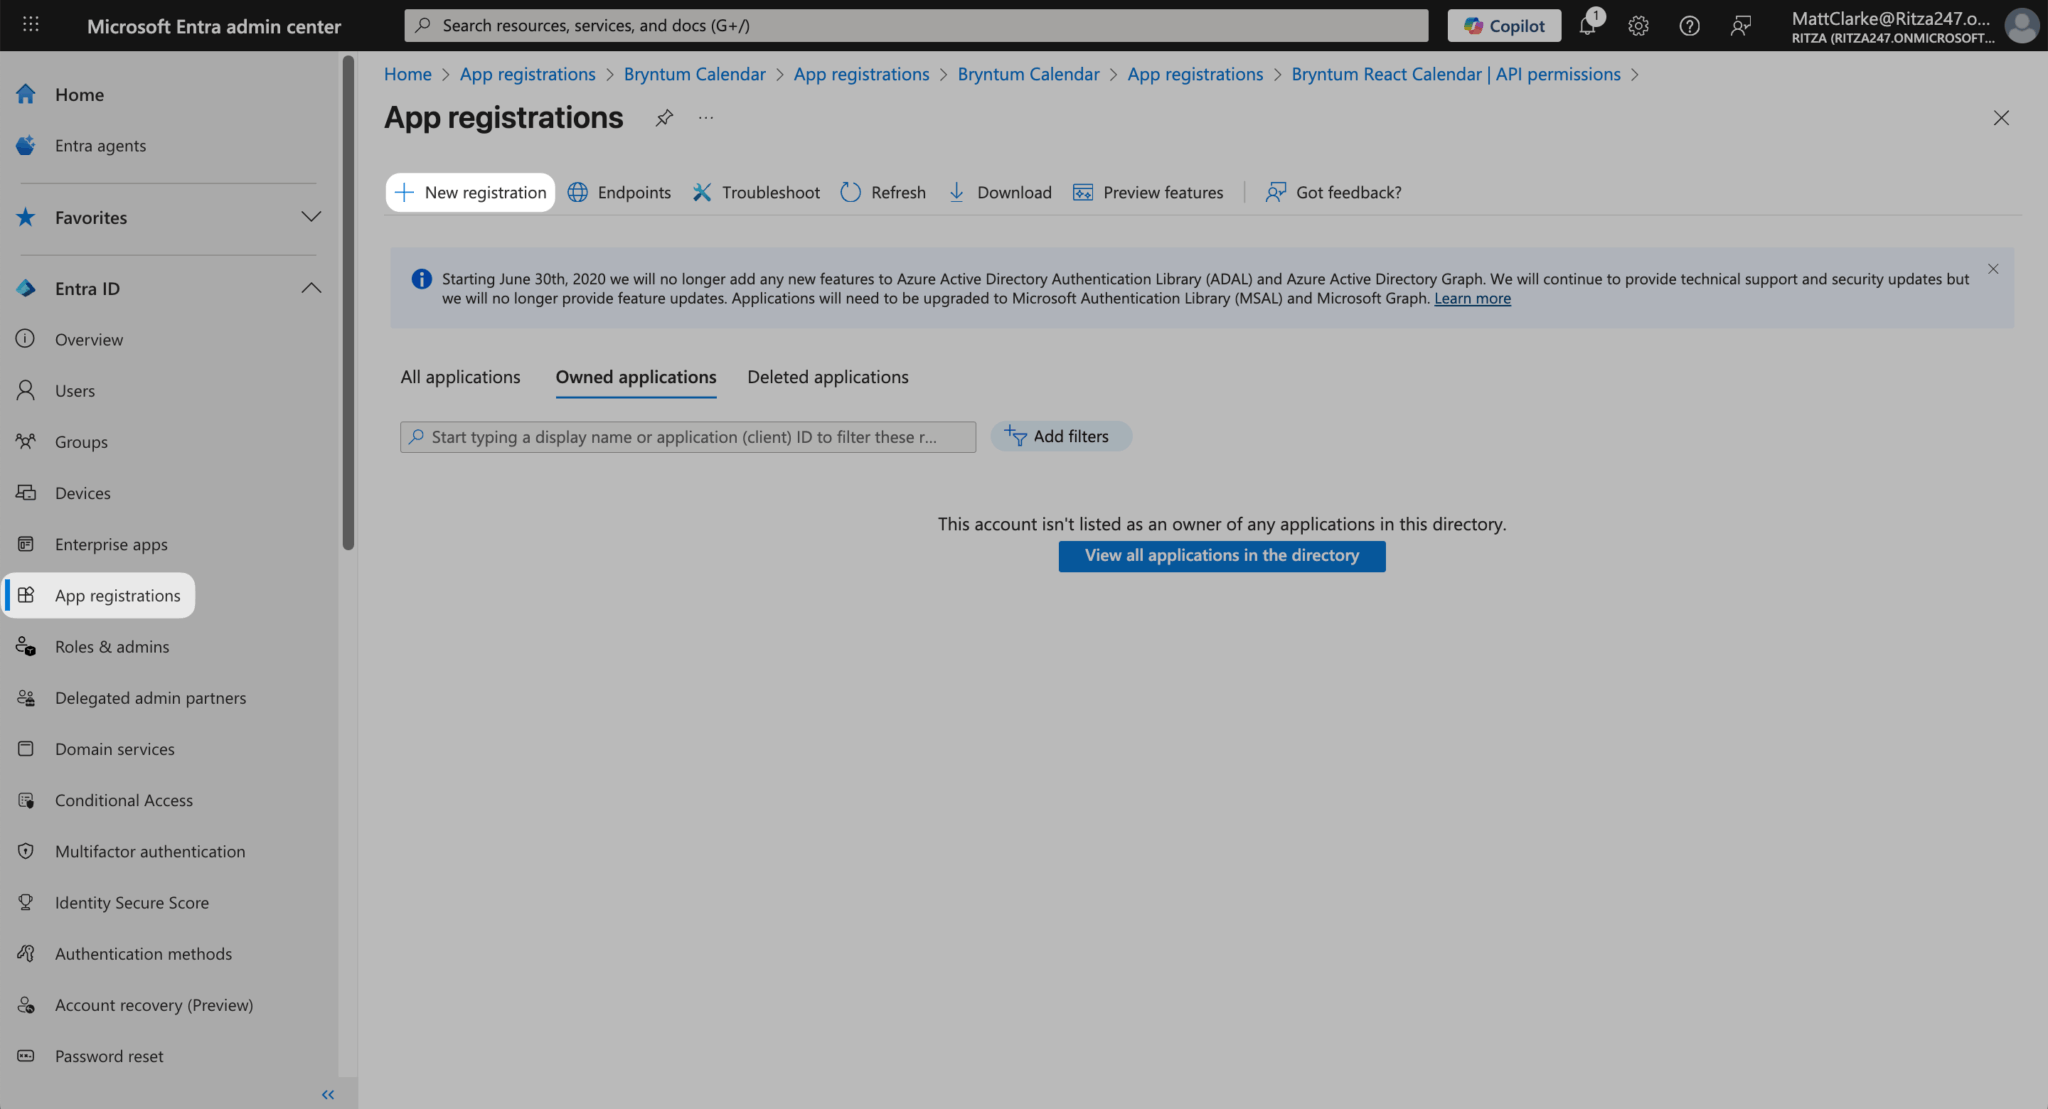
- In the left-hand navigation menu, select App registrations.
- Click the New registration button to create a new app registration.
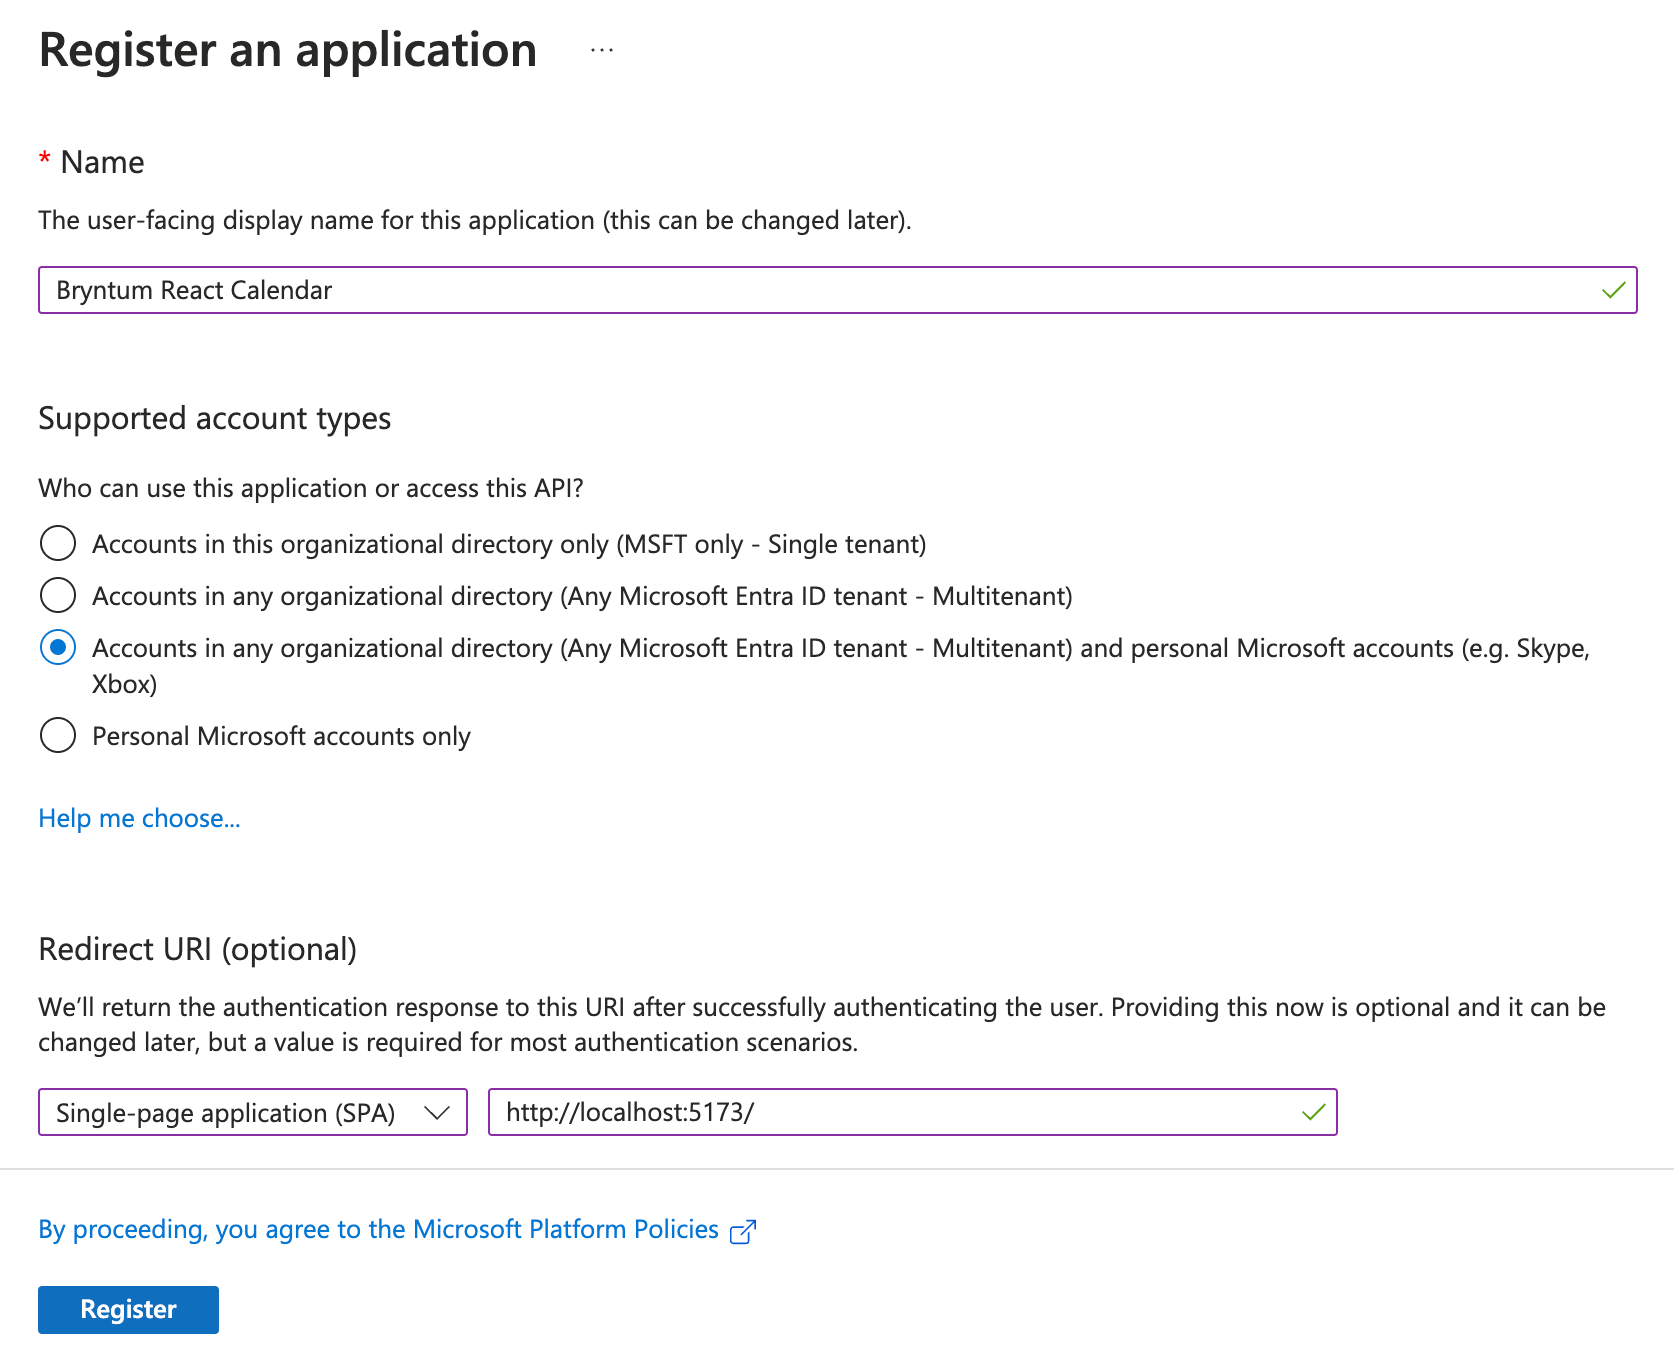
- Name your app.
- Under Supported account types select Accounts in any organizational directory (Any Microsoft Entra ID tenant – Multitenant) and personal Microsoft accounts (e.g. Skype, Xbox)
- Set the Redirect URI to
https://localhost:5173and select Single-page application (SPA). - Check that you agree with the Microsoft identity platform for developers Terms of Use and then click the Register button.
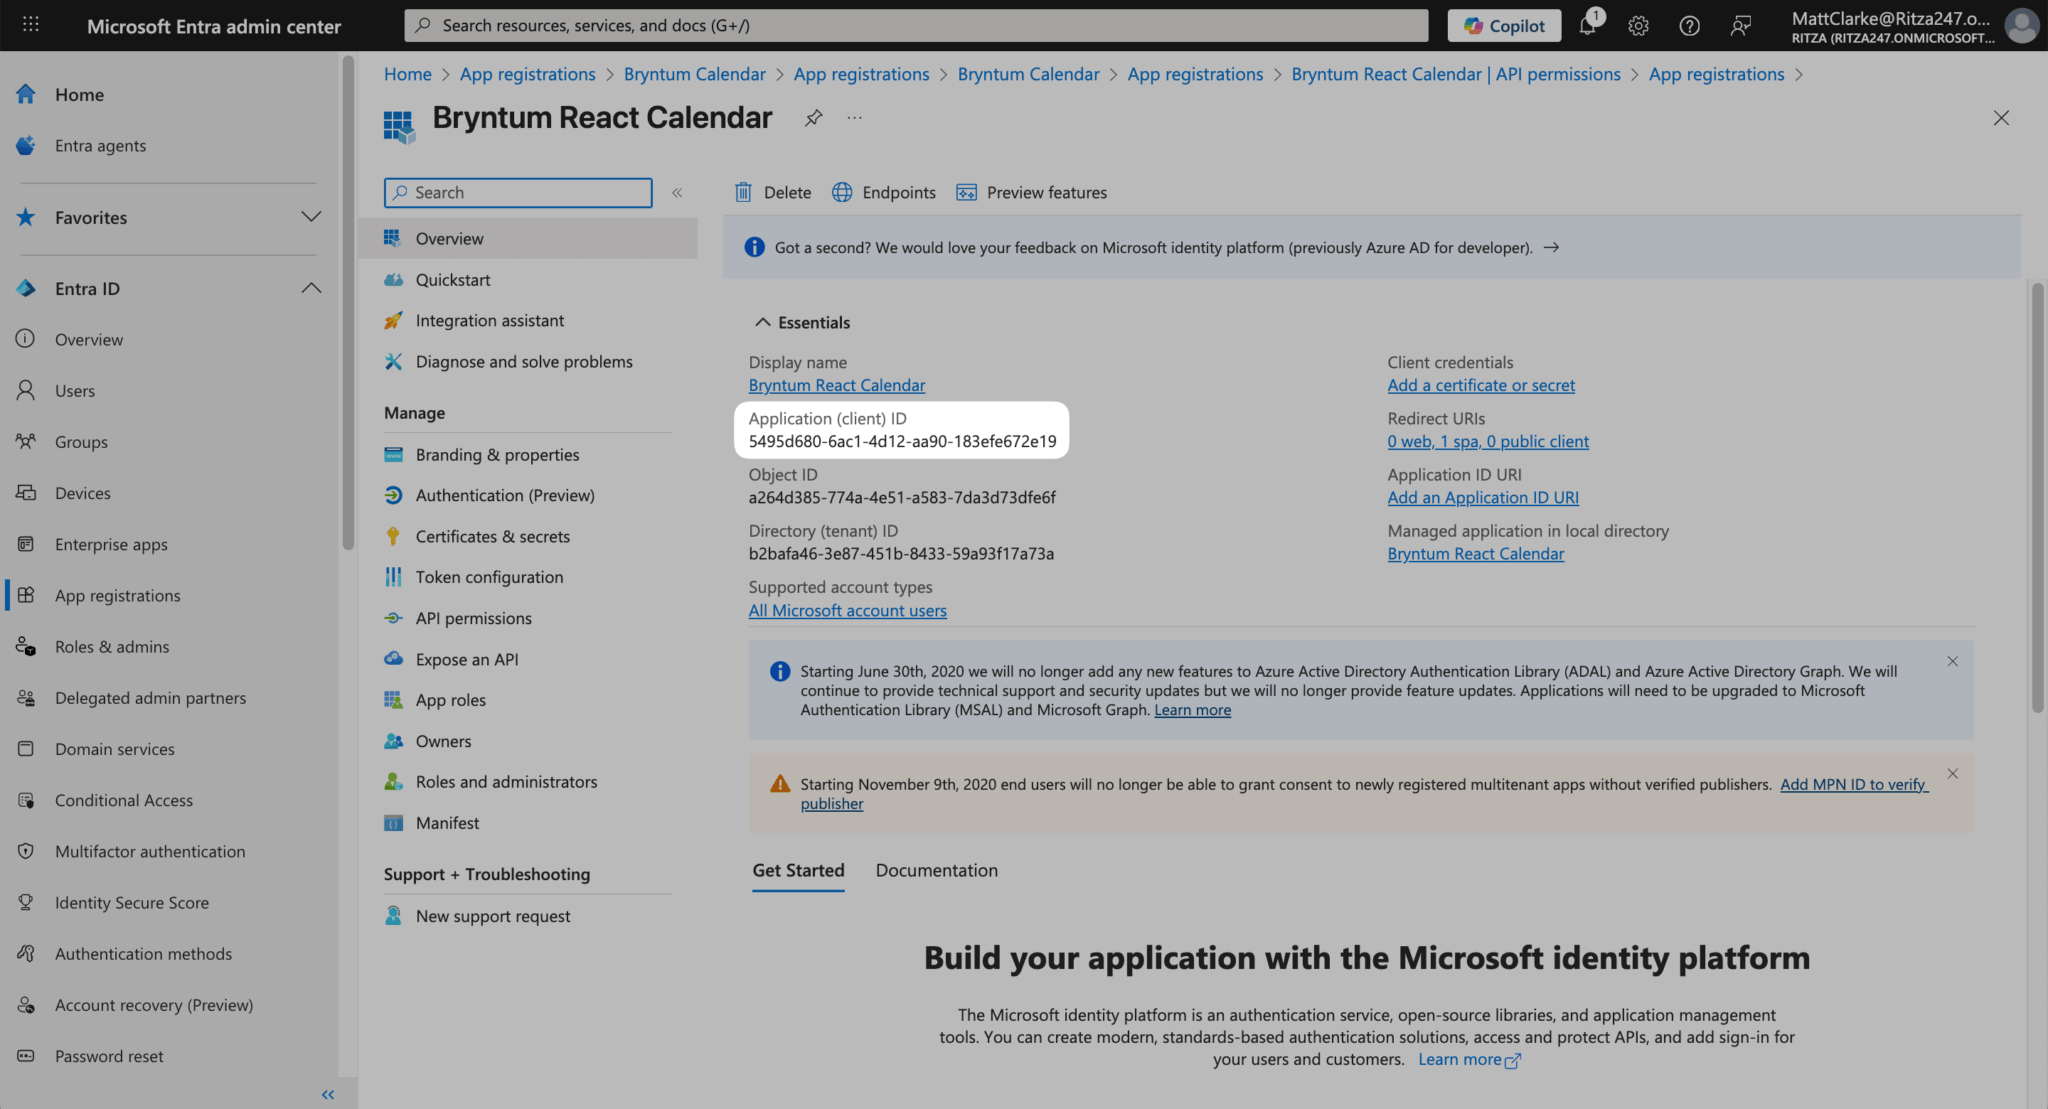
- After registering your application, take note of the Application (client) ID, which you’ll use for authentication in the React Bryntum Calendar app.
Next, we’ll configure the API permissions in the Microsoft Entra admin center.
- Navigate to API permissions in the Bryntum React Calendar menu (to the right of the navigation menu). You’ll see that the
User.Readpermission for the Microsoft Graph API (which gives the app permission to sign in and read the user’s profile) has been configured:
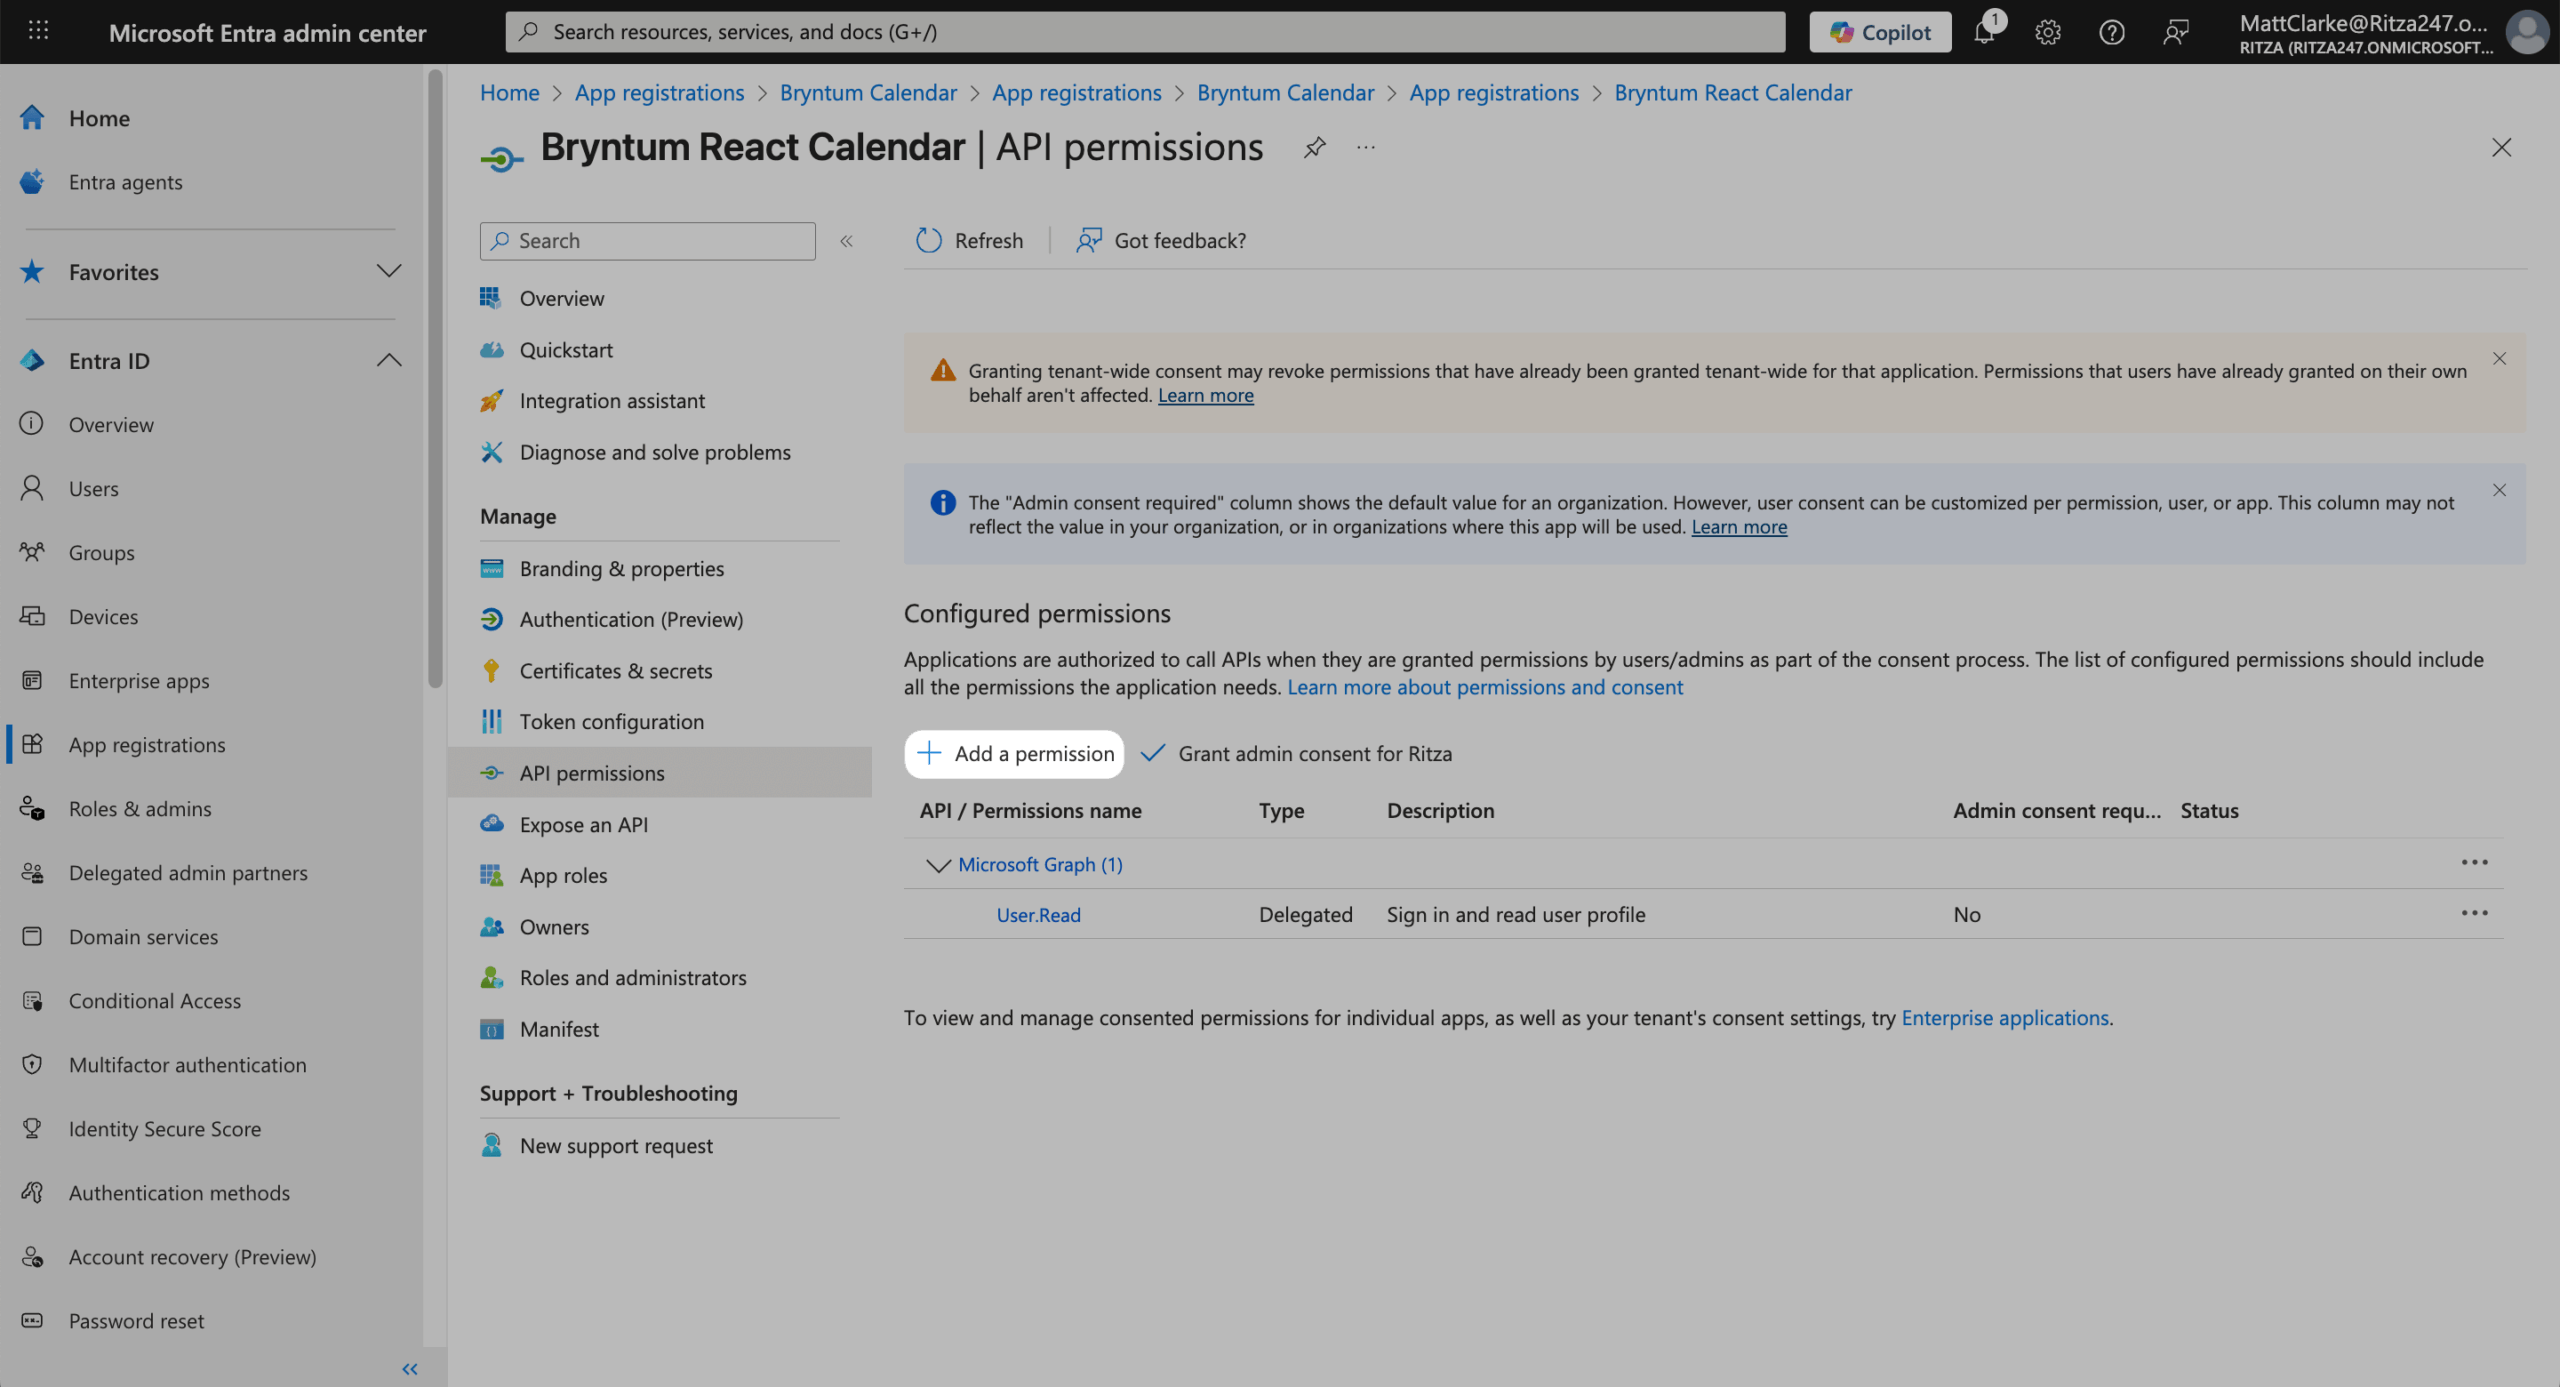
- Click the Add a permission button.
- In the Select an API section, choose Microsoft Graph and then select Delegated permissions, which means that your app needs access to the API for signed-in users.
- Under Select permissions choose the following permissions:
Calendars.ReadWriteprovides full access to user calendars.MailboxSettings.Readgives read access to users’ mailbox settings.offline_accessmaintains access to data you’ve given it access to.openidsigns users in.profileis used to view the user’s basic profile.
- Finally, click the Add permissions button to save your changes.

Authenticating users with the Microsoft Entra app and MSAL React
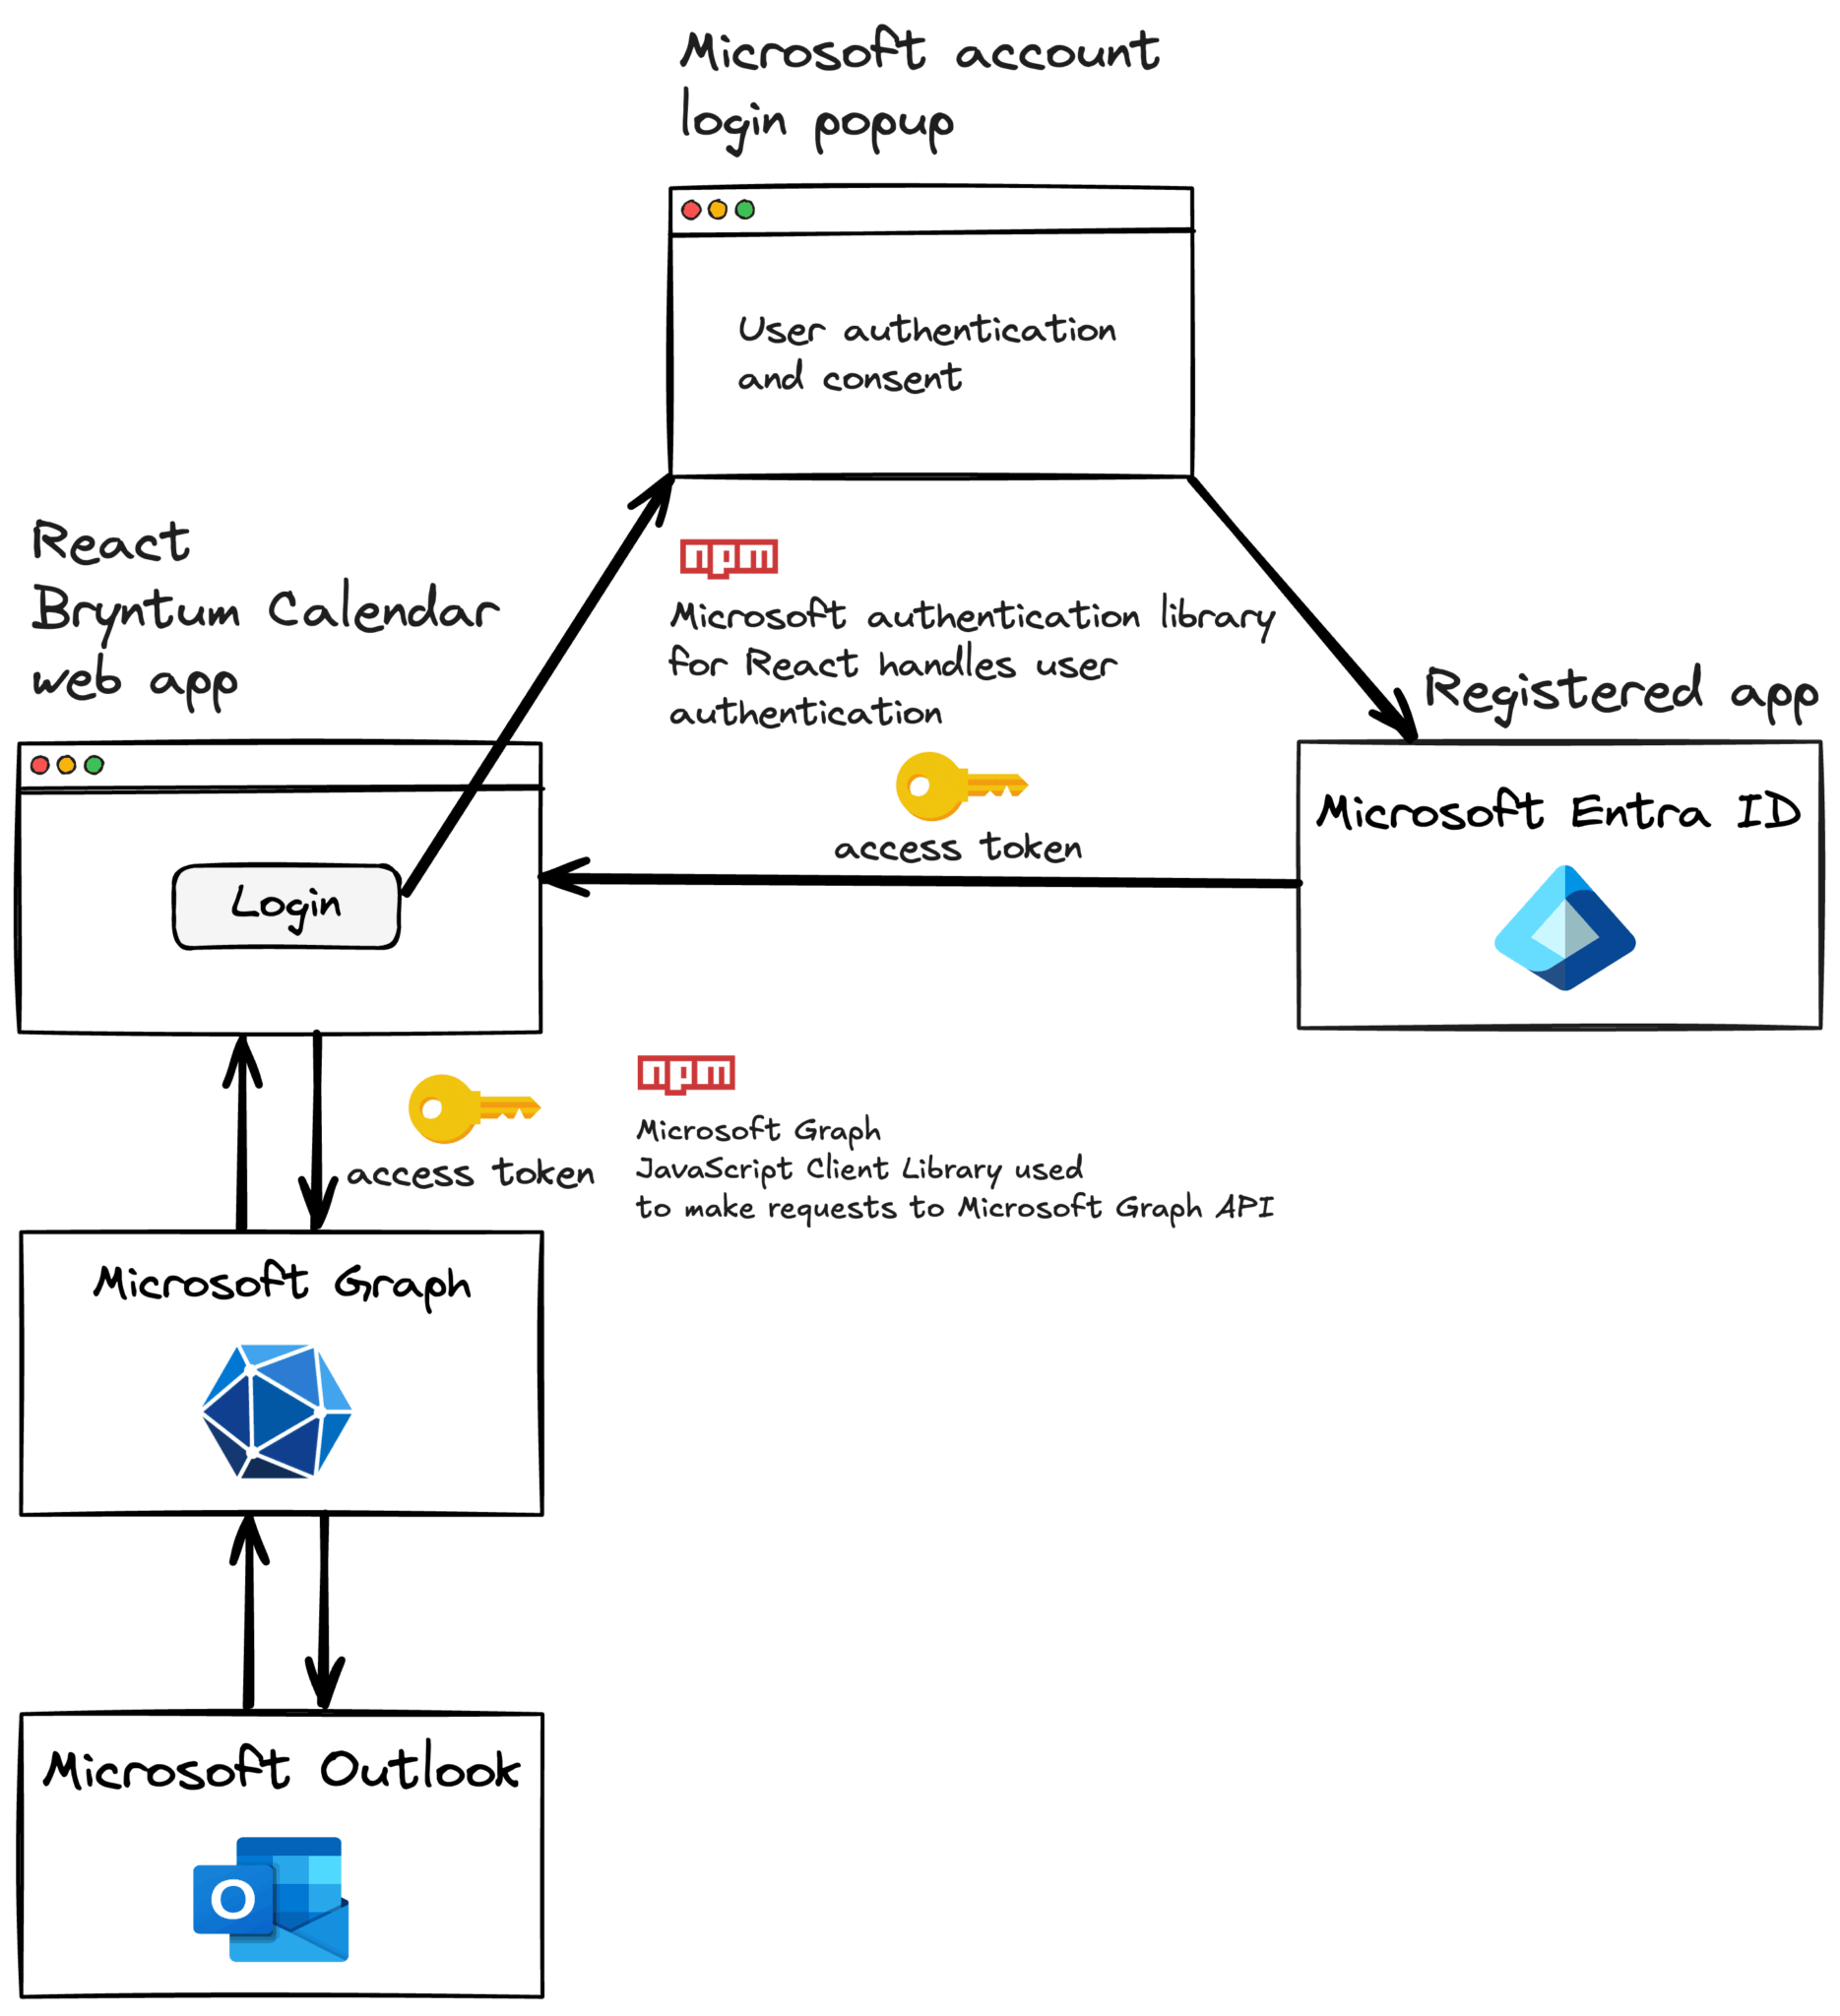
The following diagram outlines how we’ll access the user’s Microsoft Outlook Calendar data from the React Bryntum Calendar app. We’ll create a Microsoft login button, which uses the Microsoft Authentication Library for React (MSAL React) and the Microsoft Entra app to authenticate the user account. Once authenticated, an access token is returned by Microsoft Entra ID. This access token gives the app access to Microsoft Outlook via the Microsoft Graph API.
Create a .env file in the root folder of your React Bryntum app and add the following variables to it:
VITE_MS_CLIENT_ID="your Application (client) ID"
VITE_MS_REDIRECT_URI="https://localhost:5173/"
Add the Application (client) ID of your Microsoft Entra app (which you noted in the previous section).
Now install MSAL React:
npm i @azure/msal-reactThis library enables client-side React apps to authenticate users using Microsoft Entra ID.
Initializing MSAL React
Create an msalConfig.ts file in the src folder and add the following object to it:
const msalConfig = {
    appId       : import.meta.env.VITE_MS_CLIENT_ID,
    redirectUri : import.meta.env.VITE_MS_REDIRECT_URI,
    scopes      : [
        'user.read',
        'mailboxsettings.read',
        'calendars.readwrite'
    ]
};

export default msalConfig;
This MSAL React configuration sets the Microsoft Entra app information and required scopes.
Replace the code in the src/main.tsx file with the following lines of code:
import { StrictMode } from 'react';
import { createRoot } from 'react-dom/client';

import {
    PublicClientApplication,
    EventType,
    EventMessage,
    AuthenticationResult
} from '@azure/msal-browser';

import config from './msalConfig';
import App from './components/App';
import './css/index.css';


const msalInstance = new PublicClientApplication({
    auth : {
        clientId    : config.appId,
        redirectUri : config.redirectUri
    },
    cache : {
        cacheLocation          : 'sessionStorage',
        storeAuthStateInCookie : true
    }
});

// Initialize MSAL and then render the app
msalInstance.initialize().then(() => {
    // Check if there are already accounts in the browser session
    // If so, set the first account as the active account
    const accounts = msalInstance.getAllAccounts();
    if (accounts && accounts.length > 0) {
        msalInstance.setActiveAccount(accounts[0]);
    }

    msalInstance.addEventCallback((event: EventMessage) => {
        if (event.eventType === EventType.LOGIN_SUCCESS && event.payload) {
            // Set the active account - this simplifies token acquisition
            const authResult = event.payload as AuthenticationResult;
            msalInstance.setActiveAccount(authResult.account);
        }
    });

    createRoot(document.getElementById('root') as HTMLElement).render(
        <StrictMode>
            <App pca={msalInstance} />
        </StrictMode>
    );
}).catch(error => {
    console.error('MSAL Initialization Error:', error);
});
MSAL React uses the @azure/msal-browser package as a peer dependency to enable authentication in JavaScript single-page apps without needing a backend server. The library uses the OAuth 2.0 Authorization Code Flow with PKCE.
In the above code, we create and initialize an MSAL public client application instance and pass it as a prop to the App component. The access token is stored in session storage. It’s valid for 60-90 minutes (you can override the default access token lifetime variation by configuring the token lifetime).
Once the instance is initialized, we check whether the user is currently logged in and set the active account. We also add an event callback that sets the active account after the user logs in.
Now replace the code in the src/components/App.tsx file with the following code:
import React from 'react';
import { MsalProvider } from '@azure/msal-react';
import { IPublicClientApplication } from '@azure/msal-browser';

import Calendar from './Calendar';
import '../css/App.css';

type AppProps = {
  pca: IPublicClientApplication
};

export default function App({ pca }: AppProps): React.JSX.Element {
    return (
        <MsalProvider instance={pca}>
            <Calendar />
        </MsalProvider>
    );
}
MSAL React is built on the React context API. Every part of your app that requires authentication (the Calendar component in our case) must be wrapped in the MsalProvider component. All components wrapped in the MsalProvider have access to the PublicClientApplication instance via context, as well as to all the hooks and components provided by MSAL React.
Using Microsoft Graph to get user data
Install the following libraries:
npm i @microsoft/microsoft-graph-client @microsoft/microsoft-graph-typesThe Microsoft Graph JavaScript client library is a wrapper for the Microsoft Graph API that can be used server-side and in the browser. Let’s use it to get the user’s profile data.
In the src folder, create a graphService.ts file for functions that call the Microsoft Graph API and add the following lines of code to it:
import { Client } from '@microsoft/microsoft-graph-client';
import { AuthCodeMSALBrowserAuthenticationProvider } from '@microsoft/microsoft-graph-client/authProviders/authCodeMsalBrowser';

import { User } from '@microsoft/microsoft-graph-types';

let graphClient: Client | undefined = undefined;

function ensureClient(authProvider: AuthCodeMSALBrowserAuthenticationProvider) {
    if (!graphClient) {
        graphClient = Client.initWithMiddleware({
            authProvider : authProvider
        });
   }
    return graphClient;
}

export async function getUser(authProvider: AuthCodeMSALBrowserAuthenticationProvider): Promise<User> {
    ensureClient(authProvider);

    // Return the /me API endpoint result as a User object
    const user: User = await graphClient!.api('/me')
        // Only retrieve the specific fields needed
        .select('displayName,mail,mailboxSettings,userPrincipalName')
        .get();
    return user;
}
The getUser function fetches some basic user data.
Managing authentication and app state using React context
Let’s use React context to store user state and handle the login and logout functionality of our app.
Create an AppContext.tsx file in the src folder and add the following lines of code to it:
import React, { useContext, createContext } from 'react';
import { AuthCodeMSALBrowserAuthenticationProvider } from '@microsoft/microsoft-graph-client/authProviders/authCodeMsalBrowser';

export interface AppUser {
    displayName?: string,
    email?: string,
    avatar?: string,
    timeZone?: string,
    timeFormat?: string
};

export interface AppError {
    message: string,
    debug?: string
};

type AppContext = {
    user?: AppUser;
    error?: AppError;
    signIn?: () => Promise<void>;
    signOut?: () => Promise<void>;
    displayError?: Function;
    clearError?: Function;
    authProvider?: AuthCodeMSALBrowserAuthenticationProvider;
    isLoading?: boolean;
}

interface ProvideAppContextProps {
    children: React.ReactNode;
}
Here, we define the TypeScript types and interfaces that we’ll need.
Next, create the app context for authentication with the following initial values:
const appContext = createContext<AppContext>({
    user         : undefined,
    error        : undefined,
    signIn       : undefined,
    signOut      : undefined,
    displayError : undefined,
    clearError   : undefined,
    authProvider : undefined,
    isLoading    : false
});
Create a custom hook to read the context:
export function useAppContext(): AppContext {
    return useContext(appContext);
}
Create a provider component for the appContext:
export default function ProvideAppContext({ children }: ProvideAppContextProps) {
    const auth = useProvideAppContext();
    return (
        <appContext.Provider value={auth}>
            {children}
        </appContext.Provider>
    );
}
This provider component uses another custom hook that returns auth values.
Define this custom hook as follows:
function useProvideAppContext() {
    const msal = useMsal();
    const [user, setUser] = useState<AppUser | undefined>(undefined);
    const [error, setError] = useState<AppError | undefined>(undefined);
    const [isLoading, setIsLoading] = useState(true);
    const initialFetchDone = useRef(false);

    return {
        user,
        error,
        signIn,
        signOut,
        displayError,
        clearError,
        authProvider,
        isLoading
    };
}
The useMsal hook returns the public client application instance, an array of all the accounts currently signed in, and an inProgress value that tells you what MSAL is currently doing.
Add the following imports:
import { useState, useRef } from 'react';
import { useMsal } from '@azure/msal-react';
Add the following functions to the useProvideAppContext custom hook:
const displayError = (message: string, debug?: string) => {
    setError({ message, debug });
};

const clearError = () => {
    setError(undefined);
};
These functions are used to display an error message to the user.
Add the following authProvider below the clearError function:
// Used by the Graph SDK to authenticate API calls
const authProvider = useMemo(() => new AuthCodeMSALBrowserAuthenticationProvider(
    msal.instance as PublicClientApplication,
    {
        account         : msal.instance.getActiveAccount()!,
        scopes          : msalConfig.scopes,
        interactionType : InteractionType.Popup
    }
), [msal.instance]);
We’ll pass this authProvider to all of the functions in graphService.ts to authenticate API calls.
Add the following imports:
import { useMemo, useEffect } from 'react';
import { InteractionType, PublicClientApplication } from '@azure/msal-browser';
import msalConfig from './msalConfig';
import { getUser } from './graphService';
Add the following effect below the authProvider:
useEffect(() => {
    const checkUser = async() => {
        if (!user) {
            if (initialFetchDone.current) return;
        try {
            // Check if user is already signed in
            const account = msal.instance.getActiveAccount();
            if (account) {
                initialFetchDone.current = true;
                // Get the user from Microsoft Graph
                const user = await getUser(authProvider);
                setUser({
                    displayName : user.displayName || '',
                    email       : user.mail || user.userPrincipalName || '',
                    timeFormat  : user.mailboxSettings?.timeFormat || 'h:mm a',
                    timeZone    : user.mailboxSettings?.timeZone || 'UTC'
                });
            }
          }
          catch (err: any) {
              displayError(err.message);
          }
          finally {
              setIsLoading(false);
          }
      }
      else {
          setIsLoading(false);
      }
    };
    checkUser();
}, [authProvider, msal.instance, user]);
This effect runs on page load and adds the user’s basic info to the user state variable if they have an active session.
Add the following signIn function below the effect:
const signIn = async() => {
    setIsLoading(true);
    try {
        await msal.instance.loginPopup({
          scopes : msalConfig.scopes,
          prompt : 'select_account'
        });

        // Get the user from Microsoft Graph
        const user = await getUser(authProvider);

        setUser({
            displayName : user.displayName || '',
            email       : user.mail || user.userPrincipalName || '',
            timeFormat  : user.mailboxSettings?.timeFormat || '',
            timeZone    : user.mailboxSettings?.timeZone || 'UTC'
        });
    }
    catch (err: any) {
        displayError(err.message);
    }
    finally {
        setIsLoading(false);
    }
};
This function signs the user in by calling the loginPopup method on the public client application instance. If the authentication is successful, we get the user information using the getUser function.
Add the following signOut function below the signIn function:
const signOut = async() => {
    setIsLoading(true);
    try {
        await msal.instance.logoutPopup();
        setUser(undefined);
    }
    finally {
        setIsLoading(false);
        window.location.reload();
    }
};
We log out using the logoutPopup method.
To use the context, we need to wrap it around the Calendar component. Add the following import to the components/App.tsx file:
import ProvideAppContext from '../AppContext';Wrap the Calendar component in the app context provider:
<ProvideAppContext>
    <Calendar />
</ProvideAppContext>
Creating a sign-in modal
First install focus-trap-react, which is a React component that traps focus:
npm i focus-trap-reactWe’ll use this React component to create a modal with a Microsoft sign-in button, which will be displayed when the user is not logged in to the app.
Create a SignInModal.tsx file in the src/components folder and add the following lines of code to it:
import { useEffect, useState } from 'react';
import { FocusTrap } from 'focus-trap-react';
import { BryntumButton } from '@bryntum/calendar-react';
import { useAppContext } from '../AppContext';

function SignInModal() {
    const app = useAppContext();
    const [isVisible, setIsVisible] = useState(true);

    // Prevent page scrolling when modal is open
    useEffect(() => {
        if (isVisible) {
            const scrollY = window.scrollY;
            document.body.style.overflowY = 'hidden';
            window.scrollTo(0, 0);
            return () => {
                document.body.style.overflowY = 'auto';
                window.scrollTo(0, scrollY);
            };
        }
    }, [isVisible]);

    useEffect(() => {
        if (isVisible) {
            const handleEscape = (e: KeyboardEvent) => {
                if (e.key === 'Escape') {
                    setIsVisible(false);
                }
            };

            document.addEventListener('keydown', handleEscape);
            return () => {
                document.removeEventListener('keydown', handleEscape);
            };
        }
    }, [isVisible]);

    return (
        isVisible ? (
            <FocusTrap focusTrapOptions={{ initialFocus : '.b-button-tonal' }}>
                <div className="sign-in-modal">
                    <div className="sign-in-modal-content">
                        <div className="sign-in-modal-content-text">
                            <h2>Sign in with Microsoft</h2>
                            <p>Sign in to view and manage events from your Outlook Calendar</p>
                        </div>
                        <div className="close-modal">
                            <BryntumButton
                                icon='fa-times'
                                rendition="transparent"
                                onClick={() => setIsVisible(false)}
                            />
                        </div>
                        <BryntumButton
                            text={app.isLoading ? 'Signing in...' : 'Sign in with Microsoft'}
                            rendition="tonal"
                            onClick={() => app.signIn?.()}
                            disabled={app.isLoading}
                        />
                    </div>
                </div>
            </FocusTrap>
        ) : null
    );
}

export default SignInModal;
Here, we use the SignInModal component to render a FocusTrap component, which contains a BryntumButton widget that we use to sign users in with Microsoft. The isVisible state variable is set to false when the user is logged in. We use the useAppContext hook that we created to use the signIn function and to get the loading state of the authentication check.
Add the following styles to the src/css/App.css file:
.sign-in-modal {
  position: absolute;
  display: flex;
  justify-content: center;
  align-items: center;
  z-index: 2;
  background-color: rgba(128, 128, 128, 0.662);
  color: #181926;
  min-height: 100%;
  min-width: 100%;
}

.sign-in-modal-content {
  position: relative;
  background-color: rgb(255, 255, 255);
  padding: 2rem;
  padding-bottom: 2.5rem;
  border-radius: 12px;
}

.sign-in-modal-content-text p {
  position: relative;
  padding: 2rem;
}

.close-modal {
  position: absolute;
  top: 0;
  right: 0;
}
This code styles the FocusTrap component as a modal in the center of the screen.
Add the following imports to the src/components/Calendar.tsx file:
import { AuthenticatedTemplate, UnauthenticatedTemplate } from '@azure/msal-react';
import { BryntumButton } from '@bryntum/calendar-react';
import SignInModal from './SignInModal';
import { useAppContext } from '../AppContext';
Define the app as follows to ensure it uses the app context in the Calendar component.
const app = useAppContext();Replace the rendered <header> in the Calendar component with the following lines of code:
<UnauthenticatedTemplate>
    <SignInModal />
</UnauthenticatedTemplate>
<header>
    <div className="title-container">
        <img src={bryntumLogo} role="presentation" />
        <h1>
    Bryntum Calendar synced with Outlook Calendar demo
        </h1>
     </div>
    <AuthenticatedTemplate>
        <BryntumButton
            text={app.user && app.isLoading ? 'Signing out...' : 'Sign out'}
            rendition="tonal"
            onClick={() => app.signOut?.()}
            disabled={app.isLoading}
        />
    </AuthenticatedTemplate>
    <UnauthenticatedTemplate>
        <BryntumButton
            text={app.isLoading ? 'Signing in...' : 'Sign in with Microsoft'}
            rendition="tonal"
            onClick={() => app.signIn?.()}
            disabled={app.isLoading}
        />
     </UnauthenticatedTemplate>
</header>
We use either the AuthenticatedTemplate component or the UnauthenticatedTemplate component to render specific components based on whether the user is authenticated or unauthenticated. We use these components to show a sign-out button to authenticated users and the sign-in modal with a sign-in button to unauthenticated users.
Open https://localhost:5173. You should see a modal with a Sign in with Microsoft button:
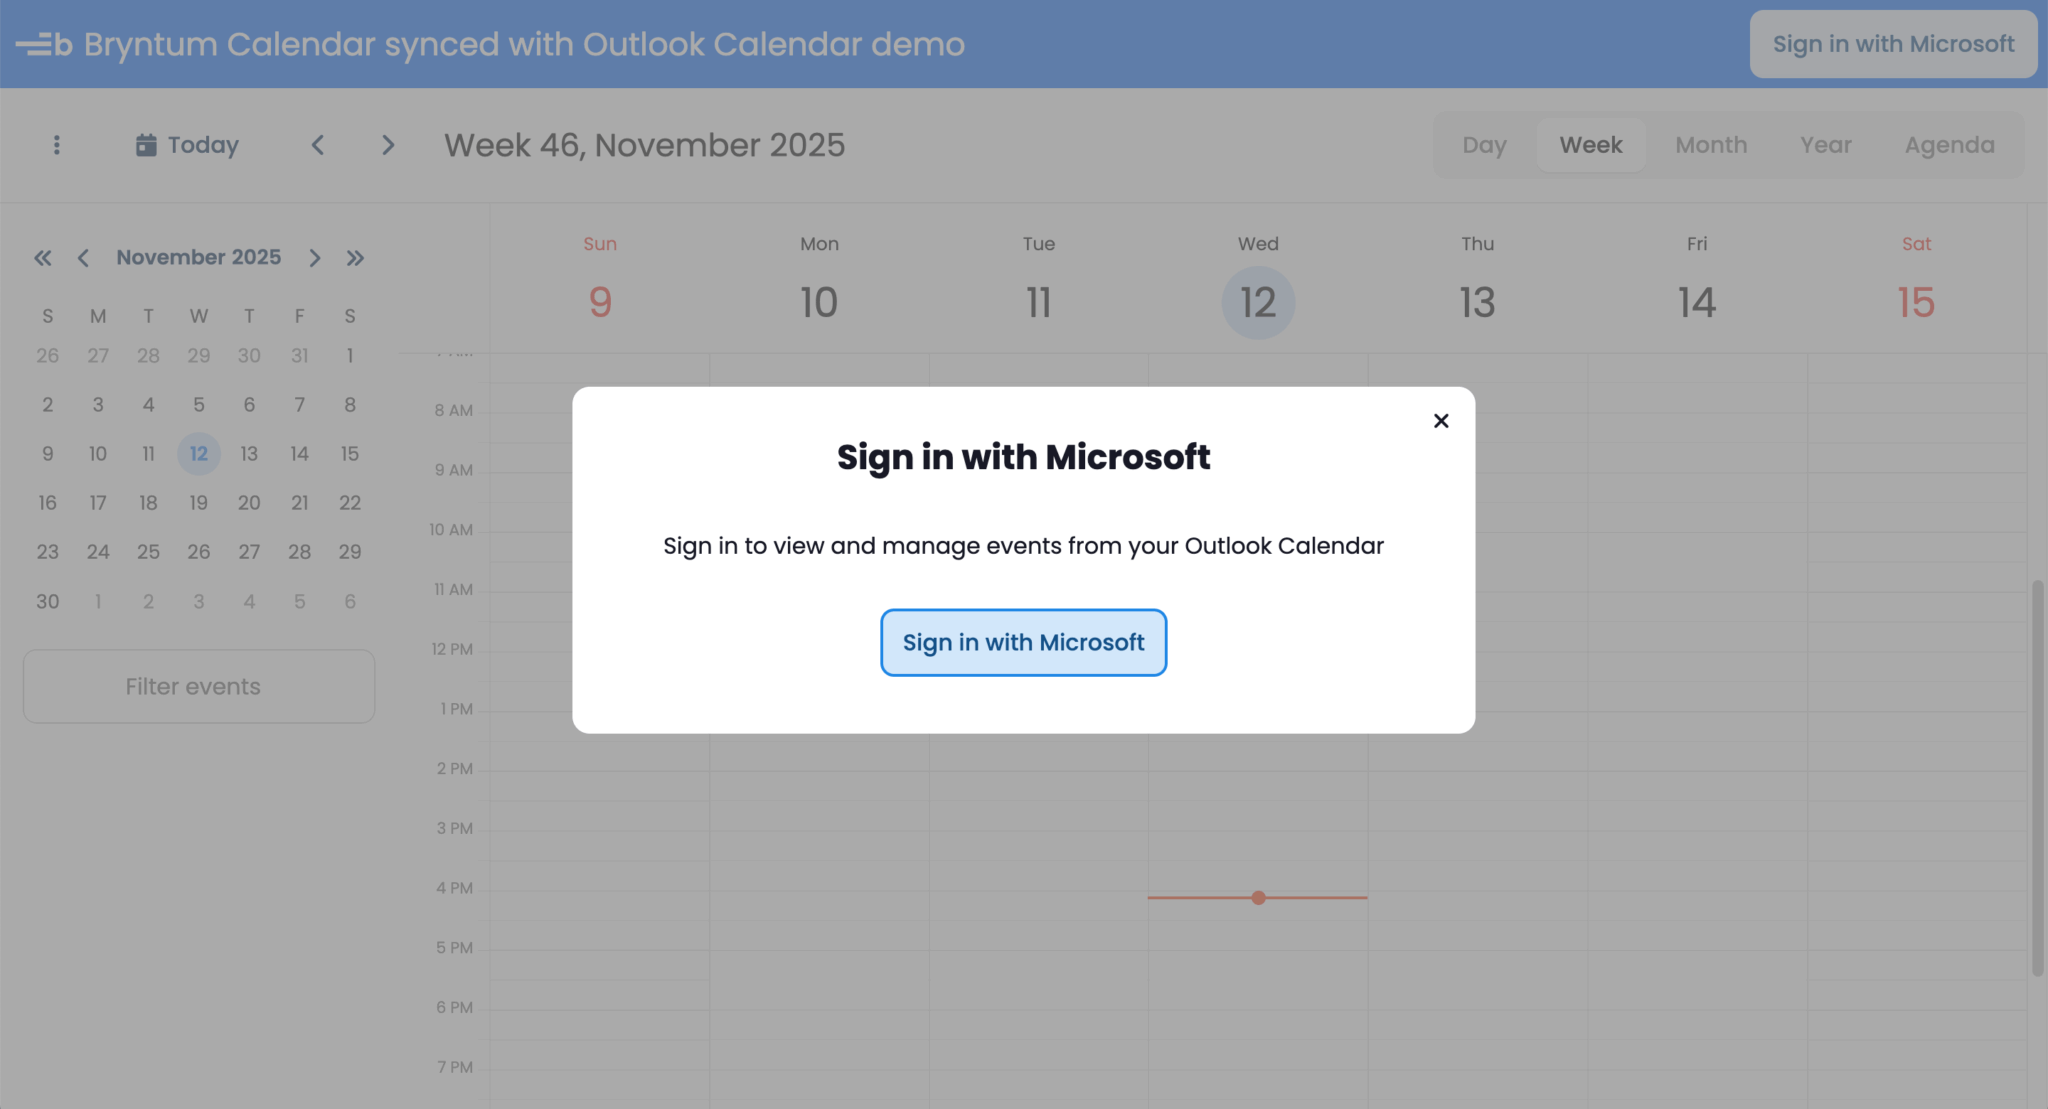
You’ll now be able to sign in to the app. The authentication state will persist even if you refresh the page. If you close the browser tab, the authentication state will be reset, and you’ll need to log in again.
Retrieving Outlook Calendar data with Microsoft Graph
Let’s use Microsoft Graph to fetch the user’s Outlook Calendar events for the current week.
Add the following function to your graphService.ts file:
export async function getUserWeekCalendar(authProvider: AuthCodeMSALBrowserAuthenticationProvider,
    timeZone: string): Promise<Event[]> {
    ensureClient(authProvider);

    // Generate startDateTime and endDateTime query params
    // to display a 7-day window
    const now = new Date();
    const startDateTime = fromZonedTime(startOfWeek(now), timeZone).toISOString();
    const endDateTime = fromZonedTime(endOfWeek(now), timeZone).toISOString();

    const response: PageCollection = await graphClient!
        .api('/me/calendarview')
        .header('Prefer', `outlook.timezone="${timeZone}"`)
        .query({ startDateTime : startDateTime, endDateTime : endDateTime })
        .select('id, subject, start, end, isAllDay')
        .orderby('start/dateTime')
        .top(1000)
        .get();

    if (response['@odata.nextLink']) {
        // Presence of the nextLink property indicates more results are available
        // Use a page iterator to get all results
        const events: Event[] = [];

        // Must include the time zone header in page
        // requests too
        const options: GraphRequestOptions = {
            headers : { 'Prefer' : `outlook.timezone="${timeZone}"` }
        };

        const pageIterator = new PageIterator(graphClient!, response, (event) => {
            events.push(event);
            return true;
        }, options);

        await pageIterator.iterate();
        return events;
    }
    else {
        return response.value;
    }
}
This function uses the Microsoft Graph API to retrieve calendar events for the current week and uses the date-fns library to simplify calculating the start and end dates for the week. The function uses the PageIterator class to manage paginated results if there is more than one page of events.
Install the date-fns and date-fns-tz time zone support libraries:
npm i date-fns date-fns-tzAdd the following imports to your graphService.ts file:
import { endOfWeek, startOfWeek } from 'date-fns';
import { fromZonedTime } from 'date-fns-tz';
import { GraphRequestOptions, PageCollection, PageIterator } from '@microsoft/microsoft-graph-client';
import { Event } from '@microsoft/microsoft-graph-types';
Next, we’ll use the getUserWeekCalendar function to populate the Bryntum Calendar with Outlook events.
Getting event data from Outlook Calendar
In the src/components/Calendar.tsx file, add the following events state declaration to the Calendar component:
const [events, setEvents] = useState<Partial<EventModel>[]>();We’ll store the fetched Outlook Calendar events in the events state variable.
Add the following effect for loading events using the getUserWeekCalendar method:
useEffect(() => {
    const loadEvents = async() => {
        if (app.user && !events) {
            if (hasRunFirstEffect.current) {
                return;
            }
            hasRunFirstEffect.current = true;
            try {
                const ianaTimeZones = findIana(app.user?.timeZone || 'UTC');
                const outlookEvents = await getUserWeekCalendar(app.authProvider!, ianaTimeZones[0].valueOf());
                const calendarEvents: Partial<EventModel>[] = [];
                outlookEvents.forEach((event) => {
                    // Convert the dates to the calendar's time zone
                    const startDate = event.start?.dateTime ? new Date(event.start.dateTime) : null;
                    const endDate = event.end?.dateTime ? new Date(event.end.dateTime) : null;

                    calendarEvents.push({
                        id        : `${event.id}`,
                        name      : `${event.subject}`,
                        startDate : startDate?.toISOString(),
                        endDate   : endDate?.toISOString(),
                        allDay    : event.isAllDay || false
                    });
                });
                setEvents(calendarEvents);
            }
            catch (err) {
                const error = err as Error;
              app.displayError!(error.message);
            }
        }
    };

    loadEvents();
}, [app.user, app.authProvider, events, app.displayError]);
If the user is signed in, Outlook Calendar events are fetched and added to the events state. Each Outlook event is converted to the Bryntum Calendar event format.
Add the following effect to display error messages using a Bryntum Toast widget:
useEffect(() => {
    if (app.error) {
        Toast.show({
            html    : app.error.message,
            timeout : 0
        });
    }
}, [app.error]);
Import the Toast widget:
import { Toast } from '@bryntum/calendar';Next, install the time zone conversion package that converts Outlook’s Windows-based time zone names to IANA Time Zone Database identifiers:
npm i windows-ianaImport the following modules, which we use in the code:
import { useEffect, useState } from 'react';
import { EventModel } from '@bryntum/calendar';
import { findIana } from 'windows-iana';
import { getUserWeekCalendar } from '../graphService';
Define the hasRunFirstEffect ref to make sure the effect only runs once initially.
const hasRunFirstEffect = useRef(false);Finally, provide your retrieved event data to the rendered BryntumCalendar component using the eventStore prop:
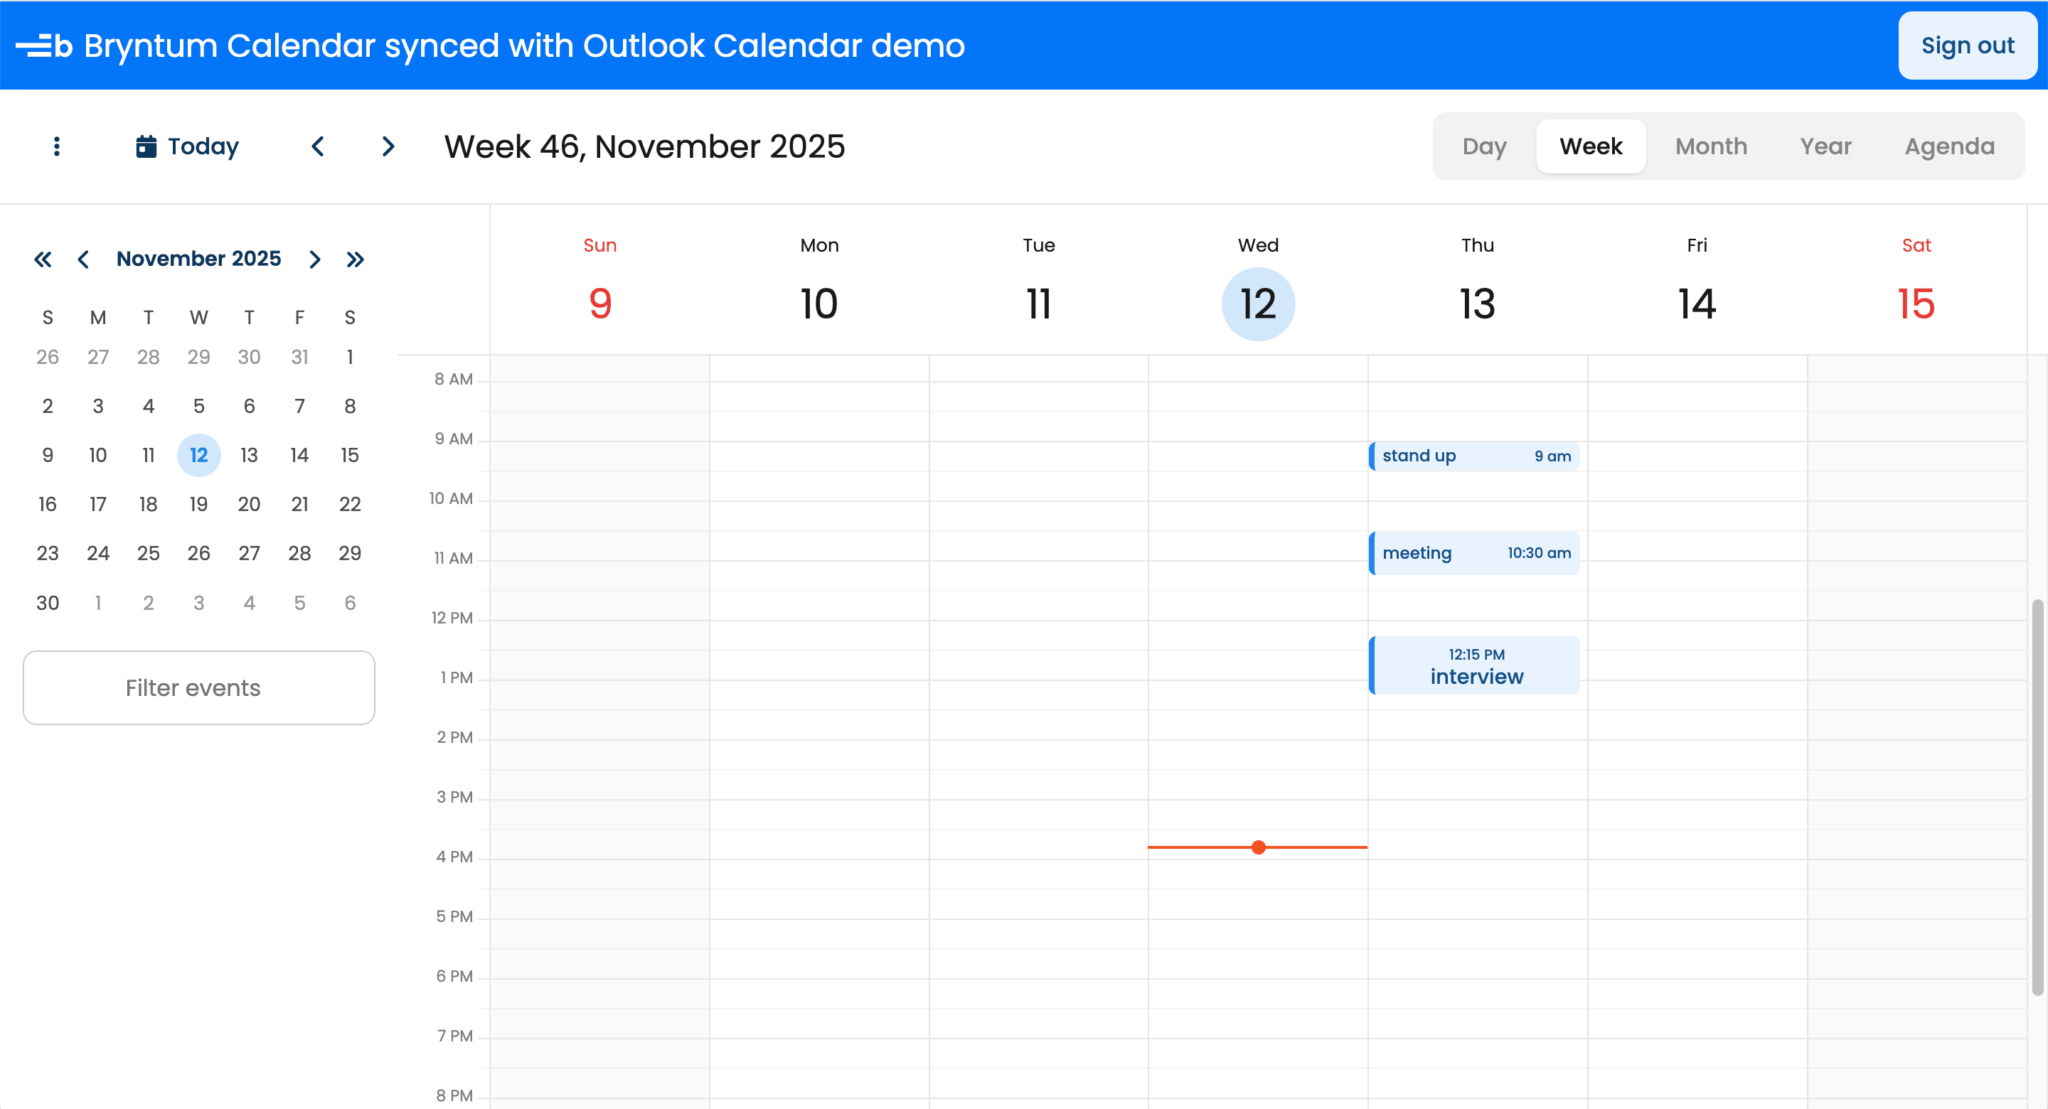
eventStore={{
    data : events
}}
Now, when you log in, you should see the Bryntum Calendar populated with your Outlook Calendar events (if you have any scheduled for the current week):
Getting historical and future event data from Outlook Calendar
Let’s extend the number of events fetched. We’ll fetch a large number of events before and after the current week.
In the src/graphService.ts file, add the following function:
export async function getUserPastCalendar(authProvider: AuthCodeMSALBrowserAuthenticationProvider,
    timeZone: string,
    daysInPast: number = 365): Promise<Event[]> {
    ensureClient(authProvider);

    // Calculate the date range
    const now = new Date();
    const endDateTime = fromZonedTime(startOfWeek(now), timeZone).toISOString();
    const startDateTime = new Date(now.getTime() - (daysInPast * 24 * 60 * 60 * 1000)).toISOString();

    // GET /me/calendarview with pagination support
    const response: PageCollection = await graphClient!
        .api('/me/calendarview')
        .header('Prefer', `outlook.timezone="${timeZone}"`)
        .query({ startDateTime, endDateTime })
        .select('id, subject, start, end, isAllDay')
        .orderby('start/dateTime')
        .top(1000)  // Maximum events per page
        .get();

    // If there are more than 1000 events, handle pagination
    if (response['@odata.nextLink']) {
        const events: Event[] = [];

        const options: GraphRequestOptions = {
            headers : { 'Prefer' : `outlook.timezone="${timeZone}"` }
        };

        // Use PageIterator to automatically handle fetching all pages
        const pageIterator = new PageIterator(graphClient!, response, (event) => {
            events.push(event);
            return true;
        }, options);

        await pageIterator.iterate();
        return events;
    }

    return response.value;
}
The getUserPastCalendar function fetches Outlook Calendar events from the past 365 days to the start of the current week. It uses the Microsoft Graph API to fetch the calendar data and uses the PageIterator class to manage paginated results if there are more than 1000 events.
Now add the following function below the getUserPastCalendar function:
export async function getUserFutureCalendar(authProvider: AuthCodeMSALBrowserAuthenticationProvider,
    timeZone: string,
    daysInFuture: number = 365): Promise<Event[]> {
    ensureClient(authProvider);

    // Calculate the date range
    const now = new Date();
    const startDateTime = fromZonedTime(endOfWeek(now), timeZone).toISOString();
    const endDateTime = new Date(endOfWeek(now).getTime() + (daysInFuture * 24 * 60 * 60 * 1000)).toISOString();

    // GET /me/calendarview with pagination support
    const response: PageCollection = await graphClient!
        .api('/me/calendarview')
        .header('Prefer', `outlook.timezone="${timeZone}"`)
        .query({ startDateTime, endDateTime })
        .select('id, subject, start, end, isAllDay')
        .orderby('start/dateTime')
        .top(1000)  // Maximum events per page
        .get();

    // If there are more than 1000 events, handle pagination
    if (response['@odata.nextLink']) {
        const events: Event[] = [];

        const options: GraphRequestOptions = {
            headers : { 'Prefer' : `outlook.timezone="${timeZone}"` }
        };

        // Use PageIterator to automatically handle fetching all pages
        const pageIterator = new PageIterator(graphClient!, response, (event) => {
            events.push(event);
            return true;
        }, options);

        await pageIterator.iterate();
        return events;
    }

    return response.value;
}
The getUserFutureCalendar has the same functionality as the getUserPastCalendar function, but it fetches events scheduled between the week after the current week and the date 365 days in the future.
In the src/components/Calendar.tsx file, import the functions for fetching Outlook events:
import { getUserFutureCalendar, getUserPastCalendar } from '../graphService';Add the following ref:
const hasFetchedInitialEvents = useRef(false);Add the following effect to fetch the past and future events from Outlook:
// load more events from outlook
useEffect(() => {
    // Skip if still loading or if we've already fetched events
    if (!app.user) return;
    if (app.isLoading) return;
    if (hasFetchedInitialEvents.current) return;

    async function fetchAllData() {
      try {
          hasFetchedInitialEvents.current = true;
          const ianaTimeZones = findIana(app.user?.timeZone || 'UTC');
          const [calendarPastEvents, calendarFutureEvents] = await Promise.all([getUserPastCalendar(app.authProvider!, ianaTimeZones[0].valueOf()), getUserFutureCalendar(app.authProvider!, ianaTimeZones[0].valueOf())]);

          const pastEvents: Partial<EventModel>[] = [];
          const futureEvents: Partial<EventModel>[] = [];

          calendarPastEvents.forEach((event) => {
              // Convert the dates to the calendar's time zone
              const startDate = event.start?.dateTime ? new Date(event.start.dateTime) : null;
              const endDate = event.end?.dateTime ? new Date(event.end.dateTime) : null;

              pastEvents.push({
                  id        : `${event.id}`,
                  name      : `${event.subject}`,
                  startDate : startDate?.toISOString(),
                  endDate   : endDate?.toISOString(),
                  allDay    : event.isAllDay || false
              });
          });

          calendarFutureEvents.forEach((event) => {
              // Convert the dates to the calendar's time zone
              const startDate = event.start?.dateTime ? new Date(event.start.dateTime) : null;
              const endDate = event.end?.dateTime ? new Date(event.end.dateTime) : null;

              futureEvents.push({
                  id        : `${event.id}`,
                  name      : `${event.subject}`,
                  startDate : startDate?.toISOString(),
                  endDate   : endDate?.toISOString(),
                  allDay    : event.isAllDay || false
              });
          });

          setEvents(currentEvents => {
              return [...pastEvents, ...(currentEvents || []), ...futureEvents];
          });
      }
      catch (err) {
          const error = err as Error;
          app.displayError!(error.message);
      }
    }
    fetchAllData();
}, [app.user, app.authProvider, app.displayError, app.isLoading, app.user?.timeZone]);
If the user is logged in, the fetchAllData function calls the getUserPastCalendar and getUserFutureCalendar functions to get the Outlook events. Each Outlook event is converted to the Bryntum Calendar event format. Then, the events are added to the events state.
You’ll now see past and future events in your Bryntum Calendar:

Now let’s get the changes we make in our Bryntum Calendar to sync to our Outlook Calendar.
Syncing event data changes to Outlook Calendar
In the src/graphService.ts file, we’ll create three new functions to handle CRUD operations on the Outlook Calendar events using the Microsoft Graph API.
First, add the following createEvent function:
export async function createEvent(authProvider: AuthCodeMSALBrowserAuthenticationProvider,
    newEvent: Event): Promise<Event> {
    ensureClient(authProvider);

    // POST /me/events
    // JSON representation of the new event is sent in the
    // request body
    return await graphClient!
        .api('/me/events')
        .post(newEvent);
}
This function posts new event data to Outlook to create a new Outlook event.
Next, add the following updateEvent function:
export async function updateEvent(authProvider: AuthCodeMSALBrowserAuthenticationProvider,
    id: string,
    event: Event): Promise<Event> {
    ensureClient(authProvider);

    // PATCH /me/events
    // JSON representation of the new event is sent in the
    // request body
    return await graphClient!
        .api(`/me/events/${id}`)
        .patch(event);
}
This function updates an existing Outlook event by its id.
Add the following deleteEvent function:
export async function deleteEvent(authProvider: AuthCodeMSALBrowserAuthenticationProvider,
    id: string): Promise<Event> {
    ensureClient(authProvider);

    return await graphClient!
        .api(`/me/events/${id}`)
        .delete();
}
This function deletes an existing Outlook event by its id.
Now replace the code in the src/calendarConfig.ts file with the following lines of code:
import { BryntumCalendarProps } from '@bryntum/calendar-react';
import { SyncDataParams } from './types';
import { EventModel } from '@bryntum/calendar';

type AddRecordParams = {
    eventRecord: EventModel;
}
type CalendarConfigOptions = {
    syncData: (param: SyncDataParams) => void;
    addRecord: (event: AddRecordParams) => void;
};

export function createCalendarConfig({ syncData, addRecord }: CalendarConfigOptions): BryntumCalendarProps {
    return {
        mode             : 'week',
        eventEditFeature : {
            items : {
                nameField : {
                    defaultValue : 'New Event'
                },
                resourceField   : null,
                recurrenceCombo : null
            }
        },
        onDataChange     : syncData,
        onAfterEventSave : addRecord
    };
}
Here, we add the Bryntum Calendar onDataChange and onAfterEventSave event listeners.
The onDataChange event handler is called when data in the Bryntum Calendar changes. We’ll use it to call the syncData function, which handles the synchronization of created, updated, and deleted events to the Outlook Calendar.
The onAfterEventSave event handler is called after the Save button in the event editor form has been clicked. It calls the addRecord function, which handles the synchronization of created and updated events to Outlook Calendar.
Create a types.ts file in the src folder and add the following lines of code to it:
import { Model, ProjectConsumer, ProjectModelMixin, Store } from '@bryntum/calendar';

export interface SyncDataParams {
    source: typeof ProjectConsumer | any;
    project: typeof ProjectModelMixin | any;
    store: Store;
    action: 'remove' | 'removeAll' | 'add' | 'clearchanges' | 'filter' | 'update' | 'dataset' | 'replace';
    record: Model;
    records: Model[];
    changes: object
}
Now create a crudHelpers.ts file in the src folder and add the following lines of code to it:
import { AuthCodeMSALBrowserAuthenticationProvider } from '@microsoft/microsoft-graph-client/authProviders/authCodeMsalBrowser';
import { createEvent, updateEvent, deleteEvent } from './graphService';
import { EventModel } from '@bryntum/calendar';
import React from 'react';
import { differenceInDays } from 'date-fns';

export async function BryntumSync(
    id: string,
    name: string,
    startDate: string,
    endDate: string,
    allDay: boolean,
    action: 'remove' | 'removeAll' | 'add' | 'clearchanges' | 'filter' | 'update' | 'dataset' | 'replace',
    setEvents: React.Dispatch<React.SetStateAction<Partial<EventModel>[] | undefined>>,
    authProvider: AuthCodeMSALBrowserAuthenticationProvider,
    timeZone: string
) {
    // For all-day events, set the time to midnight
    const adjustDateForAllDay = (start: string, end: string) => {
        const startDate = new Date(start);
        const endDate = new Date(end);

        // Extract year, month, day directly from the date
        const startYear = startDate.getFullYear();
        const startMonth = startDate.getMonth(); // Already 0-based
        const startDay = startDate.getDate();

        const endYear = endDate.getFullYear();
        const endMonth = endDate.getMonth(); // Already 0-based
        const duration = differenceInDays(endDate, startDate);
        const endDay = endDate.getDate() + (duration === 0 ? 1 : 0);

        const utcStartDate = new Date(Date.UTC(startYear, startMonth, startDay));
        const utcEndDate = new Date(Date.UTC(endYear, endMonth, endDay));

        return { utcStartDate : utcStartDate.toISOString(), utcEndDate : utcEndDate.toISOString() };
    };

    const { utcStartDate, utcEndDate } = adjustDateForAllDay(startDate, endDate);

    const eventData = {
        subject : name || 'New Event',
        start   : {
            dateTime : allDay ? utcStartDate : startDate,
            timeZone
        },
        end : {
            dateTime : allDay ? utcEndDate : endDate,
            timeZone
        },
        isAllDay : allDay
    };

    const formatEventDate = (dateTime: string, eventTimeZone: string, isAllDay: boolean) => {
        if (isAllDay) {
            // For all-day events, pass through the UTC date
            return dateTime;
        }
        // If the date is already in UTC format, ensure it has the correct milliseconds format
        if (eventTimeZone === 'UTC') {
            return dateTime.replace(/\.0+Z?$/, '.000Z');
        }
        // For non-UTC dates, convert to UTC
        return new Date(dateTime).toISOString();
    };

    try {
        if (action === 'add') {
            const result = await createEvent(authProvider, eventData);
            if (result.id && result.start?.dateTime && result.end?.dateTime) {
                const newEvent: Partial<EventModel> = {
                    id        : result.id,
                    name      : result.subject || '',
                    startDate : formatEventDate(result.start.dateTime, result.start.timeZone || timeZone, result.isAllDay || false),
                    endDate   : formatEventDate(result.end.dateTime, result.end.timeZone || timeZone, result.isAllDay || false),
                    allDay    : result.isAllDay || false
                };
                setEvents(prev => prev ? [...prev, newEvent] : [newEvent]);
            }
        }
        else if (action === 'update') {
            if (!id || id.startsWith('_generated')) return;
            const result = await updateEvent(authProvider, id, eventData);

            if (result.id && result.start?.dateTime && result.end?.dateTime) {
                const updatedEvent: Partial<EventModel> = {
                    id        : result.id,
                    name      : result.subject || '',
                    startDate : formatEventDate(result.start.dateTime, result.start.timeZone || timeZone, result.isAllDay || false),
                    endDate   : formatEventDate(result.end.dateTime, result.end.timeZone || timeZone, result.isAllDay || false),
                    allDay    : result.isAllDay || false
                };
                setEvents(prevEvents =>
                    prevEvents?.map(evt => (evt.id === id ? updatedEvent : evt))
                );
            }
        }
        else if (action === 'remove') {
            if (!id || id.startsWith('_generated')) return;
            await deleteEvent(authProvider, id);
            setEvents(prevEvents => prevEvents?.filter(evt => evt.id !== id));
        }
    }
    catch (error) {
        console.error('Error syncing with Outlook Calendar:', error);
        throw error;
    }
}
This code defines the BryntumSync helper function, which syncs event changes from the Bryntum Calendar to the Outlook Calendar. It performs CRUD actions using the createEvent, updateEvent, and deleteEvent functions that we created.
This helper function also handles date formatting and the conversion of events from the Bryntum Calendar format to the Outlook Calendar format. After updating the Outlook Calendar, the events React state is updated, which updates the event id for created events.
In the src/components/Calendar.tsx file, add the following imports, including the BryntumSync function that we just created:
import { useCallback } from 'react';
import { BryntumSync } from '../crudHelpers';
import { SyncDataParams } from '../types';
Add the following memoized syncWithOutlook function to the Calendar component:
const syncWithOutlook = useCallback((
    id: string,
    name: string,
    startDate: string,
    endDate: string,
    allDay: boolean,
    action: 'add' | 'update' | 'remove' | 'removeAll' | 'clearchanges' | 'filter' | 'update' | 'dataset' | 'replace'
) => {
  if (!app.authProvider) return;
  return BryntumSync(
      id,
      name,
      startDate,
      endDate,
      allDay,
      action,
      setEvents,
      app.authProvider,
      timeZone
  );
}, [app.authProvider, timeZone]);
This function calls the BryntumSync helper function with the appropriate arguments.
Add the following memoized syncData function below the syncWithOutlook function:
const syncData = useCallback(({ action, records }: SyncDataParams) => {
    if ((action === 'add' && !records[0].copyOf) || action === 'dataset') {
        return;
    }
    records.forEach((record) => {
        syncWithOutlook(
            record.get('id'),
            record.get('name'),
            record.get('startDate'),
            record.get('endDate'),
            record.get('allDay'),
            action
        );
    });
}, [syncWithOutlook]);
This function is called when events change within the Bryntum Calendar. For each changed event record, it calls the syncWithOutlook function to sync changes to the Outlook Calendar.
Now add the following memoized addRecord function below the syncData function:
const addRecord = useCallback((event: { eventRecord: EventModel }) => {
    const { eventRecord } = event;
    const isNew = eventRecord.id.toString().startsWith('_generated');

    // Get the date strings in the calendar's time zone
    const startDate = new Date(eventRecord.startDate);
    const endDate = new Date(eventRecord.endDate);

    syncWithOutlook(
        eventRecord.id.toString(),
        eventRecord.name || '',
        startDate.toISOString(),
        endDate.toISOString(),
        eventRecord.allDay || false,
        isNew ? 'add' : 'update'
    );
}, [syncWithOutlook]);
We use this function to create new events when the user clicks the Save button in the event editor. It calls the syncWithOutlook function to sync event changes to the Outlook Calendar.
Add the following timeZone state variable, which is used as an argument in the BryntumSync function, to the Calendar component:
const [timeZone, setTimeZone] = useState('UTC');Now add the following effect to the Calendar component:
useEffect(() => {
    if (app.user?.timeZone) {
        const ianaTimeZones = findIana(app.user.timeZone);
        setTimeZone(ianaTimeZones[0].valueOf());
    }
}, [app.user?.timeZone]);
This effect converts Outlook’s Windows-based time zone names to IANA Time Zone Database identifiers to ensure dates are handled correctly when syncing events.
Finally, ensure your Bryntum Calendar uses these sync handlers by updating the configuration and placing the code below the declaration of the functions:
- const calendarProps = createCalendarConfig();
+ const calendarProps = createCalendarConfig({ syncData, addRecord });
When you run the local dev server, the data changes in your Bryntum Calendar will be synced to your Outlook Calendar:
Next steps
This tutorial gives you a starting point for syncing a React Bryntum Calendar with an Outlook Calendar.
If you want to deploy your app, take a look at the Microsoft Entra guides to:
- Configuring your app’s publisher domain
- Publisher verification
- Marking your app as publisher verified
Also, make sure that you read through the Microsoft identity platform for developers Terms of Use.
You can learn how to add recurring events to your Bryntum Calendar by referring to the Microsoft Graph Outlook Calendar API and the Bryntum Calendar recurring events documentation.
Finally, visit our Bryntum Calendar demo page to get an idea of the additional features you can add to your calendar.