How to connect and sync Bryntum Calendar to a Microsoft Outlook Calendar
We strive to keep posts updated, but code samples may sometimes be outdated. Humans, see the Bryntum documentation; agents, https://mcp.bryntum.com for the latest info.
Bryntum Calendar is a fully customizable, responsive, high-performance JavaScript component that’s built using ES6+ and Sass. It can easily be integrated with React, Vue, or Angular. In this tutorial, we’ll connect and sync the Bryntum Calendar to a Microsoft Outlook Calendar. We’ll do the following:
- Create a JavaScript app that a user can log in to using their Microsoft 365 account.
- Use Microsoft Graph to get the user’s Microsoft Outlook Calendar events
- Display the Microsoft Outlook Calendar events in a Bryntum Calendar.
- Sync event changes in the Bryntum Calendar with the user’s Microsoft Outlook Calendar.
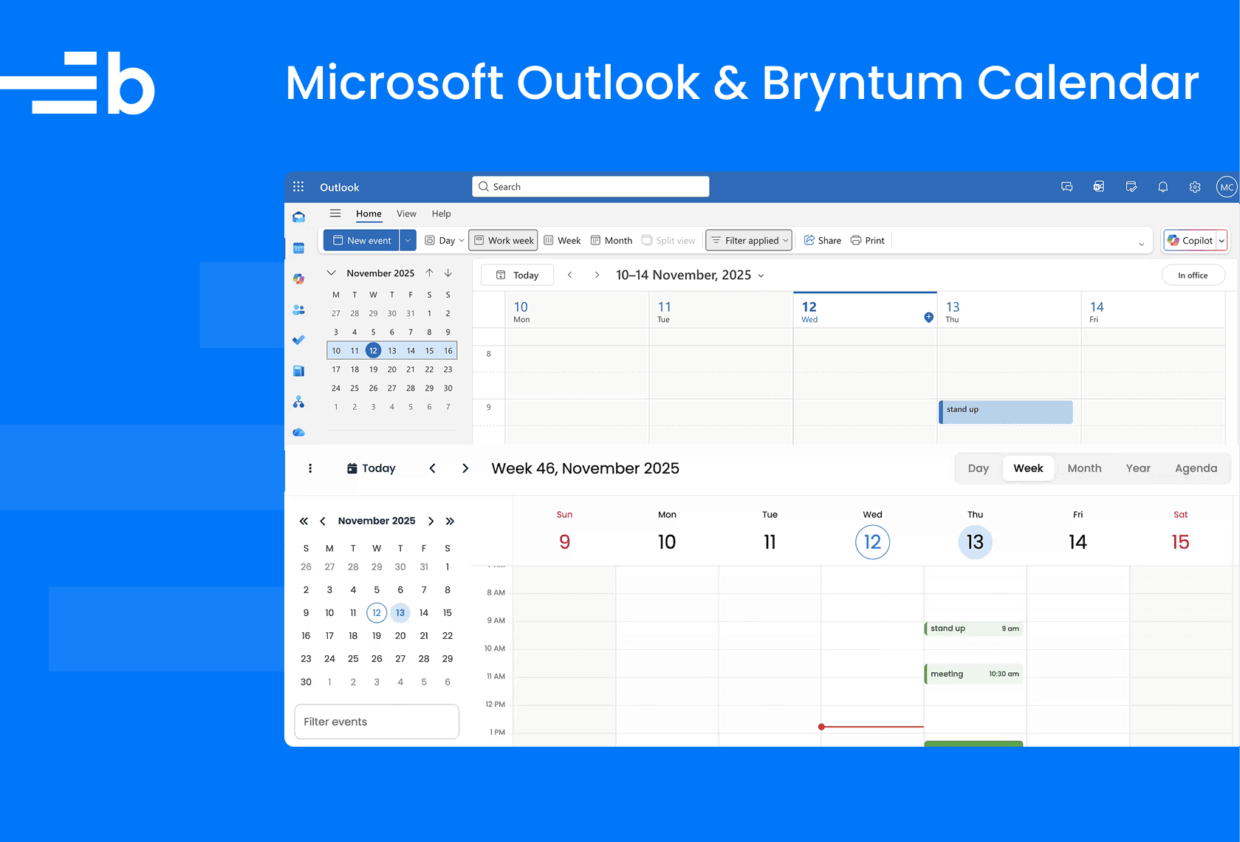
Once you’ve followed this guide, you’ll be able to sync your Bryntum and Outlook calendars, as shown below.
⚠️ If you’re using React, use the React version of this guide: How to connect and sync a React Bryntum Calendar to a Microsoft Outlook Calendar.
Getting started
Clone the starter GitHub repository. The starter repository uses Vite, which is a development server and JavaScript bundler. You’ll need Node.js version 20.19+ for Vite to work.
Now install the Vite dev dependency by running the following command:
npm installRun the local dev server using npm run dev. You’ll see a blank page.
Let’s create our Bryntum Calendar now.
Creating a calendar using Bryntum
We’ll install the Bryntum Calendar component using npm. Follow the guide to installing the Bryntum Calendar component here.
Let’s import the Bryntum Calendar component and give it some basic configuration. In the main.js file, add the following lines:
import { Calendar } from '@bryntum/calendar';

const startDate = new Date();
const endDate = new Date();
endDate.setHours(endDate.getHours() + 1);
const startDateStr = startDate.toISOString().substring(0, 19);
const endDateStr = endDate.toISOString().substring(0, 19);

const calendar = new Calendar({
    appendTo : 'calendar',

    resources : [
        {
            id         : 1,
            name       : 'Default Calendar',
            eventColor : 'green'
        }
    ],
    events : [
        {
            id         : 1,
            name       : 'Meeting',
            startDate  : startDateStr,
            endDate    : endDateStr,
            resourceId : 1
        }
    ]
});
In this code block, we create a new Bryntum Calendar instance and pass a configuration object into it. We added the calendar to the DOM as a child of the <div> element with an id of "calendar".
We pass in data inline to populate the Calendar Resources and events stores for simplicity. You can learn more about working with data in the Bryntum docs. We have a single resource, the "Default Calendar". Within the calendar, there’s one example "Meeting" event.
The style.css file contains some basic styling for the calendar. We set the <HTML> and <body> elements to have a height of 100vh so that the Bryntum Calendar will take up the full height of the screen.
Add the following imports to the top of the style.css file:
@import "@bryntum/calendar/fontawesome/css/fontawesome.css";
@import "@bryntum/calendar/fontawesome/css/solid.css";
@import "@bryntum/calendar/calendar.css";
@import "@bryntum/calendar/svalbard-light.css";
We import the Bryntum Calendar and the CSS for the Svalbard light theme, which is one of four available themes that each have light and dark variants. You can also create custom themes. The structural CSS and themes have separate imports. You can read more about styling the calendar here. If you run your dev server now, you’ll see the event in the Bryntum Calendar:

Now let’s learn how to retrieve a list of calendar events from a user’s Microsoft Outlook Calendar using Microsoft Graph.
Getting access to Microsoft Graph
We’re going to register a Microsoft 365 application by creating an application registration in Microsoft Entra ID, which is a cloud identity and access management (IAM) solution. We’ll do this so that a user can sign in to our app using their Microsoft 365 account. This will allow our app access to the data the user gives the app permission to access. A user will sign in using OAuth, which will send an access token to our app that will be stored in session storage. We’ll then use the token to make authorized requests for Microsoft 365 Outlook Calendar data using Microsoft Graph. Microsoft Graph is a single endpoint REST API that enables you to access data from Microsoft 365 applications.
To use Microsoft Graph, you need global administrator access to a Microsoft 365 tenant. If you don’t have global administrator access, join the Microsoft 365 Developer Program with your Microsoft account. If you don’t qualify for the Microsoft 365 developer program, you can sign up for a Microsoft 365 Business Premium trial to get a Microsoft 365 tenant.
Creating a Microsoft Entra app
Let’s create a Microsoft Entra app in the Microsoft Entra admin center:
- Sign in to Microsoft Entra using your Microsoft 365 Developer Program or Azure email address.
- In the left-hand navigation menu, select App registrations.
- Click the New registration button to create a new app registration.

- Name your app.
- Under Supported account types select Accounts in any organizational directory (Any Microsoft Entra ID tenant – Multitenant) and personal Microsoft accounts (e.g. Skype, Xbox)
- Set the Redirect URI to
http://localhost:5173and select Single-page application (SPA). - Check that you agree with the Microsoft identity platform for developers Terms of Use and then click the Register button.

After registering your application, take note of the Application (client) ID, which you’ll use for authentication in the React Bryntum Calendar app.
Next, we’ll configure the API permissions in the Microsoft Entra admin center.
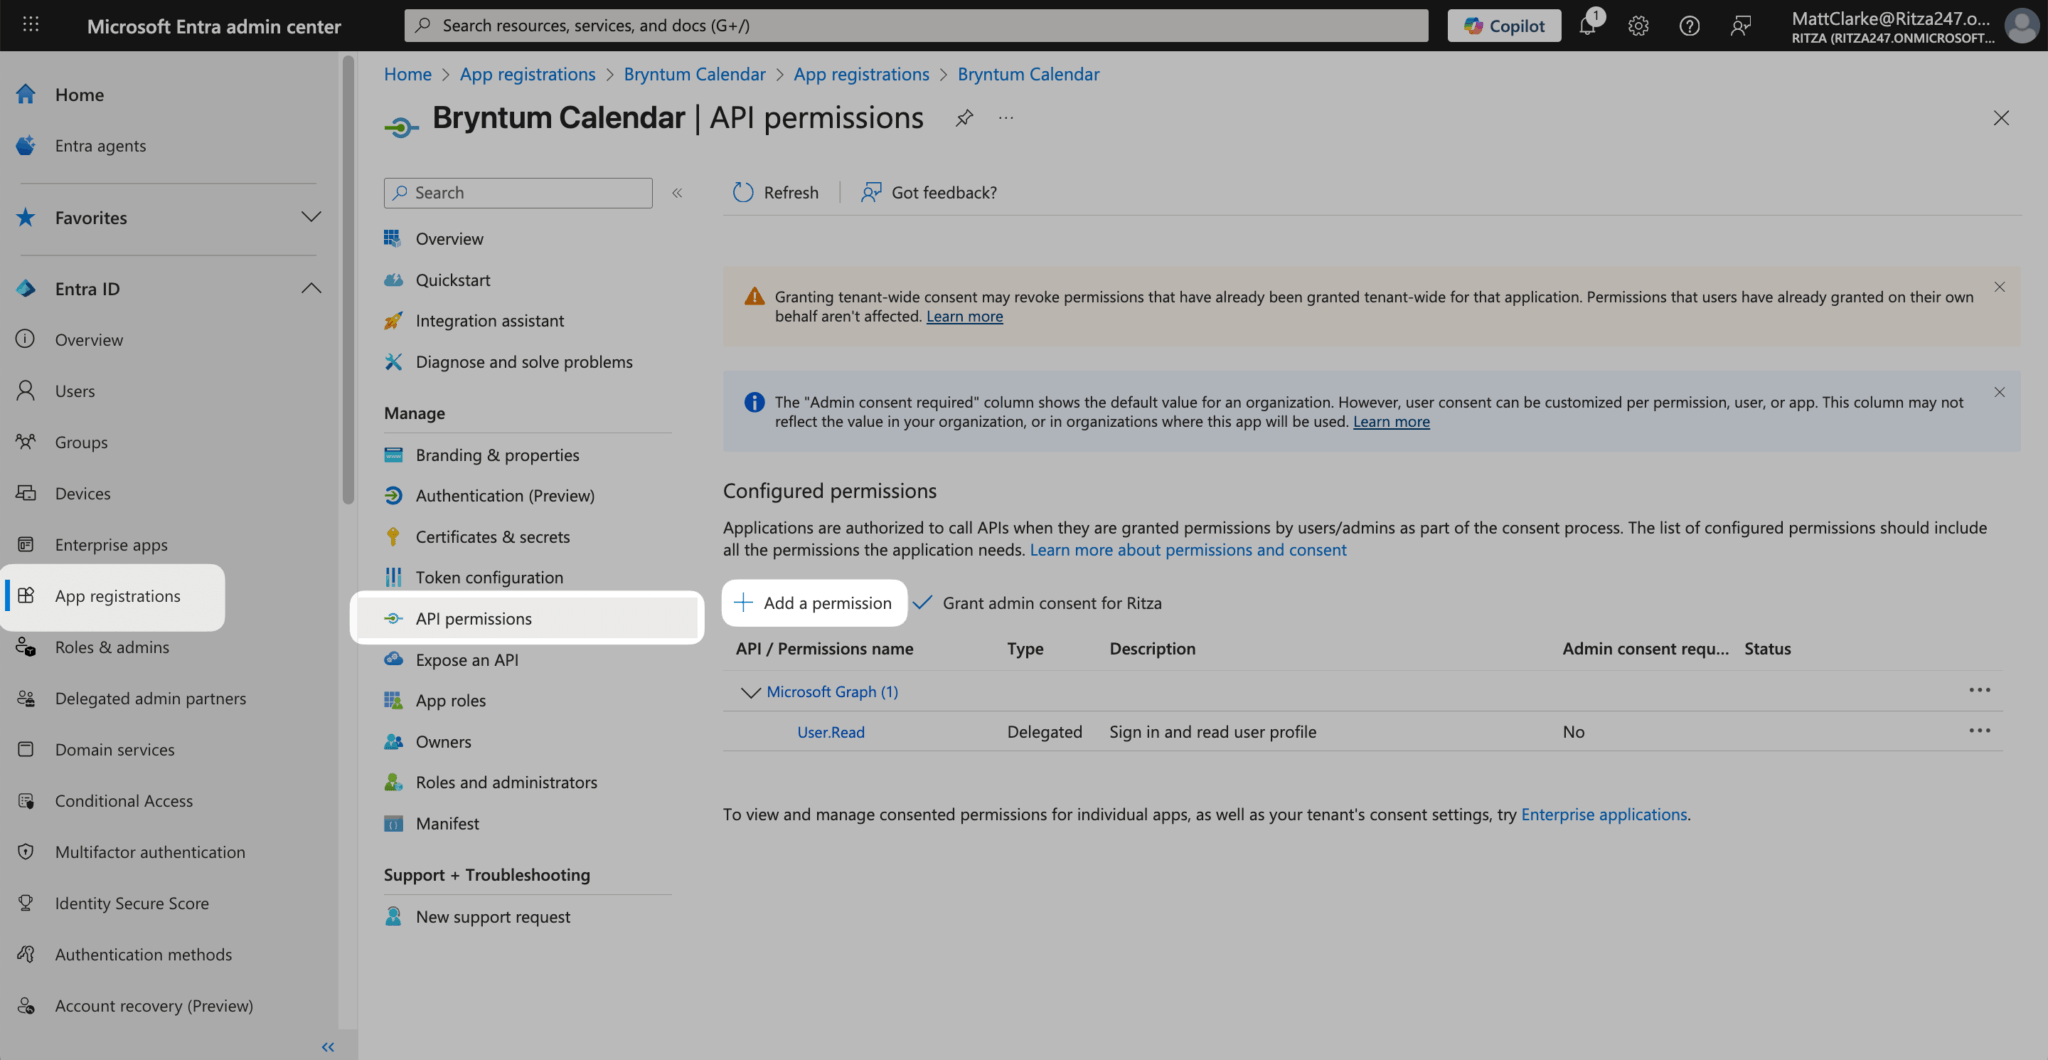
Navigate to App registrations -> API permissions on the left navigation menu. You’ll see that the User.Read permission for the Microsoft Graph API (which gives the app permission to sign in and read the user’s profile) has been configured:
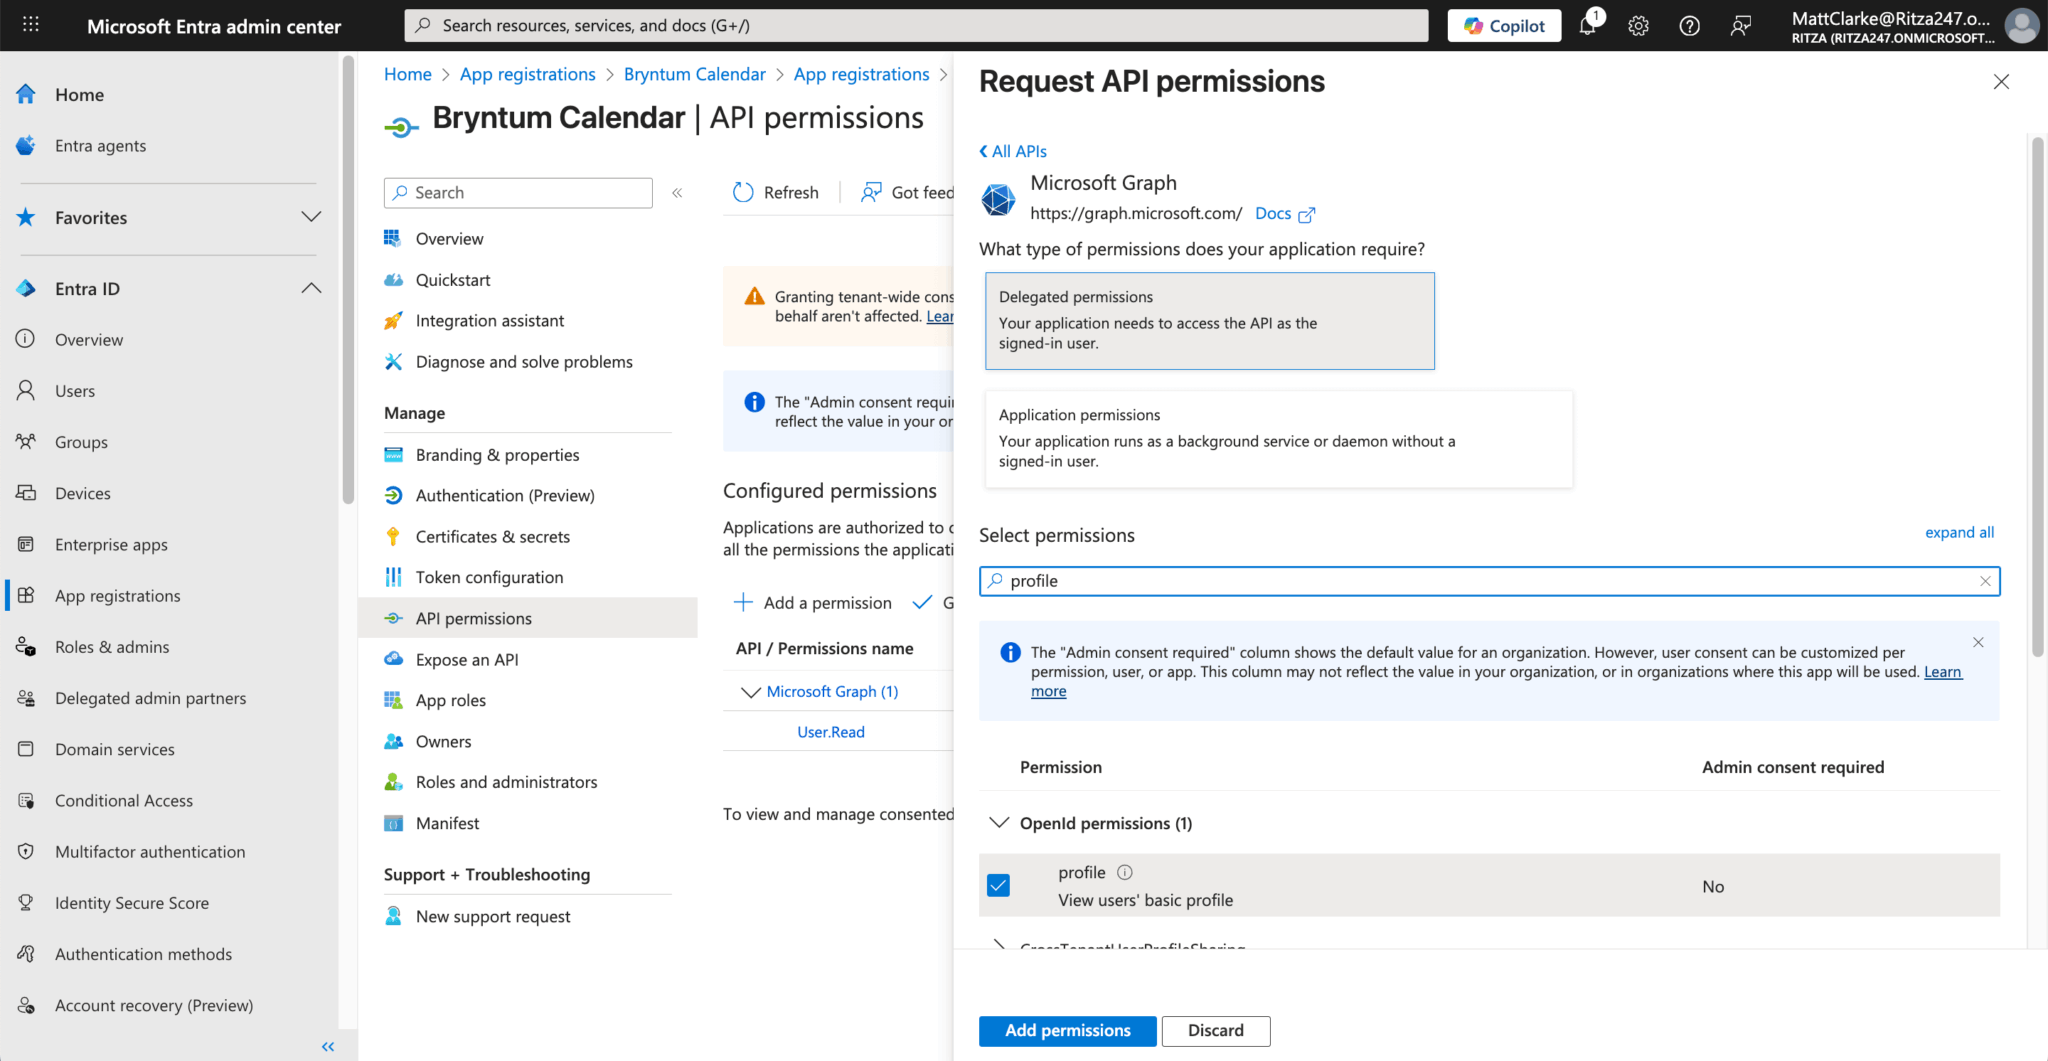
Click the Add a permission button. In the Select an API section, choose Microsoft Graph and then select Delegated permissions, which means that your app needs access to the API for signed-in users. Under Select permissions choose the following permissions:
Calendars.ReadWriteprovides full access to user calendars.MailboxSettings.Readgives read access to users’ mailbox settings.offline_accessmaintains access to data you’ve given it access to.openidsigns users in.profileis used to view the user’s basic profile.
Finally, click the Add permissions button to save your changes.
Now we can create a JavaScript web app that can get user data using the Microsoft Graph API. The next step is to set up authentication within our web app.
Setting up Microsoft 365 authentication in the JavaScript app
To get data using the Microsoft Graph REST API, our app needs to prove that we’re the owners of the app that we just created in Entra ID. Your application will get an access token from Entra ID and include it in each request to Microsoft Graph. After this is set up, users will be able to sign in to your app using their Microsoft 365 account. This means that you won’t have to implement authentication in your app or maintain users’ credentials.

First we’ll create the variables and functions we need for authentication and retrieving calendar events from Microsoft Outlook Calendar. Then we’ll add the Microsoft Authentication Library and Microsoft Graph SDK, which we’ll need for authentication and using Microsoft Graph.
Install the Microsoft Authentication Library and the Microsoft Graph JavaScript client library:
npm install @azure/msal-browser @microsoft/microsoft-graph-clientCreate a file called auth.js in your project’s root directory and add the following code:
const msalConfig = {
  auth: {
    clientId    : import.meta.env.VITE_MICROSOFT_ENTRA_APP_ID,
    // un-comment if you don't use a multi-tenant AAD app
    // authority: "https://login.microsoftonline.com/<your-directory-ID-here>",
    redirectUri: "http://localhost:5173",
  },
};
Create a .env file in the root directory of your project and add the following environment variable:
VITE_MICROSOFT_ENTRA_APP_ID=<your-client-ID-here>Replace the value for VITE_MICROSOFT_ENTRA_APP_ID with the Application (client) ID of your Entra ID application.
The following code will check permissions, create a Microsoft Authentication Library client, log a user in, and get the authentication token. Add it to the bottom of the auth.js file.
const msalRequest = { scopes : [] };
function ensureScope(scope) {
    if (
        !msalRequest.scopes.some((s) => s.toLowerCase() === scope.toLowerCase())
    ) {
        msalRequest.scopes.push(scope);
    }
}

//Initialize MSAL client
const msalClient = await msal.PublicClientApplication.createPublicClientApplication(msalConfig);

// Log the user in
async function signIn() {
    const authResult = await msalClient.loginPopup(msalRequest);
    sessionStorage.setItem('msalAccount', authResult.account.username);
}

async function getToken() {
    const account = sessionStorage.getItem('msalAccount');
    if (!account) {
        throw new Error(
            'User info cleared from session. Please sign out and sign in again.'
        );
    }
    try {
    // First, attempt to get the token silently
        const silentRequest = {
            scopes  : msalRequest.scopes,
            account : msalClient.getAccountByUsername(account)
        };

        const silentResult = await msalClient.acquireTokenSilent(silentRequest);
        return silentResult.accessToken;
    }
    catch (silentError) {
    // If silent requests fails with InteractionRequiredAuthError,
    // attempt to get the token interactively
        if (silentError instanceof msal.InteractionRequiredAuthError) {
            const interactiveResult = await msalClient.acquireTokenPopup(msalRequest);
            return interactiveResult.accessToken;
        }
        else {
            throw silentError;
        }
    }
}

export { signIn, getToken, ensureScope };
Add the following import to the top of the auth.js file:
import * as msal from '@azure/msal-browser';The msalRequest variable stores the current Microsoft Authentication Library request. It initially contains an empty array of scopes. The list of permissions granted to your app is part of the access token. These are the scopes of the OAuth standard. When your app requests an access token from Entra ID, it needs to include a list of scopes. Each operation in Microsoft Graph has its own list of scopes. The list of the permissions required for each operation is available in the Microsoft Graph permissions reference.
Using Microsoft Graph to access a user’s Outlook Calendar events for the next seven days
Create a file called graph.js in the project’s root directory and add the following code:
import { getToken, ensureScope } from './auth.js';
import { Client } from '@microsoft/microsoft-graph-client';

const userTimeZone = 'Africa/Johannesburg';

const authProvider = {
    getAccessToken : async() => {
        // Call getToken in auth.js
        return await getToken();
    }
};
// Initialize the Graph client
const graphClient = Client.initWithMiddleware({ authProvider });

async function getEvents() {
    ensureScope('Calendars.read');
    const dateNow = new Date();
    const dateNextWeek = new Date();
    dateNextWeek.setDate(dateNextWeek.getDate() + 7);
    const query = `startDateTime=${dateNow.toISOString()}&endDateTime=${dateNextWeek.toISOString()}`;
    return await graphClient
        .api('/me/calendarView')
        .query(query)
        .header('Prefer', `outlook.timezone="${userTimeZone}"`)
        .select('subject,start,end')
        .orderby(`Start/DateTime`)
        .get();
}
We get the access token using the getToken method in the auth.js file. We then use the Microsoft Graph SDK to create a Microsoft Graph client that will handle Microsoft Graph API requests.
The getEvents function retrieves the user’s calendar events for the next seven days. We use the ensureScope function to specify the permissions needed to access the calendar event data. We then call the "/me/calendarview" endpoint using the graphClient API method to get the data from Microsoft Graph. We create a query string and use the query method to get calendar events for the next seven days. The header method allows us to set our preferred time zone. Outlook Calendar event dates are stored using UTC. We need to set the time zone for the returned Outlook Calendar event start and end dates. This is done so that the correct event times are displayed in our Bryntum Calendar. Replace the value for the userTimeZone with the time zone value for your region. You can find the available strings here.
We use the select method to select the properties in the results that our app will use. We only request the data that we need, which improves our app’s performance.
The orderby method specifies how to sort the result items. We order the calendar data by the Start/DateTime field in ascending order. Ascending order is the default if the keywords asc or desc are not specified.
Now let’s add the user’s Outlook Calendar events to our Bryntum Calendar.
Adding the Microsoft Outlook Calendar events to Bryntum Calendar
Let’s add the Microsoft 365 sign-in link. In the index.html file, replace the child elements of the <body> HTML element with the following elements:
<main id="main-container" role="main" class="container">
  <div id="content" style="display: none">
    <div id="calendar" style="height: 100vh"></div>
  </div>
  <a id="signin" href="#">
    <img
      src="./images/ms-symbollockup_signin_light.png"
      alt="Sign in with Microsoft"
    />
  </a>
</main>
<script type="module" src="main.js"></script>
Initially, our app will display only the sign-in link. When a user signs in, the Bryntum Calendar will be displayed.
In the main.js file, replace the contents with the following code:
import { Calendar } from '@bryntum/calendar';
import { signIn } from './auth.js';
import { getEvents } from './graph.js';

const calendar = new Calendar({

    appendTo : 'calendar',
    resources : [
        {
            id         : 1,
            name       : 'Default Calendar',
            eventColor : 'green'
        }
    ]
});

const signInButton = document.getElementById('signin');
Now add the following function at the bottom of the file:
async function displayUI() {
    await signIn();

    // Hide sign in link and initial UI
    signInButton.style = 'display: none';
    var content = document.getElementById('content');
    content.style = 'display: block';

    // Display calendar after sign in
    var events = await getEvents();
    var calendarEvents = [];
    var eventId = 1;
    var resourceID = 1;
    events.value.forEach((event) => {
        calendarEvents.push({
            id         : eventId,
            name       : event.subject,
            startDate  : event.start.dateTime,
            endDate    : event.end.dateTime,
            resourceId : resourceID
        });
        eventId++;
    });
    calendar.events = calendarEvents;
}

signInButton.addEventListener('click', displayUI);

export { displayUI };
The displayUI function calls the signIn function in auth.js to sign the user in. Once the user is signed in, the sign-in link is hidden and the Bryntum Calendar is displayed. We use the getEvents function in the graph.js file to get the calendar events for the next seven days. We then use the retrieved Outlook Calendar events to create calendar events for the Bryntum Calendar and add them to the calendar.events store.
Now sign in to Microsoft Outlook and create some events for the current week:

Run your dev server using npm run dev and you’ll see the sign-in link:

Sign in with your Microsoft email address that you used to log in to Microsoft Outlook:

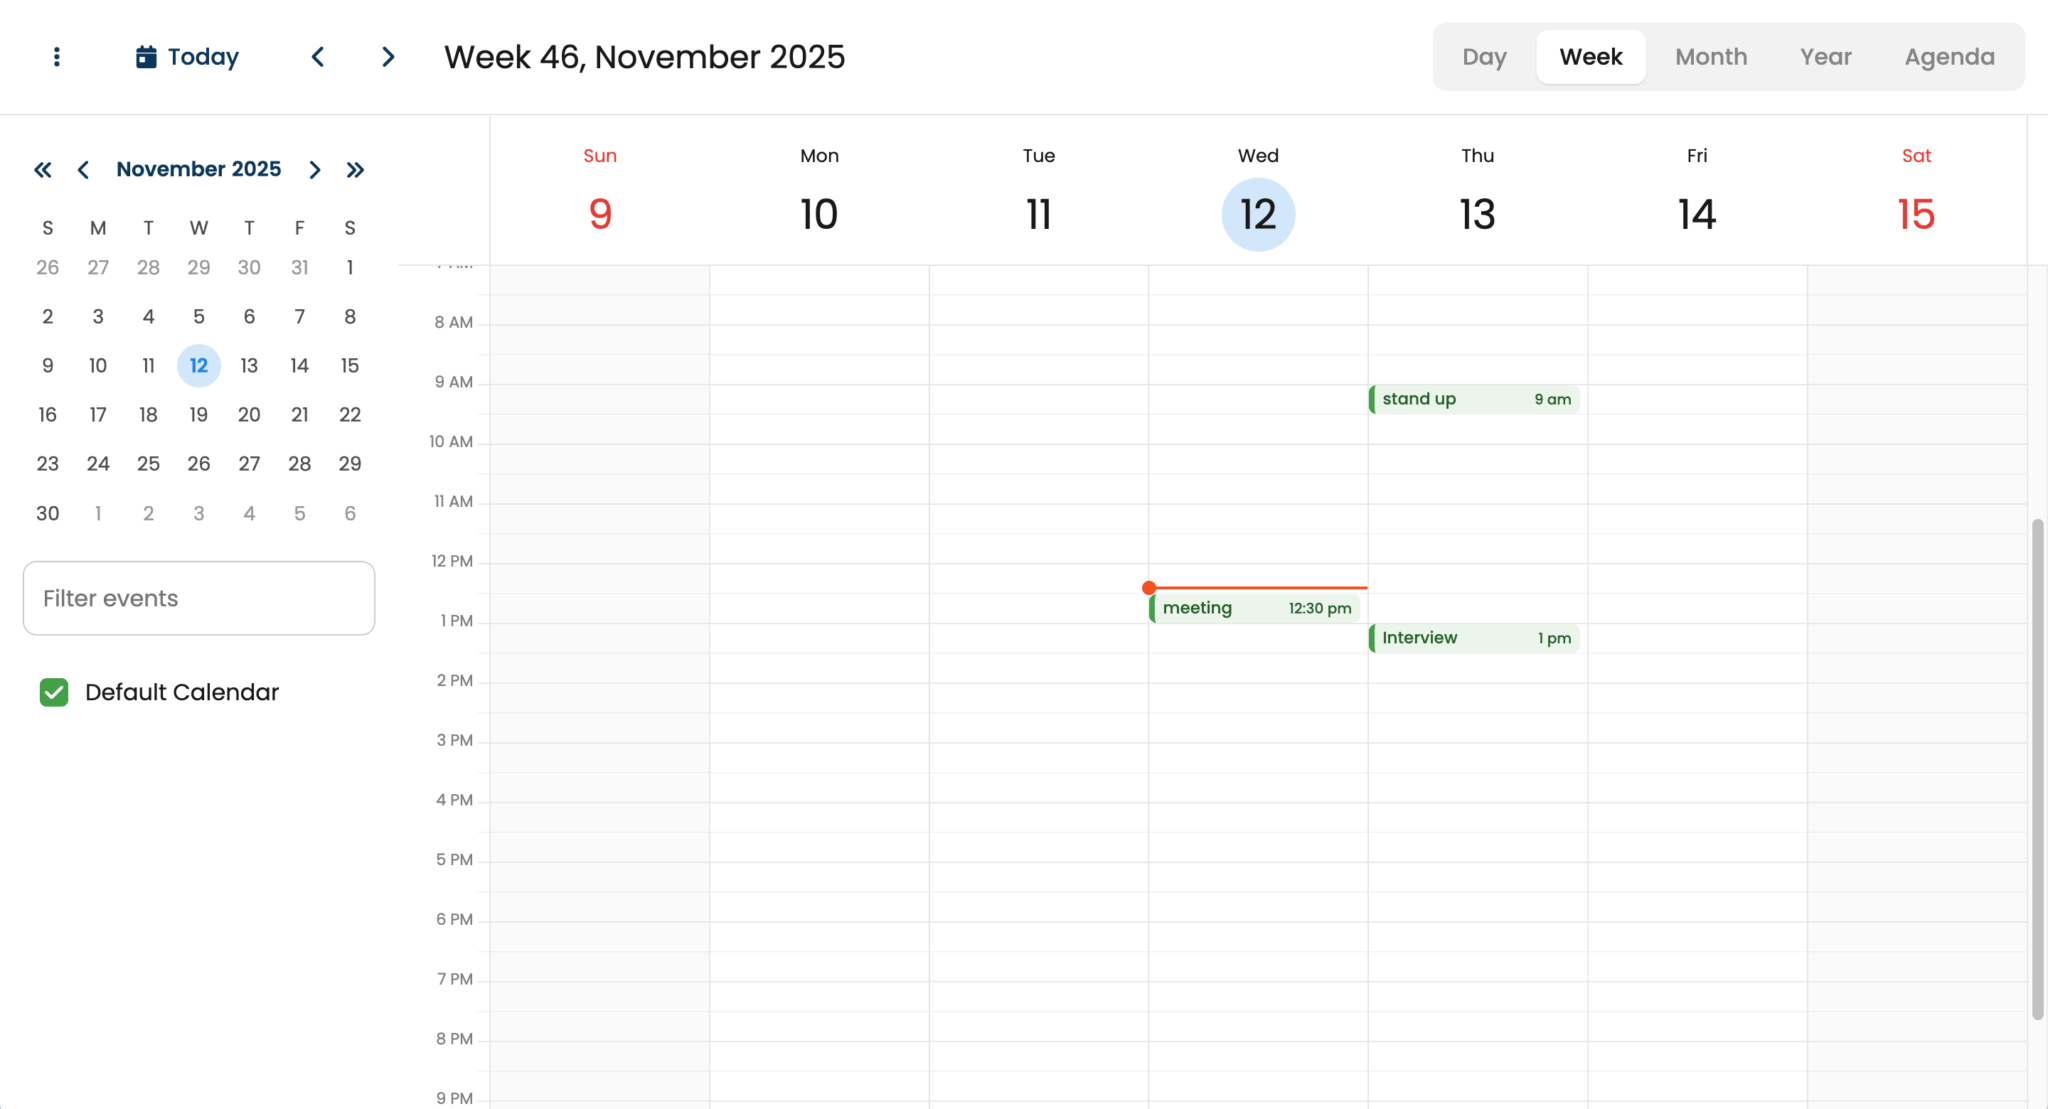
You’ll now see your Outlook Calendar events in your Bryntum Calendar:
Next, we’ll sync the calendars by implementing CRUD functionality in our Bryntum Calendar. Updates to the Bryntum Calendar events will update the events in the Microsoft Outlook Calendar.
Implementing CRUD
Now that we have connected our calendar to the Graph API, we’ll implement CRUD functionality by taking advantage of Microsoft Graph’s post, get, patch, and delete methods, passing a query string where relevant.
Create events
In the graph.js file, add the following function:
async function createEvent(name, startDate, endDate) {
    ensureScope('Calendars.ReadWrite');
    const event = {
        subject : `${name}`,
        body    : {
            contentType : 'HTML',
            content     : 'This is a test event'
        },
        start : {
            dateTime : `${startDate.toISOString()}`,
            timeZone : userTimeZone
        },
        end : {
            dateTime : `${endDate.toISOString()}`,
            timeZone : userTimeZone
        }
    };
    return await graphClient.api('/me/events').post(event);
}
Here we create a function that will create an Outlook event with a name, start date, and end date collected from the Bryntum Calendar. The function is passed the appropriate scope and the new event data is defined. The timezone needs to be specified; otherwise, Microsoft Graph will assume the timezone is GMT.
Get all events
In the graph.js file, add the following function:
async function getAllEvents() {
    ensureScope('Calendars.ReadWrite');
    return await graphClient
        .api('/me/events')
        .select(
            'id,subject,body,bodyPreview,organizer,attendees,start,end,location'
        )
        .get();
}
This function is similar to the getEvents function that we created earlier. The function is passed the appropriate scope, and we pass in an appropriate query string that filters the data to return only the event data appropriate to us. However, we will get all events from the user’s calendar in this case.
We need all the events from the user’s calendar, as we will search through these events later on.
Update events
In the graph.js file, add the following function:
async function updateEvent(id, name, startDate, endDate) {
    ensureScope('Calendars.ReadWrite');
    const event = {
        subject : `${name}`,
        body    : {
            contentType : 'HTML',
            content     : 'This is a test event'
        },
        start : {
            dateTime : `${startDate.toISOString()}`,
            timeZone : userTimeZone
        },
        end : {
            dateTime : `${endDate.toISOString()}`,
            timeZone : userTimeZone
        }
    };
    return await graphClient.api(`/me/events/${id}`).patch(event);
}
The updateEvent function will identify the appropriate Outlook event by id, and then it will use the new name, start date, and end date from the Bryntum Calendar to update the event. The function is passed the appropriate scope, and the new event data is defined.
Delete events
In the graph.js file, add the following function:
async function deleteEvent(id) {
    ensureScope('Calendars.ReadWrite');
    return await graphClient.api(`/me/events/${id}`).delete();
}
The deleteEvent function will identify the appropriate Outlook event by id, and delete the event.
Add an export for the functions at the bottom of the graph.js file:
export { createEvent, getAllEvents, updateEvent, deleteEvent };Listening for event data changes in the Bryntum Calendar
Next, we’ll set the listeners for our Bryntum Calendar so that it will know when the user updates the calendar events.
Add the following listeners property to the calendar config in the main.js file:
listeners : {
    dataChange : function(event) {
        updateMicrosoft(event);
    }
},
Here we set a listener on our Bryntum Calendar to listen for any changes to the Bryntum Calendar’s data store. This will fire an event called "update" whenever a calendar event is created or updated, and an event called "remove" whenever an event is deleted.
The event that’s retrieved from the dataChange listener will also carry event data about the specific calendar event that has been altered. We’ll use the event data to identify which event is being altered and what’s being changed.
Next we’ll create a function called updateMicrosoft that will update the Outlook Calendar when the appropriate "update" or "remove" event is fired.
Add the following code below the definition of calendar in the main.js file:
async function updateMicrosoft(event) {
    if (event.action == 'update') {
        const microEvents = await getAllEvents();
        // check if event exists in microsoft, if it does, update it, if not, create it
        var eventExists = false;

        for (var i = 0; i < microEvents.value.length; i++) {
            // event exists in both microsoft and bryntum with the same name
            if (microEvents.value[i].subject == event.record.name) {
                eventExists = true;
                updateEvent(
                    microEvents.value[i].id,
                    event.record.name,
                    event.record.startDate,
                    event.record.endDate
                );
                return;
            }
            else if ('name' in event.changes) {
                if (event.changes.name.oldValue == microEvents.value[i].subject) {
                    eventExists = true;
                    updateEvent(
                        microEvents.value[i].id,
                        event.record.name,
                        event.record.startDate,
                        event.record.endDate
                    );
                    return;
                }
            }
            else if ('resourceId' in event.changes) {
                eventExists = true;
            }
        }
        // event does not exist in microsoft, create it
        if (!eventExists) {
            if (event.record.name != undefined) {
                createEvent(
                    event.record.name,
                    event.record.startDate,
                    event.record.endDate
                );
            }
        }
    }
    // event is deleted
    else if (event.action == 'remove') {
        const microEvents = await getAllEvents();
        const eventName = event.records[0].data.name;
        for (let i = 0; i < microEvents.value.length; i++) {
            if (microEvents.value[i].subject == eventName) {
                deleteEvent(microEvents.value[i].id);
                return;
            }
        }
    }
}
Add the following imports to the top of the main.js file:
import { createEvent, getAllEvents, updateEvent, deleteEvent } from './graph.js';Update the displayUI() function in the main.js to use the getAllEvents() function.
- var events = await getEvents();
+ var events = await getAllEvents();
Here we create a function that is called on all changes to the data store of the Bryntum Calendar. The function then calls one of the Microsoft Graph CRUD functions that we defined.
On "update" we call getAllEvents to get a list of all the user’s Outlook Calendar events. We then loop through this list and compare the Bryntum Calendar event data from the "update" event to the Microsoft events.
async function updateMicrosoft(event) {
    if (event.action == 'update') {
        const microEvents = await getAllEvents();
        // check if event exists in microsoft, if it does, update it, if not, create it
        var eventExists = false;

        for (var i = 0; i < microEvents.value.length; i++) {
If there are events that match by name, then that Microsoft event needs to be updated.
if (microEvents.value[i].subject == event.record.name) {
    eventExists = true;
    updateEvent(
        microEvents.value[i].id,
        event.record.name,
        event.record.startDate,
        event.record.endDate
    );
    return;
But if the name has been changed, there won’t be a match. We need to check if any of the Microsoft event names match the name found in the “oldData” of the update data. This oldName data represents the name before the change made by `update`.
If a Microsoft event name matches the name in the “oldData”, then that Microsoft event needs to be updated to match the new name.
else if ('name' in event.changes) {
    if (event.changes.name.oldValue == microEvents.value[i].subject) {
        eventExists = true;
        updateEvent(
            microEvents.value[i].id,
            event.record.name,
            event.record.startDate,
            event.record.endDate
        );
        return;
    }
}
Next, we check the event.changes for a resource ID. If this resource ID exists, then the change has already been made and this update event should be ignored.
else if ('resourceId' in event.changes) {
    eventExists = true;
}
If the update passes any of these tests, then eventExists will be set to true. If not, then it will be set to false and the createEvent function will be triggered.
If no Microsoft event matches it, it’s because a new event was created in the Bryntum Calendar, so we create a new Outlook event using this new data.
if (!eventExists) {
    if (event.record.name != undefined) {
        createEvent(
            event.record.name,
            event.record.startDate,
            event.record.endDate
        );
    }
}
Finally, if the dataChange event is a "remove" event, then we delete the matching Outlook event using the deleteEvent function.
else if (event.action == 'remove') {
    const microEvents = await getAllEvents();
    const eventName = event.records[0].data.name;
    for (let i = 0; i < microEvents.value.length; i++) {
        if (microEvents.value[i].subject == eventName) {
            deleteEvent(microEvents.value[i].id);
            return;
        }
    }
}
Now try to create, update, delete, and edit an event in the Bryntum Calendar. You’ll see the changes reflected in the Outlook Calendar.
Next steps
This tutorial gives you a starting point for creating a Bryntum Calendar using vanilla JavaScript and syncing it with Microsoft Outlook. There are many ways that you can improve the Bryntum Calendar. For example, you can add features such as per-resource calendar views. Take a look at our Calendar demos page to see demos of the available features.