Creating AI-powered columns in Bryntum Grid
We strive to keep posts updated, but code samples may sometimes be outdated. Humans, see the Bryntum documentation; agents, https://mcp.bryntum.com for the latest info.
The Bryntum v6.2.0 release added AI functionality to the Bryntum Grid, allowing you to generate text content for cells using syntax similar to an Excel formula:
=AI(Summarize the $meetingNotes)You can add instructions to prompts, for example, to adjust the temperature (which controls the randomness of the output) or set the URL that the prompts are sent to.
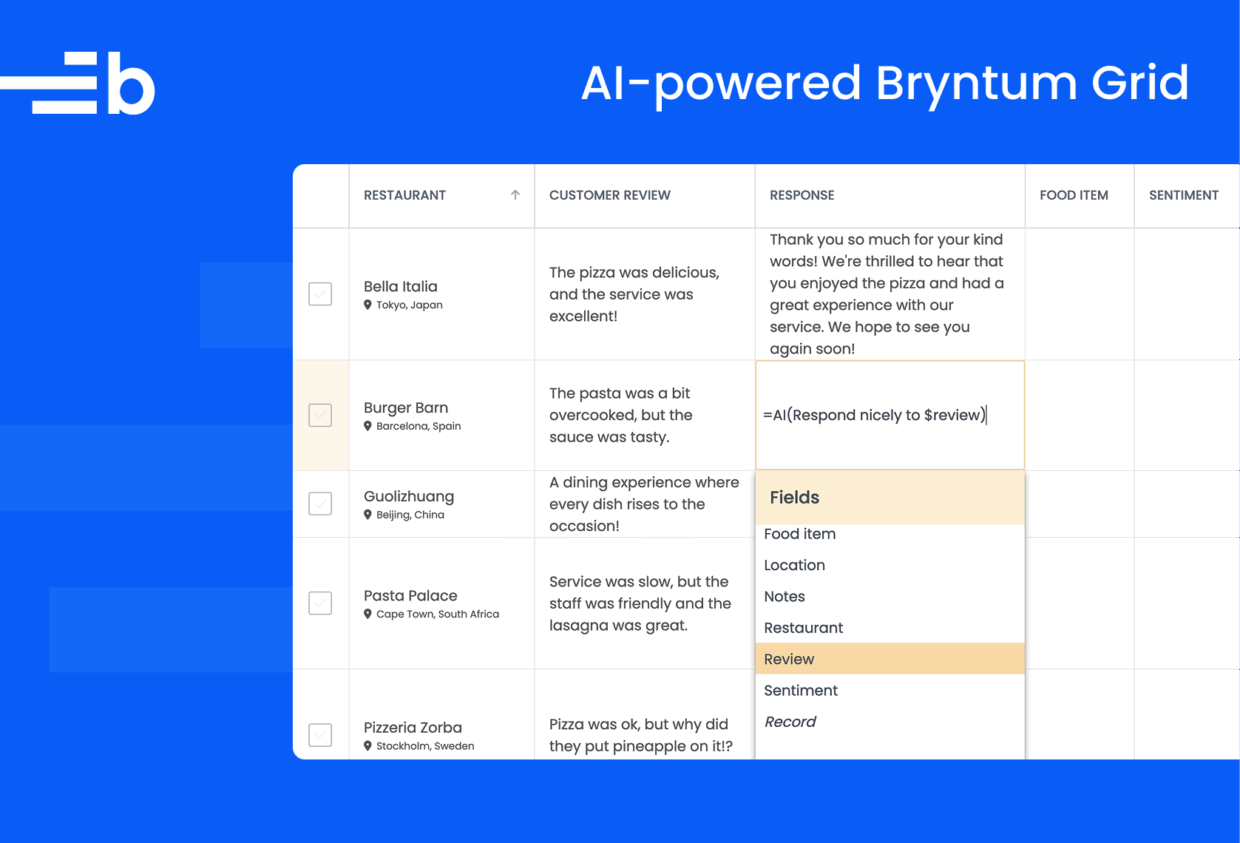
This functionality is especially useful for generating text content, such as a response to a review:
Take a look at our Bryntum Grid demos to see this text generation in action:
In this article, we’ll demonstrate how to use this new feature by adding AI functionality to a Bryntum Grid app. Note that you need a paid OpenAI account to meet the quota requirements of this tutorial.
How to add AI-powered columns to a Bryntum Grid
To add AI functionality to columns in a full-stack Bryntum Grid Express.js app, we will:
- Create an API endpoint that calls the OpenAI API.
- Use the Bryntum Grid AI formulaProvider to create an AI formula that makes calls to the OpenAI endpoint.
- Recreate the AI functionality of the app used in the AI-powered review insights demo.
Get started
In GitHub, clone the Bryntum Grid with AI-powered columns starter repo and follow the instructions in the README.md file to install the dependencies and populate a local SQLite database with example review data.
This Express app uses TypeScript, Sequelize ORM, and SQLite. The client-side Bryntum Grid is served from the public folder.
The starter has the following code and data for populating a local SQLite database with example review data:
- The Sequelize instantiation code: In
src/config/database.ts, the code for creating a Sequelize instance that uses a local SQLite database is stored as adatabase.sqlite3file in the root directory. - The Example data: The
src/initialDatafolder contains the JSON data for the example reviews that are used to populate the database. - The Sequelize data model: In
src/models/Review.ts, the Sequelize model that defines the structure of the review data. - The database seeding script: The
src/addExampleData.tsfile contains a Node.js script that uses Sequelize to create a local SQLite database and populate it with the example review data.
Note: The AI formula functionality was introduced in version 6.2.0 of Bryntum Grid.
Start the development server with npm run dev. The application will be accessible at https://localhost:3000.
Create an OpenAI API endpoint
We need an API URL for the Bryntum Grid AI functionality. The prompt passed in to the AI formula is sent to the URL using a POST request. It’s sent as the value of the prompt property in the POST request body. The default paramName can be changed.
The response from the API should be a JSON object with the response from an LLM added to the responseField, which is content by default. The response is used as the result of the AI formula, which adds the text to the Bryntum Grid cell.
We’ll use the OpenAI API to create an AI endpoint to answer the formula prompts. The OpenAI API uses API keys for authentication. Create an OpenAI API key in your OpenAI organization settings.
Create an environmental variable called OPENAI_API_KEY in your .env file and set its value to your OpenAI API key:
OPENAI_API_KEY=Install the OpenAI TypeScript and JavaScript API Library:
npm install openaiIn the src/index.ts file, import the OpenAI API client for interfacing with the OpenAI API:
import { OpenAI } from 'openai';Create an OpenAI API client instance above the code line, const app = express();, and pass in your API key in the options object:
const openai = new OpenAI({
    apiKey : process.env.OPENAI_API_KEY
});
Add the following API endpoint:
app.post('/formulaPrompt', async(req, res) => {
    try {
        const { prompt, temperature, max_tokens } = req.body;

        const response = await openai.responses.create({
            model             : 'gpt-4o-mini',
            instructions      : 'You are an AI assistant integrated with Bryntum Grid to generate content for a grid cell. Your role is to provide concise, accurate responses based on natural language prompts. Keep responses direct and to the point, avoiding unnecessary explanations or text.',
            input             : prompt,
            max_output_tokens : max_tokens || 100,
            temperature       : temperature || 1
        });

        res.json({
            content : response.output_text
        });
    }
    catch (error) {
        console.error('OpenAI API error:', error);
        res.status(500).json({
            content : 'There was an error generating the AI content'
        });
    }
});
Here, we call the Responses API to generate a text response for the formula input. The prompt, temperature, and max_tokens will be sent in the request body by the Bryntum Grid AI formula.
The optional instructions property inserts a system message as the first item in the model’s context. You can adjust this as needed. The max_output_tokens is the upper bound for the number of tokens that can be generated for a response, including visible output tokens and reasoning tokens. The temperature controls the randomness of the LLM’s output. Higher values mean more randomness, which makes the output more creative. Lower values make the output more structured and deterministic. The default value is 1, and the range of allowed values is from 0 to 2.
Add the AI formula provider to the Grid
Let’s show you just how easy it is to add AI functionality to the Grid. In the public/main.js file, add the following config object to the grid, below the rowHeight property:
    formulaProviders : {
        AI : {
            url  : '/formulaPrompt',
            body : {
                max_tokens  : 100,
                temperature : 1
            }
        }
    },
The formulaProviders object configures formulas that you can use in grid cells. Each property in formulaProviders represents a formula prefix (like AI) that is linked to a specific configuration for the FormulaProvider. The FormulaProvider class attaches to an input field in a grid cell. If the formula is used in the input, the input is sent in a POST request to the configured url (in this case, the OpenAI endpoint). The response is used as the result of the formula.
We add the max_tokens and temperature to the body of the POST request.
To use the AI formula in a column, you need to set the formula property of a column to true.
Add the following property to the response, foodItem, sentiment, and notes columns in the columns config array:
formula: true,Your columns now have AI powers!
Run the development server using the following command:
npm run devOpen https://localhost:3000 and then type the following prompt into a grid cell in the Response column:
=AI(Write a nice response to the customer who left this)Select Review from the dropdown menu that is displayed below the cell where you typed =AI(, then close the formula by typing ), and press Enter. The formula calls our OpenAI API endpoint and adds the response to the cell.
You can also click on the cell and drag the blue square in the bottom-right corner to add AI-generated responses to more cells in the column:
This spreadsheet-like behaviour is enabled by the selectionMode config in the grid:
selectionMode : {
  cell       : true,
  checkbox   : true,
  dragSelect : true
},
The dropdown menu lets you add the value of a row in another column. You can do this manually by typing the field name prefixed by a $ sign.
You can also use $this to add the whole review record:
{
    "id": "8",
    "restaurant": "Pizzeria Zorba",
    "location": "Stockholm, Sweden",
    "review": "Pizza was ok, but why did they put pineapple on it!?"
}
The expected server response looks like the following:
{
  "content": "Thank you for your feedback! ..."
}
To make it easier for users to use the AI formula, you can add an example tooltip to columns. Add the following tooltip property to the response column object in the columns array:
tooltip : 'Try typing =AI(Write a nice response to the customer who left this review: $review)',You’ll see the tooltip when you hover your cursor over the Response column header:
How to add global AI formula settings to the Grid
In addition to setting default configurations in the AI formula provider, you can add global settings that users can adjust dynamically at runtime, such as setting a global prompt suffix to provide more context or adjusting the temperature for all AI requests.
Let’s create a settings panel that allows users to adjust these global settings directly from the Grid and then save their changes locally.
Create a global AI formula settings panel
In the public/main.js file, add the following onPaint event handler to the grid config, below the store property:
onPaint({ firstPaint }) {
  if (firstPaint) {
    this.settingsPanel = new Panel({
      drawer   : true,
      width    : '37em',
      title    : 'Settings',
      defaults : {
        labelWidth : '10em'
      },
      items : {
        extra : {
          type   : 'textarea',
          height : '15em',
          label  : 'Global Prompt Suffix',
          value  : `Please return the result using the language of ${this.localeManager.locale.localeCode}. If message indicates just one word or number, character, image, or emoji is requested, return just *one* such item, and no extra text.`
        },
        temperature : {
          type        : 'slider',
          flex        : '1 0 100%',
          label       : 'Temperature',
          min         : 0,
          max         : 2,
          value       : 1,
          step        : 0.1,
          onChange    : ({ value }) => this.onTemperatureChange(value),
          showTooltip : true
        }
      }
    });
  }
},
The onPaint event handler is called when a Bryntum widget is made visible. We create a Panel with two input items:
- A
textareafor adding a prompt suffix to every AI prompt. - A
sliderthat sets the temperature.
Define the onTemperatureChange method below the onPaint event handler:
onTemperatureChange(value) {
  // Adjust configuration block, which is used by all instances
  const roundedValue = Math.round(value * 10) / 10;
  this.formulaProviders.AI.body.temperature = roundedValue;
}
When the temperature is changed, the AI formula provider’s temperature property in the POST request body is updated.
Add the global prompt suffix to AI formulas
To automatically append the global prompt suffix to each AI-generated formula request, use the onFormulaChange event handler.
Add the following onFormulaChange function to the value object of the AI FormulaProvider, formulaProviders :{ AI :{ ...:
onFormulaChange(event) {
  event.formula = `${event.formula}. ${grid.settingsPanel.widgetMap.extra.value}`;
},
Each time the AI formula runs, the global prompt suffix is added to the prompt.
Now, add the following onFormulaNetworkError function below the onFormulaChange function:
onFormulaNetworkError({ response }) {
Toast.show({
html : `AIFormula network error: ${response.statusText}
${response.url}
Please ensure that the url is correct and that the server is running.
`,
timeout : 3000
});
}Import the Bryntum Toast widget:
import { Toast } from './grid.module.js';The onFormulaNetworkError function is called when the network request to the server fails. We use the Bryntum Toast widget to display the error message to the user.
Toggle the settings panel open and closed
Add the following onSettingsClick method below the onTemperatureChange method:
onSettingsClick() {
  const { settingsPanel } = this;
  settingsPanel[settingsPanel.isVisible ? 'hide' : 'show']();
},
This function toggles the visibility of the settings panel.
Import the Bryntum Panel widget:
import { Panel } from './grid.module.js';Now, let’s add a settings button to the Grid notes header to provide users with access to the settings panel. Add the following headerWidgets array to the notes column object in the columns config:
headerWidgets : [{
  type    : 'button',
  style   : 'order:1',
  tooltip : 'Show settings panel',
  icon    : 'b-fa b-fa-cog',
  cls     : 'b-transparent',
  onClick : 'up.onSettingsClick'
}]
Here, headerWidgets defines an array of widgets to append to the column header. Clicking the button widget triggers the onSettingsClick function that opens or closes the settings panel.
You now have AI-powered columns in your Bryntum Grid, with a settings panel that lets you add context to your prompt and adjust the temperature.
Save the global AI formula settings to local storage
Let’s first create a function to save changes to the user’s global AI formula settings to their local storage.
Add the following saveGlobalPrompt method below the onTemperatureChange method:
saveGlobalPrompt(updates) {
  const currentSettings = JSON.parse(localStorage.getItem('globalPromptSettings') || '{}');

  const newSettings = {
    ...currentSettings,
    ...updates
  };

  localStorage.setItem('globalPromptSettings', JSON.stringify(newSettings));
},
This function gets the existing global prompt settings from local storage and then merges the changes passed in to the function with any existing prompt settings. The new global prompt settings are then saved to local storage.
In the onPaint event handler, add the following lines of code to the top of the firstPaint if block:
const savedSettings = localStorage.getItem('globalPromptSettings');
const settings = savedSettings ? JSON.parse(savedSettings) : {
  globalPrompt : `Please return the result using the language of ${this.localeManager.locale.localeCode}. If message indicates just one word or number, character, image, or emoji is requested, return just *one* such item, and no extra text.`,
  temperature : 1.0
};
if (!savedSettings) {
  this.saveGlobalPrompt(settings);
}
This gets the initial global prompt settings from local storage on page load and saves the settings in the settings variable. If the local storage value hasn’t been set, it’s set using the saveGlobalPrompt method.
In the onPaint event handler, change the value property of the extra item in the Panel config’s items object and add the following onChange property to the extra item:
value : settings.globalPrompt,
onChange : ({ value }) => this.saveGlobalPrompt({ globalPrompt : value })
This updates the local storage value of the globalPrompt when the value is changed.
In the temperature item, change the value property to the following:
value : settings.temperature,In the onTemperatureChange method, add the following line of code to save the temperature change to local storage:
this.saveGlobalPrompt({ temperature : roundedValue });Add the following line of code to the onFormulaChange function event handler in the AI FormulaProvider:
event.source.body.temperature = Math.round(grid.settingsPanel.widgetMap.temperature.value * 10) / 10;Each time the AI formula runs, the temperature value is added to the request body.
You can remove the hard‑coded provider temperature value in the body of the AI FormulaProvider:
- temperature: 1You now have AI-powered columns in your Bryntum Grid, with a settings panel that lets you add context to your prompt and adjust the temperature.
Next steps
The Bryntum Grid AI-powered columns are ideal for generating text content. For example, if you have a money field in your grid, such as a customer’s bill, you can automatically format the values for consistency:
=AI(format the value of bill, from $this. Round the number to 2 decimal places and add the country currency symbol using $location - add the currency symbol to the front of the number)You can then apply the AI formula to all of the column values:
Here are some more ways that you can use the powerful AI formula in your Bryntum Grid:
- Generate SEO tags instantly from product descriptions to boost your online visibility.
- Create concise summaries of lengthy meeting notes, saving valuable review time.
- Tag and categorize user-generated content, streamlining content moderation processes.
- Enrich product listings with descriptions, increasing customer engagement and conversion rates.
- Automatically translate and localize content, making your Grid data more accessible to global audiences.
- Summarize financial reports and analytics data, for better decision-making at a glance.
- Generate personalized email snippets and marketing copy to optimize your communication workflows.
With Bryntum Grid’s AI integration, your workflows become faster, smarter, and more effective, helping you stay ahead of the competition and deliver an exceptional user experience.