Creating a custom Bryntum Gantt React component for Storyblok
We strive to keep posts updated, but code samples may sometimes be outdated. Humans, see the Bryntum documentation; agents, https://mcp.bryntum.com for the latest info.
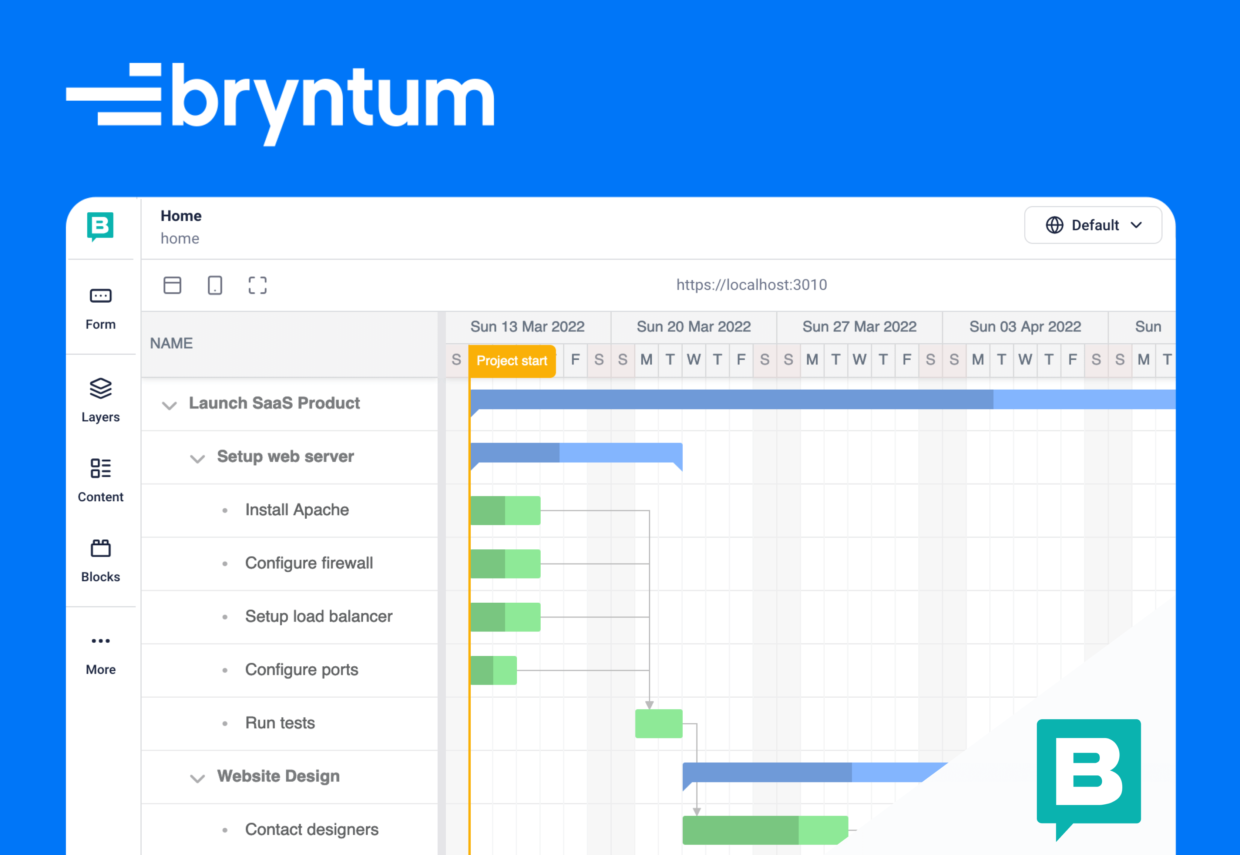
Bryntum Gantt is a highly customizable and performant JavaScript UI web component that integrates with all major JavaScript web frameworks. In this tutorial, we’ll show you how to use a Bryntum Gantt React component with Storyblok, which is a content management system (CMS) with a visual editor.
In this tutorial, we’ll do the following:
- Create a Next.js Bryntum Gantt project.
- Create a Storyblok space.
- Create Storyblok blocks for a Bryntum Gantt using the Storyblok Visual Editor.
- Create Storyblok task blocks to store Gantt tasks data.
- Connect Storyblok to the Next.js project.
- Create React components for Storyblok blocks.
- Configure the Bryntum Gantt to load tasks data from Storyblok and synchronize changes to Storyblok using the Storyblok Management API.
You can find the code for the completed tutorial in this GitHub repository.
Creating a Next.js Bryntum Gantt project
We’ll use the Bryntum Gantt Next.js with TypeScript starter template. Install the dependencies and Bryntum Gantt component by following the steps in the starter template’s README file.
The Gantt component in src/components/Gantt.tsx is a React client component, as it uses the use client directive at the top of the file.
The Bryntum Gantt project configuration, which is set in the projectConfig React state variable, has a built-in CrudManager used for loading example data. The example project data is loaded from the data.json file.
The code in the useEffect hook setup function shows you how to access the Bryntum Gantt instance.
The Bryntum Gantt React component is dynamically imported with server-side rendering (ssr) set to false in the src/components/GanttWrapper.tsx file. This is done to prevent the Bryntum Gantt React client component from being pre-rendered on the server, as Bryntum components are client-side only.
Getting started with Storyblok
Sign up to Storyblok to get a 14-day free trial. The Storyblok Visual Editor allows non-developers to manage and organize a website’s content. We’ll create Storyblok components that you can drag and drop and edit in the visual editor. We’ll create React Storyblok components to have fine control over how the components are rendered using Storyblok data.
In Storyblok, a space is where all content related to a project is kept. We’ll create a Story in the space. The content of a page is stored as a story, which consists of the content entries defined by a Content Type. The Content Type defines the type and structure of a Story, for example, “Article page”. The Content Type has data fields that can be of various types such as text, number, boolean, and asset. A field can also be a block type. A Storyblok block separates your page or other content into modifiable components.
There are three types of blocks (components): Content Type, Nestable, and Universal. A Nestable block forms part of a story, so a story can’t be created from this block type. Nestable blocks are nested within a story or other block, for example, “Chapter”, “Section”, or “Full Width Image”. A Universal block can be used as both a Content Type and a Nestable block at the same time. Storyblok gets its name from this component structure.
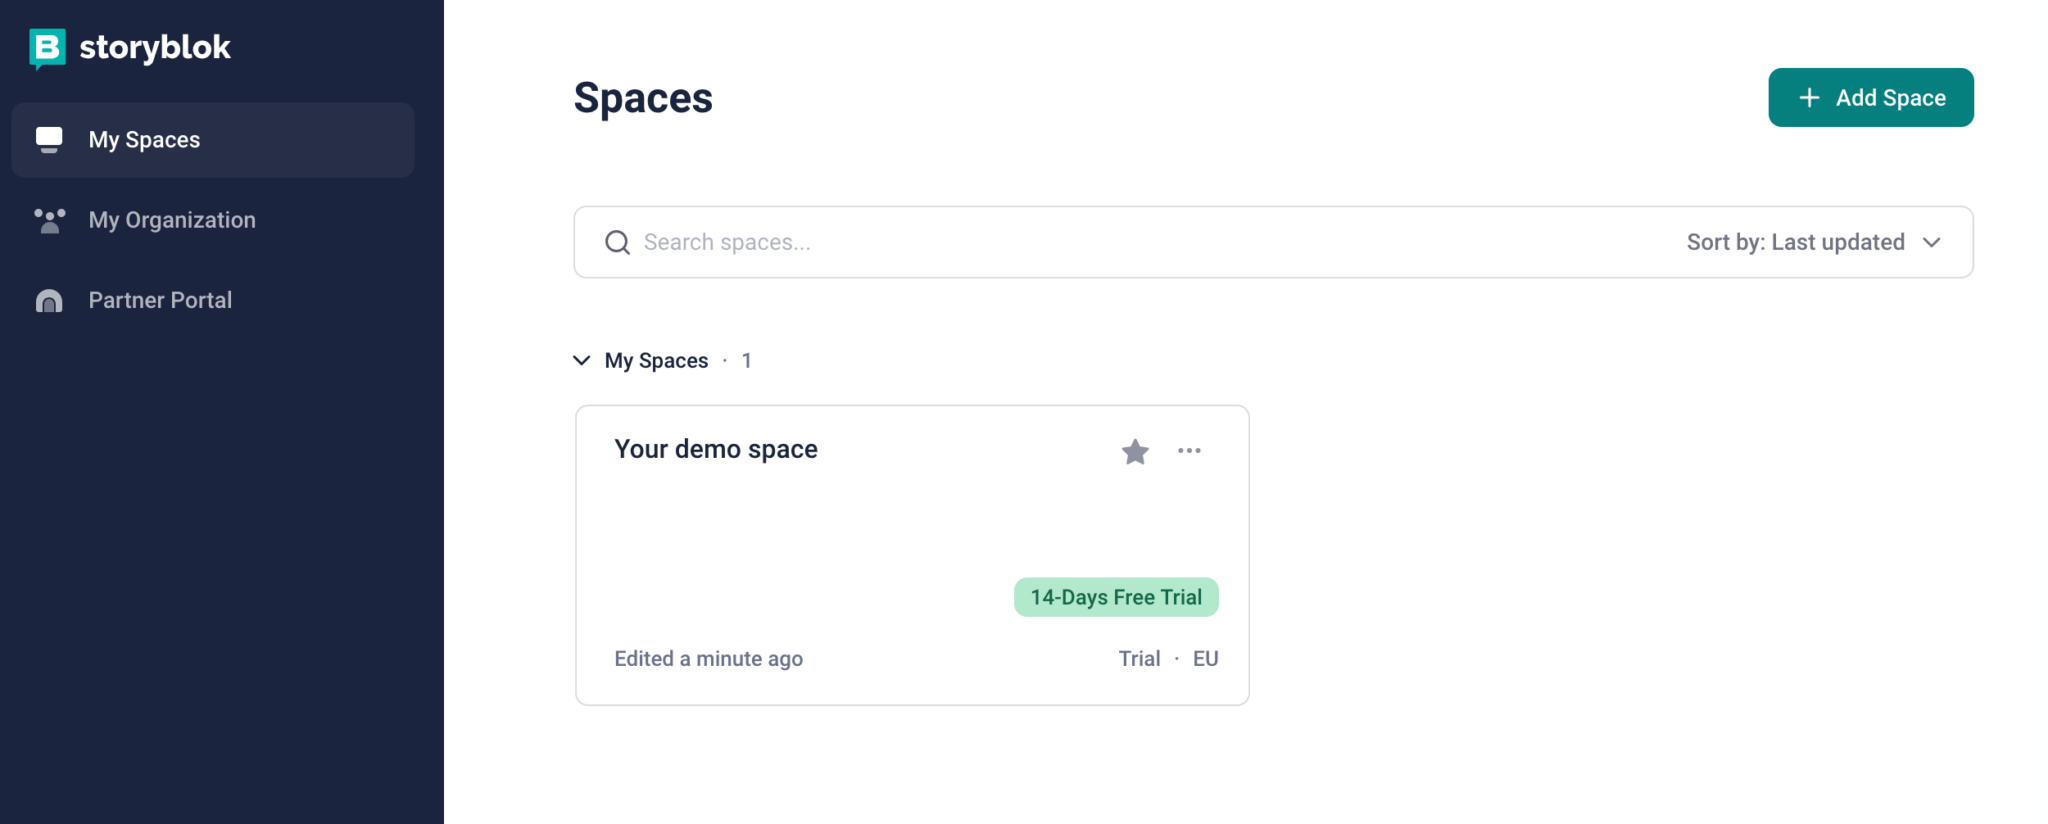
Creating a Storyblok space
Once you’ve logged in to Storyblok, open the My Spaces page and you’ll see a demo space. Click the + Add Space button at the top right to create a new space.
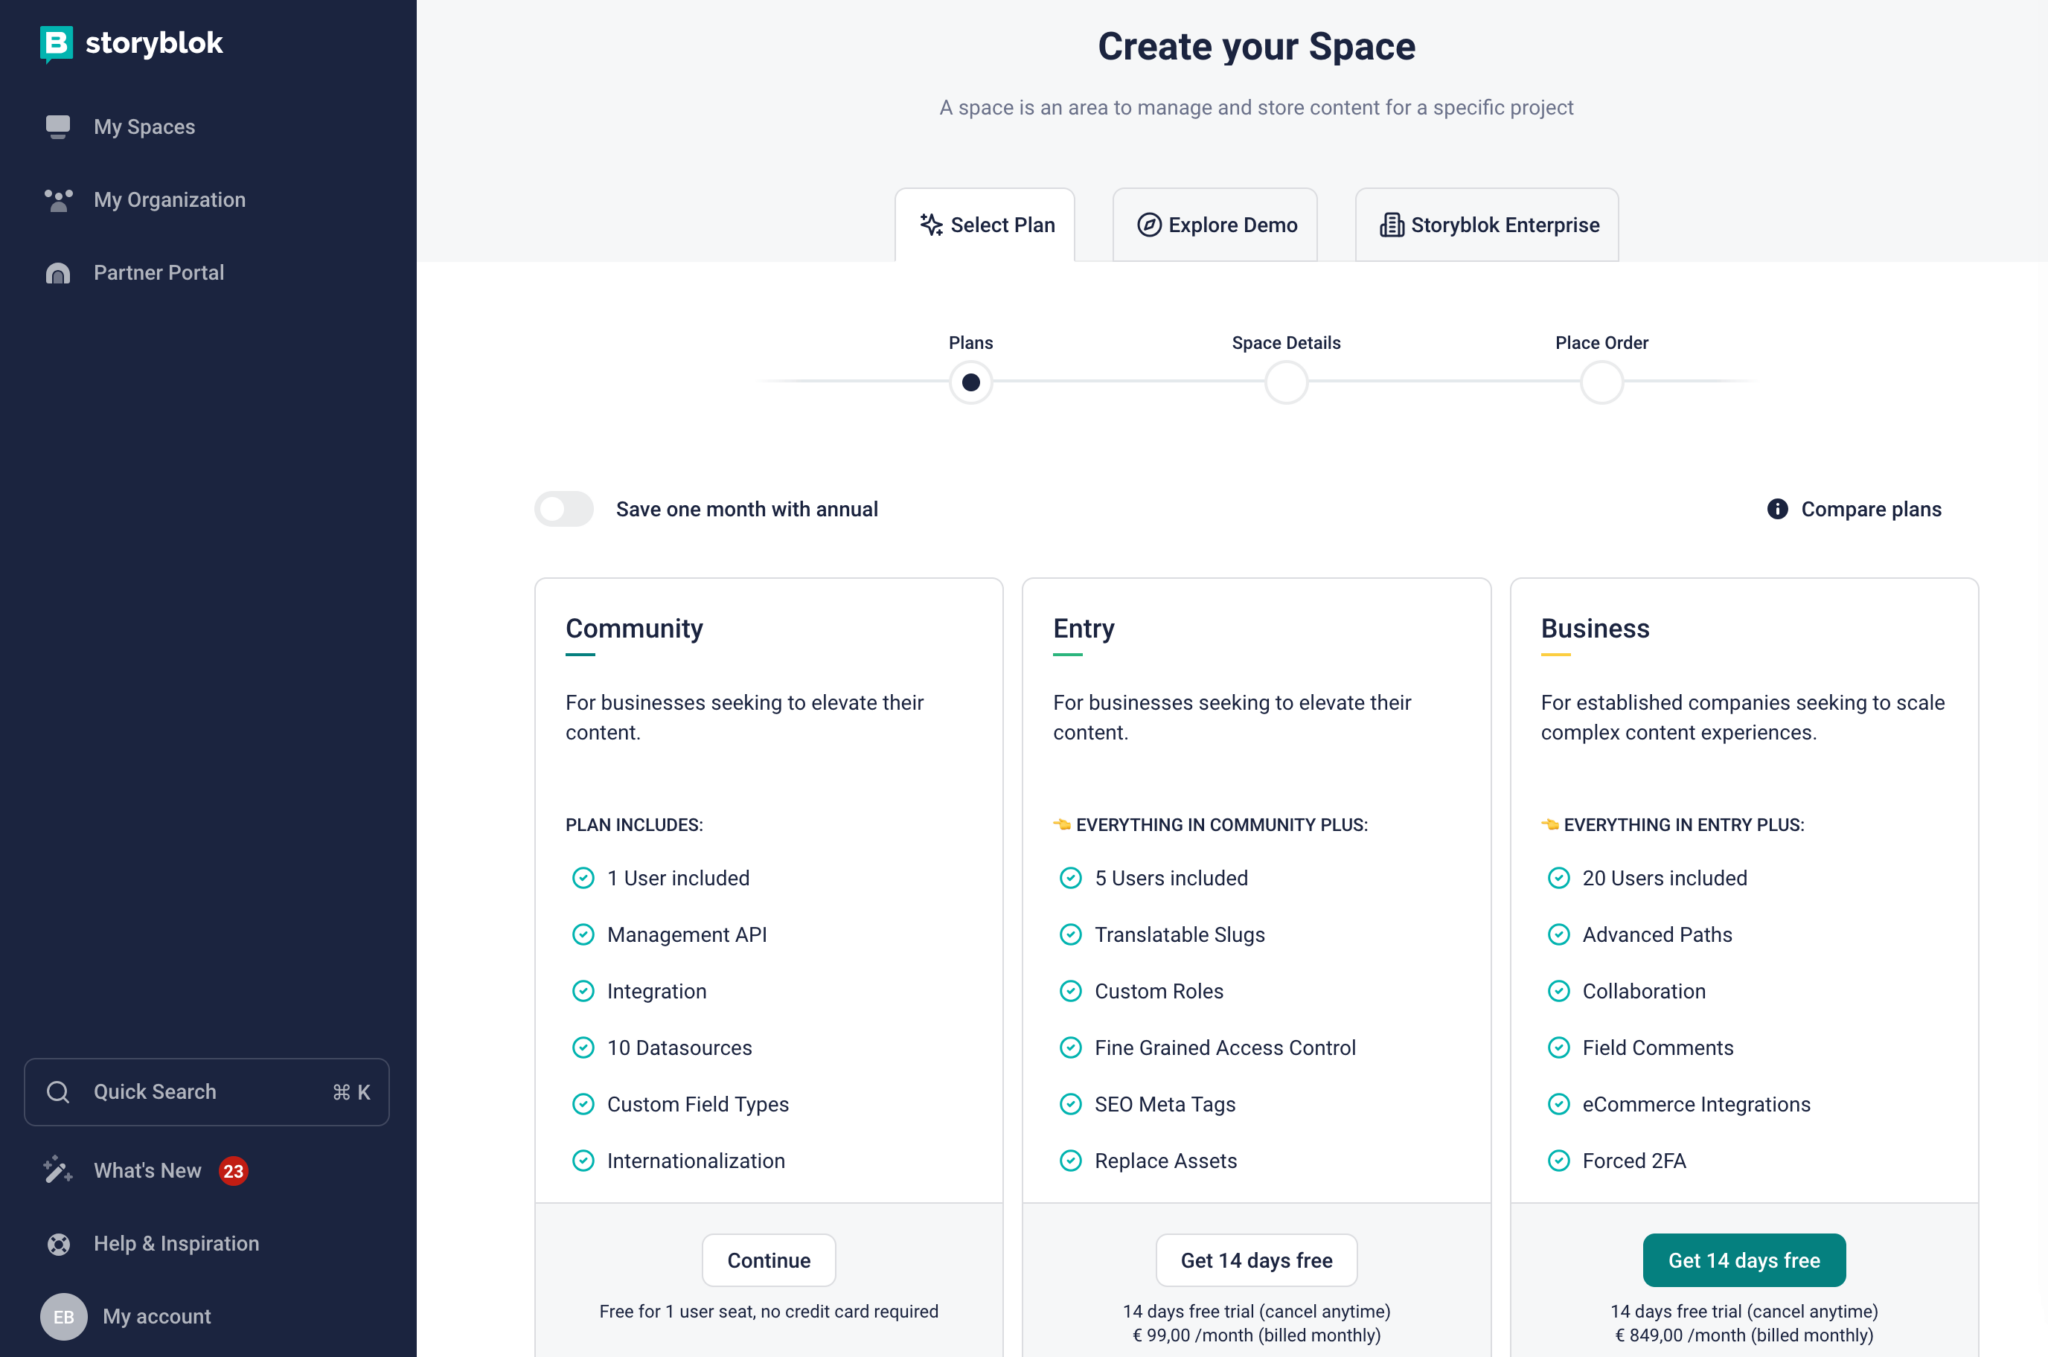
In this tutorial, we’ll use the Community plan. Click the Continue button at the bottom of the Community card.
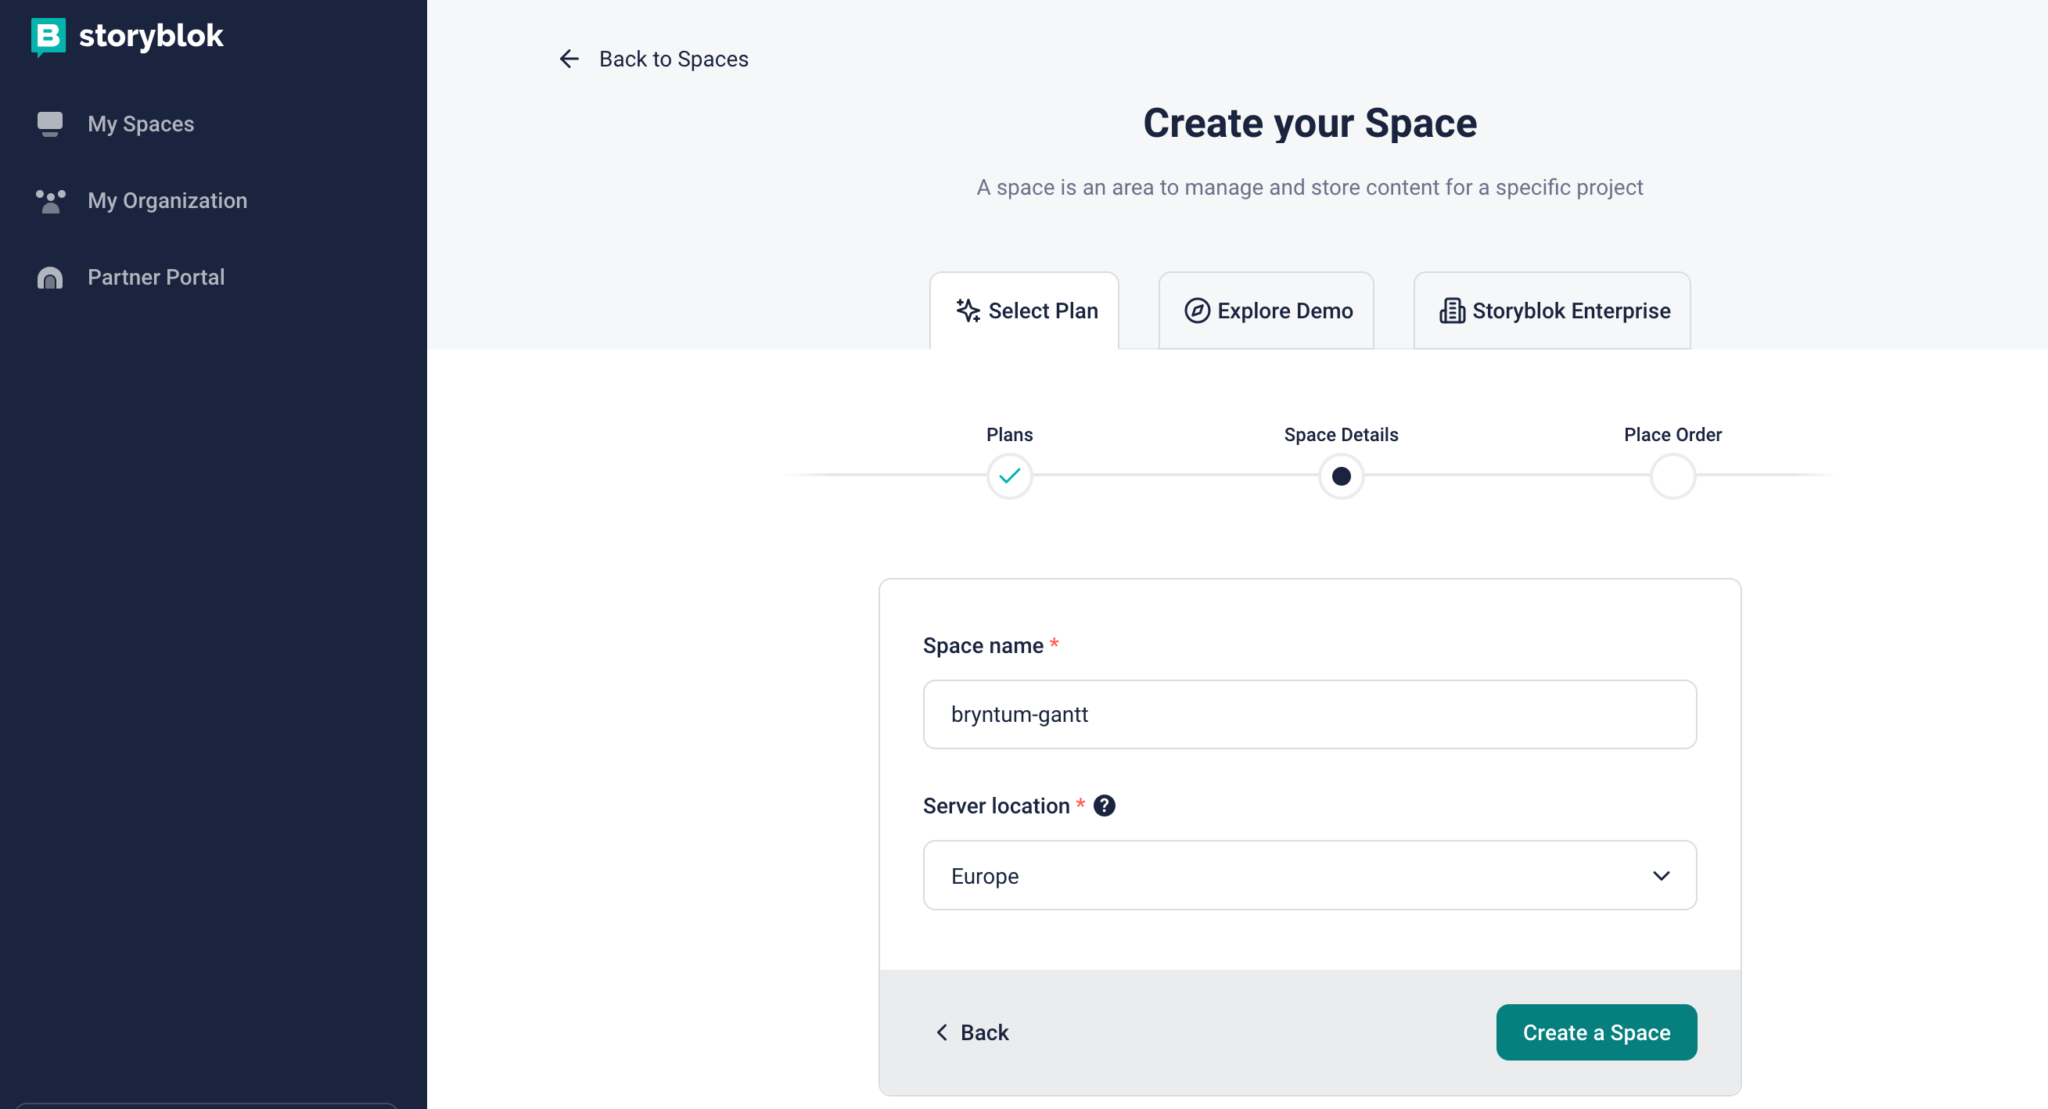
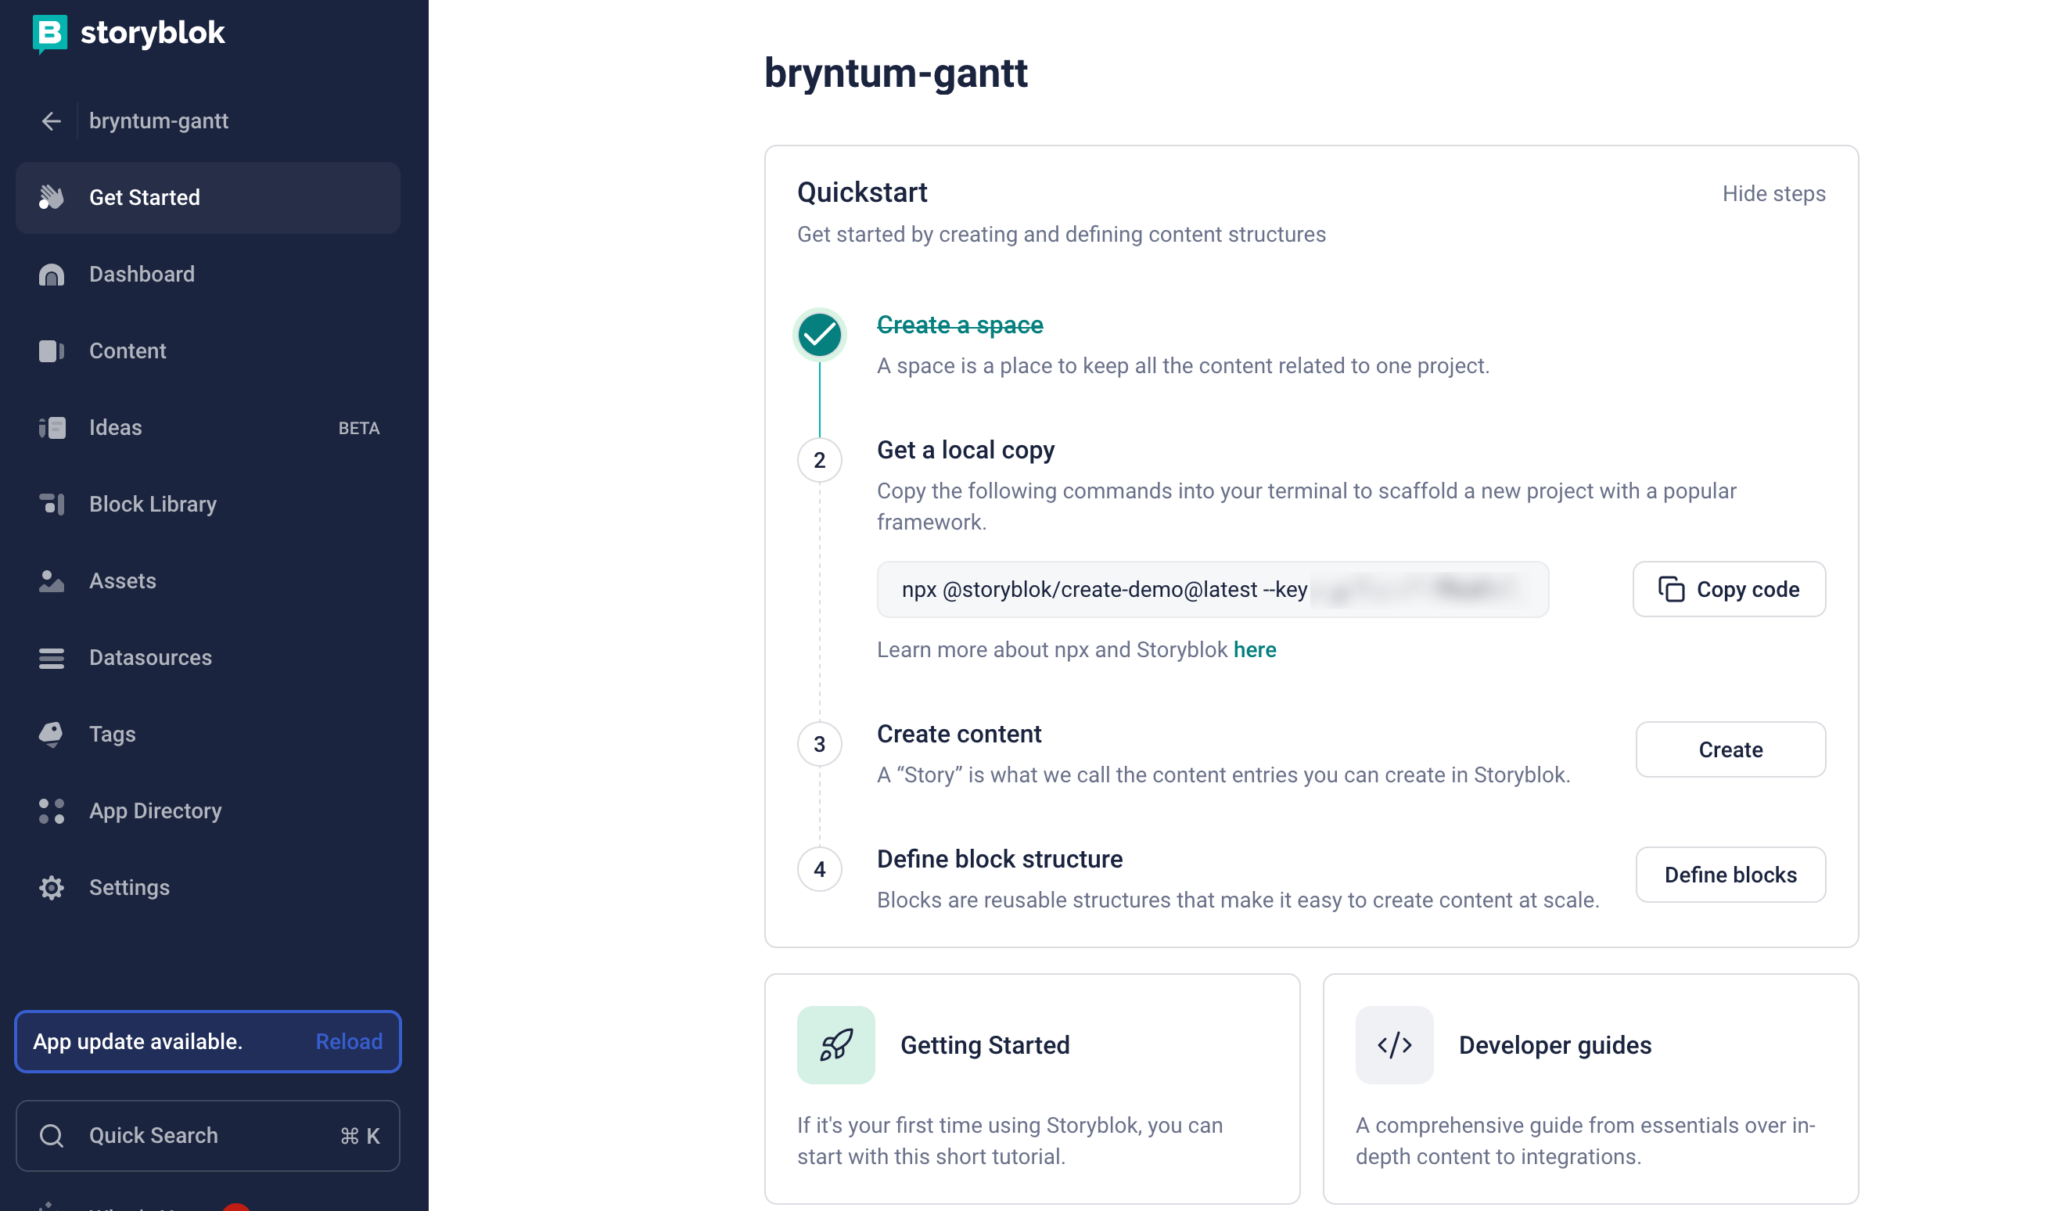
Name your space “bryntum-gantt”, set your server location, and click the Create a Space button.
A Quickstart card will be displayed for your new space.
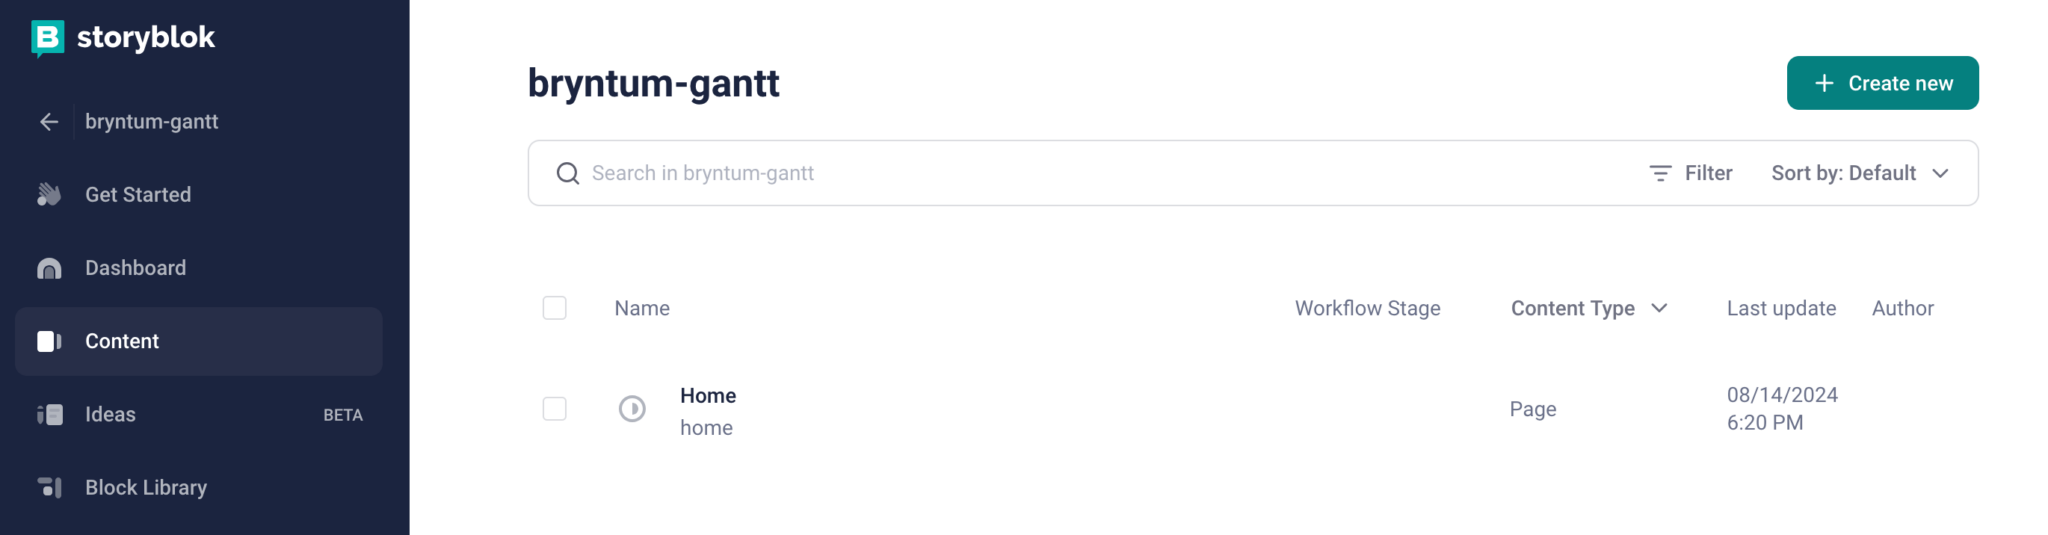
Open the Content page. You’ll see a “Home” story is created automatically, we’ll use this story. Click on it to open the visual editor.
In the right panel of the visual editor, you can see the example content that’s been added to the story.
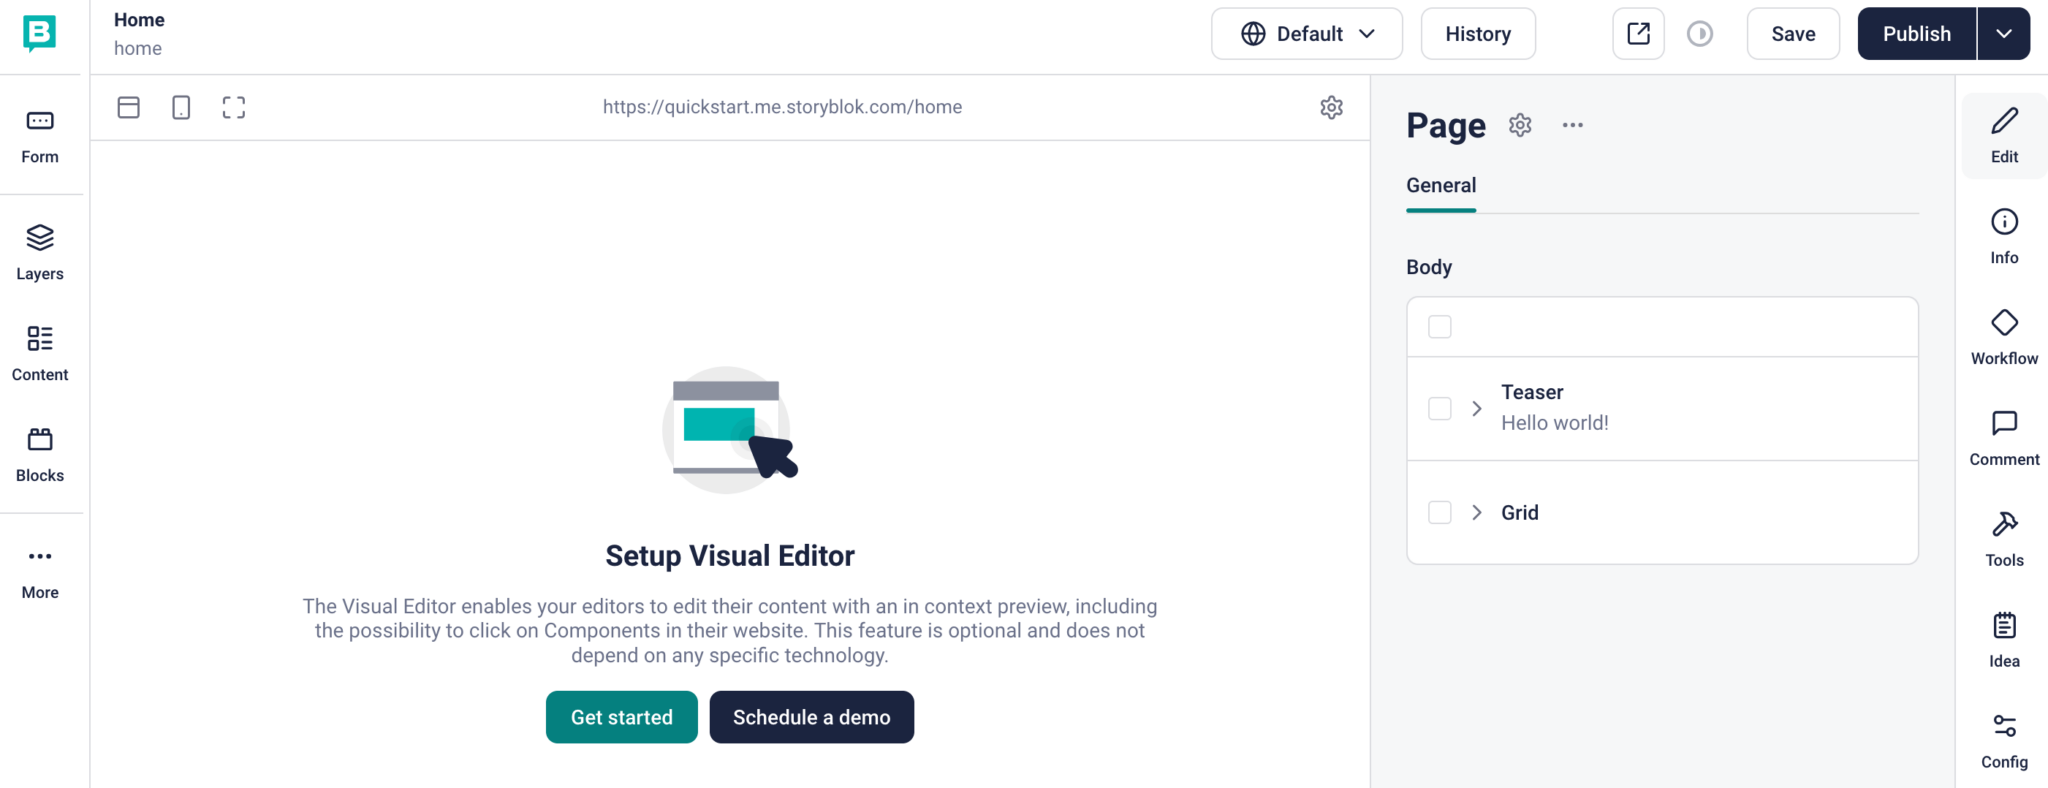
Copy the access token displayed on the page and save it as an environment variable named NEXT_PUBLIC_STORYBLOK_API_TOKEN in a .env.local file in your Next.js project.
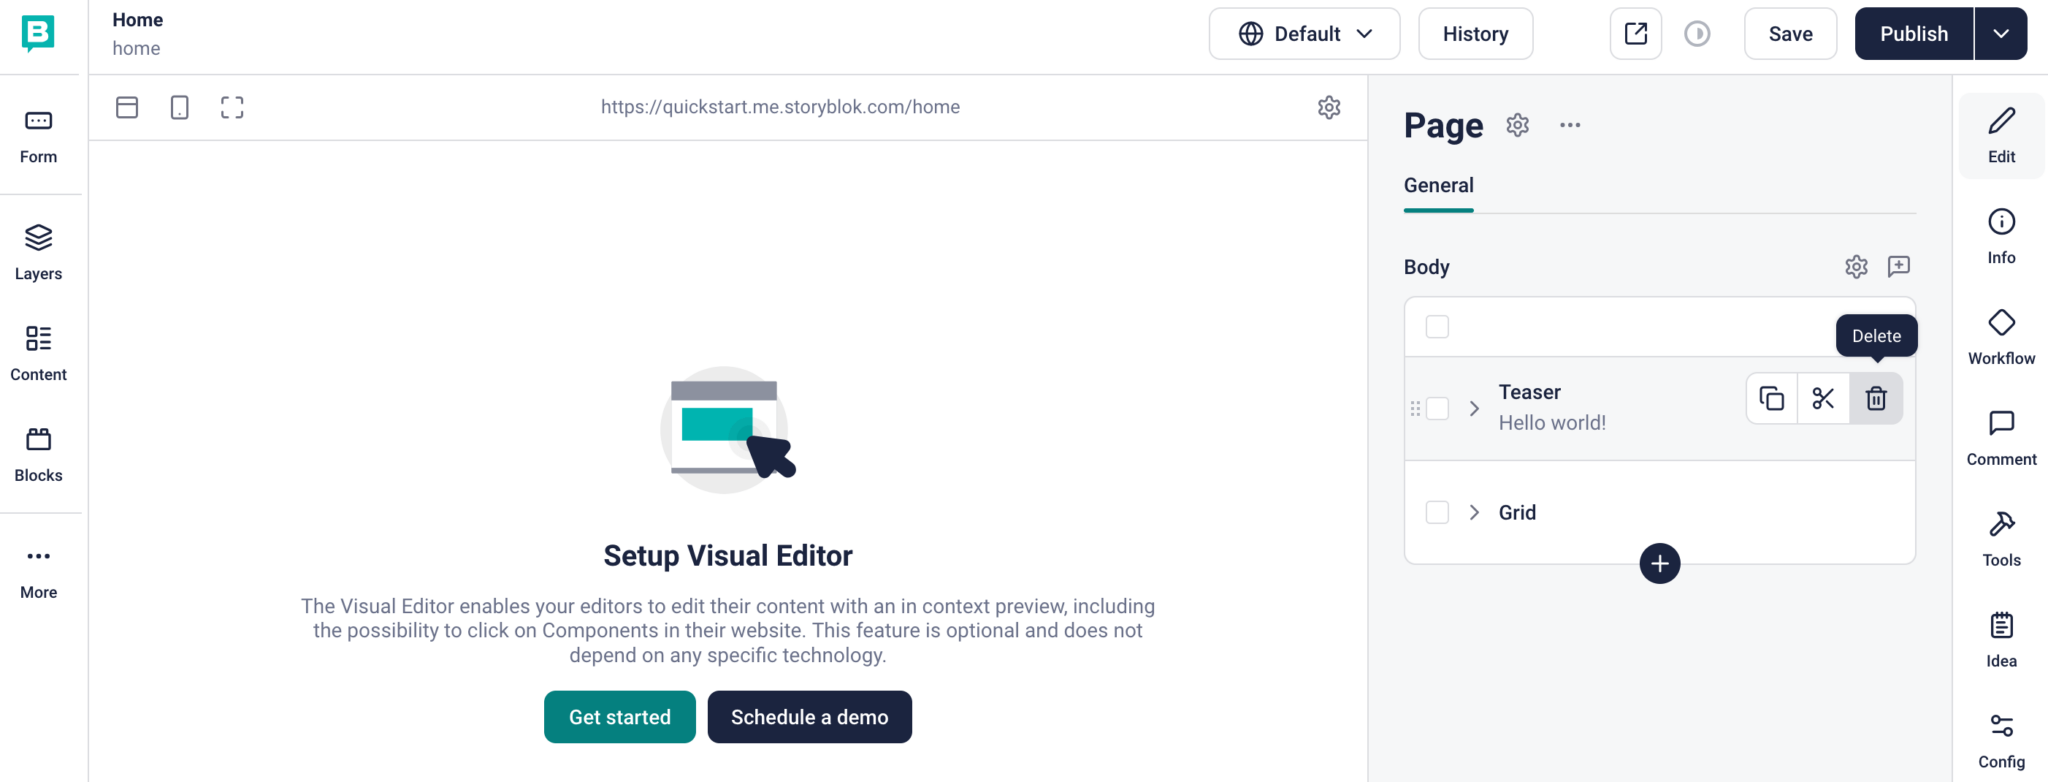
Click on the Blocks item in the left navigation bar. Note the four example blocks added to the story. Delete the feature, grid, and teaser blocks.
Now let’s create the other blocks we’ll use for the Bryntum Gantt page.
Creating Storyblok blocks using the Storyblok Visual Editor
We’ll create three blocks for the Bryntum Gantt page: Header, Gantt, and Task.
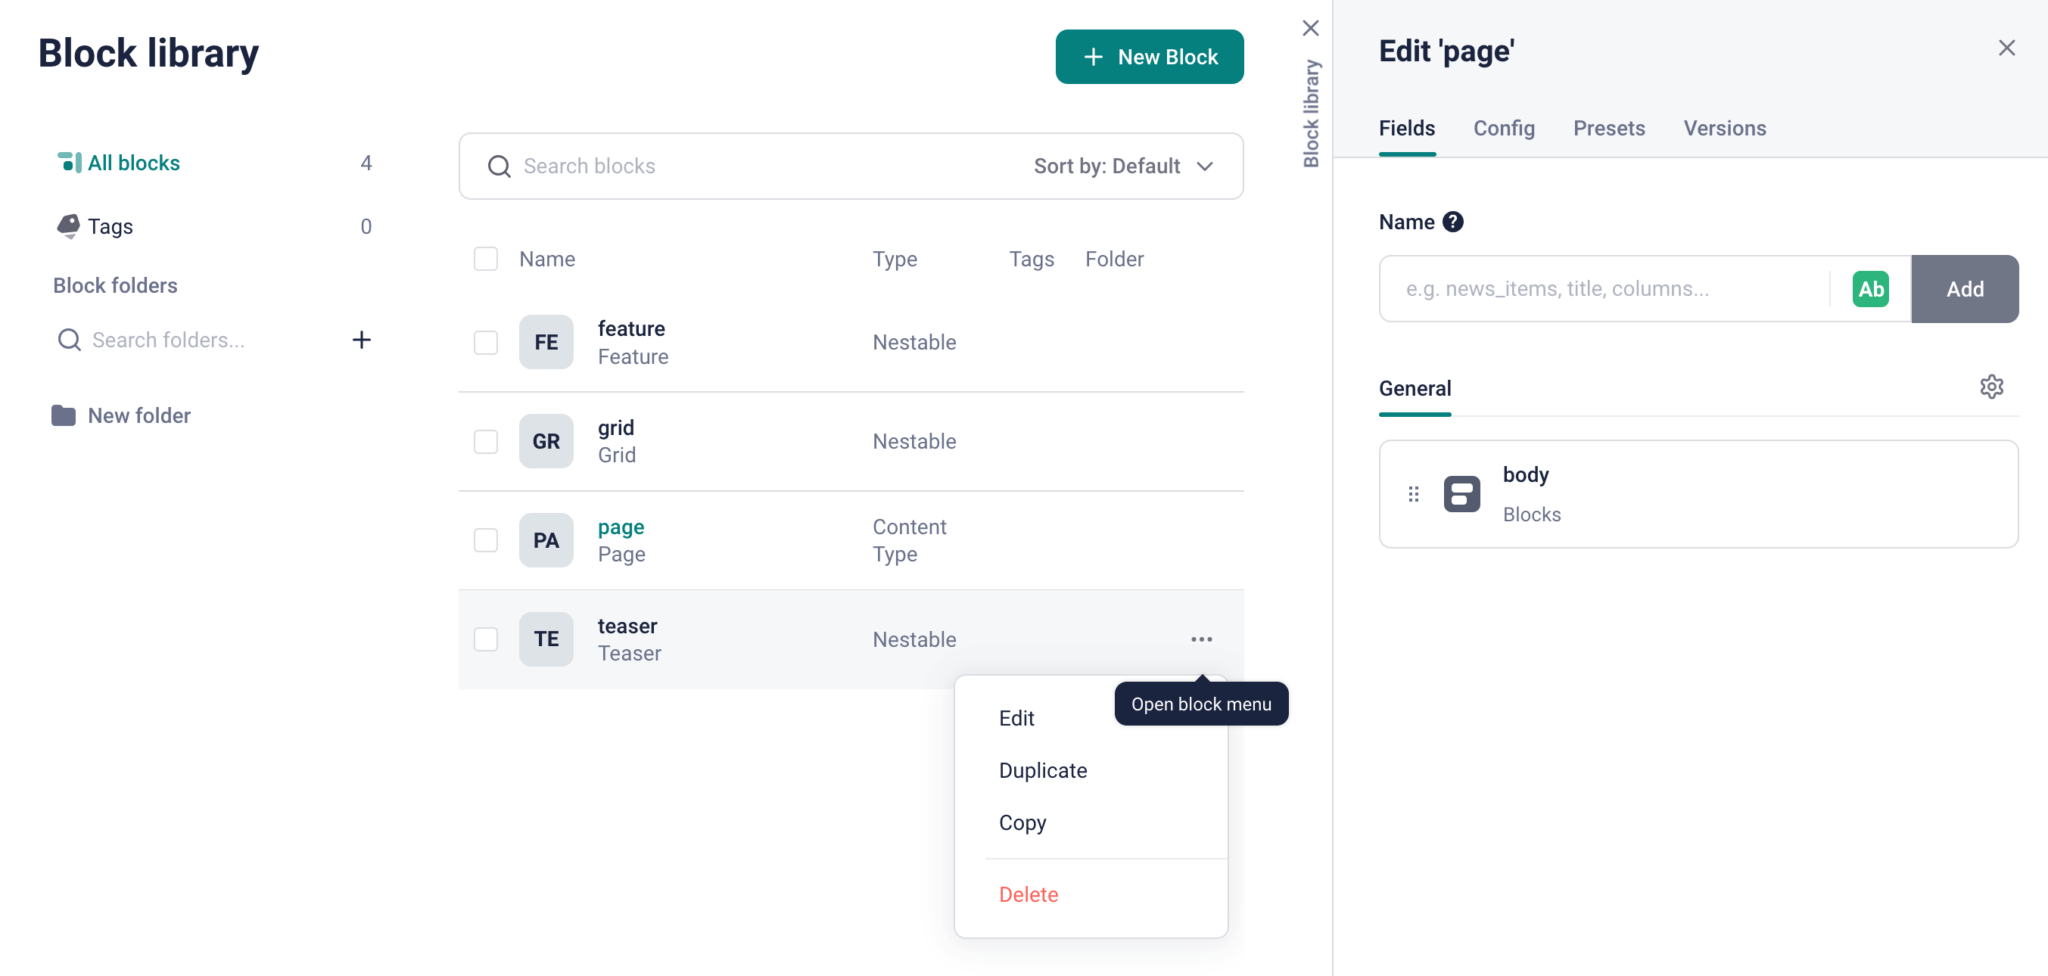
In the Block library, click the + New Block button at the top right. Set its Technical name to “header” and set the block type to Nestable block.
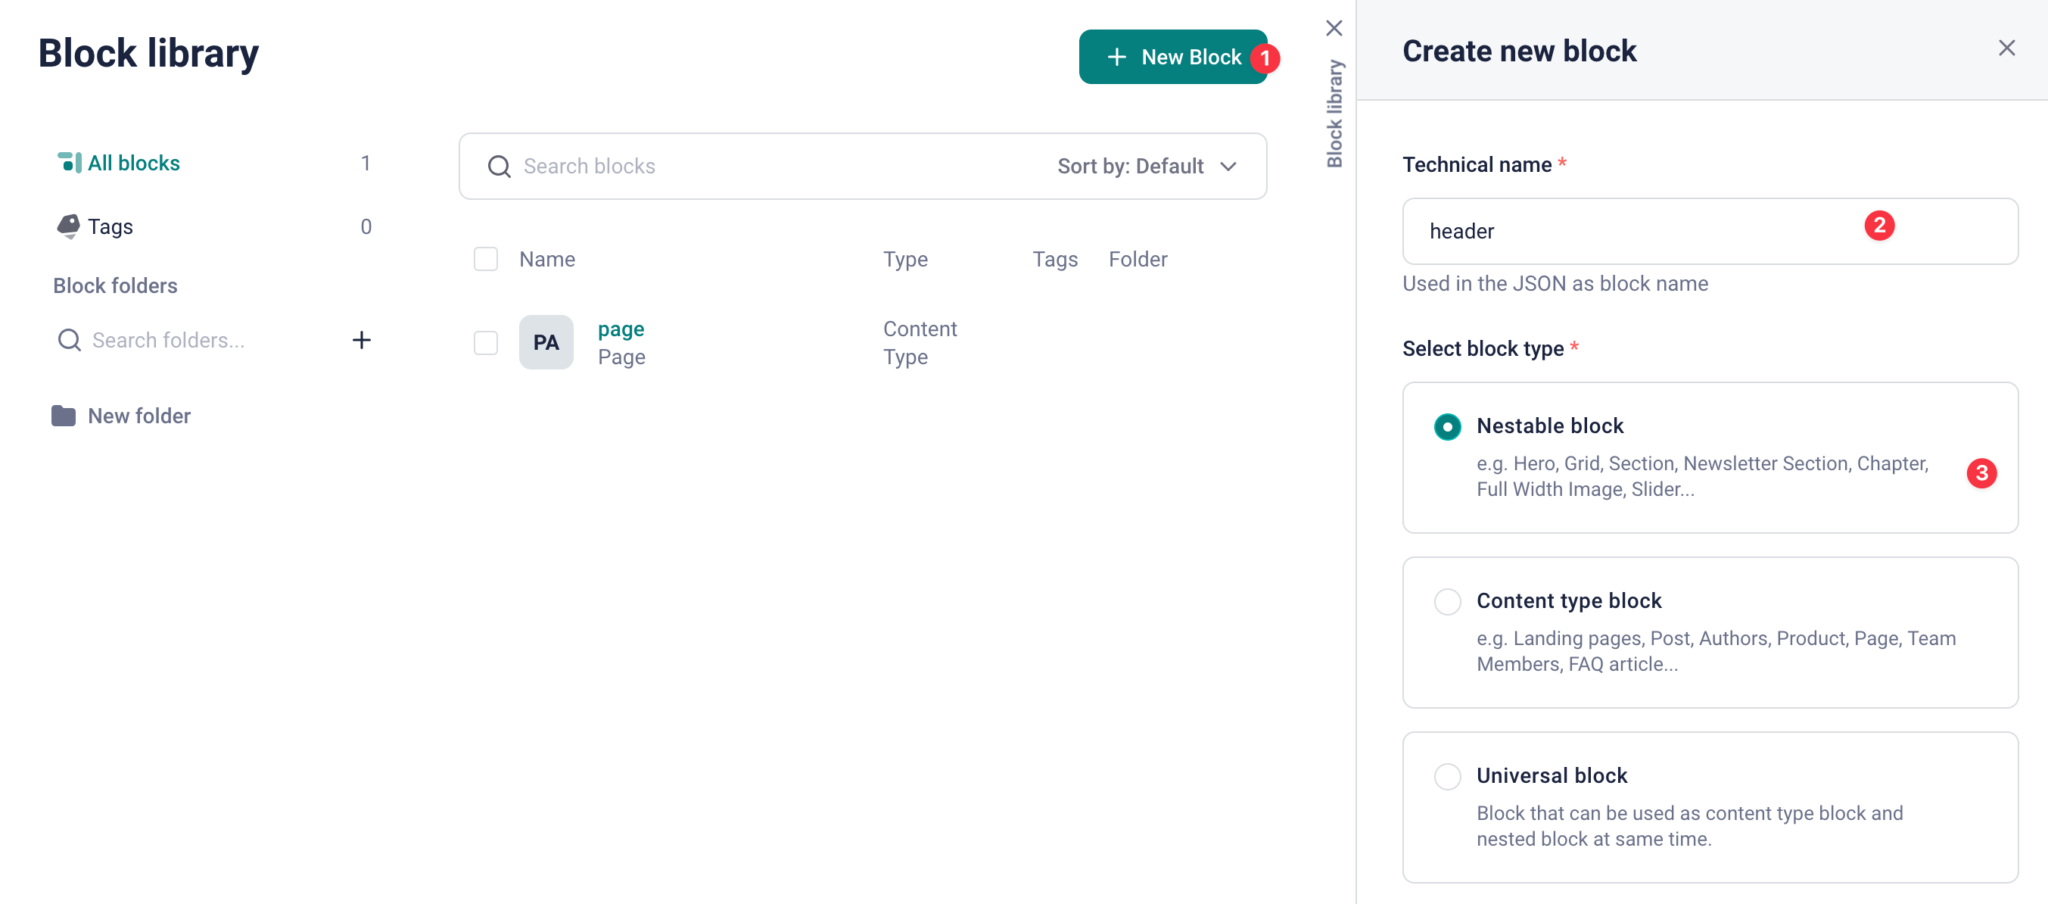
Click the Add Block button at the bottom right to create the block.
Click on the header block in the table to open the block editor panel. Add a field named “title” with a field type of Text.

Click the Save button at the bottom right.
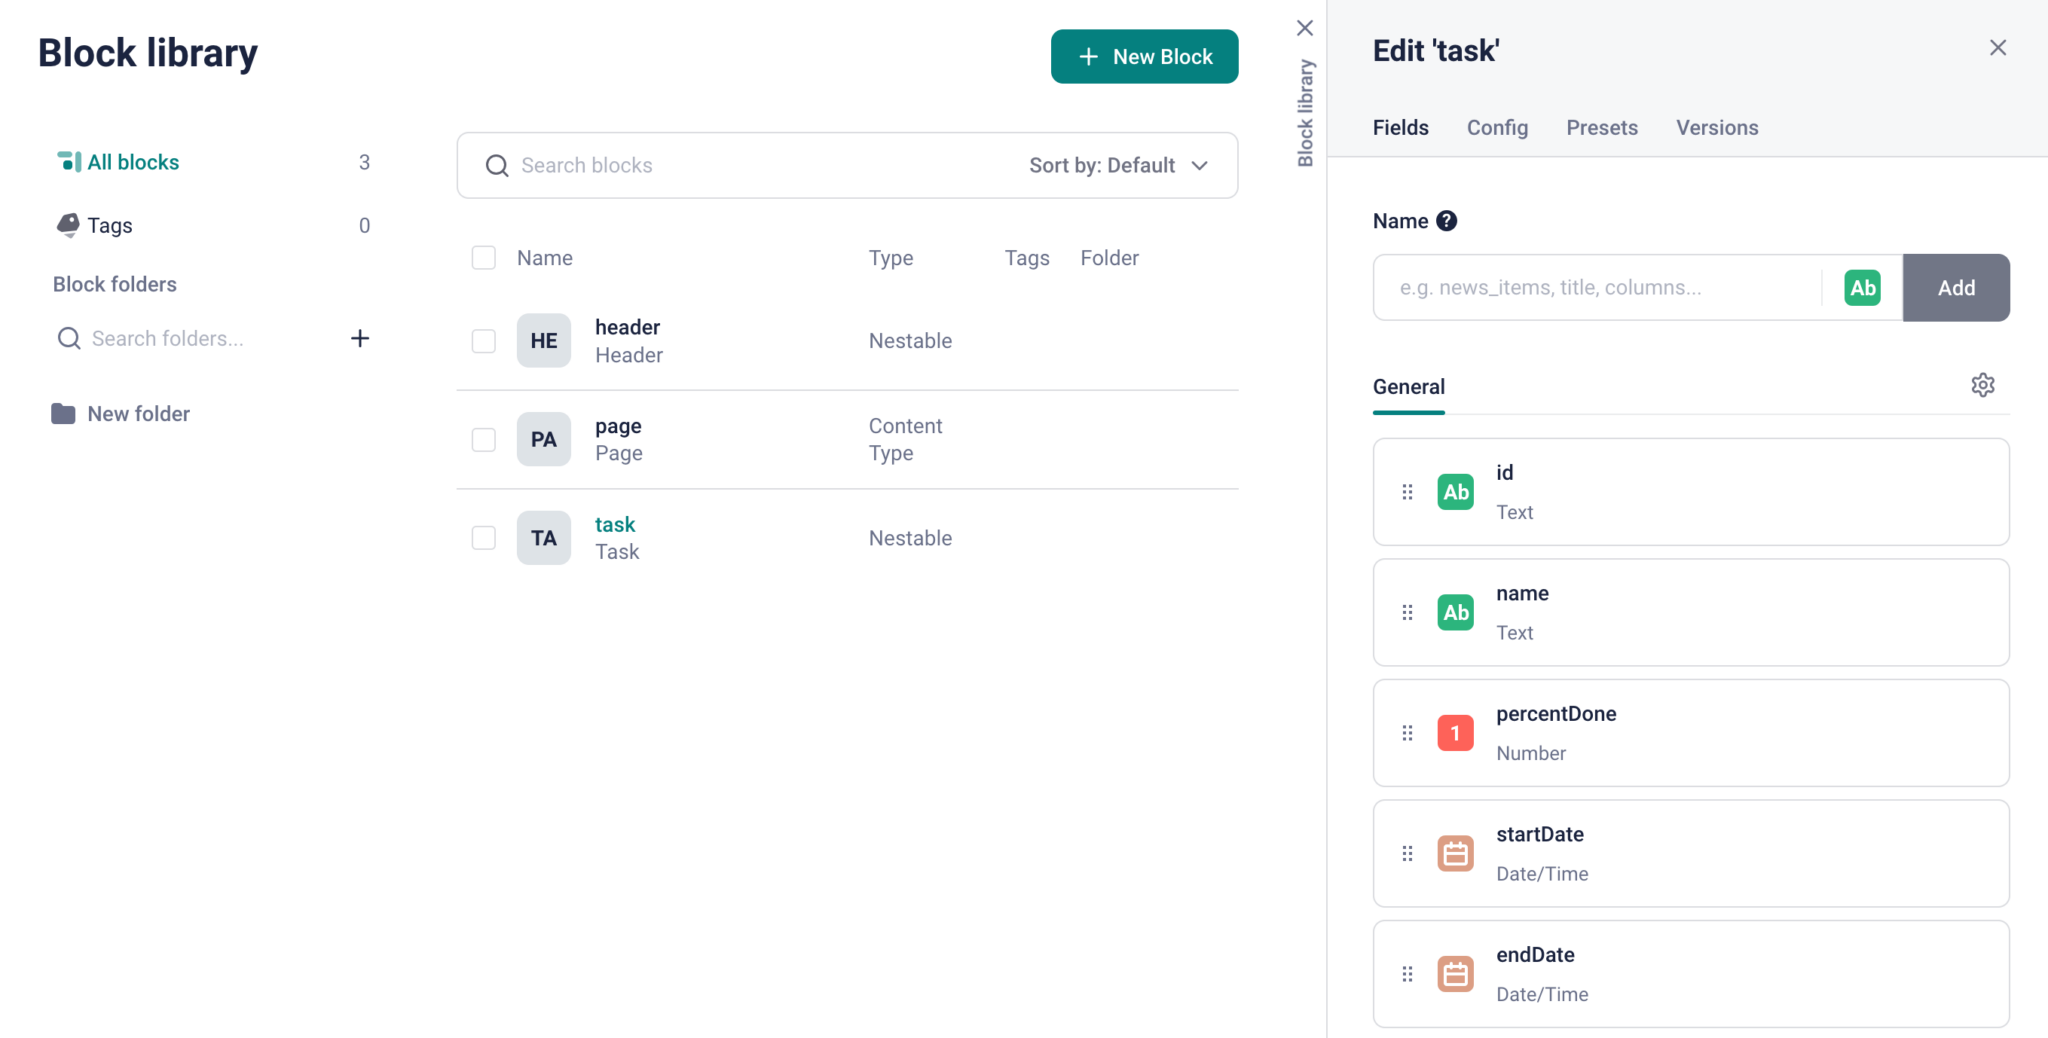
Create another nestable block called “task”. This block will store the Bryntum Gantt tasks data. Add the following fields that represent some of the Bryntum Gantt TaskModel fields.
| Field Name | Field Type |
|---|---|
| id | Text |
| name | Text |
| percentDone | Number |
| startDate | Date/Time |
| endDate | Date/Time |
| manuallyScheduled | Boolean |
| effort | Number |
| draggable | Boolean |
| resizable | Boolean |
We have excluded some fields and other types of Bryntum Gantt data store models, such as dependencies and calendars, for simplicity.
In the General tab of the task block editor, open the Edit field tab of the “manuallyScheduled” field by clicking on the manuallyScheduled list item. Toggle the Default value switch to on.
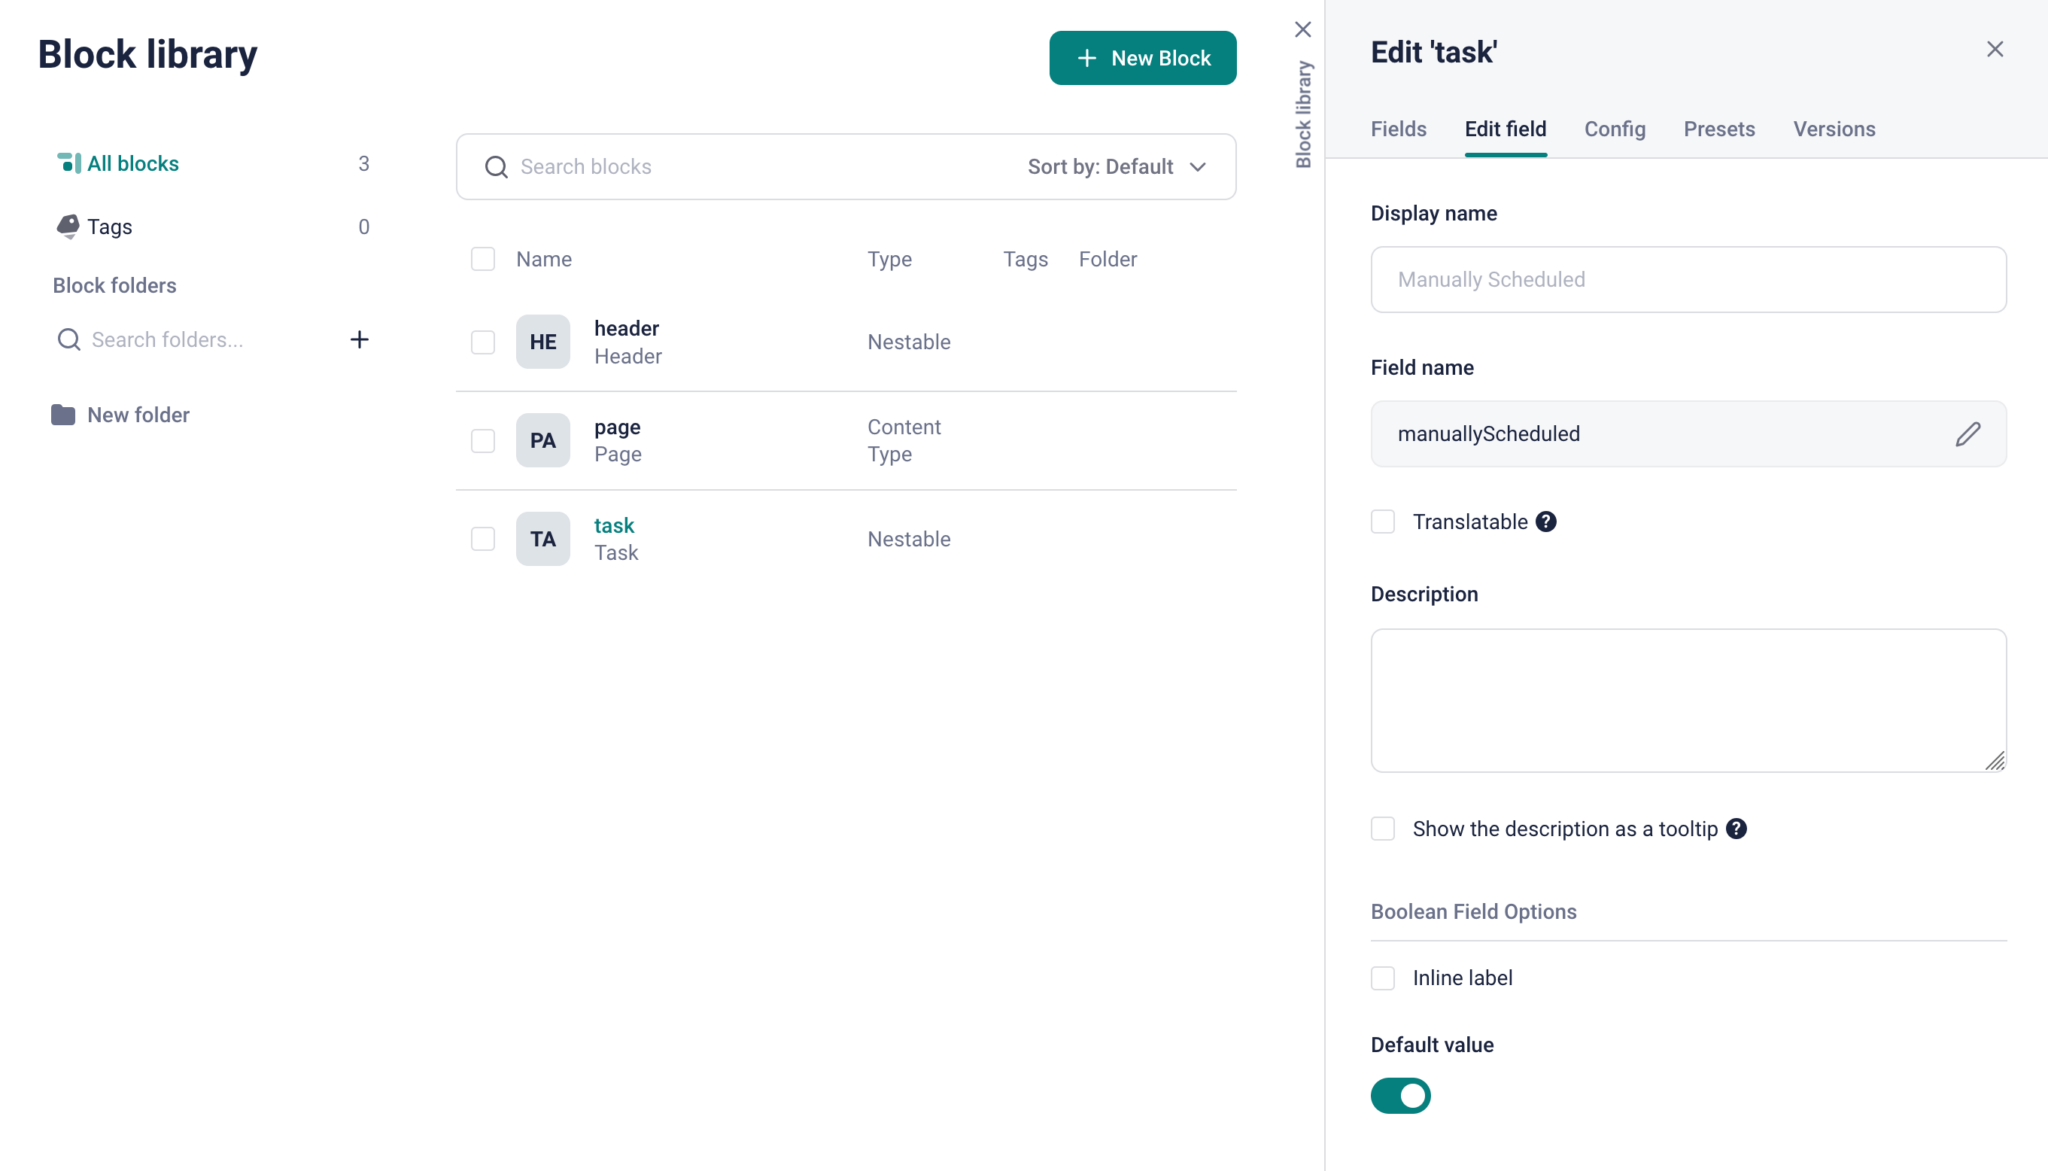
Click the Save & Back to Fields button at the bottom right. Do this for all fields that have a boolean field type.
Next, create a “gantt” block with a Universal block type. Add a field called “tasks” with a field type of Blocks. Save the block.
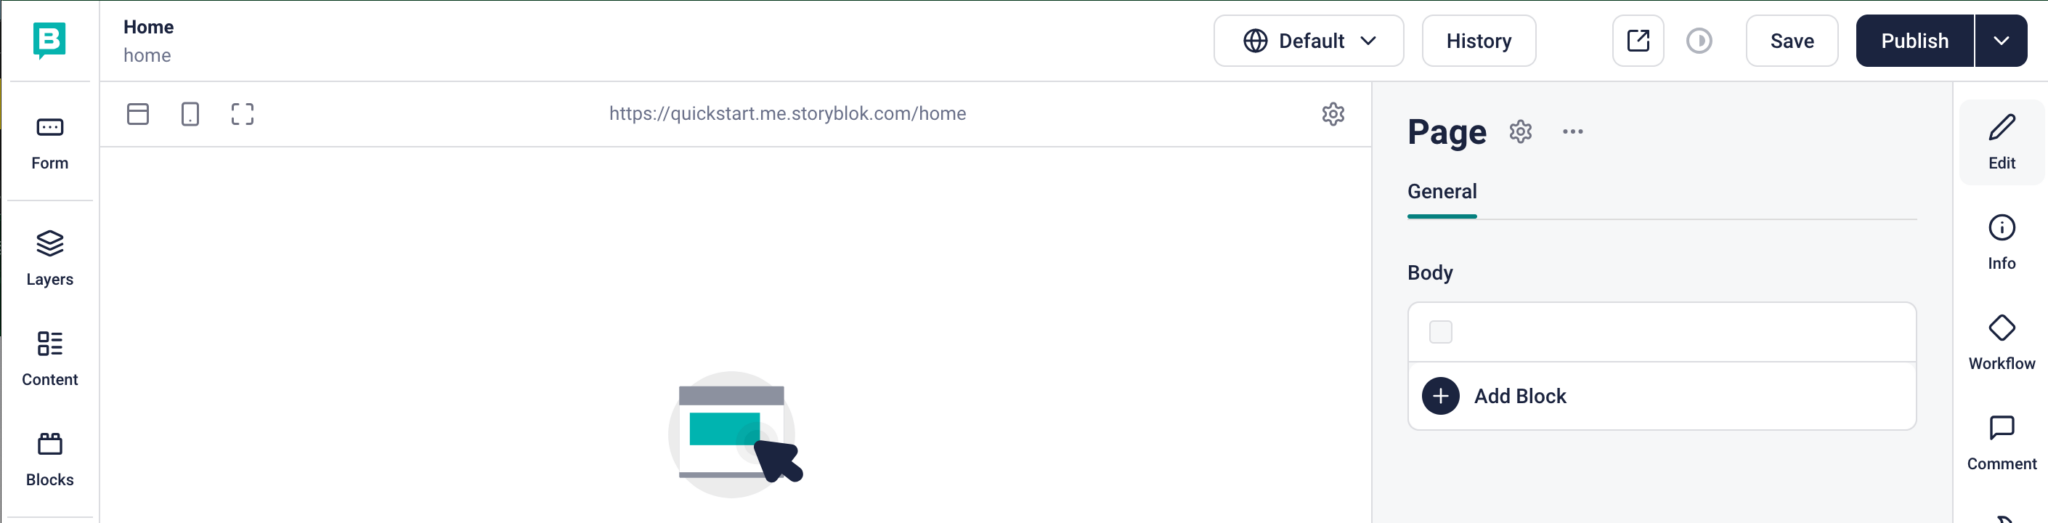
Close the Block library modal and delete the Teaser and Grid blocks in the Page block panel’s Body field.
Click the Save button at the top right of the page.
Adding the Storyblok components to a page and adding content
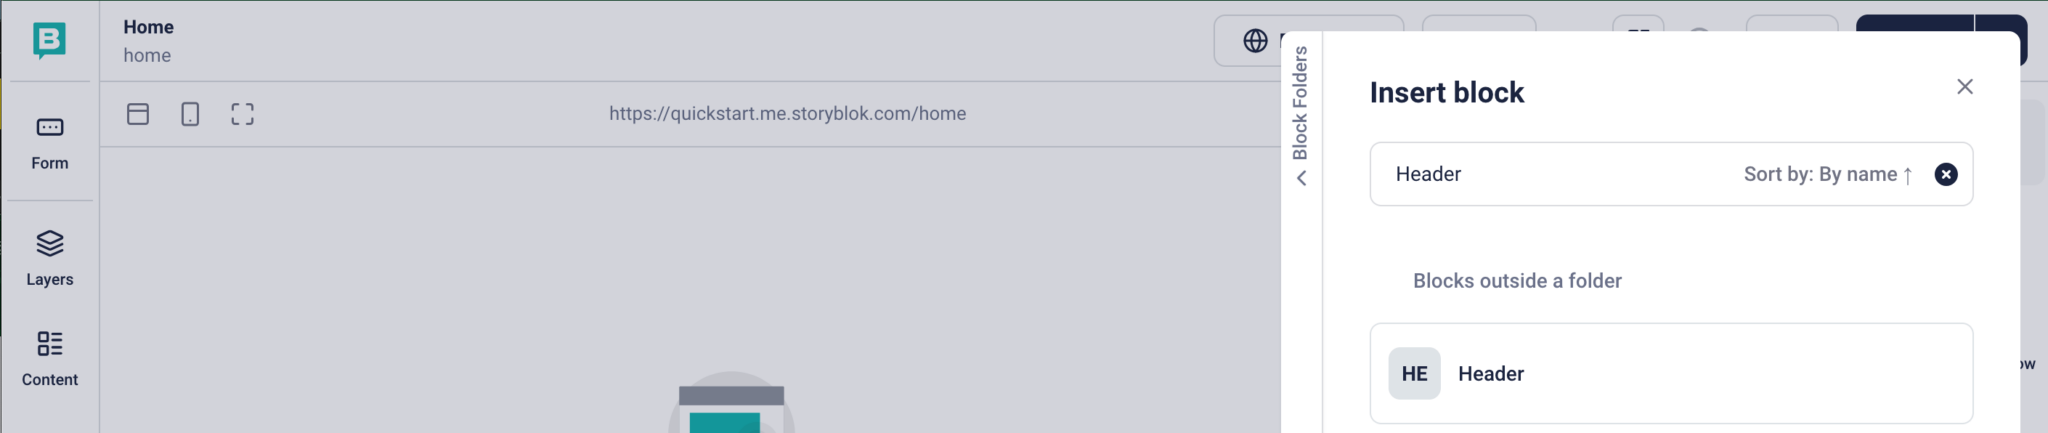
We’ll now add the Storyblok components for a Bryntum Gantt to our page component and populate them with content. First, click the Add Block button in the Body field of the page component.
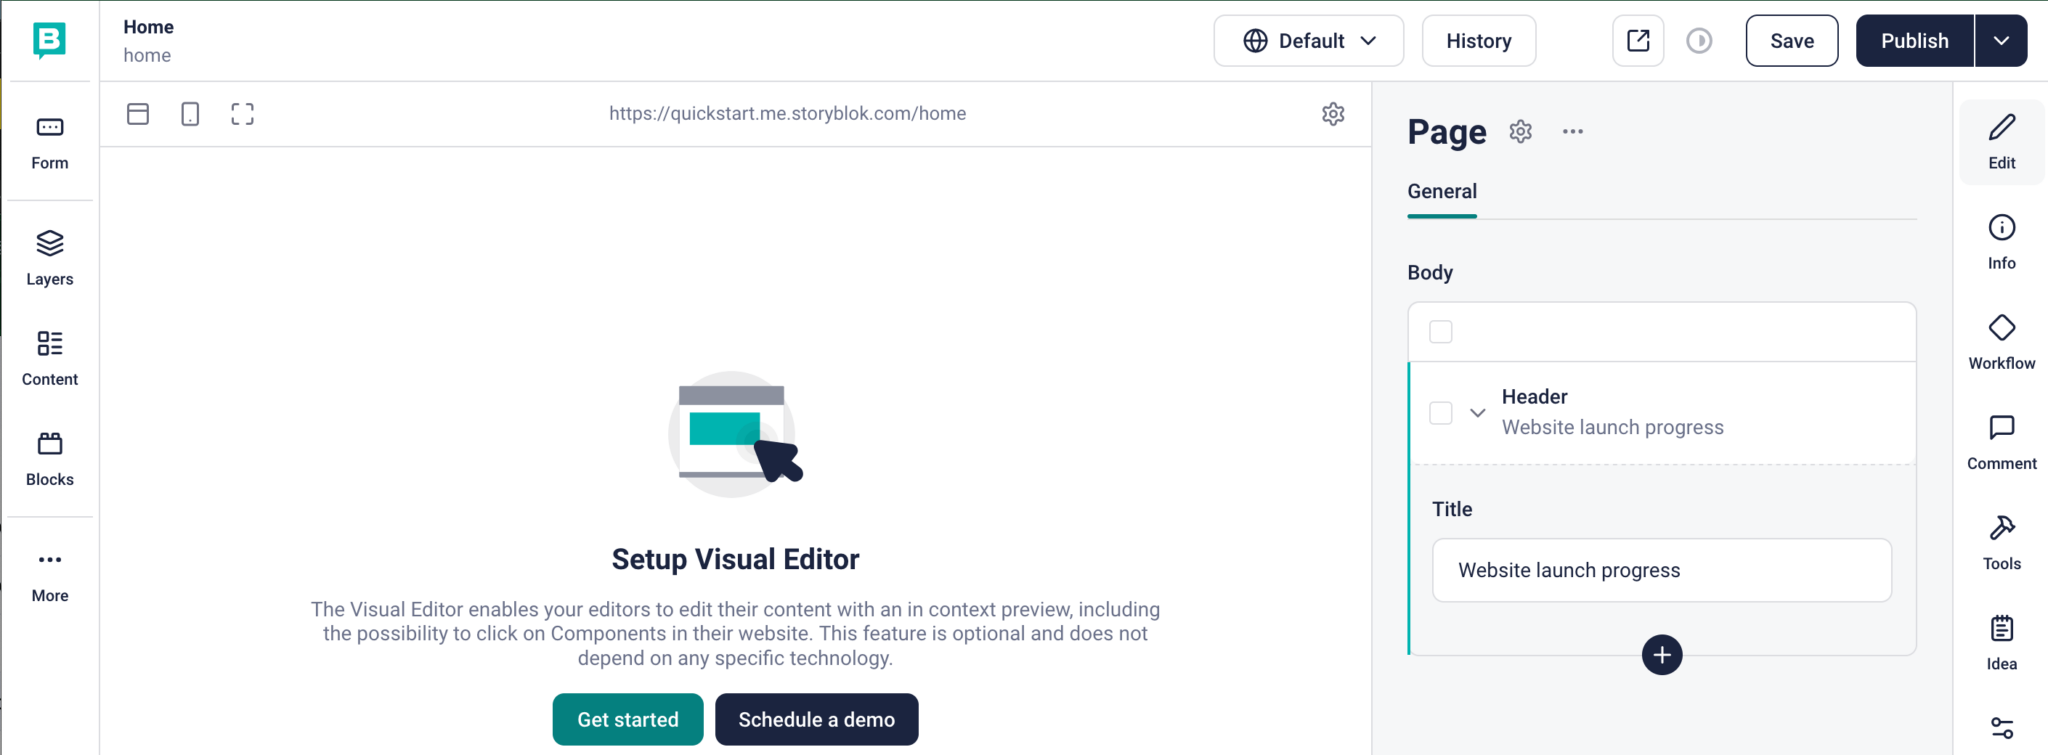
Insert a Header block.
Add the text “Website launch progress” to the header block’s Title field and click the Save button at the top right.
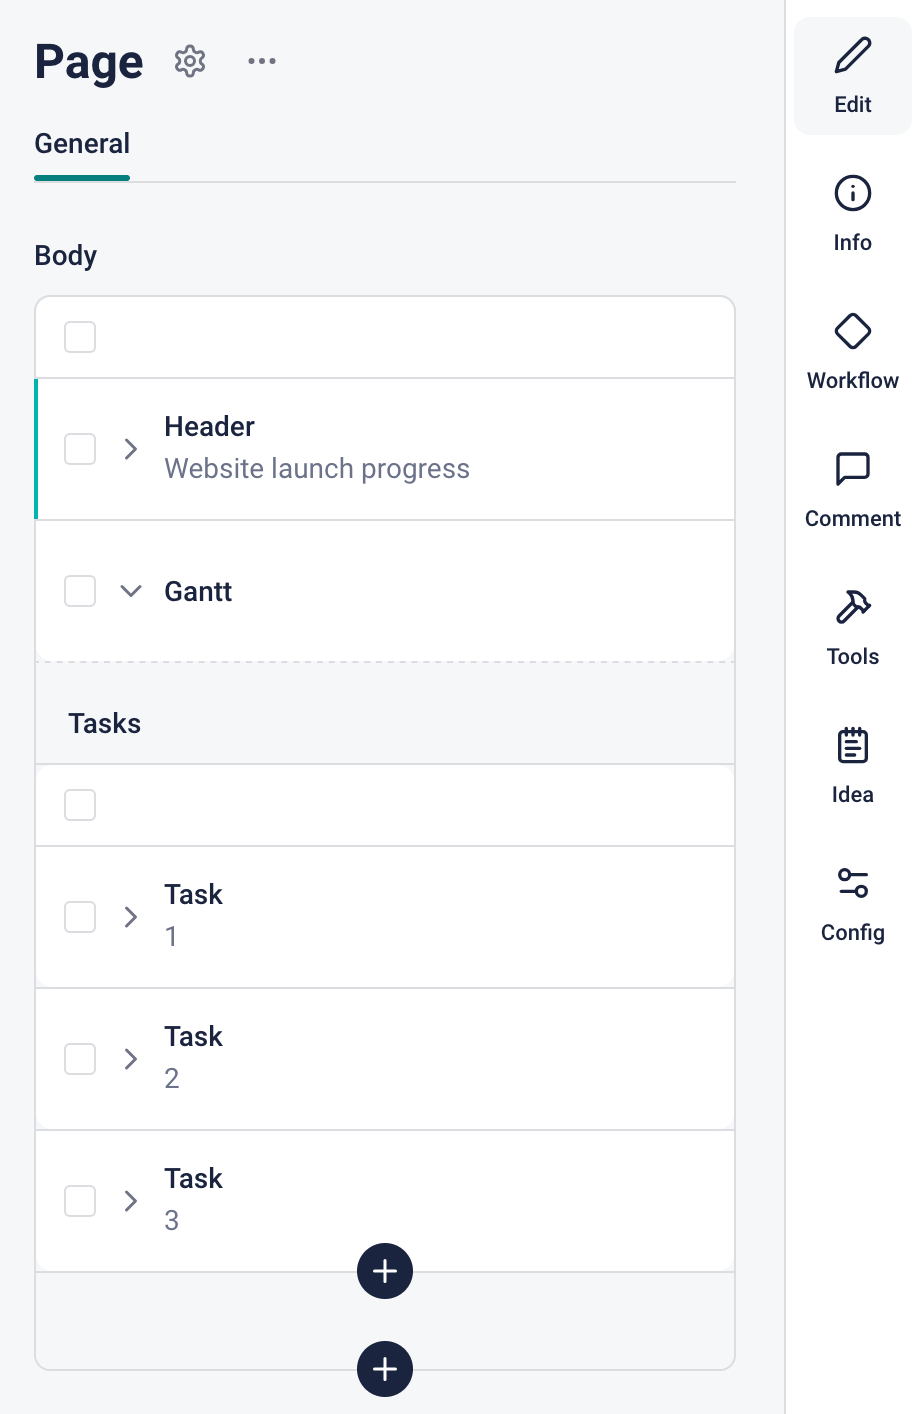
Add a Gantt block below the header block. Add three Task blocks to the Tasks field of the Gantt block with the following data:
| Field Name | Task 1 | Task 2 | Task 3 |
|---|---|---|---|
| id | 1 | 2 | 3 |
| name | design website | create website | test website |
| percentDone | 20 | 0 | 0 |
| startDate | 2024-08-19 08:00 | 2024-08-21 08:00 | 2024-08-22 08:00 |
| endDate | 2024-08-20 17:00 | 2024-08-22 17:00 | 2024-08-23 17:00 |
Click the Save button.
Your Story should now have the following component structure:
Setting up a dev server with an HTTPS proxy for connecting to the Storyblok Visual Editor
From Storyblok version 2, you need to set up your dev server with an HTTPS proxy to use a secure connection with the application. We’ll use port 3010, so the URL to access your Next.js application will be https://localhost:3010.
To set up an HTTPS proxy, use one of these guides:
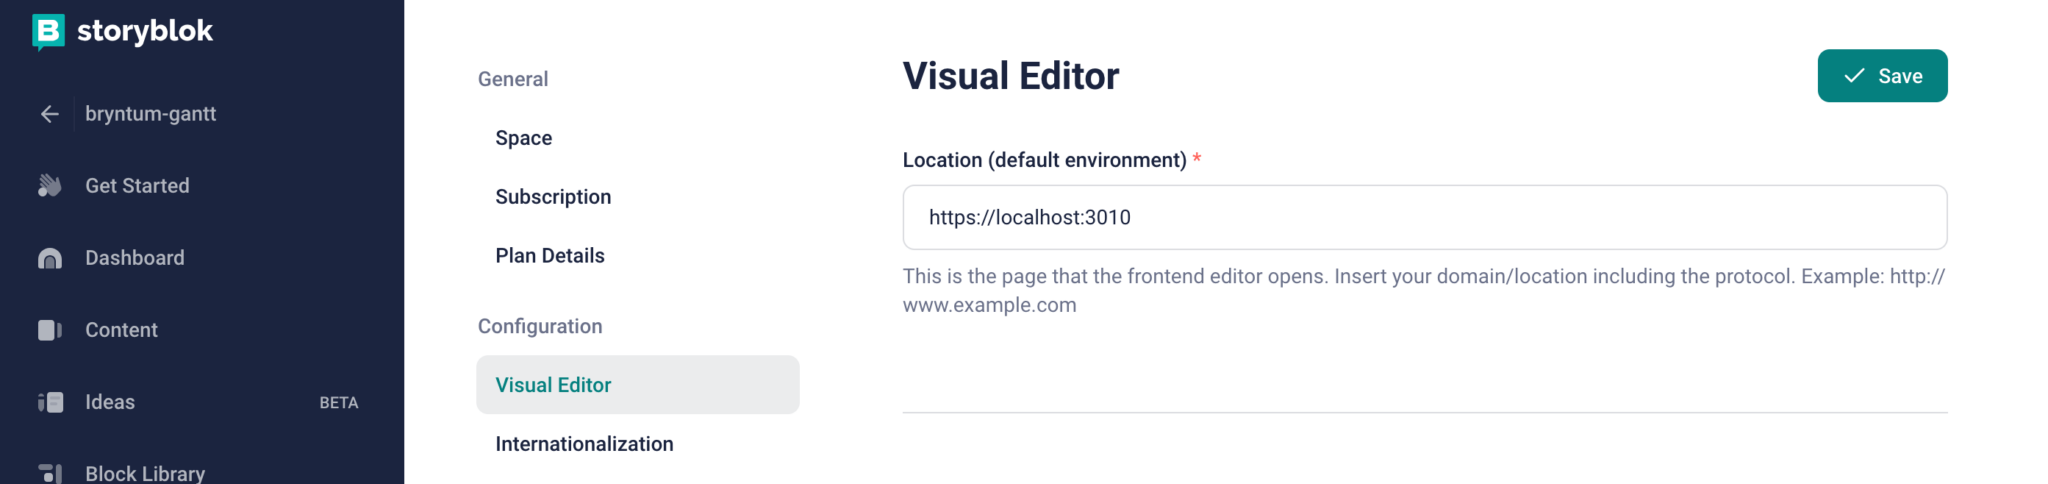
We’ll set the visual editor to open to the HTTPS proxy URL. Exit the visual editor by clicking the back button at the top left of the page. Open the Settings menu for your bryntum-gantt space, open the Visual Editor configuration, and set the location to https://localhost:3010. Click the Save button at the top right of the page.
Setting the real path
To see our Next.js app, we need to change the real path, which is the location that the visual editor opens if the location differs from the defined slug, “home”.
Open the visual editor again by opening the Home story on the Content page. Open the Config panel from the menu on the right and set the Real path to “/”. Click on the Edit item at the top of the menu on the right. Make sure that your dev server for the Next.js application and HTTPS proxy are both running.
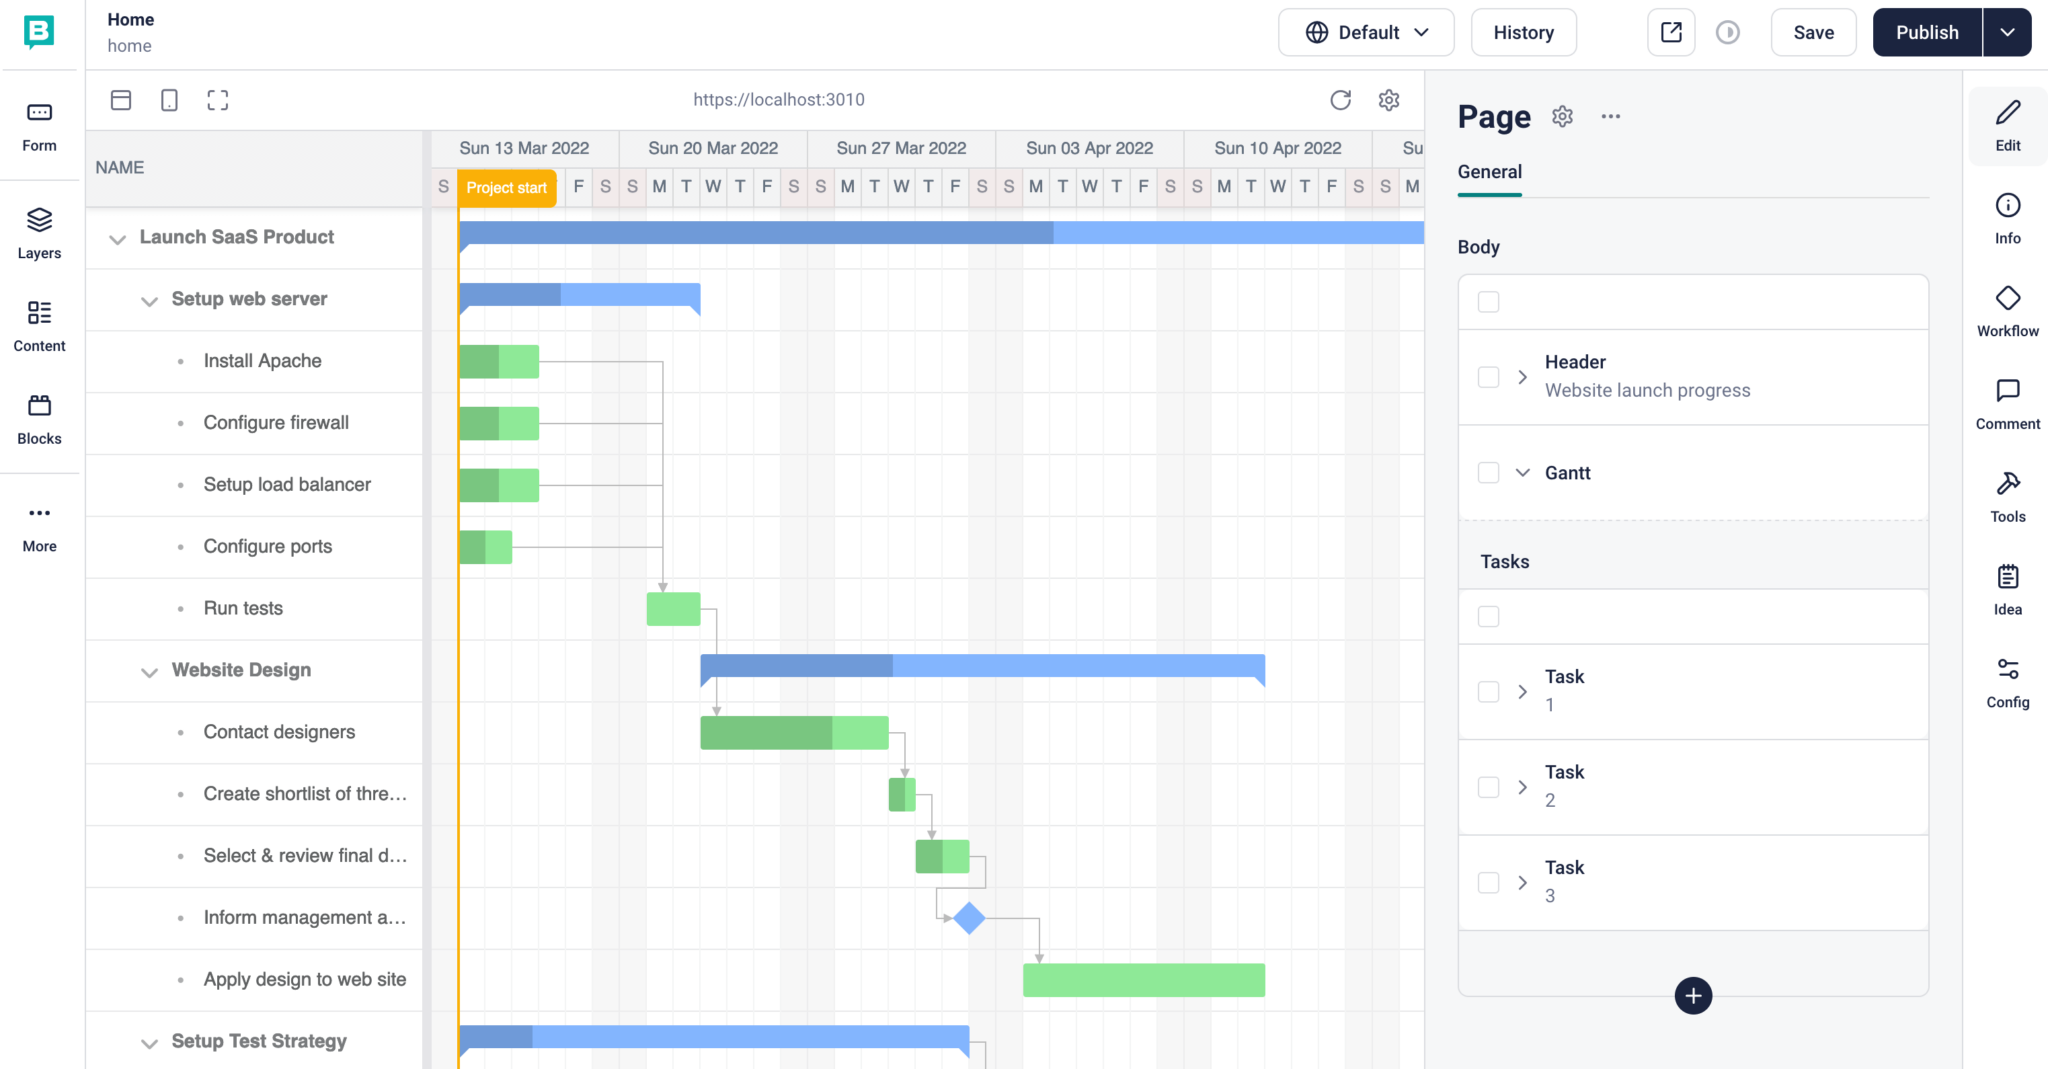
You’ll now see the example Bryntum Gantt in the visual editor.
The Bryntum Gantt is not using the Storyblok data. We need to connect Storyblok to the Next.js app and fetch the Storyblok story data. Then we’ll create React components for the Storyblok components that will render the Storyblok data.
Connecting Storyblok to the Next.js project
First, install the official Storyblok React SDK.
npm install @storyblok/reactThis React plugin allows you to interact with the Storyblok API and enables real-time visual editing.
In the src/components folder, create a file called StoryblokProvider.tsx and add the following lines of code to it:
"use client";
import { ReactNode } from "react";
import { apiPlugin, storyblokInit } from "@storyblok/react";
storyblokInit({
  accessToken: process.env.NEXT_PUBLIC_STORYBLOK_API_TOKEN,
  use: [apiPlugin],
});
export default function StoryblokProvider({
  children,
}: {
  children: ReactNode;
}) {
  return children;
}
The storyblokInit function initializes the connection to Storyblok. Note that if your Storyblok space server location is set to a region other than Europe, you’ll need to add a region parameter to the storyblokInit function call to set the correct region.
Import StoryblokProvider into the src/app/layout.tsx file:
import StoryblokProvider from "@/components/StoryblokProvider";Wrap the returned React elements in StoryblokProvider:
  return (
    <StoryblokProvider>
      <html lang="en">
        <body>{children}</body>
      </html>
    </StoryblokProvider>
  );
We’ll use this wrapper to load the Storyblok components client-side so that we can see real-time updates. The Bryntum Gantt is also client-side only.
Fetching the Story data
We’ll use the useStoryblok hook to fetch the story content and enable live editing by fetching new story data when content is changed in the Storyblok Visual Editor.
We’ll store the Story data in a React context value. Let’s create the Story data context provider. In the src folder, create a contexts folder. Create a StoryData.context.tsx file in the contexts folder and add the following lines of code to it:
"use client";
import { ISbStoryData } from "@storyblok/react";
import { createContext, useState } from "react";
import { ISbComponentType } from "storyblok-js-client";

type Story = ISbStoryData<
  ISbComponentType<string> & {
    [index: string]: any;
  }
>;

export const StoryDataContext = createContext({
  storyData: {} as Story,
  setStoryData: (data: Story) => {},
});

export default function StoryDataProvider({
  children,
}: {
  children: React.ReactNode;
}) {
  const [storyData, setStoryData] = useState<
    ISbStoryData<ISbComponentType<string> & { [index: string]: any }>
  >({} as Story);
  return (
    <StoryDataContext.Provider
      value={{
        storyData,
        setStoryData,
      }}
    >
      {children}
    </StoryDataContext.Provider>
  );
}
In the src/app/layout.tsx file, import the Story data context provider:
import StoryDataProvider from "@/contexts/StoryData.context";In the src/app/layout.tsx file, wrap the returned HTML in StoryDataProvider within the previously added StoryblokProvider.
return (
    <StoryblokProvider>
      <StoryDataProvider>
        <html lang="en">
          <body>{children}</body>
        </html>
      </StoryDataProvider>
    </StoryblokProvider>
  );
Replace the code in src/app/page.tsx file with the following lines of code:
"use client";
import { StoryDataContext } from "@/contexts/StoryData.context";
import { TaskModel } from "@bryntum/gantt";
import "@bryntum/gantt/gantt.stockholm.css";
import { StoryblokComponent, useStoryblok } from "@storyblok/react";
import { useContext, useEffect } from "react";

export default function Home() {
  const story = useStoryblok("/home", { version: "draft" });
  const { setStoryData } = useContext(StoryDataContext);
  useEffect(() => {
    if (!story?.content) return;
    const currGanttComponentIndex: number = story.content?.body.findIndex(
      (item: any) => item.hasOwnProperty("tasks")
    );
    story.content.body[currGanttComponentIndex].tasks = story.content.body[
      currGanttComponentIndex
    ].tasks.map((task: TaskModel, index: number) => {
      return { ...task, parentIndex: index + 1 };
    });
    setStoryData(story);
  }, [story, setStoryData]);

  if (!story || !story.content) {
    return <div>Loading...</div>;
  }

  return <StoryblokComponent blok={story.content} />;
}
We use the useStoryblok hook to fetch our Story data. The first argument is the slug for your Story. The second argument specifies the API options. We fetch the "draft" version of the content.
Once the Story data is fetched, we set the storyData context value to the Story data using the setStoryData context value. We give each task a parentIndex for sorting.
The StoryblokComponent allows us to render React Storyblok components dynamically. We pass in the Story data content as a prop.
Let’s create the React Storyblok components.
Creating React components for the Storyblok blocks
In the src/components folder, create a Page.tsx file and add the following lines of code to it:
import { StoryblokComponent, storyblokEditable } from "@storyblok/react";
import { PageStoryblok } from "../../component-types-sb";

const Page = ({ blok }: { blok: PageStoryblok }) => {
  return (
    <main {...storyblokEditable(blok)}>
      {blok.body?.map((nestedBlok) => (
        <StoryblokComponent blok={nestedBlok} key={nestedBlok._uid} />
      ))}
    </main>
  );
};

export default Page;
The storyblokEditable function links editable components to the Storyblok Visual Editor. We use the StoryblokComponent to render the Storyblok components dynamically.
Now create a Header.tsx file within src/components and add the following lines of code to it:
import { storyblokEditable } from "@storyblok/react";
import { HeaderStoryblok } from "../../component-types-sb";

const Header = ({ blok }: { blok: HeaderStoryblok }) => {
  return (
    <h2 {...storyblokEditable(blok)} style={{ padding: "1rem" }}>
      {blok.title}
    </h2>
  );
};

export default Header;
Create a GanttSb.tsx file within src/components and add the following lines of code to it:
import { storyblokEditable } from "@storyblok/react";
import { GanttStoryblok } from "../../component-types-sb";
import { GanttWrapper } from "./GanttWrapper";
const GanttSb = ({ blok }: { blok: GanttStoryblok }) => {
  return (
    <div {...storyblokEditable(blok)} style={{ flex: 1 }}>
      <GanttWrapper />
    </div>
  );
};
export default GanttSb;
We render the Bryntum Gantt in this component using the GanttWrapper component.
In the src/components/StoryblokProvider.tsx file, import the Storyblok React components and add them to the components object in the storyblokInit function:
import Page from "./Page";
import Header from "./Header";
import GanttSb from "./GanttSb";
const components = {
  page: Page,
  header: Header,
  gantt: GanttSb,
};
storyblokInit({
  accessToken: process.env.NEXT_PUBLIC_STORYBLOK_API_TOKEN,
  use: [apiPlugin],
  components,
});
Adding Storyblok types to components
The Storyblok components we created have types added from a component-types-sb.d.ts file. Let’s create this file. To get these types from Storyblok and add them to our project, first install the Storyblok CLI:
npm i -g storyblokLog in to Storyblok by running the following command and following the login steps:
storyblok loginAdd the following scripts to your package.json file:
"pull-sb-components": "storyblok pull-components --space 299677",
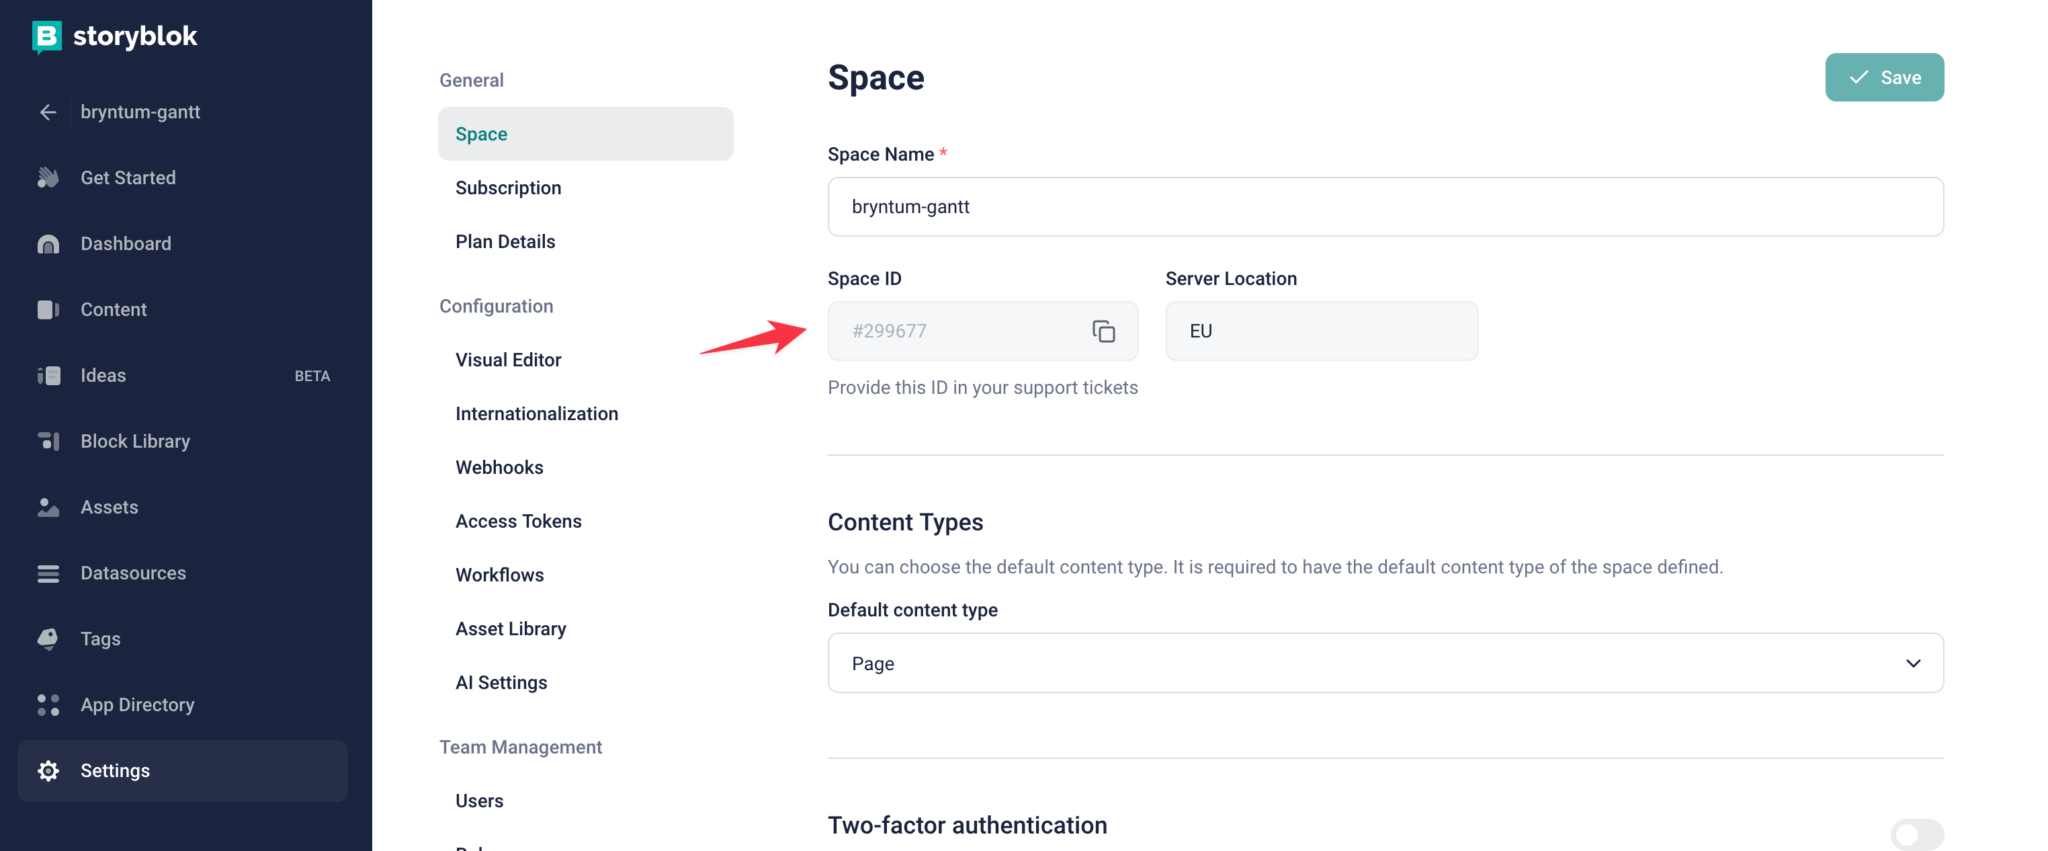
"generate-sb-types": "storyblok generate-typescript-typedefs --sourceFilePaths ./components.299677.json --destinationFilePath ./component-types-sb.d.ts"Replace 299677 with the ID of your Storyblok space. You can find your space ID in the Space page in the Settings menu of your space:
Download the schema of your Storyblok components into your Next.js app by running the following command:
npm run pull-sb-componentsA file called components.<your-spaceID>.json will be added to your root directory.
Now generate TypeScript types based on the downloaded schema with the following command:
npm run generate-sb-typesThis will create a file called component-types-sb.d.ts in your root directory.
When you make changes to your blocks in Storyblok, your component schema will change. Rerun the pull-sb-components and generate-sb-types scripts to get updated TypeScript types.
Loading the Storyblok Story data into the Bryntum Gantt
To get the Storyblok data into the Bryntum Gantt, we’ll use the context data.
First, replace the code in the src/ganttConfig.ts file with the following lines of code:
import { BryntumGanttProps } from "@bryntum/gantt-react";
const ganttConfig: BryntumGanttProps = {
  selectionMode: {
    multiSelect: false,
  },
  taskMenuFeature: {
    items: {
      // Hide item from the `edit` menu
      indent: false,
      outdent: false,
      // Hide item from the `add` submenu
      add: {
        menu: {
          subtask: false,
        },
      },
    },
  },
  columns: [{ type: "name", field: "name", width: 250 }],
  viewPreset: "weekAndDayLetter",
  barMargin: 10,
};
export { ganttConfig };
Replace the code in the src/components/Gantt.tsx file with the following lines of code:
"use client";
import { StoryDataContext } from "@/contexts/StoryData.context";
import { BryntumGantt } from "@bryntum/gantt-react";
import { useContext, useEffect, useRef } from "react";
export default function Gantt({ ...props }) {
  const { storyData, setStoryData } = useContext(StoryDataContext);
  const ganttRef = useRef<BryntumGantt>(null);
  useEffect(() => {
    // Bryntum Gantt instance
    const gantt = ganttRef?.current?.instance;
  }, []);
  return (
    <BryntumGantt
      ref={ganttRef}
      tasks={storyData?.content?.body[currGanttComponentIndex].tasks}
      {...props}
    />
  );
}
We get the Story data from the StoryDataContext provider using the useContext hook. We then bind the tasks data to the Bryntum Gantt React component. When the storyData state changes, the Bryntum Gantt will be updated.
Add the currGanttComponentIndex definition above the ganttRef definition const ganttRef = useRef<BryntumGantt>(null);:
  const currGanttComponentIndex = storyData?.content?.body.findIndex(
    (item: any) => item.hasOwnProperty("tasks")
  );
We use this index to find the Gantt component in the story data, assuming that there’s only one Gantt in the story.
Replace the styles in the src/app/globals.css file with the following styles:
* {
box-sizing: border-box;
padding: 0;
margin: 0;
}
#b-gantt-1 {
display: flex;
flex-direction: column;
height: 100vh;
font-size: 14px;
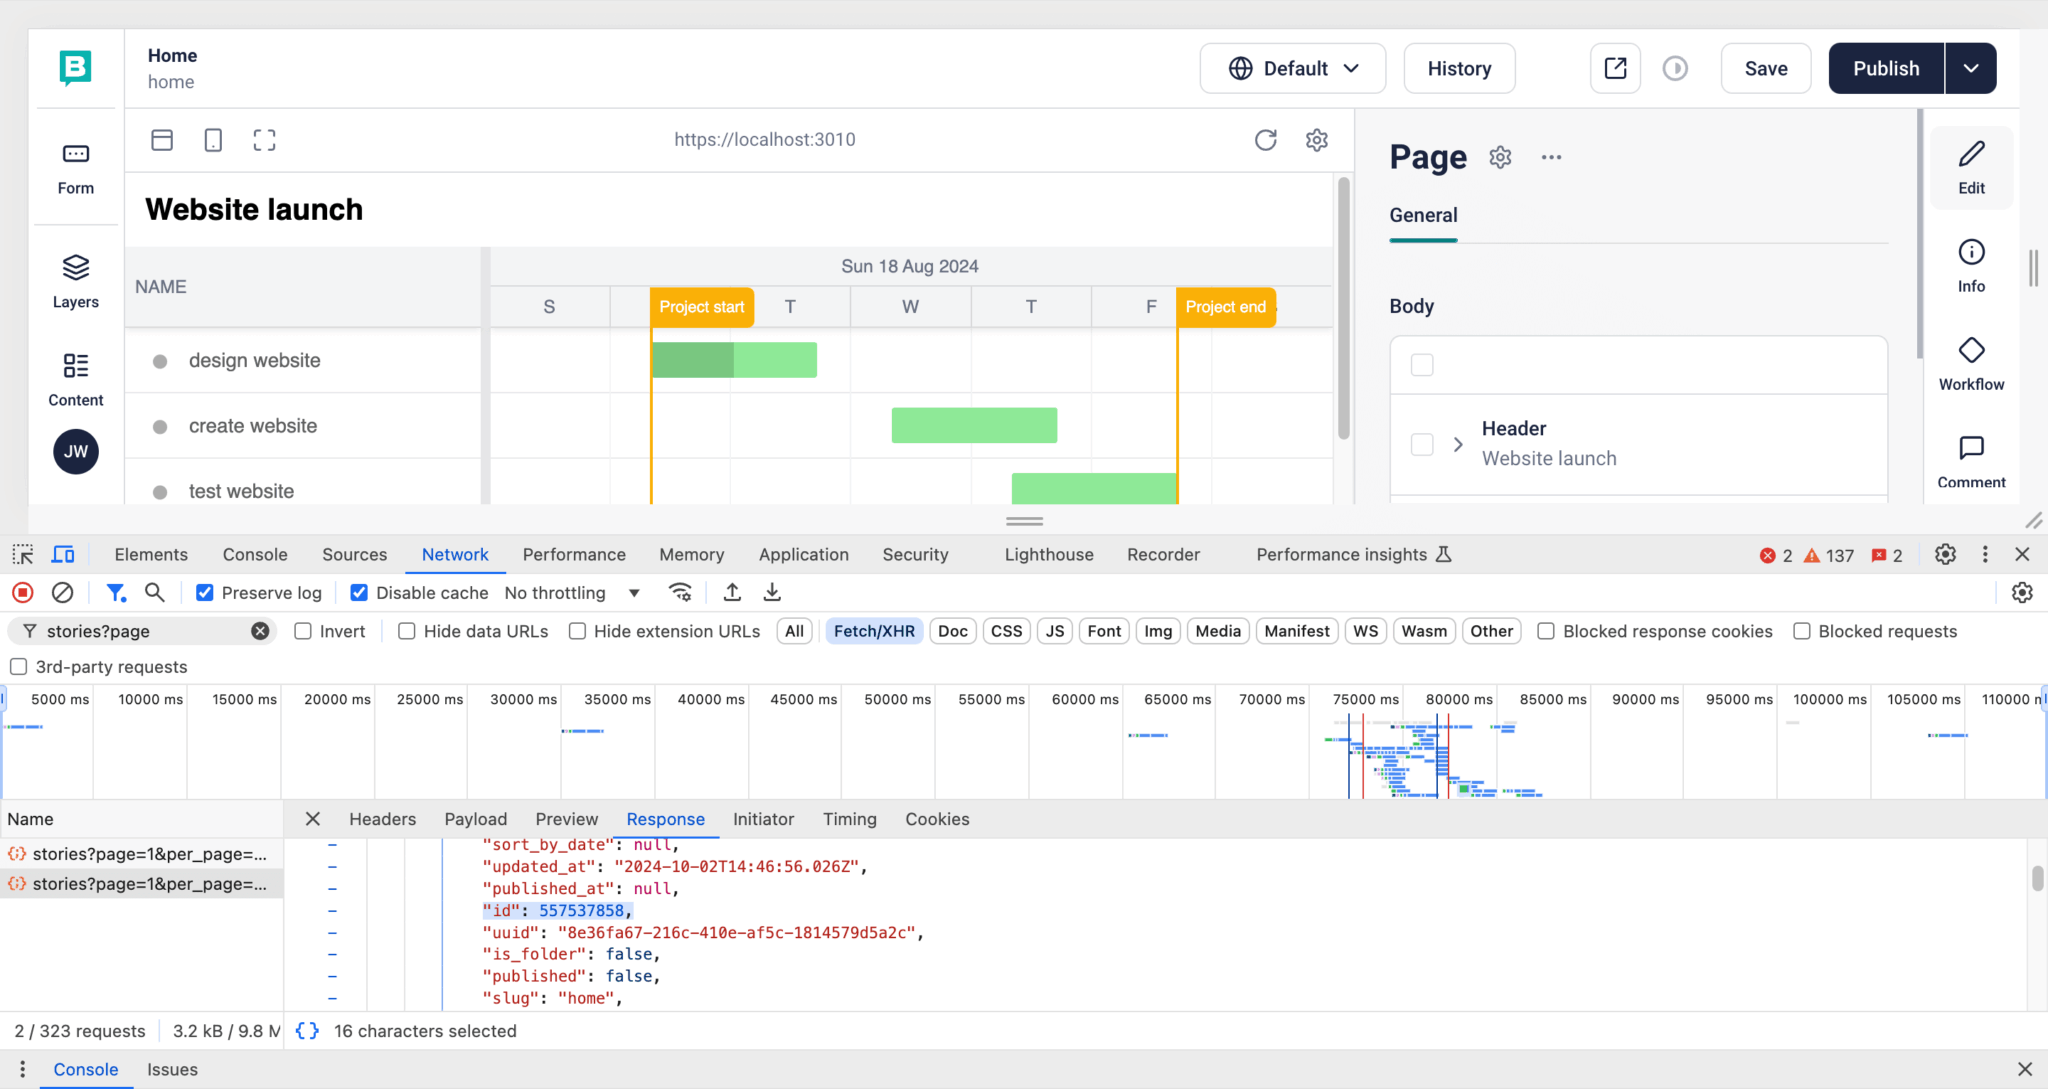
}Now when you make changes to the Story content in the Storyblok Visual Editor, you’ll see the changes in the Bryntum Gantt:
If you make changes to the Bryntum Gantt, the changes will not be persisted in Storyblok. Let’s do that next.
Updating Storyblok Story data from the Bryntum Gantt
We’ll use the Storyblok Management API to update the Storyblok Story data from the Bryntum Gantt.
You’ll need a personal access token to authenticate requests. To create a personal access token, go to the Access Tokens tab in the Storyblok app account page. Click the Generate button to create a personal access token.
Add the following env variables to your Next.js app’s .env.local file:
STORYBLOK_BRYNTUM_GANTT_SPACE_ID=
STORYBLOK_BRYNTUM_GANTT_STORY_ID=
STORYBLOK_PERSONAL_ACCESS_TOKEN=
Set the STORYBLOK_PERSONAL_ACCESS_TOKEN environment variable to your personal access token. Add your space ID, which we obtained in the Adding Storyblok types to components section above. You can find your story ID in the data returned from the Storyblok API or in the storyData React context value.
Creating an update-data API route
We’ll create a Next.js API route to update our Storyblok Story from the Bryntum Gantt.
Create an api folder in the src/app folder. Create an update folder in the api folder and create a route.ts file in the update folder. Add the following PUT request route handler to it:
export async function PUT(request: Request): Promise<Response> {
  const reqBody = await request.json();
  try {
    const res = await fetch(
      `https://mapi.storyblok.com/v1/spaces/${process.env.STORYBLOK_BRYNTUM_GANTT_SPACE_ID}/stories/${process.env.STORYBLOK_BRYNTUM_GANTT_STORY_ID}`,
      {
        method: "PUT",
        headers: {
          Authorization: process.env.STORYBLOK_PERSONAL_ACCESS_TOKEN,
          "Content-Type": "application/json",
        },
        body: JSON.stringify({ story: reqBody.story }),
      }
    );
    const data = await res.json();
    return Response.json(data);
  } catch (error) {
    console.error("Loading tasks data failed", error);
    return new Response("Loading tasks data failed", {
      status: 500,
    });
  }
}
We use the Storyblok Management API to update the Storyblok space. The whole space is updated whenever story data needs to be updated.
Let’s set up our Bryntum Gantt to send task updates to this API route.
Updating the Bryntum Gantt component
We’ll use the Bryntum Gantt onDataChange event to detect when the Bryntum Gantt’s store data has changed.
Add the onDataChange property to the BryntumGantt component in the src/components/Gantt.tsx file:
  return (
    <BryntumGantt
      ref={ganttRef}
      tasks={storyData?.content?.body[currGanttComponentIndex].tasks}
      onDataChange={syncData}
      {...props}
    />
  );
Add the following syncData function in the Gantt component:
  const syncData = async ({ store, action, records }: SyncData) => {
    const storeId = store.id;
    if (storeId === "tasks") {
      if (action === "add") {
        for (let i = 0; i < records.length; i++) {
          const storyDataState = JSON.parse(JSON.stringify(storyData));
          const content = storyDataState.content;
          const updatedContent = content.body.map((item: any) => {
            if (item.component === "gantt") {
              item.tasks = [
                ...item.tasks,
                {
                  id: crypto.randomUUID(),
                  _uid: crypto.randomUUID(),
                  name: (records[i].data as TaskModel).name,
                  startDate: convertDateToSbFormat(
                    `${(records[i].data as TaskModel).startDate}`
                  ),
                  endDate: convertDateToSbFormat(
                    `${(records[i].data as TaskModel).endDate}`
                  ),
                  component: "task",
                  percentDone: (records[i].data as TaskModel).percentDone,
                  manuallyScheduled: true,
                  effort: (records[i].data as TaskModel).effort,
                  parentIndex: records[i].data.parentIndex,
                  draggable: (records[i].data as TaskModel).draggable,
                  resizable: (records[i].data as TaskModel).resizable,
                },
              ];
            }
            return item;
          });
          const updatedStory = {
            story: {
              ...storyDataState,
              content: {
                ...storyData.content,
                body: updatedContent,
              },
            },
          };
          debouncedFetch(updatedStory);
        }
      }
      if (action === "remove") {
        for (let i = 0; i < records.length; i++) {
          const storyDataState = JSON.parse(JSON.stringify(storyData));
          const content = storyDataState.content;
          const updatedContent = content.body.map((item: any) => {
            if (item.component === "gantt") {
              item.tasks = item.tasks
                .map((task: TaskModel) => {
                  if (task.id === records[i].data.id) {
                    const dataToSend = {
                      id: records[i].data.id,
                      _uid: records[i].data._uid,
                      name: (records[i].data as TaskModel).name,
                      startDate: convertDateToSbFormat(
                        `${(records[i].data as TaskModel).startDate}`
                      ),
                      endDate: convertDateToSbFormat(
                        `${(records[i].data as TaskModel).endDate}`
                      ),
                      component: records[i].data.component,
                      percentDone: (records[i].data as TaskModel).percentDone,
                      manuallyScheduled: (records[i].data as TaskModel)
                        .manuallyScheduled,
                      effort: (records[i].data as TaskModel).effort,
                      parentIndex: records[i].data.parentIndex,
                      draggable: (records[i].data as TaskModel).draggable,
                      resizable: (records[i].data as TaskModel).resizable,
                    };
                    return dataToSend;
                  }
                  return task;
                })
                .filter((task: TaskModel) => task.id !== records[i].data.id);
            }
            return item;
          });
          const updatedStory = {
            story: {
              ...storyData,
              content: {
                ...storyData.content,
                body: updatedContent,
              },
            },
          };
          updateStory(updatedStory);
        }
      }
      if (action === "update") {
        const ganttTaskStoreData =
          ganttRef?.current?.instance?.taskStore.toJSON() as TaskModel[];
        for (let i = 0; i < records.length; i++) {
          const id = records[i].data.id;
          if (`${id}`.startsWith("_generated")) return;
          const storyDataState = JSON.parse(JSON.stringify(storyData));
          const content = storyDataState.content;
          const updatedContent = content.body.map((item: any) => {
            if (item.component === "gantt") {
              item.tasks = item.tasks.map((task: TaskModel) => {
                if (task.id === records[i].data.id) {
                  const dataToSend = {
                    id: records[i].data.id,
                    _uid: records[i].data._uid,
                    name: (records[i].data as TaskModel).name,
                    startDate: convertDateToSbFormat(
                      `${(records[i].data as TaskModel).startDate}`
                    ),
                    endDate: convertDateToSbFormat(
                      `${(records[i].data as TaskModel).endDate}`
                    ),
                    component: records[i].data.component,
                    percentDone: (records[i].data as TaskModel).percentDone,
                    manuallyScheduled: (records[i].data as TaskModel)
                      .manuallyScheduled,
                    effort: (records[i].data as TaskModel).effort,
                    parentIndex: records[i].data.parentIndex,
                    draggable: (records[i].data as TaskModel).draggable,
                    resizable: (records[i].data as TaskModel).resizable,
                  };
                  return dataToSend;
                }
                // add updated parentIndex values for other tasks - in case of reordering
                task.parentIndex = ganttTaskStoreData.filter(
                  (item: TaskModel) => item.id === task.id
                )[0].parentIndex;
                return task;
              });
            }
            return item;
          });
          const updatedStory = {
            story: {
              ...storyData,
              content: {
                ...storyData.content,
                body: updatedContent,
              },
            },
          };
          debouncedFetch(updatedStory);
        }
      }
    }
  };
We get the store, action, and records data from the dataChange event parameters. The store is used to determine which data store has been changed. In this tutorial, we only update "tasks". The action determines the type of data change that happened, "add", "remove", or "update". For each type of action, we update the storyData state object and pass the updated Story object to the updatedStory function. This function will call the update API.
Add the following updateStory function definition above the syncData function:
  function updateStory(updatedStory: any) {
    // sort tasks by parentIndex then remove parentIndex
    const currGanttComponentIndex = storyData?.content?.body.findIndex(
      (item: any) => item.hasOwnProperty("tasks")
    );
    updatedStory.story.content.body[currGanttComponentIndex].tasks =
      updatedStory.story.content.body[currGanttComponentIndex].tasks
        .sort((a: TaskModel, b: TaskModel) => a.parentIndex - b.parentIndex)
        .map((task: TaskModel) => {
          const { parentIndex, _editable, ...rest } = task;
          return rest;
        });
    fetch("/api/update", {
      method: "PUT",
      headers: {
        "Content-Type": "application/json",
      },
      body: JSON.stringify(updatedStory),
    })
      .then((response) => response.json())
      .then((data) => {
        const newGanttComponentIndex = data.story.content?.body.findIndex(
          (item: any) => item.hasOwnProperty("tasks")
        );
        if (
          JSON.stringify(
            updatedStory.story.content.body[currGanttComponentIndex].tasks
          ) !==
          JSON.stringify(data.story.content.body[newGanttComponentIndex].tasks)
        ) {
          data.story.content.body[newGanttComponentIndex].tasks =
            data.story.content.body[newGanttComponentIndex].tasks.map(
              (task: TaskModel, index: number) => {
                const { _editable, ...rest } = task;
                return { ...rest, parentIndex: index };
              }
            );
          setStoryData(JSON.parse(JSON.stringify(data.story)));
        }
      })
      .catch((error) => {
        console.error("Error:", error);
      });
  }
If the Story data is successfully updated, we set the storyData state to the updated Story data.
Add the following types for the syncData function and Story data to the top of the file below the imports:
type SyncData = {
  action: "dataset" | "add" | "remove" | "update";
  records: {
    data: TaskModel;
    meta: {
      modified: Partial<TaskModel>;
    };
  }[];
  store: {
    id: "tasks";
  };
};
type Story = ISbStoryData<
  ISbComponentType<string> & {
    [index: string]: any;
  }
>;
Define the debouncedFetch function below the updateStory function:
  const debouncedFetch = debounce((updatedStory: Story) => {
    updateStory(updatedStory);
  }, 200);
We debounce the updateStory function to prevent too many function calls, for example, when updating a task’s progress.
Add the following imports to the top of the file:
import { convertDateToSbFormat } from "@/helpers";
import { debounce } from "@/utils";
import { TaskModel } from "@bryntum/gantt";
import { ISbStoryData } from "@storyblok/react";
import { ISbComponentType } from "storyblok-js-client";
We need to create the debounce and convertDateToSbFormat helper functions. Create a utils.ts file in the src folder and add the following debounce function to it:
export const debounce = (callback: Function, wait = 200) => {
  let timeoutId: number | undefined;
  return (...args: Array<unknown>) => {
    window.clearTimeout(timeoutId);
    timeoutId = window.setTimeout(() => {
      callback.apply(null, args);
    }, wait);
  };
};
Now create a helpers.ts file in the src folder and add the following convertDateToSbFormat function: that converts a JavaScript Date to a date string that’s formatted for use with Storyblok:
export function convertDateToSbFormat(dateString: string): string {
  // Parse the input date string
  const date = new Date(dateString);
  // Extract year, month, day, hours, and minutes
  const year = date.getFullYear();
  const month = (date.getMonth() + 1).toString().padStart(2, "0");
  const day = date.getDate().toString().padStart(2, "0");
  const hours = date.getHours().toString().padStart(2, "0");
  const minutes = date.getMinutes().toString().padStart(2, "0");
  // Construct the output date string in the desired format
  const formattedDate = `${year}-${month}-${day} ${hours}:${minutes}`;
  return formattedDate;
}
The convertDateToSbFormat function converts a JavaScript date to a date string formatted for use with Storyblok.
Now when you update a task in the Bryntum Gantt, the Story data in Storyblok will be updated. When you make a change to the Bryntum Gantt and click the Save button in the Storyblok Visual Editor, you’ll see a Content Conflict dialog with the following message:
A newer version of this content item has been found in the database. Please choose how you want to proceed.To save the changes you made from the Bryntum Gantt, select the Copy over option to open the newer version with your changes in a new window.
Next steps
This tutorial gives you a starting point for using a Bryntum Gantt with Storyblok. The Bryntum Gantt only persists tasks data. You could set it up to allow dependencies and handle tree data, which would allow you to add subtasks.
You can also take a look at the Bryntum Gantt examples page to see additional features you can add, such as: