Creating a Bryntum Gantt chart with React, TypeScript, Prisma, and SQLite: Remix vs. Next.js
We strive to keep posts updated, but code samples may sometimes be outdated. Humans, see the Bryntum documentation; agents, https://mcp.bryntum.com for the latest info.
Bryntum Gantt is a fast and fully customizable JavaScript Gantt chart component packed with features. Remix and Next.js are popular full-stack JavaScript web frameworks that use React. In this tutorial, we’ll build a full-stack Bryntum Gantt chart app using Remix and then make the same app using Next.js. We’ll use a local SQLite database to store our Gantt chart data. We’ll use Prisma, which is a Node.js and TypeScript ORM, to simplify making queries to our database.
We’ll do the following for our Remix app and then make the same app using Next.js as a comparison:
- Set up Prisma and connect it to a local SQLite database.
- Seed the database with some Gantt tasks and dependencies.
- Create a client-only Gantt component for the Bryntum Gantt.
- Load data from our database into our Bryntum Gantt.
- Sync data changes in our Bryntum Gantt to our database.

Creating a Gantt chart using Remix
First we’ll create a Bryntum Gantt chart using Remix. We’ll start with a basic Remix repo that is similar to the Remix starter app.
Remix also has Remix Stacks, which are pre-configured stacks ready for production. You can use the Indie Stack if you want a Remix stack with Prisma and SQLite set up for you. We’ll set up Prisma and connect it to SQLite ourselves in this tutorial.
Getting started
We’ll start by cloning the following Bryntum Gantt using Remix starter GitHub repository. Install the dependencies by running the following command: npm install. The starter repository contains a branch called completed-gantt that contains the completed code for this tutorial.
There are global CSS styles in the app/styles/App.css file. These styles are for making the Bryntum Gantt take up the full height of the screen. You can learn more about sizing Bryntum components in our docs. The CSS styles are imported into the app by adding a <link rel="stylesheet"> tag to the app/root.tsx file. This is done using a Route Module links export.
There is a single route in app/routes/_index.tsx that renders the text “Index route”. Run the local development server using npm run dev. You’ll see a page with the rendered text. Now let’s set up Prisma in our Remix app, create schemas for our Bryntum Gantt data, connect it with a SQLite database, and seed the database with some data.
Setting up Prisma and connecting it to a local SQLite database
We’ll first set up Prisma. Install the Prisma CLI as a development dependency:
npm install prisma --save-devNow use the Prisma CLI to set up Prisma by running the following command:
npx prisma initThis creates a prisma folder in the root of your application. The prisma folder contains a Prisma schema file named schema.prisma. This Prisma schema file is the main configuration file for setting up Prisma. It’s written in Prisma Schema Language (PSL). It consists of three parts:
- Data sources: Determines how Prisma connects to your database. In our case, it will connect to a local SQLite database.
- Generators: Determines which assets are created when you run the
prisma generatecommand. We’ll use the generator for Prisma’s JavaScript Client. - Data model definition: Defines the application models and their relations. We’ll define models for the Gantt data tasks and dependencies.
If you are using VS Code, you can install the official Prisma VS Code extension, which adds syntax highlighting, formatting, auto-completion, and linting for .prisma files. If you use a different code editor, you can check the Prisma docs to learn how to configure your editor for Prisma.
Now change the data source provider in the schema.prisma file to SQLite:
datasource db {
  provider = "sqlite"
  url = env("DATABASE_URL")
}
The url is the connection URL for the database. In the .env file that was created in the Prisma set up, change the DATABASE_URL environment variable to the following:
DATABASE_URL="file:./data.db?connection_limit=1"Now add the following models for our Gantt data at the bottom of the schema.prisma file:
model Tasks {
  id                          String    @id
  parentId                    String?
  name                        String?
  startDate                   DateTime?
  endDate                     DateTime?
  effort                      Float?
  effortUnit                  String?   @default("hour")
  duration                    Float?
  durationUnit                String?   @default("day")
  percentDone                 Float?    @default(0.00)
  schedulingMode              String?
  note                        String?
  constraintType              String?
  constraintDate              DateTime?
  manuallyScheduled           Boolean?
  effortDriven                Boolean?
  inactive                    Boolean?
  cls                         String?
  iconCls                     String?
  color                       String?
  parentIndex                 Int?      @default(0)
  expanded                    Int?      @default(0)
  calendar                    Int?
  deadline                    DateTime?
  direction                   String?
  unscheduled                 Boolean?
  projectConstraintResolution String?
  delayFromParent             Int?

  @@index([parentId], name: "parentId")
  @@index([calendar], name: "calendar")
}

model Dependencies {
  id        String  @id
  fromEvent String?
  toEvent   String?
  type      Int?    @default(2)
  cls       String?
  lag       Float?  @default(0)
  lagUnit   String? @default("day")
  active    Boolean?
  fromSide  String?
  toSide    String?

  @@index([fromEvent], name: "fromEvent")
  @@index([toEvent], name: "toEvent")
}
The Tasks and Dependencies models represent the shape of the Bryntum Gantt tasks and dependencies data, respectively. Now install the Prisma Client npm package by running the following command:
npm install @prisma/clientThe Prisma Client will allow us to send queries to our database. This command also runs the prisma generate command, which generates the Prisma Client and saves it to the node_modules/.prisma/client directory by default. Note that you need to rerun the npx prisma generate command after every change you make to your Prisma schema to update the generated Prisma Client code.
To generate a migration file, run the following command:
npx prisma migrate devThe Prisma migrate database migration tool is used to keep your database schema in sync with your Prisma schema. Run this command each time you change the Prisma schema.
Running this command creates a migrations folder in the prisma folder. Each migration contains the SQLite schema, created using the Prisma schema, for the SQLite database. The command also creates a data.db and data.db-journal file in the prisma folder. The data.db file is our local SQLite database that Prisma is connected to. The data.db-journal file is a temporary file called a rollback journal that is used by SQLite for atomic commits and rollbacks.
Note that for testing and production environments, you should use the following migration command:
npx prisma migrate deployYou can read more about using Prisma migrate commands in the following article: Prisma Migrate in development and production.
Viewing the database in Prisma studio
Prisma has a built-in GUI to view and edit data in your database. Let’s open it to view our database by running the following command:
npx prisma studioWhen you open Prisma studio your browser, which will use the URL https://localhost:5555, you’ll see the following GUI:
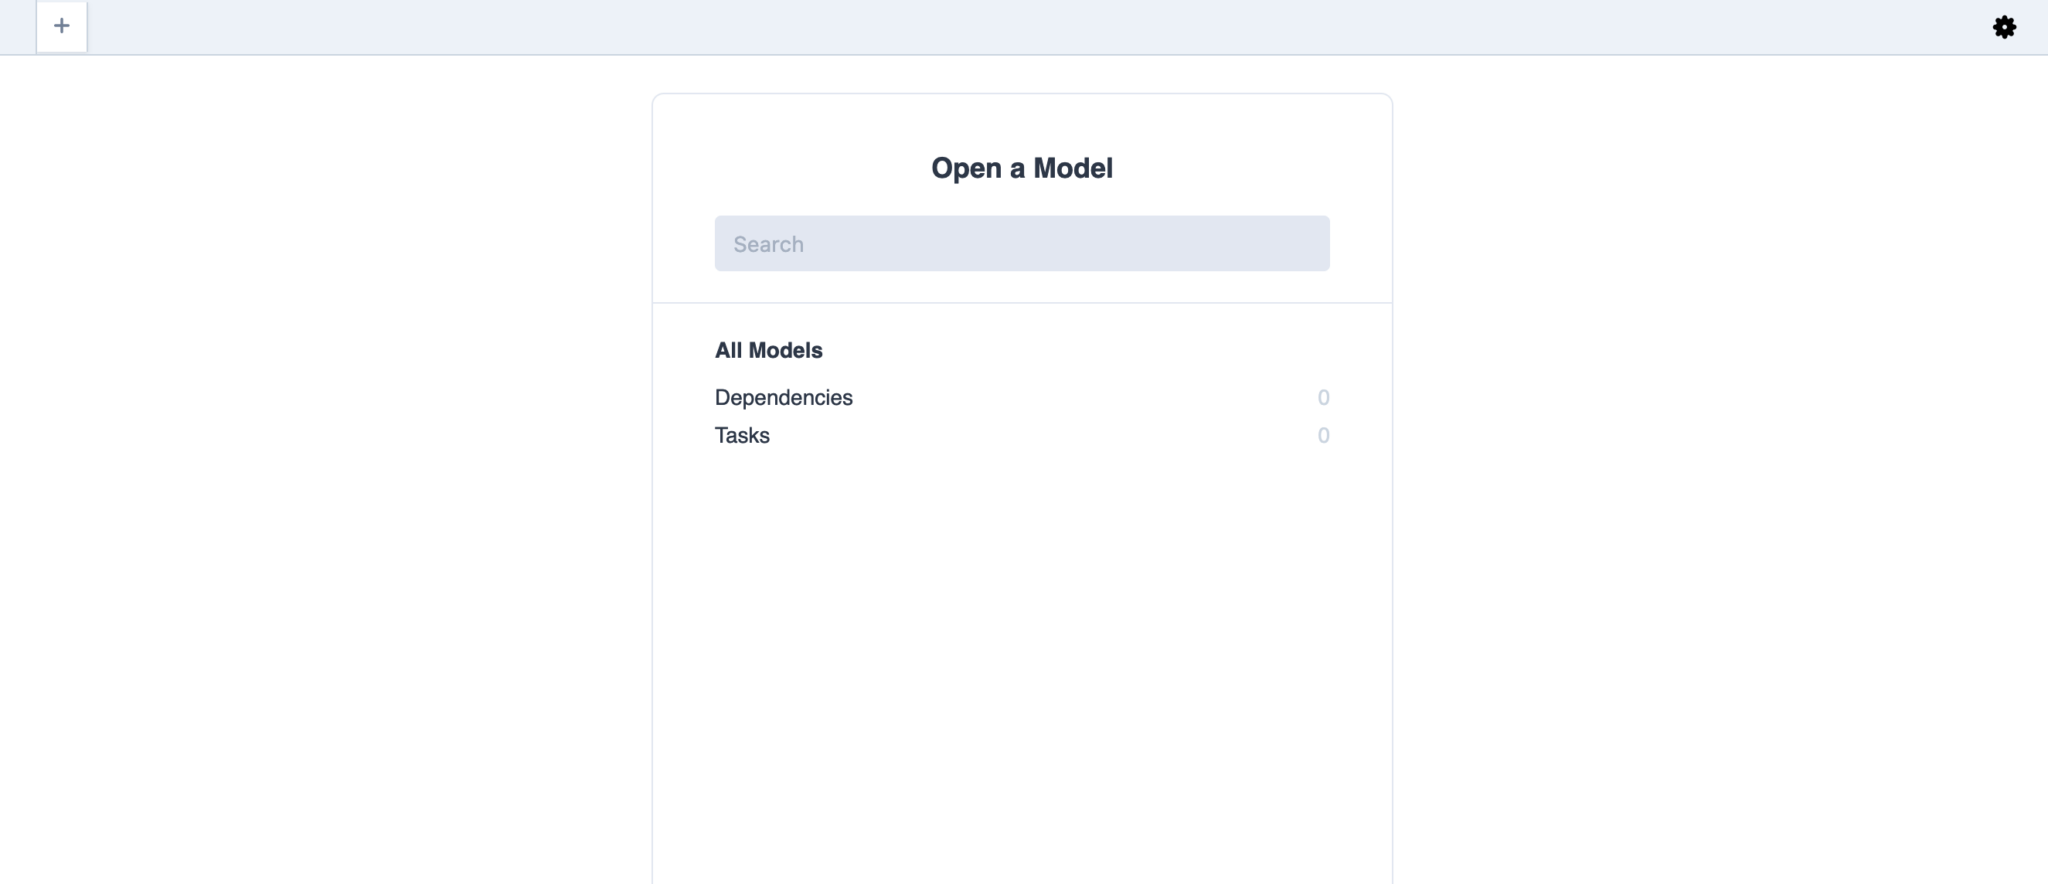
You can click on the Tasks and Dependencies SQLite tables to view, add, delete, edit, or filter records. The tables don’t have any records, so only the table columns will show. We can manually add some initial data for our Bryntum Gantt using the Prisma Studio GUI, but that would be quite tedious. Let’s rather write a script to seed our database with some tasks and dependencies.
Seeding the database
Create a seed.ts file in the prisma folder and add the following code:
import { PrismaClient } from '@prisma/client';

const prisma = new PrismaClient();

async function seed() {
    // clear database first
    await prisma.tasks.deleteMany({});
    await prisma.dependencies.deleteMany({});

    const tasks = [
        {
            id          : '1000',
            name        : 'Launch SaaS Product',
            expanded    : 1,
            iconCls     : '',
            percentDone : 34.248366013071895,
            startDate   : '2023-03-14T00:00:00.000Z',
            endDate     : '2023-03-29T00:00:00.000Z',
            parentId    : null,
            effort      : 153.0,
            duration    : 15.0,
            parentIndex : 0
        },
        {
            id          : '1',
            name        : 'Setup web server',
            expanded    : 1,
            iconCls     : '',
            percentDone : 42.30769230769231,
            startDate   : '2023-03-14T00:00:00.000Z',
            endDate     : '2023-03-29T00:00:00.000Z',
            parentId    : '1000',
            effort      : 13.0,
            duration    : 15.0,
            parentIndex : 0
        },
        {
            id          : '11',
            name        : 'Install Apache',
            expanded    : 0,
            iconCls     : '',
            percentDone : 50.0,
            startDate   : '2023-03-14T00:00:00.000Z',
            endDate     : '2023-03-17T00:00:00.000Z',
            parentId    : '1',
            effort      : 3.0,
            duration    : 3.0,
            parentIndex : 0
        },
        {
            id             : '12',
            name           : 'Configure firewall',
            expanded       : 0,
            iconCls        : '',
            percentDone    : 50.0,
            startDate      : '2023-03-17T22:00:00.000Z',
            endDate        : '2023-03-28T00:00:00.000Z',
            parentId       : '1',
            effort         : 3.0,
            duration       : 11.0,
            parentIndex    : 1,
            constraintType : 'startnoearlierthan',
            constraintDate : '2023-03-17T22:00:00.000Z'
        }
    ];

    for (const task of tasks) {
        console.log('task id: ', task.id);
        await prisma.tasks.create({
            data : task
        });
    }

    const dependencies = [
        {
            id        : '1',
            fromEvent : '11',
            toEvent   : '12',
            cls       : null,
            fromSide  : null,
            toSide    : null
        }
    ];

    for (const dependency of dependencies) {
        await prisma.dependencies.create({
            data : dependency
        });
    }

    console.log(`Database has been seeded.`);
}

seed()
    .catch((e) => {
        console.error(e);
        process.exit(1);
    })
    .finally(async() => {
        await prisma.$disconnect();
    });
We import and instantiate the Prisma Client so that we can send queries to our database.
We then run the seed() function. The seed() function first clears the database of any existing records in the tasks and dependencies tables using the Prisma deleteMany() function, which deletes multiple database records in a SQLite transaction.
The tasks and dependencies arrays contain data for the initial tasks and dependencies, respectively. We loop through each of the arrays and use the Prisma create() function to create a database record for each task or dependency.
Finally, we disconnect from the database. Generally, apps should only create one instance of PrismaClient.
Let’s create an npx script to run the seed() function. Add the following lines to your package.json file, below the “devDependencies” key:
  "prisma": {
    "seed": "npx tsx prisma/seed.ts"
  },
Now run the following command to seed our database:
npx prisma db seedTo view the data in our database, open the Prisma Studio GUI again by running the following command:
npx prisma studioYou’ll now see the database populated with three tasks and one dependency:
In the app/utils folder, create a file called db.server.ts and add the following lines of code to it:
import { PrismaClient } from '@prisma/client';

let prisma: PrismaClient;

declare global {
  var __db__: PrismaClient;
}

// This is needed because in development we don't want to restart
// the server with every change, but we want to make sure we don't
// create a new connection to the DB with every change either.
// In production, we'll have a single connection to the DB.
if (process.env.NODE_ENV === 'production') {
    prisma = new PrismaClient();
}
else {
    if (!global.__db__) {
        global.__db__ = new PrismaClient();
    }
    prisma = global.__db__;
    prisma.$connect();
}

export { prisma };
We’ll use this file to connect to our Prisma Client to make sure that we have a single connection to the SQLite database during development. Now let’s add a Bryntum Gantt chart to our app.
Creating a client-only Gantt component for Remix
⚠️ Please note that Bryntum components are only client-side rendered.
We’ll install the Bryntum Gantt component using npm. You can try out Bryntum components for free using our public Bryntum trial package.
If you have a Bryntum license, please refer to our npm Repository Guide to access the private Bryntum repository.
npm install @bryntum/ganttYou’ll also need to install the Bryntum Gantt React wrapper that encapsulates the Bryntum Gantt in a React component. Install the Gantt React wrapper using the following command:
npm i @bryntum/gantt-react@5.6.11Let’s first create our Gantt configuration file. This config file will determine how the Gantt chart will look and where it gets data from. It adds to the built-in core functionality of the Gantt chart. Create a file called ganttConfig.ts in the app folder and add the following lines of code to it:
import type { BryntumGanttProps } from '@bryntum/gantt-react';

const ganttConfig: BryntumGanttProps = {
    columns    : [{ type : 'name', field : 'name', width : 250 }],
    viewPreset : 'weekAndDayLetter',
    barMargin  : 10
};

export { ganttConfig };
Our Gantt chart will have a single column called “name” and will display the letter representing the week and the letter representing the day in the header of the timeline of the Gantt chart.
In the app/components folder, create a file called Gantt.client.tsx and add the following lines to it:
import { BryntumGantt } from '@bryntum/gantt-react';
import { ganttConfig } from '~/ganttConfig';
import type { LegacyRef } from 'react';

type Props = {
  ganttRef: LegacyRef | undefined;
};

export default function Gantt({ ganttRef }: Props) {
    return <BryntumGantt ref={ganttRef} {...ganttConfig} />;
}
This component renders the Bryntum Gantt React wrapper component. We pass in a ref prop to access the Bryntum Gantt instance. We don’t use this in our app but it’s useful if you need to access the Bryntum Gantt instance. We also pass in the ganttConfig.
It’s important to note that Remix uses server-side rendering (SSR) and Bryntum’s components are client-side only. We’ll make use of the ClientOnly component of the Remix-utils library to render the Bryntum Gantt on the client. We added .client to the name of our Gantt component, which explicitly tells the Remix compiler to only bundle this file for the client. This makes sure that it’s not run on the server. Install the Remix-utils library using the following command:
npm i remix-utils@7.6.0Now let’s add our Gantt component as a client-only component in our _index.tsx route under app/routes. Replace the code in this file with the following lines of code:
import { useRef } from 'react';
import type { LegacyRef } from 'react';
import { ClientOnly } from 'remix-utils/client-only';
import type { BryntumGantt } from '@bryntum/gantt-react';
import Gantt from '~/components/Gantt.client';

export default function Index() {
    const ganttRef = useRef() as LegacyRef | undefined;
    return (
        <ClientOnly
            fallback={
                <div
                    style={{
                        display        : 'flex',
                        alignItems     : 'center',
                        justifyContent : 'center',
                        height         : '100vh'
                    }}
                >
                    <p>Loading...</p>
                </div>
            }
        >
            {() => <Gantt ganttRef={ganttRef} />}
        </ClientOnly>
    );
}
A fallback component will show “Loading…” while the Bryntum Gantt is loading.
We’ll use the Bryntum Stockholm theme to style our Gantt. Import it at the top of the app/styles/App.css file:
@import "@bryntum/gantt/gantt.stockholm.css";This theme is required to render the Bryntum Gantt correctly. For more information on rendering and styling, see this article in our docs.
Now run the local development server using npm run dev and you’ll see an empty Gantt chart:

Loading data from SQLite
Let’s get the data from our local SQLite database into our Gantt chart. We’ll modify the Gantt config file to load data from a specific URL. In the app/ganttConfig.ts file add the following lines of code:
import { ProjectModel } from '@bryntum/gantt';

const project = new ProjectModel({
    taskStore : {
        autoTree          : true,
        transformFlatData : true
    },
    transport : {
        load : {
            url : 'https://localhost:3000/api/gantt'
        }
    },
    autoLoad         : true,
    validateResponse : true,
});
We create an instance of the ProjectModel, which uses the Gantt Crud manager to load and sync data.
The taskStore class represents the tree of tasks in the project’s data store. We set autoTree and transformFlatData to true to automatically transform flat data to hierarchical data. This allows us to add flat data to our data store—flat data is easier to create. The data added in the seed.ts file has a flat structure, there are no child tasks nested in parent tasks.
We specify the URL location of the data to populate the Gantt chart using transport. We’ll create an API route at this URL.
The autoLoad property is set to true so that the data is automatically loaded on page load.
The validateResponse property validates the structure of responses from our server.
Now add the project to your ganttConfig variable by adding the project as a property:
project,Let’s create the API route to get our Gantt data. It will be a Remix resource route, which is a route that’s not part of your application UI.
In the routes folder, create a file called api.gantt.ts. Add the following lines of code to the file:
import { json } from '@remix-run/node';
import { prisma } from '~/utils/db.server';

export async function loader() {
    try {
        const tasks = await prisma.tasks.findMany();
        const dependencies = await prisma.dependencies.findMany();
        return json({
            success : true,
            tasks   : {
                rows : tasks
            },
            dependencies : {
                rows : dependencies
            }
        });
    }
    catch (error) {
        return json({
            success : false,
            tasks   : {
                rows : []
            },
            dependencies : {
                rows : []
            }
        });
    }
}
We create a Remix loader function that only runs on the server. When a GET request is made to this route, the response of the loader is returned. This function queries our SQLite database using the Prisma Client. We use the Prisma findMany() method to get all of the tasks and dependencies records from our database. We then return a response using the Remix helper function json() to create our response. The format of the response is the expected Bryntum Gantt load response structure.
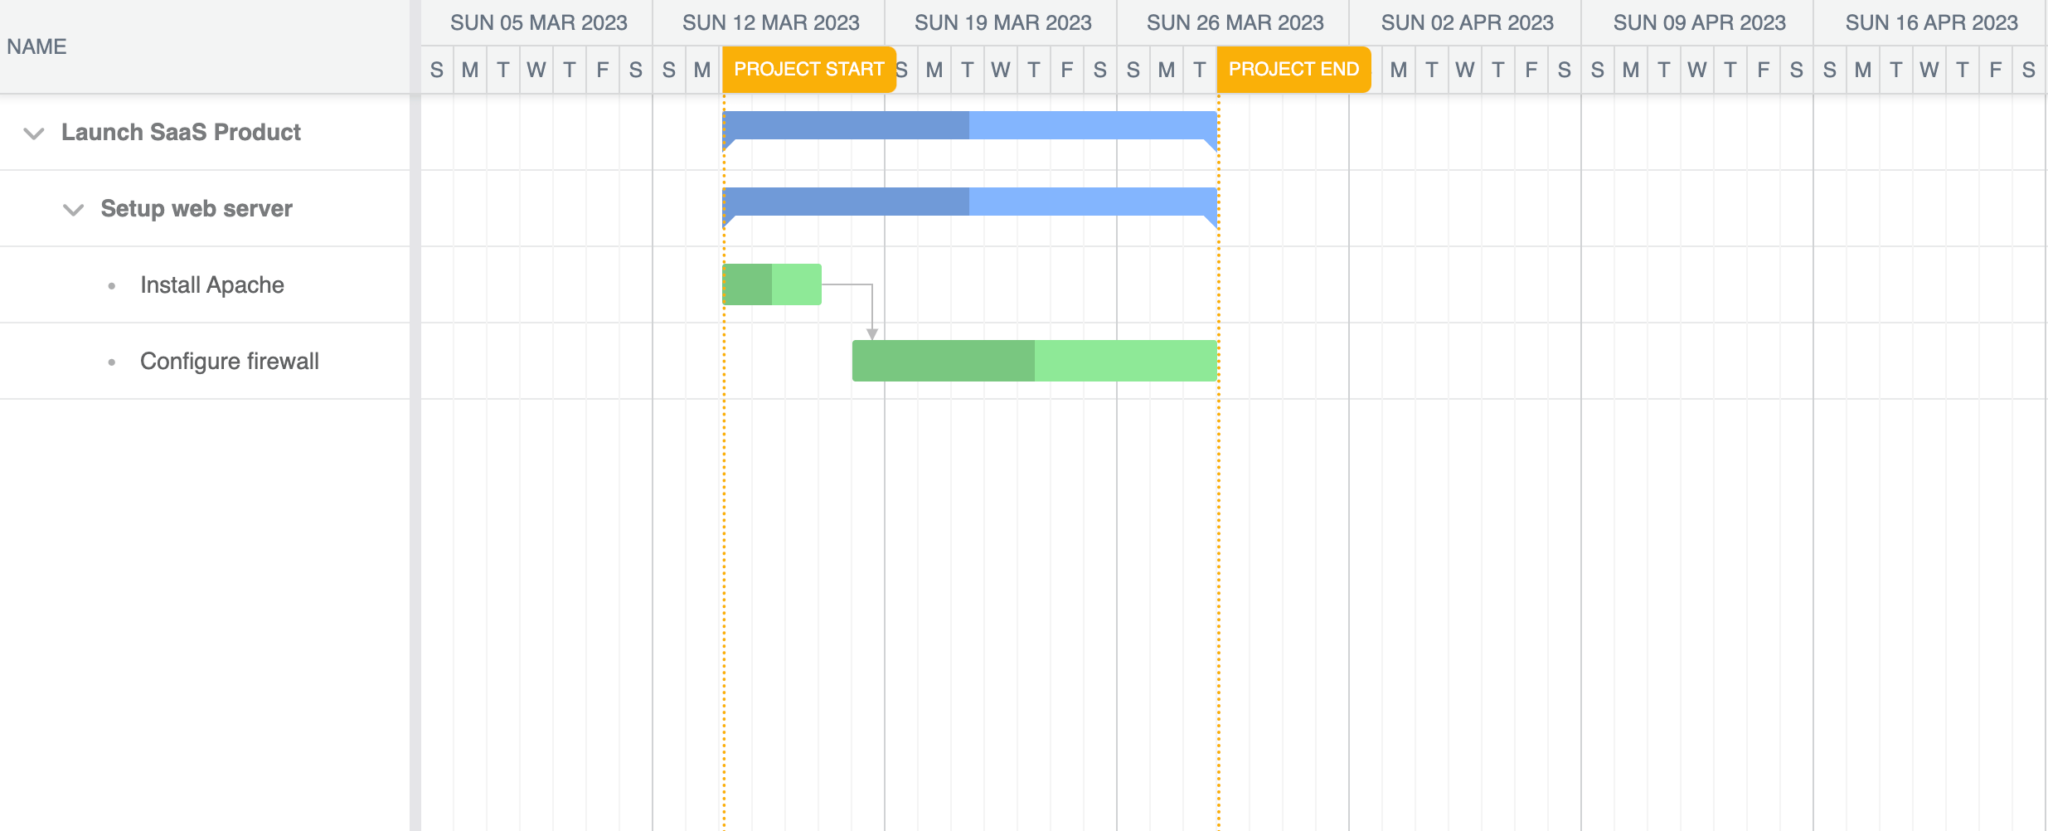
Now when you run your app, you’ll see the Gantt chart with the tasks and dependencies data from our database:

Now let’s sync changes to our Gantt chart in the browser to our database.
Syncing data changes to SQLite
First, we’ll modify the transport options in the project of our ganttConfig in ganttConfig.ts. Add the following sync property:
sync : {
    url : 'https://localhost:3000/api/gantt'
}
We use sync to specify the URL the project will send data about changes to when we make a change in the Gantt on the client. Our Gantt chart will send a POST request with the changes.
Add the following autoSync property below the autoLoad property:
autoSync: true,Setting autoSync to true will make our Gantt chart automatically send a POST request when data store changes occur.
We’ll use a Remix action function to handle POST requests to our API route. The action function is a server-only function like the loader function and it handles all non-GET requests to a route. Add the following action function and types to the app/routes/api.gantt.ts file:
type SyncReqBodyTasksObj = {
    added?: Tasks[];
    updated?: Tasks[];
    removed?: Tasks[];
  };

  type SyncReqBodyDependenciesObj = {
    added?: Dependencies[];
    updated?: Dependencies[];
    removed?: Dependencies[];
  };

  type SyncReqBody = {
    type: 'sync';
    reqestId: number;
    tasks: SyncReqBodyTasksObj;
    dependencies?: SyncReqBodyDependenciesObj;
  };

export async function action({ request: req }: ActionFunctionArgs) {
    if (req.method != 'POST') return json({ message : 'Method not allowed' });

    const data: SyncReqBody = await req.json();
    let requestId: number | null = null;
    let lastKey: 'added' | 'deleted' | 'updated' | 'error' | '' = '';
    let err = null;
    const taskUpdates: Tasks[] = [];
    const tasksRemoved: Tasks[] = [];
    const dependencyUpdates: Dependencies[] = [];
    const dependenciesRemoved: Dependencies[] = [];
    for (const [key, value] of Object.entries(data)) {
        if (key === 'requestId') {
            requestId = value as number;
        }
        if (key === 'tasks') {
            for (const [key2, value2] of Object.entries(
          value as SyncReqBodyTasksObj
            )) {
                if (key2 === 'added') {
                    value2.forEach((addObj) => taskUpdates.push(addObj));
                    value2[0].id = crypto.randomUUID();
                    const val = await createOperation(value2[0], 'tasks');
                    lastKey = val.msg;
                    err = val.error;
                }
                if (key2 === 'updated') {
                    value2.forEach((updateObj) => taskUpdates.push(updateObj));
                    const val = await updateOperation(value2, 'tasks');
                    lastKey = val.msg;
                    err = val.error;
                }
                if (key2 === 'removed') {
                    tasksRemoved.push(value2[0]);
                    const val = await deleteOperation(value2[0].id, 'tasks');
                    lastKey = val.msg;
                    err = val.error;
                }
            }
        }
        if (key === 'dependencies') {
            for (const [key2, value2] of Object.entries(
          value as SyncReqBodyDependenciesObj
            )) {
                if (key2 === 'added') {
                    value2[0].id = crypto.randomUUID();
                    value2.forEach((addObj) => dependencyUpdates.push(addObj));
                    const val = await createOperation(value2[0], 'dependencies');
                    lastKey = val.msg;
                    err = val.error;
                }
                if (key2 === 'updated') {
                    value2.forEach((updateObj) => dependencyUpdates.push(updateObj));
                    const val = await updateOperation(value2, 'dependencies');
                    lastKey = val.msg;
                    err = val.error;
                }
                if (key2 === 'removed') {
                    dependenciesRemoved.push(value2[0]);
                    const val = await deleteOperation(value2[0].id, 'dependencies');
                    lastKey = val.msg;
                    err = val.error;
                }
            }
        }
    }
    return sendResponse(
        lastKey,
        requestId,
        err,
        taskUpdates,
        dependencyUpdates,
        tasksRemoved,
        dependenciesRemoved
    );
}
Our client-side Gantt will send POST requests to sync the data with our database when the data is changed on the client. We can return a response early with an error message if a non-POST method, other than GET, is used. The Gantt sends a specific sync request structure and our action function gets the sync POST request data. The action function loops through the object to determine which database table to update: tasks or dependencies, and determines the type of operation to perform: add, update, or delete. We’ll create helper functions to perform these actions.
We use the randomUuid() method of the Node crypto module to create unique IDs for added tasks and dependencies.
Now import the crypto module at the top of the file:
import crypto from 'crypto';We also need some other imports. Add the following lines of code to the top of the file:
import type { ActionFunctionArgs } from '@remix-run/node';
import type { Dependencies, Tasks } from '@prisma/client';
import {
    sendResponse,
    createOperation,
    deleteOperation,
    updateOperation
} from '~/helpers/helpers.server';
You can change the error response catch statement in the loader function to return the following:
return sendResponse('error', null, error, [], [], [], []);Let’s create the helper functions that we imported. In the app/helpers folder, create a file called helpers.server.ts and add the following lines of code to it:
import { json } from '@remix-run/node';
import { prisma } from '~/utils/db.server';
import type { Dependencies, Tasks } from '@prisma/client';

type GanttDataPOSTRes = {
  success: boolean;
  requestId: number;
  tasks: {
    rows: Tasks[] | [];
    removed: Tasks[] | [];
  };
  dependencies: {
    rows: Dependencies[] | [];
    removed: Dependencies[] | [];
  };
};

export function sendResponse(
    action: 'added' | 'deleted' | 'updated' | 'error' | '',
    requestId: number | null,
    error: unknown,
    taskUpdates: Tasks[],
    dependencyUpdates: Dependencies[],
    tasksRemoved: Tasks[],
    dependenciesRemoved: Dependencies[]
) {
    if (action == 'error') console.log(error);
    const result: Partial = {
        success : action === 'error' ? false : true
    };
    if (requestId !== undefined && requestId !== null)
        result.requestId = requestId;
    // updated tasks
    result.tasks = { rows : [], removed : [] };
    if (taskUpdates.length) {
        result.tasks.rows = [...result.tasks.rows, ...taskUpdates];
    }
    // deleted tasks
    result.tasks.removed = [];
    if (tasksRemoved.length) {
        result.tasks.removed = [...result.tasks.removed, ...tasksRemoved];
    }
    // updated dependencies
    result.dependencies = { rows : [], removed : [] };
    if (dependencyUpdates.length) {
        result.dependencies.rows = [
            ...result.dependencies.rows,
            ...dependencyUpdates
        ];
    }
    // deleted dependencies
    result.dependencies.removed = [];
    if (dependenciesRemoved.length) {
        result.dependencies.removed = [
            ...result.dependencies.removed,
            ...dependenciesRemoved
        ];
    }
    return json(result);
}
The Bryntum Gantt expects a specific sync response structure. The sendResponse function is used to create this response structure. It takes in the sync action, which can be “added”, “updated”, or “deleted”, or “error” to handle errors. It also takes in arrays of the tasks and dependencies updates and removals. When a server makes changes to the synced data, which we do using Prisma, the new tasks and dependencies values must be part of the response that the Bryntum Gantt Crud Manager receives.
Now add the following function below the sendResponse function:
export async function createOperation(
    addObj: Tasks | Dependencies,
    table: 'tasks' | 'dependencies'
): Promise<{
    msg: 'added' | 'error';
    error: unknown;
  }> {
    const data: Record = {};
    for (const [key, value] of Object.entries(addObj)) {
        if (
            key !== 'baselines' &&
        key !== 'from' &&
        key !== 'to' &&
        key !== '$PhantomId' &&
        key !== 'segments' &&
        key !== 'ignoreResourceCalendar'
        ) {
            data[key] = value;
        }
    }
    try {
        if (table === 'tasks') {
            await prisma.tasks.create({ data : data as Tasks });
        }
        if (table === 'dependencies') {
            await prisma.dependencies.create({ data : data as Dependencies });
        }
        return { msg : 'added', error : null };
    }
    catch (error) {
        return { msg : 'error', error };
    }
}
The createOperation function takes in the new task or dependency object to add to the database and the database table that it should be added to. We use the Prisma create() function, which queries our database and adds the object to the appropriate table.
Before adding the object, we remove properties that we don’t want to persist to our database, such as “$PhantomId”, which might cause collisions on the client after data reloading. The backend should assign new identifiers to added records, which we did using uuid in the action function in api/gantt.ts. You can read more about phantom identifiers in our docs.
Add the following function below the createOperation function:
export async function deleteOperation(
    id: string,
    table: 'tasks' | 'dependencies'
): Promise<{
    msg: 'deleted' | 'error';
    error: unknown;
  }> {
    try {
        if (table === 'tasks') {
            await prisma.tasks.delete({ where : { id : id } });
        }
        if (table === 'dependencies') {
            await prisma.dependencies.delete({ where : { id : id } });
        }
        return { msg : 'deleted', error : null };
    }
    catch (error) {
        return { msg : 'error', error : error };
    }
}
We use the id argument to find the task or dependency to delete and delete it using the Prisma delete() function, which runs a SQLite query that deletes the record.
Now add the following function below the deleteOperation function:
export async function updateOperation(
    updates: Tasks[] | Dependencies[],
    table: 'tasks' | 'dependencies'
): Promise<{
    msg: 'updated' | 'error';
    error: unknown;
  }> {
    try {
        await Promise.all(
            updates.map(async({ id, ...update }) => {
                if (table === 'tasks') {
                    await prisma.tasks.update({
                        where : { id },
                        data  : update
                    });
                }

                if (table === 'dependencies') {
                    await prisma.dependencies.update({
                        where : { id },
                        data  : update
                    });
                }
            })
        );
        return { msg : 'updated', error : null };
    }
    catch (error) {
        return { msg : 'error', error };
    }
}
This function takes in an array of tasks or dependencies, as there may be multiple updates to perform. We loop through the tasks or dependencies and use the Prisma update() function to run an update query for each record with a given id.
Now make changes to your Gantt and refresh the page. The changes will be persisted to the database.
Creating a Gantt chart using Next.js
Now let’s create a Bryntum Gantt chart using Next.js. We’ll start with a basic Next.js repo that is similar to the Next.js starter app.
Next.js has starter templates for full-stack applications, like Remix Stacks. You can use the Fullstack Blog with Next.js + Prisma template if you want a Next.js stack with Prisma set up for you.
There are many similarities between creating the Bryntum Gantt app with Remix and Next.js.
Getting started
We’ll start by cloning the following Bryntum Gantt using Next.js starter GitHub repository. Install the dependencies by running the following command: npm install. The starter repository also contains a branch called completed-gantt that contains the completed code for this tutorial. The Next.js module path alias is configured as @/*, which allows us to import directly from the root folder using @/. This simplifies our relative import statements.
There are global CSS styles in the styles/App.css file. These styles are for making the Bryntum Gantt take up the full height of the screen. You can learn more about sizing Bryntum components in our docs. The CSS styles are imported into the pages/_app.tsx file. This Next.js app component is used to initialize pages.
There is a single page, page/index.tsx, that renders the text “Index route”. Run the local development server using npm run dev. You’ll see a page with the rendered text.
Setting up Prisma and connecting it to a local SQLite database
The set up for Prisma with SQLite is the same as for Remix. You can follow the instructions in the Remix section of this tutorial.
With Remix we named the file used to connect to our Prisma client db.server.ts. Change the name db.server.ts to db.ts.
Creating a client-only Gantt component for Next.js
⚠️ Please note that Bryntum components are only client-side rendered.
First, install the Bryntum Gantt component and Bryntum Gantt React wrapper using npm in the same way as we did with Remix in the “Creating a client-only Gantt component for Remix” section above. Now let’s create a Bryntum Gantt configuration file in the same way as we did with Remix. Create a file called ganttConfig.ts in the root directory and add the following lines of code to it:
import type { BryntumGanttProps } from '@bryntum/gantt-react';

const ganttConfig: BryntumGanttProps = {
    columns    : [{ type : 'name', field : 'name', width : 250 }],
    viewPreset : 'weekAndDayLetter',
    barMargin  : 10
};

export { ganttConfig };
In the components folder, create a file called Gantt.tsx and add the following lines to it:
import { LegacyRef } from 'react';
import { ganttConfig } from '@/ganttConfig';
import { BryntumGantt } from '@bryntum/gantt-react';

type Props = {
  ganttRef: LegacyRef | undefined;
};

export default function Gantt({ ganttRef }: Props) {
    return <BryntumGantt ref={ganttRef} {...ganttOpt} />;
}
This component renders the Bryntum Gantt React wrapper component. We use a ref to access the Bryntum Gantt instance. We don’t use this in our app but it’s useful if you need to access the Bryntum Gantt instance. We also pass in the ganttConfig.
Next.js, like Remix, uses SSR and Bryntum’s components are client-side only. We’ll import the BryntumGantt component dynamically to ensure that the Bryntum Gantt is rendered on the client only.
Now let’s import our Gantt component into our index page. Replace the code in the index.tsx file with the following lines of code:
import { useRef, LegacyRef } from 'react';
import Head from 'next/head';
import dynamic from 'next/dynamic';
import { BryntumGantt } from '@bryntum/gantt-react';

const GanttDynamic = dynamic(() => import('@/components/Gantt'), {
    ssr     : false,
    loading : () => {
        return (
            <div
                style={{
                    display        : 'flex',
                    alignItems     : 'center',
                    justifyContent : 'center',
                    height         : '100vh'
                }}
            >
                <p>Loading...</p>
            </div>
        );
    }
});

export default function BryntumGanttPage() {
    const ganttRef = useRef() as LegacyRef | undefined;
    return (
        <>
            <Head>
                <title>Bryntum Gantt using Next.js</title>
                <meta name="description" content="Bryntum Gantt using Next.js" />
                <meta name="viewport" content="width=device-width, initial-scale=1" />
                <link rel="icon" href="/favicon.ico" />
            </Head>
            <GanttDynamic ganttRef={ganttRef} />
        </>
    );
}
We dynamically import our Gantt component with ssr set to false. While the component is loading, we display a loading component that returns a <p> tag with the message “Loading…”.
We’ll use the Bryntum Stockholm theme to style our Gantt, as we did with Remix. Import it at the top of the styles/App.css file:
@import "@bryntum/gantt/gantt.stockholm.css";Now run the local development server using npm run dev and you’ll see an empty Gantt chart:
Note that Next.js 13, which this app uses, introduced the App Router (app). All components inside the app directory are React Server Components by default. You can make a component client-only by adding the "use client" directive at the top of the file, before any imports. At the time of writing this tutorial, Next.js recommends not using the app directory in production yet because it’s currently in beta.
Loading data from SQLite
Let’s get the data from our local SQLite database into our Gantt chart. We’ll modify the Gantt config file to load data from a specific URL. In the ganttConfig.ts file, add the following lines of code:
import { ProjectModel } from '@bryntum/gantt';

const project = new ProjectModel({
    taskStore : {
        autoTree          : true,
        transformFlatData : true
    },
    transport : {
        load : {
            url : 'https://localhost:3000/api/gantt'
        }
    },
    autoLoad         : true,
    validateResponse : true,
});
This is the same project model that we created for the Remix Gantt.
Now add the project to your ganttConfig variable by adding the project as a property:
project,Let’s create a Next.js API route to get our Gantt data. In the pages/api folder, create a file called gantt.ts and add the following lines of code to it:
import type { NextApiRequest, NextApiResponse } from 'next';
import { prisma } from '@/utils/db';
import { Dependencies, Tasks } from '@prisma/client';

export type GanttDataGETRes = {
  success: boolean;
  tasks: {
    rows: Tasks[];
  };
  dependencies: {
    rows: Dependencies[];
  };
};

export type GanttDataPOSTRes = {
  success: boolean;
  requestId: number;
  tasks: {
    rows: Tasks[] | [];
    removed: Tasks[] | [];
  };
  dependencies: {
    rows: Dependencies[] | [];
    removed: Dependencies[] | [];
  };
};

export type GanttDataRes =
  | GanttDataGETRes
  | GanttDataPOSTRes
  | Partial
  | { message: 'Method not allowed' };


export default async function handler(
    req: NextApiRequest,
    res: NextApiResponse
) {
    if (req.method === 'GET') {
        try {
            const tasks = await prisma.tasks.findMany();
            const dependencies = await prisma.dependencies.findMany();
            return res.json({
                success : true,
                tasks   : {
                    rows : tasks
                },
                dependencies : {
                    rows : dependencies
                }
            });
        }
        catch (error) {
            return res.json({
                success : false,
                tasks   : {
                    rows : []
                },
                dependencies : {
                    rows : []
                }
            });
        }
    }

    if (req.method === 'POST') {

    }

    return res.status(405).json({ message : 'Method not allowed' });
}
In our Next.js API route handler function, we use the Prisma findMany() function to get the tasks and dependencies from our SQLite database if a GET request is made. The format of the response is the expected Bryntum Gantt load response structure. This code is almost the same as the code we used in the loader function we used for the Remix Bryntum Gantt.
Now when you run your app, you’ll see the Gantt chart with the tasks and dependencies data loaded from our database:
Now let’s sync changes to our Gantt chart in the browser to our database.
Syncing data changes to SQLite
First we’ll modify the transport options in the project of our ganttConfig in ganttConfig.ts, as we did when we used Remix. Add the following sync property:
    sync: {
      url: 'https://localhost:3000/api/gantt',
    },
Now add the following autoSync property below the autoLoad property:
autoSync: true,We’ll sync data changes to our Gantt chart using the same API route that we used to load data. Add the following imports to the api/gantt.ts API route:
import {
    sendResponse,
    createOperation,
    deleteOperation,
    updateOperation
} from '@/helpers/helpers';
import crypto from 'crypto';
We’ll create these helper functions a little later.
Add the following TypeScript types:
type SyncReqBodyTasksObj = {
  added?: Tasks[];
  updated?: Tasks[];
  removed?: Tasks[];
};

type SyncReqBodyDependenciesObj = {
  added?: Dependencies[];
  updated?: Dependencies[];
  removed?: Dependencies[];
};

type SyncReqBody = {
  type: 'sync';
  reqestId: number;
  tasks: SyncReqBodyTasksObj;
  dependencies?: SyncReqBodyDependenciesObj;
};
Now add the following lines of code to the handler function in the if statement where req.method === "POST":
const data: SyncReqBody = req.body;
let requestId: number | null = null;
let lastKey: 'added' | 'deleted' | 'updated' | 'error' | '' = '';
let err = null;
const taskUpdates: Tasks[] = [];
const tasksRemoved: Tasks[] = [];
const dependencyUpdates: Dependencies[] = [];
const dependenciesRemoved: Dependencies[] = [];
for (const [key, value] of Object.entries(data)) {
    if (key === 'requestId') {
        requestId = value as number;
    }
    if (key === 'tasks') {
        for (const [key2, value2] of Object.entries(
      value as SyncReqBodyTasksObj
        )) {
            if (key2 === 'added') {
                value2.forEach((addObj) => taskUpdates.push(addObj));
                value2[0].id = crypto.randomUUID();
                const val = await createOperation(value2[0], 'tasks');
                lastKey = val.msg;
                err = val.error;
            }
            if (key2 === 'updated') {
                value2.forEach((updateObj) => taskUpdates.push(updateObj));
                const val = await updateOperation(value2, 'tasks');
                lastKey = val.msg;
                err = val.error;
            }
            if (key2 === 'removed') {
                tasksRemoved.push(value2[0]);
                const val = await deleteOperation(value2[0].id, 'tasks');
                lastKey = val.msg;
                err = val.error;
            }
        }
    }
    if (key === 'dependencies') {
        for (const [key2, value2] of Object.entries(
      value as SyncReqBodyDependenciesObj
        )) {
            if (key2 === 'added') {
                value2[0].id = crypto.randomUUID();
                value2.forEach((addObj) => dependencyUpdates.push(addObj));
                const val = await createOperation(value2[0], 'dependencies');
                lastKey = val.msg;
                err = val.error;
            }
            if (key2 === 'updated') {
                value2.forEach((updateObj) => dependencyUpdates.push(updateObj));
                const val = await updateOperation(value2, 'dependencies');
                lastKey = val.msg;
                err = val.error;
            }
            if (key2 === 'removed') {
                dependenciesRemoved.push(value2[0]);
                const val = await deleteOperation(value2[0].id, 'dependencies');
                lastKey = val.msg;
                err = val.error;
            }
        }
    }
}
return sendResponse(
    res,
    lastKey,
    requestId,
    err,
    taskUpdates,
    dependencyUpdates,
    tasksRemoved,
    dependenciesRemoved
);
The code here is almost the same as the code used in the Remix action function that we used to handle POST requests in the Remix Bryntum Gantt. The difference is that we send an extra parameter, the Next.js API response object, as the first argument to the sendResponse helper function. In the Remix app, we didn’t need to do this as Remix has a helper function called json() that we used to create a response.
Now let’s create the helper functions that we imported. In the helpers folder, create a file called helpers.ts and add the following lines of code to it:
import { Dependencies, Tasks } from '@prisma/client';
import { GanttDataRes, GanttDataPOSTRes } from '@/pages/api/gantt';
import { prisma } from '@/utils/db';
import { NextApiResponse } from 'next';

export function sendResponse(
    res: NextApiResponse,
    action: 'added' | 'deleted' | 'updated' | 'error' | '',
    requestId: number | null,
    error: unknown,
    taskUpdates: Tasks[],
    dependencyUpdates: Dependencies[],
    tasksRemoved: Tasks[],
    dependenciesRemoved: Dependencies[]
) {
    if (action == 'error') console.log(error);
    const result: Partial = {
        success : action === 'error' ? false : true
    };
    if (requestId !== undefined && requestId !== null)
        result.requestId = requestId;
    // updated tasks
    result.tasks = { rows : [], removed : [] };
    if (taskUpdates.length) {
        result.tasks.rows = taskUpdates;
    }
    // deleted tasks
    result.tasks.removed = [];
    if (tasksRemoved.length) {
        result.tasks.removed = tasksRemoved;
    }
    // updated dependencies
    result.dependencies = { rows : [], removed : [] };
    if (dependencyUpdates.length) {
        result.dependencies.rows = dependencyUpdates;
    }
    // deleted dependencies
    result.dependencies.removed = [];
    if (dependenciesRemoved.length) {
        result.dependencies.removed = dependenciesRemoved;
    }
    return res.json(result);
}

export async function createOperation(
    addObj: Tasks | Dependencies,
    table: 'tasks' | 'dependencies'
): Promise<{
  msg: 'added' | 'error';
  error: unknown;
}> {
    const data: Record = {};
    for (const [key, value] of Object.entries(addObj)) {
        if (
            key !== 'baselines' &&
      key !== 'from' &&
      key !== 'to' &&
      key !== '$PhantomId' &&
      key !== 'segments' &&
      key !== 'ignoreResourceCalendar'
        ) {
            data[key] = value;
        }
    }
    try {
        if (table === 'tasks') {
            await prisma.tasks.create({ data : data as Tasks });
        }
        if (table === 'dependencies') {
            await prisma.dependencies.create({ data : data as Dependencies });
        }
        return { msg : 'added', error : null };
    }
    catch (error) {
        return { msg : 'error', error };
    }
}

export async function deleteOperation(
    id: string,
    table: 'tasks' | 'dependencies'
): Promise<{
  msg: 'deleted' | 'error';
  error: unknown;
}> {
    try {
        if (table === 'tasks') {
            await prisma.tasks.delete({ where : { id : id } });
        }
        if (table === 'dependencies') {
            await prisma.dependencies.delete({ where : { id : id } });
        }
        return { msg : 'deleted', error : null };
    }
    catch (error) {
        return { msg : 'error', error : error };
    }
}

export async function updateOperation(
    updates: Tasks[] | Dependencies[],
    table: 'tasks' | 'dependencies'
): Promise<{
  msg: 'updated' | 'error';
  error: unknown;
}> {
    try {
        await Promise.all(
            updates.map(async({ id, ...update }) => {
                if (table === 'tasks') {
                    await prisma.tasks.update({
                        where : { id },
                        data  : update
                    });
                }

                if (table === 'dependencies') {
                    await prisma.dependencies.update({
                        where : { id },
                        data  : update
                    });
                }
            })
        );
        return { msg : 'updated', error : null };
    }
    catch (error) {
        return { msg : 'error', error };
    }
}
This code is similar to the code in the app/helpers/helpers.server.ts file used in the Remix Gantt app.
Now any changes that you make to your Gantt chart on the client will be persisted to the database.
Remix vs. Next.js
There aren’t many differences between creating the full-stack Bryntum Gantt app with Remix and creating it with Next.js, although the Remix app was a little easier to create.
The difference between the two frameworks was most obvious in how data is fetched. Our Bryntum Gantt components fetch data from the client using GET and POST requests. With Remix, we used the Remix loader and action functions in a resource route to handle fetching data from our SQLite database using Prisma. The resource route was our API. The Remix helper function json() that we used to create the returned response from the sendResponse helper function simplified this function, as we didn’t need to pass a response object as a function argument as we did with the Next.js Bryntum Gantt app.
With Next.js, we used a Next.js API route to handle fetching data from our database. We used if statements in our handler to determine the type of request. The Remix syntax, using the loader(), action(), and json() functions, made the API code simpler and easier to read than the Next.js API code.
Creating a client-only component for Remix was similar to Next.js. Remix required a third-party library, remix-utils, to make the Gantt component client-only. The syntax used for making the Gantt component client-only in Remix, using the ClientOnly component, was similar to the Next.js dynamic import used to make the Gantt component client-only in Next.js.
The global CSS styles in the App.css folder were imported into the Next.js app in the _app page, which uses the Next.js app component. With Remix, the global CSS was added to the root route using the route module method links. This method returned an array of the values of an HTML <link> tag. This illustrates some of the core philosophies of Remix’s APIs: using web standards and not abstracting things too much. Remix uses the Web Fetch API, whereas Next.js has its own modified type of API route request and response.
Another way that Remix uses web standards is by doing data mutations using modified HTML forms, which means that you don’t need JavaScript for data mutations when using Remix. We did not use this feature as the Bryntum Gantt component handled the data syncing. Remix ships less JavaScript, which can make it more performant than Next.js.
In Remix, you can mix client and server code in the same route. You can do this with Next.js 12 using getServerSideProps or getStaticProps, but the new app directory in Next.js 13 introduces React Server Components. This allows you to add server-side code in a React component. You can colocate server and client code more easily. The app directory also improves the handling of layouts, loading states, and error states in a way that seems inspired by Remix. The app directory is in beta, it’s not yet ready for production.
Next.js has built-in font, script, and image optimization, and better support for various CSS styling solutions than Remix. It’s a more mature full-stack framework. Next.js also offers more rendering options than Remix, which is SSR only. If your website uses many static pages that could benefit from Static Site Generation (SSG) or Incremental Static Generation (ISG), Next.js is a good choice. Although the HTTP stale-while-revalidate caching directive (SWR) used by Remix is a good alternative to SSG. Remix always needs a host with a server, Next.js can be statically hosted.
For starting a project, Next.js has templates and Remix has stacks. There are far more Next.js templates, but the Remix stacks seem more production-ready because they also include set up for testing and GitHub Actions for deployment pipelines.
In terms of hosting, Next.js can easily be hosted on Vercel, which is the company that created and maintains it. Next.js depends on Node.js for hosting a full-stack app but can also use an Edge runtime. Remix is based on the Web Fetch API, which makes it more flexible in terms of where it can run, including new JavaScript runtimes such as Deno.
The choice of which framework to use depends on your website needs. For creating our full-stack Bryntum Gantt app, both frameworks worked well. The following table summarizes the comparison of the features of the two frameworks:
| Remix | Next.js | |
|---|---|---|
| Creating a Bryntum Gantt | ✔️ | ✔️ |
| Data fetching | ✔️ | |
| Using web standards | ✔️ | |
| TypeScript support | ✔️ | ✔️ |
| CSS support | ✔️ | |
| SSG and ISG | ✔️ | |
| Image, font, and script optimization | ✔️ | |
| Nested routes and layouts | ✔️ | ✔️ |
| Developer experience | ✔️ | |
| Easy hosting | ✔️ | |
| Hosting using different JS runtimes | ✔️ |
Next Steps
This tutorial gives you a starting point for creating a full-stack Bryntum Gantt app. Take a look at our Bryntum Gantt demo page to see the wide variety of features you can add to your Gantt chart.
If you use Microsoft Teams, you can learn how to integrate your Bryntum Gantt with it by following our tutorial How to build a Gantt chart into Microsoft Teams with Bryntum.
Build it with Bryntum Gantt
Start a free trial, explore live demos, or read the docs.