Our Scheduler is so fast it can rickroll you
We strive to keep posts updated, but code samples may sometimes be outdated. Humans, see the Bryntum documentation; agents, https://mcp.bryntum.com for the latest info.
We care a lot about how fast Bryntum Scheduler is, and about whether it schedules correctly. We’ve written about lazy loading data, so a timeline holding a year of bookings only loads the slice you’re looking at, and about benchmarking React Gantt libraries for scheduling correctness.
We want the Scheduler to be performant, regardless of the project you use it for, so now and then we throw a workload at it to test its limits.
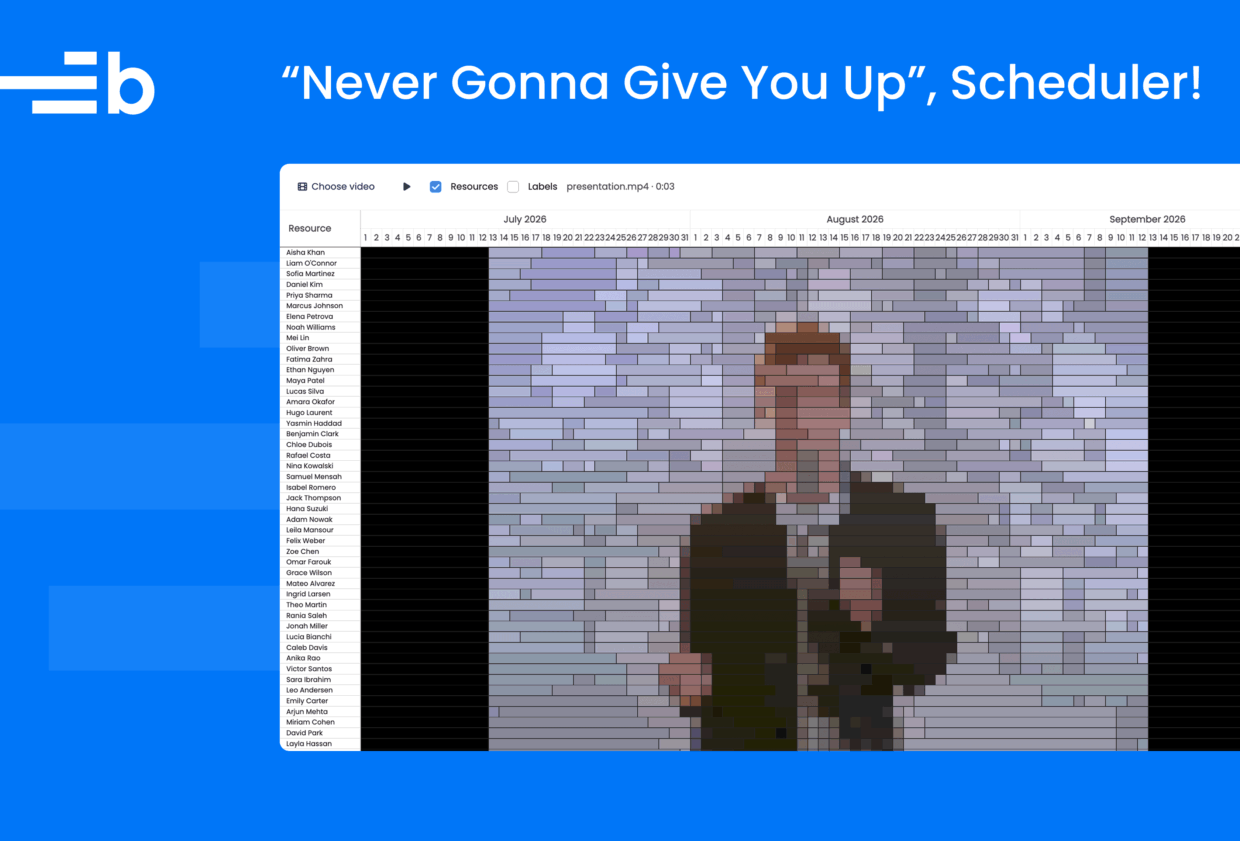
This one started as a question: can a Scheduler rickroll you?
We handed the problem to Claude Code with the Bryntum MCP server and Bryntum skills installed. With a little help, it gave us a working app:
You can try the demo yourself by cloning the Bryntum Scheduler rickroll GitHub repository, installing dependencies with npm install, and starting the dev server with npm run dev. It uses the Bryntum Scheduler trial package, so no license is needed to run it.
Turning video frames into Scheduler events
The demo takes any video file, samples each frame, and repaints it using nothing but Scheduler event bars. Every colored rectangle is a real event record in the event store, sitting on a resource row, drawn through the same rendering path a regular scheduler, such as a maintenance schedule, uses.
This works because a video is a sequence of colored rectangles, and a Scheduler already draws colored rectangles. We can get from one to the other in five steps: load the video into a detached element, sample each frame on a canvas, compress each row into color segments, map those segments onto a fixed event pool, and draw the pooled events with eventRenderer.
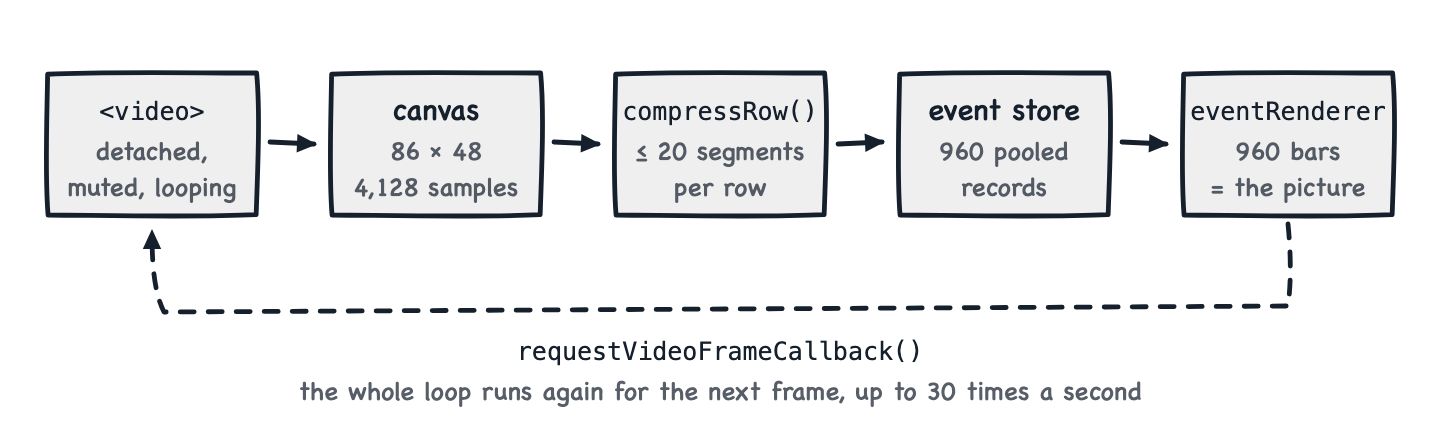
Nothing in that loop is created or destroyed after startup. Each stage rewrites values that already exist, which is what keeps a frame cheap.
Loading the video into a detached element
The demo loads the chosen file, using a Bryntum File Picker, into a detached, muted, looping <video> element. That element supplies the frames without adding a visible video player to the page.
Sampling a video frame into an 86 by 48 canvas
A video frame carries far more detail than a timeline can usefully draw, so the next job is to simplify each video frame’s image by taking samples.
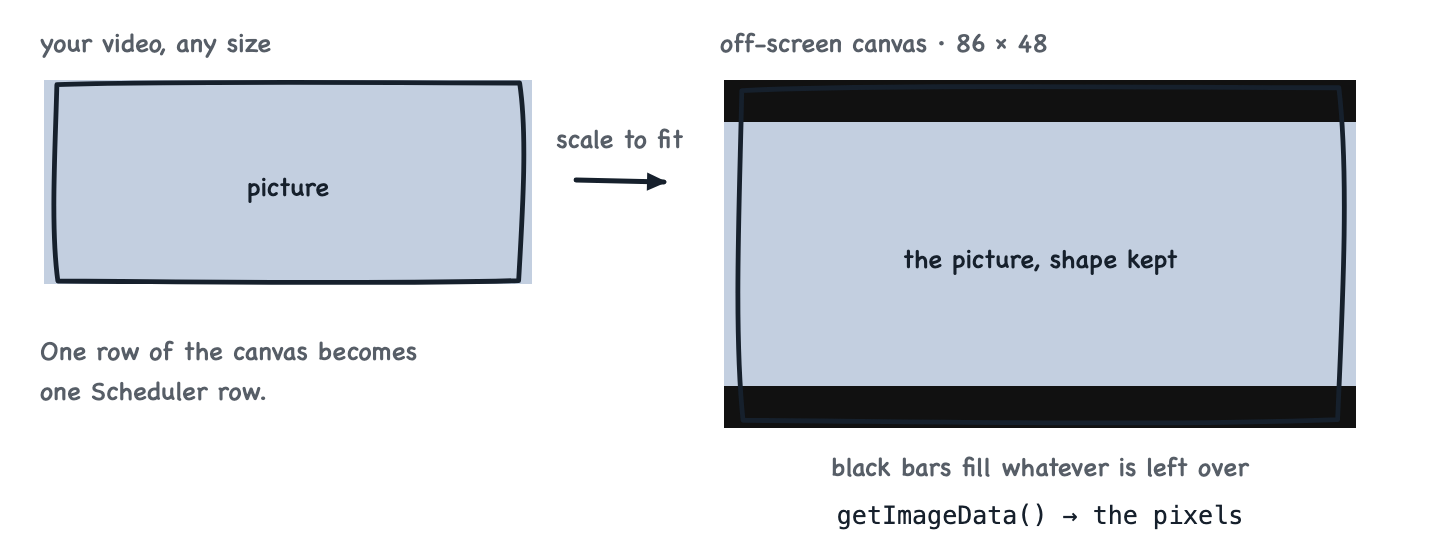
The code draws each frame onto an off-screen canvas that is 86 samples wide and 48 samples tall. That gives 48 Scheduler rows and 86 horizontal sample positions, or 4,128 sample points in total. The drawVideoFrame() function fits the source video into that shape without stretching it, fills the leftover space with black letterbox bars, and then calls the getImageData() function to read the frame back as raw numbers representing the color.
Left to right, that is the source frame shrinking into the sample grid and coming back out as plain numbers:
context.fillStyle = blackFill;
context.fillRect(0, 0, sampleColumns, sampleRows);
context.drawImage(video, drawX, drawY, drawWidth, drawHeight);
applyFrame(context.getImageData(0, 0, sampleColumns, sampleRows).data);
This is the only canvas in the demo, and nobody ever sees it. It exists so the application can read a video frame back as an array of numbers.
Compressing each row into 20 color segments
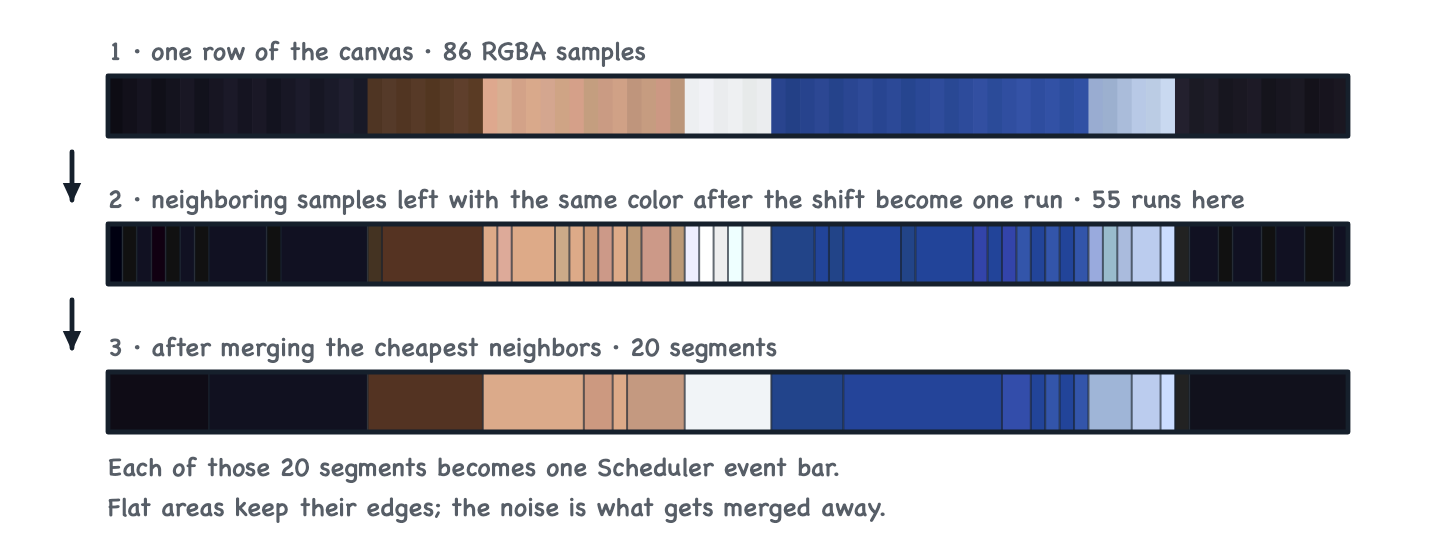
Each row of 86 samples, which are color pixels in an image frame’s row, is compressed into at most 20 horizontal color segments, and one compressed segment becomes one event bar. The conversion runs in three steps.
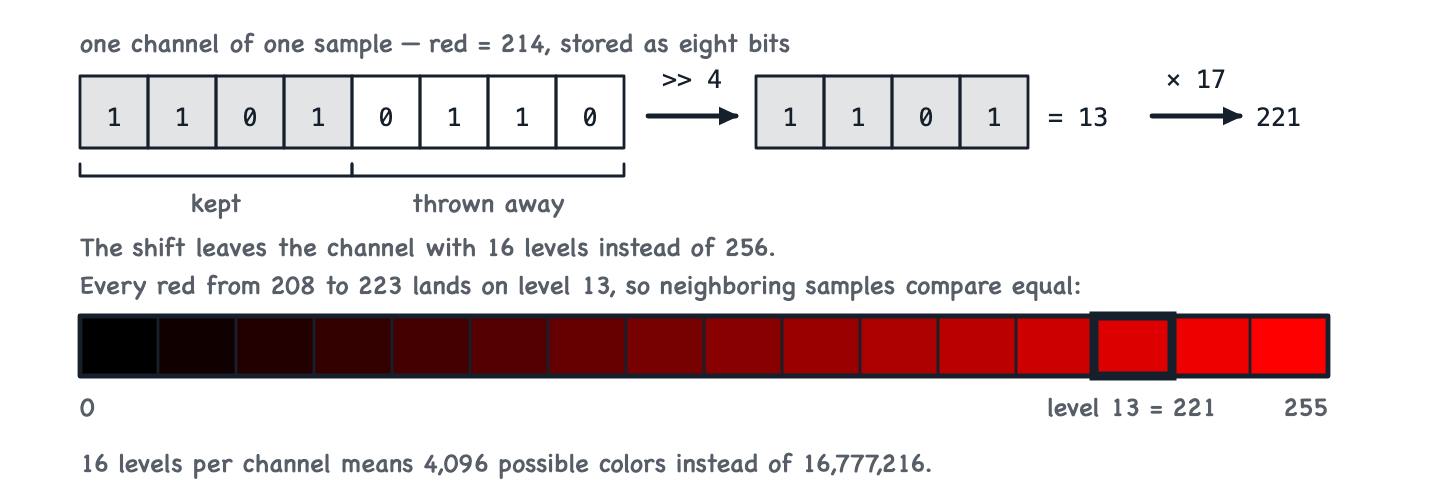
First, the code reduces the color precision. The getImageData() function returns three numbers for each sample, one for red, one for green, and one for blue. Those are its channels, and each holds a single byte, so a value from 0 to 255. Three channels of 256 values each gives 256 × 256 × 256 possible colors per sample, or 16,777,216.
Across an area that looks like the same color, neighboring pixels still differ by a point or two, partly from camera noise and partly from the codec that compressed the video, and that is enough to stop them matching.
So the code throws away the bottom half of each channel, sliding every bit four places right so the lowest four are removed. For red = 214, 11010110 becomes 1101, or 13. Multiplying by 17 puts it back on the original scale, since levels run 0 to 15 and 255 ÷ 15 = 17, so level 13 becomes 221. The palette is now 16 × 16 × 16 = 4,096 colors, and each group of 16 near-identical shades collapses onto one value, so samples that differed only by that invisible variation compare as equal.
Following one red value through the shift shows what gets thrown away, and which of the 16 surviving levels it lands on:
Second, the code walks along the row collecting samples into runs. A run is a stretch of samples that sit next to each other and came out of the shift with the same color, and it records where it starts, where it ends, how long it is, and that shared color. A run ends as soon as the next sample differs on any of the three channels, so a color that reappears later in the row starts a new run rather than joining the earlier one.
These ten samples from the middle of a row make four runs, because the level changes three times along the way:
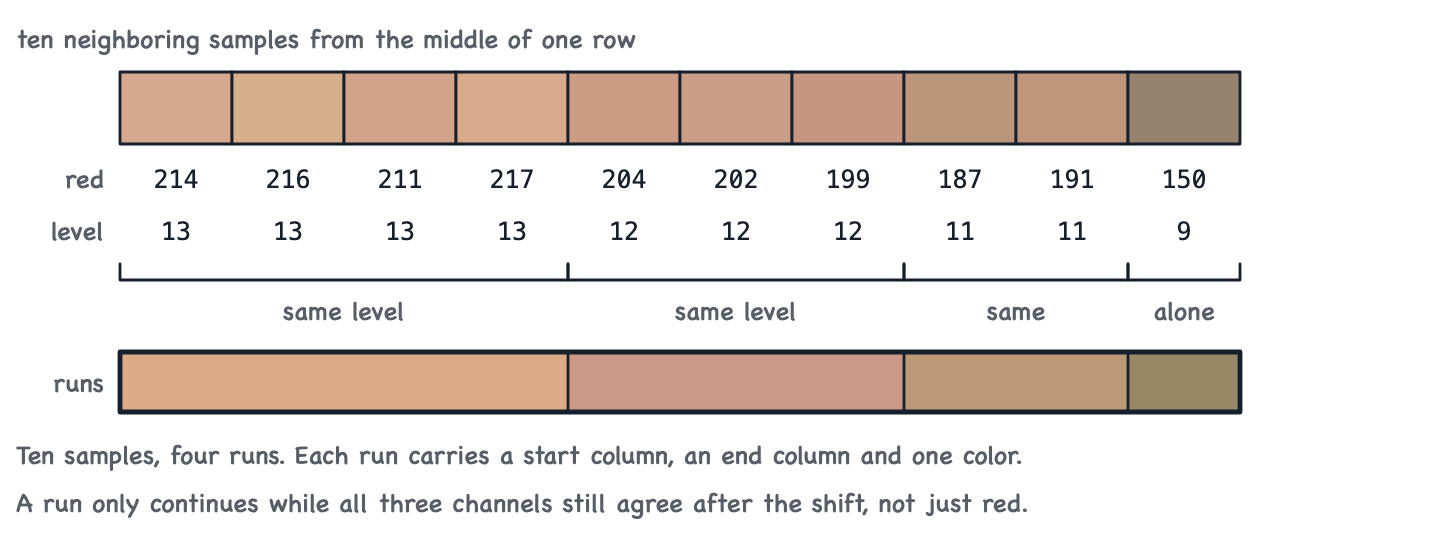
Those two steps happen in the same pass, which packs the three reduced channels into a single integer, so comparing two samples is one integer comparison rather than three.
Third, any row that still has more than 20 runs gets merged down. The code repeatedly finds the cheapest neighboring pair and joins them, where cost is the squared color distance multiplied by the length of the shorter run. Similar colors go first, and small details go before large ones. The merged segment takes a length-weighted average of the two colors:
while (segments.length > maximumSegmentsPerRow) {
    let
        bestIndex = 0,
        bestCost  = Infinity;

    for (let index = 0; index < segments.length - 1; index++) {
        const
            first  = segments[index],
            second = segments[index + 1],
            cost   = colorDistance(first, second) * Math.min(first.length, second.length);

        if (cost < bestCost) {
            bestCost = cost;
            bestIndex = index;
        }
    }

    // Merge the closest neighboring colors. The surviving boundaries become the animated Scheduler event edges.
    segments.splice(bestIndex, 2, mergeSegments(segments[bestIndex], segments[bestIndex + 1]));
}
The merge loop is where the ceiling comes from. However busy the frame is, every row leaves this function with between one and 20 segments, and each of those is already close to a Scheduler event: it has a row, a horizontal start, a horizontal end, and a color.
Across a full row, the three steps stack up like this, with the row narrowing at each one:
Mapping the segments onto a pool of 960 events
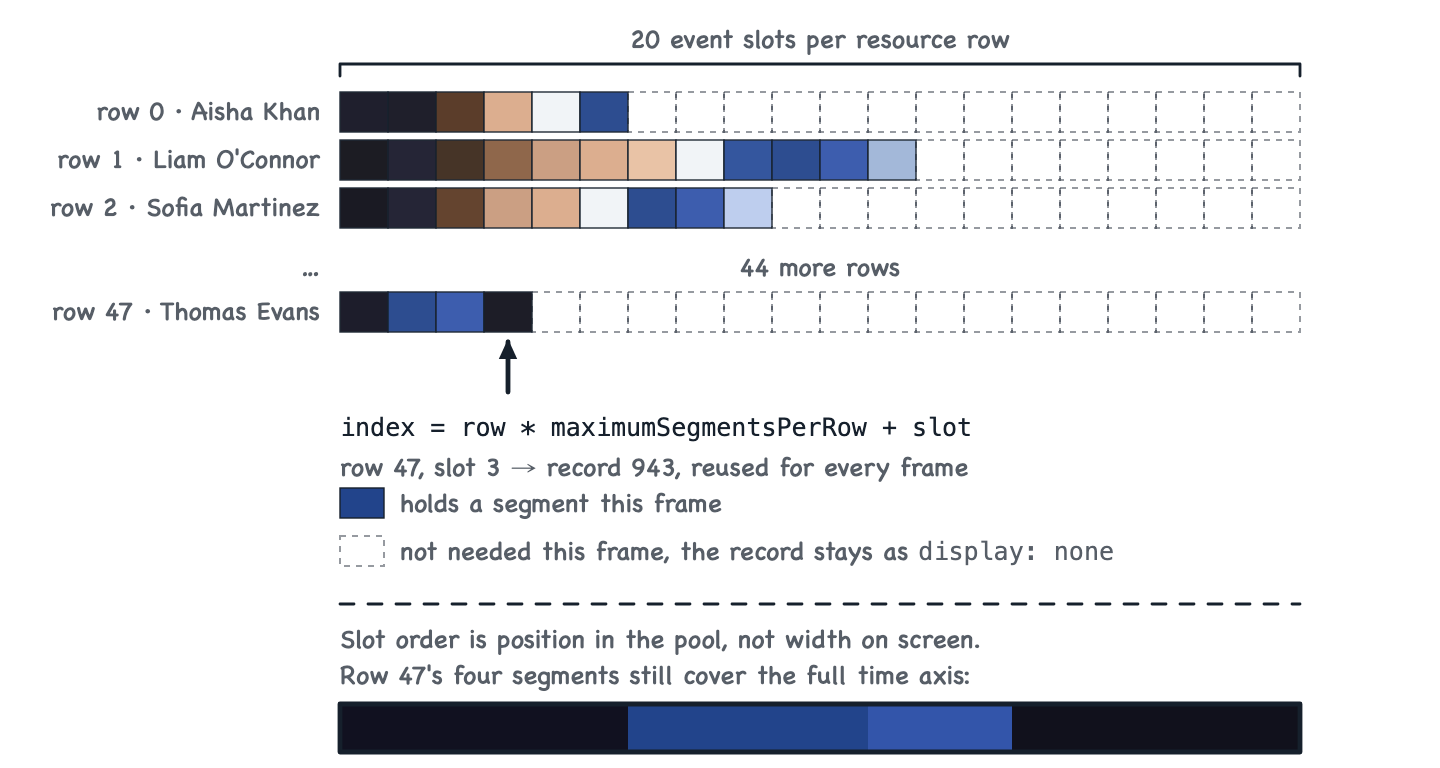
At startup the demo creates 48 resources and 20 event records per resource, which is a fixed pool of 960 records. Slots 0 to 19 belong to the first row, slots 20 to 39 belong to the second, and so on.
For each new frame, the applyFrame() function hands a row’s first segment to its first slot, its second segment to its second slot, and so on. A row only needs as many segments as it has color changes, so plain rows use very few. A row that is all one color takes a single segment and leaves 19 slots spare, for example, a blank white frame.
Those spare slots are never deleted. Each keeps its place in the store, and the renderer adds a b-video-region-hidden class to it, which is a plain display: none in the stylesheet. A hidden bar costs nothing to lay out, and when that row gets busy again a frame later, the record is already there waiting for a color.
Drawn as a grid, the pool is 48 rows of 20 slots. A slot’s position in that grid is only its place in the pool, not where it lands on screen, so a row using four slots still paints the full width of the timeline with four segments of differing widths:
Adding and removing records to match each frame would have the Scheduler creating and destroying DOM elements 30 times a second, so a fixed pool is more efficient.
Updating only the records that changed
A pool alone isn’t enough, because writing all 960 records every frame would mean 960 store updates for a frame where perhaps a third of the picture moved.
So a separate regionStates array remembers what each slot displayed last time. Before touching a record, the code compares the new segment’s position, color, text contrast, label state, and visibility against that memory, and leaves identical records alone:
if (!wasVisible || state.start !== segment.start || state.end !== segment.end ||
    state.color !== color || state.labelled !== labelled || state.textColor !== textColor) {
    Object.assign(state, {
        color,
        end     : segment.end,
        labelled,
        start   : segment.start,
        textColor,
        visible : true
    });

    updateRegionRecord(index);
}
The records that do change reach the store inside eventStore.beginBatch() and endBatch(). Batching is a Bryntum performance enhancing feature that suspends store events while the changes are made and lets the connected UI refresh once at the end, so a frame reaches the Scheduler as a single redraw instead of a few hundred.
Rendering the pooled events as pixels
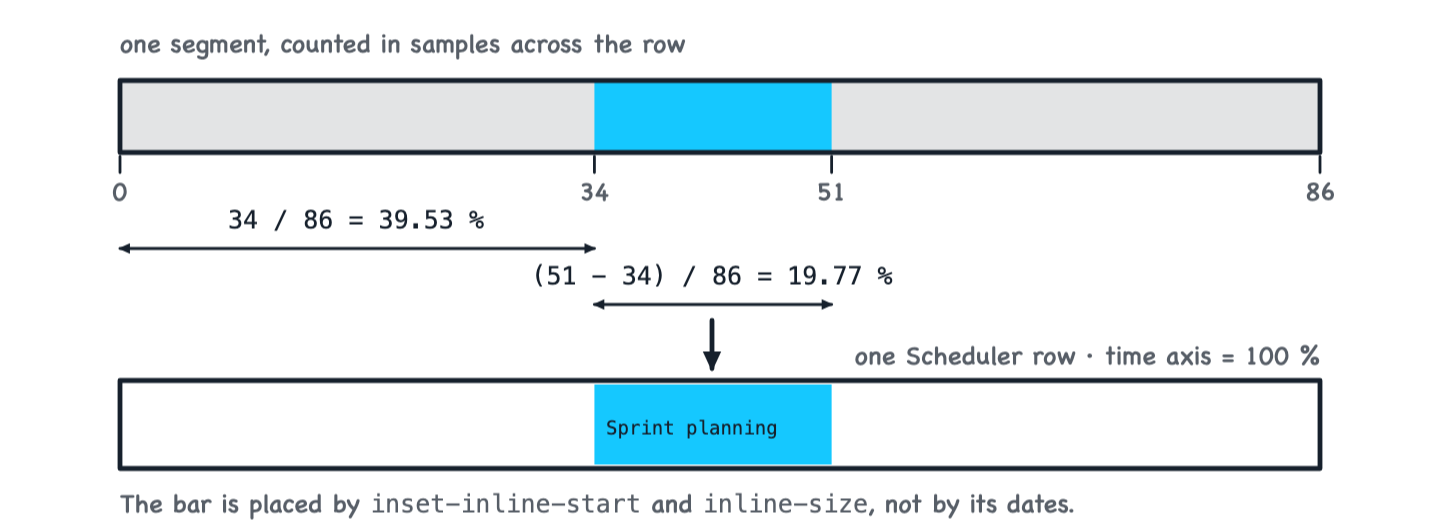
The 960 records are ordinary Scheduler events on ordinary resources, and they all share the same broad date range. Their visible positions have nothing to do with their dates.
A custom Scheduler EventModel, VideoEventModel, carries the rendering state instead:
class VideoEventModel extends EventModel {
    static $name  = 'VideoEventModel';
    static fields = [
        { name : 'videoColor', defaultValue : 'rgb(0 0 0)' },
        { name : 'videoTextColor', defaultValue : 'white' },
        { name : 'videoStart', defaultValue : 0 },
        { name : 'videoEnd', defaultValue : 0 },
        { name : 'videoVisible', defaultValue : false },
        { name : 'videoLabelled', defaultValue : false },
        { name : 'videoSplashBackground', defaultValue : false },
        { name : 'videoSplashLogo', defaultValue : false }
    ];
}
The Scheduler eventRenderer config reads those fields for each record, applies the color, and converts the segment’s start sample and length into percentages of the time axis:
eventRenderer({ eventRecord, renderData }) {
    renderData.style = `background-color:${eventRecord.videoColor};color:${eventRecord.videoTextColor};` +
        `inset-inline-start:${eventRecord.videoStart / sampleColumns * 100}%;` +
        `inline-size:${(eventRecord.videoEnd - eventRecord.videoStart) / sampleColumns * 100}%`;
Each row is sampled at 86 positions from left to right, and one bar can cover several of them. If those samples compress into eight segments, eight of the row’s 20 pooled bars are shown and the other 12 stay hidden. Dividing the position of a segment’s first sample by 86 gives the bar’s percentage offset, and dividing the number of samples it covers by 86 gives the percentage width:
CSS strips out the CSS gaps, rounded corners, transitions, and minimum widths, so each event shows as a flat strip of color. Stack 48 rows of those strips and you have the frame. The next video callback runs the same pipeline again, using requestVideoFrameCallback() where the browser provides it or falls back to requestAnimationFrame().
Doing less work per frame, not more work per second
The performance story here is mostly architectural, and it’s the same method used in the Bryntum Scheduler lazy loading post we linked earlier: give the component less to do.
Every trick in the pipeline points that way: dropping four bits per channel makes neighboring samples match, matching neighbors collapse into runs, and every row is capped at 20 segments however detailed the frame is. Records and DOM elements are created once and reused, unchanged records are never written, and the ones that do change arrive as a single batch.
By default, the Scheduler animates event changes, and to manage those animations it checks for running CSS animations on every refresh. This demo overwrites every bar many times a second, and its CSS already strips the transitions, so that check is pure overhead here. We turned this off using one config setting:
transition : {
    changeEvent : false
}
Measured performance
We measured the demo on a base M1 MacBook Air running Chrome, playing a 640 × 360 video at 20 frames per second, which gives each frame a 50 ms budget. The whole scripted pipeline — sampling the frame, compressing 48 rows, diffing 960 records, and the batched store refresh that redraws the bars — runs in about 35 ms of that budget. The Scheduler’s refresh accounts for about 28 ms of the 35. Playback on that entry-level laptop reaches about 15 of the clip’s 20 frames each second, with the dropped frames lost to the browser’s own style and paint work rather than the data pipeline. The exact framerate depends on the machine, browser, and window size.
This workload is more than a typical real scheduling application would do. What the demo shows is that the regular data and rendering path stays responsive under a continuous stream of updates.
Customizing the scheduler beyond its usual job
The other thing the demo shows is how far customization goes. Video playback was not on anyone’s list of use cases, and yet nothing here reaches into Bryntum internals or patches the library:
- A custom Bryntum Scheduler event model stores rendering state that has nothing to do with a meeting.
- The
eventRenderercontrols each bar’s color, width, position, classes, and text. - Scheduler configuration removes bar margins, row lines, event layout, and event-change transitions, and turns off the drag, resize, edit, and menu features that make no sense for pooled display records.
- Standard toolbar Bryntum widgets provide the file picker, play and pause button, resource-column and label toggles, and a status message with
role: 'status'so screen readers announce it. - An event tooltip still shows a meeting name, room, and resource while playback is paused.
- A
ResizeObserverrefits the row height so 48 rows always fill the available space.
The result looks nothing like a scheduler while the component still behaves like one.
Building the demo with Claude Code and the Bryntum MCP server
Claude Code created the draft of this demo using the Bryntum MCP server, which gives coding agents version-specific Bryntum documentation. An agent looking up the eventRenderer details, the fields a custom EventModel accepts, or how store batching behaves gets the docs for the version in the project instead of a guess from training data. Add it to Claude Code with:
claude mcp add --transport http bryntum https://mcp.bryntum.comAlongside its search_bryntum_docs tool, the server exposes guideline resources covering setup, CSS and theme imports, and framework integration, which an agent can read before it writes anything.
Bryntum skills were also used to complement the MCP server with product-specific instructions that show your AI agent how to do specific tasks.
Claude Code created a working demo, which we improved with some QA.
Build it with Bryntum Scheduler
Start a free trial, explore live demos, or read the docs.