Using Bryntum Gantt in a SharePoint SPFx Fabric Web Part
We strive to keep posts updated, but code samples may sometimes be outdated. Humans, see the Bryntum documentation; agents, https://mcp.bryntum.com for the latest info.
Sharepoint has been a popular platform for sharing all kinds of content within organisations and teams. For earlier previous versions of the Bryntum component suite, we provided an integration sample adding our components as an app, using a Visual Studio SharePoint solution. Since then, the Sharepoint Fabric framework has matured.
The SharePoint Framework (SPFx) is a page and web part model that provides support for OS independent client-side SharePoint development. With a few simple steps we can create a React App and upload it as a web part. In this blog we will show how the Bryntum Gantt chart can be easily embedded into SharePoint as a web part.
Task List and Views
Out of the box, SharePoint provides a default task list which comes with a simple view to edit list items, a calendar and a Gantt chart with limited interactivity.
These task lists are widely used within organisations but the way data is presented can be much improved. For example, basic Gantt concepts like task drag drop or viewing additional data in a tooltip are unsupported. These features are available out of the box in the Bryntum Gantt chart. Below you see the default SharePoint’s Gantt chart.
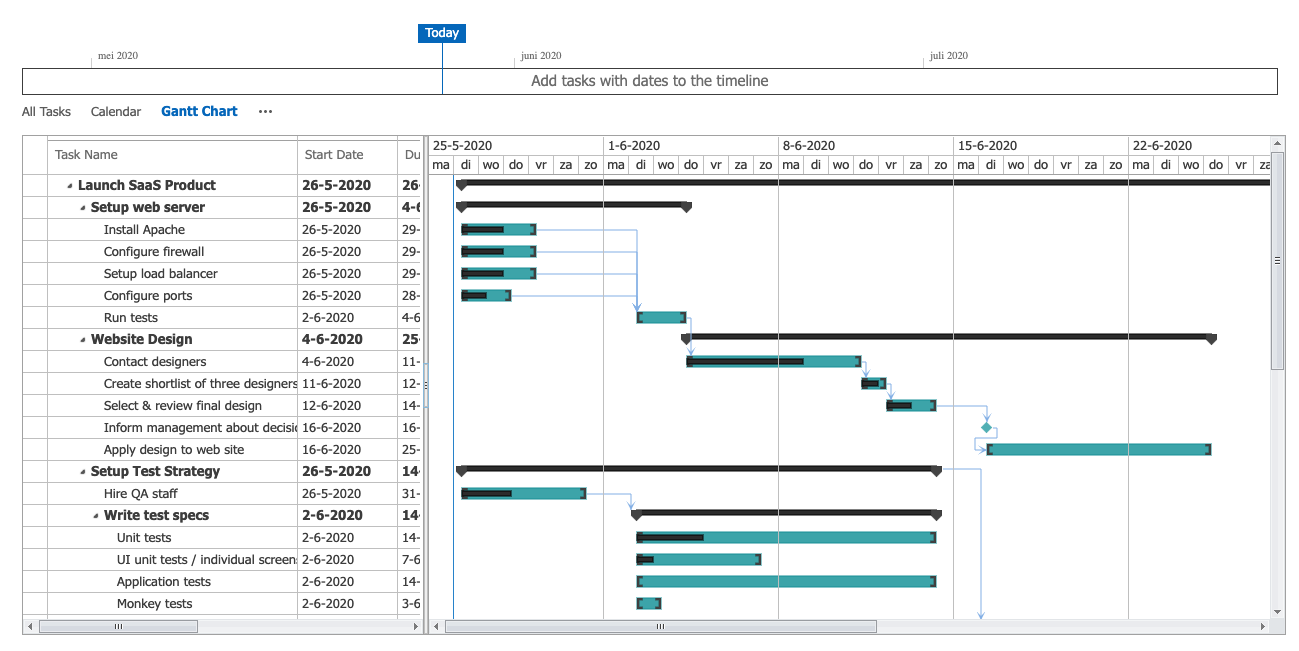
Let’s try to improve it!
Initial setup
To get started, you need an IDE (e.g. VS Code), a SharePoint Online account, node version 10.19.0 and the Bryntum Gantt chart.
In the Gantt chart examples folder, go to the React typescript GanttSPFx folder, and execute the following on the command line:
npm i
gulp serve
The serve command will start the local workbench in a new browser window and we are ready to go.
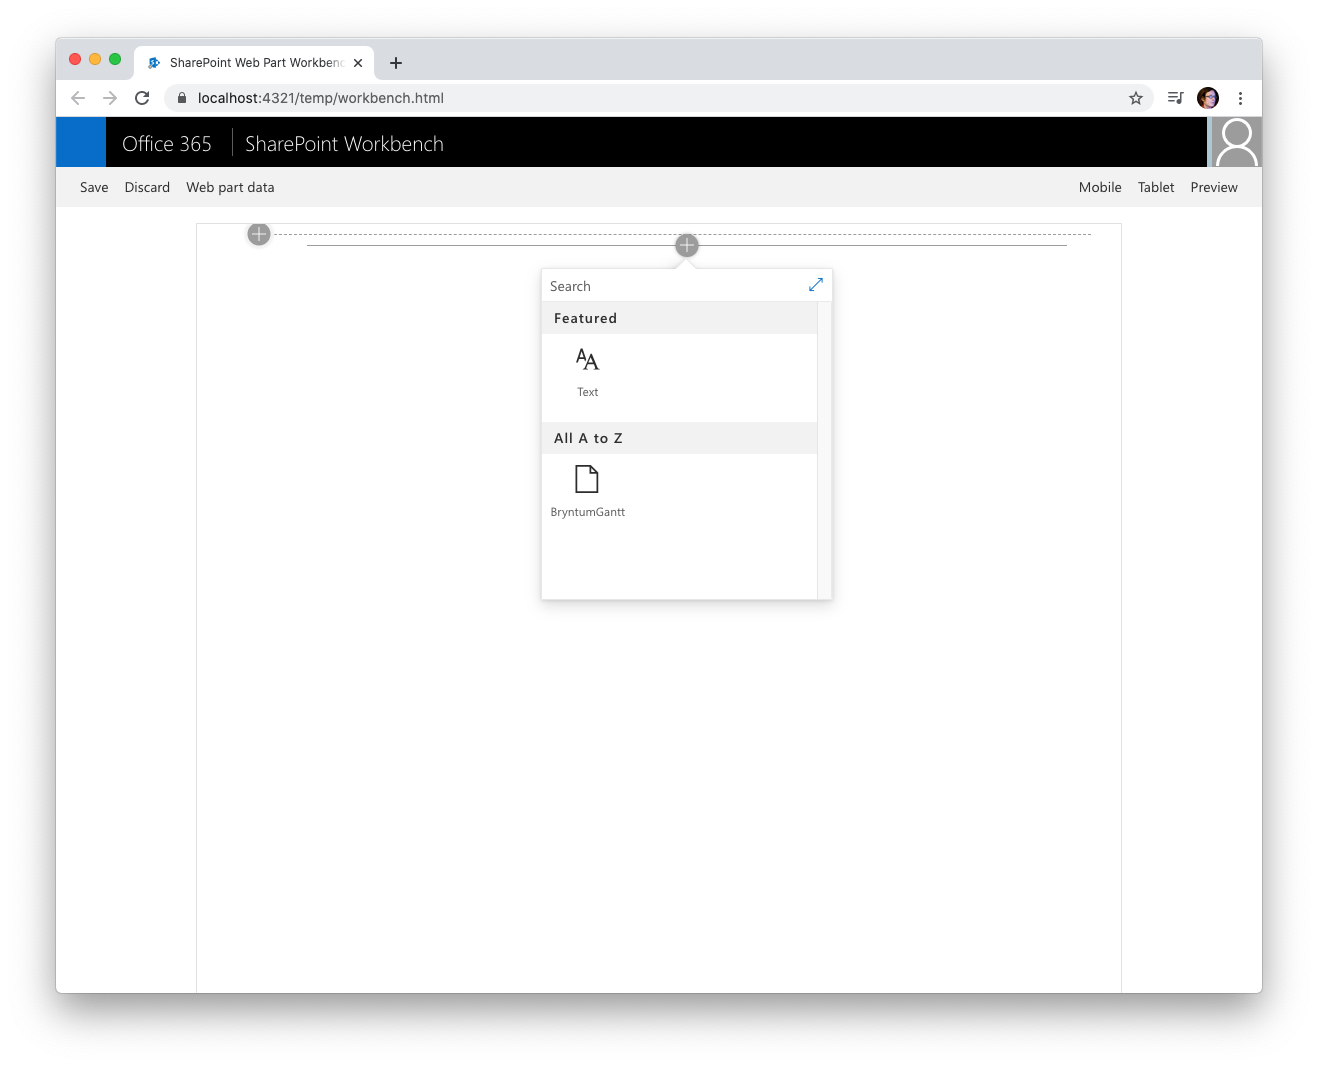
By clicking the `+` sign we will see the web part and we can add it to the page.

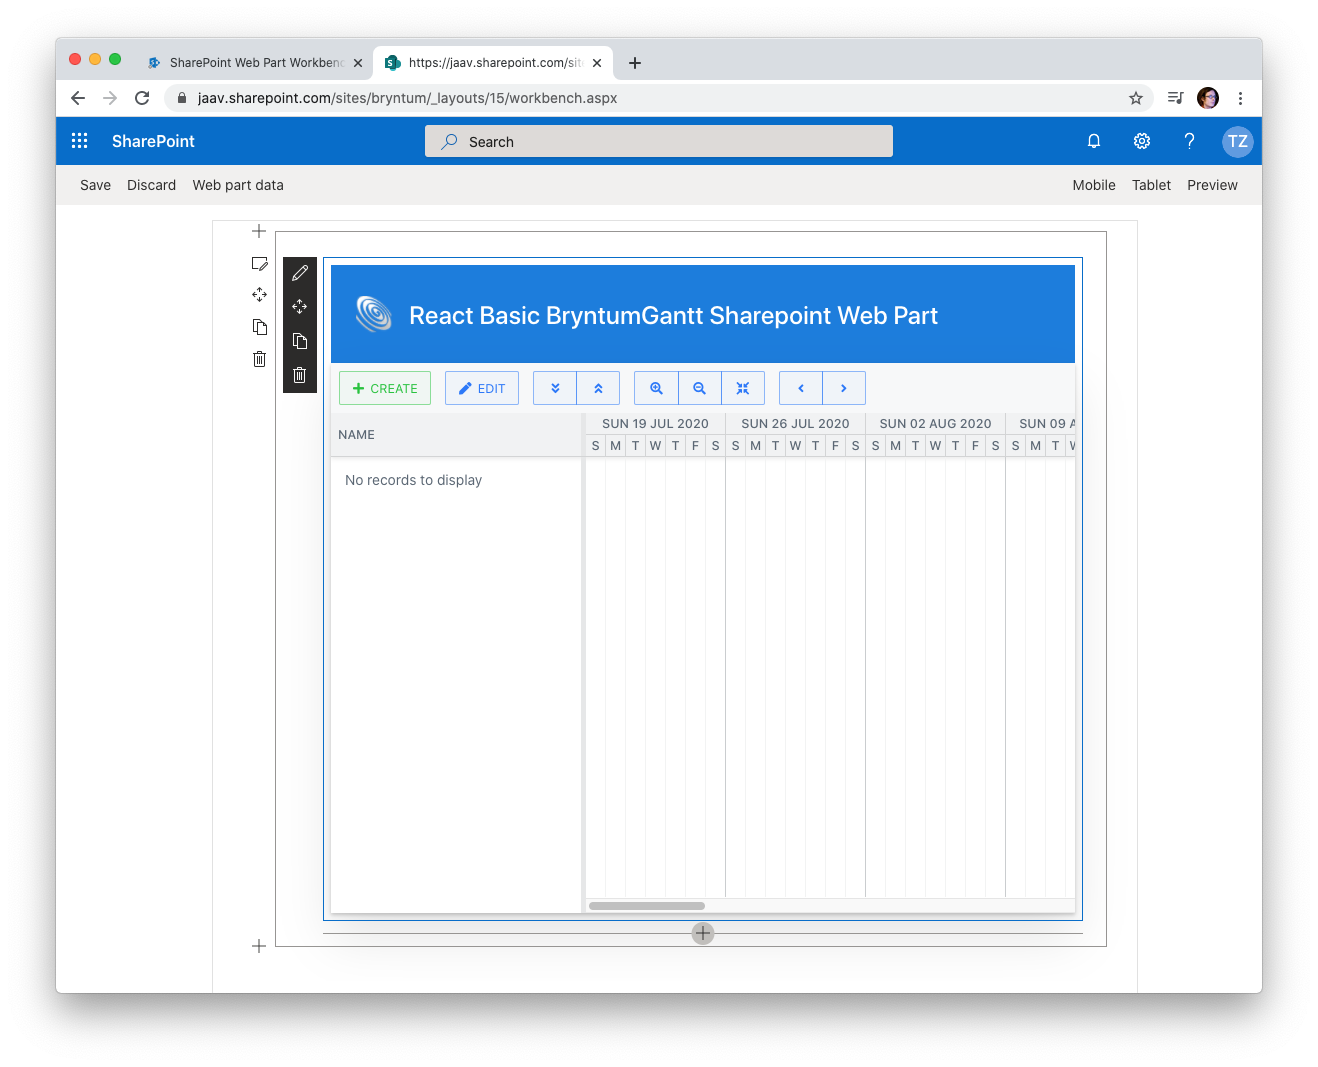
If all is set up correctly you should now see the Gantt chart rendered. The next step is to see it working on the SharePoint site. At this point we need our SharePoint Online account (tenant). For this demo we used a developer site, but it should work on any site (except the admin site).
The tenant workbench can be opened at https://yourtenant.sharepoint.com/sites/your(developer)site/_layouts/workbench.aspx in the browser. Here we add the BryntumGantt web part to the remote workbench.
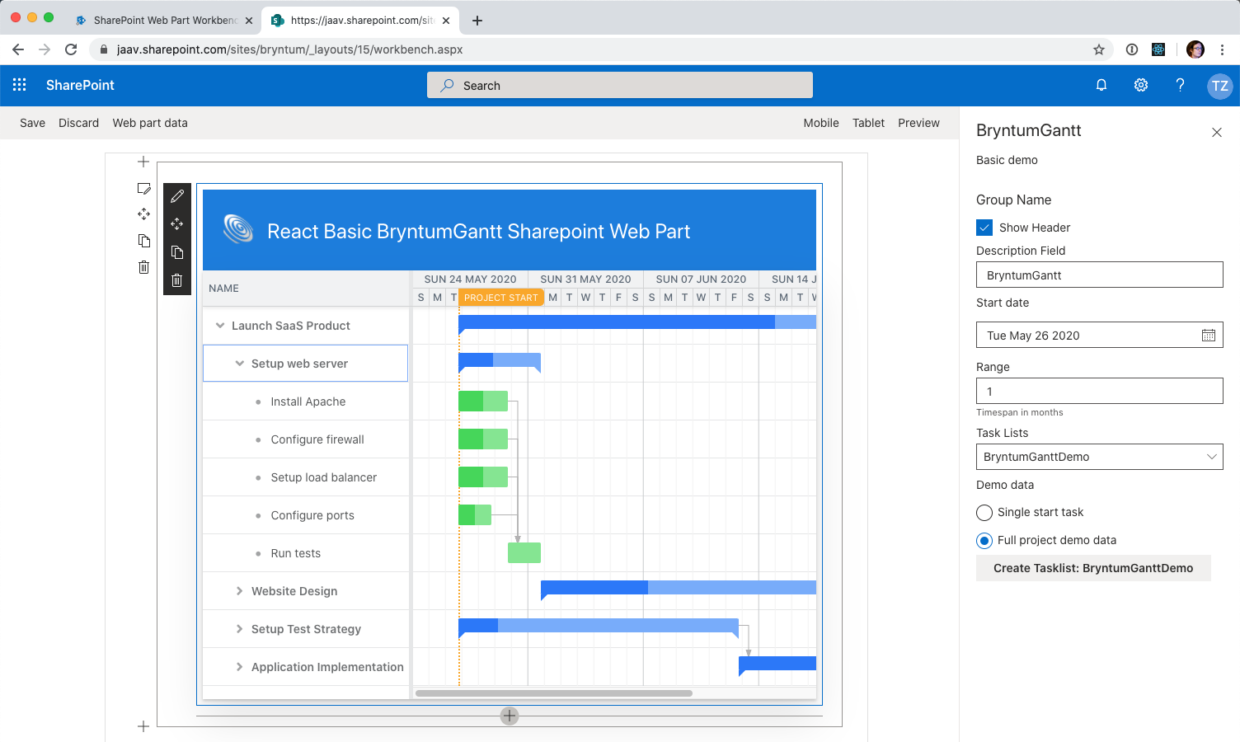
In the remote context we have to attach the BryntumGantt web part to a real task list. We can use one of our existing task lists on the site but the example provides a quick way to create a new demo list. This list has some additional fields added to be able to persist data for features like constraints, effort and duration.
The demo list can be created in the PropertyPane.

The button [Create Tasklist] creates the list and fills it with data selected in the `Demo data` choice box.

After a few seconds the task list is created on the remote tenant and shown in the `Task Lists` dropdown field. It will be automatically loaded into the chart. We can save the PropertyPane to persist the changes for next time.
At this point we can modify the sources of the example to our liking. The local workbench will automatically detect code changes and refresh the web part after any edits. On the remote tenant, the changes will be visible after manually refreshing the page in the browser.
Time to code
When the local and remote workbench are running, we are ready to do some coding and customise the example to our liking.
List creation and adding data model fields
We start by adding a few extra fields to the Bryntum Task model:
// Fields which are not on a default SharePoint TaskList.
  static get additionalFields() {
    return [
      { name: 'constraintDate', dataSource: 'ConstraintDate', type : 'date' },
      { name: 'constraintType', dataSource: 'ConstraintType' },
      { name: 'effort', dataSource: 'Effort', type: 'number' },
      { name: 'duration', dataSource: 'Duration', type: 'number', allowNull: true },
      { name: 'manuallyScheduled', dataSource: 'ManuallyScheduled', type:'boolean' },
      { name: 'rollup', dataSource: 'Rollup', type:'boolean' },
      { name: 'schedulingMode', dataSource: 'SchedulingMode' },
      { name: 'effortDriven', dataSource: 'EffortDriven' }
    ];
  }
When creating a new list in the PropertyPane, the fields in the additional section are added to the newly created task list (on creation).
Data Model
The data model describes how TaskList data is processed and retrieved by the Gantt component.
The Gantt chart is configured with a ProjectModel which is the entity responsible for loading and saving data to underlying data stores inside the Gantt chart. We override some methods used for communicating with the server and send our data requests to SharePoint using the pnpjs library.
class TaskListModel extends ProjectModel {

  private service: Service;

  // Override of the crudmanager to bypass Ajax response, no decoding needed
  public decode(response: any): any {
    return response;
  }

  // Override of the crudmanager to bypass Ajax response, no encoding needed
  public encode (requestConfig: any): string {
    return requestConfig;
  }

  /**
   * Override of the crudmanager. Use the List Proxy instead of the default AjaxRequest
   * @param request
   */
  public sendRequest(request: any): Promise<any> {
    return new Promise((resolve, reject) => {
      switch(request.type) {
          case 'load':
            return this.service.load(request);
          case 'sync':
            return this.service.sync(request);
        }
    });
  }
}
The Service class will process data requests and retrieve the data from SharePoint and return the response to the Project. In case of a load request we do the following in the Service class:
public load(request: any): Promise<Response> {

    return new Promise((resolve, reject) => {
      this.proxy.getTaskListItems(this.listId).then(response => {
        this.finish(request, response);
        resolve(response);
      }).catch(handleFail);
    });
  }
The service is using a proxy to process the calls with the pnpjs library. TaskListItems are retrieved with the sp package.
public getTaskListItems(listId: string): Promise<Response> {

    const response = new Response();

    return new Promise((resolve, reject) => {

      sp.web.lists.getById(listId).items.select('*,ParentIDId').getAll().then((tasks) => {

        ...
        response.tasks.rows = ...

        // Get all site users. you might want to filter some out
        sp.web.siteUsers().then((users) => {
          response.resources.rows = users;
          resolve(response);
        });
      }).catch(reject);
    });
  }
The returned Response object is passed back to the ProjectModel in the format expected.
interface ITaskList {
  deleteTaskListItems(listId: string, actions: UpdateAction[]): Promise<UpdateAction[]>;
  addTaskListItems(listId: string, actions: UpdateAction[]): Promise<UpdateAction[]>;
  updateTaskListItems(listId: string, actions: UpdateAction[]): Promise<UpdateAction[]>;
  getTaskListItems(listId: string): Promise<Response>;
}
In the example, a full implementation is provided for each action.
PropertyPane
The example is built with React. The Bryntum React integration guide provides good guidelines how to configure and style the gantt component. The PropertyPane for the web part is used to configure it (e.g. its behavior and appearance). We recommend you to read this guide which shows how to modify the basic structure of a web part.
Time to Deploy
When we are finished coding and the web part is ready for production use, the solution can be easily packaged by running a few commands.
gulp bundle --ship
gulp package-solution --ship
We upload the created bryntum-fabric-sp.sppkg package to our app catalog.

We then press [Deploy] and make the web part available for all our sites within the organisation, voilà!

Summing up
In this blog we have shown that with some simple steps it is possible to integrate the Bryntum Gantt component as a web part on any page in SharePoint using the SPFx framework. With the pnpjs library it is possible to connect to any datasource within SharePoint.
This demo ships as part of the React demo suite. Customising the React gantt component is explained in our React guide where you learn how to add menus, toolbars or any other widget provided by Bryntum.
Happy Coding!
Further Reading
- https://docs.microsoft.com/en-us/sharepoint/dev/spfx/sharepoint-framework-overview
- https://docs.microsoft.com/nl-nl/sharepoint/dev/spfx/set-up-your-development-environment
- https://docs.microsoft.com/nl-nl/sharepoint/dev/spfx/set-up-your-developer-tenant
- https://docs.microsoft.com/nl-nl/sharepoint/dev/spfx/web-parts/get-started/build-a-hello-world-web-part
- https://pnp.github.io/pnpjs