Migrating from DHTMLX Gantt to Bryntum Gantt
We strive to keep posts updated, but code samples may sometimes be outdated. Humans, see the Bryntum documentation; agents, https://mcp.bryntum.com for the latest info.
Bryntum Gantt and DHTMLX Gantt are commercial project management tools for scheduling tasks. In this tutorial, we’ll migrate an existing implementation of a DHTMLX Gantt chart over to Bryntum Gantt.
Here are the steps we’ll follow:
- Migrate the database to the Bryntum Gantt data structure
- Update the server API endpoints.
- Update the library import and set up.
- Test the migration implementation
Getting started
We will use an existing DHTMLX starter project, which uses vanilla JavaScript on the client-side and Node.js with REST API endpoints on the server-side. These endpoints interact with a MySQL client to perform CRUD operations on the database. Your implementation may differ slightly depending on which client-side (React or Angular) and server-side variants are used.
⚠️ We take DHTMLX starter application as a starting point and describe migrating it to Bryntum Gantt component. So if you want to follow the guide steps exactly please clone that repository first and install the application following instructions from its README.md file
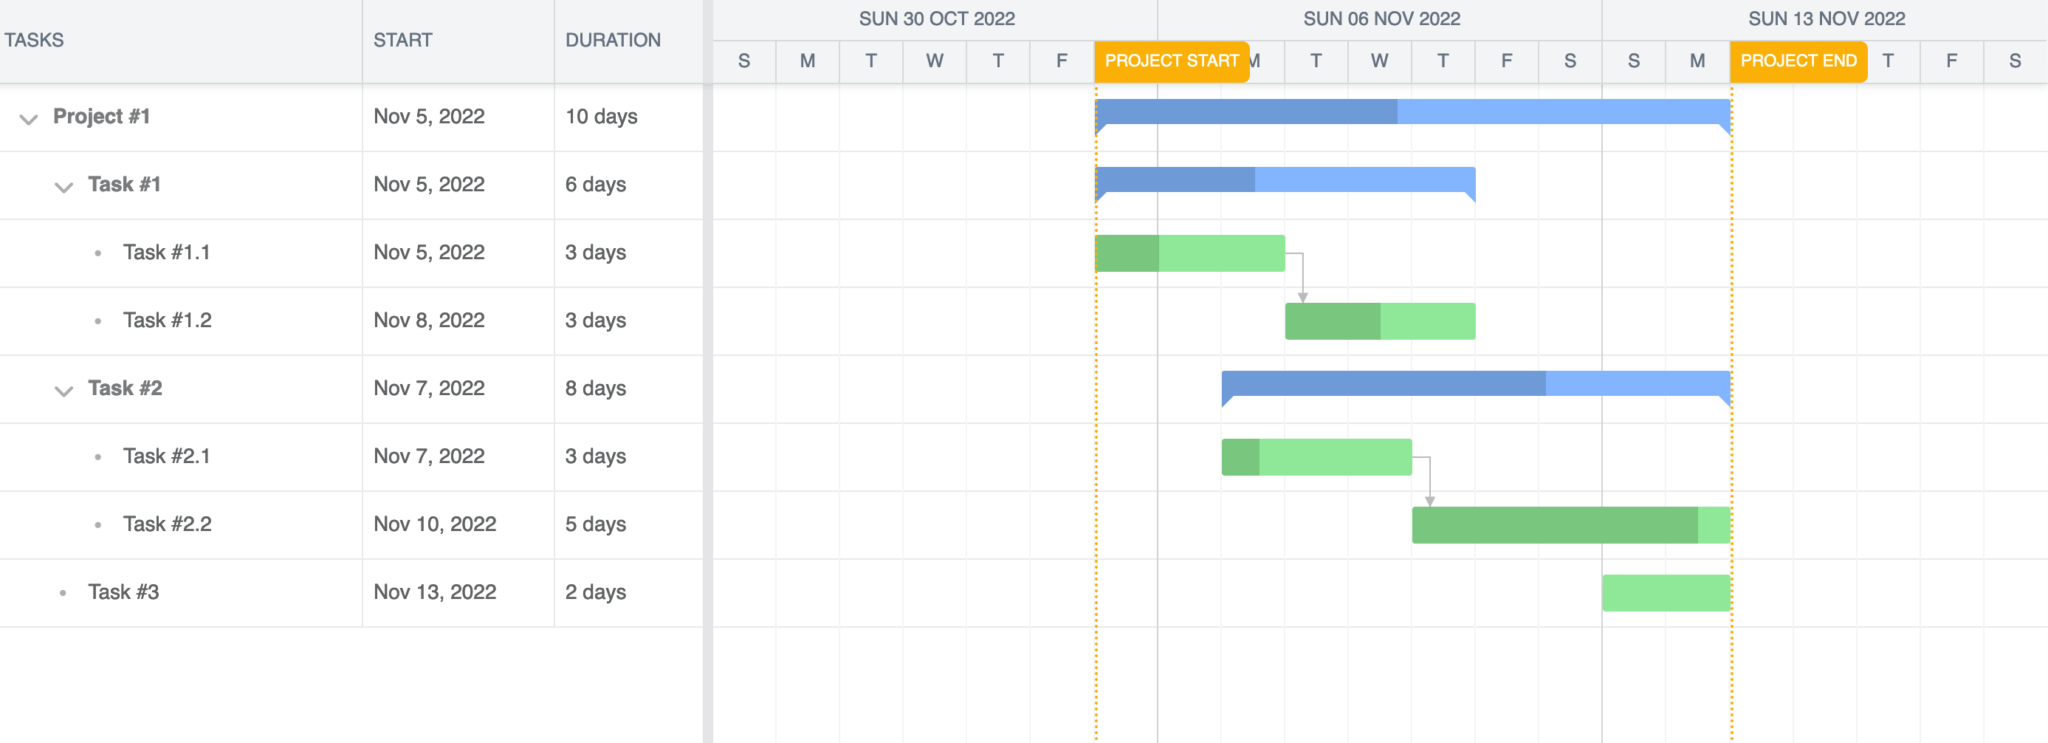
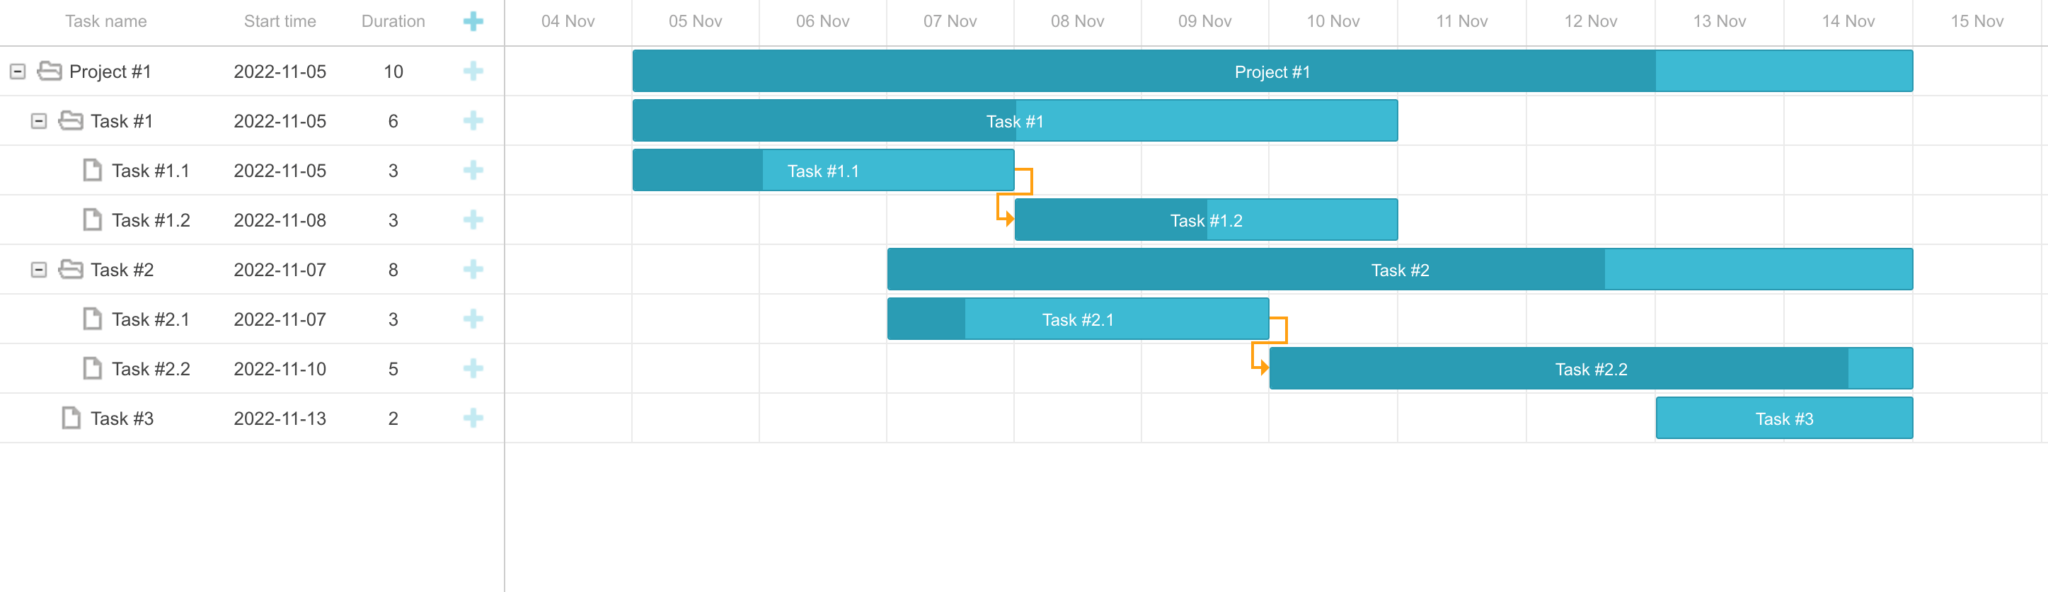
Following the migration, we expect the Bryntum Gantt chart to display the same data as this DHTMLX Gantt chart:
Migrate the database to the Bryntum Gantt data structure
To begin our migration to Bryntum Gantt, we’ll migrate the existing database to Bryntum data structure. In order to do that we’ll make new tables for Bryntum Gantt and then import data from the existing tables made for DHTMLX to the new tables.
Create database tables compatible with Bryntum Gantt
If you followed the instructions in the README.md file, you will have configured your database already and populated it with some data.
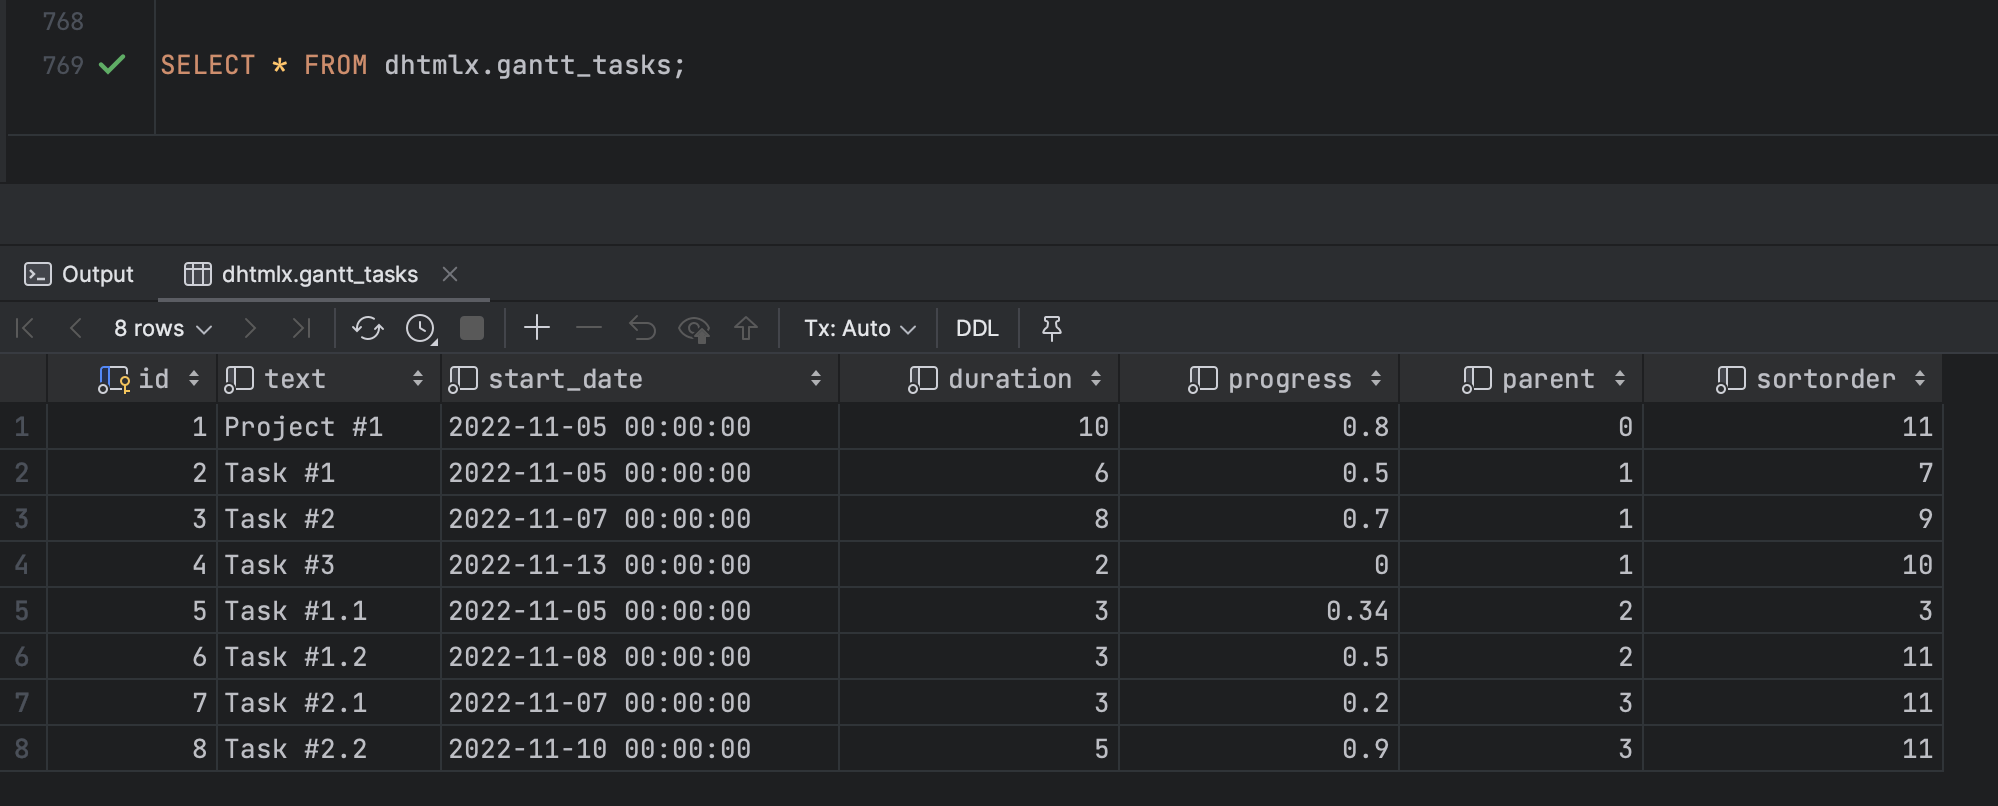
The gantt_tasks table should look like this:
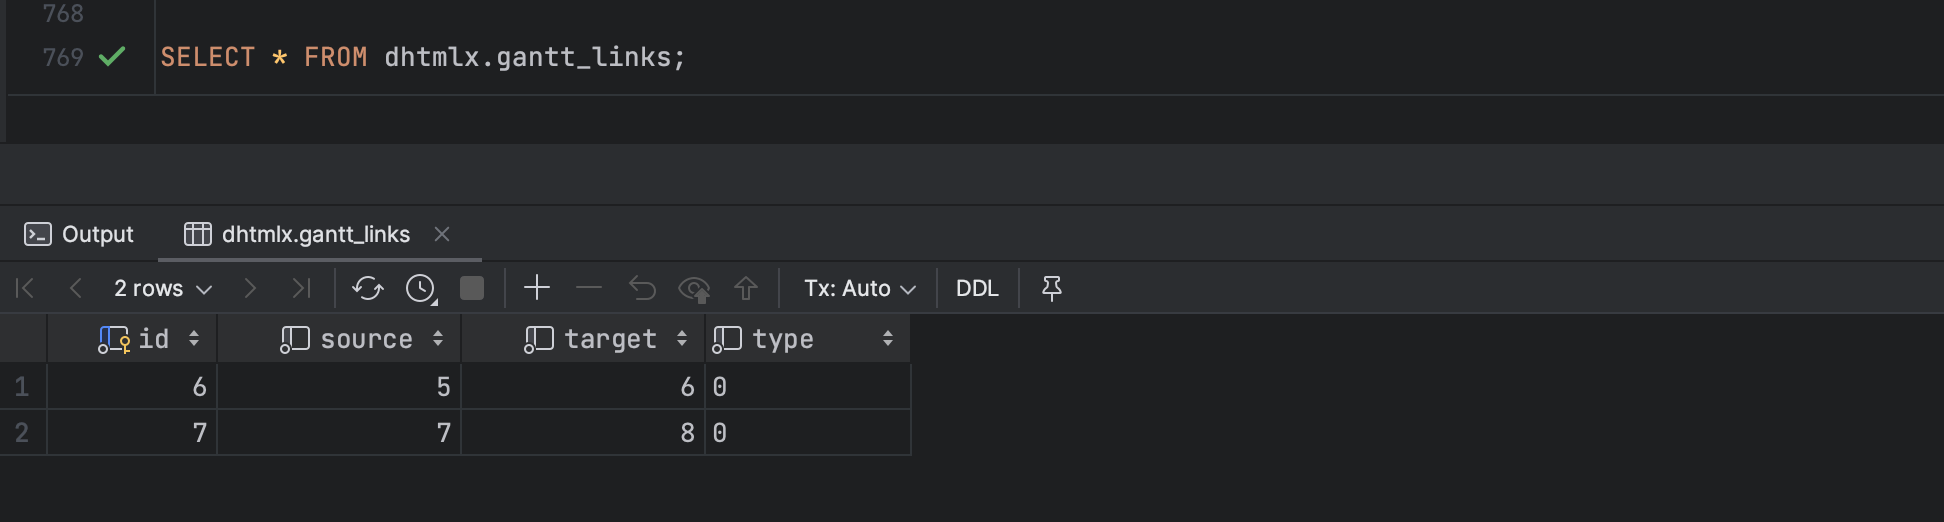
And the gantt_links table like this:
We will now create two separate tables with a schema compatible with the Bryntum Gantt Chart implementation.
Run the following query to create the tasks table for our tasks data:
CREATE TABLE `tasks`
(
    `id`                     int(11) NOT NULL AUTO_INCREMENT PRIMARY KEY,
    `parentId`               int(11)               DEFAULT NULL,
    `name`                   varchar(255)          DEFAULT NULL,
    `startDate`              datetime              DEFAULT NULL,
    `endDate`                datetime              DEFAULT NULL,
    `effort`                 float(11, 2)          DEFAULT NULL,
    `effortUnit`             varchar(255)          DEFAULT 'hour',
    `duration`               float(11, 2) unsigned DEFAULT NULL,
    `durationUnit`           varchar(255)          DEFAULT 'day',
    `percentDone`            float(11, 2) unsigned DEFAULT 0,
    `schedulingMode`         varchar(255)          DEFAULT 'Normal',
    `note`                   text                  DEFAULT NULL,
    `constraintType`         varchar(255)          DEFAULT NULL,
    `constraintDate`         datetime              DEFAULT NULL,
    `manuallyScheduled`      tinyint               DEFAULT 0,
    `unscheduled`            tinyint               DEFAULT 0,
    `ignoreResourceCalendar` tinyint               DEFAULT 0,
    `effortDriven`           tinyint               DEFAULT 0,
    `inactive`               tinyint               DEFAULT 0,
    `cls`                    varchar(255)          DEFAULT NULL,
    `iconCls`                varchar(255)          DEFAULT NULL,
    `color`                  varchar(255)          DEFAULT NULL,
    `parentIndex`            int(11)               DEFAULT 0,
    `expanded`               tinyint               DEFAULT 0,
    `calendar`               int(11)               DEFAULT NULL,
    `deadline`               datetime              DEFAULT NULL,
    `direction`              varchar(255)          DEFAULT NULL,
    INDEX (`parentId`),
    CONSTRAINT `fk_tasks_tasks` FOREIGN KEY (`parentId`) REFERENCES `tasks` (`id`) ON DELETE CASCADE,
    INDEX (`calendar`)
) ENGINE = INNODB AUTO_INCREMENT = 1;
The Bryntum Gantt has more features than the DHTMLX Gantt, which is why there are many columns in the table.
Create the dependencies table with the following query:
CREATE TABLE `dependencies`
(
    `id`        int(11) NOT NULL AUTO_INCREMENT PRIMARY KEY,
    `fromEvent` int(11)      DEFAULT NULL,
    `toEvent`   int(11)      DEFAULT NULL,
    `type`      int(11)      DEFAULT 2,
    `cls`       varchar(255) DEFAULT NULL,
    `lag`       float(11, 2) DEFAULT 0,
    `lagUnit`   varchar(255) DEFAULT 'day',
    `active`    tinyint      DEFAULT 1,
    `fromSide`  varchar(255) DEFAULT NULL,
    `toSide`    varchar(255) DEFAULT NULL,
    INDEX (`fromEvent`),
    CONSTRAINT `fk_dependencies_tasks` FOREIGN KEY (`fromEvent`) REFERENCES `tasks` (`id`) ON DELETE CASCADE,
    INDEX (`toEvent`),
    CONSTRAINT `fk_dependencies_tasks1` FOREIGN KEY (`toEvent`) REFERENCES `tasks` (`id`) ON DELETE CASCADE
) ENGINE = INNODB AUTO_INCREMENT = 1;
The dependencies table is equivalent to the gantt_links table used for the DHTMLX Gantt chart.
Migrate the existing data from the DHTMLX tables into the new tables
Run the following query to insert the existing data from the gantt_tasks table into the newly created tasks table:
INSERT INTO tasks (
    `id`,
    `parentId`,
    `name`,
    `startDate`,
    `endDate`,
    `effort`,
    `duration`,
    `percentDone`,
    `constraintType`,
    `constraintDate`,
    `parentIndex`,
    `expanded`
)
SELECT
    `id`,
    IF(`parent` = 0, NULL, `parent`),
    `text`,
    `start_date`,
    DATE_ADD(`start_date`, INTERVAL `duration` DAY),
    `duration` * 24,
    `duration`,
    `progress` * 100,
    'startnoearlierthan',
    `start_date`,
    `parent`,
    1
FROM gantt_tasks;
Next, run the following query to insert the existing data from the gantt_links table into the newly created dependencies table:
INSERT INTO dependencies (`id`, `fromEvent`, `toEvent`, `type`)
SELECT `id`, `source`, `target`,
    CASE `type`
        WHEN 'finish_to_start' then 2
        WHEN 'start_to_start' then 0
        WHEN 'finish_to_finish' then 3
        WHEN 'start_to_finish' then 1
        ELSE 2
    END
FROM gantt_links;
⚠️ Please note that Bryntum Gantt out of the box operates more data models than we just made (resources, assignments, calendars, segments etc). We don’t make the tables for all of them here to simplify the guide. To support other models on the database level please see the sql/setup.sql file included with the Bryntum Gantt php demo.
Now when the database is ready we can start updating the server side code.
Update the server API endpoints
We are going to create two new handlers on the server for querying /load and /sync paths. The first will read the data from the database and respond it to the Gantt. The second path will be requested to persist changes made on the client-side to the database.
Handling data loading requests
First let’s add /load path endpoint. In the serverConfig function of server.js file, add the following GET request handler which fetches the data from the database using the MySQL Node.js client:
// Read
app.get("/load", async (req, res) => {
  try {
    const [[tasks], [dependencies]] = await Promise.all([
      db.query("SELECT * FROM task"),
      db.query("SELECT * FROM dependencies"),
    ]);
    res.send({
      success: true,
      tasks: {
        rows: tasks,
      },
      dependencies: {
        rows: dependencies,
      }
    });
  } catch (error) {
    res.send({
      success: false,
      // pass raw exception message to the client as-is
      // please replace with something more human readable before using this on production systems
      message: error.message
    });
  }
});
As you can see in the code the handler reads data from the task and dependencies table and sends then to the client as JSON.
⚠️ Please note that in case of an error the code just sends the error message as-is to the client without any processing which is acceptable for the demo purposes but should definitely be changed for production systems.
To check that the endpoint works open the root folder of the project in the terminal and run:
npm run startNow if you open https://localhost:1337/load URL in a browser you should see data in JSON format.
Handling changes persisting
DHTMLX sends HTTP request data encoded in the URL, but Bryntum sends data to the server in a POST request body in JSON format. To support that add the following JSON bodyParser below the line app.use(bodyParser.urlencoded({ extended: true })); of server.js file:
app.use(bodyParser.json());DHTMLX uses separate HTTP methods for each of the CRUD operations. With Bryntum, except for the read operation, we use a single POST request and determine the method and operation based on the request object. Add the following HTTP POST /sync route that will be used to keep the data in the database in sync with the changes on the client-side UI:
// Create, Update, Delete (Tasks & Dependencies)
app.post("/sync", async function (req, res) {
  const { requestId, tasks, dependencies } = req.body;
  try {
    const response = { requestId, success : true };
    // if task changes are passed
    if (tasks) {
      const rows = await applyTableChanges('tasks', tasks)
      // if got some new data to update client
      if (rows) {
        response.tasks = { rows };
      }
    }
    // if dependency changes are passed
    if (dependencies) {
      const rows = await applyTableChanges('dependencies', dependencies)
      // if got some new data to update client
      if (rows) {
        response.dependencies = { rows };
      }
    }
    res.send(response);
  }
  catch (error) {
    res.send({
      requestId,
      success : false,
      // pass raw exception message to the client as-is
      // please replace with something more human readable before using this on production systems
      message : error.message
    });
  }
});
Define the applyTableChanges function at the bottom of the server.js file:
async function applyTableChanges(table, changes) {
  let rows;
  if (changes.added) {
    rows = await createOperation(changes.added, table);
  }
  if (changes.updated) {
    await updateOperation(changes.updated, table);
  }
  if (changes.removed) {
    await deleteOperation(changes.removed, table);
  }
  // if got some new data to update client
  return rows;
}
The client-side Bryntum library will make a POST request to the /sync endpoint when changes are made to keep the data in the database in sync with the client-side UI. The code we added will handle the incoming POST request and inspect the request body to determine what action should be taken on which data model. We first determine which data model to apply a sync request to and then inspect the type of operation to perform. In this case, we check if the sync request body object has a key called tasks or dependencies and then call the applyTableChanges function. In the applyTableChanges function we check if the change operation is an added, updated or removed operation in which case we perform the relevant create, update or delete query using the MySQL client.
Define the createOperation function at the bottom of server.js:
function createOperation(added, table) {
  return Promise.all(
    added.map(async record => {
      // destructuring to skip fake "$PhantomId" column
      // and few other columns just for the sake of this demo code simplification
      const { $PhantomId, baselines, from, to, segments, ...data } = record;
      // insert record
      const [result] = await db.query('INSERT INTO ?? set ?', [table, data]);
      // report to the client that we changed the record identifier
      return { $PhantomId, id : result.insertId };
    })
  );
}
⚠️ The $PhantomId is a phantom identifier. It’s an auto-generated, unique client-side value that’s used to identify a record. You should not persist it on the server. You can read more about it in the docs.
⚠️ As you might notice we skip certain fields (namely baselines, from, to, segments) persisting in the above code. We do that intentionally to simplify the guide. If your application needs some of those fields you’ll need to add their support to the code later.
Add the updateOperation and deleteOperation functions to the bottom of the server.js file:
function updateOperation(updated, table) {
  return Promise.all(
    // destructuring to skip fake "$PhantomId" column
    // and few other columns just for the sake of this demo code simplification
    updated.map(({ $PhantomId, id, baselines, from, to, segments, ...data }) => {
      return db.query('UPDATE ?? set ? where id = ?', [table, data, id]);
    })
  );
}
function deleteOperation(deleted, table) {
return db.query(`DELETE FROM ${table} WHERE id in (?)`, deleted.map(({ id }) => id));
}The starter template doesn’t have an implementation of the Update Link operation because there is no UI in the DHTMLX Gantt chart to do so. You can, however, implement it yourself. See the example implementation for editing link values provided in the docs.
The API endpoints have now been successfully updated to be compatible with our implementation of Bryntum Gantt chart.
Update library import and set up
Now when server-side part is ready we’ll update and set up the client-side code.
Install Bryntum Gantt by following step 1 and step 4 of the vanilla JavaScript with npm set-up guide.
Open the index.html file and find the <script>, <link>, and <style> tags for dhtmlxgantt.js. Comment them out and add the following code to import the Bryntum styles:
<link rel="stylesheet" href="./gantt.stockholm.css" data-bryntum-theme>
<style>
  html {
    font-size: 100%;
  }
  body {
    margin: 0;
    display: flex;
    flex-direction: column;
    height: 100vh;
    font-family: Lato, "Open Sans", Helvetica, Arial, sans-serif;
    font-size: 0.875rem;
  }
</style>
In the <body> HTML tag, comment out the <div> container as well as the DHTMLX set up code in the <script> tag. Add the following set up code from Bryntum. Ensure the <script> tag has its type set to module <script type="module">:
<script type="module">
  import { Gantt, ProjectModel } from './gantt.module.js';
  // create project which will provide data to the Gantt
  const project = new ProjectModel({
    taskStore : {
      transformFlatData : true
    },
    loadUrl: '/load', // URL for data loading
    syncUrl: '/sync', // URL for data saving
    autoLoad: true,
    autoSync: true
  });
  // create the Bryntum Gantt instance and append to body
  const gantt = new Gantt({
    appendTo: document.body,
    project,
    columns: [
      { type: 'name', width: 250, text: 'Tasks' },
      { type: 'startdate' },
      { type: 'duration' },
    ],
  });
</script>
We have now imported the Bryntum Gantt component from the library and set it up to load data from the /load endpoint on the initial load of the webpage. We also specify that the /sync endpoint will be used when any create, update, or delete operation takes place to keep the client and database in sync.
Now we need to mount Bryntum Gantt package directory to the web-server configuration. This is needed so the server would handle ./gantt.stockholm.css and ./gantt.module.js paths added to index.html.
In the server.js file, add the following line below app.use(express.static(path.join(__dirname, "public"))):
app.use(express.static(path.join(__dirname, '/node_modules/@bryntum/gantt')));Test the migration implementation
Open the root folder of the project in the terminal and run:
npm run startThen after opening https://localhost:1337 URL in a browser you should see the migrated data from DHTMLX Gantt chart loaded into the Bryntum Gantt chart, ready to take your project management to the next level with an extremely feature-rich and highly customizable Gantt chart.