How to connect Bryntum Scheduler Pro to a Microsoft Dynamics 365 Field Service project
We strive to keep posts updated, but code samples may sometimes be outdated. Humans, see the Bryntum documentation; agents, https://mcp.bryntum.com for the latest info.
Bryntum Scheduler Pro is a scheduling UI component for the web that is an extension of the Bryntum Scheduler, with additional features such as a scheduling engine, constraints, and travel time.
Microsoft Dynamics 365 Field Service is a cloud-based field service management solution that helps organizations deliver onsite services to customer locations. It includes a scheduler for visualizing and managing work orders (tasks that need to be completed at customer locations). Work orders are assigned to bookable resources, which can represent employees, contractors, or equipment.
In this tutorial, we’ll connect and sync Bryntum Scheduler Pro to Dynamics 365 Field Service as an example of how to connect a Bryntum component to a Microsoft Dynamics 365 app. Bryntum components are fully customizable and portable, and they can be added wherever HTML, CSS, and JavaScript are supported.
Microsoft Dynamics 365 apps and Dataverse
Microsoft Dynamics 365 apps include:
- Dynamics 365 Field Service
- Dynamics 365 Sales
- Dynamics 365 Customer Service
- Dynamics 365 Marketing
- Dynamics 365 Supply Chain Management
- Dynamics 365 Finance
- Dynamics 365 Business Central
We’ll use the Microsoft Dataverse Web API to get and modify data in the Dynamics 365 Field Service app.
Microsoft Dataverse is the data store used by Microsoft Dynamics 365 apps. Microsoft Power Platform apps, including Power Apps and Power BI, also use Dataverse.
Data in Dataverse is stored in tables. It includes a base set of standard tables for common use cases such as contacts, accounts, and opportunities. You can also create your own custom tables.
In our previous blog post, How to connect and sync Bryntum Gantt to Microsoft Project, we used the Microsoft Dynamics 365 Project schedule APIs to get users’ Microsoft Project tasks and task dependencies. Microsoft Project (now integrated into Microsoft Planner) demonstrates how some Microsoft 365 apps use Dataverse to extend their functionality. However, most Microsoft 365 apps like Excel, Word, PowerPoint, Teams, and SharePoint don’t use Dataverse. They have their own data stores that can be accessed using the Microsoft Graph API, as we demonstrated in our How to connect and sync a React Bryntum Calendar to a Microsoft Outlook Calendar guide.
Getting started
Clone the starter GitHub repository, which is a client-side Bryntum Scheduler Pro app. The code for the Bryntum Scheduler Pro that syncs with Microsoft Field Service is in the completed-app branch of the starter GitHub repository.
The starter repository uses Vite, a development server and JavaScript bundler. You’ll need Node.js version 20.19+ for Vite to work. Install the Vite dev dependency by running the following command:
npm installInstall the Bryntum Scheduler Pro component by following the vanilla JavaScript setup guide to access the private Bryntum npm repository.
Run the local dev server using the following command:
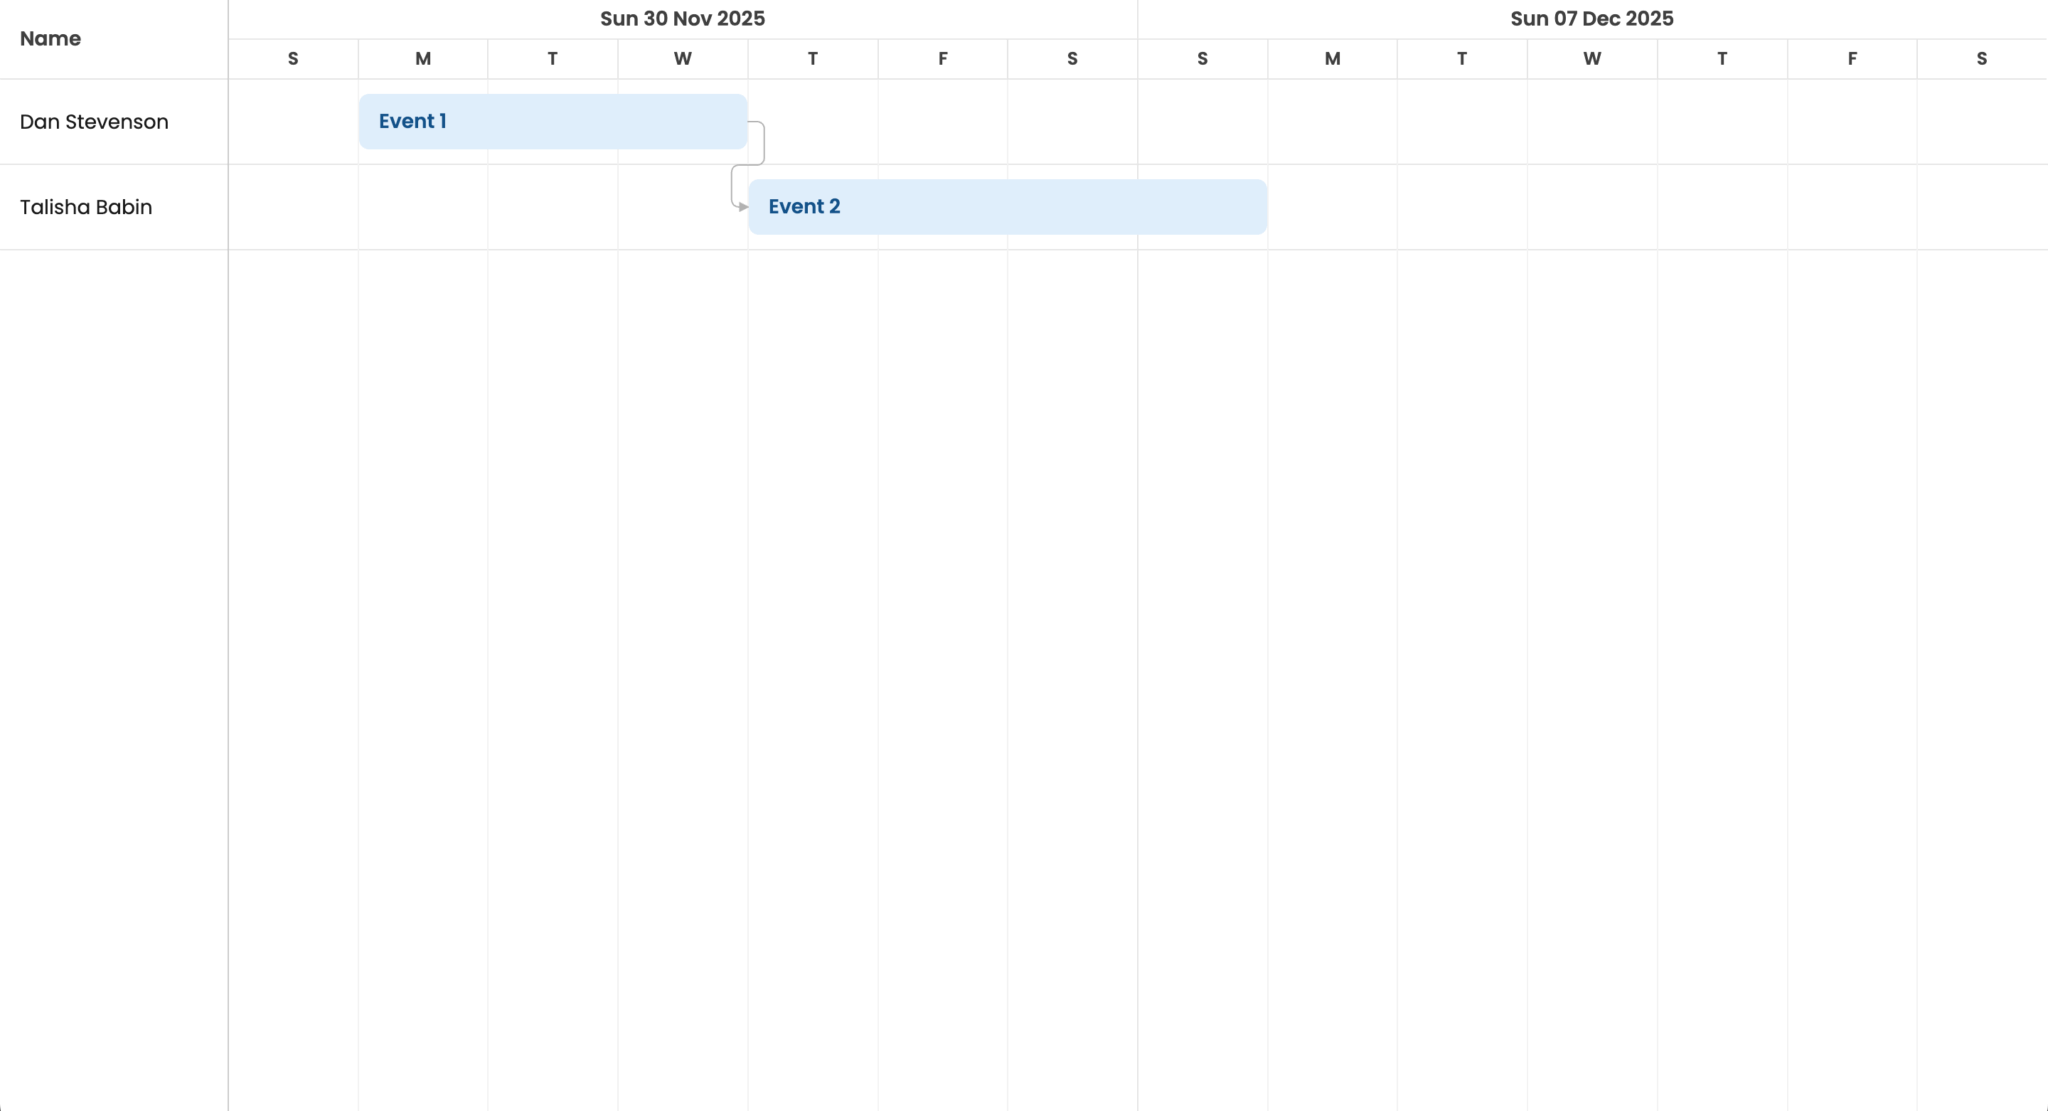
npm run devYou’ll see a Bryntum Scheduler Pro with two resources and two events:
Creating a Microsoft Entra app to connect to Microsoft 365
Next, we’ll look at how to retrieve a user’s Microsoft Field Service work orders with the Microsoft Dataverse Web API.
You’ll need a Microsoft 365 tenant, which is a dedicated instance of the Microsoft 365 services and your organization data stored at a specific location. If you don’t have a Microsoft 365 tenant, you might qualify for one through the Microsoft 365 Developer Program. If you don’t qualify for the program, you can sign up for a Microsoft 365 Business Premium trial.
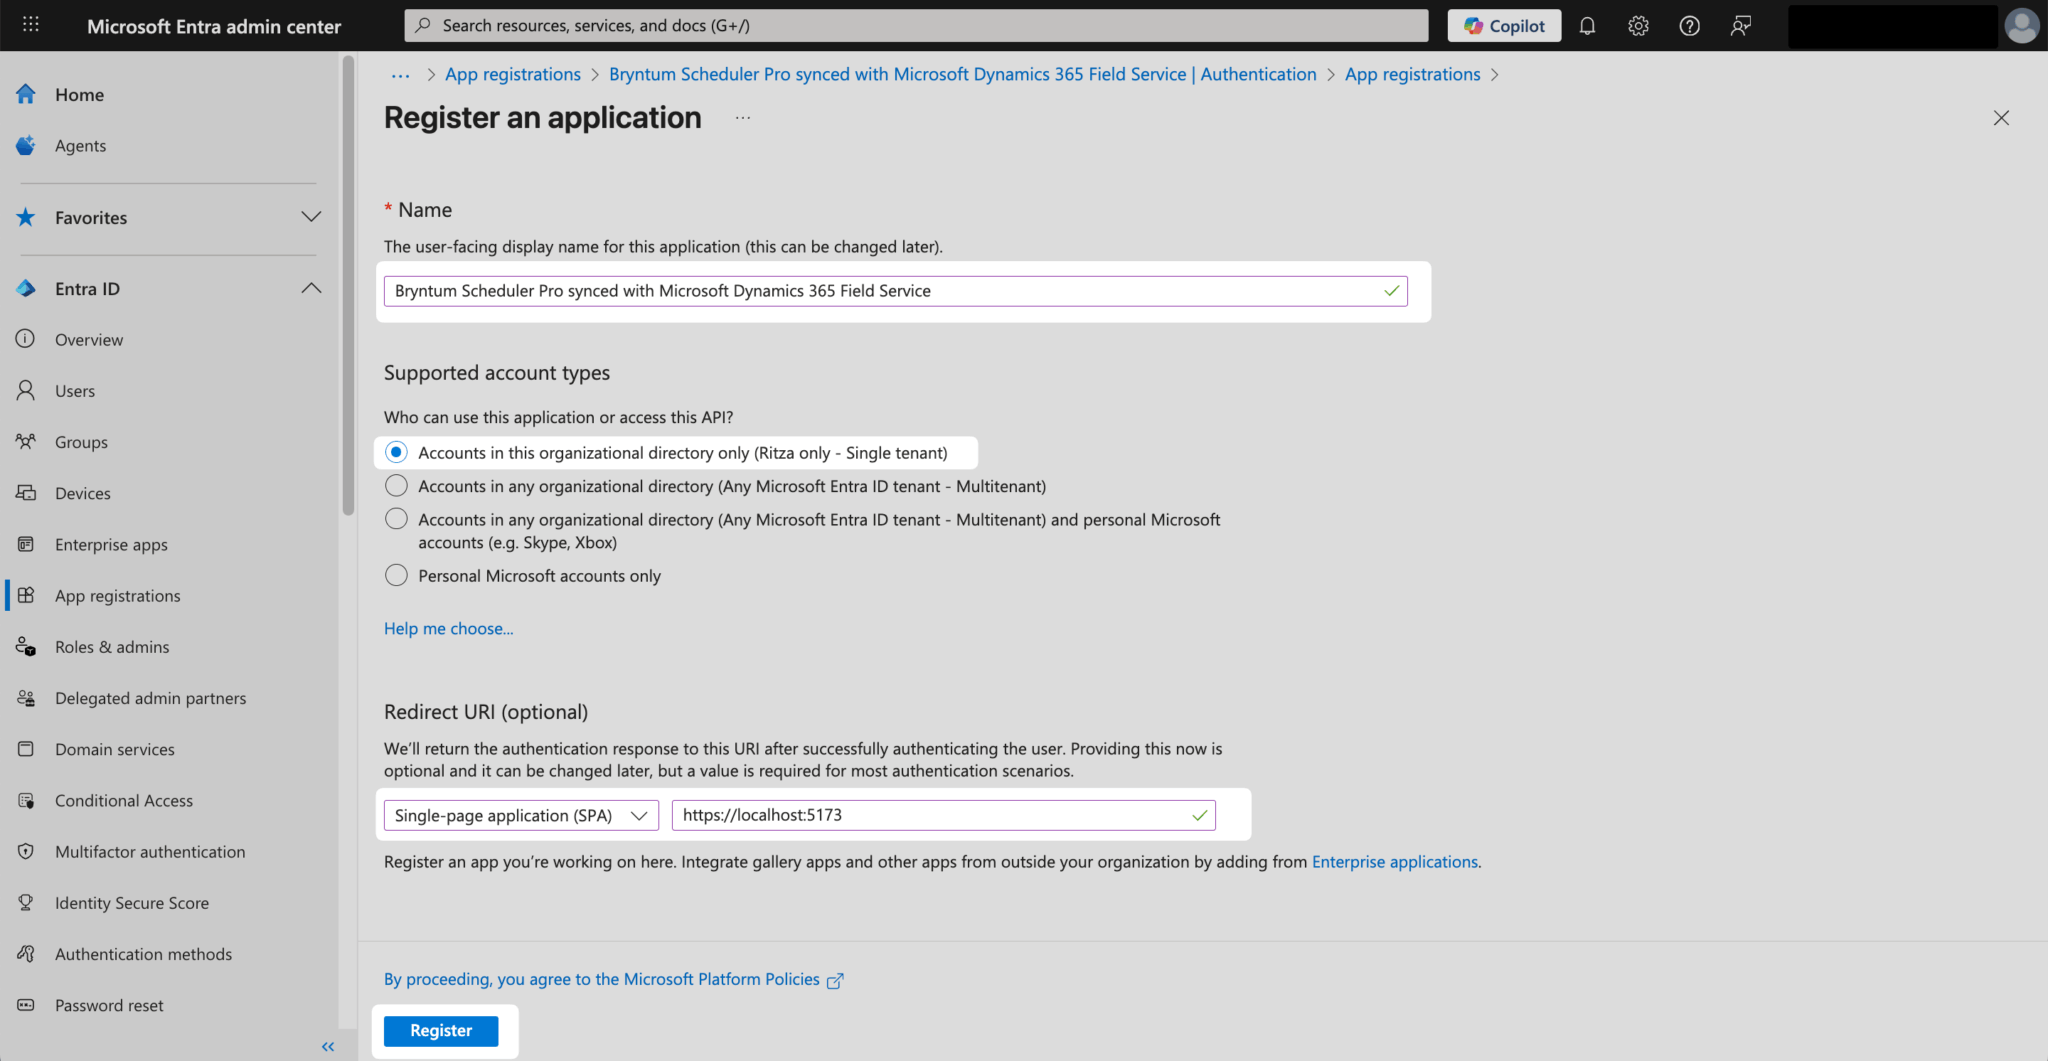
Now let’s register a Microsoft Entra app using Microsoft Entra ID, which is an identity and access management service that we’ll use to authenticate users. This app allows users to securely access Microsoft Dynamics 365 data.
Follow these steps to create an app registration in the Microsoft Entra admin center:
- Sign in using your Microsoft email address. If you joined the Microsoft 365 Developer Program, use the admin email address of your account.
- In the left navigation menu, select Entra ID and then select App registrations in the dropdown menu.
Click the New registration button to create a new app registration.
Name your app and select the “Single tenant” option for the Supported account types.
Set the Redirect URI to http://localhost:5173, select “Single-page application (SPA)” from the dropdown menu, and then click Register.
After registering your application, take note of the Application (client) ID and the Directory (tenant) ID, as you’ll need these to set up authentication for your Bryntum Scheduler Pro web app later.
Next, navigate to API permissions in the left menu of the App registrations page, click the Add a permission button, and select Dynamics CRM from the Commonly used Microsoft APIs list.
Under Select permissions, check the user_impersonation permission. Finally, click the Add permissions button.
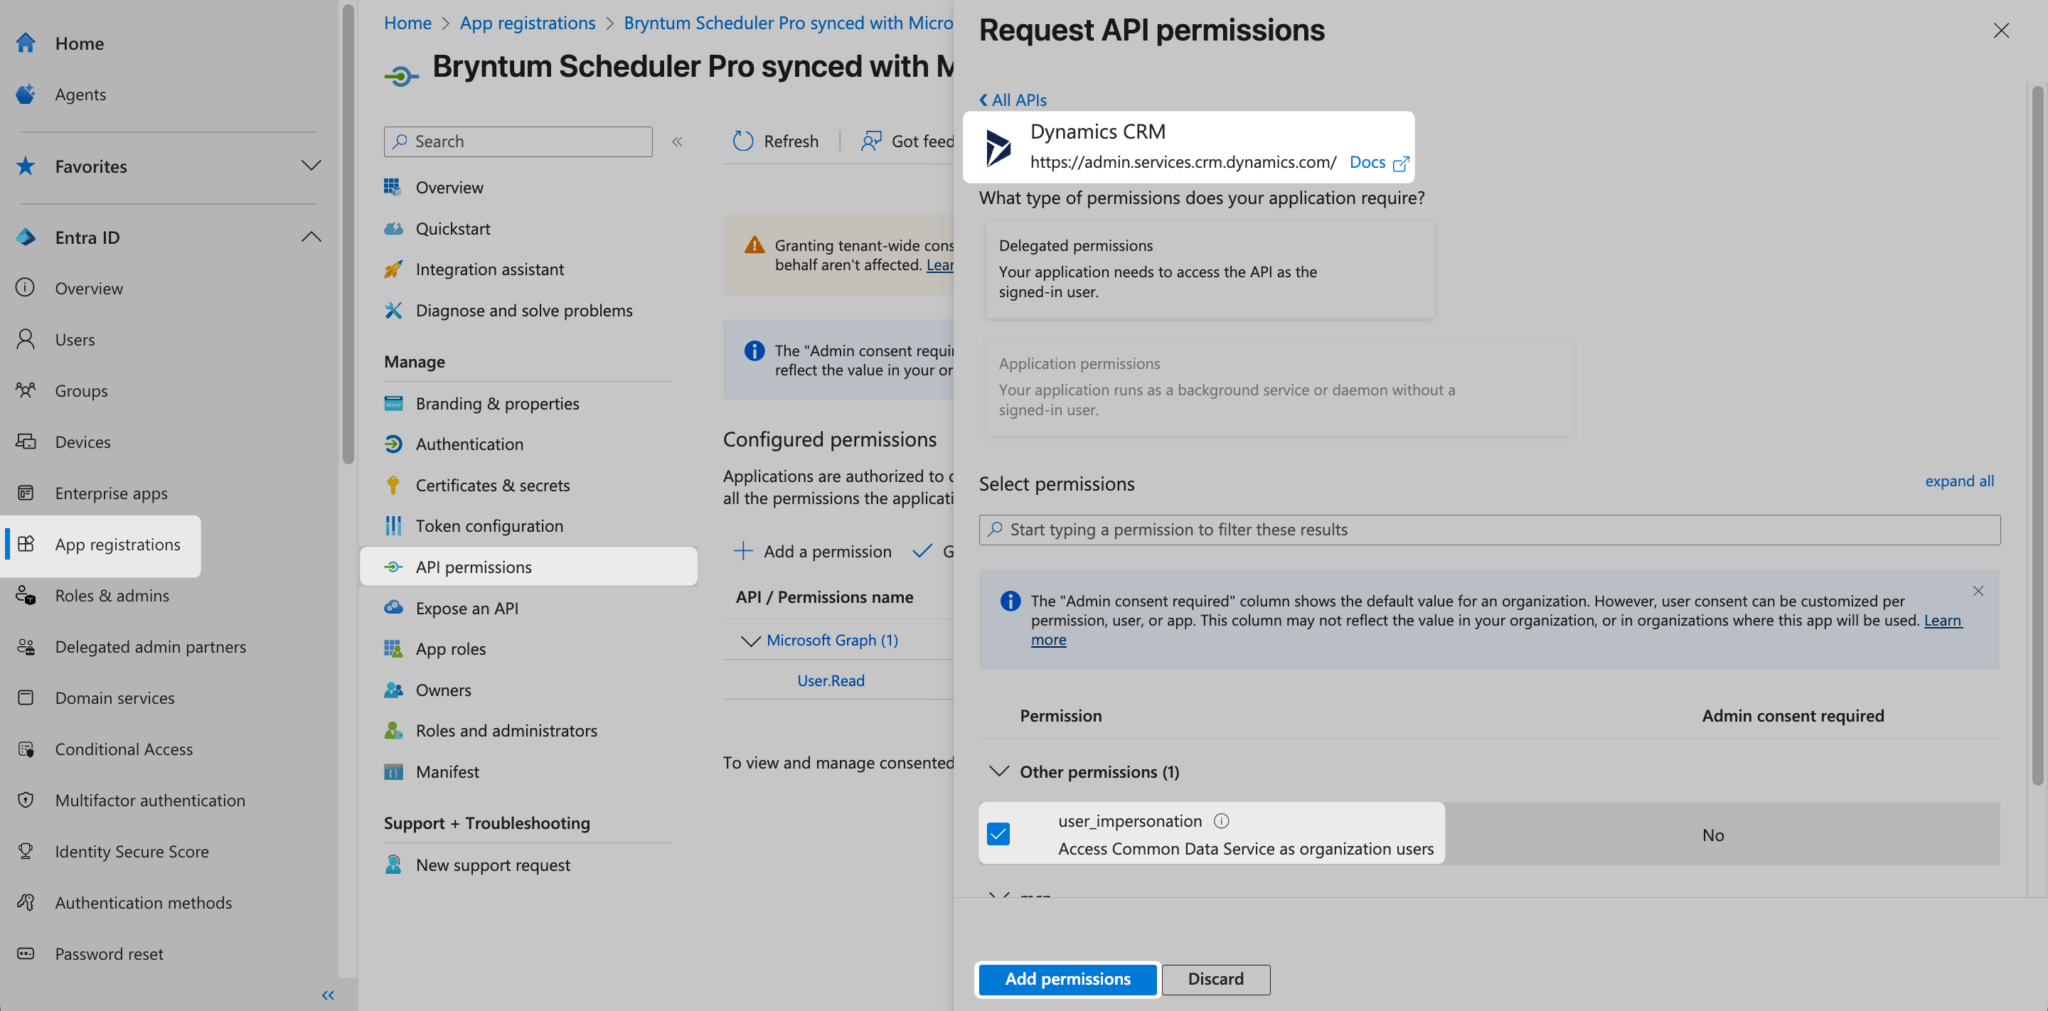
The user_impersonation permission allows your application to access the Common Data Service on behalf of authenticated Dynamics 365 (D365) users, enabling it to perform CRUD operations on Field Service work orders using the Microsoft Dataverse Web API.
Creating a Dynamics 365 Field Service project
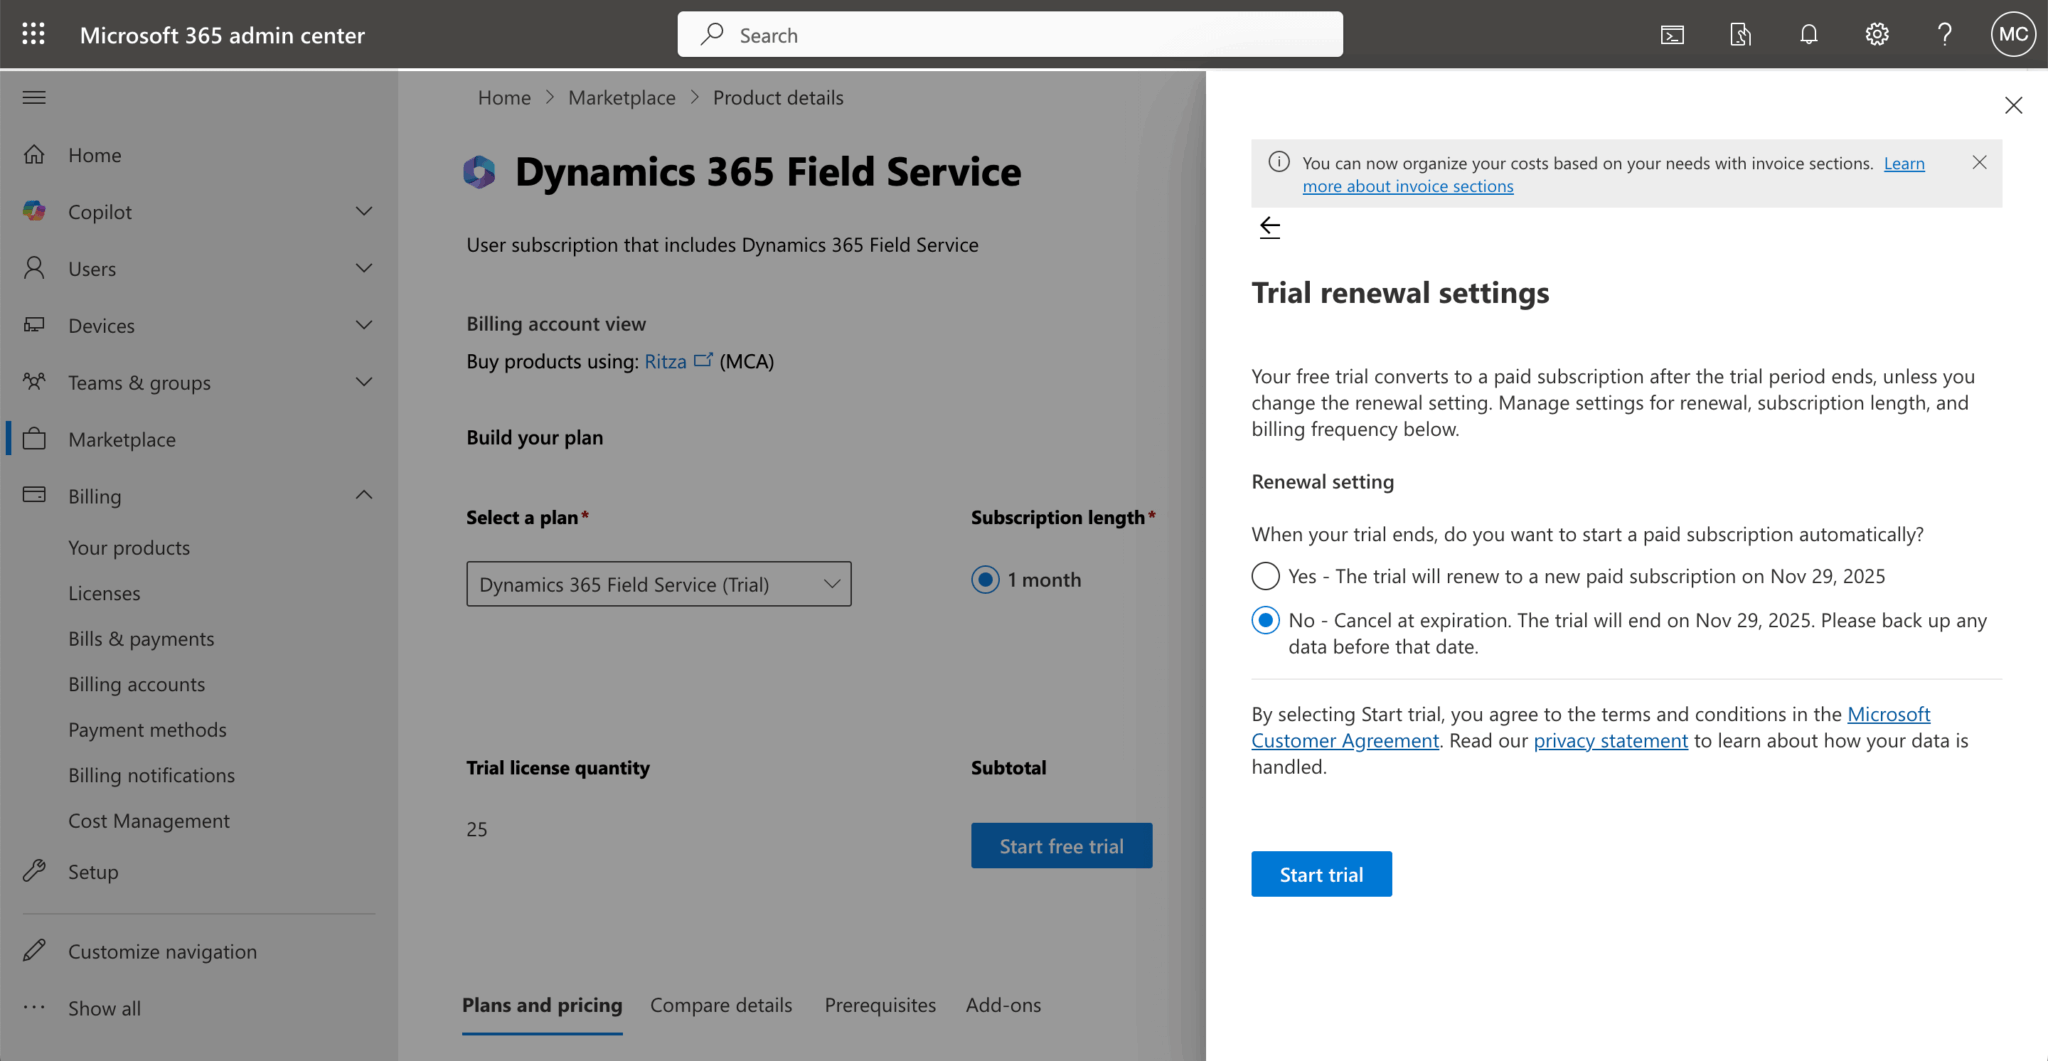
If you don’t have access to Dynamics 365 Field Service, you can sign up for a free trial here or in the Microsoft 365 admin center under Marketplace. You can set your trial to cancel after the trial period ends.
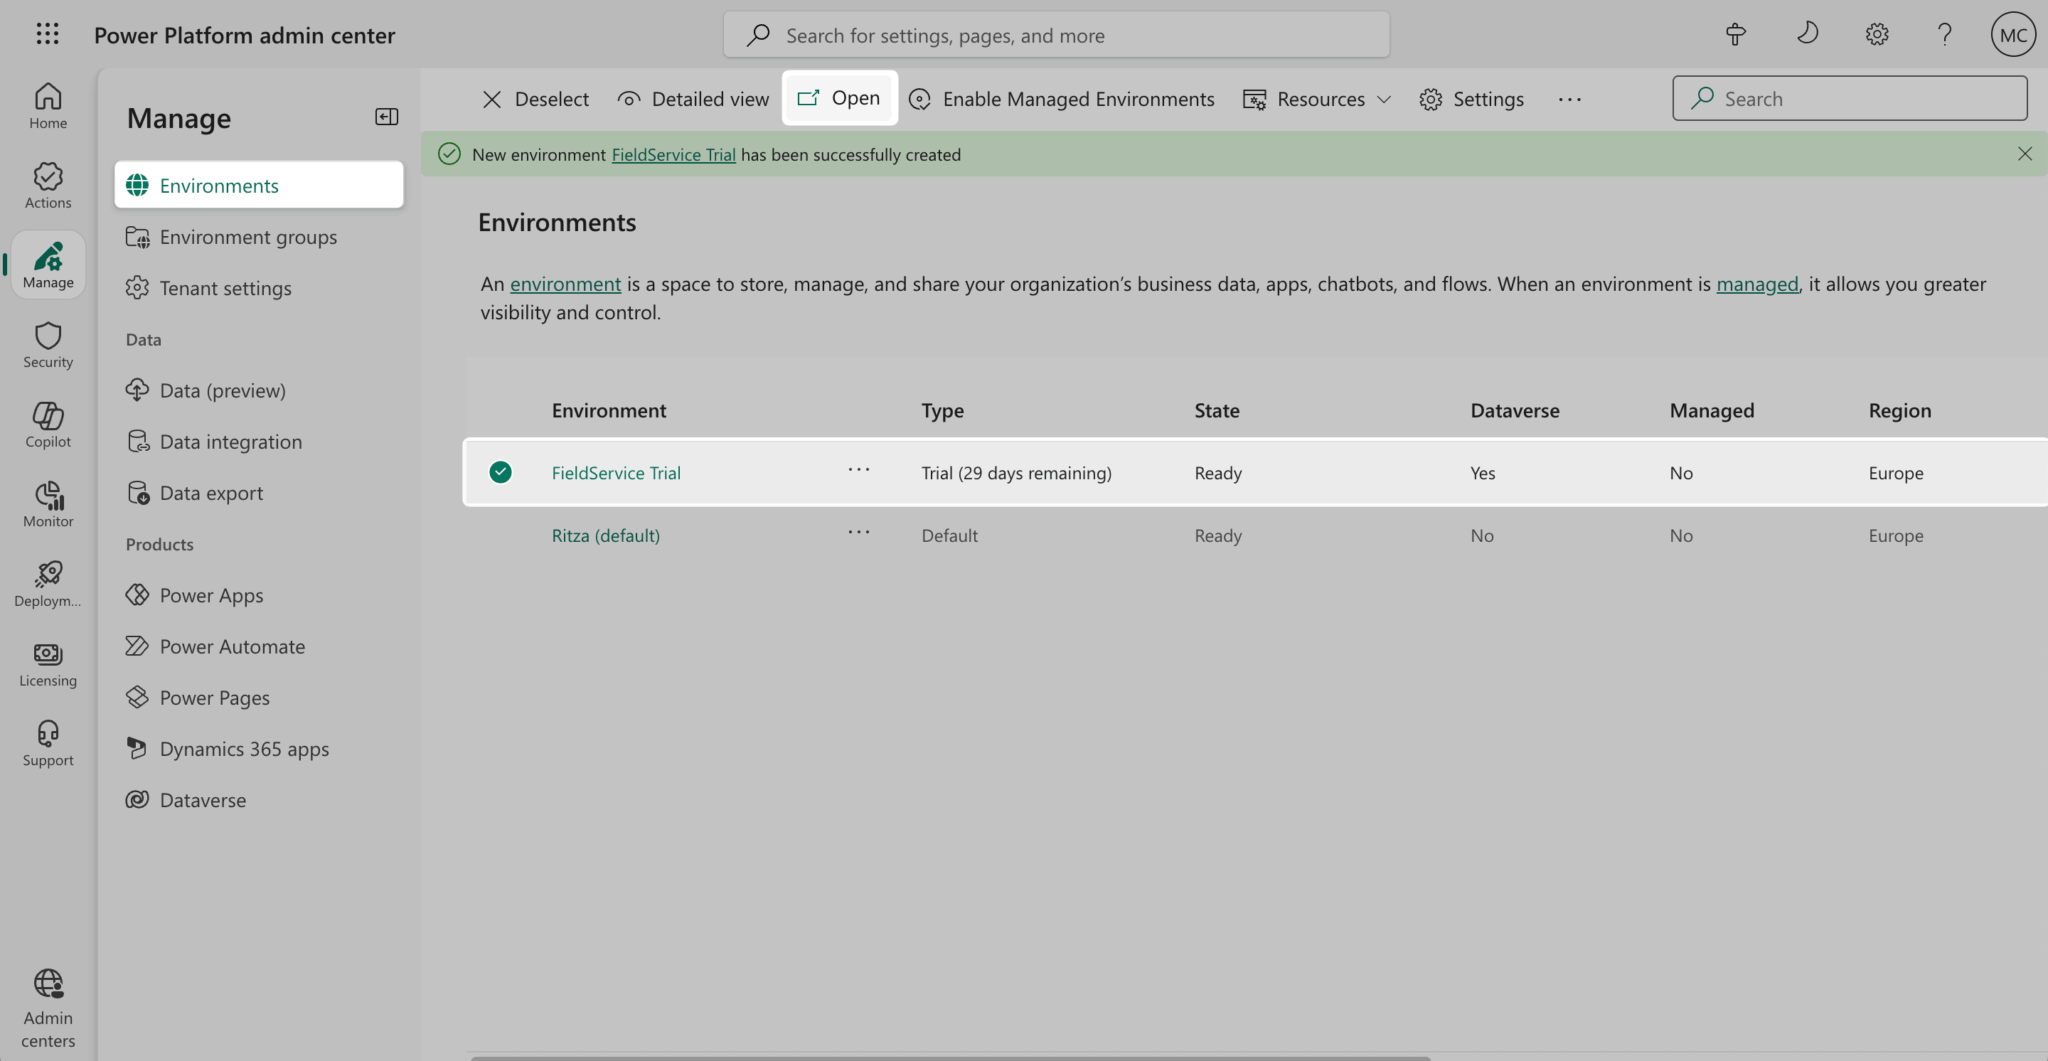
Once you’ve signed up, you can find the Field Service Trial in the Power Platform admin center under Environments.
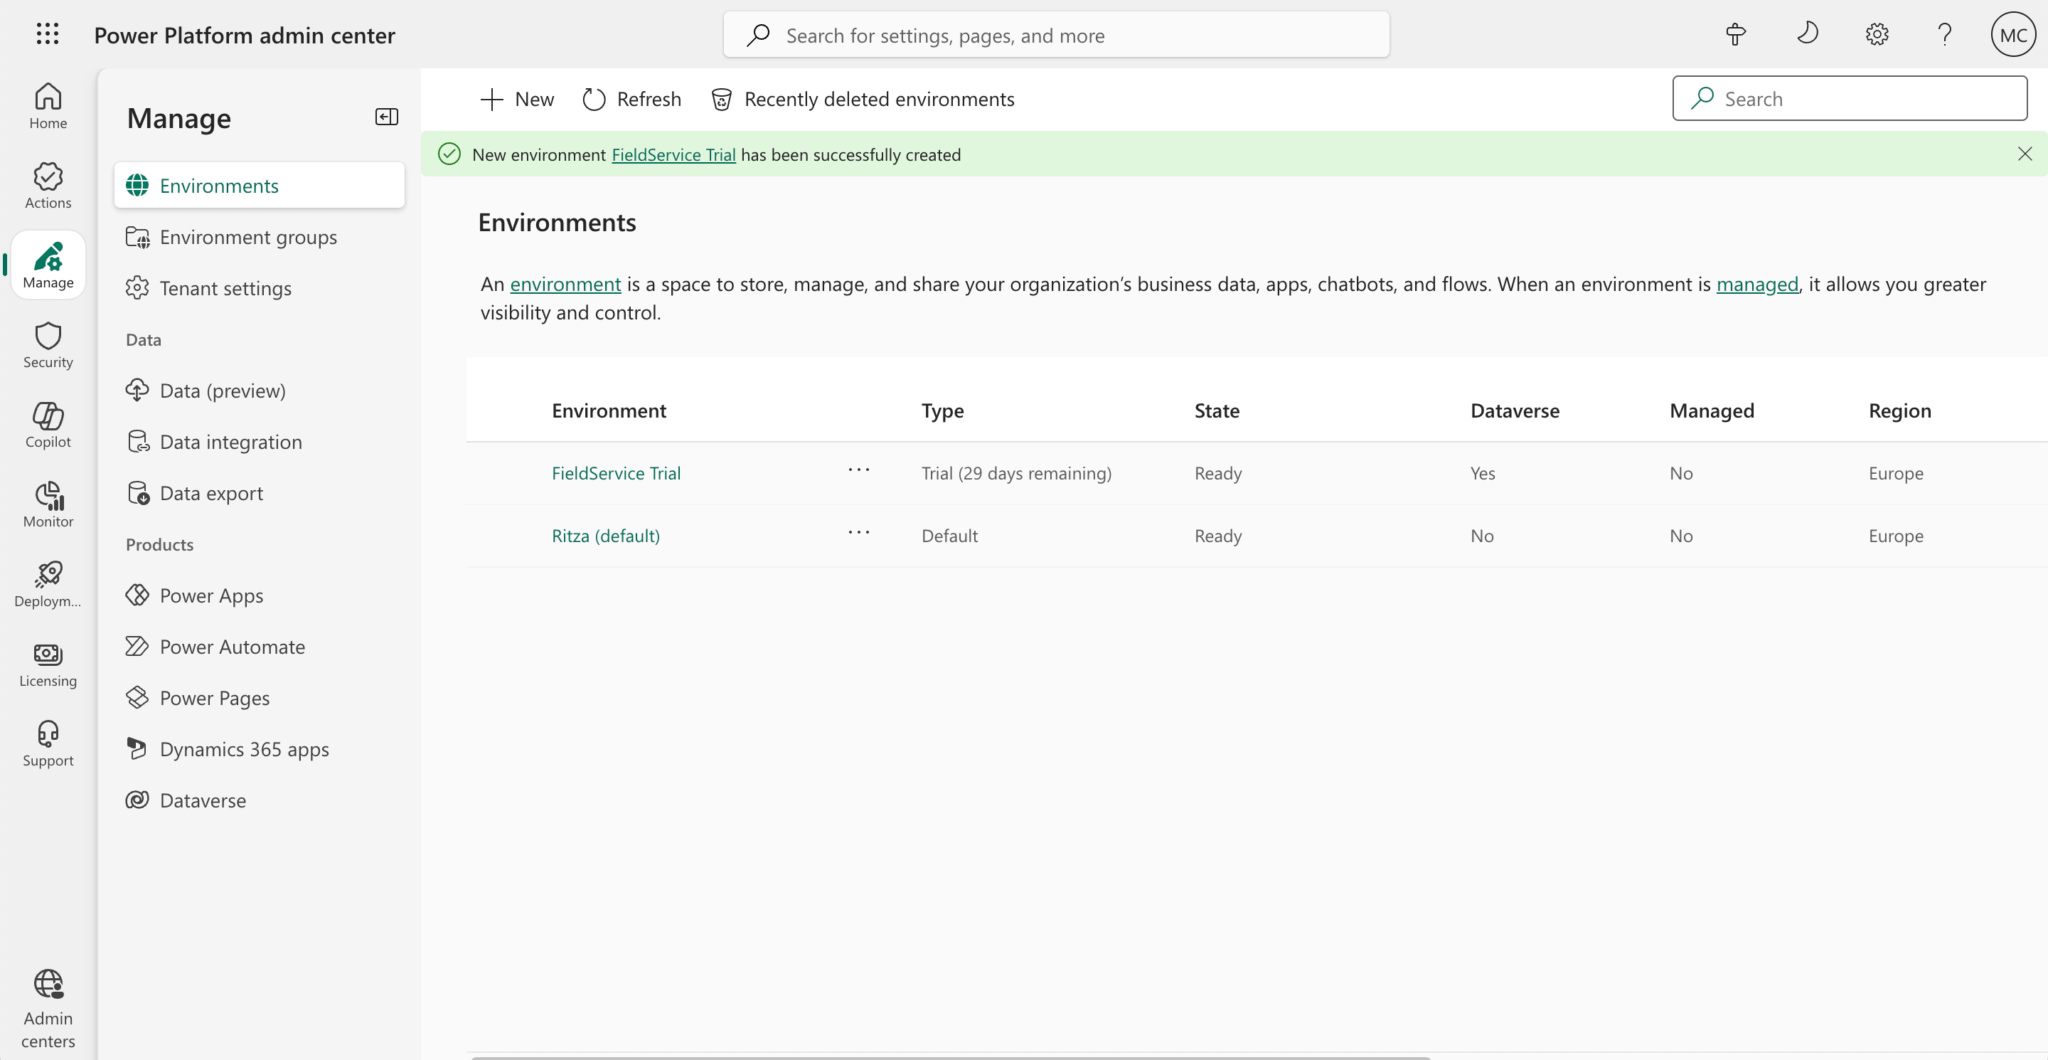
An environment is a space to store, manage, and share your organization’s business data, apps, chatbots, and flows.
Select the FieldService Trial row, then click Open at the top of the page:
This opens your environment in a new tab. After the page loads, you’ll see a list of Dynamics 365 apps in your environment, including Field Service:
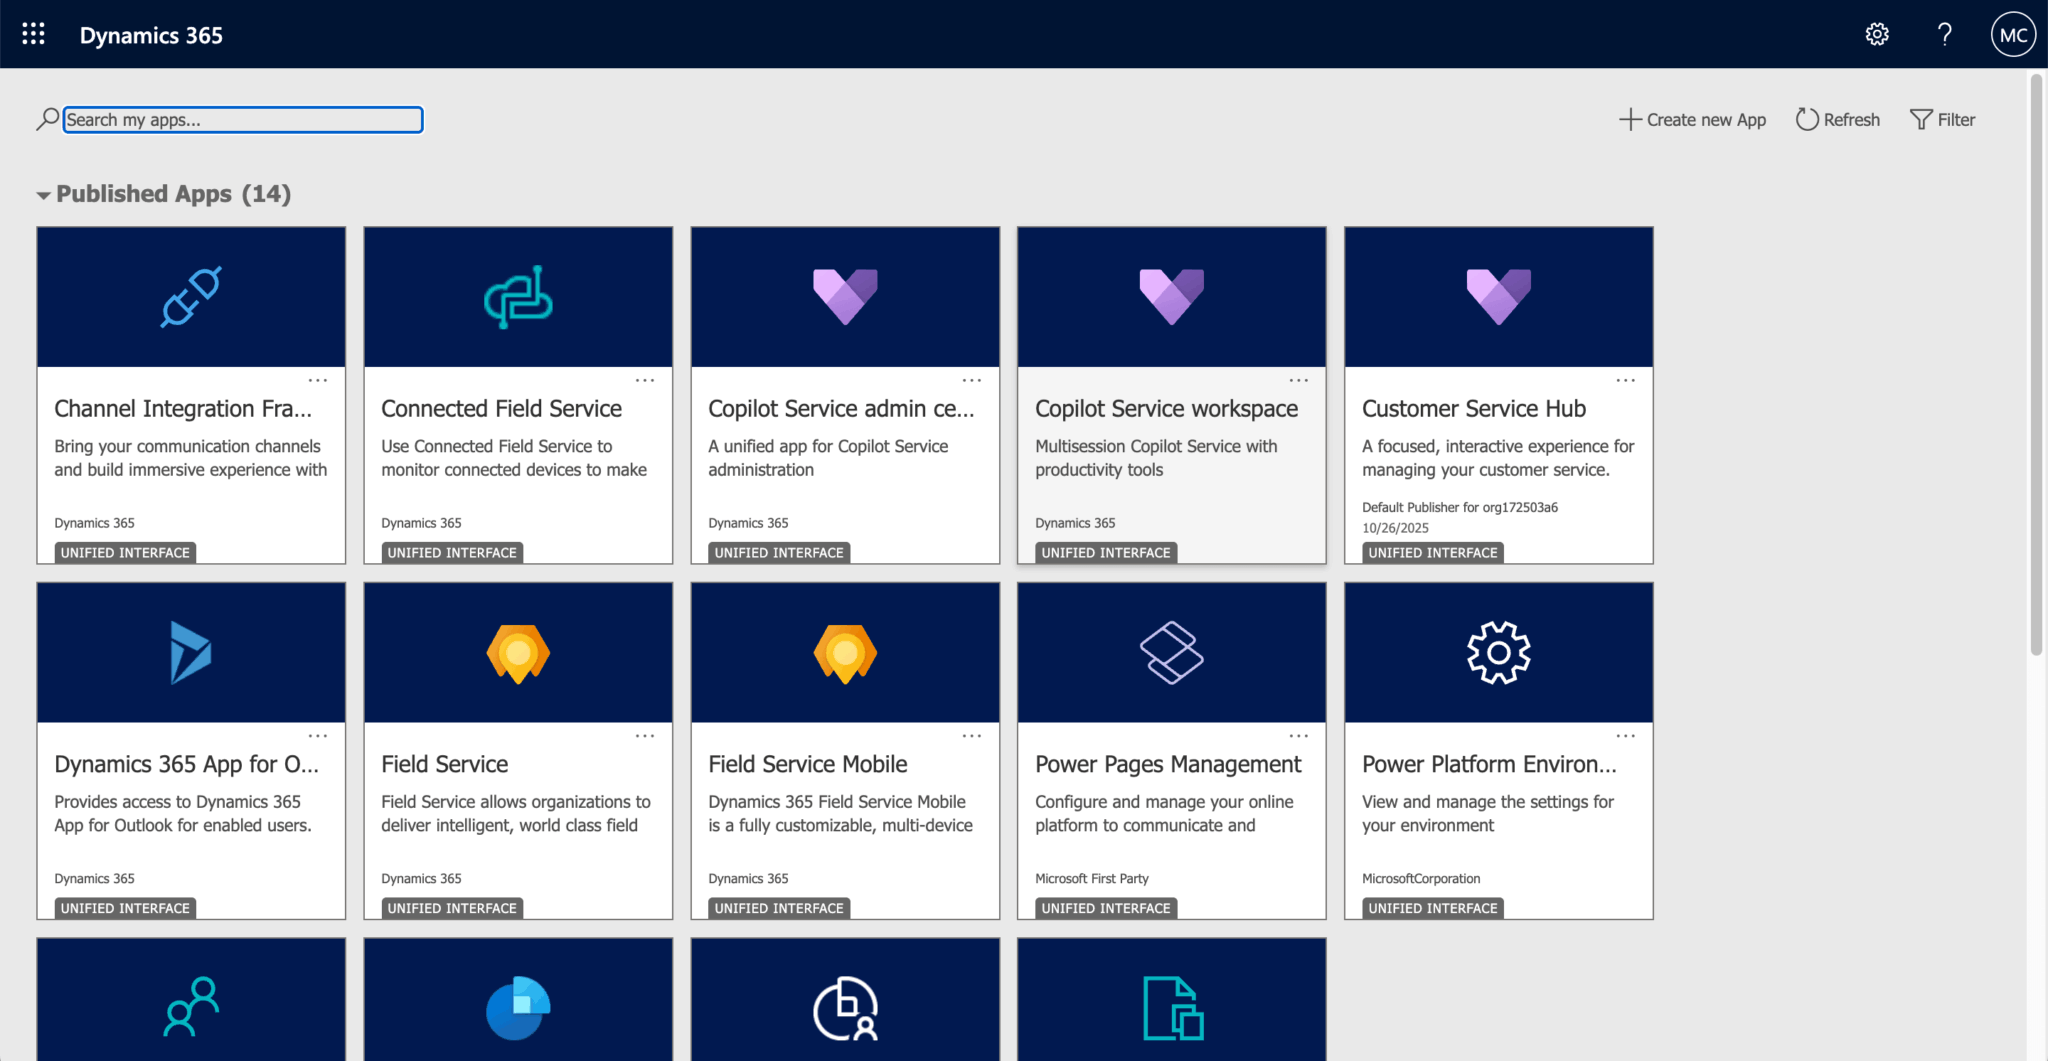
Click the Field Service card to open the Field Service home page:
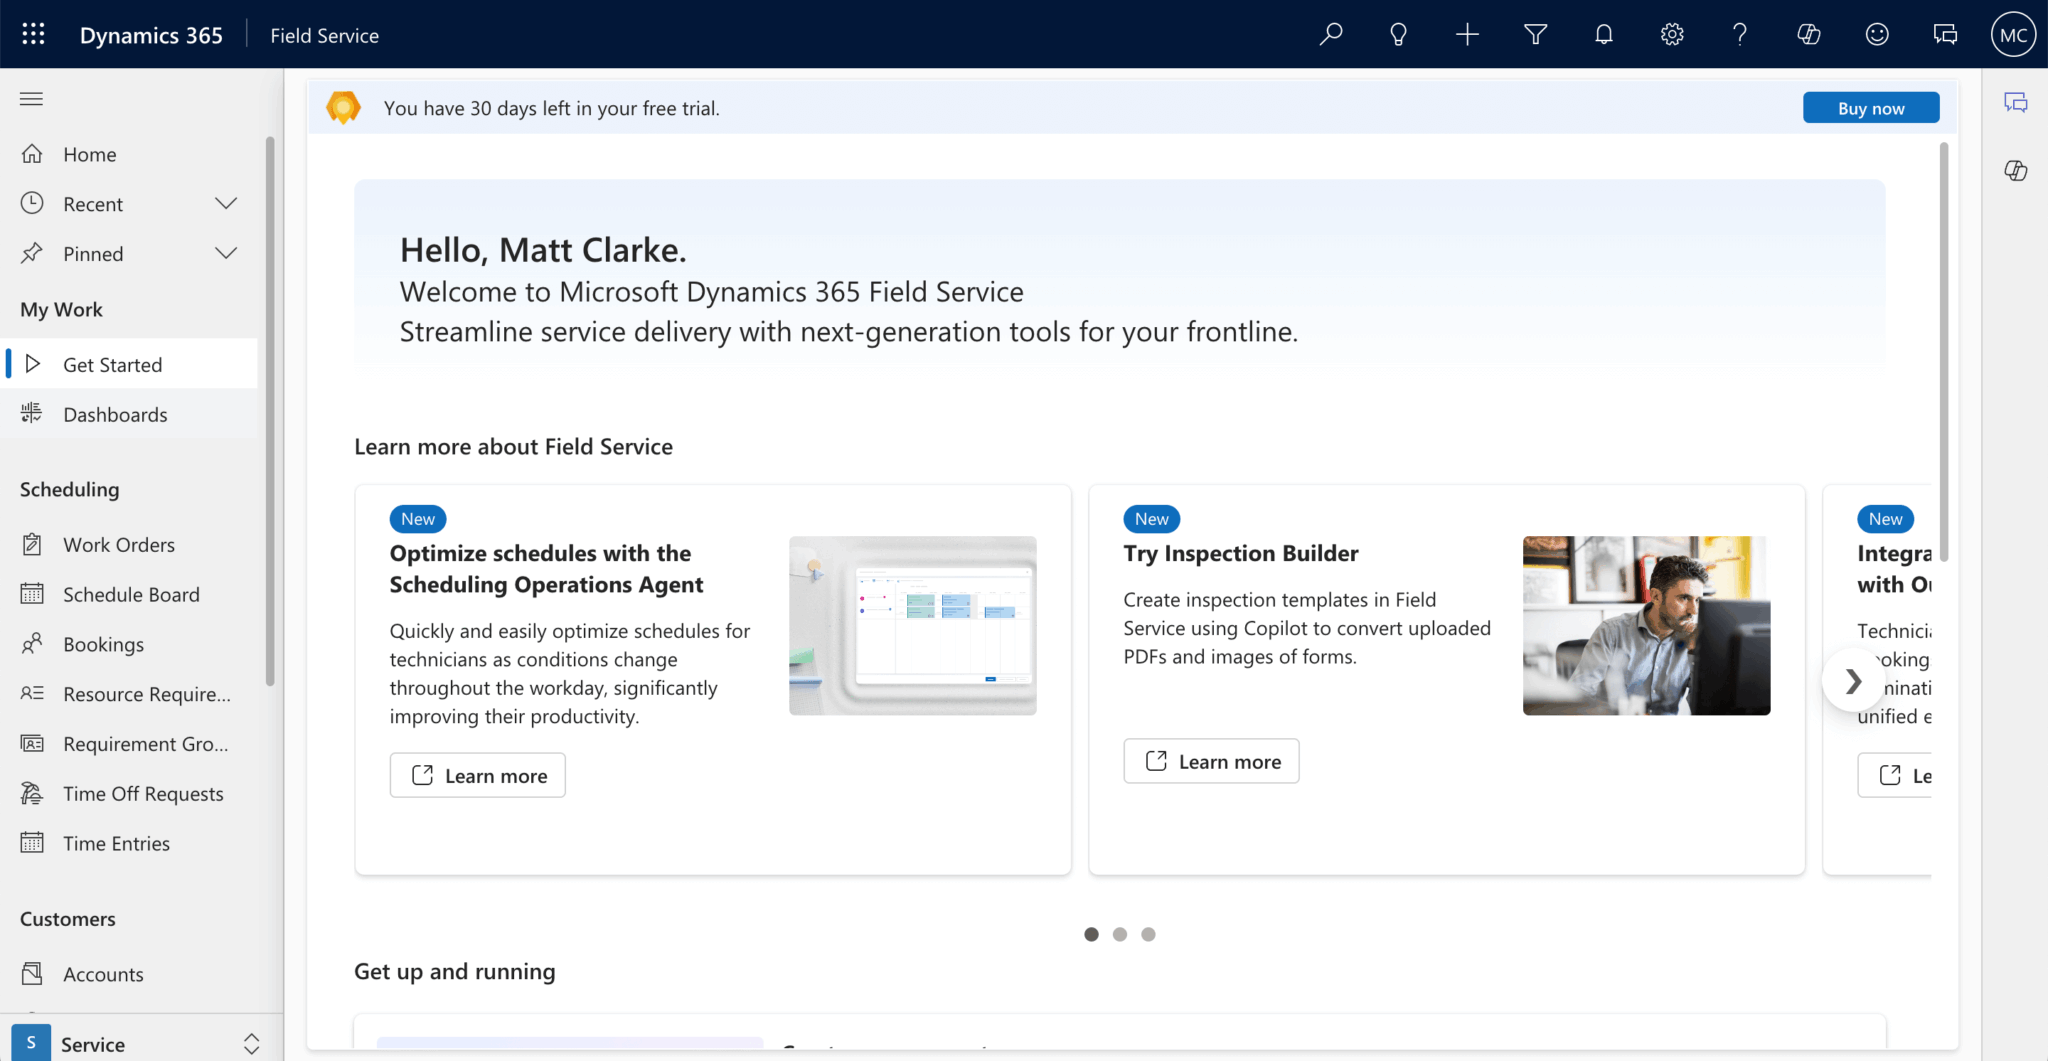
The Get up and running section on the home page lets you set up accounts and create and schedule work orders. We’ll use the example data already added to Field Service.
In the left navigation menu, select Schedule Board under Scheduling to open the scheduler:
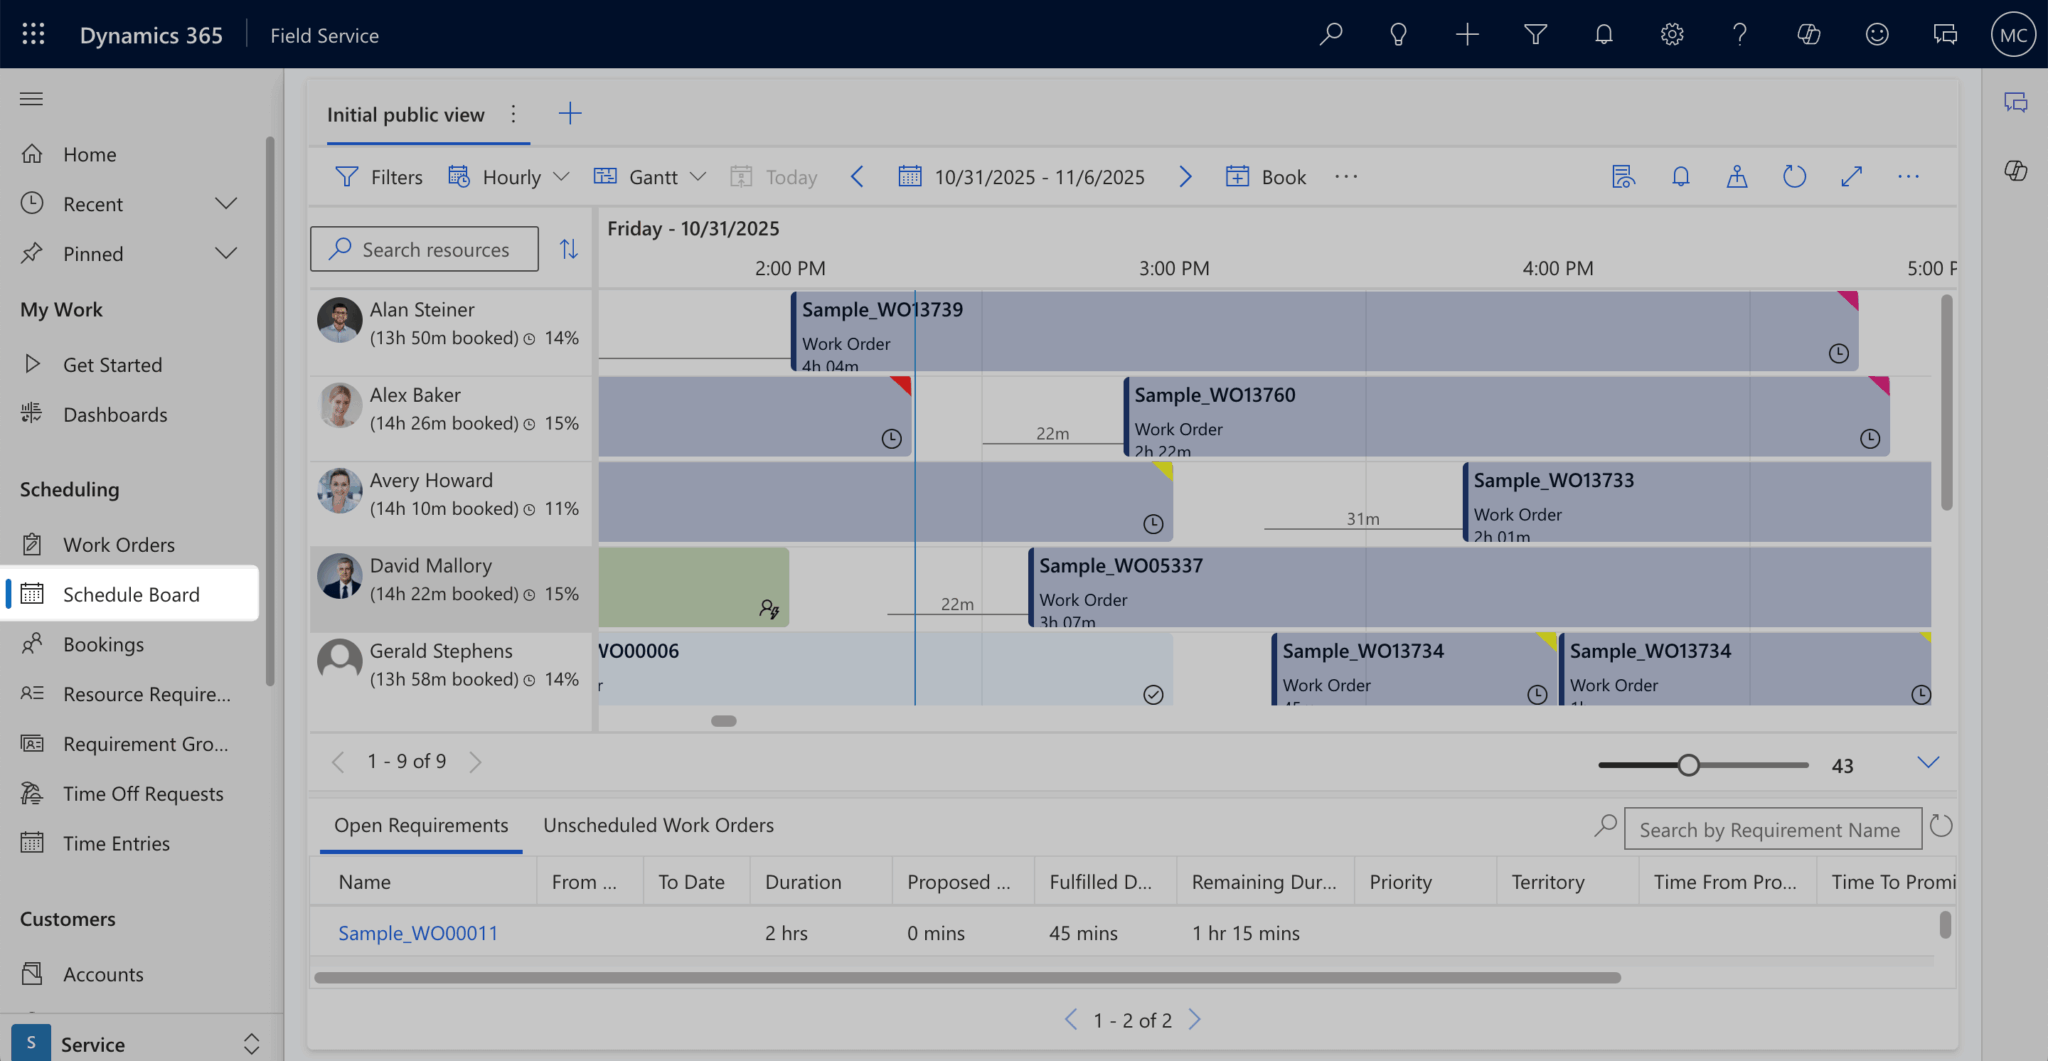
The scheduler shows a list of work orders assigned to resources. The work orders also show the estimated travel time to the customer location.
This scheduler is feature-rich, but its customization options (found under Scheduler settings) are limited. It also isn’t portable, as you can only use it in the Field Service app.
Setting up Microsoft 365 authentication in the JavaScript app
Next, let’s set up authentication in the Bryntum Scheduler Pro web app.
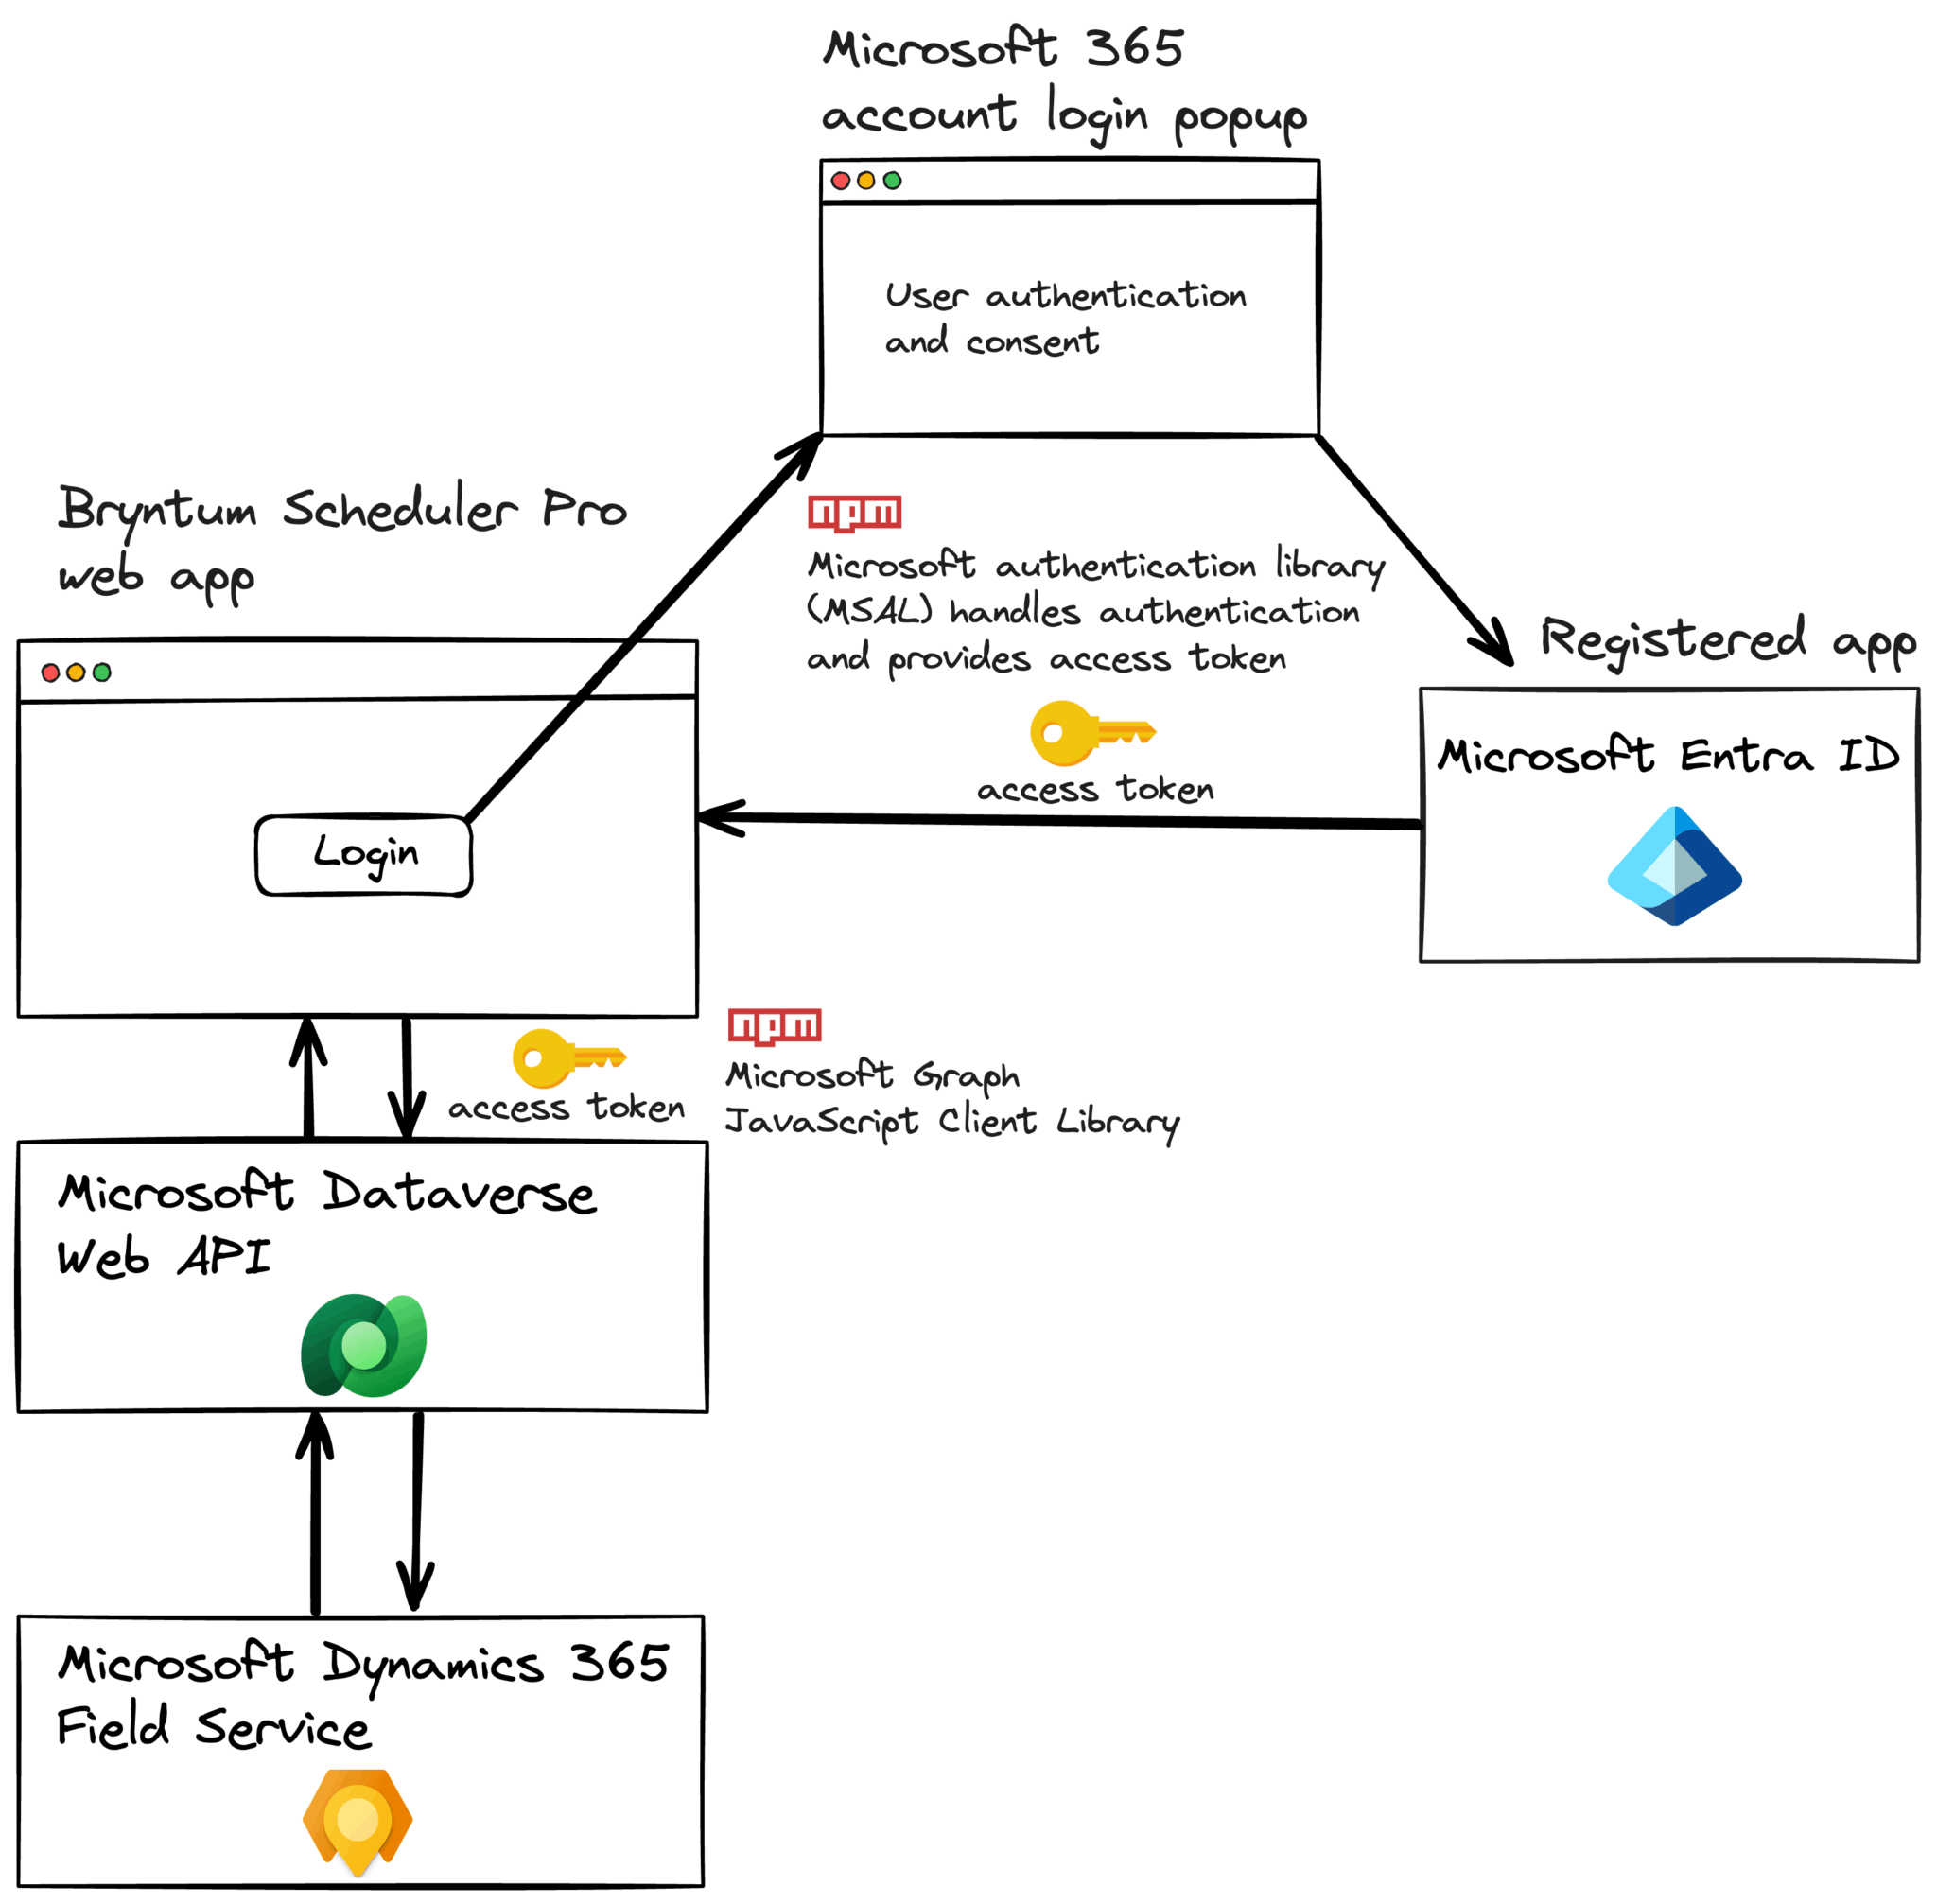
To get data using the Microsoft Dataverse Web API, your app needs to prove that you’re the owner of the app you just registered in Microsoft Entra. Your app will get an access token from Microsoft Entra and include it in each request to the Microsoft Dataverse Web API. After this is set up, users will be able to sign in to your app using their Microsoft 365 account. This means that you won’t have to implement authentication in your app or maintain users’ credentials.
The diagram below outlines how we’ll access the Microsoft Field Service work orders and resource bookings from the Bryntum Scheduler Pro web app. When a user logs into the app, Microsoft Entra ID is used to authenticate the user. The access token returned by Microsoft Entra ID will be used to connect to Microsoft Field Service via the Microsoft Dataverse Web API.
First, we’ll create the variables and functions we need for authentication and retrieving work orders and resource bookings from Microsoft Field Service. Then, we’ll add the Microsoft Authentication Library.
Create a .env.local file in the root directory of your Bryntum Scheduler Pro web app and add the following environment variables:
VITE_MICROSOFT_DYNAMICS_ORG_ID=""
VITE_MICROSOFT_ENTRA_APP_ID=""
VITE_MICROSOFT_ENTRA_TENANT_ID=""
Add your Microsoft Dynamics organization ID. You can find it in the URL of your Field Service environment: https://your-org-id.crm4.dynamics.com/. Add the Application (client) ID and the Directory (tenant) ID of your registered Microsoft Entra app. The variables are prefixed with VITE_ to expose them to the JavaScript app. Because the JavaScript app runs on the client side, these environment variables will be visible to users, which is fine in this case.
Install the Microsoft Authentication Library (MSAL) for single-page JavaScript web apps.
npm i @azure/msal-browserThis library enables authentication and authorization for web applications using the Microsoft identity platform. It simplifies the integration of secure sign-in and token acquisition for accessing protected resources.
Create a file called auth.js in the src directory and add the following code:
const msalConfig = {
    auth : {
        clientId  : import.meta.env.VITE_MICROSOFT_ENTRA_APP_ID,
        authority : `https://login.microsoftonline.com/${
    import.meta.env.VITE_MICROSOFT_ENTRA_TENANT_ID
  }`,
        redirectUri : 'http://localhost:5173'
    }
};
This code configures the MSAL for authentication with Microsoft Entra ID. The clientId is the unique ID of your Microsoft Entra app. The authority is the endpoint that MSAL will use to authenticate a user. The redirectUri is the URL that users will be redirected to after they’ve been authenticated.
Add the following imports to the top of the auth.js file:
import {
    PublicClientApplication,
    InteractionRequiredAuthError
} from '@azure/msal-browser';
Add the following code to the bottom of the file:
// Initialize a PublicClientApplication object.
const msalInstance =
  await PublicClientApplication.createPublicClientApplication(msalConfig);
const msalRequest = { scopes : [`https://${
    import.meta.env.VITE_MICROSOFT_DYNAMICS_ORG_ID
  }.api.crm4.dynamics.com/.default`] };

// Log the user in
export async function signIn() {
    const authResult = await msalInstance.loginPopup(msalRequest);
    sessionStorage.setItem('msalAccount', authResult.account.username);
}

export async function getToken() {
    const account = sessionStorage.getItem('msalAccount');
    if (!account) {
        throw new Error(
            'User info cleared from session storage. Please sign out and sign in again.'
        );
    }
    try {
        // First, attempt to get the token silently
        const silentRequest = {
            scopes  : msalRequest.scopes,
            account : msalInstance.getAccountByUsername(account)
        };
        const silentResult = await msalInstance.acquireTokenSilent(silentRequest);
        return silentResult.accessToken;
    }
    catch (silentError) {
        // If silent request fails with InteractionRequiredAuthError,
        // attempt to get the token interactively
        if (silentError instanceof InteractionRequiredAuthError) {
            const interactiveResult = await msalInstance.acquireTokenPopup(
                msalRequest
            );
            return interactiveResult.accessToken;
        }
        else {
            throw silentError;
        }
    }
}

export async function signOut() {
    const account = sessionStorage.getItem('msalAccount');
    if (account) {
        const logoutRequest = {
            account : msalInstance.getAccountByUsername(account)
        };
        await msalInstance.logoutPopup(logoutRequest);
        sessionStorage.removeItem('msalAccount');
    }
}
This code instantiates a PublicClientApplication object to use the MSAL.js library. The msalRequest variable stores the current MSAL request. It initially contains the .default scope for the D365 API.
Using .default means that when your app requests an access token from Microsoft Entra ID, the user is prompted to consent to the required permissions listed during the application registration. The list of permissions granted to your app forms part of the access token returned when a user logs in to the app.
The signIn function grants the user access and stores their access token in the browser’s session storage, and the getToken function retrieves the user’s access token from session storage.
The signOut function uses the username stored in session storage to sign the user out.
Using the Microsoft Dataverse Web API to access Microsoft Field Service work orders and resource bookings
We’ll use the Dataverse Web API to perform CRUD operations on the Bookable Resource and Bookable Resource Booking Dataverse tables. These tables represent the resources and bookings for work orders in Microsoft Field Service. The Dataverse Web API uses the Open Data Protocol (OData). You can use an OData library to make OData REST API requests. For simplicity, we’ll use the Fetch API in this tutorial.
Create a file in the src folder called crudFunctions.js and add the following lines of code:
import { getToken } from './auth.js';

const orgUrl = `https://${import.meta.env.VITE_MICROSOFT_DYNAMICS_ORG_ID}.api.crm4.dynamics.com`;
const apiVersion = 'v9.2';

export async function getResources() {
    const token = await getToken();

    const response = await fetch(
        `${orgUrl}/api/data/${apiVersion}/bookableresources?` +
        `$select=bookableresourceid,name&` +
        `$expand=ContactId($select=contactid,entityimage)`,
        {
            headers : {
                'Authorization'    : `Bearer ${token}`,
                'Accept'           : 'application/json',
                'OData-MaxVersion' : '4.0',
                'OData-Version'    : '4.0'
            }
        }
    );

    if (!response.ok) {
        throw new Error(`Failed to fetch resources: ${response.statusText}`);
    }

    return await response.json();
}
The getResources function uses the bookable resources Dataverse Web API endpoint to fetch the bookable Field Service resources. In the Authorization header, we pass in the access token from their Microsoft Entra ID login. The request URL has OData query options. The select parameter is used to select columns. To keep things simple, we only select some of the available fields in this guide.
We use the expand parameter to get related resources, which in this case is the contact ID and entity image of the contact table. The expand parameter performs a join query to get the contact information for the resource.
Add the following function to the bottom of the crudFunctions.js file:
export async function getBookings() {
    const token = await getToken();

    const response = await fetch(
        `${orgUrl}/api/data/${apiVersion}/bookableresourcebookings?` +
        `$select=bookableresourcebookingid,name,starttime,endtime,duration,msdyn_estimatedtravelduration,msdyn_estimatedarrivaltime&` +
        `$expand=Resource($select=bookableresourceid)`,
        {
            headers : {
                'Authorization'    : `Bearer ${token}`,
                'Accept'           : 'application/json',
                'OData-MaxVersion' : '4.0',
                'OData-Version'    : '4.0'
            }
        }
    );

    if (!response.ok) {
        const errorText = await response.text();
        console.error('Bookings API Error:', errorText);
        throw new Error(`Failed to fetch bookings: ${response.statusText}`);
    }

    return await response.json();
}
This function fetches the bookable Field Service resource bookings.
Adding Microsoft Field Service work orders and resource bookings to Bryntum Scheduler Pro
Let’s add a Microsoft 365 sign-in link to the Bryntum Scheduler Pro app.
Replace the contents of the <body> HTML tag in the index.html with the following:
<main>
  <div id="content" style="display: none">
    <div id="app"></div>
  </div>
  <div class="loader-container">
    <div class="loader"></div>
  </div>
  <a id="signin" href="#" style="display: none">
    <img
      src="./ms-symbollockup_signin_light.png"
      alt="Sign in with Microsoft"
    />
  </a>
</main>
Add the following styles to the src/styles.css file:
main {
  position: relative;
  height: 100vh;
}

#signin {
  position: absolute;
  top: 50%;
  left: 50%;
  transform: translate(-50%, -50%);
}

.loader-container {
  display: flex;
  justify-content: center;
  align-items: center;
  height: 100vh;
}

.loader {
  display: inline-block;
  width: 50px;
  height: 50px;
  border: 3px solid black;
  border-radius: 50%;
  border-top-color: #fff;
  animation: spin 1s ease-in-out infinite;
}

@keyframes spin {
  to { transform: rotate(360deg); }
}

@-webkit-keyframes spin {
  to {transform: rotate(360deg); }
}
Initially, the app will display the sign-in link only. When a user signs in, it will display the Bryntum Scheduler Pro.
In the src/main.js file, add the following lines to store the “Sign in with Microsoft” link element object and loader container in variables:
const signInLink = document.getElementById('signin');
const loaderContainer = document.querySelector('.loader-container');
Remove the Scheduler Pro instantiation code and add the following function to the bottom of the file:
async function displayUI() {
    const account = sessionStorage.getItem('msalAccount');
    if (!account) {
        await signIn();
    }
    signInLink.style = 'display: none';
    const content = document.getElementById('content');
    content.style = 'display: block';

    // Display Scheduler Pro after sign in
    // Wait for resources, bookings, and default image to load
    const [resourcesData, bookingsData] = await Promise.all([
        getResources(),
        getBookings(),
        loadDefaultImage()
    ]);

    // Initialize Scheduler Pro with raw D365 data
    // Field mapping is handled by CustomEventModel and CustomResourceModel
    window.schedulerPro = new SchedulerPro({
        ...schedulerproConfig,
        resourceStore : {
            data       : resourcesData.value
        },
        eventStore : {
            data       : bookingsData.value
        }
    });
}
Remove the example inline events and resources data from the src/schedulerproConfig.js file:
project : {

    resources : [
        { id : 1, name : 'Dan Stevenson' },
        { id : 2, name : 'Talisha Babin' }
    ],

    events : [
        { id : 1, startDate : '2025-12-01', duration : 3, durationUnit : 'd', name : 'Event 1' },
        { id : 2, duration : 4, durationUnit : 'd', name : 'Event 2' }
    ],

    assignments : [
        { event : 1, resource : 1 },
        { event : 2, resource : 2 }
    ],

    dependencies : [
        { fromEvent : 1, toEvent : 2 }
    ]
}
Add the signIn, getResources, and getBookings function imports to the top of the src/main.js file:
import { signIn } from './auth.js';
import { getResources, getBookings } from './crudFunctions.js';
The displayUI function calls the signIn function in auth.js to sign the user in to the app. Once the user is signed in, the sign-in link is hidden, and the Bryntum Scheduler Pro is displayed. The getResources and getBookings functions fetch the Field Service data, which are added to the Scheduler Pro’s resourceStore and eventStore. We load the data inline, but if you have control of the backend, use the Bryntum Crud Manager to simplify the data loading and syncing. Update the startDate and endDate properties in the schedulerproConfig object to match the time range of your Field Service bookings. These properties control the initial visible timeline in the Scheduler Pro.
Now add code to the bottom of the src/main.js file to display the correct HTML elements, as well as a click event listener to the “Sign in with Microsoft” link:
if (sessionStorage.getItem('msalAccount')) {
    displayUI();
    signInLink.style = 'display: none';
}
else {
    signInLink.style = 'display: block';
}

loaderContainer.style = 'display: none';

signInLink.addEventListener('click', displayUI);
Some of the Field Service bookable resources and bookable resource bookings fields, such as the ETag, don’t have an equivalent field in the Bryntum Scheduler Pro events. The ETag is used to determine the change in the content of a resource at a given URL.
We need to create custom Bryntum Scheduler Pro resource and event models to add these fields and map the Microsoft Field Service data field names to the Bryntum Scheduler Pro data model field names.
Create a lib folder in the src directory and create a CustomEventModel.js file inside it. Add the following lines of code to the CustomEventModel.js file:
import { EventModel } from '@bryntum/schedulerpro';

// Custom event model for D365 Field Service bookings
export default class CustomEventModel extends EventModel {
    static $name = 'CustomEventModel';

    static fields = [
        { name : 'id', dataSource : 'bookableresourcebookingid' },
        { name : 'bookableresourcebookingid', type : 'string' },
        { name : 'startDate', dataSource : 'msdyn_estimatedarrivaltime', type : 'date' },
        { name : 'endDate', dataSource : 'endtime', type : 'date' },
        { name : 'durationUnit', defaultValue : 'minute' },
        // Store the raw travel duration value
        { name : 'travelDuration', dataSource : 'msdyn_estimatedtravelduration', type : 'number' },
        {
            name    : 'preamble',
            type    : 'string',
            convert : (_value, data) => {
                // Only convert when loading from D365 (data will have msdyn_estimatedtravelduration)
                if (data && data.msdyn_estimatedtravelduration != null) {
                    return `${data.msdyn_estimatedtravelduration} minutes`;
                }
                // Return null to let the raw value pass through
                return null;
            }
        },
        { name : 'resourceId', dataSource : 'Resource.bookableresourceid' },
        {
            name    : 'etag',
            type    : 'string',
            convert : (_value, data) => {
                const raw = data['@odata.etag'];
                return raw ? raw.replace(/\\"/g, '"') : null;
            }
        }
    ];
}
This extends the Bryntum Scheduler Pro EventModel to include some of the specific Microsoft Field Service bookable resource booking fields. It also maps the Microsoft Field Service data field names to the Bryntum Scheduler Pro data model field names using the dataSource property. We use the convert method to convert the Microsoft Field Service data values into a form suitable for the Bryntum Scheduler Pro.
Create a CustomResourceModel.js file in the src/lib folder and add the following lines of code:
import { ResourceModel } from '@bryntum/schedulerpro';
import { getToken } from '../auth.js';

// Fetch and cache the default unknown resource image
let defaultResourceImageBase64 = null;
const defaultImageUrl = `https://${import.meta.env.VITE_MICROSOFT_DYNAMICS_ORG_ID}.crm4.dynamics.com/Webresources/msdyn_/fps/ScheduleBoard/css/images/unknownResource.jpg`;

// Function to load the default image (called after authentication)
export async function loadDefaultImage() {
    // Return immediately if already loaded
    if (defaultResourceImageBase64) {
        return;
    }

    try {
        const token = await getToken();
        const response = await fetch(defaultImageUrl, {
            headers : {
                'Authorization'    : `Bearer ${token}`,
                'Accept'           : 'application/json',
                'OData-MaxVersion' : '4.0',
                'OData-Version'    : '4.0'
            }
        });

        if (!response.ok) {
            throw new Error(`Failed to fetch default resource image: ${response.statusText}`);
        }

        const blob = await response.blob();

        // Convert blob to base64 using a promise-based approach
        defaultResourceImageBase64 = await new Promise((resolve, reject) => {
            const reader = new FileReader();
            reader.onloadend = () => resolve(reader.result);
            reader.onerror = reject;
            reader.readAsDataURL(blob);
        });
    }
    catch (error) {
        console.error('Failed to fetch default resource image:', error);
    }
}

// Custom resource model for D365 Field Service bookable resources
export default class CustomResourceModel extends ResourceModel {
    static $name = 'CustomResourceModel';

    static fields = [
        { name : 'id', dataSource : 'bookableresourceid' },
        { name : 'bookableresourceid', type : 'string' },
        {
            name    : 'imageUrl',
            type    : 'string',
            convert : (_value, data) => {
                const entityImage = data.ContactId?.entityimage;
                if (entityImage) {
                    // entityimage is base64 encoded, convert to data URL
                    return `data:image/jpeg;base64,${entityImage}`;
                }
                // Return the default resource image if available
                return defaultResourceImageBase64;
            }
        },
        {
            name    : 'etag',
            type    : 'string',
            convert : (_value, data) => {
                const raw = data['@odata.etag'];
                return raw ? raw.replace(/\\"/g, '"') : null;
            }
        }
    ];
}
We use the convert method to get a Base64-encoded image URL for the imageUrl field.
Import these custom data models into the src/main.js file:
import CustomEventModel from './lib/CustomEventModel.js';
import CustomResourceModel, { loadDefaultImage } from './lib/CustomResourceModel.js';
Update the displayUI function in src/main.js to use these custom data models. Modify the Scheduler Pro instantiation to include both modelClass properties:
resourceStore : {
    modelClass : CustomResourceModel,
    data       : resourcesData.value
},
eventStore : {
    modelClass : CustomEventModel,
    data       : bookingsData.value
}
In the src/schedulerproConfig.js file, replace the columns configuration with the following:
viewPreset : 'hourAndDay',
columns : [
    {
        text          : 'Name',
        field         : 'name',
        readOnly      : true,
        cellMenuItems : false,
        width         : 200,
        htmlEncode    : false,
        renderer({ record }) {
            const imageUrl = record.imageUrl;
            const name = record.name || '';

            return `<div style="display: flex; align-items: center; gap: 8px;">
                <img src="${imageUrl}" style="width: 32px; height: 32px; border-radius: 50%; object-fit: cover;" />
                <span>${name}</span>
            </div>`;
        }
    }
],
This renders the resource name and image in the resource column cells.
Now add the following features configuration to the schedulerproConfig object:
features : {
    dependencies : false,
    eventBuffer  : {
        // The event buffer time spans are considered as unavailable time
        bufferIsUnavailableTime : true,
        tooltipTemplate         : ({ duration }) => `<i class="fa fa-car"></i>Travel time: ${duration}`
    },

    taskEdit : {
        items : {
            generalTab : {
                items : {
                    percentDoneField : null,
                    effortField      : null,
                    postambleField   : null,
                    preambleField    : null
                }
            }
        }
    }
},
We disable the dependencies feature because Field Service doesn’t support dependencies. The eventBuffer feature lets you display the travel time. In this case, it will just display the preamble field value to the left of the event bars. We modify the taskEdit feature that configures the Task editor popup to disable unused fields.
Add the following Toolbar widget configuration to the schedulerproConfig object:
tbar : {
    items : {
        deleteButton : {
            text  : 'Sign out',
            icon  : 'fa fa-sign-out',
            style : 'margin-left: auto;',
            onClick() {
                signOut().then(() => {
                    // Refresh the page after sign out
                    location.reload();
                });
            }
        }
    }
}
We’ll then add a sign-out button to the toolbar.
Import the signOut function at the top of the file:
import { signOut } from './auth.js';Add the following styles for the travel time indicator to the src/styles.css file:
.b-sch-horizontal .b-sch-event-wrap .b-sch-event-buffer-before:not(.b-buffer-thin){
  border-inline-start:3px solid #ccc;
}
.b-sch-horizontal .b-sch-event-wrap .b-sch-event-buffer-after:not(.b-buffer-thin){
  border-inline-end:3px solid #ccc;
}
.b-sch-horizontal .b-sch-event-wrap .event-duration{
  margin-top:0.3em;
}
.b-sch-horizontal .b-sch-event-wrap .b-sch-event:not(.b-milestone) .fa{
  margin-inline-end:0.75em;
}

.b-sch-vertical .b-sch-event-wrap .b-sch-event-buffer-before:not(.b-buffer-thin){
  border-top:3px solid #ccc;
}
Now run the dev server:
npm run devYou’ll now see the sign-in link button. Sign in to see your Microsoft Field Service work orders and resource bookings in the Bryntum Scheduler Pro.
⚠️ Note that in Microsoft Field Service, dates are stored in UTC, while the Bryntum Scheduler Pro uses the local timezone of the user’s browser.
Syncing changes in the Bryntum Scheduler Pro to Microsoft Field Service
Now that we’ve connected our Scheduler Pro to Microsoft Field Service, let’s create the functions needed to implement the rest of the CRUD functionality using the Microsoft Dataverse Web API. Updates to Bryntum Scheduler Pro events will update the Field Service work order bookings.
Creating bookings
In the src/crudFunctions.js file, add the following createBooking function:
export async function createBooking(bookingData) {
    const token = await getToken();

    const response = await fetch(
      `${orgUrl}/api/data/${apiVersion}/bookableresourcebookings`,
      {
          method  : 'POST',
          headers : {
              'Authorization'    : `Bearer ${token}`,
              'Content-Type'     : 'application/json',
              'OData-MaxVersion' : '4.0',
              'OData-Version'    : '4.0',
              'Prefer'           : 'return=representation'
          },
          body : JSON.stringify(bookingData)
      }
    );

    if (!response.ok) {
        throw new Error(`Failed to create booking: ${response.statusText}`);
    }

    return await response.json();
}
This function makes a POST request to the Microsoft Field Service bookableresourcebookings API to create a new booking.
Updating bookings
Add the following updateBooking function to the bottom of the crudFunctions.js file:
export async function updateBooking(bookingId, updates) {
    // Safety check: don't try to update records that haven't been created yet
    if (`${bookingId}`.startsWith('_generated')) {
        console.error('Cannot update booking with generated ID:', bookingId);
        throw new Error('Cannot update a booking that has not been created in D365. Use createBooking instead.');
    }

    const token = await getToken();

    const response = await fetch(
        `${orgUrl}/api/data/${apiVersion}/bookableresourcebookings(${bookingId})`,
        {
            method  : 'PATCH',
            headers : {
                'Authorization'    : `Bearer ${token}`,
                'Content-Type'     : 'application/json',
                'Accept'           : 'application/json',
                'OData-MaxVersion' : '4.0',
                'OData-Version'    : '4.0'
            },
            body : JSON.stringify(updates)
        }
    );

    if (!response.ok) {
        const errorText = await response.text();
        console.error('Update booking failed:', response.status, errorText);
        throw new Error(`Failed to update booking: ${response.status} ${response.statusText}`);
    }
}
This function makes a PATCH request to the Microsoft Field Service bookableresourcebookings API to update a booking.
Deleting bookings
Add the following deleteBooking function to the bottom of the crudFunctions.js file:
export async function deleteBooking(bookingId) {
    // Don't try to delete records that were never created
    if (`${bookingId}`.startsWith('_generated')) {
        return;
    }

    const token = await getToken();

    const response = await fetch(
        `${orgUrl}/api/data/${apiVersion}/bookableresourcebookings(${bookingId})`,
        {
            method  : 'DELETE',
            headers : {
                'Authorization'    : `Bearer ${token}`,
                'OData-MaxVersion' : '4.0',
                'OData-Version'    : '4.0'
            }
        }
    );

    if (!response.ok) {
        throw new Error(`Failed to delete booking: ${response.statusText}`);
    }
}
This function makes a DELETE request to the bookableresourcebookings API.
Import these CRUD functions at the top of the src/schedulerproConfig.js file:
import { createBooking, updateBooking, deleteBooking } from './crudFunctions.js';Using data change event listeners and CRUD methods to sync Bryntum Scheduler Pro event changes with Microsoft Field Service
Add the following listeners property to the schedulerproConfig object in the src/schedulerproConfig.js file:
listeners : {
    afterEventSave({ eventRecord, source }) {
        if (eventRecord.id.startsWith('_generated')) {
            createBookingItem(eventRecord, source);
        }
        // Updates are handled by dataChange listener
    },

    dataChange : function(event) {
        updateDynamics365FieldService(event);
    }
},
The dataChange event occurs when a data change takes place in the Bryntum Scheduler Pro. The afterEventSave event happens when the Save button is clicked in the Task editor popup.
Add the following createBookingItem function to the bottom of the src/schedulerproConfig.js file:
async function createBookingItem(eventRecord, source) {
    try {
        const recordData = eventRecord.data;

        // Get the resource ID from the event's resource assignment
        const resourceId = recordData.Resource?.bookableresourceid ||
                         eventRecord.resources?.[0]?.id ||
                         eventRecord.resources?.[0]?.bookableresourceid;

        if (!resourceId) {
            console.log('Cannot create booking - no resource assigned');
            return;
        }

        const bookingData = {
            name                  : recordData.name,
            'Resource@odata.bind' : `/bookableresources(${resourceId})`,
            starttime             : recordData.msdyn_estimatedarrivaltime?.toISOString() || recordData.startDate?.toISOString(),
            endtime               : recordData.endtime?.toISOString() || recordData.endDate?.toISOString(),
            duration              : Math.round(recordData.duration)
        };

        const newBooking = await createBooking(bookingData);
        const newId = newBooking.bookableresourcebookingid;

        // Update the event with the real D365 ID
        source.project.eventStore.applyChangeset({
            updated : [
                {
                    $PhantomId                : eventRecord.id,
                    id                        : newId,
                    bookableresourcebookingid : newId
                }
            ]
        });
    }
    catch (error) {
        console.error('Error creating booking in D365:', error);
    }
}
The createBookingItem function is called when a user creates a new event in the Scheduler Pro and clicks the Save button in the Task editor. It takes the eventRecord (the new event) and source (the Scheduler Pro instance) as arguments.
The function first extracts the resource ID from the event’s resource assignment, which identifies which Field Service resource the booking should be assigned to. It then formats the event data to match the structure expected by the Microsoft Dataverse Web API, mapping Scheduler Pro field names to their Field Service equivalents. The @odata.bind annotation establishes the relationship between the booking and the resource.
After successfully creating the booking in Field Service via the createBooking function, the new booking’s ID is retrieved from the response. The function then updates the event in the Scheduler Pro’s event store using applyChangeset, replacing the temporary generated ID with the real Field Service ID. This ensures that subsequent updates to the event will correctly reference the Field Service booking ID.
Next, add the following updateDynamics365FieldService function to the bottom of the src/schedulerproConfig.js file:
async function updateDynamics365FieldService(event) {
    const { action, store, records } = event;
    const storeId = store.id;

    // Only handle events store (bookings)
    if (storeId !== 'events') {
        return;
    }

    try {
        if (action === 'remove') {

        }
        else if (action === 'update') {

        }
    }
    catch (error) {
        console.error('Error syncing to D365:', error);
    }
}
The updateDynamics365FieldService function is the main synchronization handler that responds to data changes in the Scheduler Pro.
This function doesn’t handle creating bookings, which is instead handled by the afterEventSave listener.
Add the following for loop to the if statement where action is equal to remove:
for (const record of records) {
    const recordData = record.data;
    // Skip if this is a generated ID (never saved to D365)
    if (`${recordData?.id}`.startsWith('_generated')) {
        continue;
    }

    if (recordData.bookableresourcebookingid) {
        await deleteBooking(recordData.bookableresourcebookingid);
    }
}
This code handles the deletion of bookings. It iterates through each removed record and checks if the record has a valid Field Service ID. Records with IDs starting with _generated are skipped because they were never saved to D365. For records that have a valid bookableresourcebookingid, the function calls deleteBooking to remove them from Microsoft Field Service via the Dataverse Web API.
Now add the following for loop to the if statement where action is equal to update:
for (const record of records) {
    const recordData = record.data;

    // Skip new records with generated IDs - they're handled by afterEventSave
    if (`${record.id}`.startsWith('_generated')) {
        continue;
    }

    const modifiedFields = record.meta?.modified || {};

    if (Object.keys(modifiedFields).length === 0) {
        continue;
    }

    const bookingUpdates = {};

    // Get travel duration from the travelDuration field (mapped to msdyn_estimatedtravelduration)
    let travelMinutes = null;
    if (recordData?.preamble) {
        travelMinutes = DateHelper.parseDuration(recordData.preamble).magnitude;
    }

    // Check if any time-related field changed
    const hasTimeChange = 'startDate' in modifiedFields || 'endDate' in modifiedFields || 'duration' in modifiedFields;

    // Build update payload from modified fields
    Object.keys(modifiedFields).forEach(key => {
        switch (key) {
            case 'name':
                bookingUpdates.name = record.name;
                break;
            case 'startDate':
            case 'endDate':
            case 'duration':
                // Time fields are handled together below
                break;
            case 'resourceId': {
                // Get the resource ID from the event's resource assignment
                const resourceId = recordData.Resource?.bookableresourceid || record.resources?.[0]?.id || record.resources?.[0]?.bookableresourceid;
                if (resourceId) {
                    bookingUpdates['Resource@odata.bind'] = `/bookableresources(${resourceId})`;
                }
                break;
            }
        }
    });

    // Handle all time fields together when any time field changes
    if (hasTimeChange) {
        const hasStartChange = 'startDate' in modifiedFields;
        const hasEndChange = 'endDate' in modifiedFields;

        if (hasStartChange) {
            // Calculate starttime by subtracting travel from work start time
            // Field Service will calculate msdyn_estimatedarrivaltime = starttime + travel
            const workStartTime = record.startDate;
            const actualStartTime = new Date(workStartTime.getTime());
            actualStartTime.setMinutes(actualStartTime.getMinutes() - travelMinutes);

            bookingUpdates.starttime = actualStartTime.toISOString();
        }

        if (hasEndChange) {
            const workEndTime = record.endDate;
            const actualEndTime = new Date(workEndTime.getTime());
            actualEndTime.setMinutes(actualEndTime.getMinutes() - travelMinutes);

            bookingUpdates.endtime = actualEndTime.toISOString();
        }
    }

    if (Object.keys(bookingUpdates).length > 0 && recordData.bookableresourcebookingid) {
        await updateBooking(recordData.bookableresourcebookingid, bookingUpdates);
    }
}
Import the DateHelper at the top of the file:
import { DateHelper } from '@bryntum/schedulerpro';This code handles updates to existing bookings. It iterates through each modified record and checks if the record has a generated ID, which indicates that it hasn’t been saved to Field Service yet. If so, it skips it because new records are handled by the afterEventSave listener.
Time-related fields (startDate, endDate, and duration) require special handling because of travel time in Field Service. In the Scheduler Pro, the event’s start time represents when work begins at the customer location (after travel), but D365 Field Service’s starttime field represents when the resource departs for the customer location (before travel). The correct starttime is calculated by subtracting the travel duration from the work start time. This ensures that when D365 recalculates the estimated arrival time, it matches the Scheduler Pro’s display.
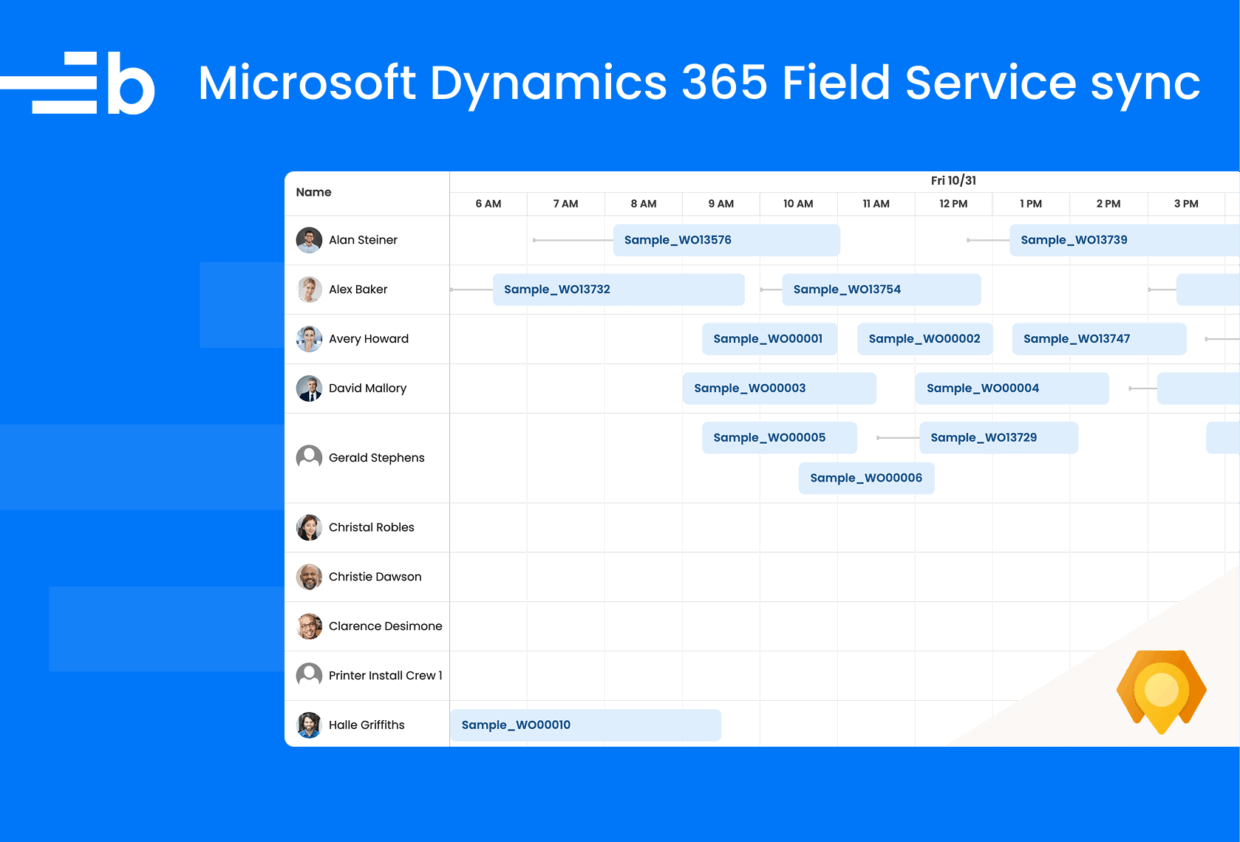
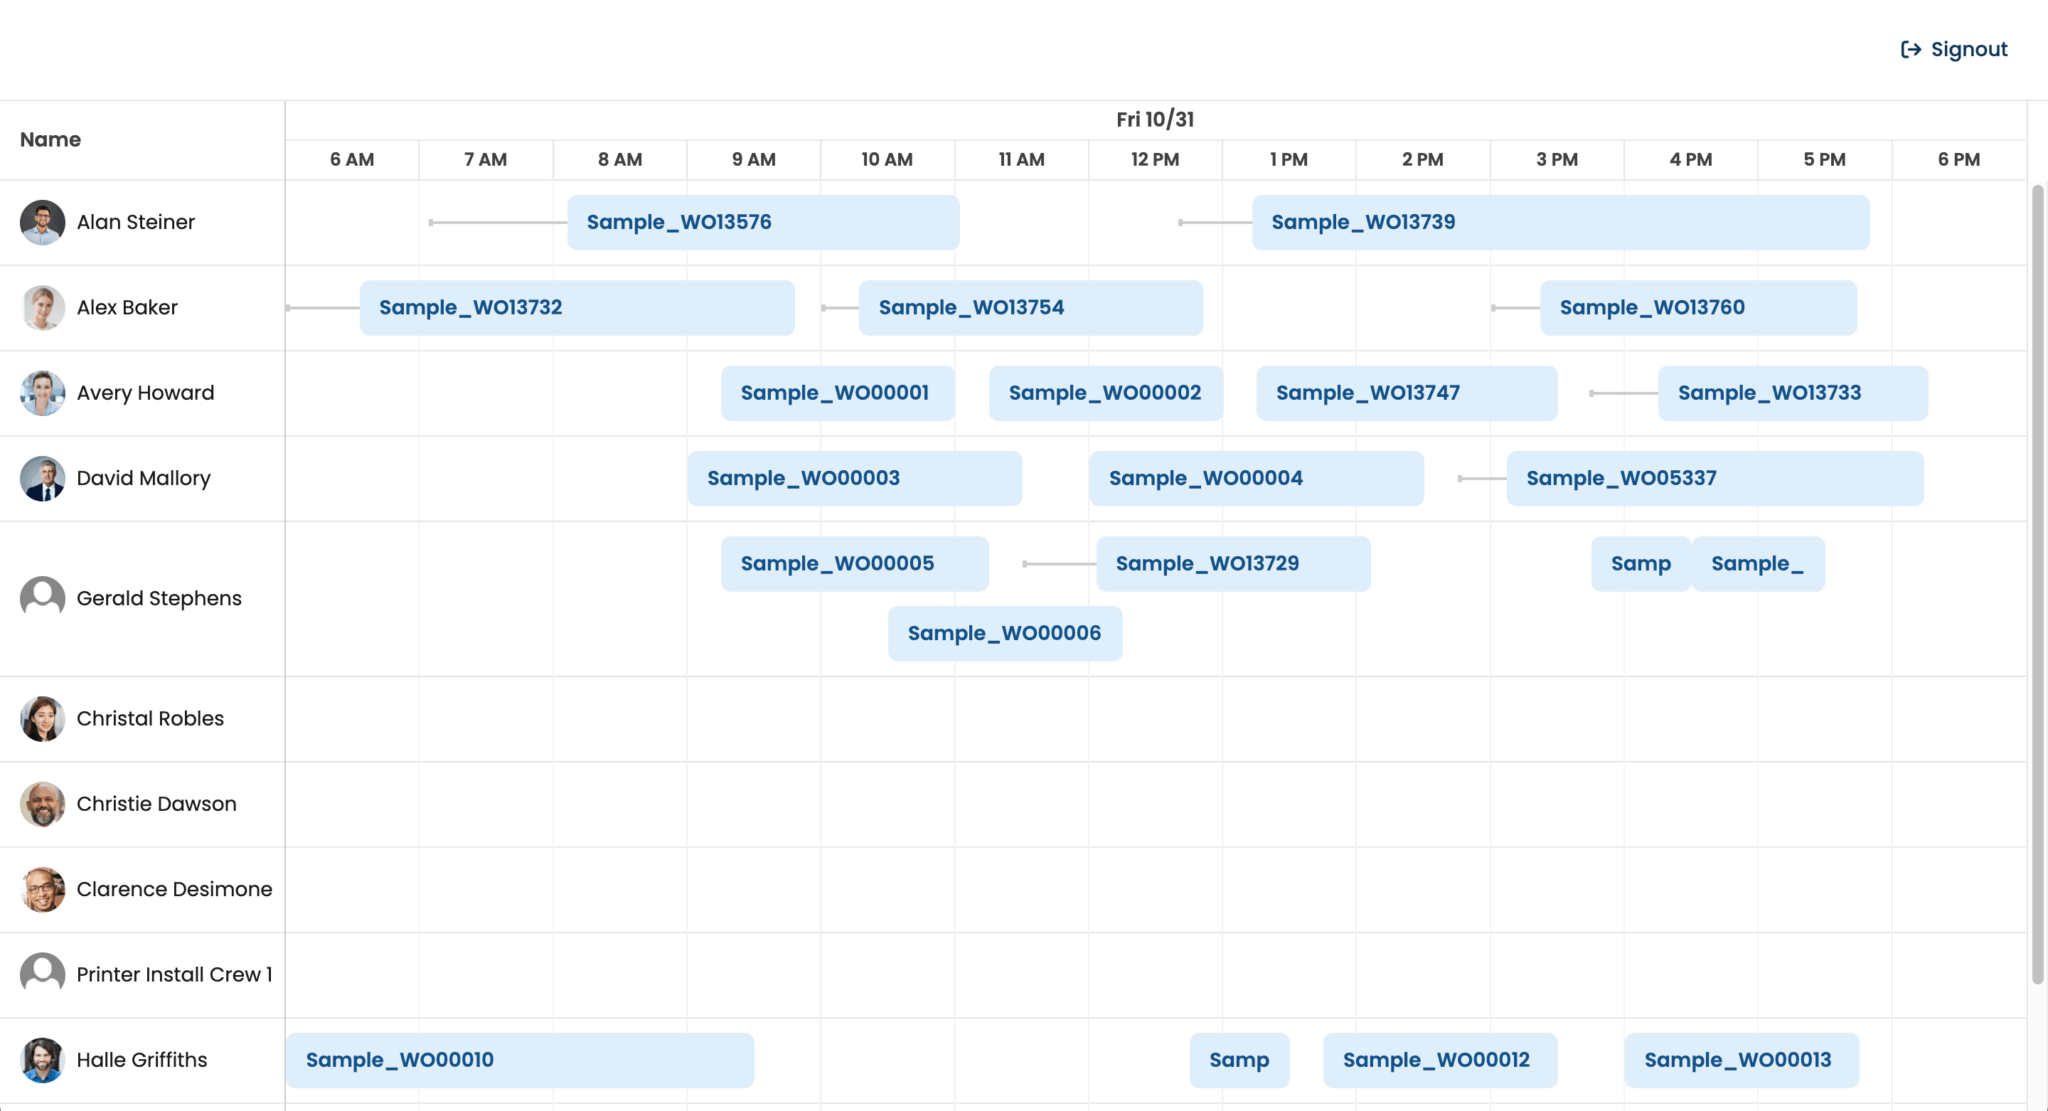
When you run the local dev server, you’ll see the final app:
Changes to the events in the Bryntum Scheduler Pro are synced back to Microsoft Field Service.
In the Bryntum Scheduler Pro, travel time is displayed but isn’t editable. If you change an event’s date that has a travel time and refresh the page, you may see that the travel time has changed. Microsoft Field Service automatically recalculates the travel time based on several factors, including resource location, work order location, and optimal route.
Displaying the Field Service saving state
When you make changes to events in the Bryntum Scheduler Pro, the updates may take a few seconds to propagate to Microsoft Field Service. Let’s add a loading indicator to the Toolbar to display the saving state.
In the src/schedulerproConfig.js file, add the following item to the items object in the schedulerproConfig tbar configuration object:
savingStatus : {
    type   : 'container',
    layout : 'hbox',
    items  : {
        label       : 'Saving status:',
        savingValue : 'Idle'
    }
},
This adds a container widget that has a label widget, which we’ll use to display the saving state.
Add the following function to the bottom of the src/schedulerproConfig.js file:
const updateSavingValue = (text = 'Idle', color = 'green') => {
    if (window.schedulerPro) {
        const { savingValue } = window.schedulerPro.widgetMap;
        if (savingValue) {
            savingValue.html = text;
            savingValue.element.style.color = color;
        }
    }
};
This function updates the text and color of the savingStatus toolbar item.
Call the function with the following text and color values just above the try blocks in the createBookingItem and updateDynamics365FieldService functions:
updateSavingValue('Updating Field Service', 'orange');Call the function with no arguments in the !resourceId if block of the createBookingItem function as well as at the bottom of the createBookingItem and updateDynamics365FieldService functions:
updateSavingValue();Call the function with the following text and color values in the catch block of the createBookingItem and updateDynamics365FieldService functions:
updateSavingValue('Error', 'red');
setTimeout(() => updateSavingValue(), 5000);
You’ll now see the saving status in the Toolbar when you make changes to events in the Bryntum Scheduler Pro:
Next steps
This tutorial showed you how to connect Bryntum Scheduler Pro to Microsoft Dynamics 365 Field Service data. Connecting to other Microsoft Dynamics 365 apps is similar.
Take a look at our Bryntum Scheduler Pro demos page to see which features you can add next. For example, the Scheduler Pro with maps example shows you how to integrate with Mapbox to display events on a map alongside the timeline view.