How to build a Gantt chart into Microsoft Teams with Bryntum

Looking for a way to streamline your team’s project management process? Look no further! A Gantt chart is a powerful tool for visualizing and managing project timelines and it’s especially useful for teams working on complex projects: Team members can clearly see the progress of a project, identify potential roadblocks, and make necessary adjustments in real-time.
Integrating a Gantt chart into your team’s workflow in your Microsoft Teams account changes the game. Your team has easy access to the most up-to-date project information along with the collaboration tools of Microsoft Teams. No more relying on outdated spreadsheets and confusing project-management software.
In this tutorial, we’ll guide you through the process of setting up your own Bryntum Gantt application in Microsoft Teams and show you how to customize it to meet the specific needs of your team.
You can find the finished code for this tutorial in the Bryntum Gantt Microsoft 365 Agents Toolkit Tab App GitHub repository.
What you’ll need
We will work from starter code hosted on GitHub to create our app. You’ll need a few other tools too:
- Visual Studio Code (VS Code)
- Microsoft 365 Agents Toolkit, a Microsoft Visual Studio Code extension that creates a project scaffolding for your app
- Node.js
- Microsoft Teams
- Microsoft Edge or Google Chrome
Set up a new blank Tab app in Teams
To create a new blank app in Teams, you first need to install the Microsoft 365 Agents Toolkit. The Agents Toolkit provides several useful tools that help in the app development process, such as tools for provisioning and deploying cloud resources and enabling you to publish the app to the Teams store.
Install Microsoft 365 Agents Toolkit
Open VS Code and navigate to the Extensions tab. Search for Microsoft 365 Agents Toolkit and select Install next to it.
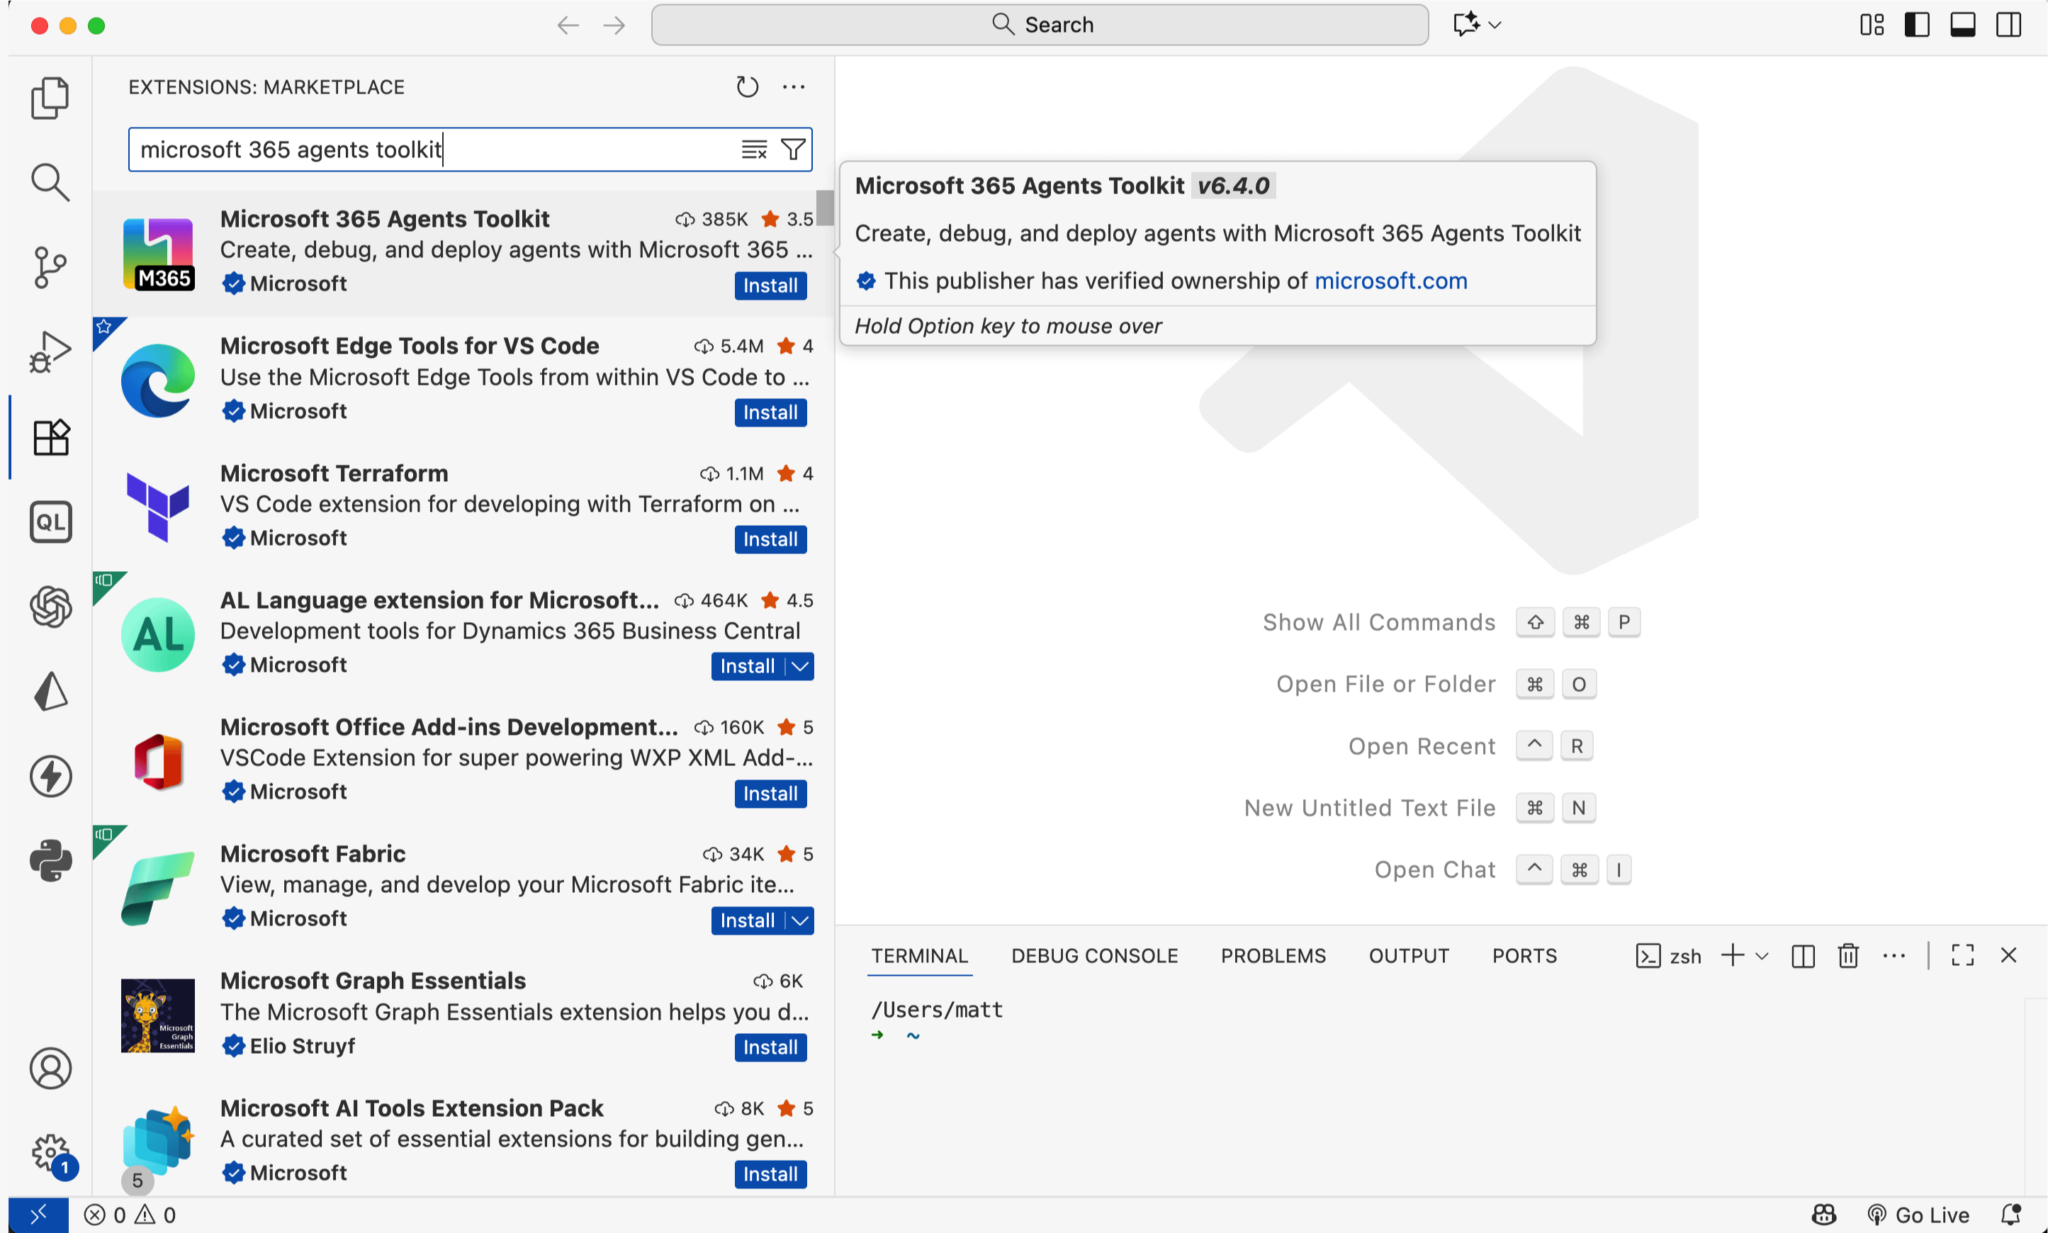
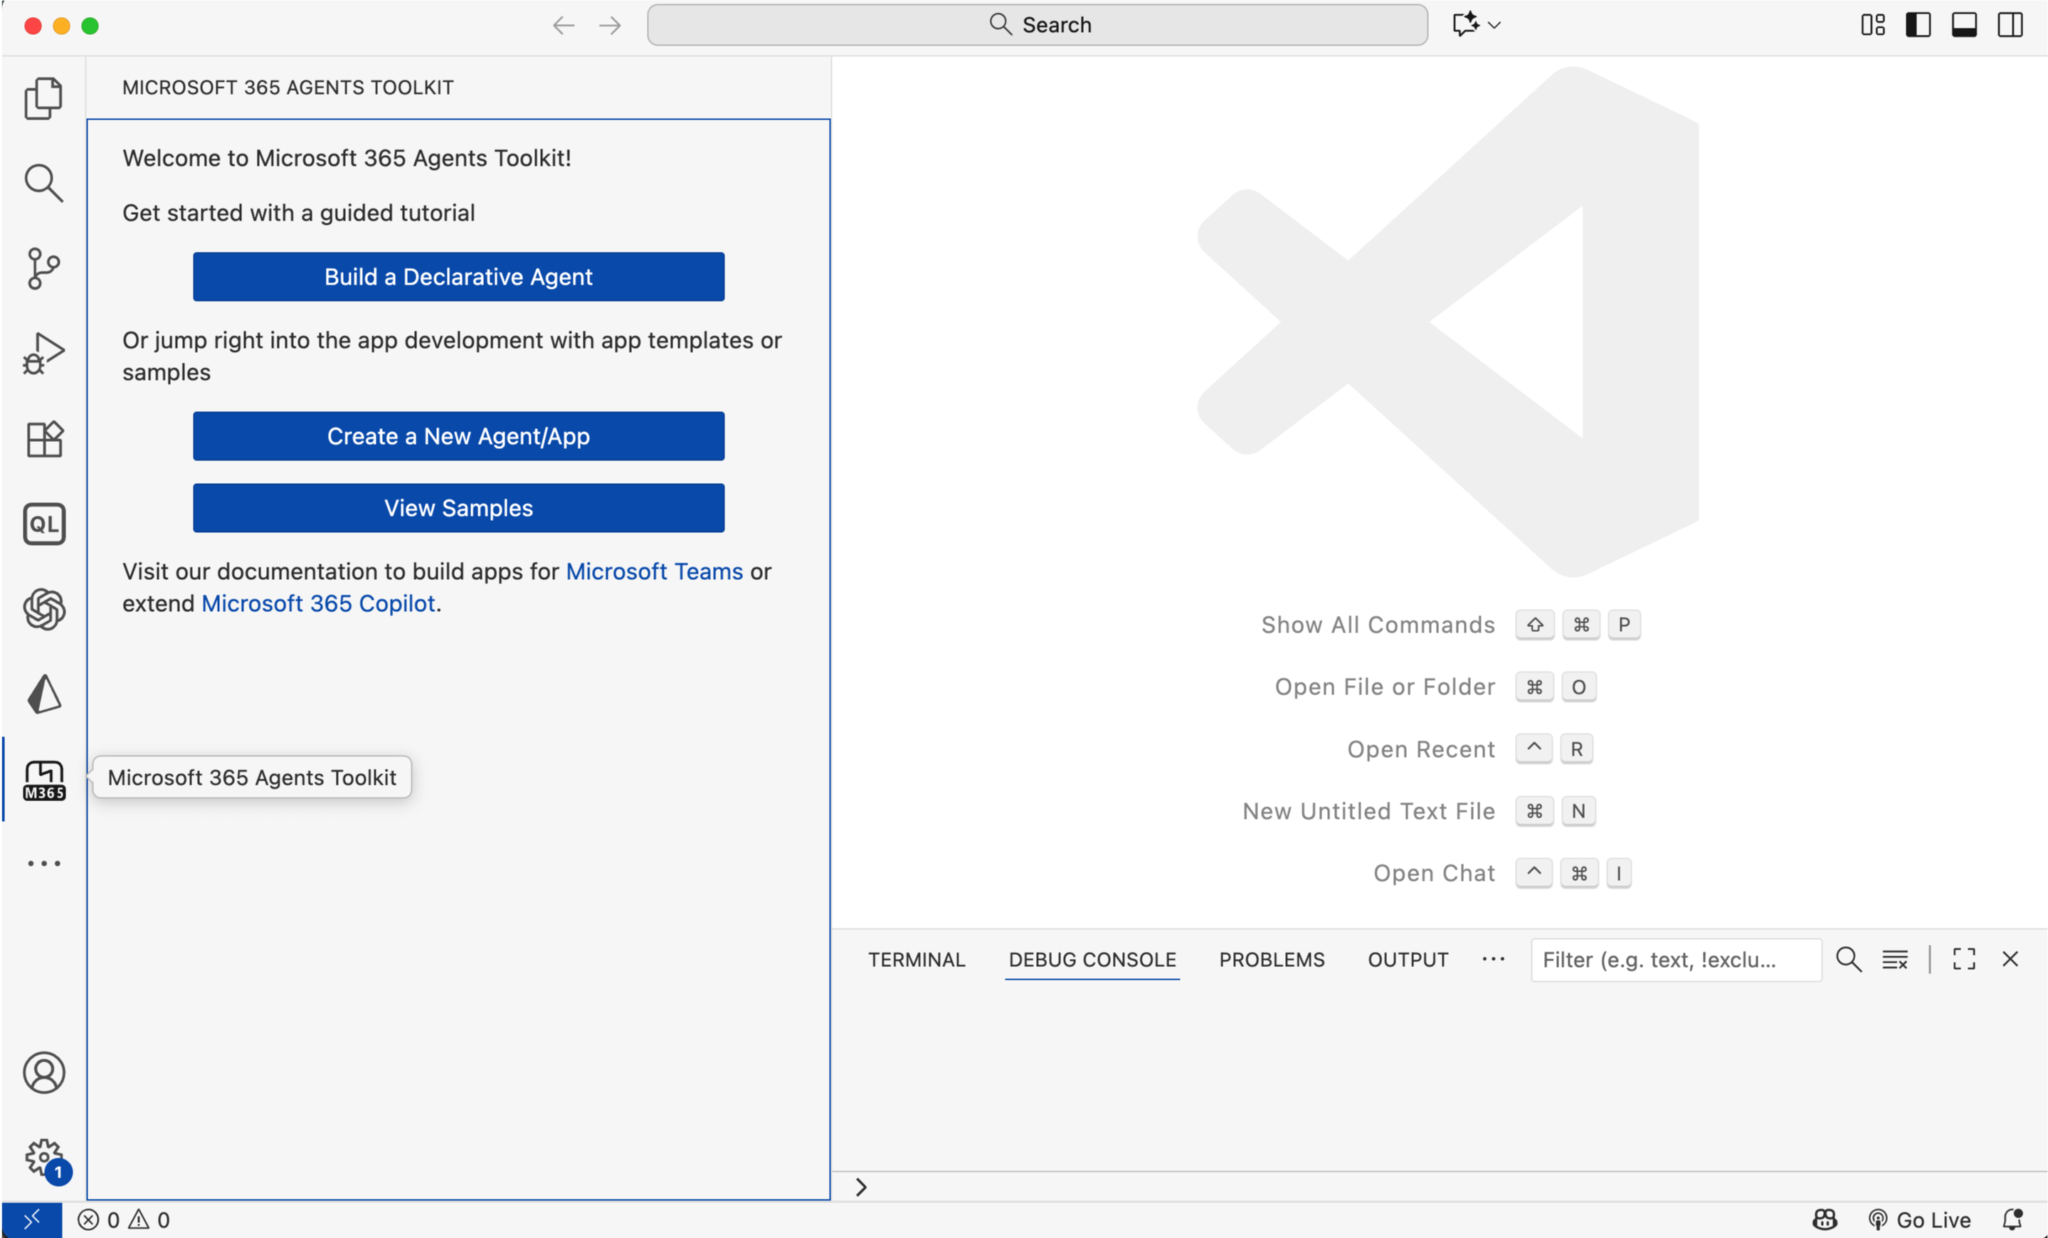
Once installed, you’ll see the Agents Toolkit icon appear in the VS Code Activity Bar.
Check that sideloading is enabled
We will use the Agents Toolkit for previewing and testing our app, a process known as sideloading. You will need to have a Microsoft tenant with admin access or a Microsoft Developer account to proceed.
If you don’t have a Microsoft Developer account, you’ll need to enable custom app uploading in Teams.
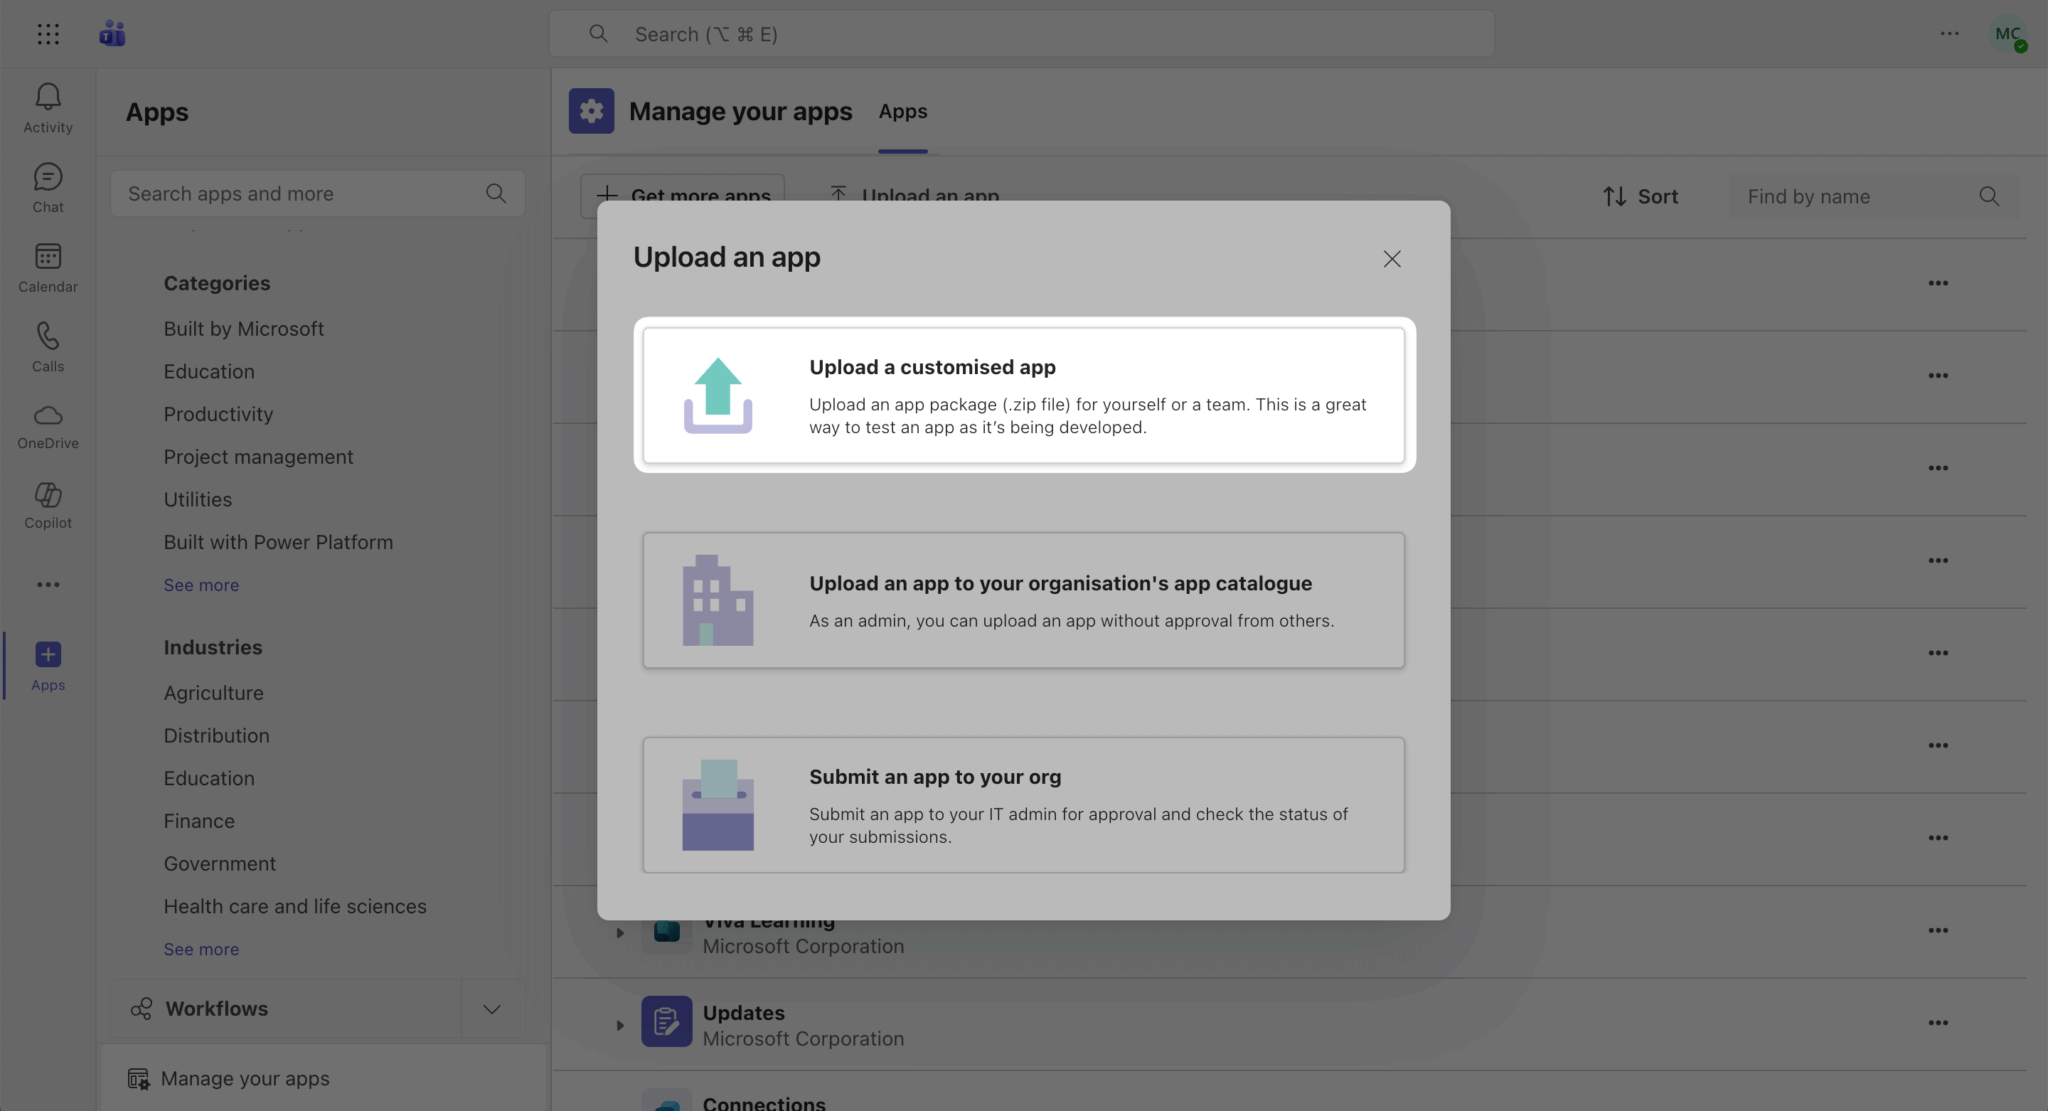
To check whether your account has a tenant with admin access, log in to Teams, open the Apps page in the left-hand sidebar, then open the Manage your apps tab.
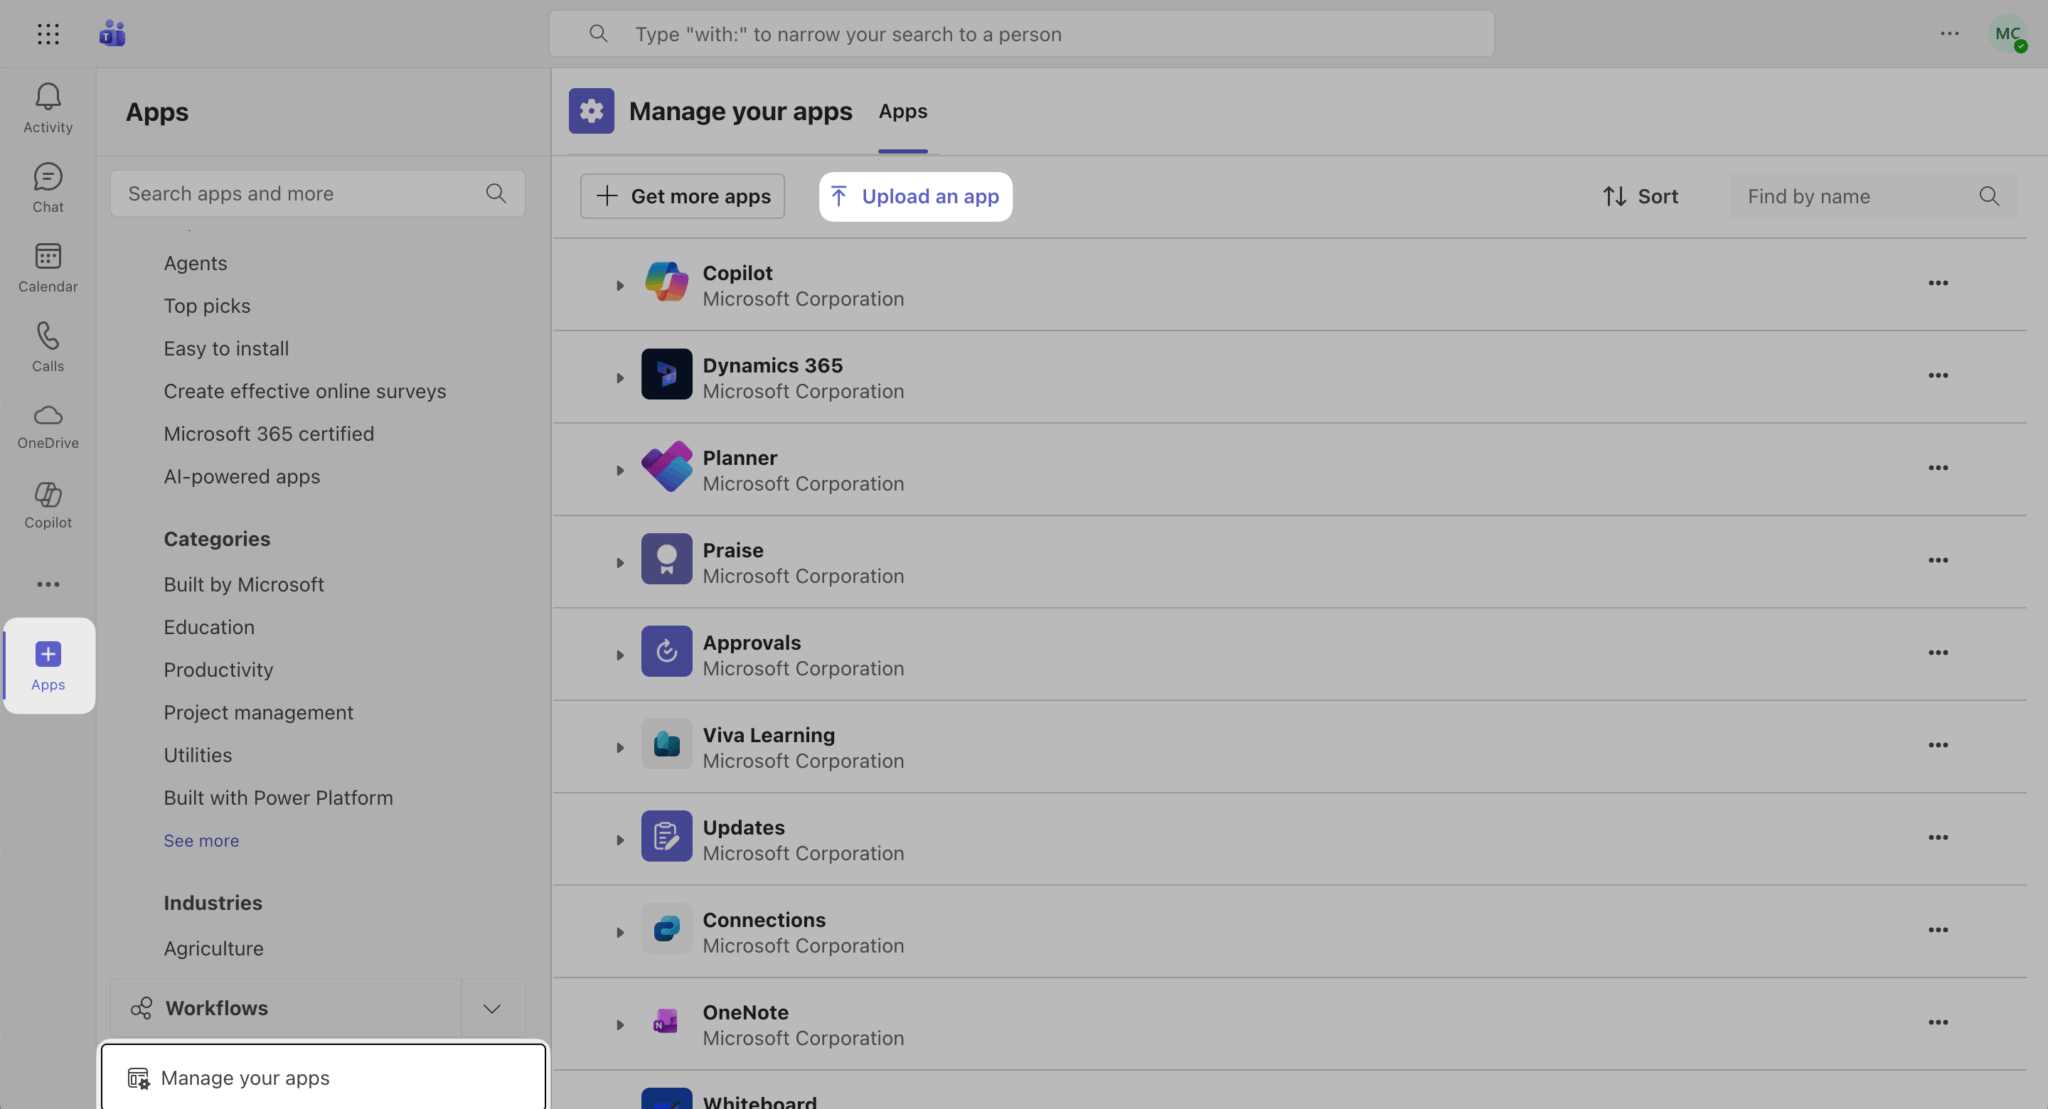
If you see the option to Upload a customized app, then you can test and preview your app with this account.
If you do not have admin access, sign up for the Microsoft 365 developer program by following these steps:
- Go to the Microsoft 365 Developer Program.
- Select Join Now and follow the onscreen instructions.
- In the welcome screen, select Set up E5 subscription
- Set up your administrator account. When you’re finished, you will be given a new email address (seen under Administrator) that you can use to log in to Teams with admin access to a tenant with sideloading enabled.
Now log in to the Agents Toolkit on VS Code with your admin account.
If you don’t qualify for the Microsoft 365 developer program you can sign up for a Microsoft 365 Business Premium trial to get a Microsoft 365 tenant with Microsoft Teams.
Create an Agents Toolkit Tab app
The Agents Toolkit extension provides a number of template applications that you can experiment with.
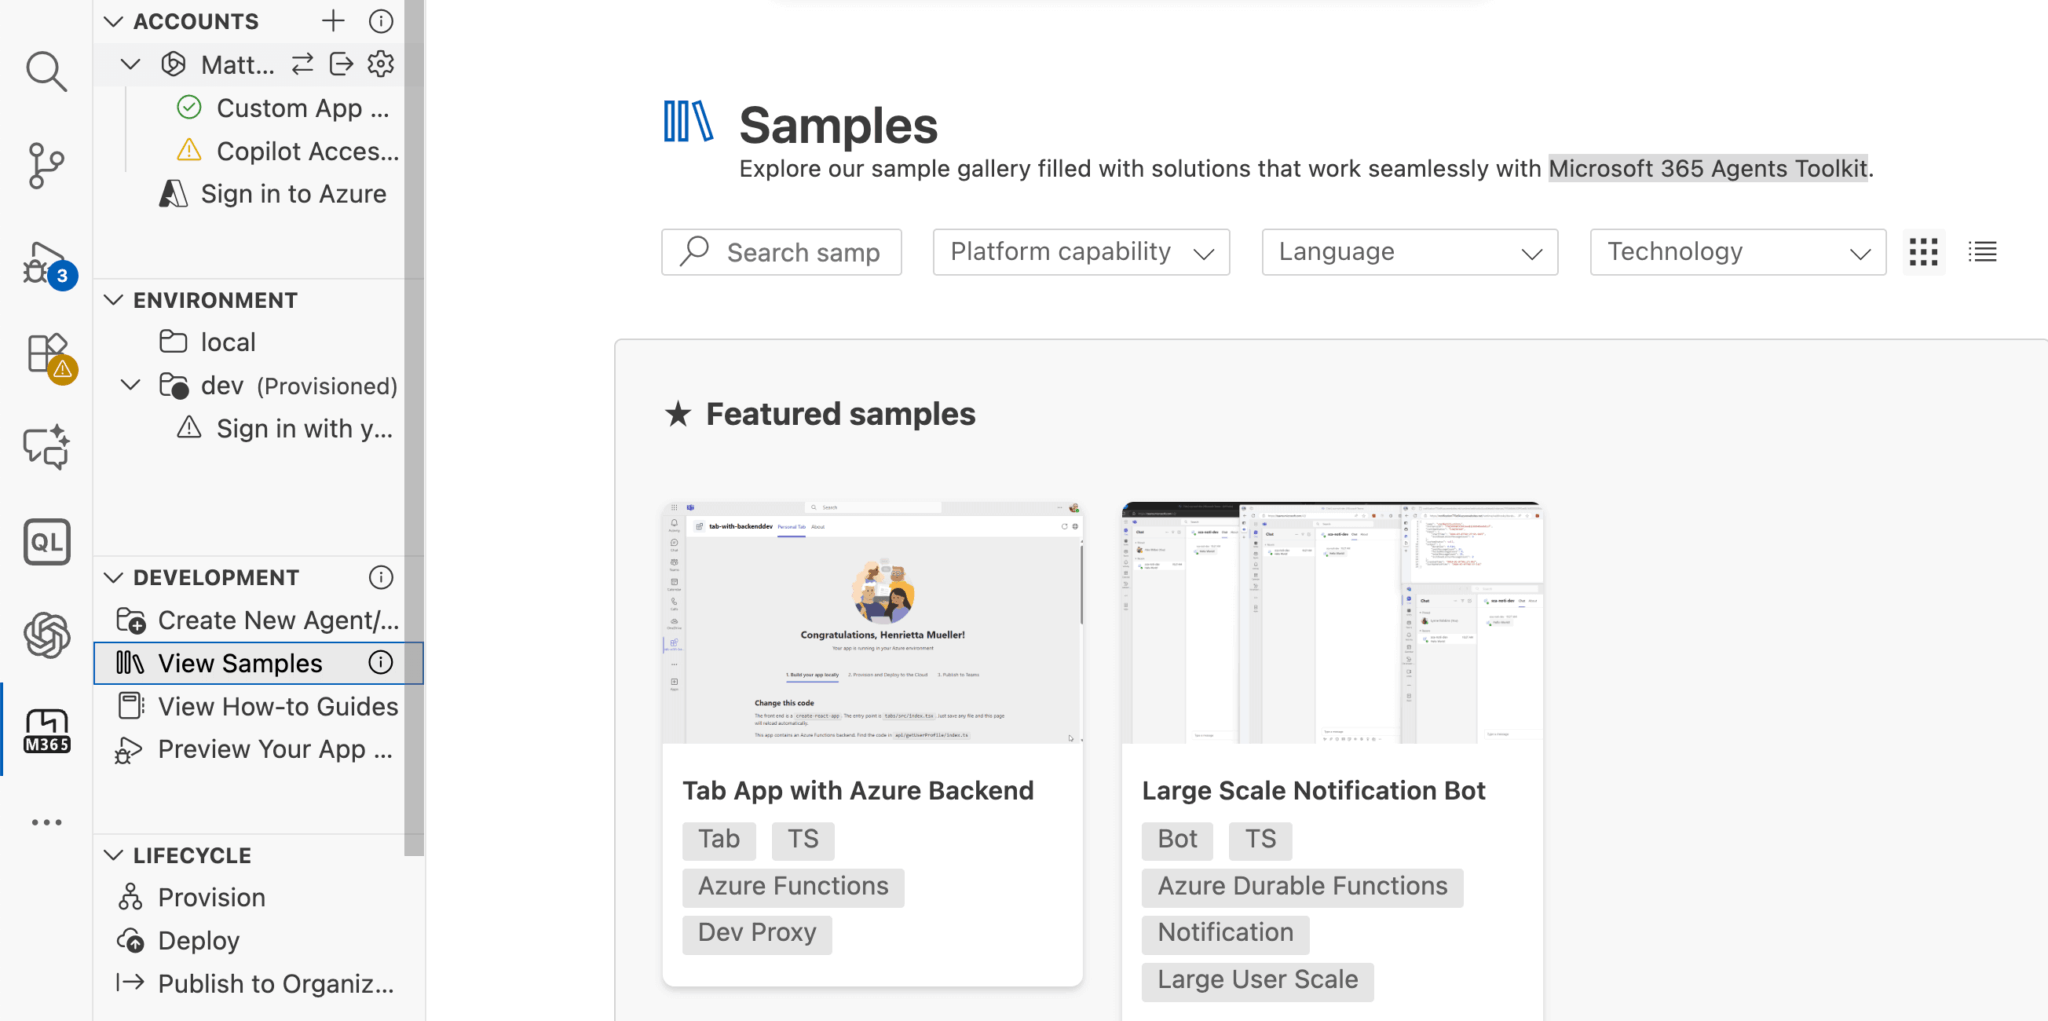
Select the Tab App with Azure Backend template to create a new Tab app.
If you get an error about needing your localhost server to be on HTTPS, manually install the Azure Functions Core Tools.
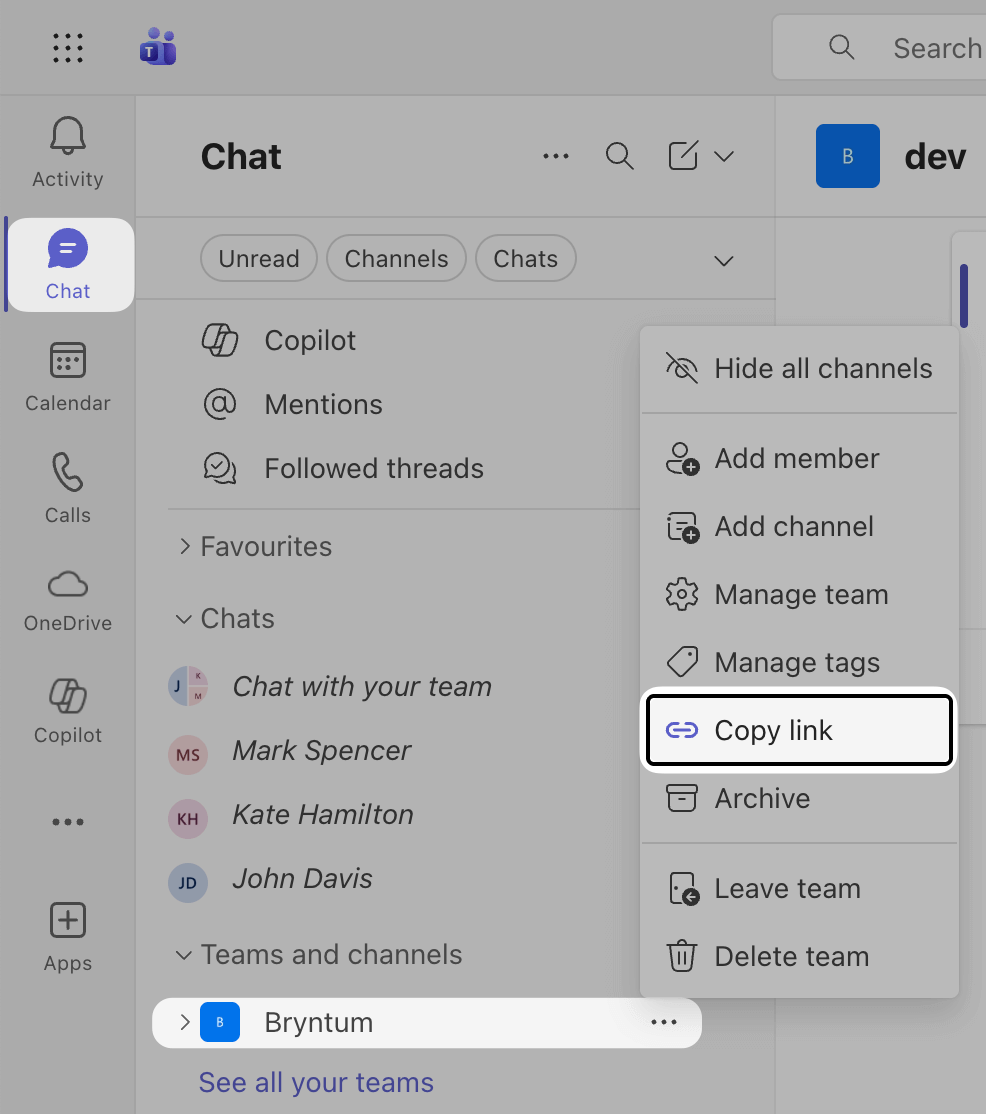
Add your Teams ID to the TEAMS_APP_ID variable in the env/.env.dev file. To find the ID, open Microsoft Teams and open the Chat page. Under Teams and channels, hover over your team and then click the three dots “More team options” button. Click copy link in the popup menu that appears. The Team ID is the groupId value in the URL link.
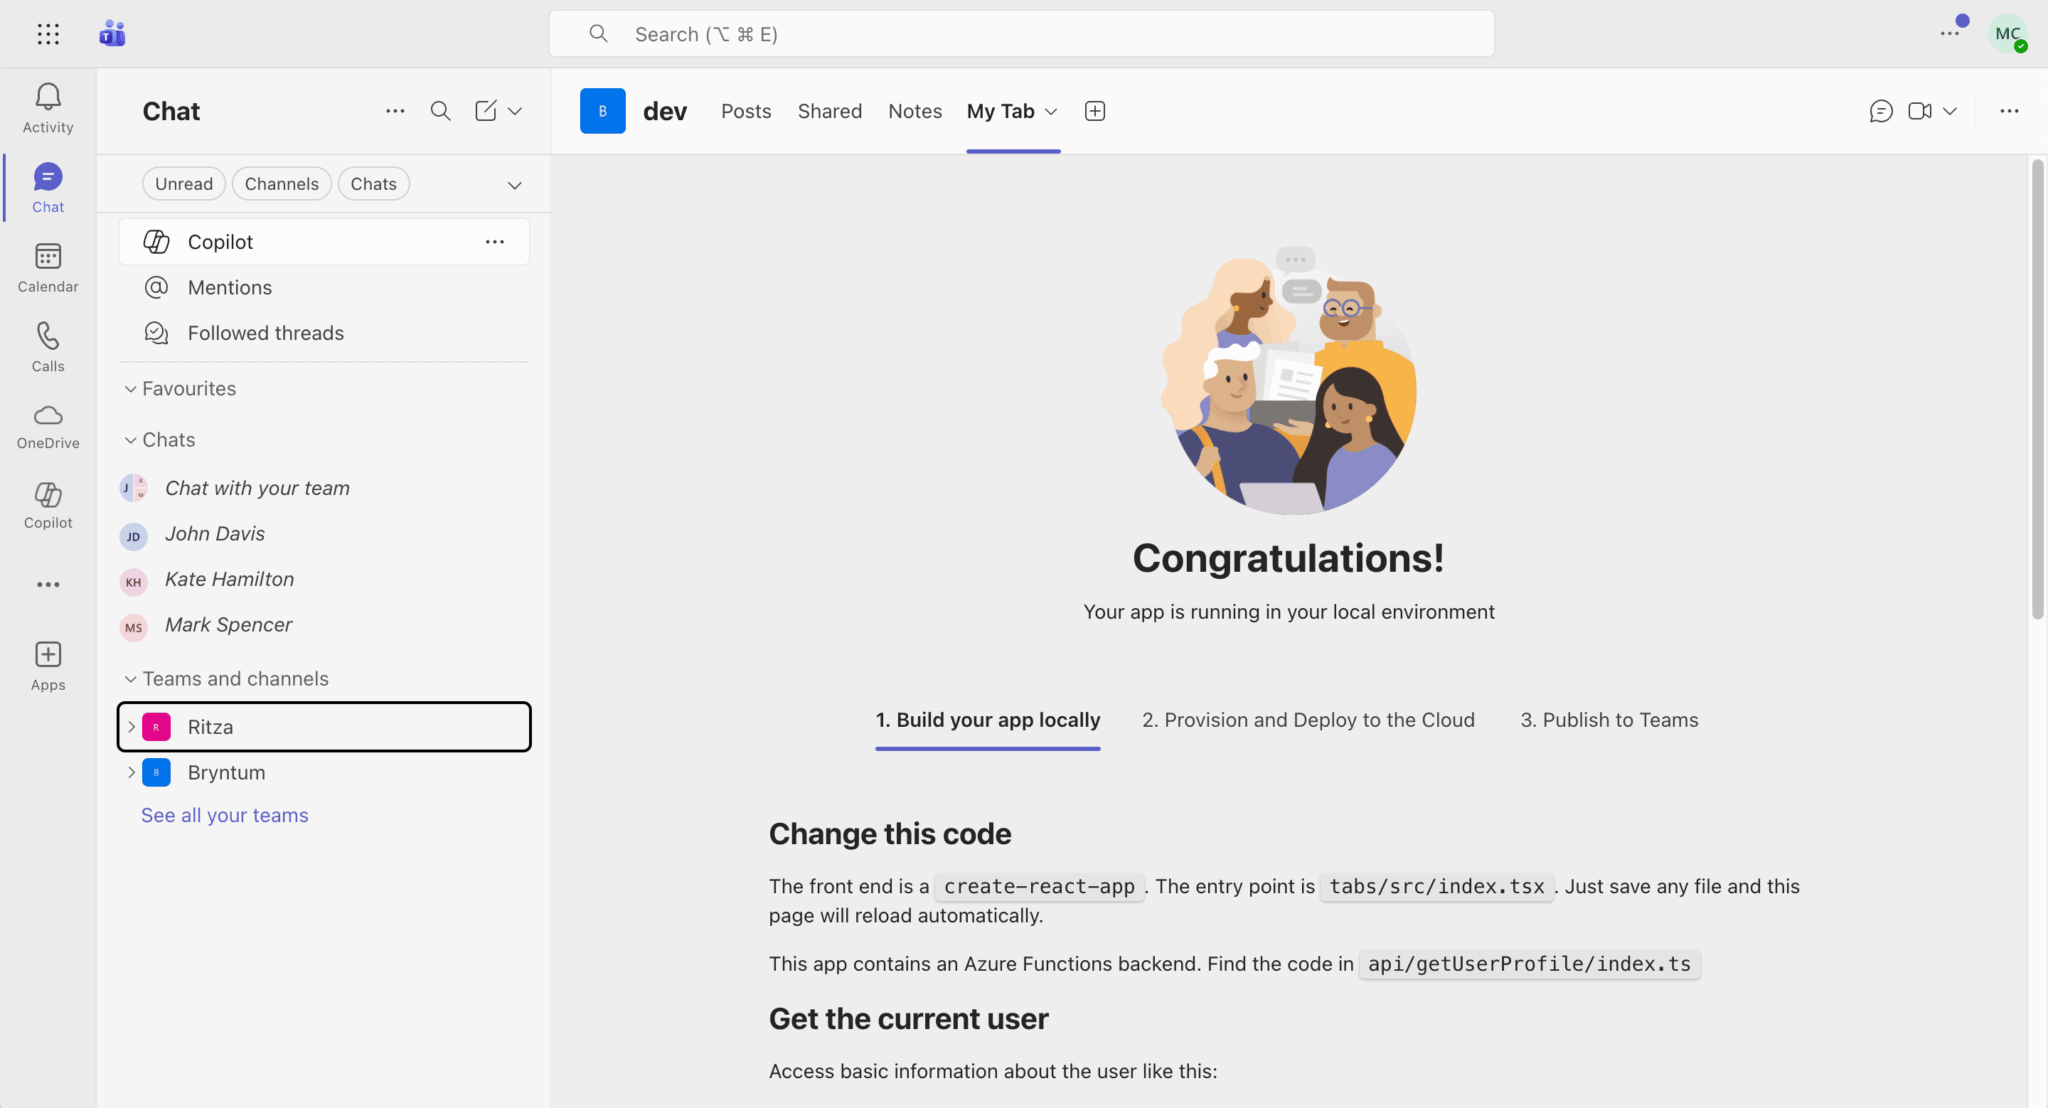
To run the app locally, open the Run and Debug Activity Panel in VS Code and select Debug in Teams (Edge) or Debug in Teams (Chrome). This will open a new browser window and you will be prompted to add your app to your Teams account. Click Add to add the app to your Teams account.
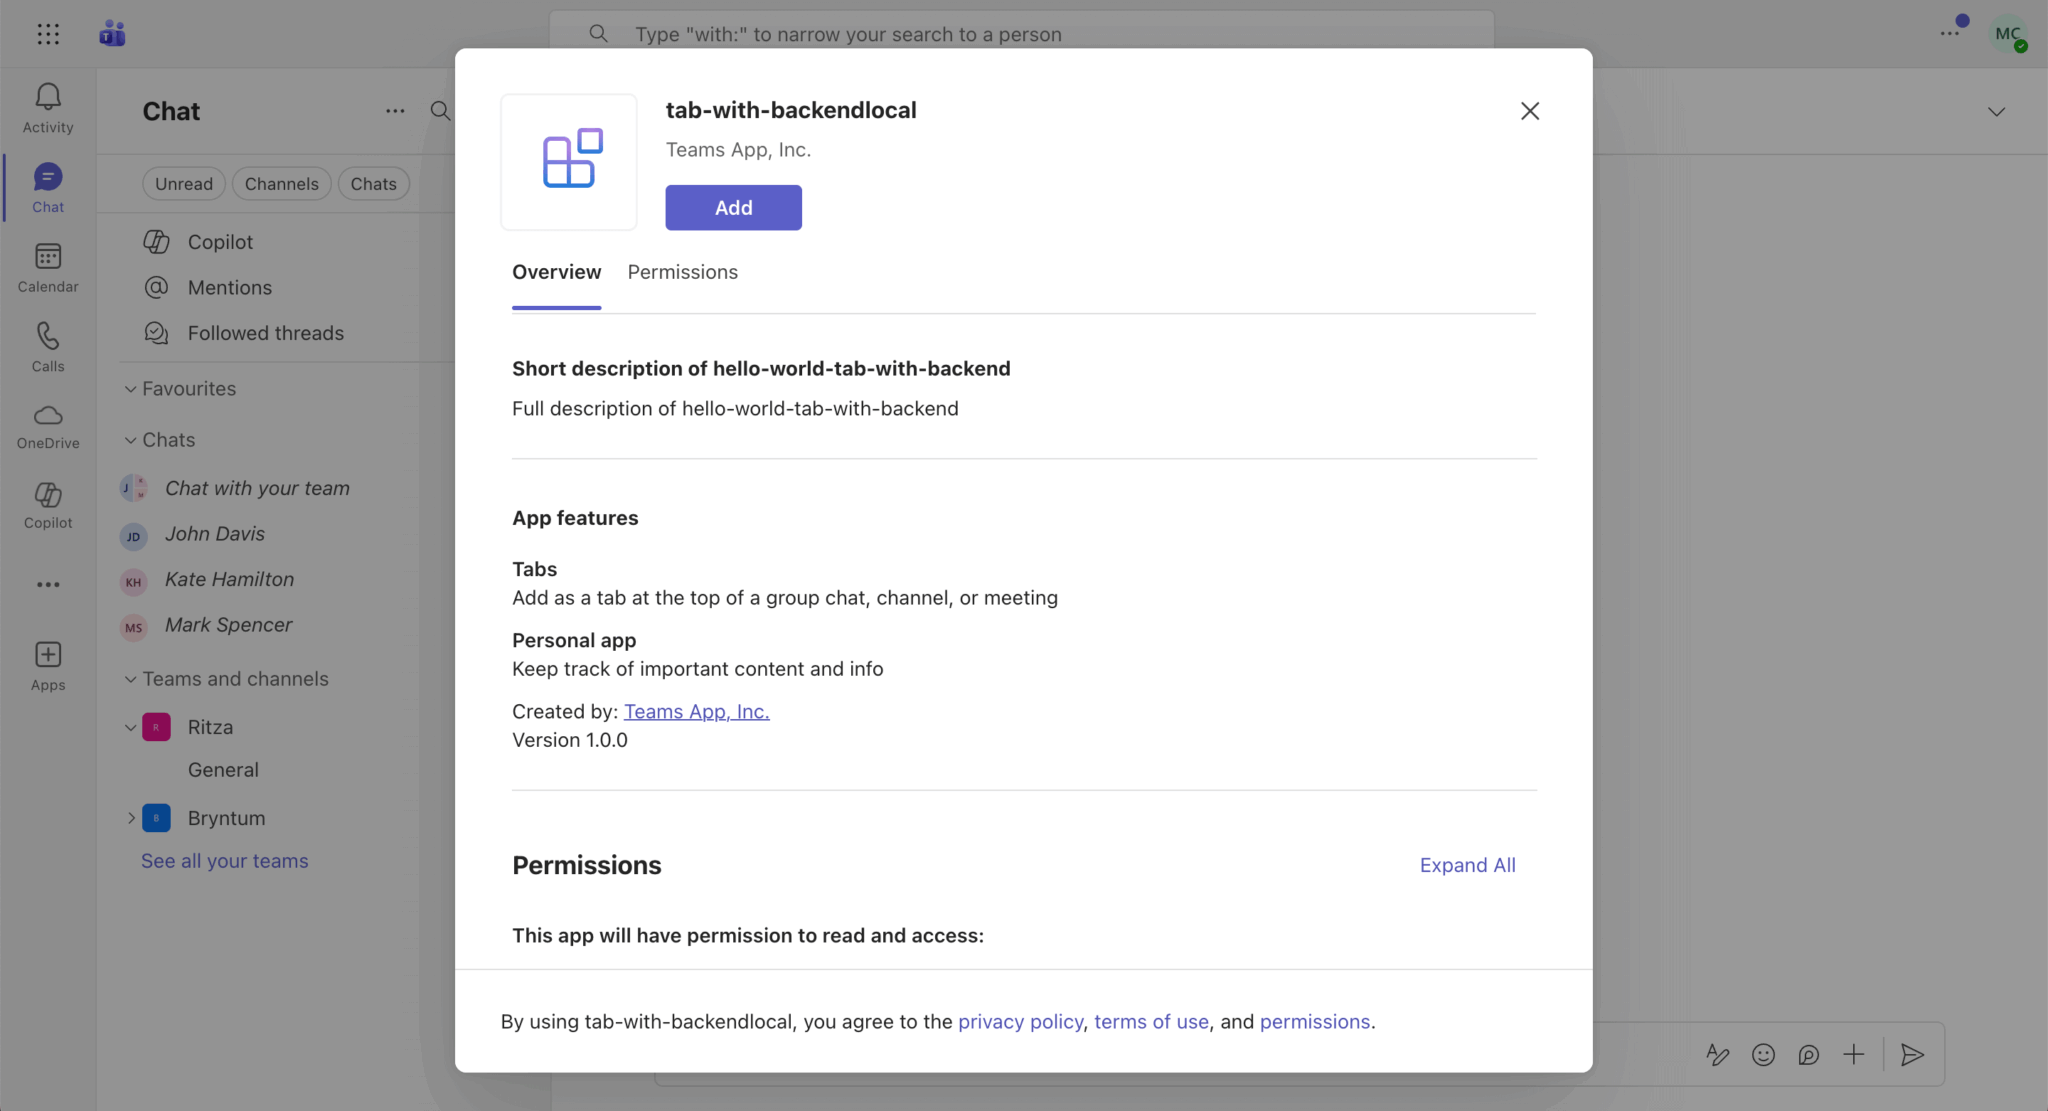
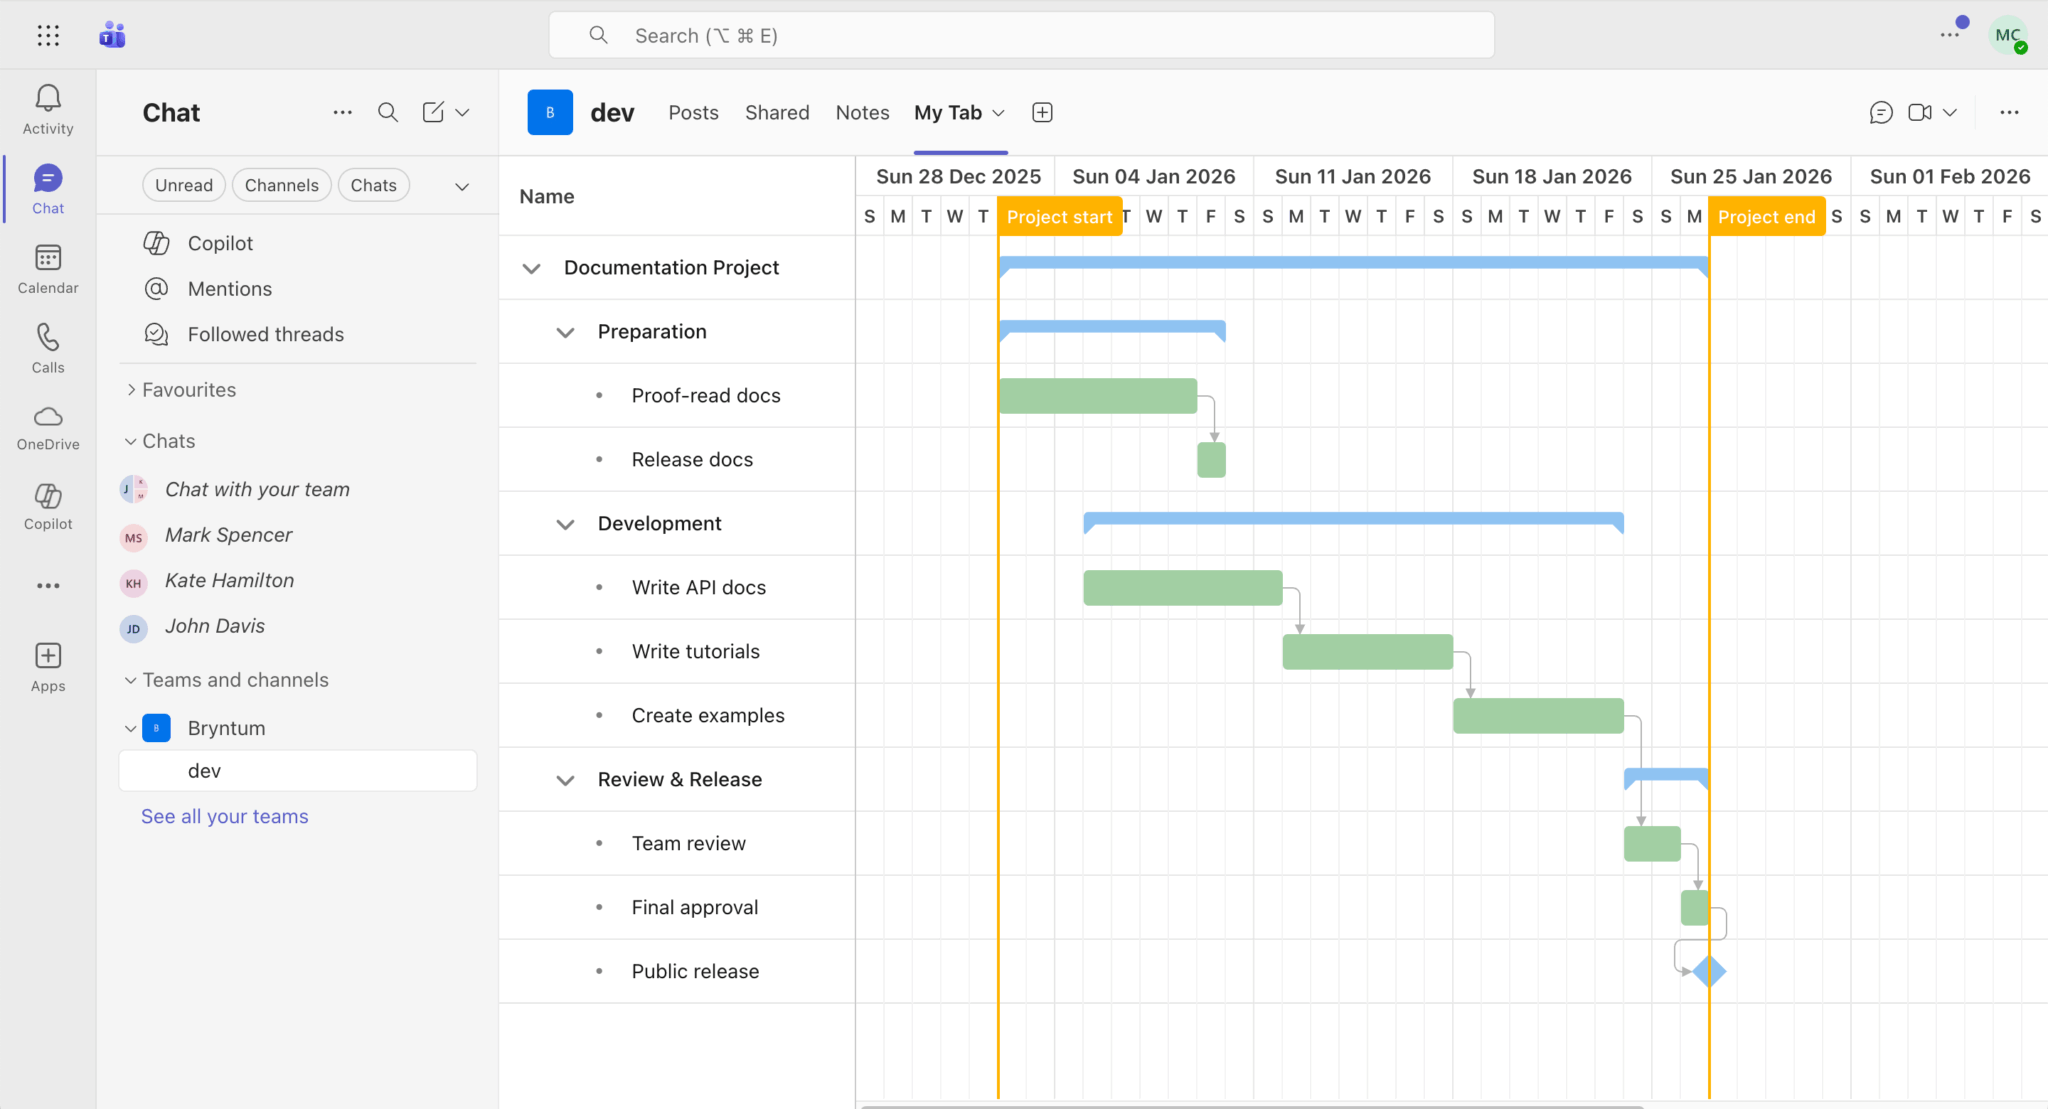
You’ll see the app in the My Tab tab:
In Microsoft Entra admin center, grant admin consent to the Teams app in the API Permissions tab of the registered app. To do this, click the Grant admin consent button at the top right corner of the page.
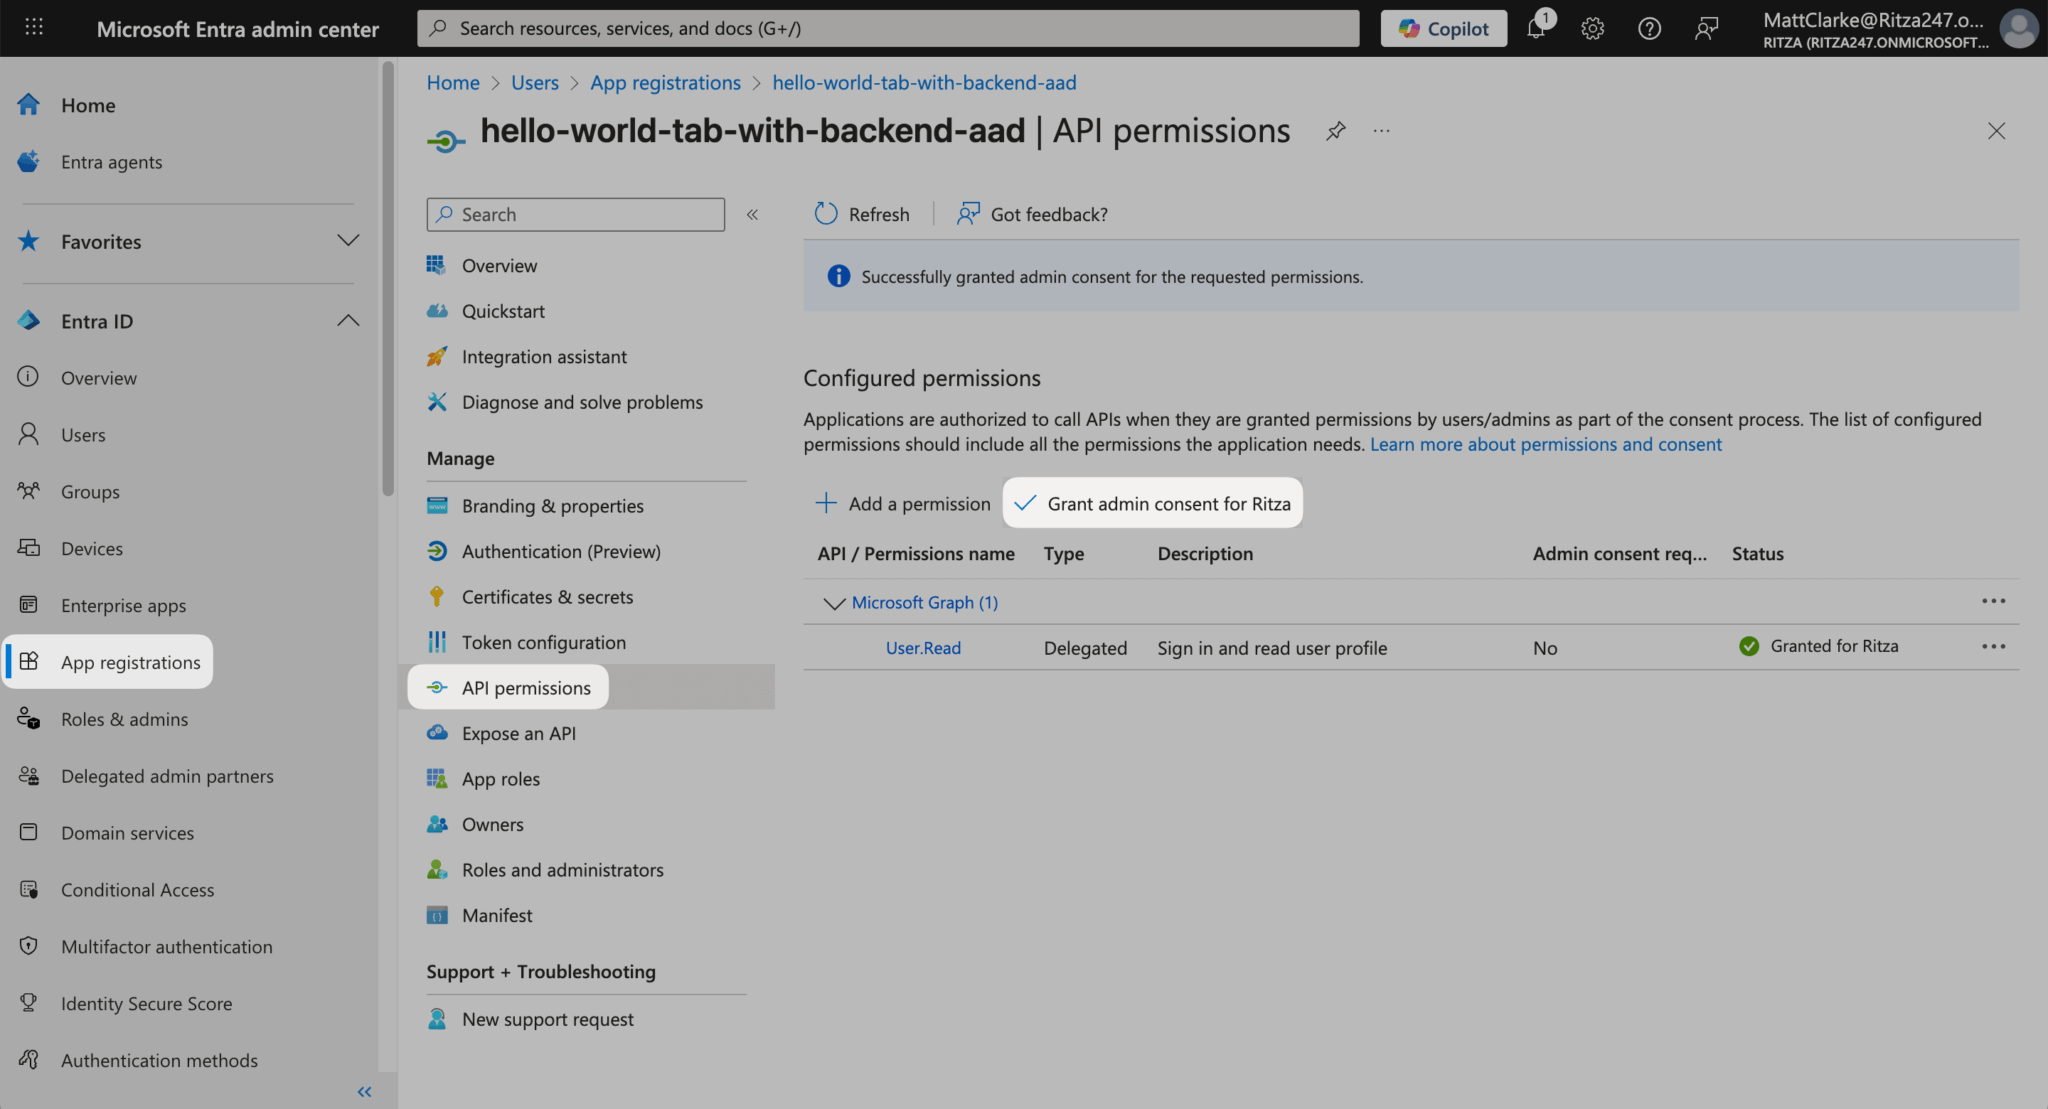
We need to do this because Tab app needs to access the Microsoft Graph API to get the user’s profile information.
⚠️ If the tab in the Chrome window that’s opened when you run the app shows the following error message, try to open https://teams.microsoft.com/v2/ in another Chrome window and navigate to the My Tab tab app:
The connection is blocked because it was initiated by a public page to connect to devices or servers on your private network. Reload this page to allow the connection.Add Bryntum Gantt to the Agents Toolkit Tab app and access the user’s Microsoft 365 profile data
Once you’ve logged in to the registry, install the Bryntum Gantt packages.
npm install @bryntum/gantt@npm:@bryntum/gantt-trial @bryntum/gantt-reactIf you have a Bryntum license, refer to our npm Repository Guide and install the licensed packages:
npm install @bryntum/gantt @bryntum/gantt-reactIn the src folder of the sample Tab app, create a ganttConfig.ts file and add the following lines of code to it:
import { BryntumGanttProps } from '@bryntum/gantt-react';

const ganttProps : BryntumGanttProps = {
    startDate  : new Date(2026, 0, 1),
    endDate    : new Date(2026, 2, 1),
    columns    : [{ type : 'name', field : 'name', width : 250 }],
    viewPreset : 'weekAndDayLetter',
    barMargin  : 10,

    project : {
        transport : {
            load : {
                url : 'data.json'
            }
        },
        autoLoad           : true,
        // Automatically introduces a `startnoearlier` constraint for tasks that (a) have no predecessors, (b) do not use
        // constraints and (c) aren't `manuallyScheduled`
        autoSetConstraints : true
    }
};

export { ganttProps };
Here we set up the configuration for our Gantt chart. The Bryntum Gantt project holds and links the data stores. We configure it to load data on page load from the data.json file in the public folder. The Bryntum Gantt project Crud Manager loads data from the loadUrl and saves changes to the syncUrl using the Fetch API for requests and JSON as the encoding format.
Copy the completed app’s data.json file and add it to the public folder.
Create a Gantt.tsx file in the src/components folder and add the following lines of code to it:
import { useRef } from 'react';
import { BryntumGantt } from '@bryntum/gantt-react';
import { ganttProps } from '../ganttConfig';

export default function Gantt({ readOnly }: { readOnly: boolean }) {

    const gantt = useRef<BryntumGantt>(null);

    return (
        <BryntumGantt
            ref={gantt}
            {...ganttProps}
            readOnly={readOnly}
        />
    );
};
Here we create a React component that renders the Bryntum Gantt component. The Gantt config properties are passed in as props to the Bryntum Gantt component. The readOnly property, which is passed in as a prop to the Gantt component, determines whether the Gantt is read-only or editable.
Next, create a AcmeGantt.tsx file in the src/components folder. You can rename this file to match your company or app name, but remember to keep a lookout for imports in the tutorial code and update them accordingly.
Next, paste the following code into the AcmeGantt.tsx file:
import React, { useMemo } from 'react';
import { app, authentication } from '@microsoft/teams-js';
import { useData } from './sample/lib/useData';
import Gantt from '../components/Gantt';
import axios from 'axios';
import config from './sample/lib/config';

export default function AcmeGantt() {
    const { data } = useData(async() => {
        await app.initialize();

        try {
            // Get SSO token from Teams
            const ssoToken = await authentication.getAuthToken({
                resources : ['User.Read']
            });

            // Call backend Azure Function which does OBO flow to get Graph API data
            const apiBaseUrl = config.apiEndpoint + '/api/';
            const apiClient = axios.create({ baseURL : apiBaseUrl });
            apiClient.interceptors.request.use(async(config) => {
                config.headers['Authorization'] = `Bearer ${ssoToken}`;
                return config;
            });

            const response = await apiClient.get('getUserProfile');

            // Backend returns user profile in graphClientMessage
            return { profile : response.data.graphClientMessage };
        }
        catch (error) {
            console.error('Failed to get user profile from backend:', error);
            throw error;
        }
    });

    // Derive role from data instead of using state
    const readOnly = useMemo(() => {
        if (data?.profile) {
            return data.profile.jobTitle === 'manager' ? false : true;
        }
        return true;
    }, [data]);

    return (
        <div>
            <Gantt readOnly={readOnly} />
        </div>
    );
}
This component renders the Gantt component and passes the readOnly property to it to control edit permissions. The useData React hook, provided by the Microsoft 365 Agents Toolkit sample, handles async data fetching. It fetches the user’s Microsoft 365 profile data. The Microsoft Teams JavaScript client library gets a Single Sign-On (SSO) token from Teams, which is then sent to the Azure Functions backend that is in api/src/functions/getUserProfile.ts. The backend uses the On-Behalf-Of (OBO) flow to exchange the SSO token for a Microsoft Graph API token. The Microsoft Graph API /me endpoint retrieves the user’s profile, which is then returned to the frontend.
We get the user’s job title from the profile data and use it to determine whether the Gantt is read-only or editable. Only managers will be able to edit the Gantt.
For testing, you can change your Job title to manager by following the steps in this guide: Add or update a user’s profile information and settings in the Microsoft Entra admin center
Now replace the code in src/components/Tab.tsx with the following:
import AcmeGantt from '../components/AcmeGantt';

export default function Tab() {

    return <AcmeGantt />;
};
This will render the AcmeGantt component in the Tab app.
Add the following styles to the src/index.css file:
@import "@bryntum/gantt/fontawesome/css/fontawesome.css";
@import "@bryntum/gantt/fontawesome/css/solid.css";
@import "@bryntum/gantt/gantt.css";
@import "@bryntum/gantt/svalbard-light.css";


#root {
  height: 100vh;
}
Here, we import the Bryntum Gantt base CSS styles and the CSS for the Svalbard light theme, which is one of the four available themes with light and dark variants. You can also create custom themes. You can read more in our Gantt styling guide.
When you run the app, you should see the Gantt in the Tab app.
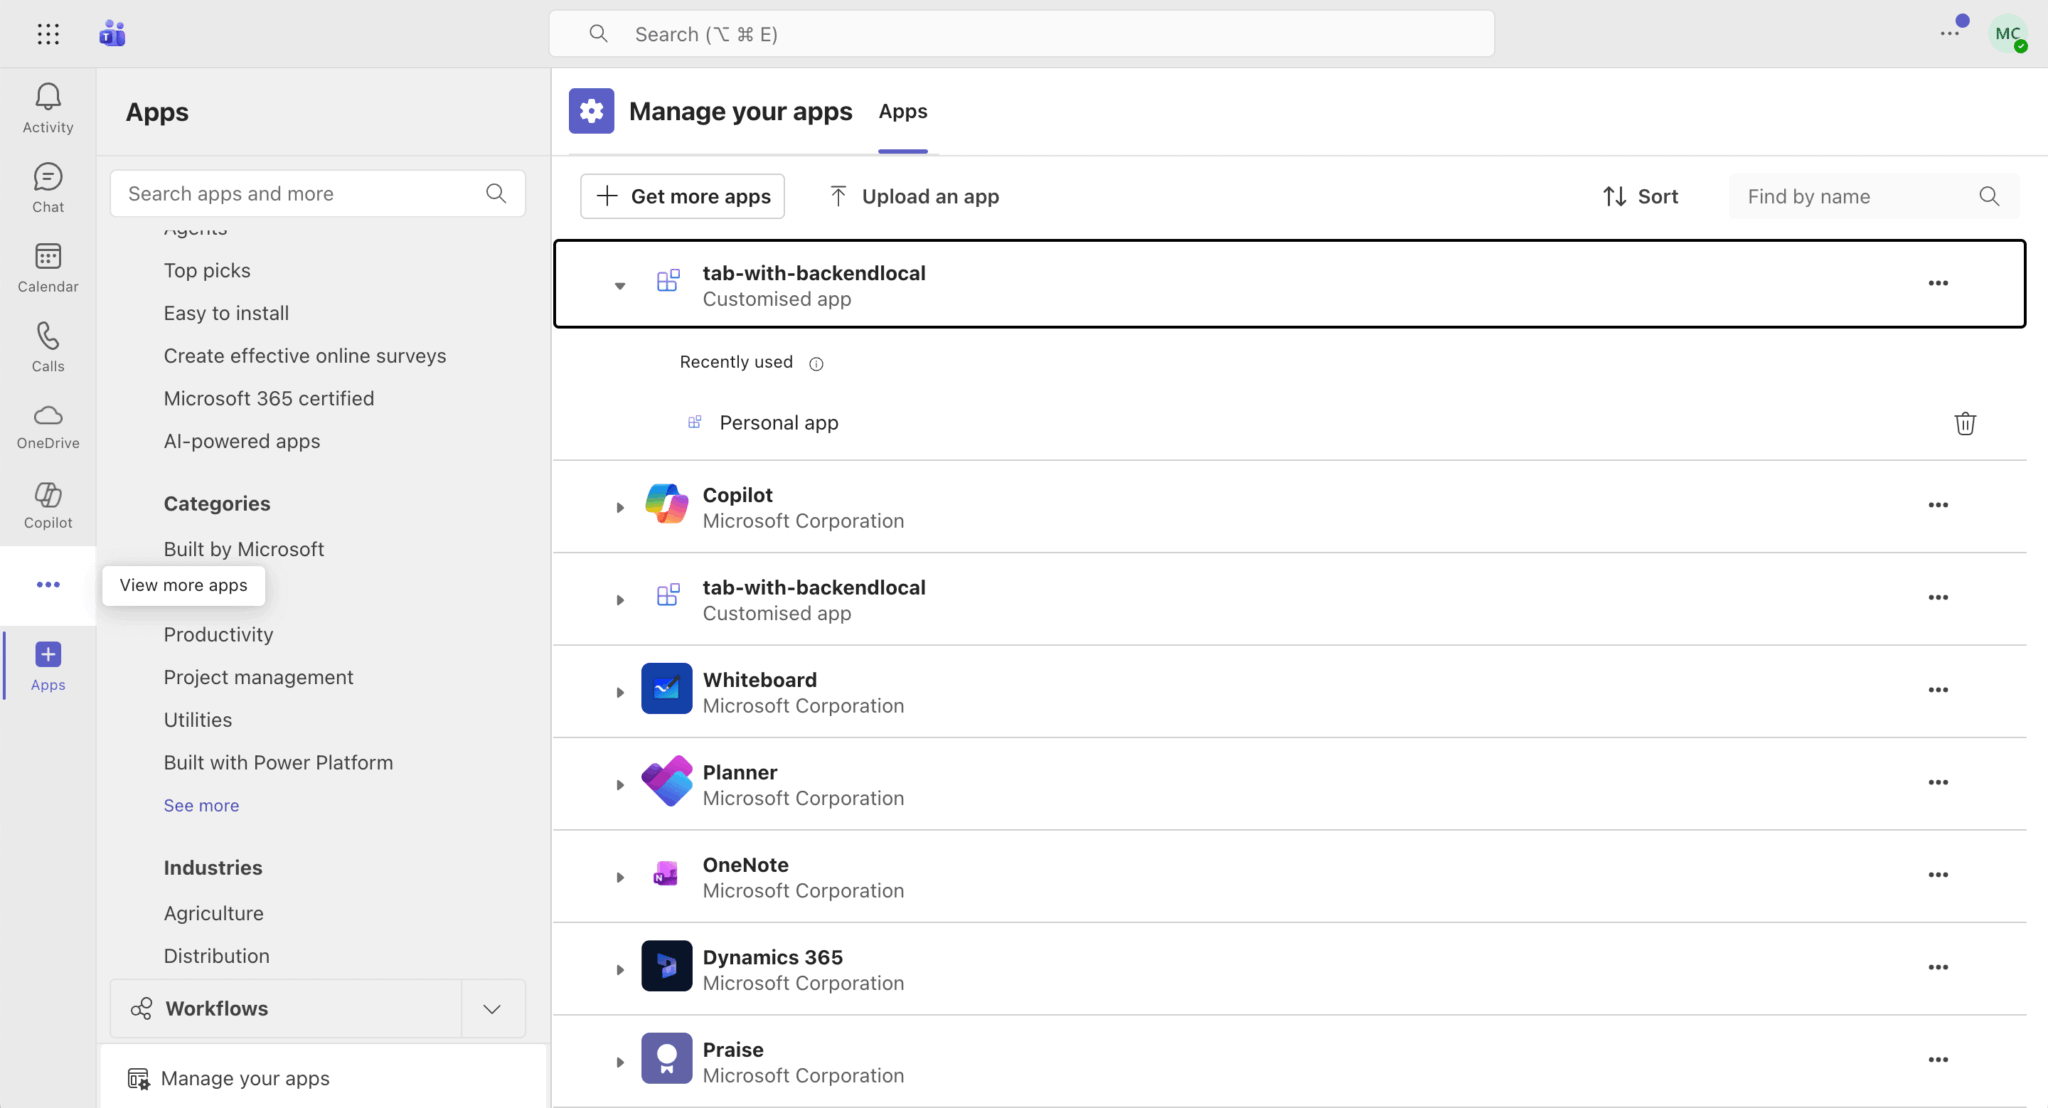
You can also view the Tab app by clicking the View more apps button and selecting it, or by opening it from the Manage your apps section on the Apps page.
This application will use two backend services:
- The Azure Functions backend handles authentication and user profile retrieval.
- The Express.js server that we’ll create will manage Gantt data persistence with MySQL.
Write the backend code (API Bryntum)
Now you may notice that after a page refresh, any changes you make to your Gantt are reset. This is because the project data is not currently being stored and updated in a database. Let’s configure our Gantt to communicate with a server that will update our tasks stored in a SQL database.
Create a self-signed certificate for HTTPS
We’ll create a self-signed certificate to run the Express.js server locally using HTTPS. Microsoft Teams runs over HTTPS and enforces strict security policies. All external content loaded into Teams tabs must be served over HTTPS.
Create a server folder in the project’s root and change into the folder:
cd serverRun the following command to create a package.json file and set the package type to "module":
npm init -y; npm pkg set type="module";Create a self-signed certificate for HTTPS by running the following command:
openssl req -x509 -newkey rsa:2048 -sha256 -days 3650 -nodes -keyout localhost.key -out localhost.cert -subj "/C=US/ST=State/L=City/O=Organization/CN=localhost" -addext "subjectAltName=DNS:localhost,DNS:*.localhost,IP:127.0.0.1,IP:::1"We need to make the certificate trusted. If you’re using macOS, open the Keychain Access application using Mac’s Spotlight search (command + space). Drag and drop the created localhost.cert file into the Certificates tab panel. Double click on the added localhost certificate and set Trust to Always Trust in the popup menu.
If you’re using Windows, you’ll need administrator privileges to install the certificate. Press Win + R, type certmgr.msc, and press Enter to open the Certificate Manager. In the left panel, right-click on Trusted Root Certification Authorities, select All Tasks > Import, and follow the Certificate Import Wizard to import your localhost.cert file. Once imported, the self-signed certificate will be trusted by Windows and your browsers for local development. You can learn more about installing certificates on Windows in the Microsoft docs: Local machine and current user certificate stores.
Add the following entries to a .gitignore file:
# See https://help.github.com/articles/ignoring-files/ for more about ignoring files.
# TeamsFx files
env/.env.*.user
env/.env.local
env/.env.dev
.env
.DS_Store
build
appPackage/build
.deployment
.localConfigs

# dependencies
/node_modules

# testing
/coverage

# Dev tool directories
/devTools/

# SSL certificates
*.pem
*.key
*.crt
*.cert

openssl.cnf
Update the Gantt configuration
To get our data from another source, we need to update the Gantt configuration file. Navigate to src/ganttConfig.ts and replace the project configuration object with the following code:
project : {
    taskStore : {
        autoTree          : true,
        transformFlatData : true
    },
    // specify data source
    transport : {
        load : {
            url : 'https://localhost:8010/data'
        },
        sync : {
            url : 'https://localhost:8010/api'
        }
    },
    autoLoad           : true,
    // Automatically introduces a `startnoearlier` constraint for tasks that (a) have no predecessors, (b) do not use
    // constraints and (c) aren't `manuallyScheduled`
    autoSetConstraints : true,
    autoSync           : true,
    validateResponse   : true
}
First we create a taskStore for the project and set autoTree and transformFlatData to true to automatically transform the formatting of our data.
Next, the transport options are set to load data from a specified URL. This URL will be a route on the server we create in the next step. We use sync to specify the URL to which the project should send data when it is synced.
Finally, we set the autoLoad, autoSync, and validateResponse options to true to automatically load data, sync data, and validate responses from our server.
Now our Gantt is configured to fetch data from a server at https://localhost:8010/.
Create the server
We’ll create a separate Express.js server to handle the data storage and retrieval for our Gantt. We’ll use MySQL as our database.
In the server folder, install the following npm packages:
npm install express body-parser uuid cors dotenv mysql2Install nodemon as a development dependency:
npm install nodemon --save-devIn the server/package.json file, add the following script:
"start": "nodemon server.js",Next, create a file called server.js in the server folder and paste the following code into it:
import express from 'express';
import bodyParser from 'body-parser';
import { v4 as uuidv4 } from 'uuid';
import mysql from 'mysql2/promise';
import cors from 'cors';
import https from 'https';
import fs from 'fs';
import 'dotenv/config';

const app = express();
const port = process.env.PORT || 8010;

app.use(
    cors({
        origin      : 'https://localhost:53000',
        credentials : true
    })
);

app.disable('x-powered-by');

app.use(bodyParser.json());

var options = {
    key                : fs.readFileSync( './localhost.key' ),
    cert               : fs.readFileSync( './localhost.cert' ),
    requestCert        : false,
    rejectUnauthorized : false
};

https.createServer( options, app ).listen(port, () => {
    console.log(`HTTPS Server is running on https://localhost:${port}`);
});
Here we set up our Express server with some configuration for communicating with our Teams app. We use bodyParser because Bryntum sends request objects in JSON format. We import uuid to generate unique IDs and enable CORS (Cross-Origin Resource Sharing). We use app.disable('x-powered-by'); to hide the server’s technology stack from potential attackers. We use the self-signed certificate for HTTPS and use it to create an HTTPS server.
Create the CRUD functions
Now we need to create the functions that will perform CRUD operations on our database and define the server routes those functions will use to interact with our database.
First define the serverConfig function, which will run when the server is started, to connect to the MySQL database. The serverConfig function has a helper function called sendResponse that formats the response of create, update, or delete operations from the Bryntum Gantt chart. The response format required is described in the Bryntum Gantt chart docs.
const db = mysql.createPool({
    host     : process.env.HOST,
    user     : process.env.MYSQL_USER,
    password : process.env.PASSWORD,
    database : process.env.DATABASE
});

async function serverConfig() {

    function sendResponse(
        res,
        action,
        requestId,
        error,
        taskUpdates,
        dependencyUpdates,
        tasksRemoved,
        dependenciesRemoved
    ) {
        if (action == 'error') console.log(error);

        const result = {
            success : action === 'error' ? false : true
        };
        if (requestId !== undefined && requestId !== null)
            result.requestId = requestId;

        // Operations to be added

        res.send(result);
        return;
      }
}

serverConfig();
Load data from MySQL to the Bryntum Gantt chart
To get data from MySQL to our Bryntum Gantt chart, add the following GET method /data route to server.js, in the serverConfig function above the sendResponse function:
app.get('/data', async(req, res) => {
    try {
        const results = await Promise.all([
            db.query('SELECT * FROM tasks'),
            db.query('SELECT * FROM dependencies')
        ]);

        const tasks = results[0][0],
            dependencies = results[1][0];

        res.send({
            success : true,
            tasks   : {
                rows : tasks
            },
            dependencies : {
                rows : dependencies
            }
        });
    }
    catch (error) {
        sendResponse(res, 'error', null, error, [], [], [], []);
    }
});
We configured this GET method route in our ganttConfig. The Gantt chart will load data from this /data route.
Updating tasks and dependencies
In the ganttConfig.ts file we created earlier, we set the sync URL of our project’s transport to http://localhost:8010/api. This is the route our app will send task update data to, so it needs to handle new, deleted, and updated tasks and dependencies.
To handle sync requests from our Bryntum Gantt chart, add the following method in the serverConfig function above the sendResponse function:
app.post('/api', async function(req, res) {
    let requestId = '';
    let lastKey = '';
    let err = null;

    const taskUpdates = [];
    const tasksRemoved = [];
    const dependencyUpdates = [];
    const dependenciesRemoved = [];

    for (const [key, value] of Object.entries(req.body)) {
        if (key === 'requestId') {
            requestId = value;
        }
        if (key === 'tasks') {
            for (const [key2, value2] of Object.entries(value)) {
                if (key2 === 'added') {
                    // Assign UUID BEFORE pushing to taskUpdates
                    value2[0].id = uuidv4();
                    const val = await createOperation(value2[0], 'tasks');
                    // Push to taskUpdates AFTER UUID is assigned and DB operation is complete
                    value2.forEach((addObj) => taskUpdates.push(addObj));
                    lastKey = val.msg;
                    err = val.error;
                    if (err) {
                        console.error('Error creating task:', err);
                    }
                }

                if (key2 === 'updated') {
                    value2.forEach((updateObj) => taskUpdates.push(updateObj));
                    const val = await updateOperation(value2, 'tasks');
                    lastKey = val.msg;
                    err = val.error;
                }

                if (key2 === 'removed') {
                    tasksRemoved.push(value2[0]);
                    const val = await deleteOperation(value2[0].id, 'tasks');
                    lastKey = val.msg;
                    err = val.error;
                }
            }
        }

        if (key === 'dependencies') {
            for (const [key2, value2] of Object.entries(value)) {
                if (key2 === 'added') {
                    value2[0].id = uuidv4();
                    value2.forEach((addObj) => dependencyUpdates.push(addObj));
                    const val = await createOperation(value2[0], 'dependencies');
                    lastKey = val.msg;
                    err = val.error;
                }

                if (key2 === 'updated') {
                    value2.forEach((updateObj) => dependencyUpdates.push(updateObj));
                    const val = await updateOperation(value2, 'dependencies');
                    lastKey = val.msg;
                    err = val.error;
                }

                if (key2 === 'removed') {
                    dependenciesRemoved.push(value2[0]);
                    const val = await deleteOperation(value2[0].id, 'dependencies');
                    lastKey = val.msg;
                    err = val.error;
                }
            }
        }
    }

    sendResponse(
        res,
        lastKey,
        requestId,
        err,
        taskUpdates,
        dependencyUpdates,
        tasksRemoved,
        dependenciesRemoved
    );
});
When changes are made to our Gantt, the client-side Bryntum library will make a POST request to the /api endpoint to keep the data in the database in sync with the client-side UI. The code we added will handle the incoming POST request and inspect the request body to determine what action should be taken on which data model. We first determine which data model to apply a sync request to and then inspect the type of operation to perform.
For example, when adding a task to the database, there will be a POST request to the /api route. The route will check if the sync request body object has a key called tasks and then check if the nested object key is an operation called added. If this is the case for both, it will call the createOperation function (which we’ll define later on) and insert the added task into our database using the MySQL client. Then we insert the relevant columns to be stored and ignore keys of the object that we don’t need.
A similar process is followed for updating and removing tasks and for adding, updating, and removing dependencies.
Now let’s add the createOperation, updateOperation, and deleteOperation functions to handle the CRUD functionality of our server.
Update function
Add the following code at the bottom of server.js:
async function updateOperation(updates, table) {
    try {
        await Promise.all(
            updates.map(({ id, ...update }) => {
                return db.query(
          `
          UPDATE ${table}
          SET ${Object.keys(update)
              .map((key) => `${key} = ?`)
              .join(', ')}
          WHERE id = ?
        `,
          Object.values(update).concat(id)
                );
            })
        );
        return { msg : 'update', error : null };
    }
    catch (error) {
        return { msg : 'error', error };
    }
}
There may be multiple updates to perform at once, so we loop through the update property array and create key and value arrays for each update. We use these to construct UPDATE database queries. The Promise.all method handles all of the async updates at once. The updateOperation function returns a result object. The response is sent using the sendResponse method, which formats the response correctly. The table argument allows us to add tasks to either the tasks table or the dependencies table.
Add function
Now add the following function above the updateOperation function:
async function createOperation(addObj, table) {
    const valArr = [];
    const keyArr = [];

    // Fields to exclude from database insertion
    const excludedFields = [
        'baselines',
        'from',
        'to',
        '$PhantomId',
        'segments',
        'ignoreResourceCalendar',
        'delayFromParent',
        'projectConstraintResolution'
    ];

    // Helper function to convert ISO datetime to MySQL datetime format
    const formatDateForMySQL = (dateStr) => {
        if (!dateStr) return null;
        try {
            const date = new Date(dateStr);
            if (isNaN(date.getTime())) return dateStr; // Return original if invalid
            return date.toISOString().slice(0, 19).replace('T', ' ');
        }
        catch {
            return dateStr;
        }
    };

    for (const [key, value] of Object.entries(addObj)) {
        if (!excludedFields.includes(key)) {
            keyArr.push(`\`${key}\``);
            // Format datetime fields for MySQL
            if ((key === 'startDate' || key === 'endDate' || key === 'constraintDate' || key === 'deadline') && value) {
                valArr.push(formatDateForMySQL(value));
            }
            else {
                valArr.push(value);
            }
        }
    }

    const sql = `INSERT INTO ${table} (${keyArr.join(', ')}) VALUES (${Array(
        keyArr.length
    )
        .fill('?')
        .join(',')})`;

    try {
        await db.query(sql, valArr);
        return { msg : 'added', error : null };
    }
    catch (error) {
        console.error('Database error in createOperation:', error);
        return { msg : 'error', error : error };
    }
}
Delete function
Now add the following deleteOperation function below the updateOperation function:
async function deleteOperation(id, table) {
    try {
        await db.query(`DELETE FROM ${table} WHERE id = ?`, [id]);
        return { msg : 'deleted', error : null };
    }
    catch (error) {
        return { msg : 'error', error : error };
    }
}
We use the id argument to find the task and delete it using the DELETE MySQL query.
Update the sendResponse function
We can now update our sendResponse function to include the operations we added for tasks and dependencies:
function sendResponse(
    res,
    action,
    requestId,
    error,
    taskUpdates,
    dependencyUpdates,
    tasksRemoved,
    dependenciesRemoved
) {
    if (action == 'error') console.log(error);

    const result = {
        success : action === 'error' ? false : true
    };
    if (requestId !== undefined && requestId !== null)
        result.requestId = requestId;

    // updated tasks
    result.tasks = {};
    result.tasks.rows = [];

    if (taskUpdates.length) {
        result.tasks.rows = [...result.tasks.rows, ...taskUpdates];
    }

    // deleted tasks
    result.tasks.removed = [];

    if (tasksRemoved.length) {
        result.tasks.removed = [...result.tasks.removed, ...tasksRemoved];
    }

    // updated dependencies
    result.dependencies = {};
    result.dependencies.rows = [];

    if (dependencyUpdates.length) {
        result.dependencies.rows = [
            ...result.dependencies.rows,
            ...dependencyUpdates
        ];
    }

    // deleted dependencies
    result.dependencies.removed = [];

    if (dependenciesRemoved.length) {
        result.dependencies.removed = [
            ...result.dependencies.removed,
            ...dependenciesRemoved
        ];
    }

    res.send(result);
    return;
}
In this function, we format the response to include the results of the operations applied and send the response to the client to complete the handling of the HTTP request.
The API endpoints have now been successfully created to be compatible with our implementation of the Bryntum Gantt chart.
Configure the MySQL database
To set up a MySQL database locally, we’ll install MySQL Server and MySQL Workbench. MySQL Workbench is a MySQL GUI that we’ll use to create a database with tables for the Gantt data and to run queries.
Download MySQL Server and MySQL Workbench from the MySQL community downloads page. If you’re using Windows, you can use the MySQL Installer to download MySQL products. Use the default configurations when configuring MySQL Server and Workbench. Make sure that you configure the MySQL Server to start at system startup for convenience.
Open the MySQL Workbench desktop application. Open the local instance of the MySQL Server that you configured.
We’ll write our MySQL queries in the query tab and execute the queries by pressing the yellow lightning bolt button.
Let’s run some MySQL queries in MySQL Workbench to create, use, and populate a database for our Bryntum Gantt.
Run the following query in MySQL Workbench to create a database called bryntum:
CREATE DATABASE bryntum;Now run the following query to set the bryntum database for use:
USE bryntum;Let’s create the two tables we need for our Bryntum Gantt chart data: tasks and dependencies.
Run the following query to create the tasks table for our task data:
CREATE TABLE `tasks` (
  `id` varchar(80) NOT NULL,
  `parentId` varchar(80) DEFAULT NULL,
  `name` varchar(255) DEFAULT NULL,
  `startDate` datetime DEFAULT NULL,
  `endDate` datetime DEFAULT NULL,
  `effort` float(11,2) DEFAULT NULL,
  `effortUnit` varchar(255) DEFAULT 'hour',
  `duration` float(11,2) unsigned DEFAULT NULL,
  `durationUnit` varchar(255) DEFAULT 'day',
  `percentDone` float(11,2) unsigned DEFAULT '0.00',
  `schedulingMode` varchar(255) DEFAULT NULL,
  `note` text,
  `constraintType` varchar(255) DEFAULT NULL,
  `constraintDate` datetime DEFAULT NULL,
  `manuallyScheduled` tinyint DEFAULT '1',
  `effortDriven` tinyint DEFAULT '0',
  `inactive` tinyint DEFAULT '0',
  `cls` varchar(255) DEFAULT NULL,
  `iconCls` varchar(255) DEFAULT NULL,
  `color` varchar(255) DEFAULT NULL,
  `parentIndex` int DEFAULT '0',
  `expanded` tinyint DEFAULT '0',
  `calendar` int DEFAULT NULL,
  `deadline` datetime DEFAULT NULL,
  `direction` varchar(255) DEFAULT NULL,
  `$PhantomId` varchar(255) DEFAULT NULL,
  `unscheduled` tinyint(1) DEFAULT NULL,
  PRIMARY KEY (`id`),
  KEY `parentId` (`parentId`),
  KEY `calendar` (`calendar`)
) ENGINE=MyISAM DEFAULT CHARSET=utf8mb4 COLLATE=utf8mb4_0900_ai_ci;
Run the following query to create the dependencies table for our dependency data:
CREATE TABLE `dependencies` (
  `id` varchar(80) NOT NULL,
  `fromEvent` varchar(80) DEFAULT NULL,
  `toEvent` varchar(80) DEFAULT NULL,
  `type` int DEFAULT '2',
  `cls` varchar(255) DEFAULT NULL,
  `lag` float(11,2) DEFAULT '0.00',
  `lagUnit` varchar(255) DEFAULT 'day',
  `$PhantomId` varchar(255) DEFAULT NULL,
  `active` tinyint(1) DEFAULT NULL,
  `fromSide` varchar(255) DEFAULT NULL,
  `toSide` varchar(255) DEFAULT NULL,
  PRIMARY KEY (`id`),
  KEY `fromEvent` (`fromEvent`),
  KEY `toEvent` (`toEvent`)
) ENGINE=MyISAM DEFAULT CHARSET=utf8mb4 COLLATE=utf8mb4_0900_ai_ci;
Now add some example tasks data to the tasks table:
INSERT INTO `tasks` (`id`, `name`, `expanded`, `iconCls`, `percentDone`, `startDate`, `endDate`, `parentId`, `effort`, `duration`, `parentIndex`) VALUES
("1000", 'Launch SaaS Product', 1, '', 34.248366013071895, '2026-01-14 00:00:00', '2026-01-29 00:00:00', NULL, 153.00, 15.00, 0),
("1", 'Setup web server', 1, '', 42.30769230769231, '2026-01-14 00:00:00', '2026-01-29 00:00:00', "1000", 13.00, 15.00, 0),
("11", 'Install Apache', 0, '', 50.00, '2026-01-14 00:00:00', '2026-01-17 00:00:00', "1", 3.00, 3.00, 0),
("12", 'Configure firewall', 0, '', 50.00, '2026-01-18 00:00:00', '2026-01-29 00:00:00', "1", 3.00, 11.00, 1);
We can also add some example dependencies data:
INSERT INTO `dependencies` (`id`, `fromEvent`, `toEvent`, `lag`) VALUES
("1","11","12",2);
Now create a .env file in the server folder of your Tabs app and add the following lines for connecting to a MySQL database:
HOST=localhost
MYSQL_USER=
PASSWORD=
DATABASE=bryntum
PORT=8010
Add the password and username for your MySQL server.
Run your app
Now that our database, server, and Teams app are set up, we can run our application with data persistence. Navigate to the server folder in your terminal and run:
npm run startMake sure the Tabs app is running locally by opening the Run and Debug Activity panel in VS Code and selecting Debug in Teams (Edge) or Debug in Teams (Chrome).
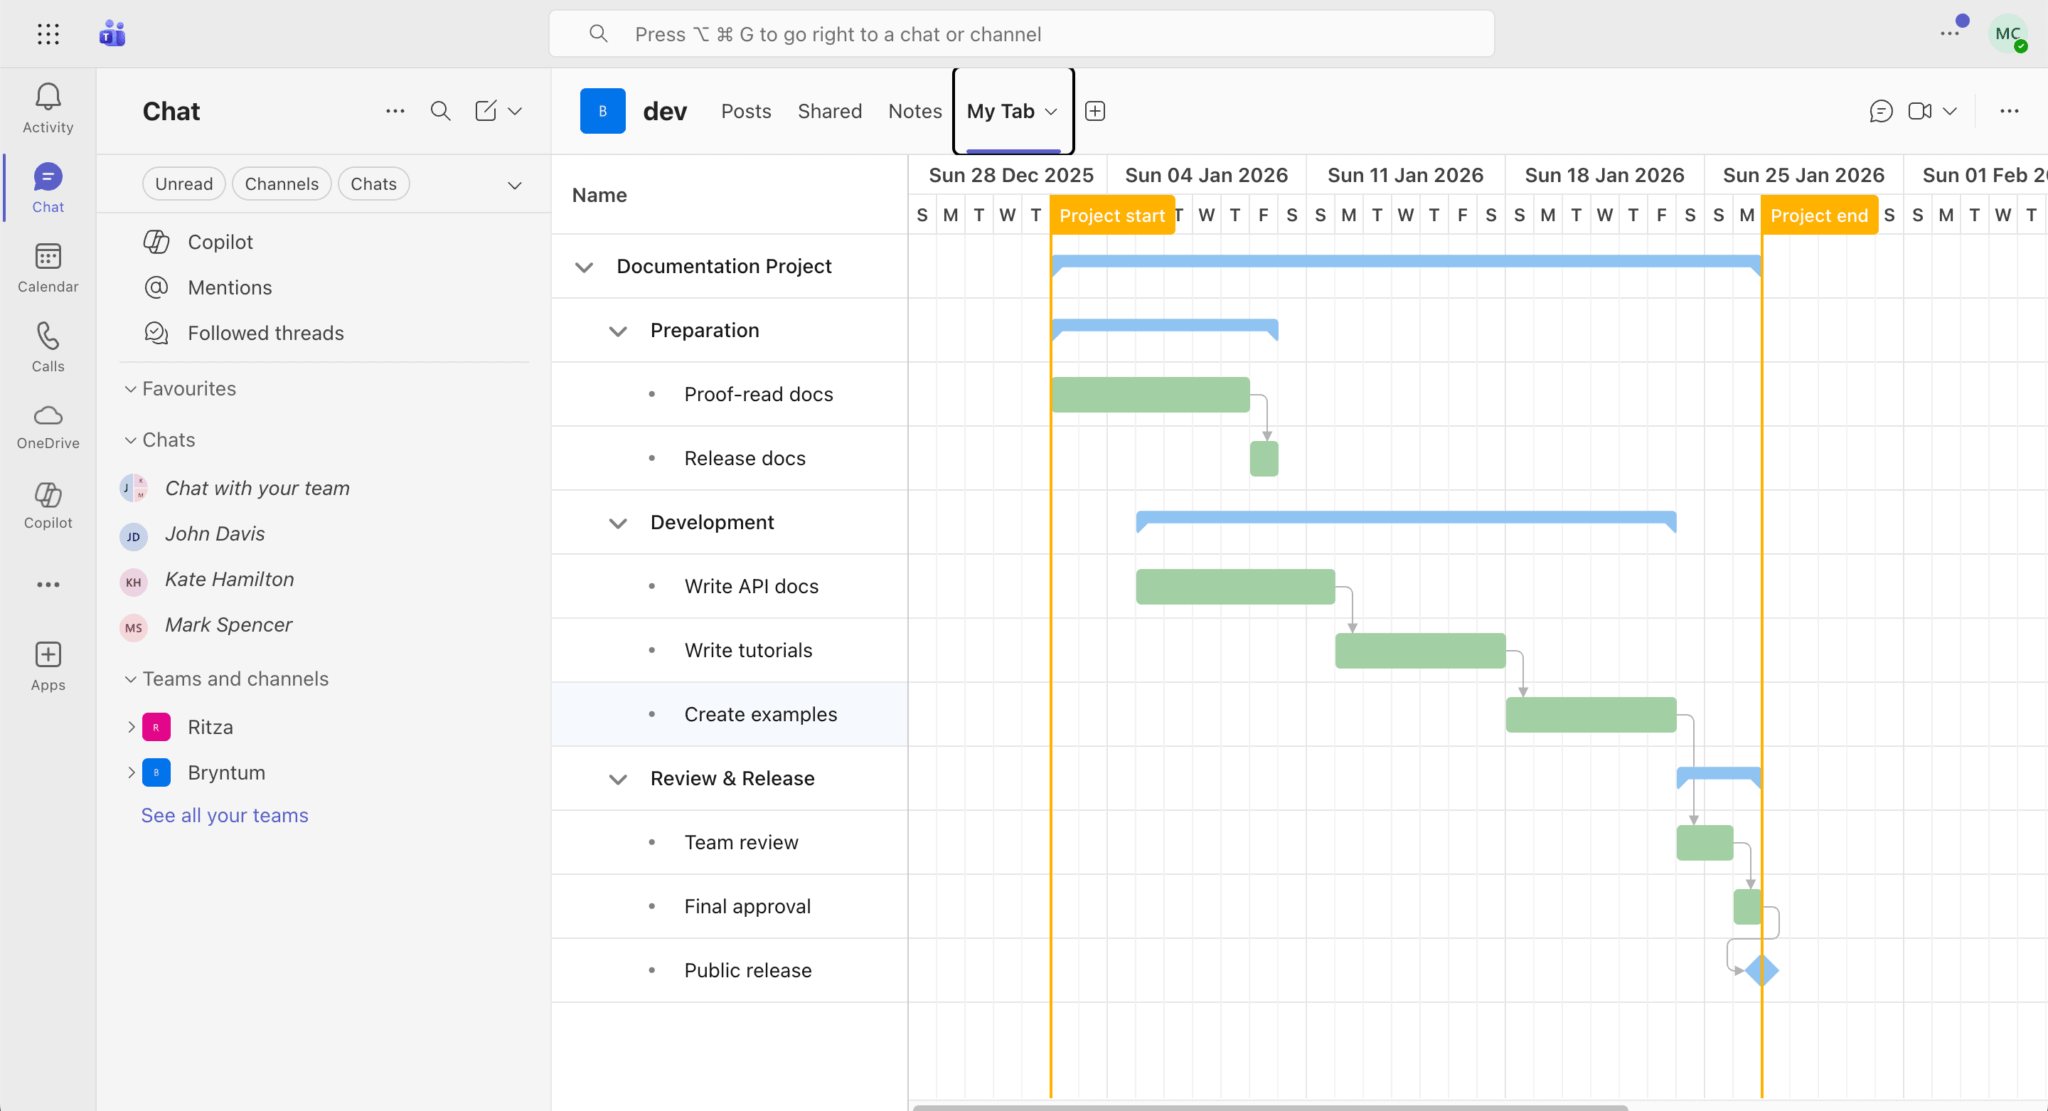
You should see a Gantt app in Teams with data from your MySQL database:
⚠️ Remember to update your job title to manager to allow editing the items on the chart as earlier set in the AcmeGantt.tsx file.
You can also update multiple properties of a task by right-clicking on a taskbar, clicking Edit, and then changing multiple values. The updateOperation function will also persist task reordering using drag-and-drop functionality.
Next steps
You now have a working version of the Gantt chart application in Microsoft Teams that you can use to visualize and manage project timelines.
So what comes next? Now that you’ve tested and verified the functionality of the application, you might like to deploy it to your production environment. Take a look at the deployment section in the README.md file of your Tabs app to learn how.
Are you already using Gantt chart inside Teams? If you’ve implemented Bryntum Gantt with MS Teams, we would be interested in hearing your feedback.