Getting Started with Bryntum Grid, React, and RxJS
We strive to keep posts updated, but code samples may sometimes be outdated. Humans, see the Bryntum documentation; agents, https://mcp.bryntum.com for the latest info.
If you have a web application with a lot of data, you need to find a way to display that information in a succinct and organized way, which is where grids can help. Grids are crucial components of user interfaces that tabulate massive volumes of data and make it easy for users to interact with them. Many individuals choose to use premade packages like Bryntum Grid because they are highly functional and speed up the coding process.
Bryntum Grid is an effective and high-performing table component for web applications. It comes with various capabilities, including the ability to rearrange rows and columns or modify individual cells, search and filter data, and scroll through grid portions. The grid’s visual appearance is set using the renderer functions, standard CSS, and themes built with Syntactically Awesome Style Sheets (Sass).
Bryntum Grid uses a variety of techniques, including virtual representation, the use of reusable grid elements, and CSS optimizations, to achieve visualization and navigation efficiency. You can modify virtually any portion of the codebase thanks to a robust API. Moreover, custom data formats are an option in addition to JSON, which is how all data is loaded by default. It offers a wide range of customization choices, which include premade or custom themes.
In this article, you’ll learn how to build an application using React, Bryntum Grid, and Reactive Extensions for JavaScript (RxJS). You will utilize React Hooks and RxJS for state management and build an interactive grid with built-in features.
Getting Started
Start by doing the following:
- Create a Vanilla JavaScript Vite project using
npm create vite@latest. - Add the project name (for example,
rxjs-grid). - Select
React>JavaScript. - Install the dependencies with
cd rxjs-grid && npm install.
Now, you can install the Bryntum Grid using npm. First, get access to the Bryntum private npm registry by following the guide in our docs. When you’ve logged in to the registry, install Bryntum Grid by following this guide.
Create a basic grid
To start with the Bryntum grid, use the BryntumGrid and store the configuration in states using useState. Replace the content of App.jsx with the following code:
import { useState } from "react";
import { BryntumGrid } from "@bryntum/grid-react";
function App() {
  const [columns] = useState([
    { text: "Country Name", field: "countryName", flex: 2 },
    { text: "Code", field: "code", flex: 1 },
    { text: "Capital", field: "capital", flex: 1 },
    { text: "Continent", field: "continent", flex: 1 },
    { text: "Currency", field: "currency", flex: 1 },
    { text: "Languages", field: "languages", flex: 1 },
  ]);

  const [data, setData] = useState([
    {
      id: 1,
      countryName: "Brasil",
      code: "BR",
      capital: "Brasília",
      continent: "South America",
      currency: "BRL",
      languages: "Portuguese",
    },
    {
      id: 2,
      countryName: "Bahamas",
      code: "BS",
      capital: "Nassau",
      continent: "North America",
      currency: "BSD",
      languages: "English",
    },
    {
      id: 3,
      countryName: "Botswana",
      code: "BW",
      capital: "Gaborone",
      continent: "Africa",
      currency: "BWP",
      languages: "English, Tswana",
    },
    {
      id: 4,
      countryName: "Colombia",
      code: "CO",
      capital: "Bogotá",
      continent: "South America",
      currency: "COP",
      languages: "Spanish",
    },
    {
      id: 5,
      countryName: "Costa Rica",
      code: "CRC",
      capital: "Brasília",
      continent: "North America",
      currency: "CR",
      languages: "Spanish",
    },
    {
      id: 6,
      countryName: "Ecuador",
      code: "EC",
      capital: "Quito",
      continent: "South America",
      currency: "USD",
      languages: "Spanish",
    },
  ]);
  const [features] = useState({
    cellEdit: true,
    regionResize: false,
    stripe: true,
  });
  return <BryntumGrid data={data} columns={columns} features={features} />;
}
export default App;
To add styling, remove the App.css and import one of the built-in Bryntum themes into the index.css.
@import "@bryntum/grid/grid.stockholm.css";Bryntum comes with five built-in themes, learn more about them here.
The default grid height is not enough to show all the records. To make it full page height, you can append the following content to index.css
/* Make grid full page */
#root {
height: 100vh;
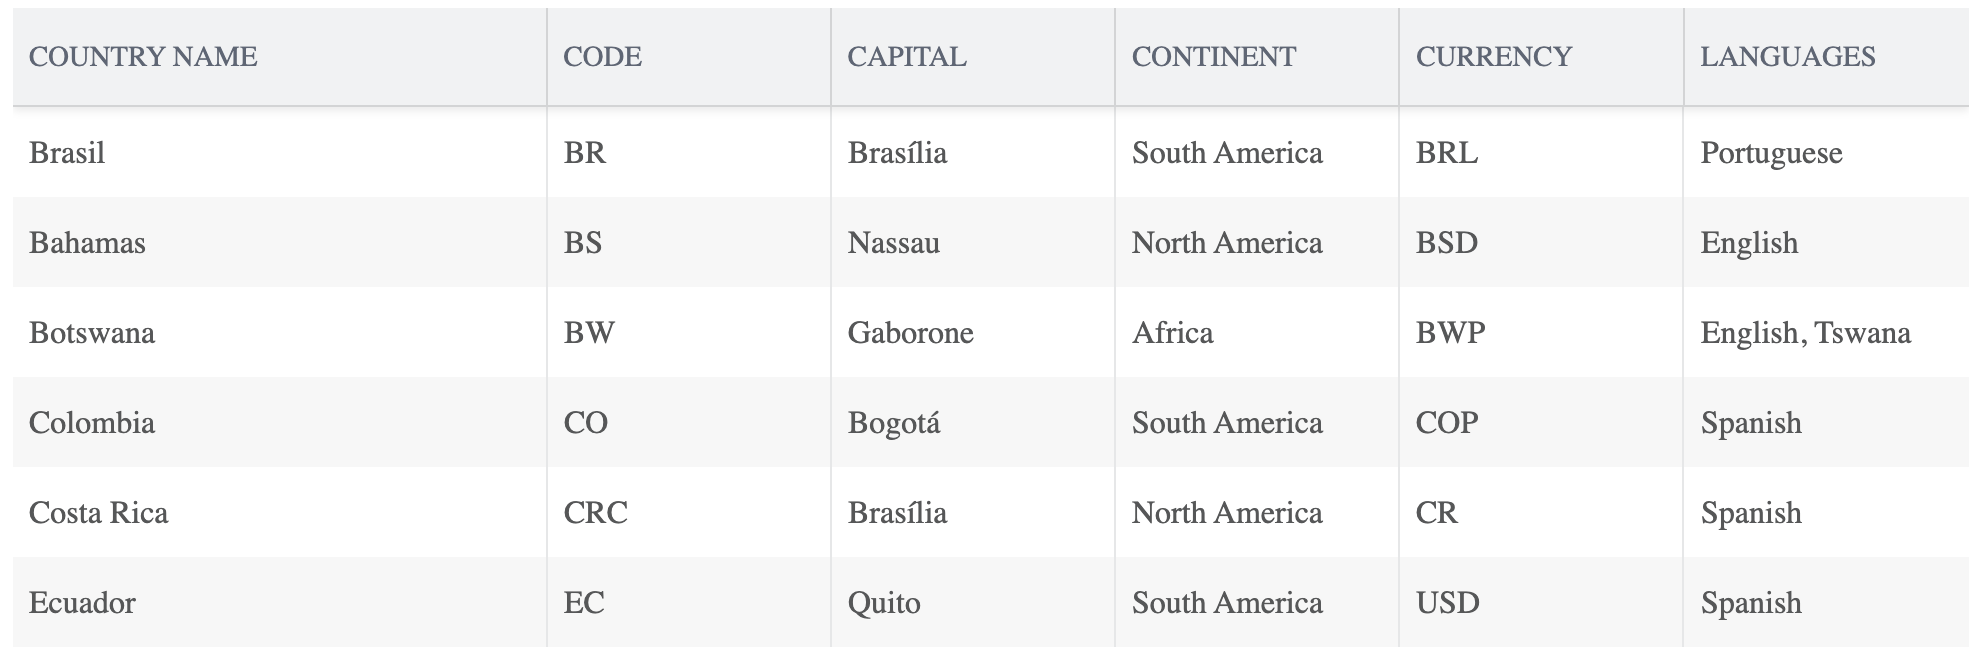
}Use npm run dev to start a dev server. With that, your grid should look like the following:
RxJS for Managing App State
RxJS is a package that allows the creation of asynchronous and event-based applications with the help of observable sequences. In a nutshell, the RxJS package enables you to manage and modify data over time. You can read more about RxJS in the official documentation.
The fundamental features of RxJS are as follows:
- Observable: An observable is a data source that contains data that can be shared between various components of your application. The source can operate synchronously or asynchronously, and it can provide numerous values over time.
- Observer: An observer is an object that consumes the information an observable emits. Until the observable is finished or the observer unsubscribes from the observable, the observer continues to receive data from the observable.
- Subscription: This has to do with an observer requesting information from an observable. An observer will only receive data that they subscribe to.
- Subjects: An RxJS subject can function simultaneously as an observer and an observable. Values can be broadcast to numerous observers, allowing every observer who has subscribed to a subject to get any data that is received.
Install RxJS and Create a Store
To install RxJS and create a store, run the following command in your terminal:
npm install rxjs
The best way to interact between components when using RxJS with React Hooks is to utilize an Observable and a Subject.
To contain your store, create a store folder in the src directory.
Navigate to src/store and create a DataStore.js file that will be used for your grid functions. Then you need to import the Subject class and create a variable from it in DataStore.js:
import { Subject } from 'rxjs';

const subject = new Subject();
Now you need to obtain data from the store. The data can be empty, but when an API call is made, it needs to have data in it. In this tutorial, you’ll make use of dummy data. In the DataStore.js, after the Subject, add the following:
let data = [
  {
    id: 1,
    countryName: "Brasil",
    code: "BR",
    capital: "Brasília",
    continent: "South America",
    currency: "BRL",
    languages: "Portuguese",
  },
  {
    id: 2,
    countryName: "Bahamas",
    code: "BS",
    capital: "Nassau",
    continent: "North America",
    currency: "BSD",
    languages: "English",
  },
  {
    id: 3,
    countryName: "Botswana",
    code: "BW",
    capital: "Gaborone",
    continent: "Africa",
    currency: "BWP",
    languages: "English, Tswana",
  },
  {
    id: 4,
    countryName: "Colombia",
    code: "CO",
    capital: "Bogotá",
    continent: "South America",
    currency: "COP",
    languages: "Spanish",
  },
  {
    id: 5,
    countryName: "Costa Rica",
    code: "CRC",
    capital: "Brasília",
    continent: "North America",
    currency: "CR",
    languages: "Spanish",
  },
  {
    id: 6,
    countryName: "Ecuador",
    code: "EC",
    capital: "Quito",
    continent: "South America",
    currency: "USD",
    languages: "Spanish",
  },
];
Next, create a method for sending and receiving data from the store:
export const DataStore = {
  sendData: (data) => {
    subject.next([...data]);
  },
  onData: () => subject.asObservable(),
  data,
};
The sendData() method is used when you want to update the data. A data argument will be provided to the sendData() method, which will be appended to the data set.
Then the onData() method returns an Observable that you Subscribe to receive recent data. Also, you export the data so that it can be used as initial data. You need to export the store so it can be imported and used elsewhere.
Use Data in Component
In the App.jsx file, you need to import the DataStore and obtain data from the store to use in the useState hook. To do this, you simply update the initial state of const [data, setData]:
import React, { useState } from 'react';
import { DataStore } from './store/DataStore';
function App() {
const [data, setData] = useState(DataStore.data);
}
Then you need to create a useEffect hook and subscribe to the onData method to listen for any changes. Import useEffect so that you can use it:
import { useEffect }  from 'react';
function App() {

useEffect(() => {
    	const subscription = DataStore.onData().subscribe(data => {
        	setData(data);
    	});
    	return () => subscription.unsubscribe();
} , []);
}
Finally, you need to unsubscribe from the Observable when the component unmounts to prevent memory leaks in the application.
Add Data to the Grid
The next thing you need to create is a form that allows you to add additional country data to the grid. Because you subscribed to it in useEffect, you’re notified when a form submission is made, and the grid is updated in real time.
You can proceed to update the code in the App.jsx file to add an informational form for creating a new grid item. Make a button to turn the form on and off. After that, the form is created and styled. Then you need to handle the toggle and form states as seen here:
const [toggleForm, setToggleForm] = useState(false);
const [formData, setFormData] = useState({
  id: "",
  countryName: "",
  code: "",
  capital: "",
  continent: "",
  currency: "",
  languages: "",
});
const triggerToggle = () => {
  setToggleForm(!toggleForm);
};
return (
    <>
      <div className="content-container">
        <div className="new-content">
          <button className="btn-primary" onClick={triggerToggle}>
            Add new
          </button>
        </div>
        {toggleForm && (
          <div>
            <form className="form-container">
              <input
                type="text"
                placeholder="Country Name"
                name="countryName"
                id="countryName"
                className="form-input"
                onChange={(e) =>
                  setFormData({ ...formData, countryName: e.target.value })
                }
                value={formData.countryName}
              />
              <input
                type="text"
                placeholder="Code"
                name="code"
                id="code"
                className="form-input"
                onChange={(e) =>
                  setFormData({ ...formData, code: e.target.value })
                }
                value={formData.code}
              />
              <input
                type="text"
                placeholder="Capital"
                name="capital"
                id="capital"
                className="form-input"
                onChange={(e) =>
                  setFormData({ ...formData, capital: e.target.value })
                }
                value={formData.capital}
              />{" "}
              <br />
              <input
                type="text"
                placeholder="Continent"
                name="continent"
                id="continent"
                className="form-input"
                onChange={(e) =>
                  setFormData({ ...formData, continent: e.target.value })
                }
                value={formData.continent}
              />
              <input
                type="text"
                placeholder="Currency"
                name="currency"
                id="currency"
                className="form-input"
                onChange={(e) =>
                  setFormData({ ...formData, currency: e.target.value })
                }
                value={formData.currency}
              />
              <input
                type="text"
                placeholder="Languages"
                name="languages"
                id="languages"
                className="form-input"
                onChange={(e) =>
                  setFormData({ ...formData, languages: e.target.value })
                }
                value={formData.languages}
              />
              <div>
                <button className="btn-primary">Submit</button>
              </div>
              <br />
            </form>
          </div>
        )}
        <div id="grid">
          <BryntumGrid data={data} columns={columns} features={features} />
        </div>
      </div>
    </>
    );
Now add the styles in the index.css file:
.content-container {
    width: 100%;
}
.btn-primary {
    display: inline-block;
    font-weight: 400;
    text-align: center;
    border: 1px solid transparent;
    padding: 0.375rem 0.75rem;
    font-size: 1rem;
    line-height: 1.5;
    border-radius: 0.25rem;
    color: #fff;
    background-color: #007bff;
    border-color: #007bff;
    cursor: pointer;
}
.new-content {
    display: flex;
    justify-content: right;
    margin: 10px;
}
.form-container {
    text-align: center;
}
.form-input {
    padding: 0.375rem 0.75rem;
    font-size: 1rem;
    line-height: 1.5;
    color: #495057;
    background-color: #fff;
    background-clip: padding-box;
    border: 1px solid #ced4da;
    border-radius: 0.25rem;
    margin: 5px;
}
Also, change the #root to #grid in the index.css:
#grid {
height: 100vh;
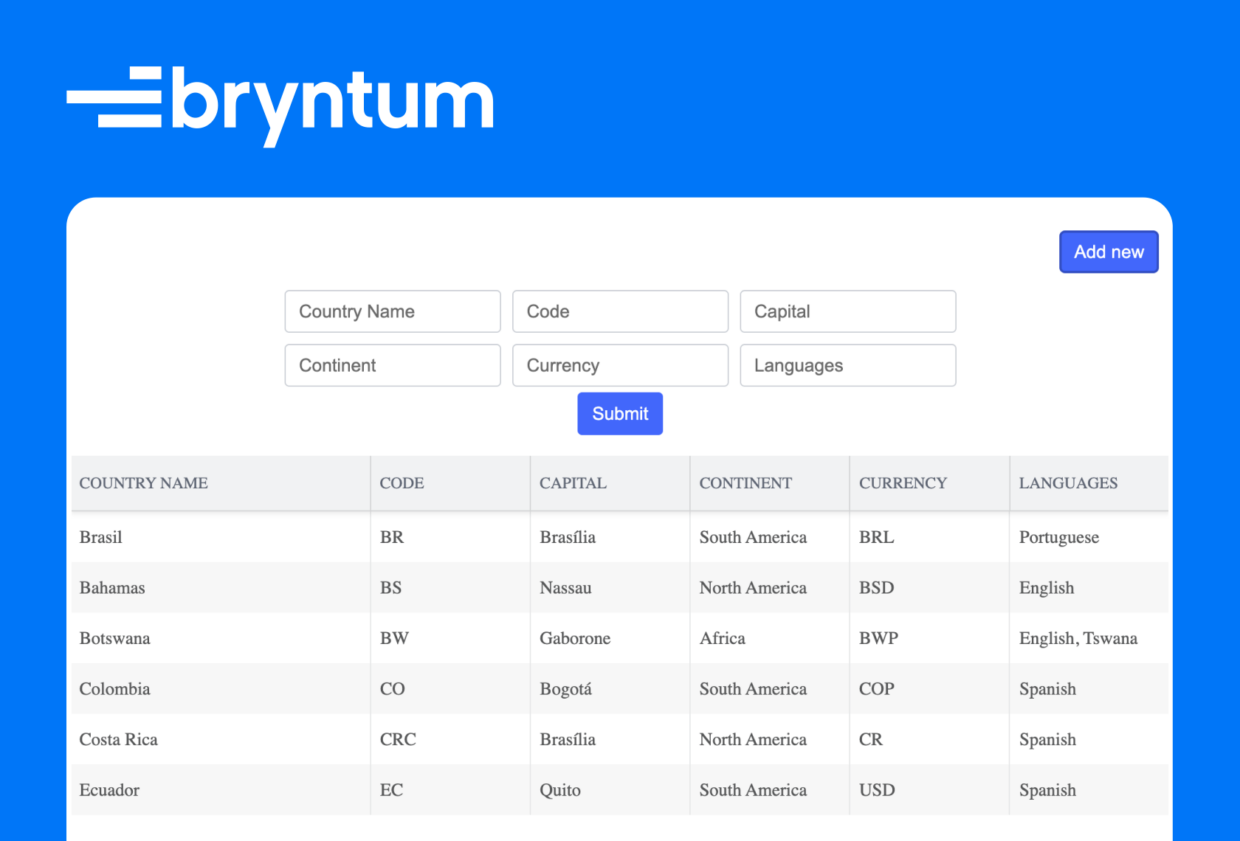
}In the previous code, the toggleForm is used to show and hide the form when you select the Add new button. The formData holds details of the form, which are set onChange of the form input. Your current form should look like this:
Upon submission of the form, the data is sent to the RxJS store, and the form is reset. Then since you are subscribing to the store, data will be updated, resulting in a rerender of the grid with the new data added to the table.
Add the submit function to the App.jsx file:
const handleSubmit = (e) => {
        e.preventDefault();
        // to increment the id of the new record
        formData.id = data.length + 1;
        // to add the new record to the data array
        DataStore.sendData([...data, formData]);
        // to reset the form
        setFormData({
            id: '',
            countryName: '',
            code: '',
            capital: '',
            continent: '',
            currency: '',
            languages: ''
        });
        // to close the form
        setToggleForm(!toggleForm);
    }
Then update it:
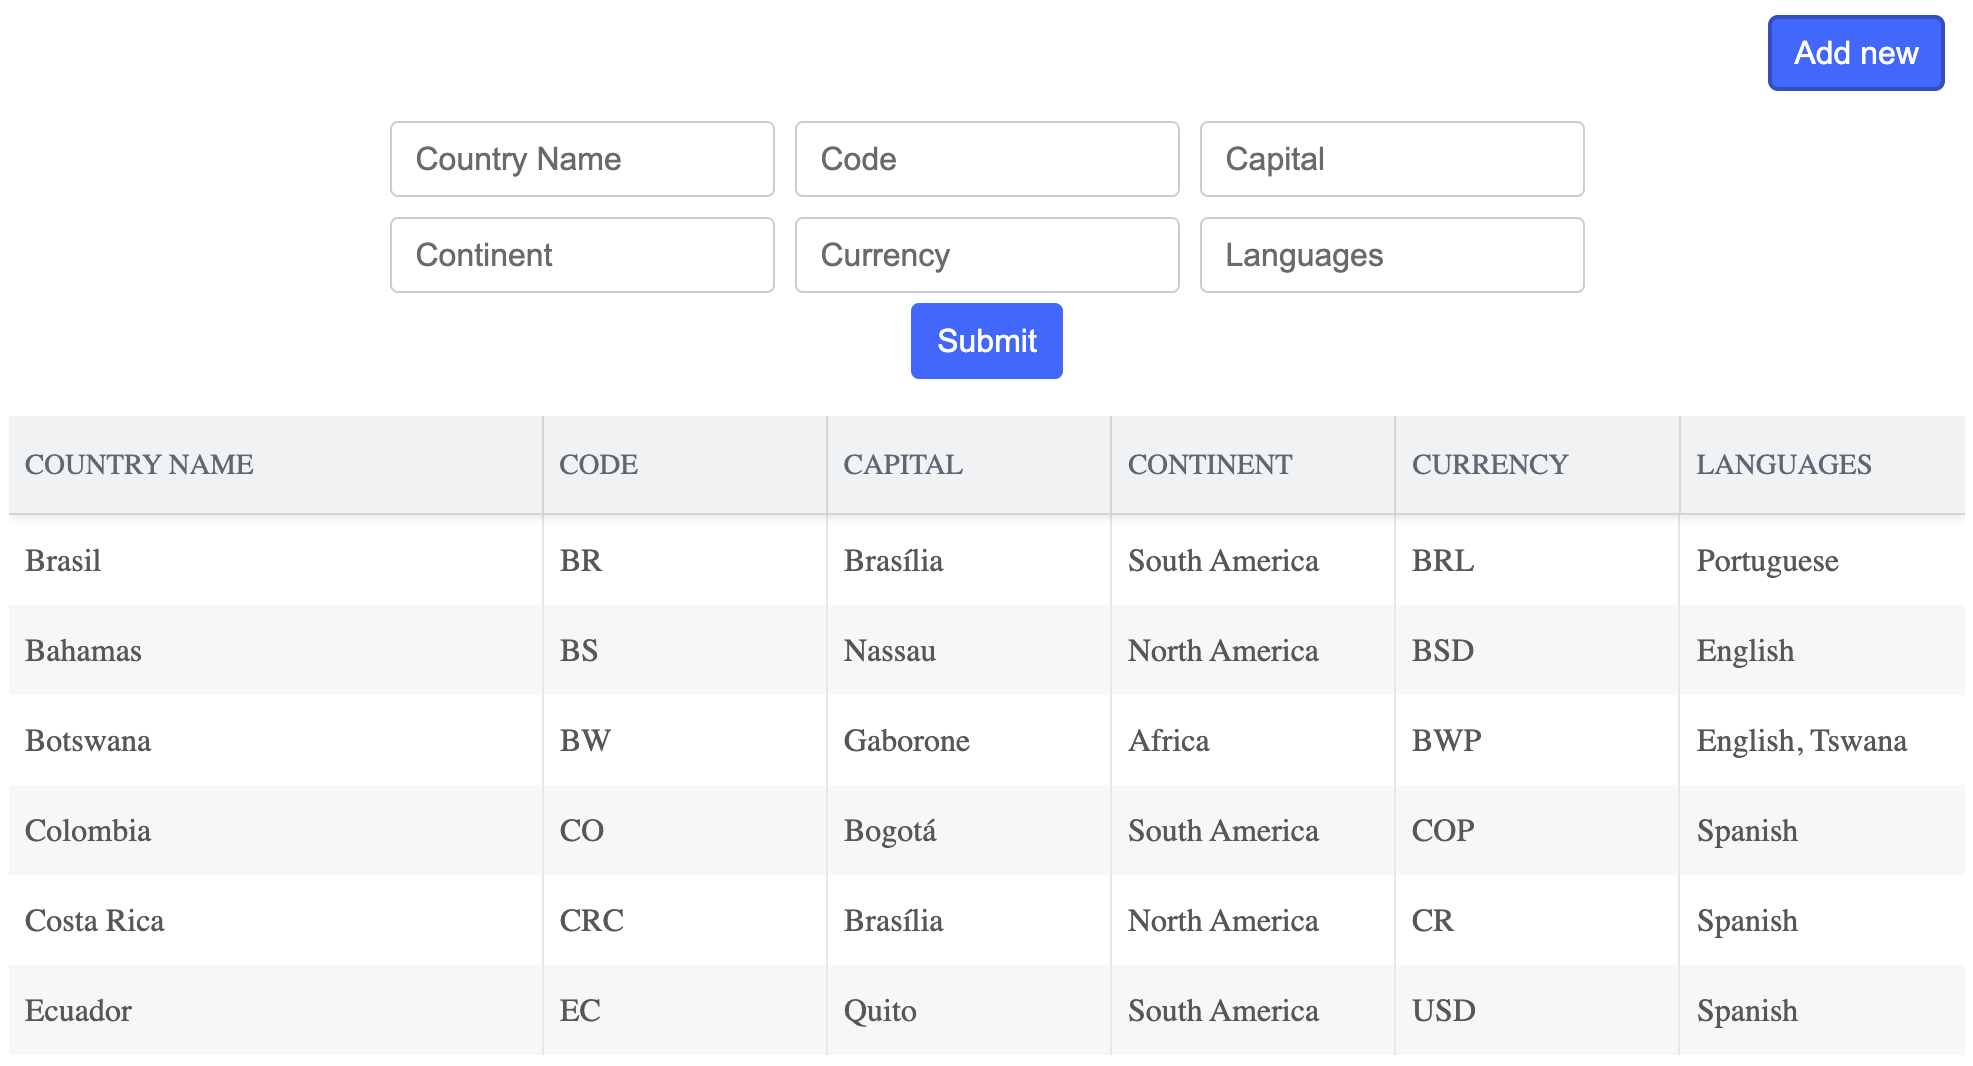
<button className='btn-primary' onClick={handleSubmit}>Submit</button>Now the list is updated upon submitting:
Bryntum Grid is quite flexible and comes with a lot of built-in features that you can use to listen to events based on the triggering of any feature. A full list of features is available in the Bryntum Grid docs.
Conclusion
In this article, you learned how to use Bryntum Grid with its configurations in a React application. You also learned how to manage the application state with RxJS. In addition, you learned how to get data from the RxJS store to prefill the grid and, later, add more data to the grid from the store.
We have a list of online examples that are completely interactive, please make sure to check them out. If you’re new to Bryntum Grid, we offer a 45-day trial, the perfect opportunity to explore the full capabilities of our tool in your projects. And remember, if you have any questions or need support along the way, our forums are always open.