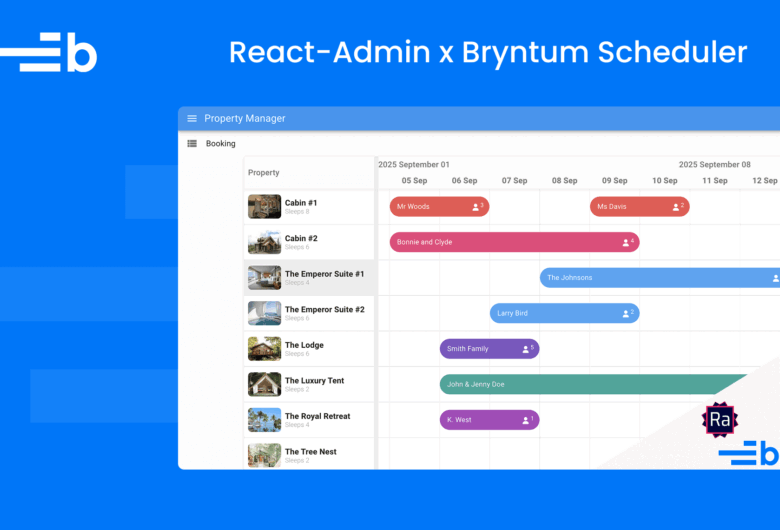
Create a property management scheduler with Bryntum using vanilla JavaScript

We strive to keep posts updated, but code samples may sometimes be outdated. Humans, see the Bryntum documentation; agents, https://mcp.bryntum.com for the latest info.
The Bryntum Scheduler component is a JavaScript resource management widget you can use to manage complex schedules. It is feature-packed with great performance, and you can customize it to suit your needs. In this tutorial, we will create a property management app to keep track of bookings for different rental apartments using the Bryntum Scheduler. Our vanilla JavaScript scheduler will have the following features:
- The properties have different prices per night, and dates can be set aside when a property is not available to be booked.
- The user can add new bookings by clicking and dragging their cursor in empty parts of the scheduler rows. The price of the stay will automatically be calculated based on the number of days and price per night.
- Booking dates can’t overlap.
- The user can set the details for the booking: The client’s name, the duration of the stay, price, and number of guests.
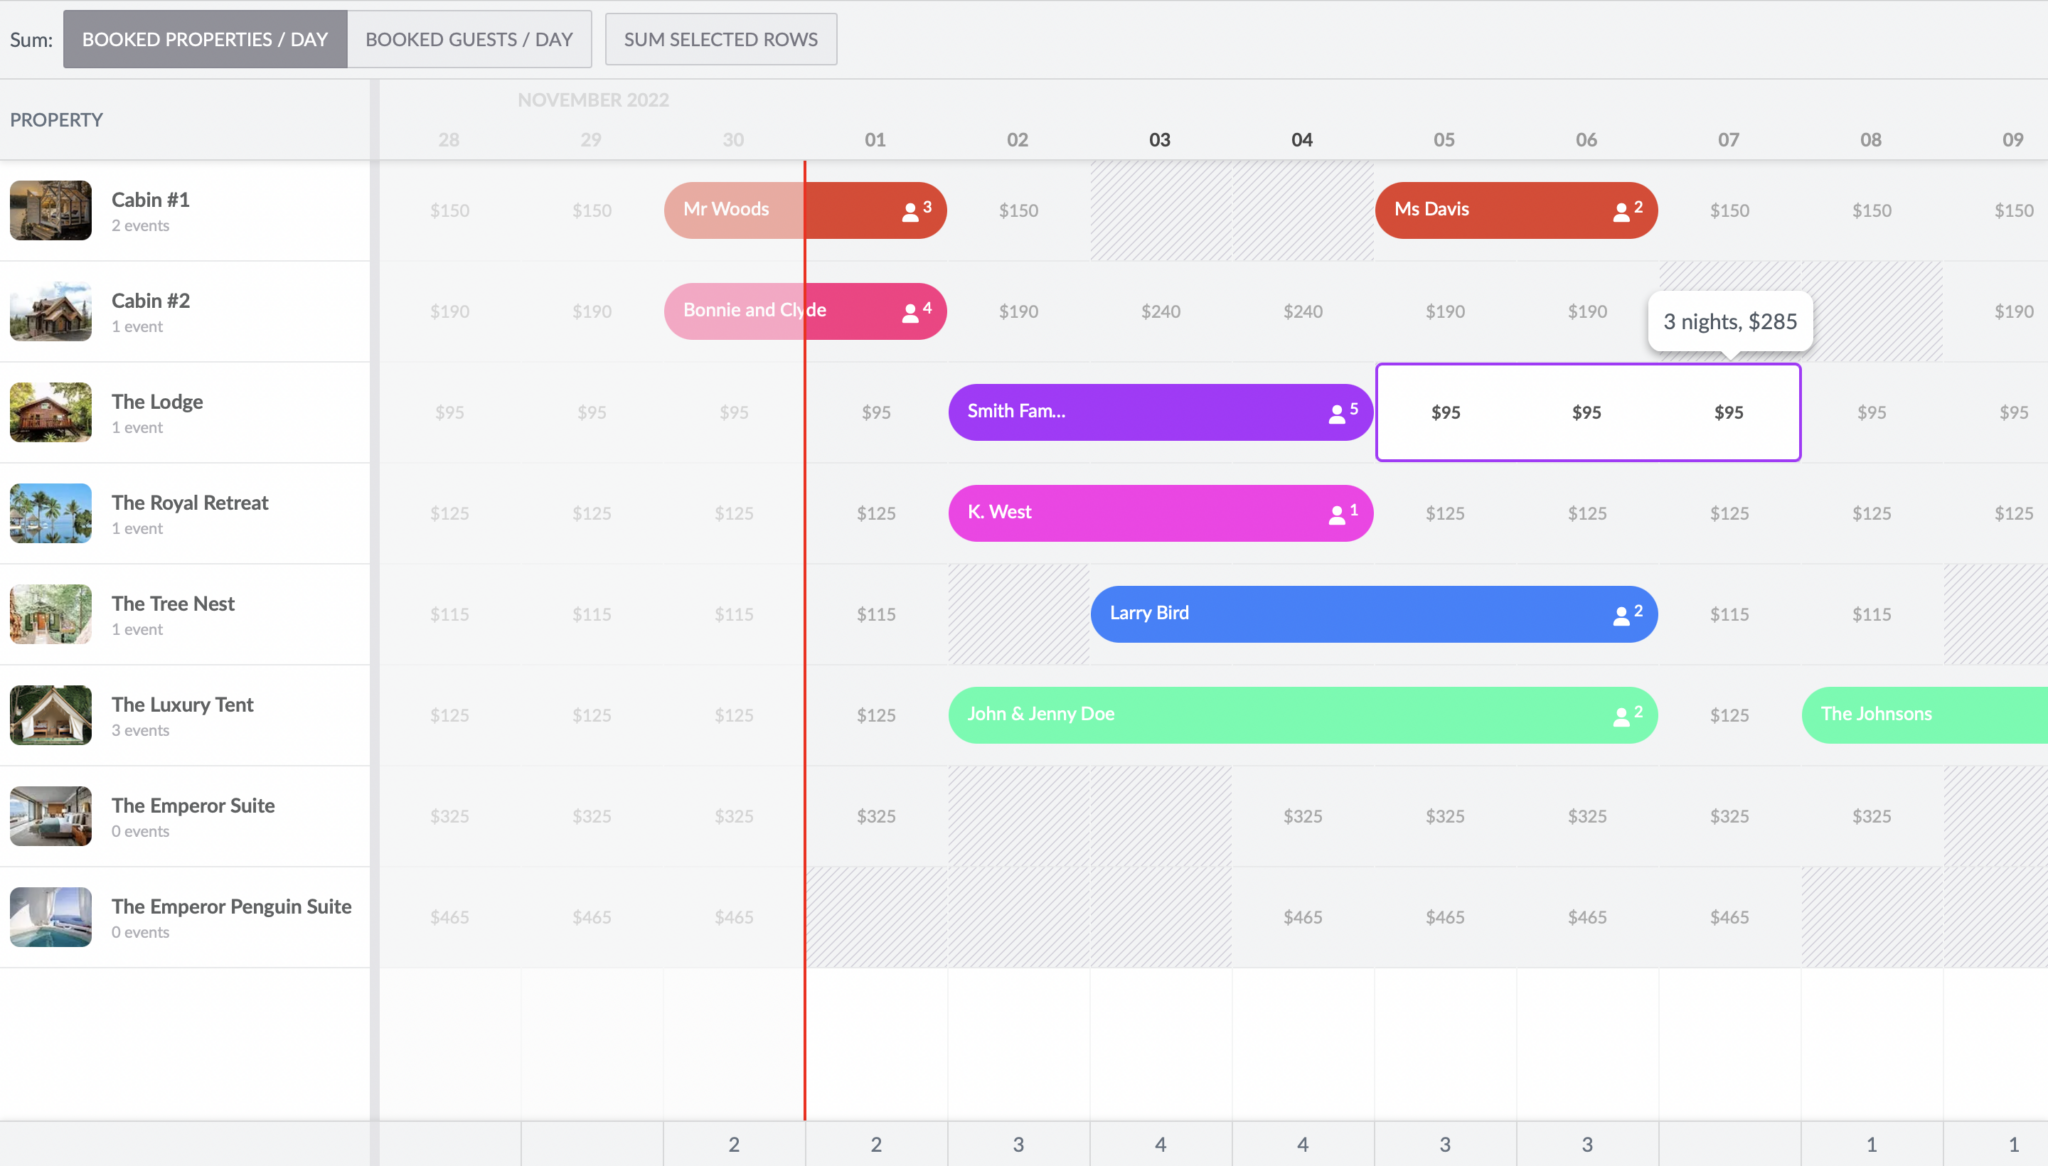
- A summary row to show the number of bookings or number of guests per day. The user can toggle between the summary options using buttons at the top of the scheduler. Multiple property rows can be selected to calculate the combined summary row values for the selected properties.
Once you’re done, you’ll have a property management scheduler that looks like the one shown in the image below and in this short demo video
Getting started
To get started, we’ll follow the steps outlined in the following guide from the Bryntum docs: Getting Started on Bryntum Scheduler with Vanilla JS. We will use files from the trial distribution folder. If you want to use npm instead, you can follow this guide from the docs.
Download the free trial version distribution folder of the Bryntum version 5.2.0 Scheduler here. If you have already bought the licensed version, you can log in here to get it.
Unzip the downloaded distribution folder on your PC. We’ll make use of the following folders to make our property management app:
| Folder | Contents |
|---|---|
/build | Distribution folder, contains JS bundles, CSS themes, locales, and fonts. |
/lib | Source code, can be included in your ES6+ project using import. |
/resources | SCSS files to build our themes or your own custom theme. |
/examples/_shared | Shared library resources used by demos. |
/examples/booking | Code used by booking demo. |
We’ll copy files and folders from these into a new folder for our property management scheduler app. In the root folder of your project, create a folder called schedulerDist and add the following files and folders from the Bryntum Scheduler distribution folder:
|__ schedulerDist
    |__ build
    |__ examples
        |__ _shared
            |__ browser
            |__ shared.css
            |__ shared.css.map
            |__ shared.scss
    |__ lib
    |__ resources
In the examples folder, we only need the browser folder and the shared.css, shared.css.map, and shared.scss files.
Now add the following files and folders from the Bryntum Scheduler distribution folder /examples/booking/ folder to the root folder of your project. This is the folder that contains the code for the demo that we’ll create in this tutorial:
|__ data
|__ lib
|__ resources
In the lib folder, replace file imports in DailyRate.js, DaySelector.js, PropertyModel.js and ReservationModel.js as below:
// Imports for DailyRate.js
import {
    ResourceTimeRangeStore,
    DateHelper,
    RecurringTimeSpansMixin,
    RecurringTimeSpan,
    ResourceTimeRangeModel,
}  from '../schedulerDist/build/scheduler.module.js';
// Imports for DaySelector.js
import {
GridFeatureManager,
Tooltip,
DateHelper,
DomHelper,
EventHelper,
InstancePlugin,
} from '../schedulerDist/build/scheduler.module.js';// Imports for PropertyModel.js
import { ResourceModel } from '../schedulerDist/build/scheduler.module.js';// Imports for ReservationModel.js
import { EventModel } from '../schedulerDist/build/scheduler.module.js';In the resources folder, do the following find and replace for the file imports:
// Find:
../../../resources/
// Replace with:
../schedulerDist/resources/
Create an index.html file in your app’s root folder and add the following lines to it:
<!DOCTYPE html>
<html lang="en">
<head>
	<meta name="description" content="This example shows a demo booking application, using ResourceTimeRanges and the summary feature."/>
	<meta charset="UTF-8">
	<meta name="viewport" content="width=device-width, initial-scale=1, maximum-scale=1, user-scalable=no">
	<title>Bryntum Scheduler - Property booking demo</title>
	<script src="./schedulerDist/examples/_shared/browser/helper.js"></script>
	<link rel="stylesheet" href="./schedulerDist/build/scheduler.stockholm.css" data-bryntum-theme>
	<link rel="stylesheet" href="./schedulerDist/examples/_shared/shared.css">
	<link rel="stylesheet" href="./resources/app.css">
</head>
<body>
	<div id="container">
	</div>
	<script type="module" src="./app.js"></script>
</body>
</html>
Now create an app.js file in your app’s root folder. We’ll only need to work in this file from now on to create our property management scheduler.
We use JavaScript modules to split the code into separate modules that can be imported and exported, so we’ll need a local HTTP server to run the code. To get a local server with live reload, you can install the npm Live Server package. If you are using VS Code, you can install the Live Server extension.
Creating a Scheduler instance
To create a scheduler, let’s first import all of the classes that we’ll need from the schedulerDist/build/ folder and the lib folder in the root of our app:
import {
    Scheduler,
    DisplayField,
    Summary,
    ResourceInfoColumn,
    TimeRanges,
    ResourceTimeRanges,
    DateHelper,
    StringHelper,
} from './schedulerDist/build/scheduler.module.js';
import './lib/DaySelector.js';
import DailyRateStore from './lib/DailyRateStore.js';
import ReservationModel from './lib/ReservationModel.js';
import PropertyModel from './lib/PropertyModel.js';
Now let’s create an instance of our scheduler and configure it with inline properties:
const scheduler = new Scheduler({
    appendTo          : 'container',
});
The appendTo property indicates the id of the DOM element that the scheduler will be added to as a child element. In the index.html file, there is a <div> element with an id of container.
If you open the development server in your browser now, you’ll now see the Bryntum Scheduler:
We’ll now proceed to configure our scheduler with more properties to make it a useful booking management app.
Setting the date range and columns
Let’s set the date range displayed at the top of the scheduler and create a column for our resources, which will be our accommodation properties.
Add the following properties to the scheduler:
    viewPreset        : 'dayAndMonth',
    resourceImagePath : 'resources/',
    startDate                 : new Date(2022, 10, 28),
    endDate                   : new Date(2022, 11, 20),
The viewPreset describes the type of timeline view. In this case, we’ll use a day and month view for the calendar. The resourceImagePath contains the accommodation property images that will be displayed in the property column we’ll create. We set the start and end date of the calendar view using JavaScript Date objects.
Add the following columns property to define our accommodation property:
    columns : [
        {
            type            : 'resourceInfo',
            text            : 'Property',
            width           : 260,
        }
    ],
We set the type to 'resourceInfo' to display the basic information for our scheduler resource, which will be the accommodation properties.
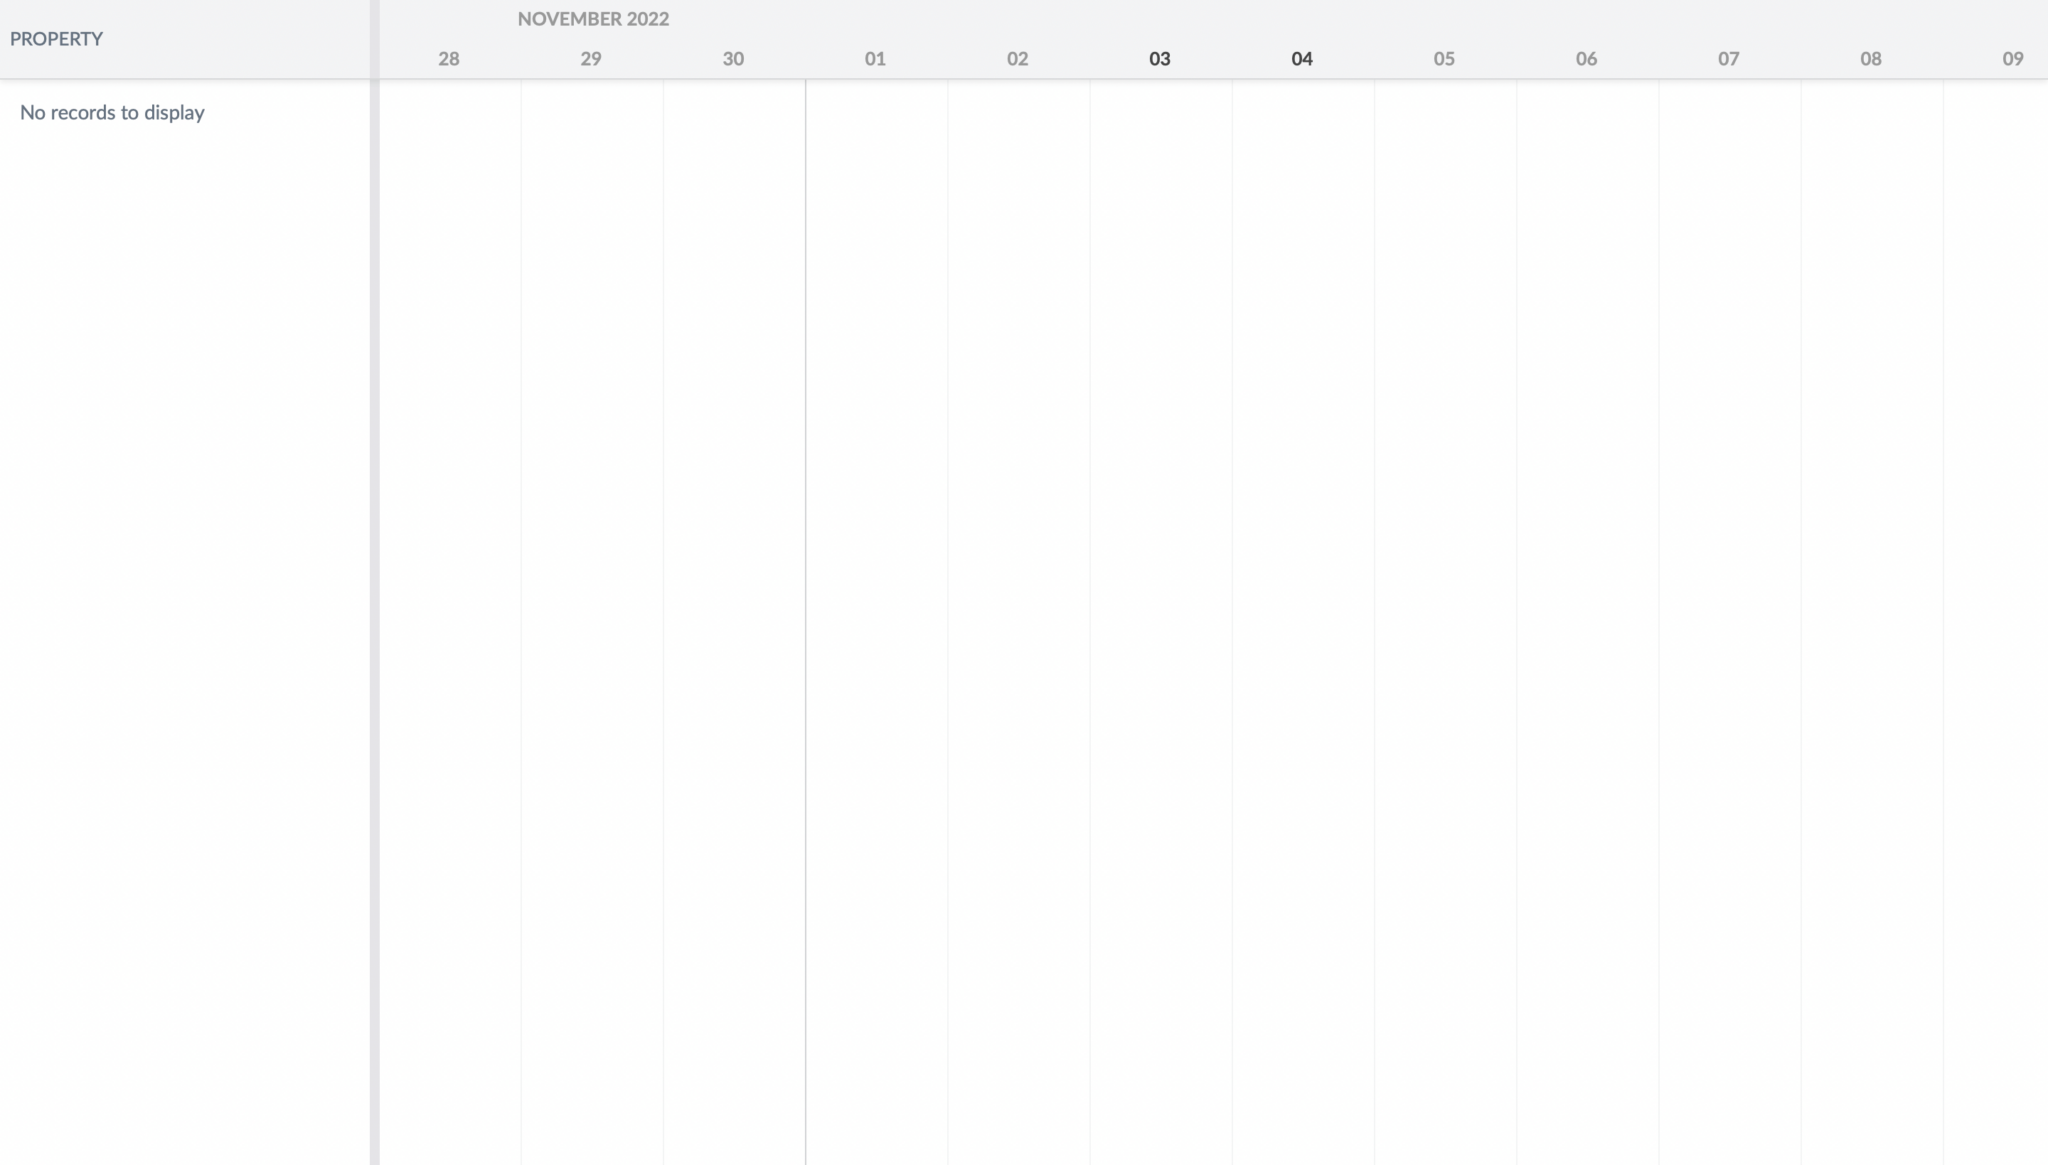
You’ll now see a “PROPERTY” column in your scheduler and the calendar header will be nicely formatted:
Getting data using the Crud Manager
The Scheduler includes a crudManager for loading and saving remote data. It has a loadUrl property that we’ll use to populate the scheduler’s data stores. Add the following crudManager property to your scheduler:
    crudManager : {
        autoLoad      : true,
        resourceStore : {
            modelClass : PropertyModel
        },

       eventStore : {
            modelClass : ReservationModel
        },
        resourceTimeRangeStore : new DailyRateStore(),
        loadUrl : 'data/data.json'
    },
The loadUrl property defines the url data source, which is the data.json file in the data folder. You can also configure the crudManager to sync data changes to a specific back end url. For more information, you can read the following guide in our docs: Saving data.
We also define the three data stores that we’ll use. They make use of models and stores defined in the ./lib folder. The resourceStore holds the data for our accommodation properties. It uses the custom PropertyModel that extends the scheduler ResourceModel. It adds an extra sleeps field to it. This extra property is used in the data/data.json file in the resources rows. It defines the number of people that each property can accommodate.
The eventStore holds the data for our bookings. It uses the custom ReservationModel that extends the scheduler EventModel. It adds the extra fields guests and pricePerNight. These extra properties are used in the data/data.json file in the events rows.
The resourceTimeRangeStore holds the data for the resource time ranges that are used to display prices per date and property in the calendar part of our scheduler. The DailyRateStore class extends the scheduler RecurringTimeSpansMixin class that adds recurring time spans functionality to the scheduler. It uses the DailyRateModel model that has a pricePerNight field. It also has a getPricePerNightFor method that we’ll use to get the price per night for an accommodation property when we create a new booking on a particular date.
In the data/data.json file, the resourceTimeRanges rows have a pricePerNight field and a recurrenceRule that describes the days on which the prices are applied. There is also an exceptionDates field that shows days where no prices should be applied. These indicate days when the property is not available for booking.
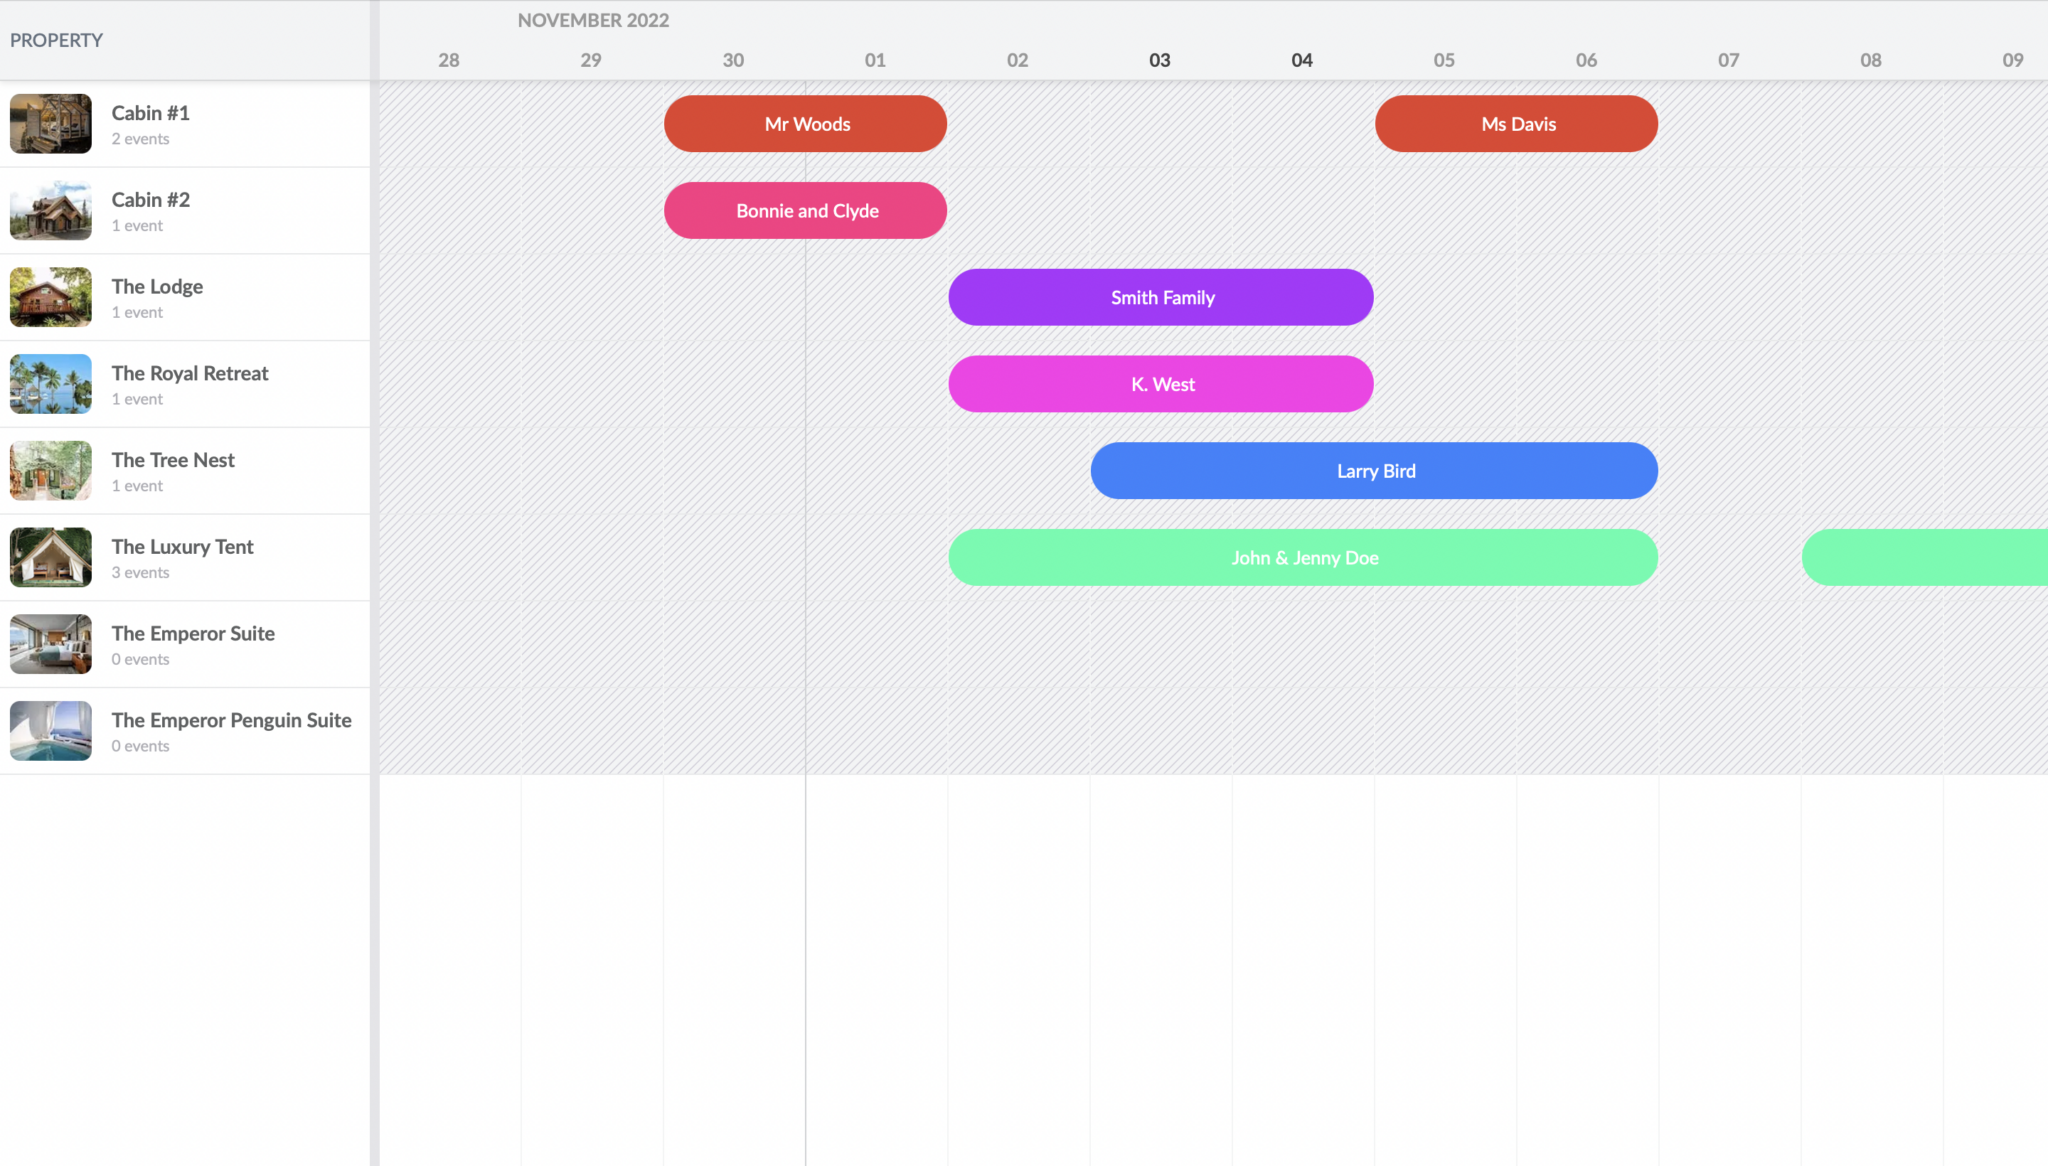
You’ll now see the properties and bookings in your booking scheduler app:
The prices per date and property are not rendered. Let’s fix that.
Displaying the prices per date and property
First, let’s increase the row height and the bar margin of the bookings. Add the following properties to your scheduler:
    rowHeight         : 70,
    barMargin         : 15,
Now add the following `features` property to your scheduler:
    features: {
        // Time ranges are used to shade time in the past (simulated)
        timeRanges         : true,
        // Resource time ranges are used to display prices per date and property
        resourceTimeRanges : {
            enableMouseEvents : true
        },
    },
The timeRanges property is used to visualize a time range. In this case, it simulates shading time in the past. The time range rendered is defined in the timeRanges property in the data/data.json file. It has a cls property, which is a custom CSS class. The shaded class is defined in resources/app.css.
Now add the following three properties to your scheduler, below the endDate property:
    zoomOnTimeAxisDoubleClick : false,
    zoomOnMouseWheel          : false,
    allowOverlap              : false,
The zoomOnTimeAxisDoubleClick and zoomOnMouseWheel properties prevent zooming in or out of the current calendar view. The allowOverlap property prevents bookings from overlapping. Try moving a booking to a date where there’s another booking in your property management scheduler app. It won’t work. Also, you can’t move any bookings in the shaded area. The shaded layer is meant to prevent moving events in the past.
You can extend the duration of a booking by dragging the sides of the booking bar. We can improve the user experience of this by making the booking bar width increment by one-day units when it’s resized. Add the following properties to the scheduler below the barMargin property:
    snap              : true,
    tickSize          : 100,
    timeResolution    : {
        unit      : 'day',
        increment : 1
    },
Now when you resize the booking, the width will increment to the next day. You can’t, for example, have a half-day booking.
You may notice that we aren’t able to add new bookings yet. Let’s add this feature.
Adding a custom add booking feature
Let’s add a custom feature to allow a user to add new bookings by clicking and dragging their cursor in empty parts of the scheduler rows. The price of the stay will automatically be calculated based on the number of days and price per night. A tooltip will show the calculated cost and the duration of the stay while creating the booking.
Add the following property to your scheduler inside the features property:
        // Custom feature that allows drag selecting days (see lib/DaySelector.js)
        daySelector : true,
The class that defines this custom feature is in lib/DaySelector.js.
Try adding an event. You’ll notice that an event editor pops up. You can also access the event editor by right-clicking on an existing booking. The event editor does not contain all the fields we need yet, such as the number of guests. We’ll customize this next.
Customizing the edit event pop-up menu
To customize the edit event pop-up, we’re going to use the eventEdit feature. Add the following eventEdit feature to your scheduler inside the features property:
        // Customize the event editor to better fit the use-case
        eventEdit : {
            editorConfig : {
                autoUpdateRecord : true,
                defaults         : {
                    labelPosition : 'above'
                }
            },
            items : {
                startTimeField : false,
                endTimeField   : false,
                endDateField   : false,
                nameField : {
                    label : 'Guest name'
                },
                resourceField : {
                    label : 'Property'
                },
                startDateField : {
                    label : 'Check-in',
                    flex  : '1 0 50%'
                },
                durationField : {
                    type   : 'number',
                    label  : 'Nights',
                    name   : 'duration',
                    flex   : '1 0 50%',
                    cls    : 'b-inline',
                    min    : 0,
                    weight : 500
                },
                priceField : {
                    type   : 'number',
                    name   : 'pricePerNight',
                    label  : 'Price per night (USD)',
                    weight : 210
                },
                // Custom field for number of guests
                guestsField : {
                    type     : 'number',
                    name     : 'guests',
                    label    : 'Number of guests',
                    weight   : 210,
                    value    : 2,
                    required : true,
                    min      : 1
                }
            }
        },
We set the fields that we don’t want to false and define the fields that we want. For the “NIGHTS” and “NUMBER OF GUESTS” fields, we set a min of one. The “NUMBER OF GUESTS” field has a default value of two and is a required field.
Let’s also disable some features that we don’t need for this tutorial. Add the following properties inside the features property:
        // Disable features not to be used in this tutorial (mainly to prevent zooming, uses a fixed view)
        cellMenu           : false,
        scheduleMenu       : false,
        timeAxisHeaderMenu : false,
        eventDragCreate    : false,
        scheduleTooltip    : false,
If you create a booking now, you’ll notice that the “PRICE PER NIGHT (USD)” field is empty. Let’s get it to auto-populate the price per night for the first day booked. Add the following method to your scheduler, below the crudManager property:
    onBeforeEventAdd({ eventRecord, resourceRecords }) {
        console.log("beforeEventAdd");
        // Copy price over to the reservation record when created
        eventRecord.pricePerNight = this.resourceTimeRangeStore.getPricePerNightFor(resourceRecords[0], eventRecord.startDate);
    },
The beforeEventAdd event runs before an event is added. We add the price per night to the eventRecord by using the getPricePerNightFor method defined in lib/DailyRateStore.js.
Now if you add a task, you’ll see that the “PRICE PER NIGHT (USD)” field is auto-populated.
Changing the booking bar text
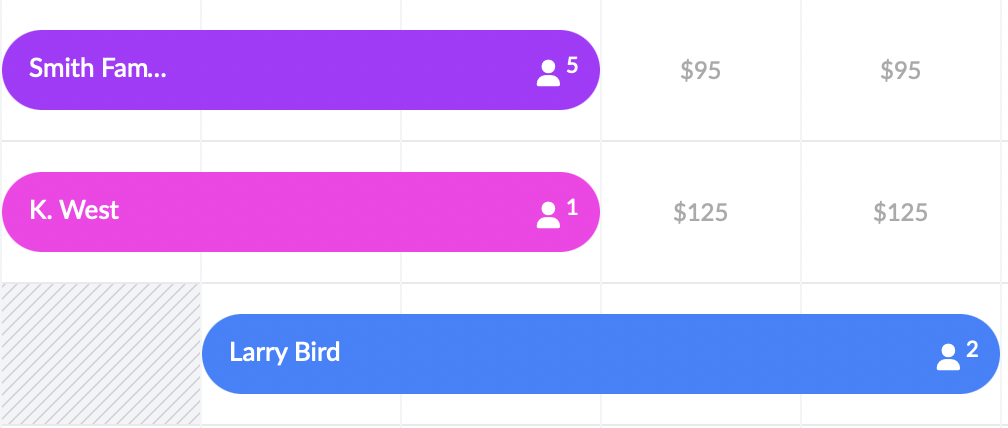
The booking bar currently only displays the guest name. Let’s change it so that it also displays the number of guests.
Add the following eventRenderer method to your scheduler below the onBeforeEventAdd method:
    eventRenderer({ eventRecord }) {
        return StringHelper.xss`${eventRecord.name} <i class="b-fa b-fa-user"><sup>${eventRecord.guests}</sup>`;
    },
The eventRenderer function is called when an event is rendered in the scheduler. A string is returned that creates HTML that is rendered on the booking bar. We add the name of the booking and the number of guests. We use the Font Awesome user icon to indicate the number of guests. The version of Font Awesome used by Bryntum has a b-fa prefix instead of fa to prevent conflicts with other versions of Font Awesome on the page. The source of these icons is in schedulerDist/build/fonts and they are imported as a font-face in “/schedulerDist/build/scheduler.stockholm.css`.
You’ll now see a user icon on the booking bar with a number indicating the number of guests.
Customizing the event tooltip
When you hover over a booking, a default tooltip will appear that shows the start and end date of the booking. Let’s customize it to display the check-in date and the duration of the stay. Add the following eventTooltip feature to your scheduler inside the features property:
        // Customize the event tooltip to display check-in date and stay duration
        eventTooltip : {
            template : ({ eventRecord }) => `
               <h4>Check-in:</h4>
               ${DateHelper.format(eventRecord.startDate, 'MMM Do')}
               <h4>Length of stay:</h4>
                ${eventRecord.duration} nights
           `
        },
The eventTooltip feature allows you to customize the template used to render the tooltip. The template method receives data about an event as arguments. We use the eventRecord argument to render a string displaying the data we want about the booking.
Adding a summary row
The last feature we’ll add is a summary row showing the number of bookings or number of guests per day.
Add the following summary feature to your scheduler inside the features property:
        // Different summaries per time axis tick based on which button in the toolbar is pressed
        summary : {
            renderer : ({ events : reservations }) => {
                let result;
                if (scheduler.widgetMap.summaryButton.value === 'count') {
                    result = reservations.length;
                }
                else {
                    result = reservations.reduce((total, reservation) => total + reservation.guests, 0);
                }
                return StringHelper.xss`${result || ''}`;
            }
        },
The summary feature displays a summary row in the grid footer. It renders the number of reservations or the total number of guests, depending on the value of the summaryButton group that we’ll soon create.
Let’s create a toolbar at the top of our scheduler that has a summaryButton group with a togglable value. Add the following property to your scheduler:
    tbar : [
        {
            type : 'widget',
            html : 'Sum:'
        },
        {
            type        : 'buttongroup',
            ref         : 'summaryButton',
            toggleGroup : true,
            items       : [{
                value   : 'count',
                pressed : true,
                text    : 'Booked properties / day'
            }, {
                value : 'guests',
                text  : 'Booked guests / day'
            }],
            onClick() {
                scheduler.features.summary.refresh();
            }
        },
        {
            text       : 'Sum selected rows',
            toggleable : true,
            onToggle   : 'up.onSumToggle'
        }
    ],
The summaryButton has a togglable value that is either count or guests. When one of them is clicked, the value is updated by refreshing the summary feature value.
There is also a “Sum selected rows” button that allows us to calculate the number of booked properties or guests for selected rows only. For it to work, we need to define the onSumToggle method. Add the following onSumToggle method to your scheduler below the eventRenderer method:
    onSumToggle() {
        this.features.summary.selectedOnly = !this.features.summary.selectedOnly;
    },
Now you’ll be able to determine the number of booked properties or guests per day for the whole scheduler or selected rows.
Next steps
This tutorial gives you a starting point for building your own property management scheduler with Bryntum using vanilla JavaScript. There are many ways you can add to or improve the property management scheduler. For example, a good additional feature to add would be to limit the number of guests for a booking based on the max number of people that property can accommodate. If you have any questions on this tutorial or if you built something similar we would love to hear your feedback.
Build it with Bryntum Scheduler
Start a free trial, explore live demos, or read the docs.