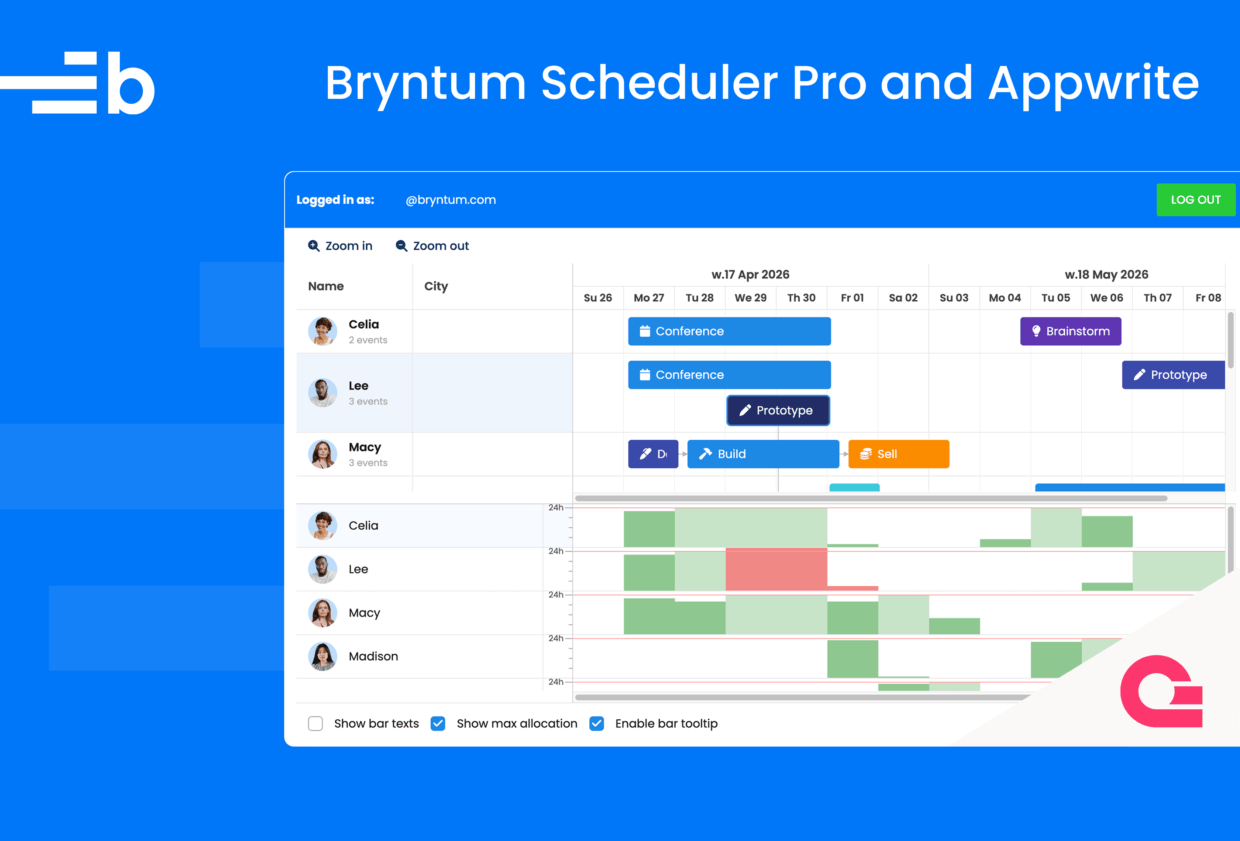
Create a React Scheduler with Bryntum Scheduler Pro and Appwrite
We strive to keep posts updated, but code samples may sometimes be outdated. Humans, see the Bryntum documentation; agents, https://mcp.bryntum.com for the latest info.
Bryntum Scheduler Pro is an enterprise-grade JavaScript scheduler component. It’s an extension of the Scheduler with extra features, such as:
The Scheduler Pro also has additional widgets, including a Resource Histogram that lets you view the working time allocations of resources, so you can identify which team members are over- or under-assigned to tasks.
You can use Bryntum components with all major JavaScript frameworks and integrate them with a range of backend services, including Appwrite, an open-source backend platform for developing web and mobile applications. It has all the features that you typically need for a backend, including auth, databases, storage, cloud functions, real time, messaging, and hosting.
This guide demonstrates how to use a React Bryntum Scheduler Pro component with Appwrite, building the following app:
By following this tutorial, you’ll learn to:
- Create an Appwrite project
- Use the Appwrite Node.js SDK to make a database with tables for Bryntum Scheduler Pro tasks, resources, dependencies, assignments, and calendars data
- Build a REST API using Appwrite Functions and the Appwrite Node.js SDK
- Set up user authentication in a client-side Bryntum Scheduler Pro React app with the Appwrite Web SDK
- Configure the Scheduler Pro component to load data from and sync data changes to the Appwrite REST API function
You can find the code for the completed tutorial in these GitHub repositories:
- Appwrite Scheduler Pro database – tables creation script
- Bryntum Scheduler Pro REST API – Appwrite function
- Bryntum Scheduler Pro – Appwrite TanStack Start app
Creating an Appwrite TanStack Start project
Sign up for an Appwrite account if you don’t already have one.
Create a project, name your project, and select a deployment region:
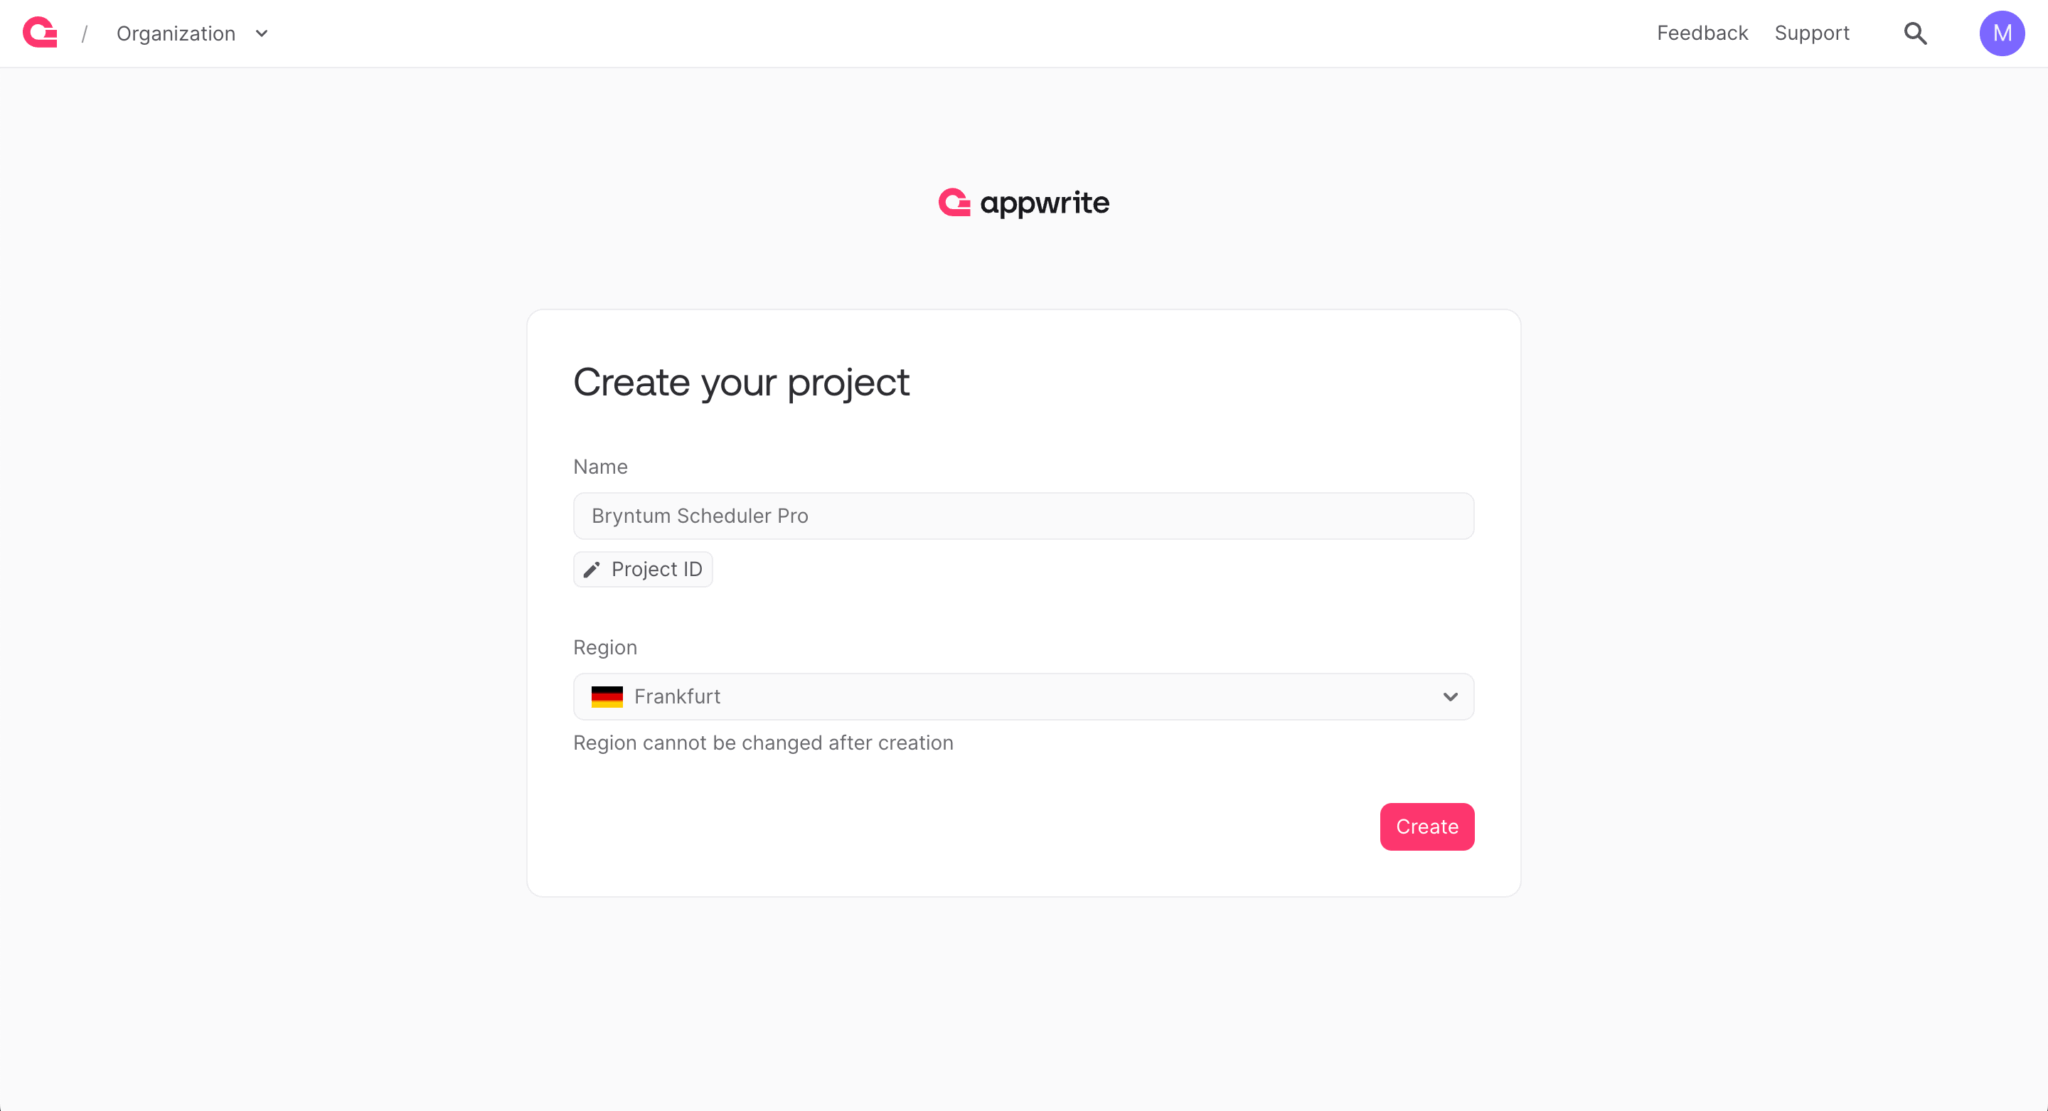
If you’re using the free plan, Appwrite automatically creates a Personal projects organization for you.
Once it has created your project, you’re redirected to the project’s Get started page. In the Connect your platform section, click the Web button to add a platform for the client-side Bryntum Scheduler Pro React app that you’ll connect with this Appwrite project:
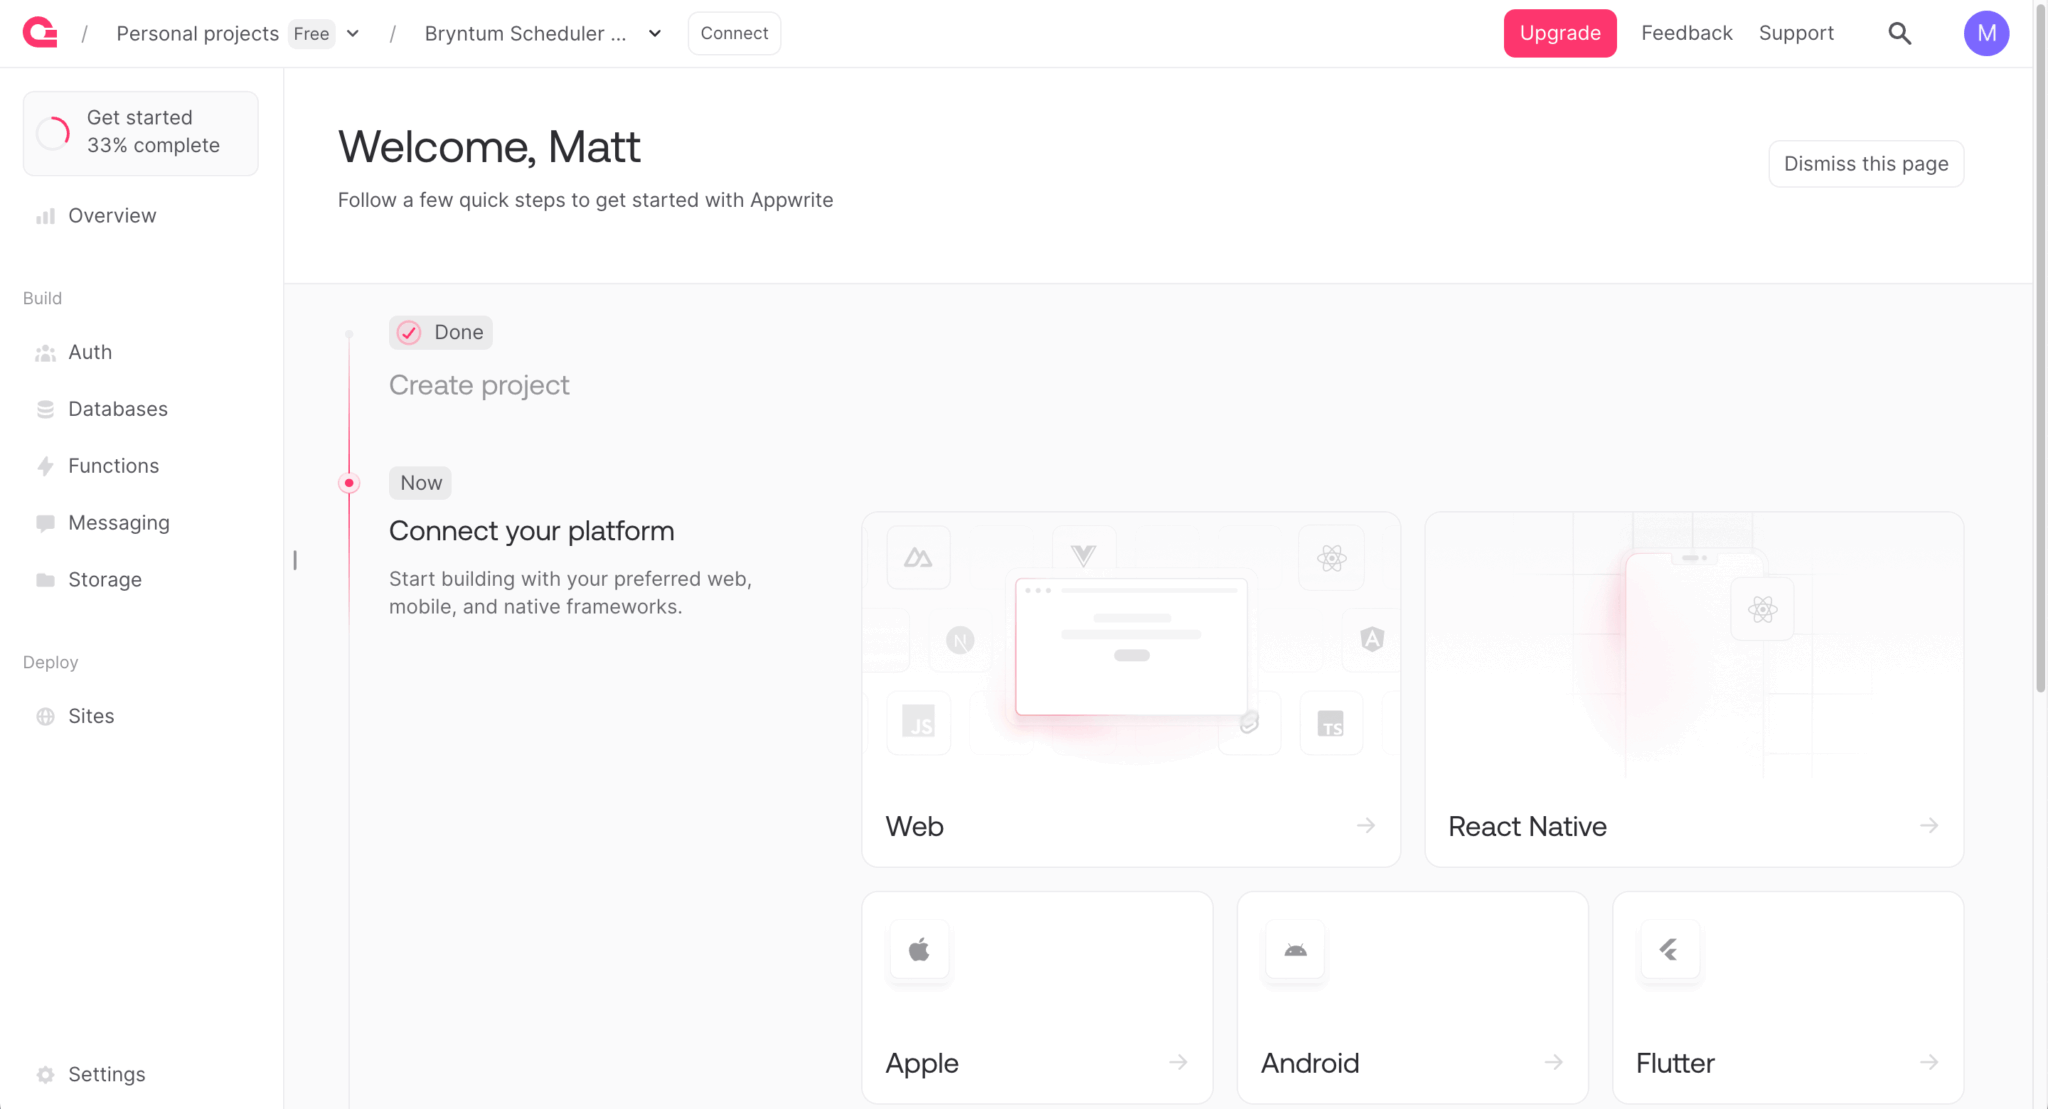
Select TanStack Start and enter localhost as the Hostname (which your app will use to interact with Appwrite APIs):
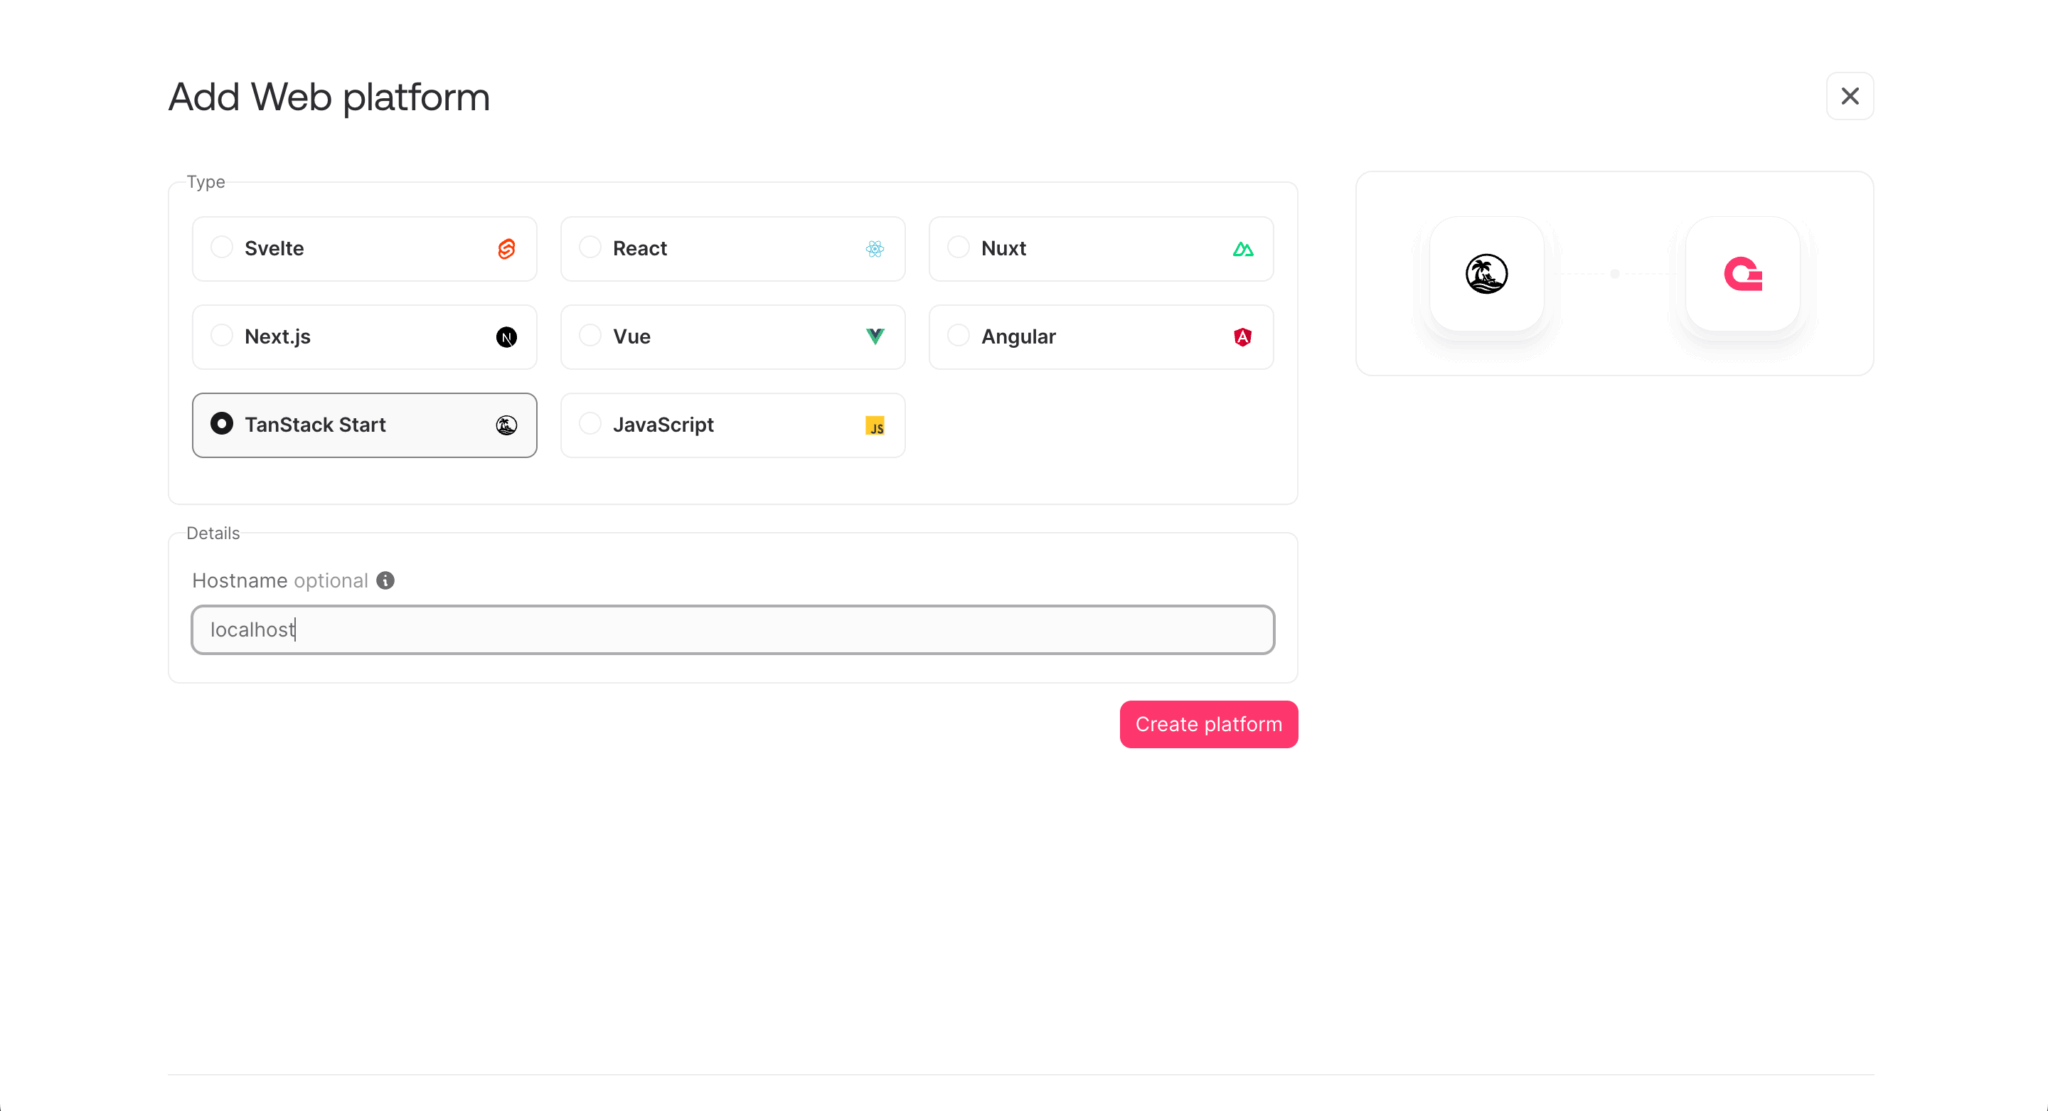
Click the Create platform button.
Follow the steps to clone and set up the Appwrite TanStack starter. You can also copy the provided prompt and use it to give your agent instructions for cloning and setting up the starter.
Let’s first create a database in Appwrite.
Creating a database
In the Appwrite Console, open the Databases page from the navigation menu and click the + Create database button. Name your database:
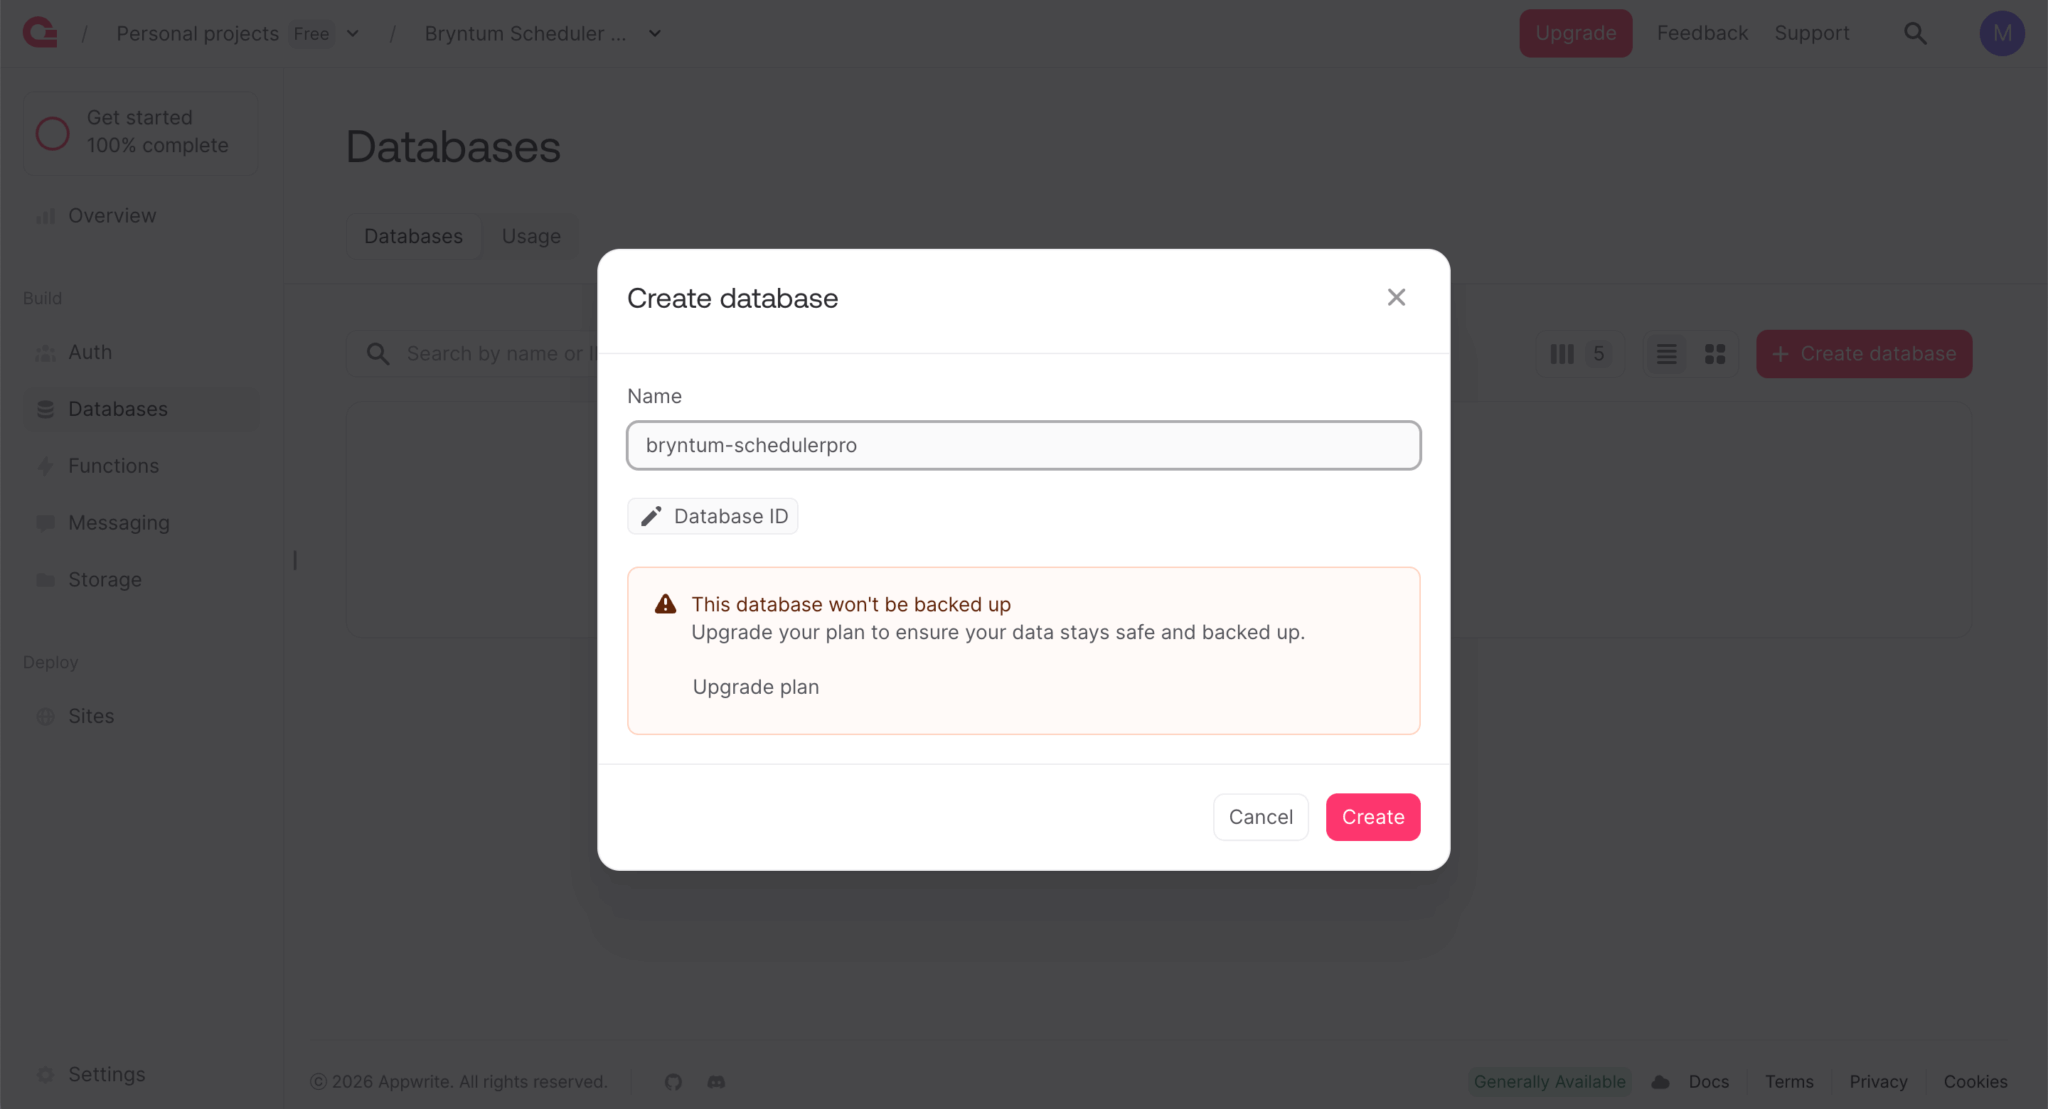
Each database contains a group of tables with columns and rows. Appwrite uses a SQL database.
Note the database ID next to the database name, which we’ll use soon.
Creating database tables programmatically using the Appwrite Server SDK
We’ll use the Appwrite Node.js SDK to create database tables and columns programmatically.
First, create a Node.js project:
npm init -yIn the package.json file, set the "type" to "module" to use ES module imports:
"type": "module",Install the Node.js Appwrite SDK and dotenv:
npm install node-appwrite dotenvCreate a .gitignore file and add the following text to it:
*.log
.env
node_modules/
.DS_Store
Create a .env file and add the following text to that file:
APPWRITE_PROJECT_ID = ""
APPWRITE_ENDPOINT = ""
APPWRITE_DATABASE_ID  = ""
APPWRITE_API_KEY = ""
Add the APPWRITE_PROJECT_ID and APPWRITE_ENDPOINT from your Appwrite TanStack Start project .env. Add the database ID, which is next to the database name in the Appwrite Console.
Creating an API key
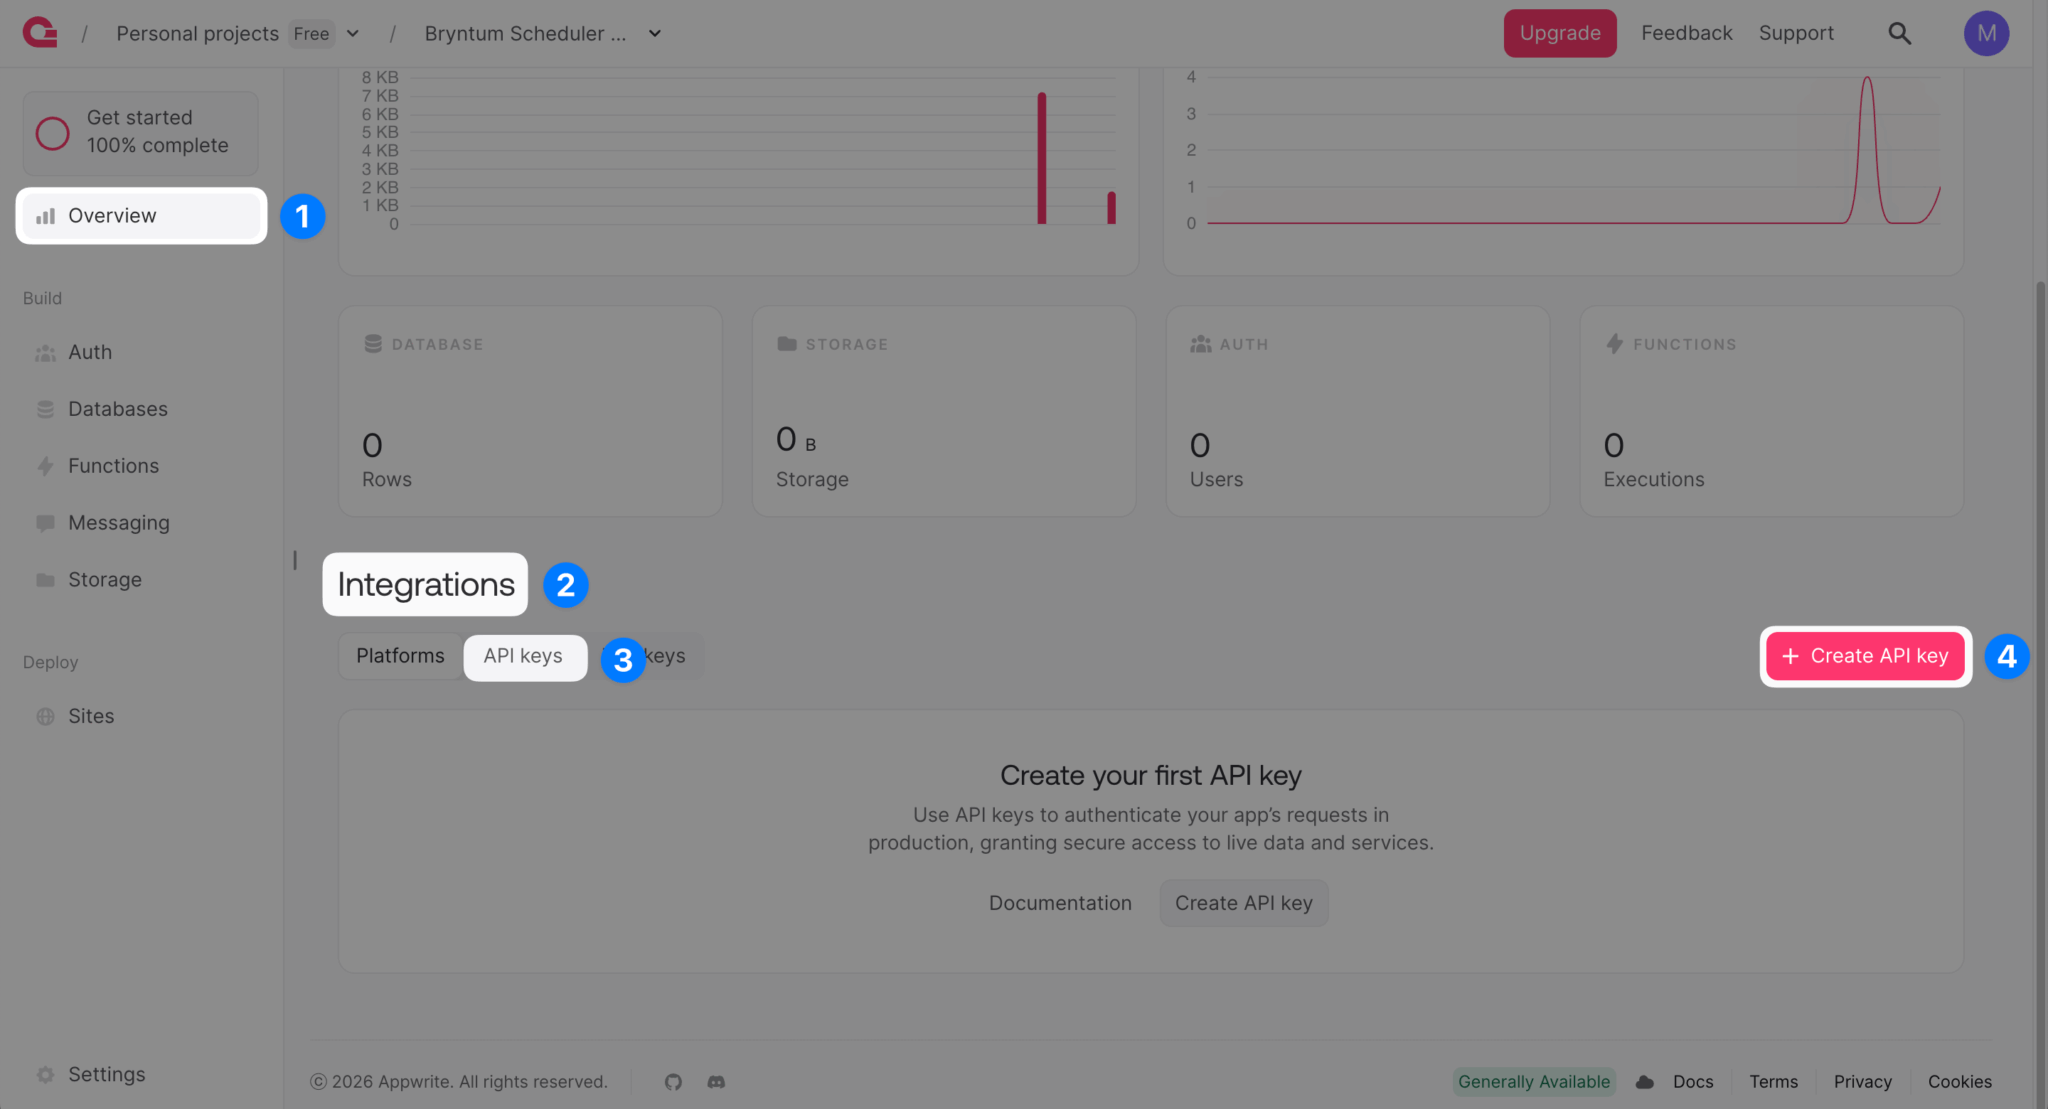
To create a new API key in your Appwrite Console, navigate to Overview > Integrations > API keys and click Create API key:
Set Scopes to Database and then add your API key to the APPWRITE_API_KEY environment variable in your Node.js project .env file.
Creating a database table creation script
Although we can create database tables using the Appwrite Console GUI, we’ll use the Appwrite Node.js SDK to create tables more quickly, programmatically.
The Bryntum Scheduler Pro component stores and links data stores in its project. It has the following types of data stores:
- ResourceStore
- EventStore
- AssignmentStore
- DependencyStore
- TimeRangeStore
- ResourceTimeRangeStore
- CalendarManagerStore
Let’s create Appwrite database tables for the resource, event, assignment, dependency, and calendar stores.
Create an index.js file and add the following lines of code to it:
import { Client, TablesDB, Permission, Role } from 'node-appwrite';
import 'dotenv/config';

const client = new Client()
    .setEndpoint(process.env.APPWRITE_ENDPOINT)
    .setProject(process.env.APPWRITE_PROJECT_ID)
    .setKey(process.env.APPWRITE_API_KEY);

const tablesDB = new TablesDB(client);

const DATABASE_ID = process.env.APPWRITE_DATABASE_ID;
Define the permissions array that grants authenticated users full CRUD access to the tables:
const PERMISSIONS = [
    Permission.read(Role.users()),
    Permission.create(Role.users()),
    Permission.update(Role.users()),
    Permission.delete(Role.users())
];
Add the main function that calls createTable for each of the five table definitions:
async function main() {
    try {
        await createTable(resources);
        await createTable(events);
        await createTable(assignments);
        await createTable(dependencies);
        await createTable(calendars);
        console.log('\nAll tables created.');
    }
    catch (error) {
        console.error('Error:', error.message);
    }
}

main();
Define the createTable helper function that creates a table and iterates through its column definitions to add each column with the appropriate type:
async function createTable({ tableId, name, columns }) {
    console.log(`\nCreating Table: ${name}...`);

    await tablesDB.createTable({
        databaseId  : DATABASE_ID,
        tableId,
        name,
        permissions : PERMISSIONS
    });

    for (const col of columns) {
        console.log(`  Adding Column: ${col.key} (${col.type})`);
        const base = {
            databaseId : DATABASE_ID,
            tableId,
            key        : col.key,
            required   : col.required ?? false
        };

        switch (col.type) {
            case 'string':
                await tablesDB.createStringColumn({
                    ...base,
                    size    : col.size ?? 255,
                    default : col.default ?? null,
                    array   : col.array ?? false
                });
                break;
            case 'boolean':
                await tablesDB.createBooleanColumn({
                    ...base,
                    default : col.default ?? null,
                    array   : col.array ?? false
                });
                break;
            case 'float':
                await tablesDB.createFloatColumn({
                    ...base,
                    default : col.default ?? null,
                    array   : col.array ?? false
                });
                break;
            case 'integer':
                await tablesDB.createIntegerColumn({
                    ...base,
                    default : col.default ?? null,
                    array   : col.array ?? false
                });
                break;
            case 'datetime':
                await tablesDB.createDatetimeColumn({
                    ...base,
                    default : col.default ?? null,
                    array   : col.array ?? false
                });
                break;
            case 'enum':
                await tablesDB.createEnumColumn({
                    ...base,
                    elements : col.elements,
                    default  : col.default ?? null,
                    array    : col.array ?? false
                });
                break;
        }
    }

    console.log(`  Done: ${name}`);
}
Now define the table configuration objects. Each object specifies the table ID, name, and columns with their types and defaults.
The resources table stores the ResourceStore data:
const resources = {
    tableId : 'resources',
    name    : 'resources',
    columns : [
        { key : 'name', type : 'string', size : 255, required : true },
        { key : 'eventColor', type : 'string', size : 255 },
        { key : 'readOnly', type : 'boolean', default : false },
        { key : 'expanded', type : 'boolean', default : false }
    ]
};
The events table stores the EventStore data, and the assignments table stores the AssignmentStore data that links events to resources:
const events = {
    tableId : 'events',
    name    : 'events',
    columns : [
        { key : 'name', type : 'string', size : 255, required : true },
        { key : 'readOnly', type : 'boolean', default : false },
        { key : 'timeZone', type : 'string', size : 255 },
        { key : 'draggable', type : 'boolean', default : true },
        { key : 'resizable', type : 'string', size : 255 },
        { key : 'children', type : 'string', size : 255 },
        { key : 'allDay', type : 'boolean', default : false },
        { key : 'duration', type : 'float' },
        { key : 'durationUnit', type : 'string', size : 255, default : 'hour' },
        { key : 'startDate', type : 'datetime' },
        { key : 'endDate', type : 'datetime' },
        { key : 'exceptionDates', type : 'string', size : 1000 },
        { key : 'recurrenceRule', type : 'string', size : 255 },
        { key : 'cls', type : 'string', size : 255 },
        { key : 'eventColor', type : 'string', size : 255 },
        { key : 'eventStyle', type : 'string', size : 255 },
        { key : 'iconCls', type : 'string', size : 255 },
        { key : 'style', type : 'string', size : 255 },
        { key : 'calendar', type : 'string', size : 255 },
        { key : 'direction', type : 'string', size : 255 },
        { key : 'manuallyScheduled', type : 'boolean', default : false },
        { key : 'unscheduled', type : 'boolean', default : false },
        { key : 'ignoreResourceCalendar', type : 'boolean', default : false },
        { key : 'constraintType', type : 'string', size : 255 },
        { key : 'constraintDate', type : 'datetime' },
        { key : 'effort', type : 'float' },
        { key : 'effortUnit', type : 'string', size : 255 },
        { key : 'inactive', type : 'boolean' },
        { key : 'segments', type : 'string', size : 1000 },
        { key : 'effortDriven', type : 'boolean', default : false },
        { key : 'schedulingMode', type : 'string', size : 255 },
        { key : 'delayFromParent', type : 'float' },
        { key : 'showInTimeline', type : 'boolean' },
        { key : 'percentDone', type : 'integer', default : 0 },
        { key : 'note', type : 'string', size : 255 },
        { key : 'preamble', type : 'string', size : 255 },
        { key : 'postamble', type : 'string', size : 255 }
    ]
};

const assignments = {
    tableId : 'assignments',
    name    : 'assignments',
    columns : [
        { key : 'eventId', type : 'string', size : 50, required : true },
        { key : 'resourceId', type : 'string', size : 50, required : true },
        { key : 'units', type : 'float' }
    ]
};
The dependencies table stores the DependencyStore data. The fromEvent and toEvent columns store the IDs of the connected events:
const dependencies = {
    tableId : 'dependencies',
    name    : 'dependencies',
    columns : [
        { key : 'fromEvent', type : 'string', size : 50 },
        { key : 'toEvent', type : 'string', size : 50 },
        { key : 'fromSide', type : 'string', size : 10, default : 'right' },
        { key : 'toSide', type : 'string', size : 10, default : 'left' },
        { key : 'type', type : 'integer' },
        { key : 'cls', type : 'string', size : 255 },
        { key : 'lag', type : 'float', default : 0 },
        { key : 'lagUnit', type : 'string', size : 255, default : 'hour' },
        { key : 'exceptionDates', type : 'string', size : 1000 },
        { key : 'active', type : 'boolean' }
    ]
};
The calendars table stores CalendarManagerStore data. The intervals column stores the JSON-stringified calendar interval data:
const calendars = {
    tableId : 'calendars',
    name    : 'calendars',
    columns : [
        { key : 'name', type : 'string', size : 255, required : true },
        { key : 'intervals', type : 'string', size : 1000 },
        { key : 'unspecifiedTimeIsWorking', type : 'boolean', default : false }
    ]
};
Run the script to create all five tables:
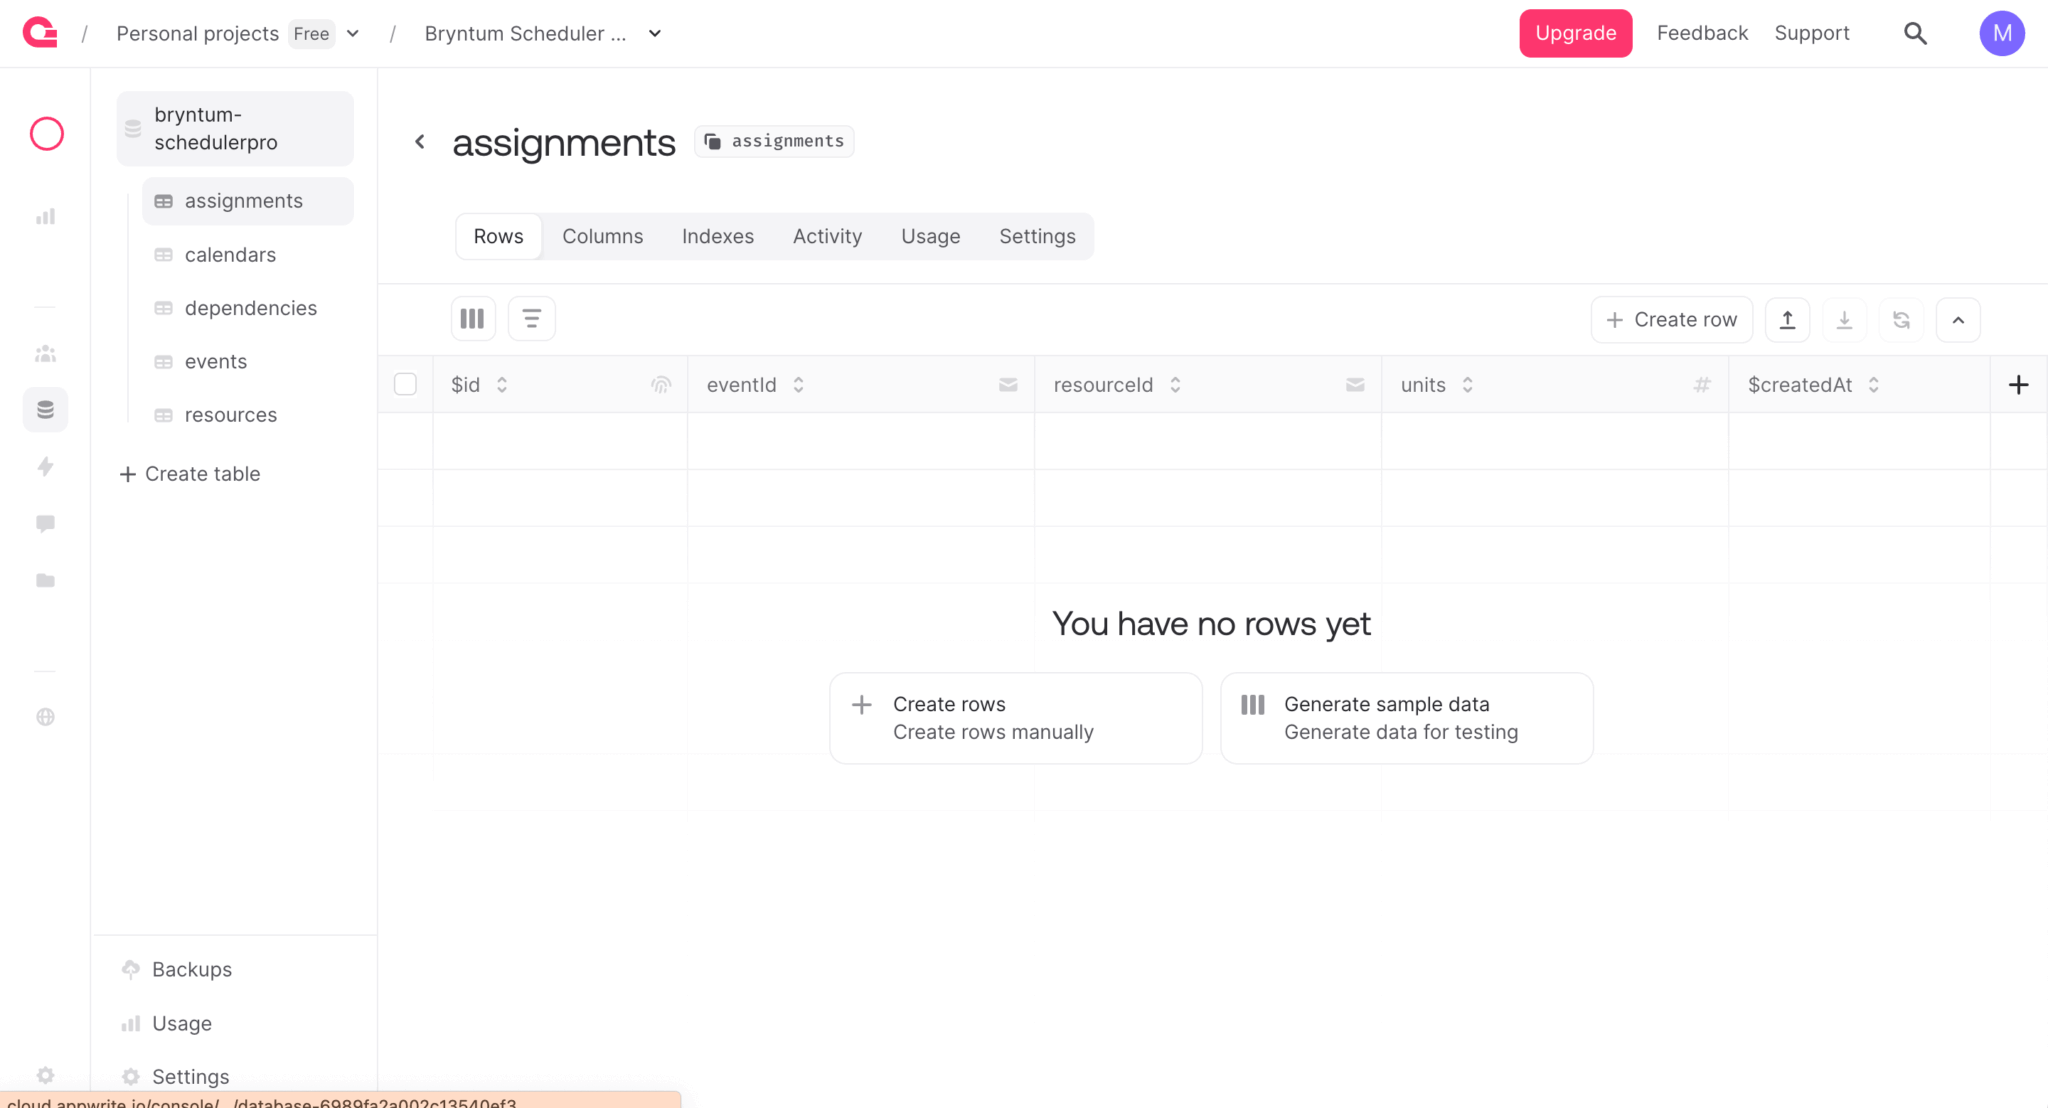
node index.jsOnce the script completes, you’ll see the tables in your Appwrite Console database:
Adding example data to tables using CSV imports
We’ll add example data to the tables using CSV imports.
Download the CSV files for the example data.
To import a CSV file, open a table in the Appwrite Console and click the Import button:
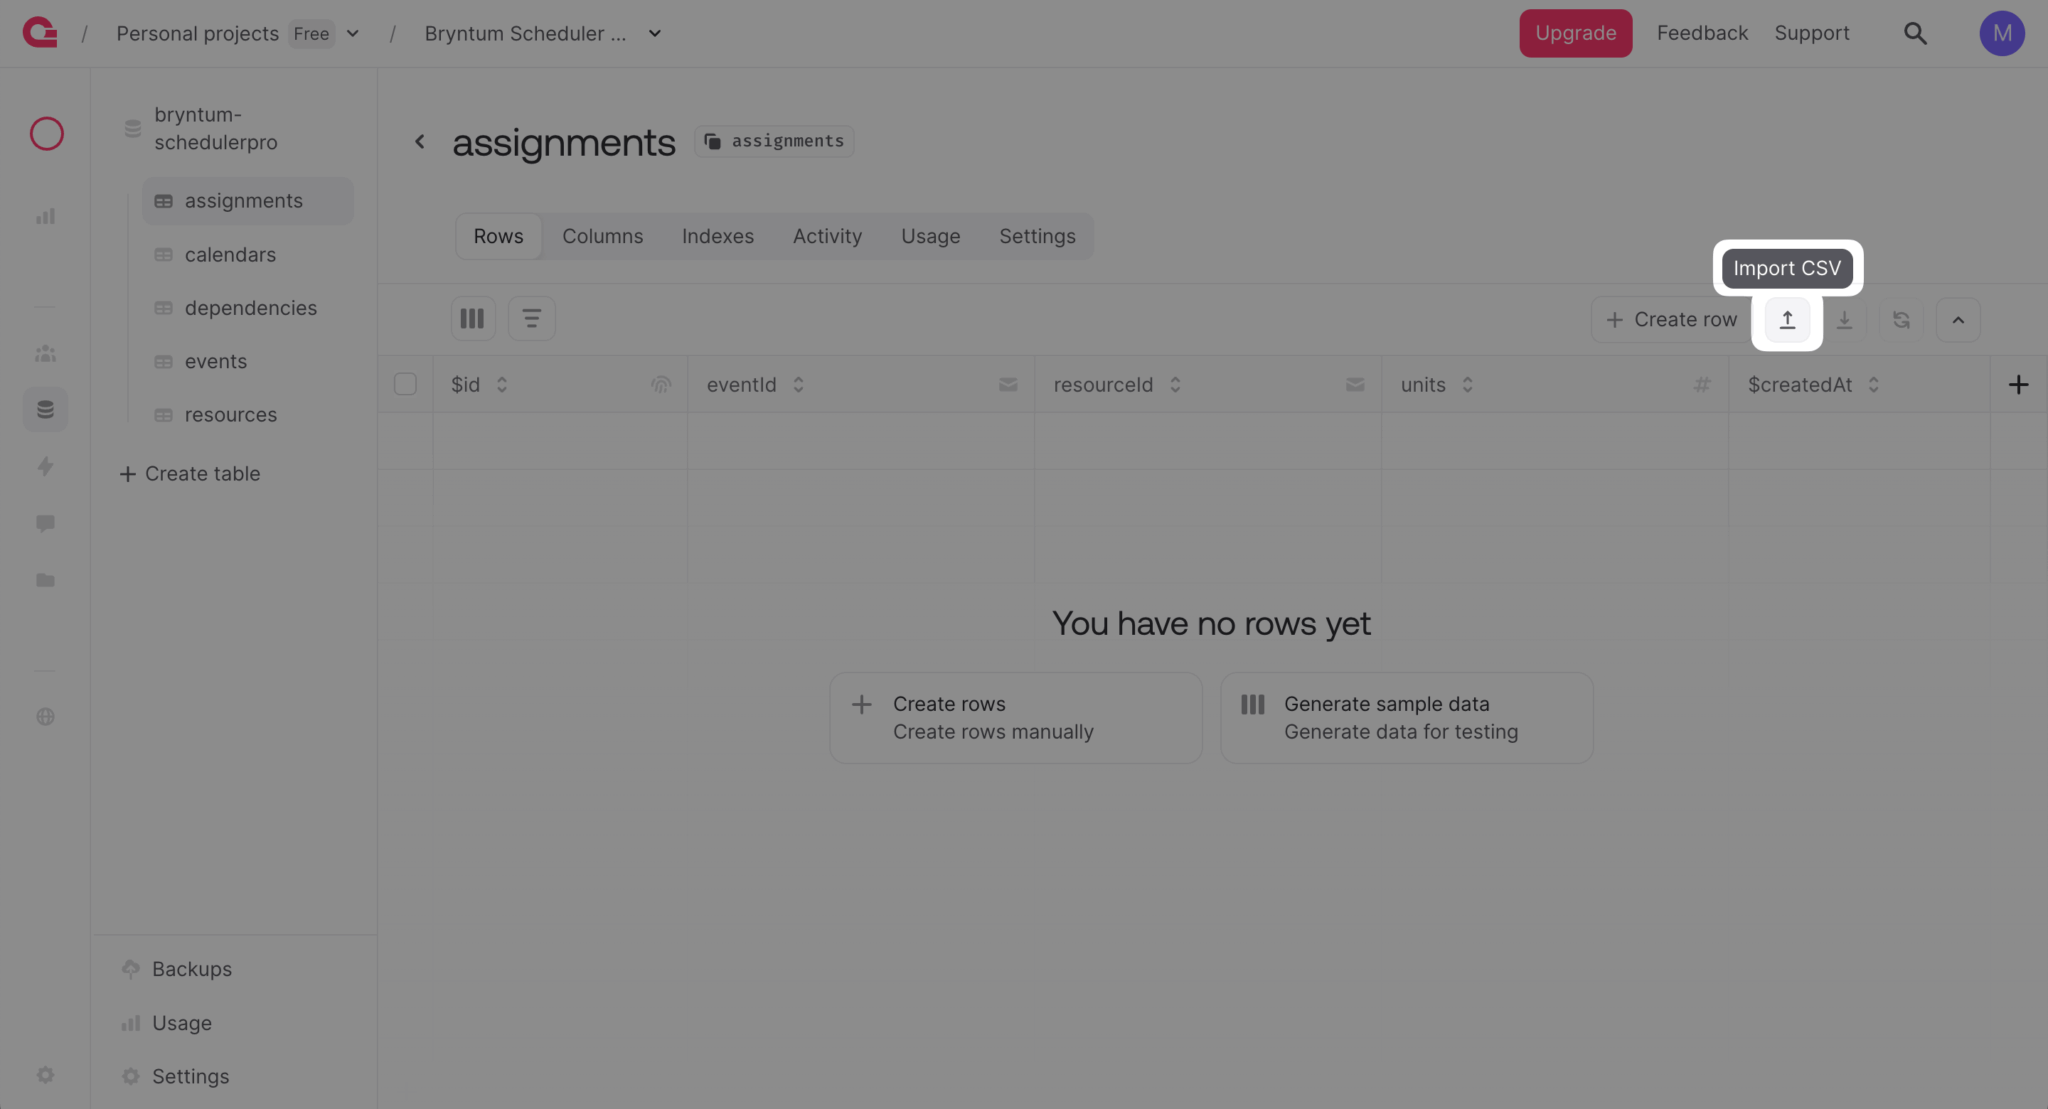
Each CSV file includes an $id column for defining custom row IDs. This preserves the IDs from the demo data (which is necessary because the assignments table references resource and event IDs, and the dependencies table references event IDs). If you don’t include the $id column, Appwrite generates unique IDs for each row automatically.
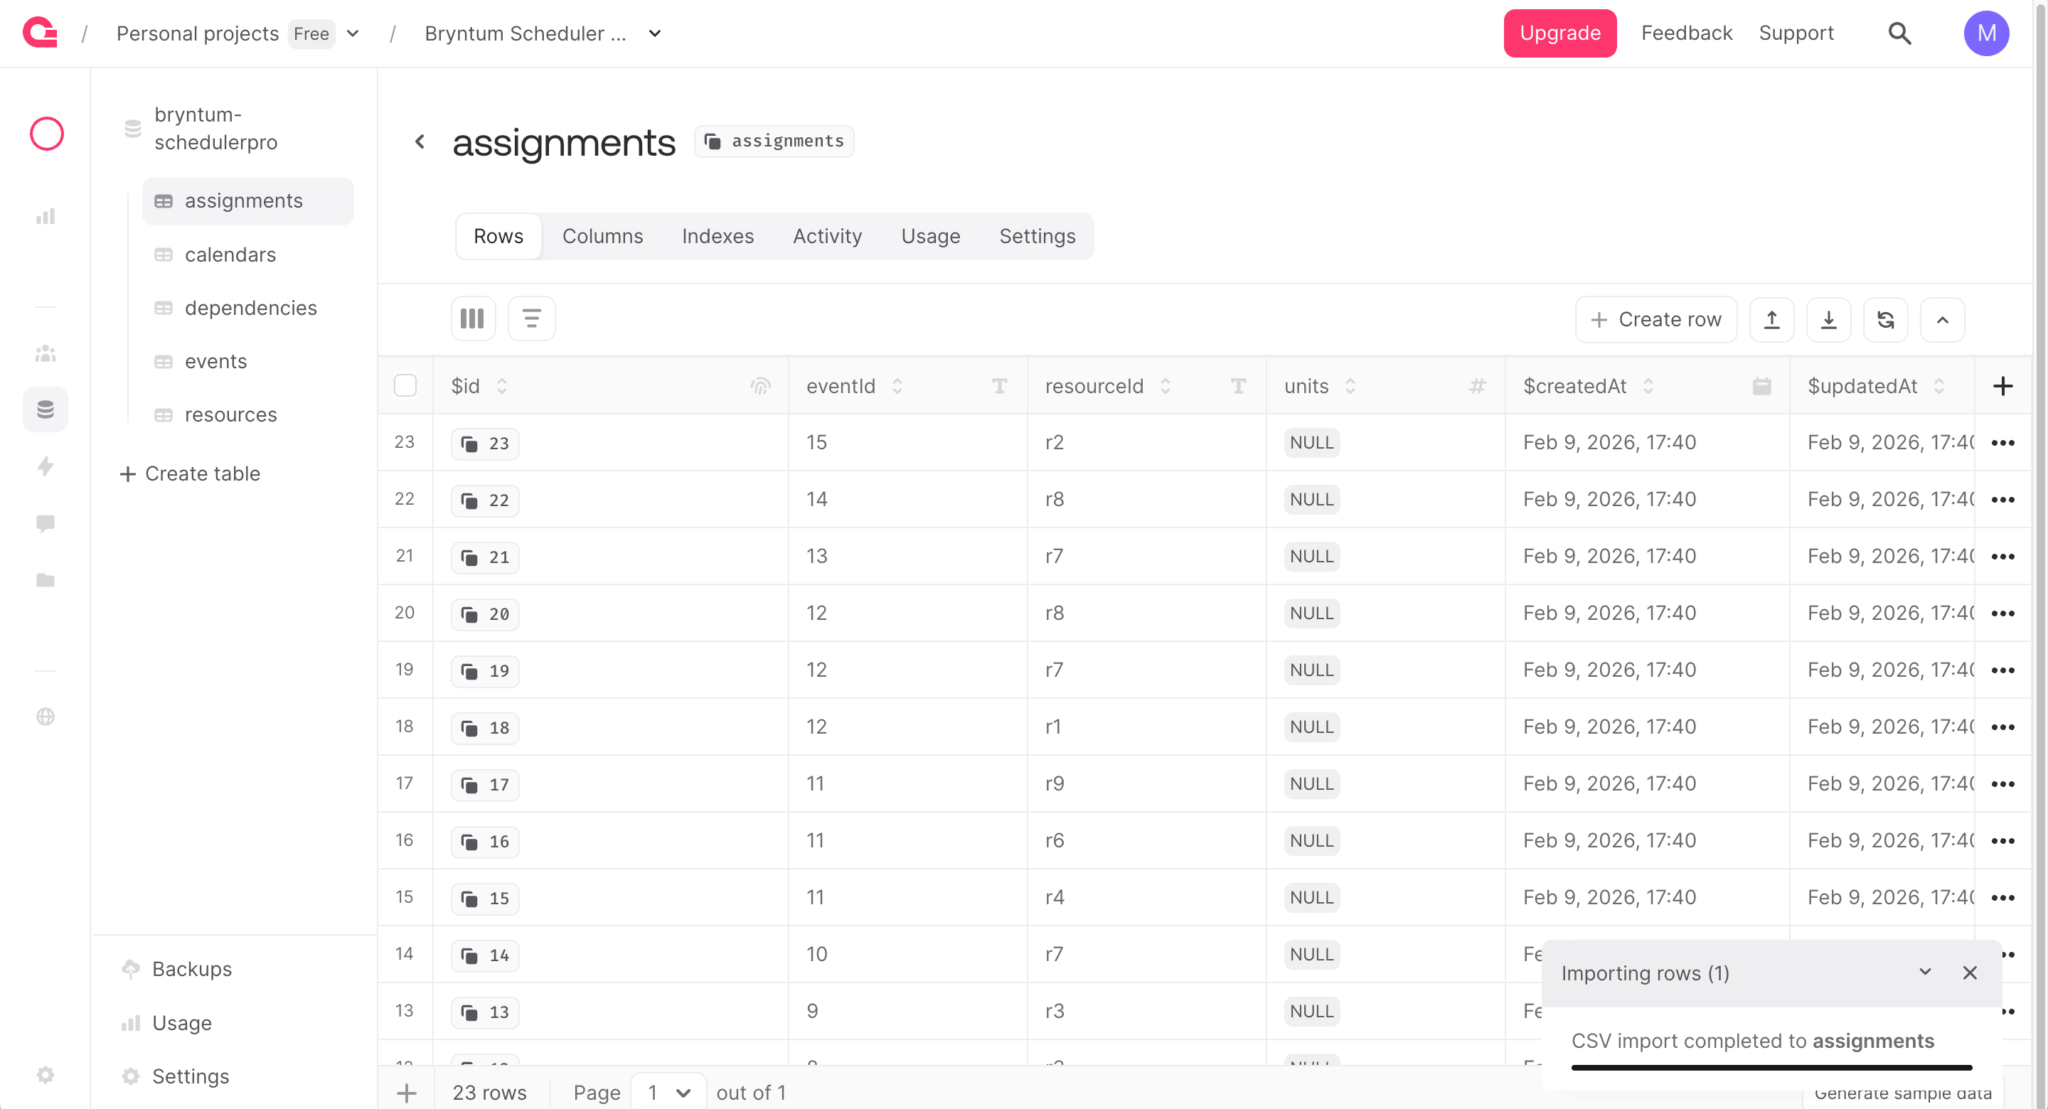
Import the CSV files for each of the five tables: resources, events, assignments, dependencies, and calendars.
Creating an Appwrite function REST API
We’ll create a REST API for the Bryntum Scheduler Pro using Appwrite Functions. These server-side, serverless functions are managed by Appwrite, so you don’t need to worry about server maintenance or scaling. Each function has:
- A unique URL
- Configurable environment variables
- Configurable permissions
- An isolated container in which it’s executed
They can be triggered by various events, including HTTP requests, SDK methods, and server events.
Let’s build and deploy a Node.js Appwrite function.
Creating a Node.js Appwrite function
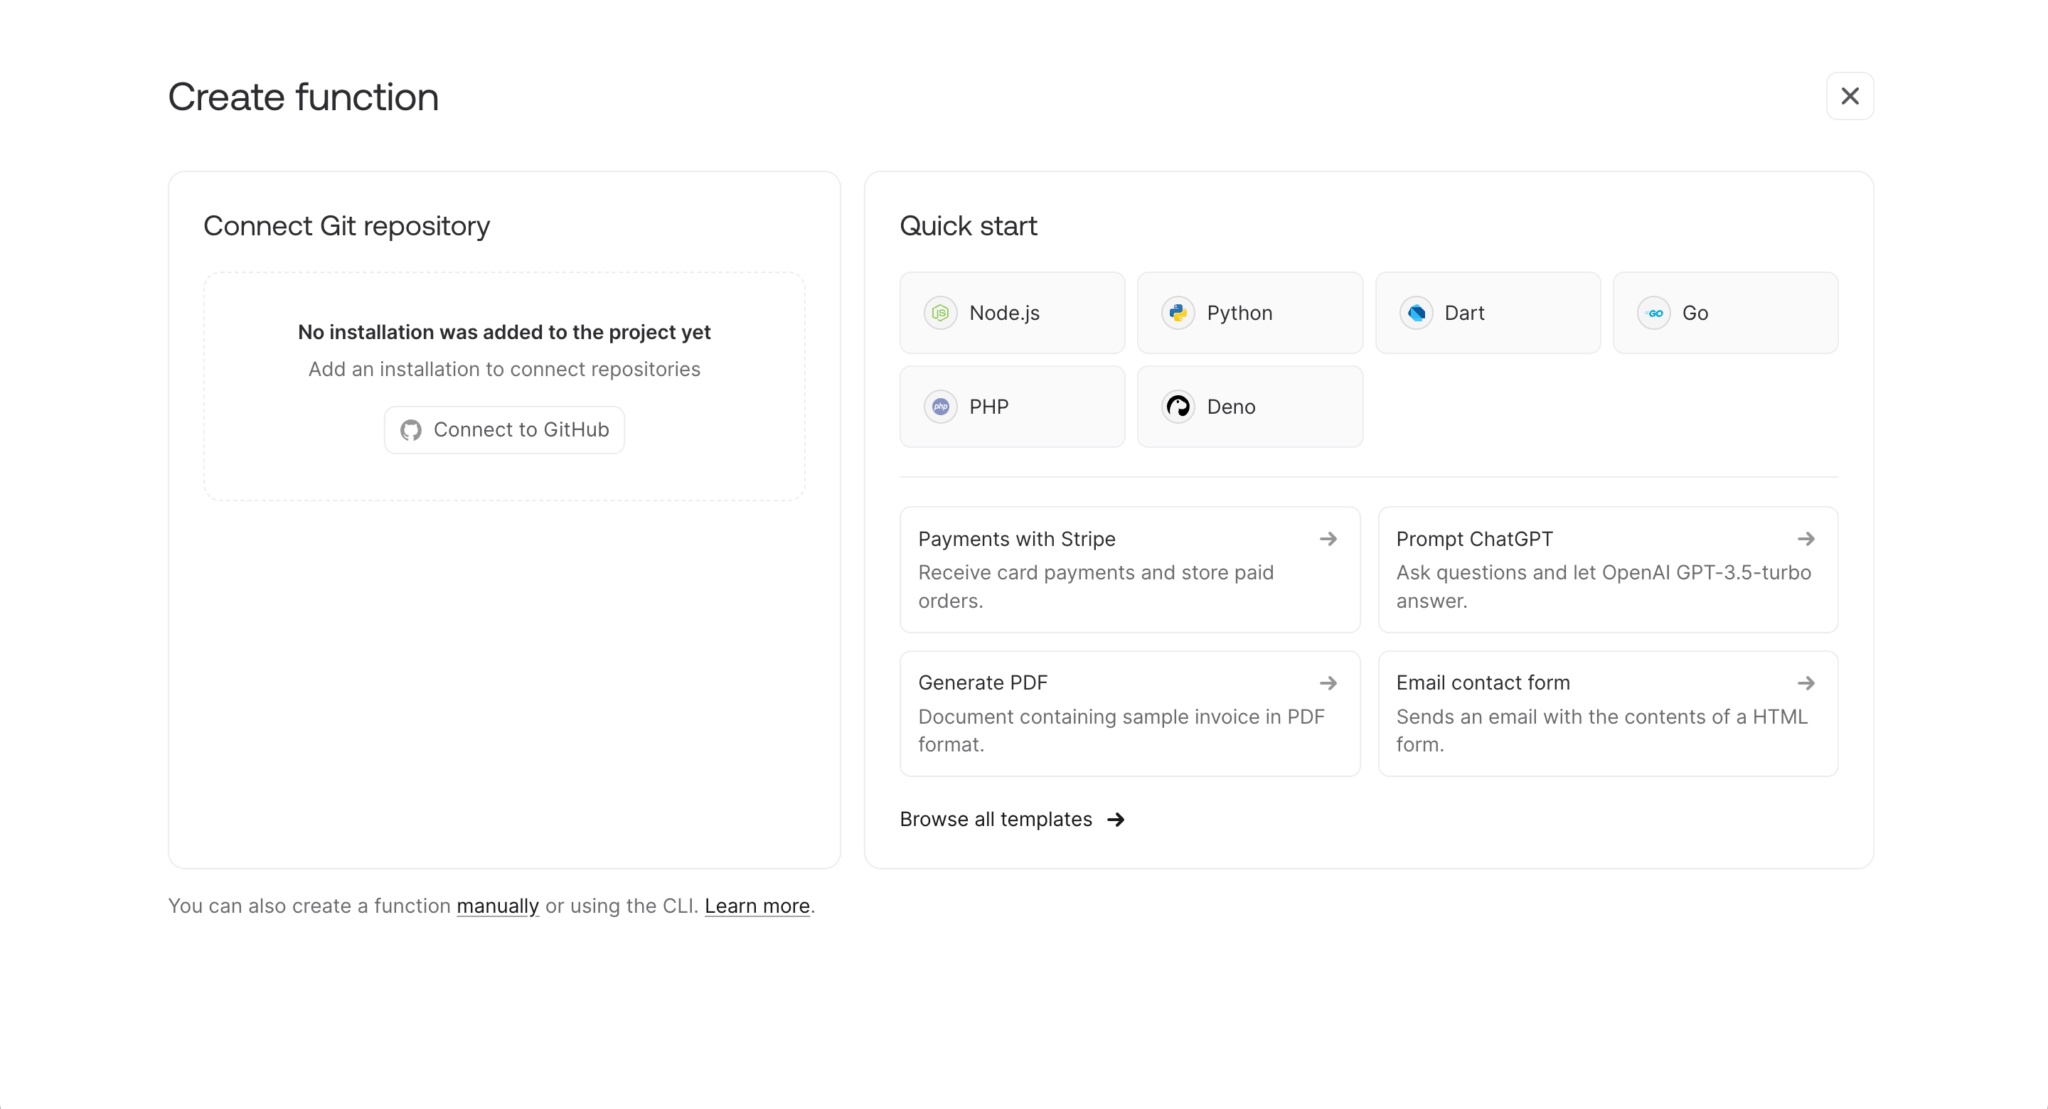
In the Appwrite Console, open the Functions page and click the + Create function button.
Connect to your GitHub account, grant Appwrite access to one or all of your repositories, and then in the Quick start section, select the Node.js starter template.
Name your function Bryntum Scheduler Pro REST API and select Node.js – 22 as the Runtime:
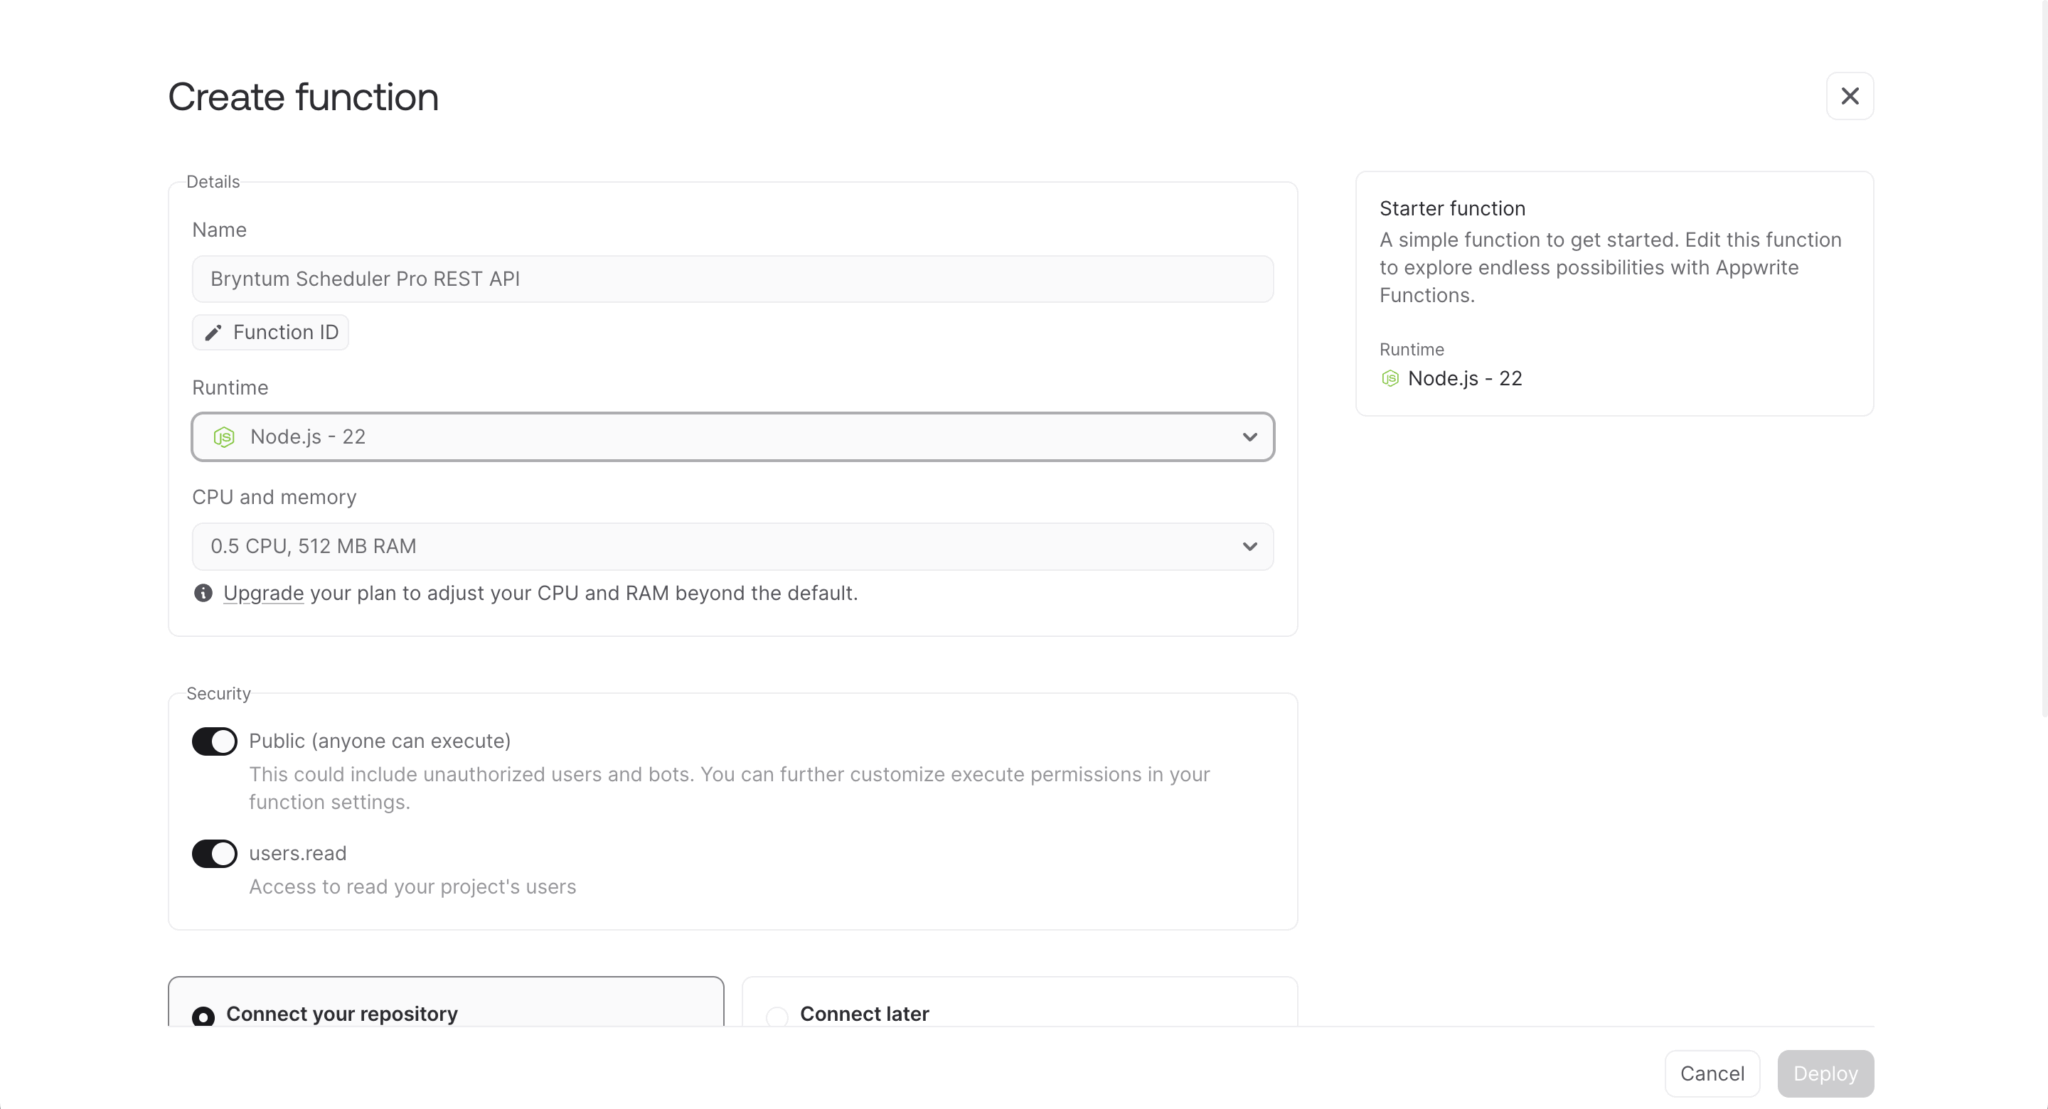
In the Permissions step, ensure that anyone can execute the function using its domain by permitting the following for each section:
- Execute permissions: Enable Public (anyone can execute).
- Function scopes: Under Auth, enable users.read, and under Database, enable tables.read, tables.write, columns.read, columns.write, indexes.read, indexes.write, rows.read, and rows.write.
Note: Later, we’ll add CRUD operations to the function and set up JWT authentication so that only registered users can perform the CRUD operations.
Select the Connect your repository option. Depending on the GitHub access permissions you granted Appwrite, choose Create a new repository or Connect existing repository.
Set the Root directory input to ./ and then click Deploy.
Once Appwrite has created the function repository or added it to an existing repo, you’ll see your created function:
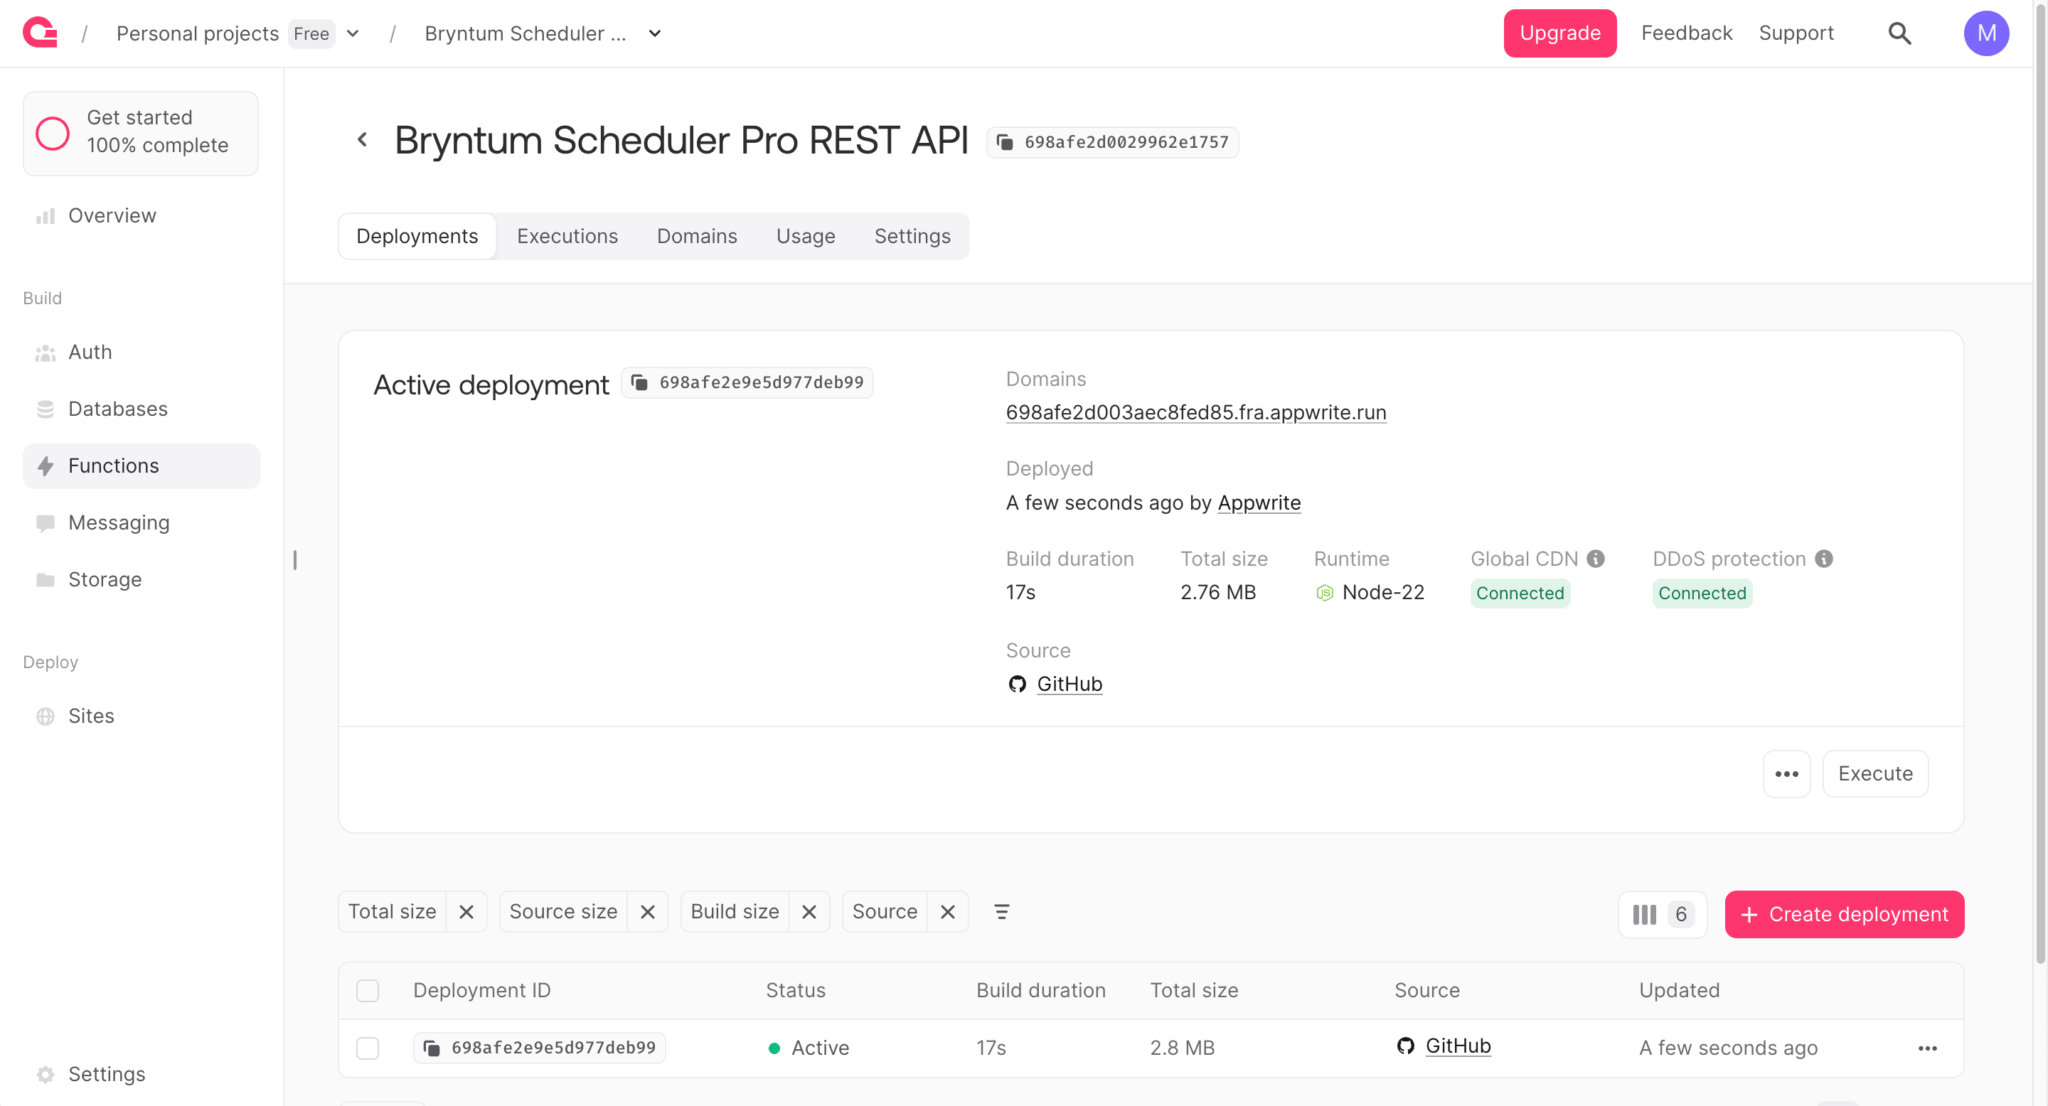
You can see the GitHub repository link and the domain URL for the function in the Active deployment card.
Below the Active deployment card, you’ll see all of the deployments in a table. Functions automatically deploy when their GitHub repo changes. Each deployment builds the function, as you can see in the deployment logs (click on a deployment row to see its logs). You can also execute the function by clicking the Execute button at the bottom right. We’ll trigger the Node.js function by sending HTTP requests to the function’s domain URL.
In the GitHub repository src folder, there is a main.js file. This main.js file defines the template function that receives a request and sends back a response, as described in the repository’s README file.
Creating a local copy of the Appwrite function
Clone your Appwrite function repo so you can work on it locally, replacing <YOUR_GITHUB_USERNAME> and <appwrite_bryntum_scheduler_pro_rest_api> with your own values:
git clone git@github.com:<YOUR_GITHUB_USERNAME>/<appwrite_bryntum_scheduler_pro_rest_api>.gitInstall the dependencies, which include the Appwrite Node.js SDK (for enabling Appwrite integration from your Node.js server-side code):
npm installUpdate node-appwrite to version 22, which uses the new TablesDB API:
npm install node-appwrite@22.0.0Any changes that you push to the GitHub repo will trigger a new deployment of the function.
Fetching data from Appwrite
Replace the code in the src/main.js file with the following lines of code:
import { Client, TablesDB, ID } from 'node-appwrite';

const PROJECT_ID = process.env.PROJECT_ID;
const DATABASE_ID = process.env.DATABASE_ID;
const RESOURCES_TABLE_ID = process.env.RESOURCES_TABLE_ID;
const EVENTS_TABLE_ID = process.env.EVENTS_TABLE_ID;
const ASSIGNMENTS_TABLE_ID = process.env.ASSIGNMENTS_TABLE_ID;
const DEPENDENCIES_TABLE_ID = process.env.DEPENDENCIES_TABLE_ID;
const CALENDARS_TABLE_ID = process.env.CALENDARS_TABLE_ID;
We’ll use Appwrite Functions environment variables to store the IDs we need to access our database tables.
The environment variables in a function are accessed via the runtime language’s system library. In Node.js, they are accessed via the process.env property.
To create the environment variables, navigate to your function in the Appwrite Console and then open the Settings tab. Scroll down to the Environment variables card to create the following variables:
PROJECT_ID
DATABASE_ID
RESOURCES_TABLE_ID
EVENTS_TABLE_ID
ASSIGNMENTS_TABLE_ID
DEPENDENCIES_TABLE_ID
CALENDARS_TABLE_ID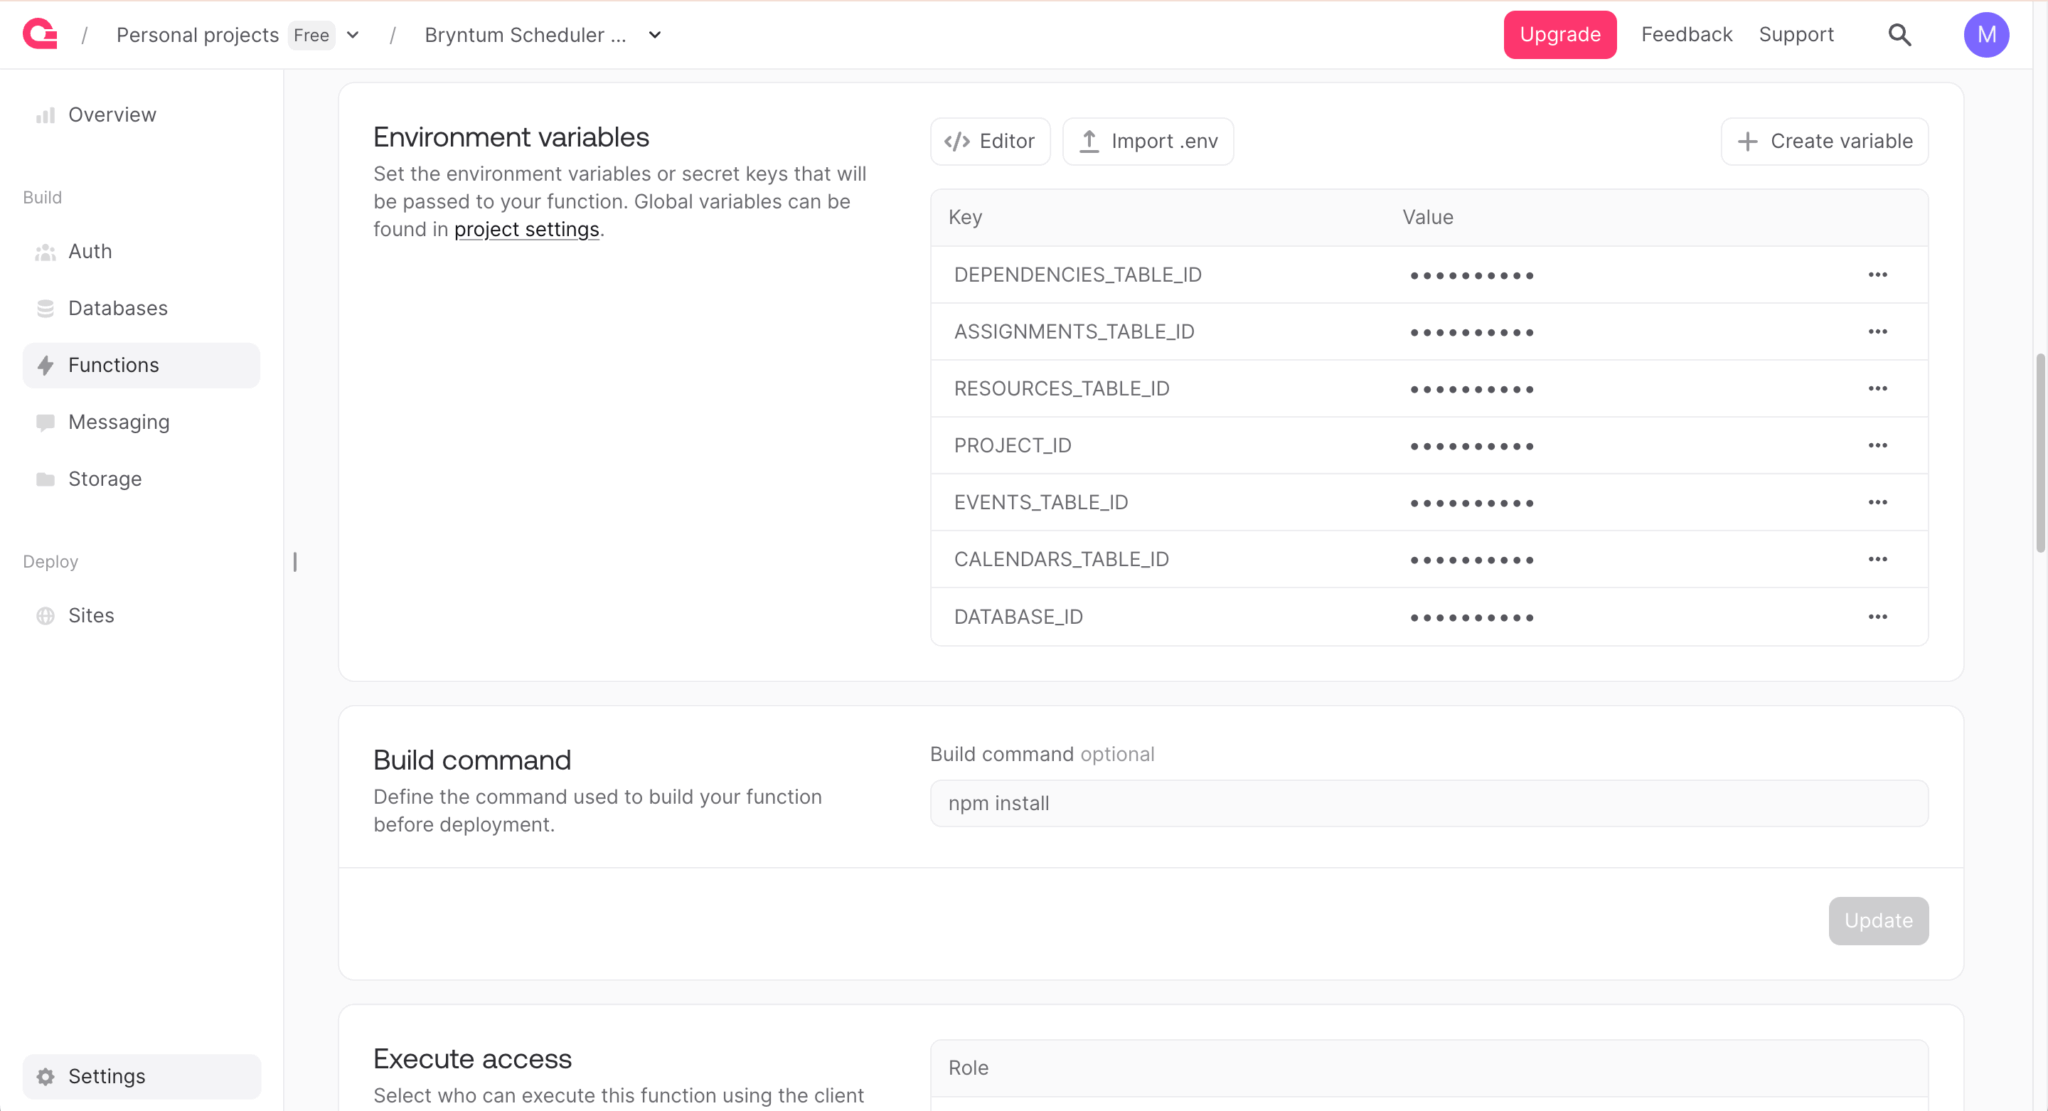
Enter your environment variable values:
- You can find the
PROJECT_IDvalue on the Overview page, next to your project title. - The Databases page includes a table of all the databases. You can find the
DATABASE_IDvalue in the Database ID column. - Click on a row in the database table to view its tables. You can find each
TABLE_IDnext to the table name.
We need to select who can execute this function using the client API. By default, no one can access it because the permissions are empty. To change this, navigate to your function in the Appwrite Console and then open the Settings tab. Scroll down to the Execute access card and add the Role Any.

We allow anyone to execute the function because we added authentication logic in the function’s code.
Now add the following default export function to the src/main.js file:
export default async ({ req, res, log, error }) => {
    if (req.method === 'OPTIONS') {
        return res.send('', 200, {
            'Access-Control-Allow-Origin'  : 'http://localhost:3000',
            'Access-Control-Allow-Methods' : 'POST, GET, OPTIONS',
            'Access-Control-Allow-Headers' : 'Content-Type, Authorization',
        });
    }

    const jwt = req.headers['authorization'];
    if (!jwt) {
        return res.json({ success: false, message: 'Unauthorized' }, 401, {
            'Access-Control-Allow-Origin': 'http://localhost:3000',
        });
    }

    const client = new Client()
        .setEndpoint('https://fra.cloud.appwrite.io/v1')
        .setProject(PROJECT_ID)
        .setJWT(jwt);

    const tablesDB = new TablesDB(client);

    // The Appwrite function code in the next sections goes here

};
The function receives log and error from the Appwrite function context for logging.
We’ll make requests to this function from a React app that runs on a different origin, http://localhost:3000, so we need to handle cross-origin resource sharing (CORS). The OPTIONS handler at the top handles preflight requests. Although CORS headers are often set using res.setHeader(), the way Appwrite handles responses means that res.setHeader() doesn’t work in the serverless Appwrite Functions. Instead, we need to include CORS headers directly in the response returned by the function. The OPTIONS handler must come before the JWT check, so that preflight requests aren’t blocked.
The function checks the JWT from the authorization header next. When you send requests, they are authenticated using JWT authentication. This ensures that only logged-in users can view or change data.
When a user logs in, the Appwrite client SDK creates a new session. In the above code, we use that session to generate a client-side JWT that gets added to the authorization header when requests are made to the function.
We initialize the Appwrite client SDK with the regional endpoint (replace fra with your project’s region), the project ID, and the JWT. We then use the client to create a TablesDB instance, so the React app can query and modify database tables using the function.
Add the following lines of code below the tablesDB variable:
if (req.method === 'GET') {
        try {
                const [
                        resourcesRes,
                        eventsRes,
                        assignmentsRes,
                        dependenciesRes,
                        calendarsRes
                ] = await Promise.all([
                        tablesDB.listRows({ databaseId : DATABASE_ID, tableId : RESOURCES_TABLE_ID }),
                        tablesDB.listRows({ databaseId : DATABASE_ID, tableId : EVENTS_TABLE_ID }),
                        tablesDB.listRows({ databaseId : DATABASE_ID, tableId : ASSIGNMENTS_TABLE_ID }),
                        tablesDB.listRows({ databaseId : DATABASE_ID, tableId : DEPENDENCIES_TABLE_ID }),
                        tablesDB.listRows({ databaseId : DATABASE_ID, tableId : CALENDARS_TABLE_ID })
                ]);

                function cleanRow(row) {
                        row.id = row.$id;
                        const obj = Object.fromEntries(
                                Object.entries(row)
                                        .filter(([_, v]) => v != null)
                                        .filter(([k]) => k[0] !== '$')
                        );
                        // Parse JSON string fields back to objects
                        ['intervals', 'exceptionDates', 'segments'].forEach((field) => {
                                if (typeof obj[field] === 'string') {
                                        try { obj[field] = JSON.parse(obj[field]); } catch (e) { /* keep as string */ }
                                }
                        });
                        return obj;
                }

                return res.json({
                        success      : true,
                        resources    : { rows : resourcesRes.rows.map(cleanRow) },
                        events       : { rows : eventsRes.rows.map(cleanRow) },
                        assignments  : { rows : assignmentsRes.rows.map(cleanRow) },
                        dependencies : { rows : dependenciesRes.rows.map(cleanRow) },
                        calendars    : { rows : calendarsRes.rows.map(cleanRow) }
                }, 200, {
                        'Access-Control-Allow-Origin': 'http://localhost:3000',
                });
        }
        catch(err) {
                error(JSON.stringify(err, null, 2));
                return res.json({
                        success : false,
                        message : err.message || 'Scheduler Pro data could not be loaded',
                        type    : err.type || null
                }, 500, {
                        'Access-Control-Allow-Origin': 'http://localhost:3000',
                });
        }
}
When an authorized GET request is made to this function, it fetches and returns the resources, events, assignments, dependencies, and calendars data using the load response structure expected by Bryntum Scheduler Pro.
The tablesDB.listRows method gets a list of all rows in a table. The Appwrite Node.js SDK v22 uses object parameters for TablesDB methods, passing databaseId and tableId as named properties. The function uses Promise.all to fetch all five tables in parallel. The response from listRows contains a rows array. The cleanRow helper sets the id from Appwrite’s $id, strips Appwrite-specific $-prefixed fields and null values, and parses JSON string fields (intervals, exceptionDates, segments) into objects.
Commit the changes and push them to your remote repository:
git add .
git commit -m "add: load Scheduler Pro data"
git push origin
In this guide, we’ll push changes to the remote repository to test our function. However, Appwrite recently added support for local function development, which allows you to build and test your functions locally, without needing to deploy them.
To run functions locally, you need to have the latest version of the Appwrite CLI installed on your machine. The CLI checks that you have Docker installed; if you don’t, it provides you with the necessary installation instructions. Local development uses Docker to replicate your production environment.
Syncing data changes to Appwrite
Let’s handle POST requests from Bryntum Scheduler Pro sync requests.
When the Bryntum Scheduler Pro sends a sync request, it includes the changes for all the linked data stores in a single request with a specific sync request structure.
The response to a sync request also needs to have a specific sync response structure. When a record is created in Appwrite, the response sends the new record id to the client-side Bryntum Scheduler Pro. This ensures the Bryntum Scheduler Pro has the correct id for the record.
Add the following lines of code below the req.method === 'GET' if block:
if (req.method === 'POST') {
        const { requestId, resources, events, assignments, dependencies, calendars } = req.body;
        try {
                const response = { requestId, success : true };
                let eventMapping = {};

                if (resources) {
                        const rows = await applyTableChanges(RESOURCES_TABLE_ID, resources);
                        if (rows) response.resources = { rows };
                }
                if (events) {
                        const rows = await applyTableChanges(EVENTS_TABLE_ID, events);
                        if (rows) {
                                // Map phantom event IDs to real IDs for assignment references.
                                rows.forEach((row) => {
                                        eventMapping[row.$PhantomId] = row.id;
                                });
                                response.events = { rows };
                        }
                }
                if (assignments) {
                        // Replace phantom event IDs with real IDs.
                        if (events?.added) {
                                assignments.added?.forEach((assignment) => {
                                        if (eventMapping[assignment.eventId]) {
                                                assignment.eventId = eventMapping[assignment.eventId];
                                        }
                                });
                        }
                        const rows = await applyTableChanges(ASSIGNMENTS_TABLE_ID, assignments);
                        if (rows) response.assignments = { rows };
                }
                if (dependencies) {
                        const rows = await applyTableChanges(DEPENDENCIES_TABLE_ID, dependencies);
                        if (rows) response.dependencies = { rows };
                }
                if (calendars) {
                        const rows = await applyTableChanges(CALENDARS_TABLE_ID, calendars);
                        if (rows) response.calendars = { rows };
                }

                return res.json(response, 200, {
                        'Access-Control-Allow-Origin': 'http://localhost:3000',
                });
        }
        catch(err) {
                error(JSON.stringify(err, null, 2));
                return res.json({
                        requestId,
                        success : false,
                        message : err.message || 'There was an error syncing the data changes',
                        type    : err.type || null
                }, 500, {
                        'Access-Control-Allow-Origin': 'http://localhost:3000',
                });
        }
}
When there are data changes in the Bryntum Scheduler Pro, the Scheduler Pro sends JSON data in POST requests to this Appwrite function to keep the frontend and Appwrite database data in sync.
In the function, we first parse the request body to determine which of the data stores in the project data have been changed.
We process the stores in a specific order. We need to process events before assignments, because when one sync request creates a new event and its assignment, the assignment references the event’s phantom ID. We use the eventMapping object to map these phantom IDs to the real Appwrite IDs, so we can save the assignment with the correct eventId.
The function calls the applyTableChanges helper function for each data store that has been changed, and passes in the updated data records as the second argument of the applyTableChanges function.
Define the applyTableChanges function below the req.method === 'OPTIONS' if block:
async function applyTableChanges(tableId, changes) {
        let rows;
        if (changes.added) {
                rows = await createOperation(changes.added, tableId);
        }
        if (changes.removed) {
                await deleteOperation(changes.removed, tableId);
        }
        if (changes.updated) {
                await updateOperation(changes.updated, tableId);
        }
        // New row IDs to send to the client.
        return rows;
}
This helper function checks whether the change resulted from an added, removed, or updated operation, and calls the appropriate CRUD-operation helper function to update the Appwrite database tables.
Appwrite rejects unknown fields when creating or updating rows. The Bryntum Scheduler Pro sync requests include fields like $PhantomId, from, to, and others that don’t exist as table columns. To handle this, we’ll define the valid columns for each table and filter out any unknown fields before sending data to Appwrite.
Define the following TABLE_COLUMNS object and prepareRowData helper function above the applyTableChanges function:
// Valid columns per table — must match the Appwrite table schemas.
// Appwrite rejects unknown fields, and JWT lacks columns.read scope to fetch these dynamically.
const TABLE_COLUMNS = {
        [RESOURCES_TABLE_ID]    : 'name,eventColor,readOnly,expanded',
        [EVENTS_TABLE_ID]       : 'name,readOnly,timeZone,draggable,resizable,children,allDay,duration,durationUnit,startDate,endDate,exceptionDates,recurrenceRule,cls,eventColor,eventStyle,iconCls,style,calendar,direction,manuallyScheduled,unscheduled,ignoreResourceCalendar,constraintType,constraintDate,effort,effortUnit,inactive,segments,effortDriven,schedulingMode,delayFromParent,showInTimeline,percentDone,note,preamble,postamble',
        [ASSIGNMENTS_TABLE_ID]  : 'eventId,resourceId,units',
        [DEPENDENCIES_TABLE_ID] : 'fromEvent,toEvent,fromSide,toSide,type,cls,lag,lagUnit,exceptionDates,active',
        [CALENDARS_TABLE_ID]    : 'name,intervals,unspecifiedTimeIsWorking'
};
// Convert comma-separated strings to Sets for fast lookup.
Object.keys(TABLE_COLUMNS).forEach(k => {
        TABLE_COLUMNS[k] = new Set(TABLE_COLUMNS[k].split(','));
});

function prepareRowData(tableId, data) {
        // Filter to only valid columns for this table.
        const columns = TABLE_COLUMNS[tableId];
        const prepared = columns
                ? Object.fromEntries(Object.entries(data).filter(([k]) => columns.has(k)))
                : { ...data };
        // Stringify JSON fields for storage.
        ['exceptionDates', 'segments', 'intervals'].forEach((field) => {
                if (prepared[field] && typeof prepared[field] === 'object') {
                        prepared[field] = JSON.stringify(prepared[field]);
                }
        });
        return prepared;
}
The TABLE_COLUMNS object defines the valid column names for each table as comma-separated strings, which we convert to Sets for fast lookup. These column names must match the columns defined in your Appwrite table schemas (from the table creation script earlier).
The prepareRowData function filters the incoming data to include only valid columns for the target table. Then it stringifies any JSON fields for storage.
Define the createOperation helper function above the prepareRowData function:
function createOperation(added, tableId) {
        return Promise.all(
                added.map(async(record) => {
                        const { $PhantomId } = record;
                        const prepared = prepareRowData(tableId, record);
                        const row = await tablesDB.createRow({
                                databaseId : DATABASE_ID,
                                tableId,
                                rowId      : ID.unique(),
                                data       : prepared
                        });
                        return { $PhantomId, id : row.$id };
                })
        );
}
This maps through the array of added records, prepares the data using prepareRowData to filter the valid columns, and creates a new row in the table. It returns the $PhantomId and the new, real id so that the Bryntum Scheduler Pro on the client-side can update its references.
The phantom identifier, $PhantomId, is a unique, autogenerated client-side value used to identify the record.
Note: You should not allow phantom identifiers to persist in your database. You can read more about phantom identifiers in the Sync request structure section of the Bryntum Scheduler Pro Crud Manager guide.
Define the deleteOperation function below the createOperation function:
function deleteOperation(removed, tableId) {
        return Promise.all(
                removed.map(({ id }) => tablesDB.deleteRow({
                        databaseId : DATABASE_ID,
                        tableId,
                        rowId      : id
                }))
        );
}
This maps through the array of removed records and deletes each row from the table.
Now, define the updateOperation function below the deleteOperation function:
function updateOperation(updated, tableId) {
        return Promise.all(
                updated.map((record) => {
                        const { id } = record;
                        const prepared = prepareRowData(tableId, record);
                        return tablesDB.updateRow({
                                databaseId : DATABASE_ID,
                                tableId,
                                rowId      : id,
                                data       : prepared
                        });
                })
        );
}
This maps through the array of updated records, prepares the data, and updates each row in the table.
Commit your changes and push them to your repository.
Now we’re ready to add a React Bryntum Scheduler Pro component to the Appwrite TanStack Start project that will use the Appwrite function to connect with our Appwrite database.
Adding authentication to the Appwrite TanStack Start app
Let’s add basic email authentication to register new Appwrite users and log existing users in to the Appwrite TanStack Start app. We won’t add email verification or set up password recovery for this app.
Handling user authentication and passing user data to app components
First, we’ll create a custom React hook for handling user authentication and using React context to share user data and authentication methods with our app components.
In the lib folder, create a context folder and create a user.tsx file within it. We’ll add authentication handling and a user context provider to this file.
First, add the following imports to context/user.tsx:
import { ID, Models } from 'appwrite';
import { createContext, useContext, useEffect, useState } from 'react';
import { account } from '../appwrite';
Add the following TypeScript interfaces to define the value of the React user context (created later in the guide) and the Appwrite error type:
interface IUserContext {
    current: Models.User<Models.Preferences> | null;
    login: (email: string, password: string) => Promise<void>;
    logout: () => Promise<void>;
    register: (email: string, password: string) => Promise<void>;
    error: string | null;
    setError: (error: string | null) => void;
    isLoading: boolean;
}

interface AppwriteError {
    type: string;
    message: string;
}
Add the user context and a custom useUser hook so that you can access the user’s data and authentication methods in the user context from any component:
const UserContext = createContext<IUserContext | null>(null);

export function useUser() {
    return useContext(UserContext);
}
Add the following user context provider:
export function UserProvider({ children }: { children: React.ReactNode }) {
    const [user, setUser] = useState<Models.User<Models.Preferences> | null>(null),
        [error, setError] = useState<string | null>(null),
        [isLoading, setIsLoading] = useState<boolean>(true);


    // Initial session check.
    useEffect(() => {
        async function initSession() {
            try {
                const currentUser = await account.get();
                if (currentUser) {
                    const accountJWT = await account.createJWT();
                    sessionStorage.setItem('accountJWT', accountJWT.jwt);
                    setUser(currentUser);
                }
            }
            catch (err) {
                setUser(null);
            }
            finally {
                setIsLoading(false);
            }
        };

        initSession();
    }, []); // Run once on mount.

    return (
        <UserContext.Provider value={{
            current : user,
            login,
            logout,
            register,
            error,
            setError,
            isLoading
        }}>
            {children}
        </UserContext.Provider>
    );
}
This function initializes the user, error, and isLoading states. On page load, the effect uses the account.get method to check whether a user is logged in to the app in the current browser. If it detects a logged-in user, the effect creates a JWT that it stores in session storage before setting the user state. The function then adds the user data and authentication methods to the value prop of the context provider.
Add the following login function below the state variable declarations in the UserProvider function:
async function login(email: string, password: string) {
        try {
                setIsLoading(true);
                await account.createEmailPasswordSession({ email, password });
                const loggedInUser = await account.get();
                const accountJWT = await account.createJWT();
                sessionStorage.setItem('accountJWT', accountJWT.jwt);
                setUser(loggedInUser);
                setError(null);
                window.location.replace('/');
        }
        catch (err) {
                const error = err as Error;
                setError(error.message || 'An error occurred');
        }
        finally {
                setIsLoading(false);
        }
}
The account.createEmailPasswordSession method allows each user to log in to their account with their email and password. A successful login creates a JWT, stores it in session storage, then sets the user state and reloads the page.
Add the following logout function below the login function:
async function logout() {
        try {
                await account.deleteSession({ sessionId: 'current'});
        }
        catch (err) {
                console.error('Logout error:', err);
        }
        finally {
                setUser(null);
                setIsLoading(false);
                sessionStorage.removeItem('accountJWT');
        }
}
The account.deleteSession method logs users out of the app.
Add the following register function below the logout function:
async function register(email: string, password: string) {
        try {
                setIsLoading(true);
                await account.create(ID.unique(), email, password);
                await login(email, password);
        }
        catch (err) {
                const error = err as Error;
                setError(error.message || 'An error occurred');
                setIsLoading(false);
        }
}
The account.create method registers new users.
To make authenticated requests to our Appwrite Bryntum Scheduler Pro REST API function, we need to create a JWT using the logged-in user’s session. In the login and initSession functions above, the account.createJWT method creates a JWT for the logged-in user. The JWT is valid for 15 minutes or until the user logs out. We store the JWT in session storage, where it’s accessible for making requests to the Appwrite function.
Important: You must create and store the JWT in session storage before calling setUser(). When you call setUser(), it triggers a re-render that mounts the Scheduler Pro component, which immediately attempts to load data from the Appwrite function. If the JWT isn’t in session storage yet, the request fails with an authentication error.
The logout function removes the JWT from session storage when the user logs out.
The JWT is valid for 15 minutes, but the user session is valid for 365 days by default. You can adjust the session length in the Settings tab, found on your project Auth page in the Appwrite Console.
Adding refresh functionality
Let’s add refresh functionality so that our JWT doesn’t become invalid.
Insert the following variable at the top of the src/lib/context/user.tsx file:
const REFRESH_INTERVAL = 14 * 60 * 1000; // 14 minutesThis refreshes the JWT every 14 minutes.
Finally, add the following effect to the UserProvider component:
useEffect(() => {
        if (!user) return; // Don't set up refresh for logged-out users.

        let refreshInterval: number | null = null;

        const refreshToken = async() => {
                try {
                        // First, verify the session is still valid.
                        await account.get();
                        // If the session is valid, refresh the JWT.
                        const accountJWT = await account.createJWT();
                        sessionStorage.setItem('accountJWT', accountJWT.jwt);
                }
                catch (err) {
                        const error = err as any;
                        // Log the user out if there is an unauthorized-scope or session-not-found error.
                        if (error?.type === 'general_unauthorized_scope' ||
                                error?.type === 'user_session_not_found') {
                                if (refreshInterval) {
                                        clearInterval(refreshInterval);
                                }
                                await logout();
                        }
                }
        };

        const handleVisibilityChange = () => {
                if (document.visibilityState === 'visible') {
                        refreshToken();
                }
        };

        // Set up the refresh interval.
        refreshInterval = window.setInterval(refreshToken, REFRESH_INTERVAL);

        // Add the visibility change listener.
        document.addEventListener('visibilitychange', handleVisibilityChange);

        // Cleanup
        return () => {
                if (refreshInterval) {
                        clearInterval(refreshInterval);
                }
                document.removeEventListener('visibilitychange', handleVisibilityChange);
        };
}, [user]); // Only reset the refresh logic when the user changes.
The refresh interval calls the refreshToken function every 14 minutes, and the visibilitychange listener calls it when the user returns to the browser tab.
When the user’s session expires, we log them out and remove the JWT from session storage.
Wrapping the app with the user provider and adding a navigation bar
In TanStack Start, the root layout is defined in src/routes/__root.tsx. This file acts as both the HTML shell and the layout wrapper for all routes.
Replace the code in the src/routes/__root.tsx file with the following:
import { TanStackDevtools } from '@tanstack/react-devtools';
import {
    createRootRoute,
    HeadContent,
    Outlet,
    Scripts,
} from '@tanstack/react-router';
import { TanStackRouterDevtoolsPanel } from '@tanstack/react-router-devtools';
import { UserProvider, useUser } from '../lib/context/user';

import appCss from '../styles.css?url';

export const Route = createRootRoute({
    head: () => ({
        meta: [
            { charSet: 'utf-8' },
            { name: 'viewport', content: 'width=device-width, initial-scale=1' },
            { title: 'Bryntum Scheduler Pro with Appwrite' },
        ],
        links: [{ rel: 'stylesheet', href: appCss }],
    }),
    shellComponent: RootDocument,
    component: RootLayout,
});

function RootDocument({ children }: { children: React.ReactNode }) {
    return (
        <html lang="en">
            <head>
                <HeadContent />
            </head>
            <body>
                {children}
                <TanStackDevtools
                    config={{ position: 'bottom-right' }}
                    plugins={[
                        {
                            name: 'TanStack Router',
                            render: <TanStackRouterDevtoolsPanel />,
                        },
                    ]}
                />
                <Scripts />
            </body>
        </html>
    );
}

function RootLayout() {
    return (
        <UserProvider>
            <AppShell />
        </UserProvider>
    );
}

function AppShell() {
    const user = useUser();

    return (
        <div id="app">
            <nav>
                <div>
                    {user?.current
                        ? (
                            <div className="logged-in-items">
                                <span><b>Logged in as:</b> {user.current.email}</span>
                                <button
                                    className="button"
                                    type="button"
                                    onClick={() => user.logout()}
                                    disabled={user.isLoading}
                                >
                                Log Out
                                </button>
                            </div>
                        )
                        : (
                            <div className="logged-out-item">
                            Using Bryntum Scheduler Pro with Appwrite
                            </div>
                        )}
                </div>
            </nav>
            <main>
                <Outlet />
            </main>
        </div>
    );
}
The shellComponent wraps the HTML document structure, while the component provides the app layout. The RootLayout function wraps the app with the UserProvider context. The AppShell component uses the useUser hook to get the user’s data and renders a navigation bar with the user’s email and a Log Out button when a user is logged in. The Outlet component from @tanstack/react-router renders the matched child route.
Adding a login route and homepage
TanStack Start uses file-based routing. Route files in the src/routes/ directory are automatically registered as routes. For example, src/routes/login.tsx creates a /login route and src/routes/index.tsx creates the / (home) route.
Adding a login route
Create a login.tsx file in the src/routes folder and add the following lines of code to it:
import { createFileRoute, useNavigate } from '@tanstack/react-router';
import { useEffect, useState } from 'react';
import { useUser } from '../lib/context/user';

export const Route = createFileRoute('/login')({
    component: Login,
});

function Login() {
    const user = useUser();
    const navigate = useNavigate();

    useEffect(() => {
        if (user?.current) {
            navigate({ to: '/' });
        }
    }, [user?.current]);

    const [email, setEmail] = useState('');
    const [password, setPassword] = useState('');

    return (
        <div className="login-form-container">
            <form>
                <fieldset disabled={user?.isLoading}>
                    <input
                        type="email"
                        placeholder="Email"
                        value={email}
                        onChange={(event) => {
                            user?.setError(null);
                            setEmail(event.target.value);
                        }}
                        autoComplete="email"
                    />
                    <input
                        type="password"
                        placeholder="Password"
                        value={password}
                        onChange={(event) => {
                            user?.setError(null);
                            setPassword(event.target.value);
                        }}
                    />
                    <div className="button-container">
                        <button
                            className="button"
                            type="button"
                            onClick={() => user?.login(email, password)}
                        >
                        Login
                        </button>
                        <button
                            className="button"
                            type="button"
                            onClick={() => user?.register(email, password)}
                        >
                        Register
                        </button>
                    </div>
                    {user?.error ? <p className="error-message">{user.error}</p> : <p className="error-message"></p>}
                </fieldset>
            </form>
        </div>
    );
}
The createFileRoute function from @tanstack/react-router defines the route and its component. When a user is already logged in, we use the useNavigate hook to redirect them to the '/' route. We use the register and login functions from the useUser hook to register users and log them in.
Updating the homepage route
Replace the code in the src/routes/index.tsx file with the following:
import { createFileRoute, Link } from '@tanstack/react-router';
import { useUser } from '../lib/context/user';

export const Route = createFileRoute('/')({
    component: Home,
});

function Home() {
    const user = useUser();

    return (
        <div className="home-page">
            {user?.current
                ? (
                    <div>TODO: add Bryntum Scheduler Pro</div>
                )
                :
                user?.isLoading ?
                    (
                        <div className="loader-container">
                            <div className="loader"></div>
                        </div>
                    ) :
                    (
                        <p>
                            Please <Link to="/login">login or register</Link> to view the Bryntum Scheduler Pro
                        </p>
                    )
            }
        </div>
    );
}
When a user is logged in, this code displays placeholder text for the Bryntum Scheduler Pro. When no user is logged in, it displays a link to the login route. The Link component from @tanstack/react-router handles client-side navigation.
Adding CSS styling
Add the following CSS styles to the src/styles.css file, below the existing @import "tailwindcss" line, for styling the navigation and pages:
@import url('https://fonts.googleapis.com/css2?family=Poppins:wght@300;400;500;600;700&display=swap');

:root {
    font-family: Poppins, "Open Sans", Helvetica, Arial, sans-serif;
}

.home-page {
  display : flex;
  align-items : center;
  justify-content : center;
  height : 100%;
  padding: 0 1rem;
  box-sizing: border-box;
}

main {
  height: 100vh;
}

nav {
  padding: 1rem;
  border-bottom: 1px solid #e0e0e7;
  background-color: #0076f8;
  color: #ffffff;
}

nav .logged-in-items {
  display: flex;
  align-items: center;
  justify-content: space-between;
  gap: 1rem;
}

nav .logged-out-item {
  padding : 0.6rem 0;
}

.button {
  border-radius: 3px;
  text-transform: uppercase;
  border: 1px solid transparent;
  padding: 0.6rem 1.2rem;
  font-size: 1em;
  font-weight: 500;
  font-family: inherit;
  background-color: #27ca37;
  color: #f9f9f9;
  cursor: pointer;
  transition: background-color 0.3s;
}

.button:hover {
  border-color: #27ca37;
  background-color: #27ca37;
}

.button:focus,
.button:focus-visible {
  outline: 4px auto -webkit-focus-ring-color;
}

.button:disabled {
  background-color: #e0e0e7;
  color: #a0a0a7;
  cursor: not-allowed;
}

a {
  font-weight: 500;
  color: #646cff;
  text-decoration: inherit;
}
a:hover {
  color: #747bff;
}

.loader-container {
  display: flex;
  justify-content: center;
  align-items: center;
}

.loader {
  display: inline-block;
  width: 50px;
  height: 50px;
  border: 3px solid black;
  border-radius: 50%;
  border-top-color: #fff;
  animation: spin 1s ease-in-out infinite;
}

@keyframes spin {
  to { transform: rotate(360deg); }
}

@-webkit-keyframes spin {
  to {transform: rotate(360deg); }
}

.login-form-container {
  display: flex;
  flex-direction: column;
  align-items: center;
  justify-content: center;
  gap: 1rem;
  height: 100%;
}

.login-form-container form {
  width: 100%;
  max-width: 300px;
}

.login-form-container form fieldset {
  /* remove default styling */
  margin-inline-start: 0;
  margin-inline-end: 0;
  padding-block-start: 0;
  padding-block-end: 0;
  padding-inline-start: 0;
  padding-inline-end: 0;
  border: none;
  min-inline-size: min-content;
  display: flex;
  flex-direction: column;
  gap: 1.2rem;
}

.login-form-container input {
  font-family: inherit;
  font-size: 1rem;
  font-weight: 500;
  padding: 0.6rem 1rem;
  border-radius: 8px;
  border: 1px solid #e0e0e7;
}

.login-form-container .button-container {
  display: flex;
  gap: 1rem;
}

.error-message {
  height: 50px;
  font-size: 0.8rem;
  color: #ff4d4f;
}
Run the dev server and open http://localhost:3000 to see the homepage with a link to the login page. Navigate to the login page and register an account:
You’ll see the following placeholder text:
TODO: add Bryntum Scheduler Pro
Notice that the form shows a message from Appwrite if there are any login or registration errors.
Let’s add a Bryntum Scheduler Pro to the homepage of a logged-in user.
Adding Bryntum Scheduler Pro to the homepage
We’ll first install the Bryntum Scheduler Pro React component, then create a Bryntum Scheduler Pro component and render it on the homepage for logged-in users.
Installing the Bryntum Scheduler Pro React component
If you’re using the free trial, install the public Bryntum trial packages:
npm install @bryntum/schedulerpro@npm:@bryntum/schedulerpro-trial @bryntum/schedulerpro-reactIf you have a Bryntum license, refer to our npm Repository Guide and install the licensed packages:
npm install @bryntum/schedulerpro @bryntum/schedulerpro-reactCreating a Bryntum Scheduler Pro config file
Create a schedulerProConfig.ts file in the src/lib folder and add the following lines of code to it:
import { BryntumResourceHistogramProps, BryntumSchedulerProProps } from '@bryntum/schedulerpro-react';

const onAction = ({ source }) => {
    source.up('resourcehistogram').extraData.onToolbarAction(source);
};

const toolbarConfig = {
    cls   : 'histogram-toolbar',
    items : [
        {
            type    : 'checkbox',
            dataset : { action : 'showBarText' },
            text    : 'Show bar texts',
            tooltip : 'Check to show resource allocation in the bars',
            checked : false,
            onAction
        },
        {
            type    : 'checkbox',
            dataset : { action : 'showMaxEffort' },
            text    : 'Show max allocation',
            tooltip : 'Check to display max resource allocation line',
            checked : true,
            onAction
        },
        {
            type    : 'checkbox',
            dataset : { action : 'showBarTip' },
            text    : 'Enable bar tooltip',
            tooltip : 'Check to show tooltips when moving mouse over bars',
            checked : true,
            onAction
        }
    ]
};

export const projectProps = {
    autoLoad         : true,
    autoSync         : true,
    validateResponse : true
};

export const schedulerProps : BryntumSchedulerProProps = {
    flex              : '1 1 50%',
    startDate         : new Date(2026, 3, 26),
    endDate           : new Date(2026, 4, 10),
    viewPreset        : 'dayAndWeek',
    eventStyle        : 'filled',
    tickSize          : 70,
    subGridConfigs   : {
        locked : {
            width : '30em'
        }
    },
    columns : [
        {
            type  : 'resourceInfo',
            text  : 'Name',
            field : 'name',
            width : '10em'
        },
        {
            text                 : 'City',
            htmlEncodeHeaderText : false,
            field                : 'city',
            width                : '9em',
        }
    ]
};

export const histogramProps : BryntumResourceHistogramProps = {
    flex                   : '1 1 50%',
    hideHeaders            : true,
    rowHeight              : 60,
    nonWorkingTimeFeature  : true,
    scheduleTooltipFeature : false,
    showBarTip             : true,
    bbar                   : toolbarConfig,
    columns                : [
        {
            type           : 'resourceInfo',
            text           : 'Name',
            field          : 'name',
            flex           : 1,
            showEventCount : false
        }
    ]
};
This config exports three objects:
projectPropsconfigures the shared project model that manages data for both the Scheduler Pro and the Resource Histogram. We’ll add the Appwrite transport config to it later.schedulerPropsconfigures the Scheduler Pro component’s visual settings, including the time range, view preset, event style, and columns for the resource grid on the left.histogramPropsconfigures the Resource Histogram, which displays resources’ working time allocation. ThetoolbarConfigadds checkboxes for toggling bar text, max allocation lines, and bar tooltips.
Adding resource images
The Bryntum Scheduler Pro ResourceInfoColumn displays resource images or the resource name initials if an image is not available. To display images, you need to set the resourceImagePath. Create a users folder in the public folder and add the example resource images to it.
In the src/schedulerProConfig.ts file add the following property to the schedulerProps and histogramProps config:
resourceImagePath : 'users/',In the src/styles.css file add the following style:
/* Fix Tailwind preflight overriding Bryntum resource avatar image */
img.b-resource-image {
  max-width : none;
  height    : var(--b-avatar-size, 2.5em);
}
Tailwind CSS v4’s preflight reset applies max-width: 100% and height: auto to all img elements. This overrides Bryntum’s fixed avatar sizing on the ResourceInfoColumn images, causing them to not be displayed. This style fix restores Bryntum’s intended dimensions. Alternatively, you can uninstall Tailwind as we don’t use it in this tutorial.
You can also use Appwrite Storage to store the resource images.
Creating the Bryntum Scheduler Pro component
Create a components folder in the src folder. Create a SchedulerPro.tsx file in the components folder and add the following lines of code to it:
import { useEffect, useRef } from 'react';
import {
    BryntumSchedulerPro,
    BryntumResourceHistogram,
    BryntumSchedulerProProjectModel,
    BryntumSplitter,
    BryntumButton
} from '@bryntum/schedulerpro-react';
import { histogramProps, schedulerProps, projectProps } from '../lib/schedulerProConfig';

function SchedulerPro() {
    const schedulerRef = useRef(null);
    const histogramRef = useRef(null);
    const projectRef   = useRef(null);

    // Setup partnership between scheduler and histogram
    useEffect(() => {
        histogramRef.current.instance.addPartner(schedulerRef.current.instance);
    }, []);

    // Toolbar checkboxes click handler
    const onToolbarAction = (source) => {
        const action = source.dataset.action;
        histogramRef.current.instance[action] = source.checked;
    };

    // Zoom In/Out handler
    const onZoom = ({ source }) => {
        const {
            dataset : { action }
        } = source;
        schedulerRef.current.instance[action]();
    };

    return (
        <div className="demo-app">
            <div className="demo-toolbar">
                <BryntumButton
                    dataset={{ action : 'zoomIn' }}
                    icon="b-icon-search-plus"
                    text="Zoom in"
                    onAction={onZoom}
                />
                <BryntumButton
                    dataset={{ action : 'zoomOut' }}
                    icon="b-icon-search-minus"
                    text="Zoom out"
                    onAction={onZoom}
                />
            </div>
            <BryntumSchedulerProProjectModel
                ref={projectRef}
                {...projectProps}
            />
            <BryntumSchedulerPro
                ref={schedulerRef}
                project={projectRef}
                {...schedulerProps}
            />
            <BryntumSplitter />
            <BryntumResourceHistogram
                ref={histogramRef}
                project={projectRef}
                extraData={{ onToolbarAction }}
                {...histogramProps}
            />
        </div>
    );
}

export default SchedulerPro;
This component renders a Scheduler Pro paired with a Resource Histogram below it. The BryntumSchedulerProProjectModel is a shared project model that both components use for data. A BryntumSplitter separates the two views, and BryntumButton components provide zoom controls.
The useEffect hook sets up a partnership between the histogram and the scheduler, so that scrolling and zooming stay in sync. The onToolbarAction handler connects the histogram’s bottom toolbar checkboxes to toggle bar text, max allocation lines, and bar tooltips. The onZoom handler delegates zoom actions to the scheduler instance.
In the src/routes/index.tsx file, import the SchedulerPro component:
import SchedulerPro from '../components/SchedulerPro';Replace the placeholder text (rendered when a user logs in to the homepage) with the SchedulerPro component:
- <div>TODO: add Bryntum Scheduler Pro</div>
+ <SchedulerPro />
Since Bryntum components are client-side only, add ssr: false to the route configuration to disable server-side rendering for this route:
export const Route = createFileRoute('/')({
    component: Home,
    ssr: false,
});
Import the Bryntum Scheduler Pro styles in the src/styles.css file:
@import "@bryntum/schedulerpro/fontawesome/css/fontawesome.css";
@import "@bryntum/schedulerpro/fontawesome/css/solid.css";
@import "@bryntum/schedulerpro/schedulerpro.css";
@import "@bryntum/schedulerpro/svalbard-light.css";
These imports include the Font Awesome icon styles used by the Bryntum toolbar buttons, the base Scheduler Pro styles, and the Svalbard Light theme, one of five available themes with light and dark modes.
Add the following styles for the demo layout:
.demo-app {
  display        : flex;
  flex-direction : column;
  height         : 100%;
  width          : 100%;
  min-width      : 0;
}

.demo-toolbar {
  display: flex;
}
Run the dev server and open http://localhost:3000. You should see an empty Bryntum Scheduler Pro with a Resource Histogram below it:
Now let’s connect the Bryntum Scheduler Pro to our Appwrite function.
Connecting to the Appwrite function via the Bryntum Scheduler Pro Crud Manager
In the src/lib/schedulerProConfig.ts file, add this header variable above the projectProps export:
const header = { 'Content-Type' : 'application/json' };
Object.defineProperty(header, 'Authorization', {
    get()      { return sessionStorage.getItem('accountJWT'); },
    enumerable : true
});
The Authorization header uses Object.defineProperty with a getter, so that the function reads the JWT value from session storage dynamically each time a request is made. A static assignment like sessionStorage.getItem('accountJWT') would capture the value at module load time, before the user has logged in and a JWT has been created.
Then update projectProps to include the transport configuration:
export const projectProps = {
    transport : {
        load : {
            url         : import.meta.env.VITE_PROJECT_FUNCTION_DOMAIN_URL,
            method      : 'GET',
            headers     : header,
            credentials : 'omit'
        },
        sync : {
            url         : import.meta.env.VITE_PROJECT_FUNCTION_DOMAIN_URL,
            method      : 'POST',
            headers     : header,
            credentials : 'omit'
        },
    },
    autoLoad         : true,
    autoSync         : true,
    // This config enables response validation and dumps found errors into the browser console.
    // It's only meant to be used as a development-stage helper, so please set it to false for production.
    validateResponse : true
};
Add your Appwrite function’s domain URL to the .env file:
VITE_PROJECT_FUNCTION_DOMAIN_URL="https://<domain>.fra.appwrite.run"You can find the domain URL in the Active deployment card on your function’s page:
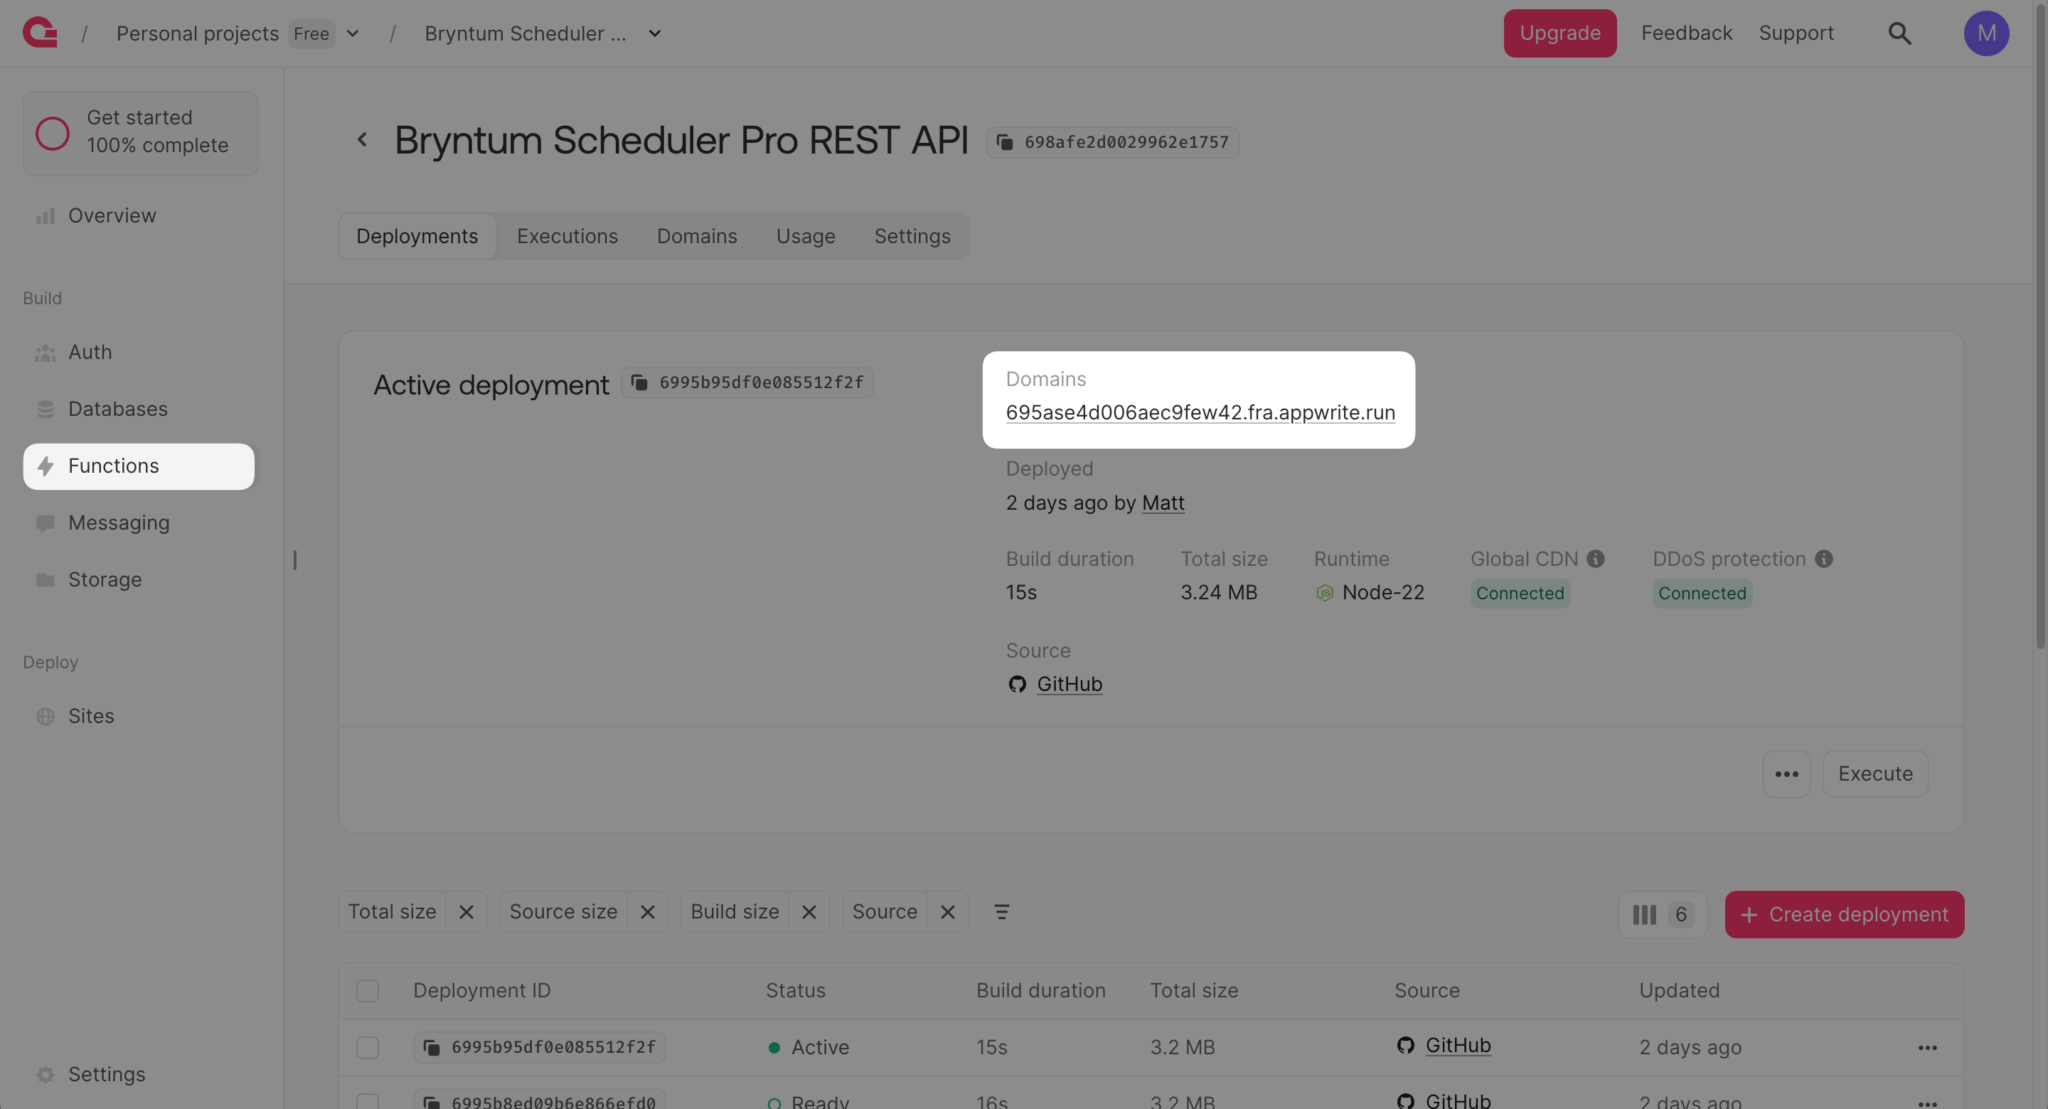
The projectProps configures the shared Crud Manager project model, which both the Scheduler Pro and the Resource Histogram use. The Crud Manager simplifies loading data from and syncing data changes to a server, using the Fetch API as a transport system with JSON encoding.
The transport config sets the loadUrl and syncUrl to the Appwrite domain URL and authenticates requests by passing the JWT (created from the user’s session) in the Authorization header. The credentials: 'omit' setting prevents the browser from sending cookies with cross-origin requests.
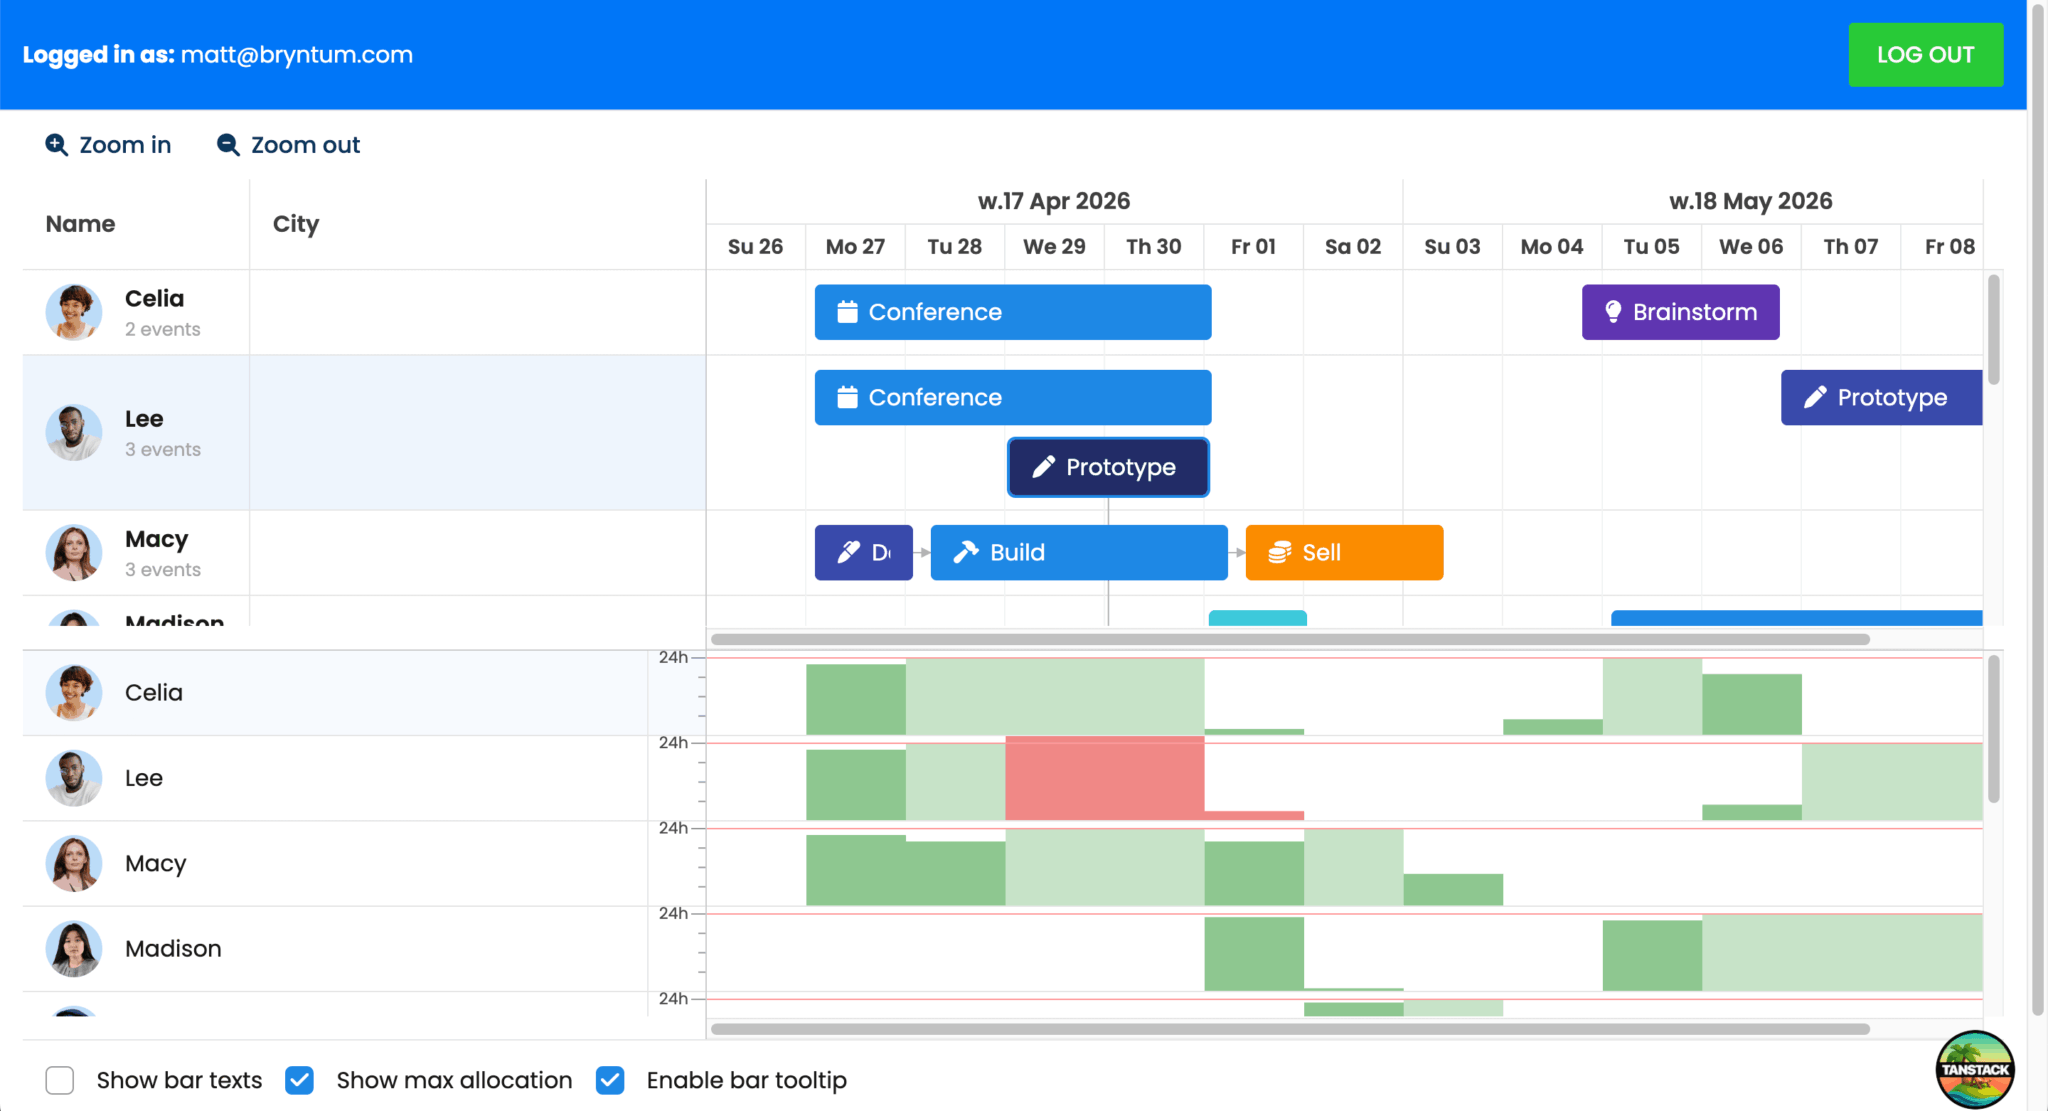
Open your local development server, http://localhost:3000, to see the Bryntum Scheduler Pro populated with your example data.
You can create, update, and delete events, resources, assignments, and dependencies, and the changes will be synced to your Appwrite database:
Next steps
This guide provides a starting point for using Bryntum Scheduler Pro with Appwrite. Take a look at the additional features you can add to a Bryntum Scheduler Pro component on the examples page, such as:
- AG Grid and map integration
- Infinite scroll with lazy data loading
- Nested events with drag-n-drop support
We used basic email authentication for the Bryntum Scheduler Pro. You can improve it by adding email verification, password recovery, and other authentication methods such as phone (SMS), magic URL, and OAuth 2.
Appwrite also has a new AI-coding tool, Imagine, for building full-stack apps. We didn’t use it for this guide because it doesn’t have Appwrite Functions yet, but it will soon.
To learn more about using Bryntum Scheduler Pro with TanStack Start and TanStack Table, check out our blog post: Build a location-based scheduler with Bryntum Scheduler Pro, TanStack Table, Shadcn UI, and Mapbox.